Hama DIR150BT User manual

Operating Instructions / Bedienungsanleitung / Mode d‘emploi / Instrucciones de uso /
Руководство по эксплуатации / Istruzioni per l‘uso / Gebruiksaanwijzing / Οδηγίες χρήσης / Instrukcja obsługi /
Használati útmutató / Návod k použití / Návod na použitie / Manual de instruções / Kullanma kılavuzu /
Manual de utilizare / Bruksanvisning / Käyttöohje / Работна инструкция / Betjeningsvejledning / Manuelt stasjonssøk
(DIR150BT)

2
2.1 Explanation of warning symbols and notes..........................................5
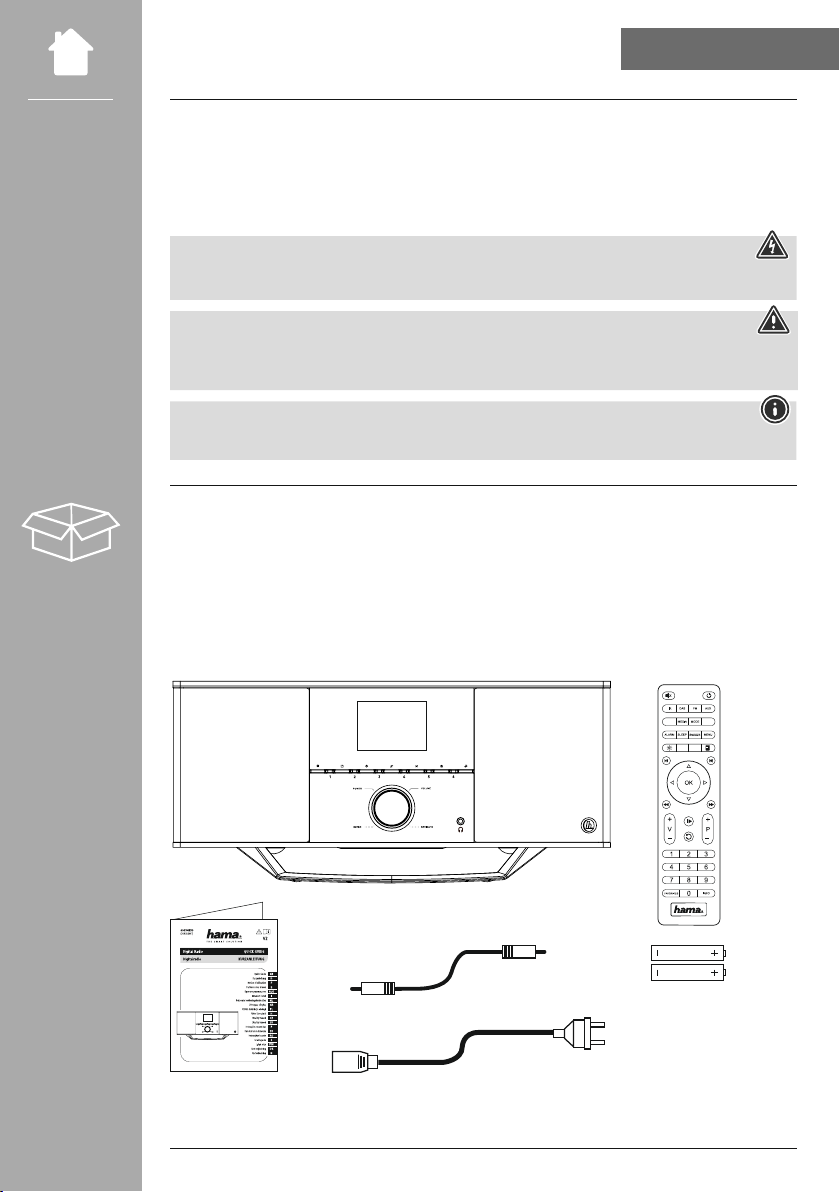
2.2 Package contents.............................................................5
5.1 Rear view ..................................................................9
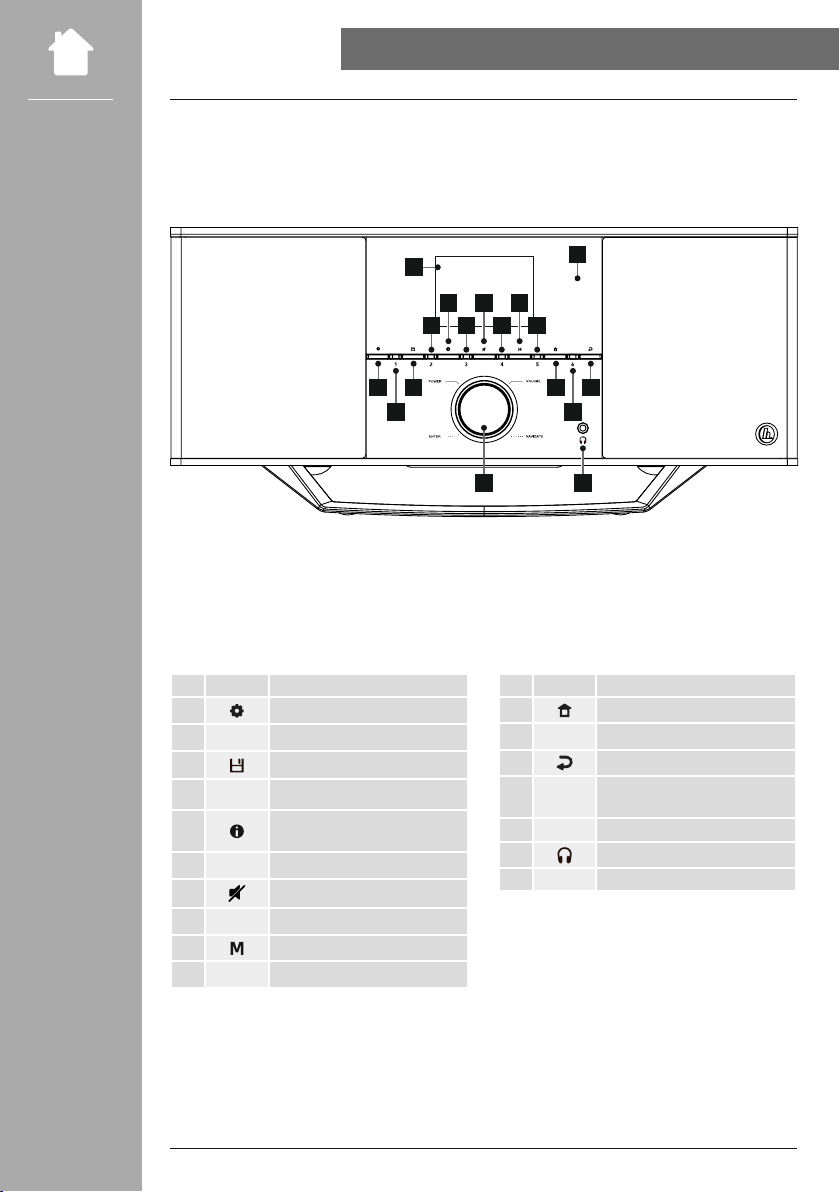
5.2 Front view .................................................................10
5.3 Remote control .............................................................11
6.1 General operation ...........................................................12
6.2 Settings menu ..............................................................12
6.3 Managing favourites .........................................................13
6.4 Music operation.............................................................13
7.1 Remote control .............................................................14
7.2 Connecting and operating the radio..............................................14
7.3 Prepare the network connection/Internet connection .................................15
7.4 LAN connection (wired network) ................................................15
7.5 WLAN/Wi-Fi connection (wireless network) ........................................16
8.1 Control options .............................................................17
8.2 Language selection ..........................................................17
8.3 Setup wizard ...............................................................17
8.4 Time settings ...............................................................17
8.5 Keep network connected ......................................................18
8.6 Network wizard .............................................................18
8.7 Managing favourites .........................................................19
8.8 Screen display ..............................................................20
10.1 Station list ................................................................22
10.2 Full scan .................................................................22
10.3 Delete inactive stations ......................................................22
10.4 DRC - Dynamic Range Control .................................................22
10.5 Station sequence ...........................................................22

3
11.1 Country (based on the IP address of the radio) .....................................23
11.2 History (not yet available or empty during initial setup)...............................23
11.3 Search...................................................................23
11.4 Countries.................................................................23
11.5 Popular ..................................................................24
11.6 Discover .................................................................24
11.7 Add stations and create/maintain your own favourites lists
(web browser required) .................................................... 24
11.8 Calling up the administration interface...........................................25
11.9 Add your own stations.......................................................26
11.10 Delete stations............................................................27
15.1 Automatic station search .....................................................32
15.2 Manual station search .......................................................32
15.3 Settings ..................................................................32
17.1 Connectasourcedevice......................................................34
17.2 Music playback via Bluetooth®.....................................................................................34
17.3 More settings .............................................................34
18.1 Sleep....................................................................35
18.2 Alarm clock ...............................................................35
18.3 Timer....................................................................36

4
20.1 Internet settings............................................................38
20.1.1 Network wizard .........................................................38
20.1.2 ConnectingtoaWLAN....................................................38
20.1.3 Pre-Shared Key (PSK) .....................................................39
20.1.4 PIN ..................................................................39
20.1.5 WPS setup .............................................................40
20.1.6 View settings ...........................................................40
20.1.7 Manual settings.........................................................40
20.2 Bluetooth®receiver (BT RX) ...................................................43
20.2.1 Bluetooth®receiver ......................................................43
20.3 Equaliser .................................................................44
21.1 Display illumination .........................................................45
21.1.1 Operating mode.........................................................45
21.1.2 Standby mode ..........................................................45
21.1.3 Snooze mode...........................................................45
21.2 Colour scheme.............................................................45
22.1 Setup wizard ..............................................................46
22.2 Time settings ..............................................................46
22.2.1 Time / date setting .......................................................46
22.2.2 Time synchronisation .....................................................46
22.2.3 Time display............................................................47
22.2.4 Setting the time zone.....................................................47
22.2.5 Summer / winter time.....................................................47
22.3 Language ................................................................47
22.4 Auto standby..............................................................47
22.5 Software update ...........................................................47
22.6 Factory settings ............................................................47
23.1 Info .....................................................................48
23.2 Privacy Policy ..............................................................48

5
Thank you for choosing a Hama product. Take your time and read the following instructions and
information completely. Please keep these instructions in a safe place for future reference. If you sell the
device, please pass these operating instructions on to the new owner.
This symbol indicates a risk of electric shock from touching product parts carrying hazardous voltage.
This symbol is used to indicate safety instructions or to draw your attention to specic hazards and
risks.
This symbol is used to indicate additional information or important notes.
• "DIR150BT" Digital Radio
• Remote control
• 2 x AAA (micro) batteries
• Mains power supply
• Jack Cable
• Quick-start guide (multi-lingual)
CD BT

6
• The product is intended for private, non-commercial use only.
• Protect the product from dirt, moisture and overheating and use it in dry rooms only.
•As with all electrical products, this device should be kept out of the reach of children.
• Do not drop the product and do not expose it to any major shocks.
• Do not operate the product outside the power limits specied in the technical data.
•Keep the packaging material out of the reach of children due to the risk of suffocation.
• Dispose of packaging material immediately in accordance with the locally applicable regulations.
• Do not modify the device in any way. Doing so voids the warranty.
• Do not use the product in the immediate vicinity of heaters, other heat sources or in direct sunlight.
• Do not use the product in areas in which electronic products are not permitted.
• Only use the article under moderate climatic conditions.
• The product is intended only for use inside buildings.
• Do not use the product in a damp environment and avoid splashing water.
• Route all cables so that there is no risk of tripping.
• Do not bend or crush the cable.
• Always pull directly on the plug when disconnecting the cable, never on the cable itself.
• Do not open the device or continue to operate it if it becomes damaged.
• Do not use the product if the AC adapter, adapter cable or power cable is damaged.
• Do not attempt to service or repair the product yourself. Leave any and all service work to qualied
experts.

7
• When inserting batteries, note the correct polarity (+ and - markings) and insert the batteries
accordingly. Failure to do so could result in the batteries leaking or exploding.
• Only use batteries (or rechargeable batteries) that match the specied type.
• Before you insert the batteries, clean the battery contacts and the polarity contacts.
• Do not allow children to change batteries without supervision.
• Do not mix old and new batteries, or batteries of different types or from different manufacturers.
• Remove the batteries from products that are not being used for an extended period (unless these are
being kept ready for an emergency).
• Do not short-circuit batteries.
• Do not charge batteries.
• Do not burn batteries.
•Keep batteries out of the reach of children.
• Never open, damage or swallow batteries or allow them to enter the environment. They can contain
toxic, environmentally harmful heavy metals.
• Remove spent batteries from the product and dispose of them without delay.
•Avoid storing, charging and using in extreme temperatures and at extremely low atmospheric
pressures (such as at high altitudes).
• High sound pressure!
• There is a risk of hearing damage.
•To prevent any loss of hearing, avoid listening at loud volumes for prolonged periods.
• Always keep the volume at a sensible level. Loud volumes, even over short periods, can cause
hearing loss.
• Using this product limits your perception of ambient noise. For this reason, do not operate any
vehicles or machines while using this product.

8
This radio offers you the option of using virtually all of the functions conveniently in combination with a
smartphone or tablet. To do this, download the free UNDOK app (for iOS & Android).
A detailed description of the UNDOK app and all of its functions can be found in our UNDOK Guide at:
•For best reception, ensure that the antenna is fully extended and vertical.
•Try various different positions if necessary to get the best reception.

9
Power switch Disconnects the radio completely from the mains when switched
off
Mains connection Connection of the enclosed mains adapter to the power supply
Ethernet / LAN Connection to the home network via RJ45 patch cable
Optical digital output SPDIF Serial interface for optical transmission of signals to other devices
USB connection
- Connection of USB storage media with FAT 16/32 formatting for
playback of audio content
- Charging port for smartphones/tablets and other USB devices
(max. 5V / 2.1A)
Line out (3.5mm) Analogue connection with external loudspeakers and other audio
devices via 3.5 mm audio cable
Aux in (3.5mm) Analogue connection with external audio sources via 3.5mm audio
cable
Antenna Antenna for receiving DAB/VHF signals
POWER
ON
AC IN
100-240V~50/60Hz LAN OPTICAL OUT LINE OUT AUX IN
5V 2.1A
OFF

10
[SETTINGS/MENU] button
1[PRESET 1] button
[MEMORY] button
2[PRESET 2] button
[INFO] button
3[PRESET 3] button
[MUTE] button
4[PRESET 4] button
[MODE] button
5[PRESET 5] button
[HOME] button
6[PRESET 6] button
[BACK] button
[POWER] button** / [VOLUME] /
[ENTER] / [NAVIGATE]
Infra-red receiver
Headphone socket
2.8“ colour display

11
CD BT
Power
Mute
Internet radio
DABradio
FM/VHF radio
AUX-In
CD CD playback mode
Media player (USB)
Mode
BT BT playback mode
Alarm clock
Sleep timer
Sleep
Menu
Adjust backlight
Equaliser
Previous track
Next track
Navigation buttons left, right,
up, down
OK
Rewind
Fast forward
Increase / reduce volume
Next / Previous favourite
Continue / Pause
Back
Favourites buttons 1-10
List of favourites
Information

12
Hand symbol Press once
Hand symbol Press multiple times
Hand symbol Press repeatedly
Hand symbol Hold for 3 seconds
Rotary knob
Navigation
• Navigation forwards in the current menu
• Navigation backwards in the current menu
• Reduces the volume of the current playback
• Increases the volume of the current playback
Rotary knob
button
• Conrmation button for opening the menu or
function currently highlighted
•Toggling between the presentation forms available
(full screen / split screen)
• Switch off and switch on the radio
button Changes the contents shown in the station information
(genre / artist / information)
button Repeated pressing toggles between operating modes
button All menus are closed and the radio returns to the
playback screen
button Opens the Settings menu for the currently active
mode
button
• Opens the station search / station list (DAB)
•Toggles between the setting for the volume and
manual frequency setting (VHF)
• Back to the previous menu

13
button
• Access favourite storage space
1 for current playback mode
• Save the current station to
favourite storage space 1
button
• Access favourite storage space
2 for current playback mode
• Save the current station to
favourite storage space 2
button
• Access favourite storage space
7 for current playback mode
• Save the current station to
favourite storage space 7
button
• Calls up the favourites list to
select favourites
• Calls up the favourites list to
save the selected station
button
• The current playback is stopped and the current
position in the playback is saved
• Pressing the button again continues playback
button
The current track is started from the beginning.
Pressing the button again calls up the previous
track
button The next track on the storage medium is played
button Disables the sound and re-enables it if pressed
again

14
• Open the battery compartment cover located on the rear of the remote control.
• Insert the batteries provided, making sure you match the polarities correctly. The correct polarity is
indicated by the plus and minus symbols in the battery compartment.
• Only operate the product from an approved socket that is connected to the public power supply. The
socket must be installed close to the product and must be easily accessible.
• Disconnect the product from the power supply using the On/Off switch – if this is not available,
unplug the power cord from the socket.
• If using a multi-socket power strip, make sure that the total power consumption of all connected
devices does not exceed the power strip's maximum throughput rating.
• If you will not be using the product for a prolonged period, disconnect it from mains power.
• Connect the network cable to a properly installed and easily accessible network socket.
• The power supply unit is suitable for mains voltages between 100 and 240 V, and is thus operable on
almost any AC power grid. Please note that a country-specic adapter may be necessary.
•You can nd an appropriate selection of Hama products at www.hama.com.
Once the product has been connected to mains power, initialisation takes place.
The radio starts up.

15
You can integrate this radio into a local network. To receive internet radio or access non-local media
(streaming, such as Spotify Connect), the network must be connected to the internet.
The LAN connection is less susceptible to faults than a WLAN connection. That´s why it´s
recommended to use a wired connection between access point (AP) and radio to ensure an
undisturbed reception.
• Connect an RJ45 LAN cable to a free socket on your router / switch / AP.
• Connect the other end of the LAN cable to the radio's LAN socket (RJ45).
• Ensure the router is switched on, is functioning correctly and that there is a connection to the internet/
network.
•Follow your router´s operating instructions as regards the correct functioning of the WLAN connection.
• A detailed description of how to congure the LAN connection is given in the
section.
POWER
ON
AC IN
100-240V~50/60Hz LAN OPTICAL OUT
LINE OUT AUX IN
5V 2.1A
OFF

16
• Ensure the router is switched on, is functioning correctly and that there is a connection to the internet/
network.
•Activate the WLAN function of your router if it is not already activated.
•Follow your router´s operating instructions as regards the correct functioning of the WLAN connection.
• A detailed description of how to congure the WLAN connection is given in the
section.

17
Once the radio has been initialised for the rst time, switch it on using the button (Power button)
if required to start the product setup process. Below, the relevant steps are explained in brief. Further
information can be found in the relevant detailed sections.
Please see the operating concept for information on the radio's general operation.
The radio can be used with the following control options:
1. Control elements on the device
2. The enclosed remote control
3. The free UNDOK app for Android and iOS devices
Once the initial start-up procedure is complete, you can choose
your preferred system language.
Please note that some parts of the interface are synchronised over
the Internet and it may be that some sections are not available in
your chosen language.
We recommend using the setup wizard for quick and easy rst-
time setup (setting of the time, date, Internet connection, etc.).
If you skip the setup wizard's help with rst-time setup, you can
of course still make these settings via the System settings or re-
initiate the setup wizard.
To select between the various settings options, use the control elements explained in the operating
concept. These allow you to navigate between the menu items and subsequently conrm your
selection. If you have accidentally made an incorrect selection, you can return to the previous menu
item.
The radio allows the time to be displayed in 12-hour (am/pm) or 24-hour format. The time can be
calibrated using the various reception methods (VHF/DAB/DAB+/Internet), enabling the current time to be
synchronised automatically in the event of
a power cut. If you disable synchronisation, there is the risk that the time information will need to be
repopulated manually after a power cut.
German
Italian
Norwegian
Polish
LANGUAGE
YES NO
SYSTEM SETTINGS

18
This setting is a radio energy-saving function. If the function is switched off, the network function
automatically switches to standby mode in order to reduce energy consumption. This means that, when
the network function is disabled, the radio cannot be accessed from your PC, smartphone or tablet.
Using the network wizard will help you connect the radio to the local network or Internet.
Because this chapter is extensive, please follow the directions in section .
Once the network wizard has nished,the setup wizard is nished as well.

19
Please see the operating concept for information on how to store content for the relevant mode in a
storage space and retrieve it. The following storage spaces are available for the reception methods
supported:
Digital radio DAB+ 30
Analogue radio VHF/FM 30
Internet radio 30
Spotify Connect 10
Amazon Music 8
OR
Remote control
on the product
Antenne Bayern
Artist: Hama
Song: Hama
12:35
DAB
1 - Antenne Bayern
2 - Bayern 3
3 - Rockantenne
4 - Bayern 1
RECALL FROM PRESET
NAVIGATE
3s
ENTER
1
3s
Antenne Bayern
Artist: Hama
Song: Hama
12:35
DAB
Antenne Bayern
Artist: Hama
Song: Hama
12:35
DAB
1
OR
Remote control
on the product
1Antenne Bayern
Artist: Hama
Song: Hama
12:35
DAB
1
Antenne Bayern
Artist: Hama
Song: Hama
12:35
DAB
Antenne Bayern
Artist: Hama
Song: Hama
12:35
DAB
1 - Antenne Bayern
2 - Bayern 3
3 - Rockantenne
4 - Bayern 1
RECALL FROM PRESET
NAVIGATE
ENTER
1 - Antenne Bayern
2 - Bayern 3
3 - Rockantenne
4 - Bayern 1
5 - ...
6 - ...
7 - ...
RECALL FROM PRESET

20
For playback modes that display image content, which can be slideshow content, station logos or album
covers, for example, you can choose between different display methods.
1) Split screen
2) Display of image content on the entire screen
Please refer to the operating concept for the key assignment.
This function is currently only available for Internet radio, DABradio and Spotify Connect modes.
Slideshow
Other manuals for DIR150BT
1
This manual suits for next models
1
Table of contents
Other Hama Radio manuals