manuals.online logo
Brands
  1. Home
  2. •
  3. Brands
  4. •
  5. Helvex
  6. •
  7. Bathroom Fixture
  8. •
  9. Helvex Kubica E-3005 Instruction manual

Helvex Kubica E-3005 Instruction manual

Hola soy Fluxy, te
ayudaré a instalar
tu producto.
1-02-1608-5
Hi I'm Fluxy, I'll
help you to install
your product.
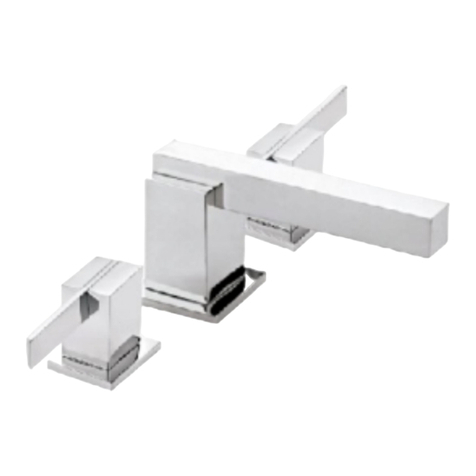
Monomando de Lavabo a Pared Incluye Contra
Tipo Hongo sin Rebosadero
Wall Mount Faucet with Mushroom Drain without
Overflow
Esta Guía de Instalación Aplica al Producto en Cualquier Acabado
This Installation Guide Applies to the Product in any Finishing
E-3005, E3005-25CM
E-3005-S
Cada metro de altura de
su producto a la base
del tinaco equivalen a
(0,1 kg/cm²) [1,42 PSI].
Meter of height of your
product to the base of
the tub is equivalent to
(0,1 kg/cm²) [1,42 psi].
Requerimientos de Instalación
Installation Requirements
Requerimientos de Instalación
Installation Requirements
Modelos / Models
Mínima / Minimum Máxima / Maximum
kg/cm² PSI kPa kg/cm² PSI kPa
0,25 3,55 24,51 6,0 85,3 588,3
GENERAL INSTALLATION
GUÍA DE INSTALACIÓN
Cromo / Chrome
Satín / Satin
perico
adjustable wrench
aereator key
llave para
5/64" allen
wrench
llave allen
5/64"
aireador
Artículos Incluidos en el Producto /
Items Included in the Product
Herramientas y Materiales Recomendados / Recommended Tools and Materials
desarmador plano
slotted screwdriver
nivel
level
teflón
plumber’s tape
E-3005-ND
Níquel Duravex / Duravex Nickel
[email protected]
Original Spare Parts:
Consultancy and Technical
(52) 55 53 33 94 31
(52) 55 53 33 94 00
Refacciones Originales:
Asesoría y Servicio Técnico:
Ext. 5913, 5068 y 4815
Service:
(52) 55 53 33 94 21
[email protected]
www.refaccioneshelvex.com.mx
EP-3005
Cromo / Chrome
Monomando de Lavabo a Pared Incluye Contra Tipo Push
Wall Mount Faucet with Push Drain
E-3005, E3005-25CM
E-3005-S, E-3005-ND
EP-3005
1
Medidas Recomendadas / Recommended Dimensions
6,3 cm
2,50"
10,1 cm
4,00"
9,8 cm
3,87"
19,5 cm
7,68"
9º
Vista Lateral / Side View Vista Superior / Top View
20,9 cm
8,25"
8,8 cm
3,50"
Kúbica
To reduce the risk of injury or property damage, please read all instructions before installing the product.
Wear safety glasses. For any construction, installation, alteration, extension or repair, comply with your local
building codes. The product’s illustration may vary in appearance to the actual product as result of the
continuous improvement process it is subject to.
Para disminuir el riesgo de lesiones o daños a la propiedad, lea todas las instrucciones antes de instalar el
producto. Utilice gafas de seguridad. En obras de construcción, instalación, modificación, ampliación y
reparación deben cumplir con el reglamento de construcción y obras de su localidad. El producto ilustrado
puede sufrir cambios de aspecto como resultado de la mejora continua a la que está sujeto.
Agradecemos su elección por los productos HELVEX.
Estamos seguros de que su confiabilidad por el producto excederá sus más altas expectativas, cuya
funcionalidad, estética, durabilidad, respaldo integral y alta calidad le otorgarán plena satisfacción por años,
reflejando el compromiso con la calidad, innovación y el medio ambiente que forman parte de Helvex.
Thank you for choosing HELVEX products.
We are confident that the product reliably will exceed your highest expectations. This product’s functionality,
aesthetics, durability, quality and support will grant you full satisfaction for years, thus reflecting Helvex’s
commitment to quality, innovation and the environment.
ADVERTENCIA / WARNING
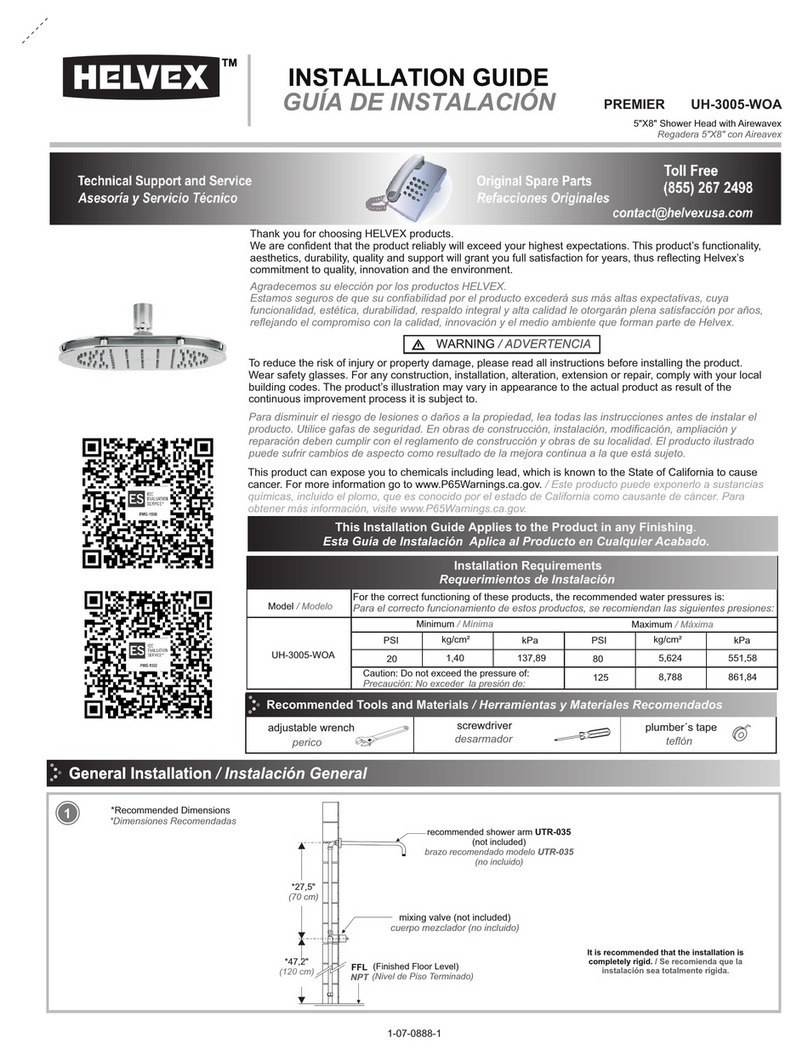
For the correct functioning of these products, the recommended
water pressures is:
Para el correcto funcionamiento de estos productos, se
recomiendan las siguientes presiones:
Instalación General / General Installation
Medidas Recomendadas / Recommended Dimensions
2
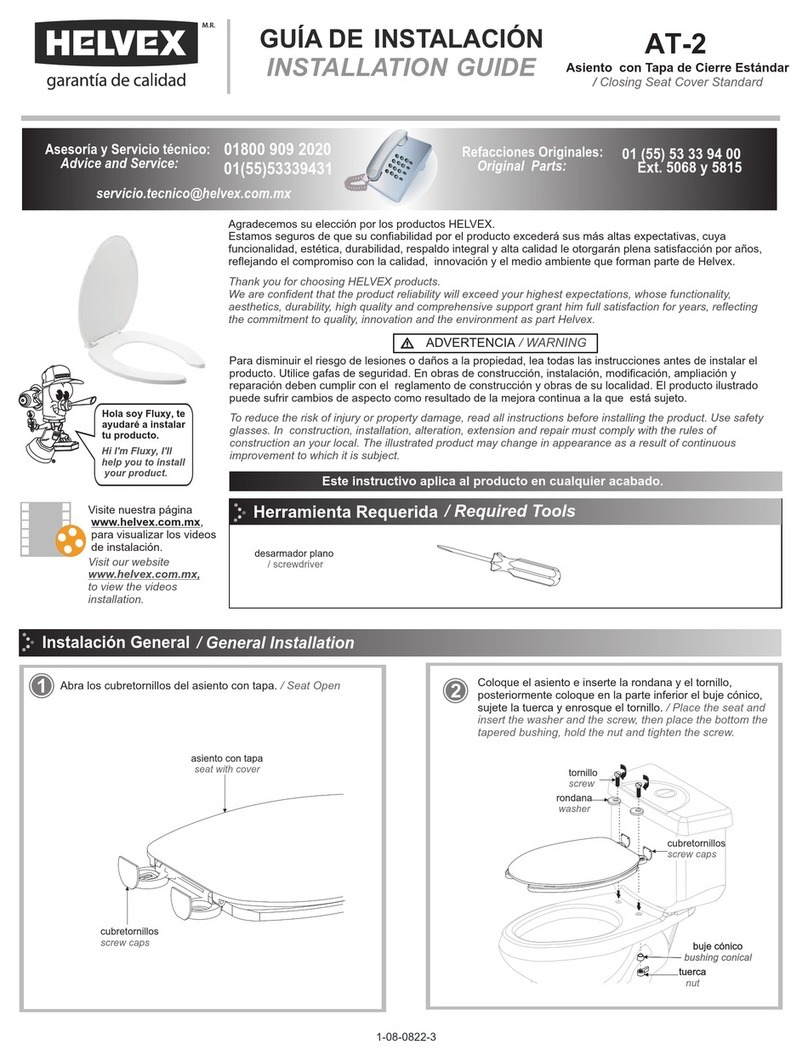
2Desarme el cuerpo del monomando. /Disassemble the wall mount
faucet body.
cuerpo del monomando
wall mount faucet body
tuerca
nut
chapetón
escutcheon
cubierta chapetón
escutcheon cover
protector
protector
cap
llave allen
allen wrench
34Ensamblar la tubería en el cuerpo del monomando e insertarlo en la
ranura de la pared, purgue la instalación antes de ensamblar el
monomando. /Assemble the pipe lines to the wall mount faucet body
and insert the installation into the grooved of the wall, purge the
installation before assembled the wall mount faucet body.
2Ensamble el cuerpo del monomando. /Assemble the wall mount
faucet body.
5 2 Nivele la instalación del monomando en el plano vertical y
horizontal. /Level installation in the vertical and horizontal plane.
6
Ranure el muro considerando las medidas recomendadas. /
Groove the wall considering the recommended measures.
cartucho
cartridge
ranura
grooved
*18cm
(7,0")
*10cm
(3,9")
*105cm
(41,3") *10cm
(3,9")
(NPT) Nivel de Piso Terminado
(FFL) Floor Level Finished
ranurado
grooved
Vista Frontal / Front View
Agua Fría
Cold Water
Agua Caliente
Hot Water
Coloque teflón en las conexiones roscadas. / Apply
plumber´s tape around the threaded connections.
Vista Superior / Top View
4,1 cm MIN.
1,65"
4,7 cm
1,88"
5,3 cm MAX.
2,12"
6,7 cm
2,64"
pared con acabado final
finished wall
MAXIMA
PROFUNDIDAD
OPTIMA
MINIMA
indicador de nivel de
profundidad
depth level indicator
PROFUNDIDAD
ÓPTIMA
OPTIMAL DEPTH
3
2Corte la parte central del protector plástico. /Cut the central part of
the protector cap.
7
Línea de corte /Cut line
2Instale la pared con acabado final y retire los protectores. /Install the
final finished wall and remove the protectors.
8
MAXIMA
PROFUNDIDAD
OPTIMA
MINIMA
Vista Superior / Top View
El nivel de pared con acabado
final debe coincidir con la línea
de PROFUNDIDAD ÓPTIMA.
The finished wall level must
match the DEPTH OPTIMAL line.
2Inserte el chapetón y fije con el tornillo allen. /Insert the
escutcheon and secure with the allen screw.
9 2 Desarme el maneral. /Disassemble the handle.
10
2Inserte el maneral y enrosque el tornillo para fijarlo. Coloque el
empaque y enrosque la salida. / Insert the handle and screw the
screw to fix it. Place the gasket and screw the faucet.
11 2Inserte la palanca en el maneral y enrosque el opresor para fijarla. /
Insert the lever in to the handle and screw the setscrew to fix it.
12
salida
empaqu
Coloque teflón en las conexiones roscadas. / Apply plumber´s tape around
the threaded connections.
4
2Construya una estructura para instalar la placa soporte. /Fabricate a
structure to install the support plate.
13 2Ubique la placa y marque en la estructura. /Locate the plate and
mark on the structure.
14
2Barrene con broca para metal. /Drill with metal drill bit.
15 2 Instale el cuerpo del monomando a la placa (incluida), fijando con los
tornillos hexagonales (incuidos). /Install the wall mount faucet body
to the support plate (included), fixing with the hexagonal screws
(included).
16
2Fije el ensamble al poste estructural con tornillos (no incluidos).
/Fix the assembly to the structural post with screws (not included).
17
Instalación en Muro Falso / Installation on Dry Wall
15cm
5,9"
40cm
15,7"
poste estructural / structural post
canal estructural
structural channel
placa soporte (incluida)
support plate (included)
cuerpo monomando
(incluido)
wall mount faucet body
(included)
tornillos (incluido) / screws (included)
tornillos (no incluidos) / screws (not included)
2Instale la tubería y el muro falso siguiendo los pasos de las
MEDIDAS RECOMENDADAS e INSTALACIÓN GENERAL.
Install the pipe line and the the dry wall following the steps of the
RECOMMENDED MEASURES and GENERAL INSTALLATION.
18
muro falso / dry wall
5
2Desarme la contra como se muestra en el diagrama. / Disassemble
the drain as shown in the diagram.
19 2Inserte la contra y el empaque, inserte el empaque cónico, la
rondana y enrosque la tuerca para fijarla, finalmente enrosque el
tubo unión. / Insert the drain and the gasket, insert the tapered
gasket, the washer and screw the nut to fix it, finally screw the
tailpiece.
20
221 2Para abrir el flujo de agua levante la palanca y para cerrar empuje la
palanca. Para ajustar la temperatura del agua, gire a la izquierda
para caliente y gire a la derecha para fría. / To open the water flow lift
the lever and to close push the lever. To adjust the water temperature,
turn left for hot and turn right for cold.
22
2Desenrosque el aireador con la llave (incluida), límpielo con agua y un cepillo suave, enrósquelo nuevamente. / Unscrew the aerator with the aerator
key (included), clean it with water and a soft brush, assemble again.
23
Instalación de la Contra / Drain Installation
contra de push incluida
en el modelo / push drain
included in the model
EP-3005
tuerca / nut
rondana / washer
empaque / gasket
tubo unión / tailpiece
protector / protector
contra incluida en los
modelos / drain
included in the models
E-3005, E3005-25CM,
E-3005-S y E3005-ND
empaque cónico / tapered gasket
cubierta
cover
empaque
gasket
o’rings
empaque / gasket
cuerpo contra
drain body
extensión superior
/ top extension
inserto (incluido sólo en
la contra de push)
/ insert (included only drain
push)
Contra de push incluida en el
modelo EP-3005 / Push drain
included in the EP-3005 model.
Coloque teflón en las conexiones roscadas. / Apply plumber´s tape around
the threaded connections.
Lavatory without Overflow Installation
Instalación para Lavabo sin Rebosadero / Operación / Operation
Mantenimiento del Aireador / Aerator Maintenance
Desenrosque la cubierta y extensión superior, coloque el inserto
(incluido) en el cuerpo contra con los o'rings y empaque.
Posteriormente reensamble. / Unscrew the cover and top extension,
place the insert (included) in the body drain with o'ring and gasket
then reassemble.
empaque / gasket
empaque cónico
tapered gasket
rondana / washer
tuerca / nut
tubo unión / tailpiece
+ fría
+ cold
+ caliente
+ hot
Posibles Causas y Soluciones / Troubleshooting
No sale agua. / No water flow.
Existe poco flujo de agua. / Low
water flow.
Hay fuga en la salida. / The faucet
leaks.
La válvula principal del agua se encuentra cerrada. / The
water supply line is closed.
El maneral se encuentra cerrado. / The handle is closed.
Aireador obstruído. / Clogged aerator.
La presión de operación no es la adecuada. / The operating
pressure is not adequate.
La salida está floja, no se aplicó teflón. / The faucet is
loose, plumber’s tape was not applied.
Abra la válvula principal de agua. / Open
the water supply line.
Gire el maneral según la operación del producto
(Pág. 5, Operación). / Turn the handle according
to the operation of the product (Page 5,
Operation).
Retire el aireador y límpielo (Pág. 5,
Mantenimiento del Aireador). / Remove the
aerator and clean it (Page 5, Aerator
Maintenance).
Revise que la presión mínima de operación
sea 0,25 kg/cm². / Check that the minimum
operating pressure is 0,25 kg/cm².
Apriete firmemente la salida, aplique teflón
(Pág. 3, paso 11). / Firmly tighten the faucet,
apply plumber’s tape (Page 3, step 11).
Problema / Problem Causa / Cause Solución / Solution
Existe filtración por el desagüe. /
The drain leaks. No se colocó el empaque. / The gasket was not placed.
Coloque el empaque y apriete firmemente
(Pág. 5, paso 20). / Place the gasket and
tighten firmly (Page 5, step 20).
6
Cambio del Cartucho / Cartridge Replacement
Desenrosque el opresor con la llave
allen (incluida) para retirar la palanca del
maneral. / Unscrew the setscrew with the
allen wrench (included) to remove the
lever from the handle.
Para retirar el maneral desenrosque el
tornillo. / To remove the handle unscrew
the screw.
2Para cambiar el cartucho es necesario seguir los siguientes pasos. / To replacement the cartridge is necessary to follow the next steps.
24
Desnrosque la cubierta del chapetón y la
tuerca, retire el cartucho y cámbielo por
uno nuevo. / Unscrew the escutcheon
cover and the nut, remove the cartridge
and replacement for new one.
Enter our free
training courses.
Participa en nuestros
cursos gratuitos
de capacitación.
HELVEX, S. A. DE C. V. Calzada Coltongo # 293, Col. Industrial Vallejo, Alcaldía Azcapotzalco, C. P. 02300, Ciudad de México.
Es muy importante seguir las siguientes instrucciones para conservar los
acabados de los productos HELVEX, con brillo y en perfecto estado:
1. Utilice únicamente agua y un paño limpio.
2. No utilice fibras, polvos, abrasivos, ni productos químicos.
3. No utilice objetos punzo-cortantes para limpiar los acabados.
4. Se recomienda realizar la limpieza de su producto diariamente.
Visite nuestras páginas www.helvex.com.mx para México y www.helvex.com
para el mercado Internacional
In Guadalajara:
Contact:
In Monterrey:
En la Ciudad de México:
In Mexico City:
En Monterrey: En Guadalajara:
(52) 55 53 33 94 00
Ext. 5806, 5805 y 5804
33 36 19 01 13
Comunícate:
81 83 33 57 67
81 83 33 61 78
It is very important to follow the instructions below to preserve HELVEX products
finishings, shiny and in perfect conditions:
1. Use only water and a clean cloth.
2. Do not use fibers, powders, abrasives, or chemicals.
3. Do not use sharp objects to clean the finishings.
4. It is recommended to clean your device daily
Visit our websites www.helvex.com.mx for México and www.helvex.com
for the international market
Recomendaciones de Limpieza / Cleaning Recommendations

This manual suits for next models

4

Other Helvex Bathroom Fixture manuals

Helvex RMB-30 User manual

Helvex

Helvex RMB-30 User manual

Helvex H-3302 User manual

Helvex

Helvex H-3302 User manual

Helvex TH-974 User manual

Helvex

Helvex TH-974 User manual

Helvex MB-1100 User manual

Helvex

Helvex MB-1100 User manual

Helvex AT-2 User manual

Helvex

Helvex AT-2 User manual

Helvex H-3300 User manual

Helvex

Helvex H-3300 User manual

Helvex Nuva 9124 User manual

Helvex

Helvex Nuva 9124 User manual

Helvex E-909-S/C User manual

Helvex

Helvex E-909-S/C User manual

Helvex H-3003 User manual

Helvex

Helvex H-3003 User manual

Helvex H-500 User manual

Helvex

Helvex H-500 User manual

Helvex H-3010 User manual

Helvex

Helvex H-3010 User manual

Helvex RM-15 User manual

Helvex

Helvex RM-15 User manual

Helvex 210-32 User manual

Helvex

Helvex 210-32 User manual

Helvex 410-19-1 User manual

Helvex

Helvex 410-19-1 User manual

Helvex VPH-1 User manual

Helvex

Helvex VPH-1 User manual

Helvex Maxima U20105 User manual

Helvex

Helvex Maxima U20105 User manual

Helvex LV STALA User manual

Helvex

Helvex LV STALA User manual

Helvex Piura PIU-201 User manual

Helvex

Helvex Piura PIU-201 User manual

Helvex H-3300 User manual

Helvex

Helvex H-3300 User manual

Helvex RMM-27-CR/AI User manual

Helvex

Helvex RMM-27-CR/AI User manual

Helvex Nuva 9104 User manual

Helvex

Helvex Nuva 9104 User manual

Helvex AC10-TR011 User manual

Helvex

Helvex AC10-TR011 User manual

Helvex RM-14-SD User manual

Helvex

Helvex RM-14-SD User manual

Helvex M-1009 User manual

Helvex

Helvex M-1009 User manual

Popular Bathroom Fixture manuals by other brands

RamonSoler T100 D manual

RamonSoler

RamonSoler T100 D manual

V-Tec AIRKEEP user manual

V-Tec

V-Tec AIRKEEP user manual

PULSE+ AquaRain 1019-CH owner's manual

PULSE+

PULSE+ AquaRain 1019-CH owner's manual

Delta Kitano T14063 manual

Delta

Delta Kitano T14063 manual

Delta 25250 quick start guide

Delta

Delta 25250 quick start guide

Delta Kendari IAO35024 quick start guide

Delta

Delta Kendari IAO35024 quick start guide

NewLine Ravello instruction manual

NewLine

NewLine Ravello instruction manual

Devon & Devon Savoy Y Assembly instructions

Devon & Devon

Devon & Devon Savoy Y Assembly instructions

M-TI JENTLE PED FOOT SPA Owner's manual operation & care

M-TI

M-TI JENTLE PED FOOT SPA Owner's manual operation & care

Dreamline SAPPHIRE-V ACVH48W760XXX01 installation instructions

Dreamline

Dreamline SAPPHIRE-V ACVH48W760XXX01 installation instructions

Ro-Man CQB instruction manual

Ro-Man

Ro-Man CQB instruction manual

Delta Becker 35891LF-R quick start guide

Delta

Delta Becker 35891LF-R quick start guide

Devon & Devon Lady Assembly instructions

Devon & Devon

Devon & Devon Lady Assembly instructions

PULSE+ Aloha 1021-SSB owner's manual

PULSE+

PULSE+ Aloha 1021-SSB owner's manual

Twin Star Home 36BV34018 Assembly instruction

Twin Star Home

Twin Star Home 36BV34018 Assembly instruction

mr. steam MX4E Installation, operation and maintenance manual

mr. steam

mr. steam MX4E Installation, operation and maintenance manual

VanMarcke GO MORENA instruction manual

VanMarcke

VanMarcke GO MORENA instruction manual

Dreamline ENIGMA AIR SHEN-6434480 Series installation instructions

Dreamline

Dreamline ENIGMA AIR SHEN-6434480 Series installation instructions

manuals.online logo
manuals.online logoBrands
  • About & Mission
  • Contact us
  • Privacy Policy
  • Terms and Conditions

Copyright 2025 Manuals.Online. All Rights Reserved.