manuals.online logo
Brands
  1. Home
  2. •
  3. Brands
  4. •
  5. Helvex
  6. •
  7. Bathroom Fixture
  8. •
  9. Helvex SS-1 User manual

Helvex SS-1 User manual

Other Helvex Bathroom Fixture manuals

Helvex RM-15 User manual

Helvex

Helvex RM-15 User manual

Helvex AC10-TR011 User manual

Helvex

Helvex AC10-TR011 User manual

Helvex AT-2 User manual

Helvex

Helvex AT-2 User manual

Helvex Maxima E-712 User manual

Helvex

Helvex Maxima E-712 User manual

Helvex Antares C-44 User manual

Helvex

Helvex Antares C-44 User manual

Helvex Premier H-3005 User manual

Helvex

Helvex Premier H-3005 User manual

Helvex UH-3300-WA User manual

Helvex

Helvex UH-3300-WA User manual

Helvex PREMIER UH-3005-WOA User manual

Helvex

Helvex PREMIER UH-3005-WOA User manual

Helvex TV-302 User manual

Helvex

Helvex TV-302 User manual

Helvex Novus E-34 User manual

Helvex

Helvex Novus E-34 User manual

Helvex Kubica MEP-2114 User manual

Helvex

Helvex Kubica MEP-2114 User manual

Helvex Elite MI-01-S/C User manual

Helvex

Helvex Elite MI-01-S/C User manual

Helvex VCG-2 User manual

Helvex

Helvex VCG-2 User manual

Helvex Piazza PIA105-61CM User manual

Helvex

Helvex Piazza PIA105-61CM User manual

Helvex H-3002 User manual

Helvex

Helvex H-3002 User manual

Helvex LV CASSINI User manual

Helvex

Helvex LV CASSINI User manual

Helvex AF-2 User manual

Helvex

Helvex AF-2 User manual

Helvex H-3010 User manual

Helvex

Helvex H-3010 User manual

Helvex Elite DX ME-2121 User manual

Helvex

Helvex Elite DX ME-2121 User manual

Helvex LV STALA User manual

Helvex

Helvex LV STALA User manual

Helvex EP-909 User manual

Helvex

Helvex EP-909 User manual

Helvex Maxima E-713 User manual

Helvex

Helvex Maxima E-713 User manual

Helvex TR-038-S User manual

Helvex

Helvex TR-038-S User manual

Helvex Vertika E-910-DX User manual

Helvex

Helvex Vertika E-910-DX User manual

Popular Bathroom Fixture manuals by other brands

Kohler Mira Sport Max J03G Installation and user guide

Kohler

Kohler Mira Sport Max J03G Installation and user guide

Moen 186117 Series installation guide

Moen

Moen 186117 Series installation guide

Hans Grohe Raindance Showerpipe 27235000 Instructions for use/assembly instructions

Hans Grohe

Hans Grohe Raindance Showerpipe 27235000 Instructions for use/assembly instructions

Signature Hardware ROUND SWIVEL BODY SPRAY 948942 Install

Signature Hardware

Signature Hardware ROUND SWIVEL BODY SPRAY 948942 Install

fine fixtures AC3TH installation manual

fine fixtures

fine fixtures AC3TH installation manual

LIXIL HP50 Series quick start guide

LIXIL

LIXIL HP50 Series quick start guide

KOLO ATOL PLUS installation manual

KOLO

KOLO ATOL PLUS installation manual

Hans Grohe PuraVida 15073000 Instructions for use/assembly instructions

Hans Grohe

Hans Grohe PuraVida 15073000 Instructions for use/assembly instructions

Toto TS111B8 Installation and owner's manual

Toto

Toto TS111B8 Installation and owner's manual

Kohler K-1158-H2 Homeowner's guide

Kohler

Kohler K-1158-H2 Homeowner's guide

Coram Showers OFFSET QUADRANT manual

Coram Showers

Coram Showers OFFSET QUADRANT manual

baliv DU-2010 manual

baliv

baliv DU-2010 manual

odass OD-1710 instruction manual

odass

odass OD-1710 instruction manual

Oxygenics Evolution Easy installation instructions

Oxygenics

Oxygenics Evolution Easy installation instructions

Bradley Express SS Series installation instructions

Bradley

Bradley Express SS Series installation instructions

DURAVIT C.1 C15240 0090 Instructions for mounting and use

DURAVIT

DURAVIT C.1 C15240 0090 Instructions for mounting and use

Sunshower PURE SOLO manual

Sunshower

Sunshower PURE SOLO manual

Heatstore HSTRL500WTN Installation and operating instructions

Heatstore

Heatstore HSTRL500WTN Installation and operating instructions

manuals.online logo
manuals.online logoBrands
  • About & Mission
  • Contact us
  • Privacy Policy
  • Terms and Conditions

Copyright 2025 Manuals.Online. All Rights Reserved.

Hola soy Fluxy, te
ayudaré a instalar
tu producto.
Hi I'm Fluxy, I'll
help you to install
your product.
ADVERTENCIA / WARNING
Para disminuir el riesgo de lesiones o daños a la propiedad, lea todas las instrucciones antes de instalar el
producto. Utilice gafas de seguridad. En obras de construcción, instalación, modificación, ampliación y
reparación deben cumplir con el reglamento de construcción y obras de su localidad. El producto ilustrado
puede sufrir cambios de aspecto como resultado de la mejora continua a la que está sujeto.
Agradecemos su elección por los productos HELVEX.
Estamos seguros de que su confiabilidad por el producto excederá sus más altas expectativas, cuya
funcionalidad, estética, durabilidad, respaldo integral y alta calidad le otorgarán plena satisfacción por años,
reflejando el compromiso con la calidad, innovación y el medio ambiente que forman parte de Helvex.
Thank you for choosing HELVEX products.
We are confident that the product reliability will exceed your maximum expectations. The functionality,
aesthetics, durability, quality and support will grant you full satisfaction for years, it is Helvex commitment to
the quality, innovation and the environment.
To reduce the risk of injury or property damage, read all instructions. Before installing the product, please
remember to use safety glasses. Apply building normative for any construction, installation, alteration,
extension or repair. As result of continuous improvement, the product illustration may change in appearance.
Este instructivo aplica al producto en cualquier acabado. / This instructive applies
to the product in any finish.
El aparato no debe utilizarse por personas (incluyendo niños) con capacidades físicas sensoriales o mentales
reducidas, o carezcan de experiencia o conocimiento, a menos que reciban supervisión o capacitación.
Los niños deben supervisarse para que no jueguen con el aparato.
The device should not be used by persons (including children) with reduced physical sensory or mental
capabilities, or lack of experience and knowledge, unless they receive supervision or training.
Children should be supervised to not play with the appliance.
1-08-0762-4
* Elimina las incrustaciones, evitando el óxido y la corrosión en las
tuberías.
* Ahorro de costos a través de un mejor aprovechamiento de energía en el
área de agua caliente.
* Prolongada duración de vida de máquinas y aparatos en contacto con el
agua.
* Ahorro de tiempo y menos costos de limpieza.
* Facilita la limpieza de los componentes que están en contacto con el agua.
* Eliminates fouling, avoiding rust and corrosion in pipes.
* Cost savings through better utilization of energy in the hot water area.
* Prolonged life span of machines and apparatus in contact with water.
* Saves time and less cleaning costs.
* Facilitates cleaning of components that are in contact with water.
pinzas de corte
screwdriver
desarmador de cruz
[email protected]
Original Spare Parts:
Consultancy and Technical
01(55)53339431
01800 909 2020 01 (55) 53 33 94 00
Refacciones Originales:
Asesoría y Servicio Técnico:
Ext. 5068, 5815 y 5913
Service:
53 33 94 21
01 800 890 0594
[email protected]
SS-1
cutting pliers
Acondicionador para Aguas Duras de Corriente
Sinsarro. / Conditioner for Hard Waters of
Current Sinsarro.
Ventajas / Advantage
INSTALLATION GUIDE
GUÍA DE INSTALACIÓN
Herramienta Requerida / Required Tools Herramienta Incluida en su Producto
/ Tools Included in your Product
cincho de plástico
plastic straps
transformador
transformer
2
1
Diagrama de Instalación / Installation Diagram
2
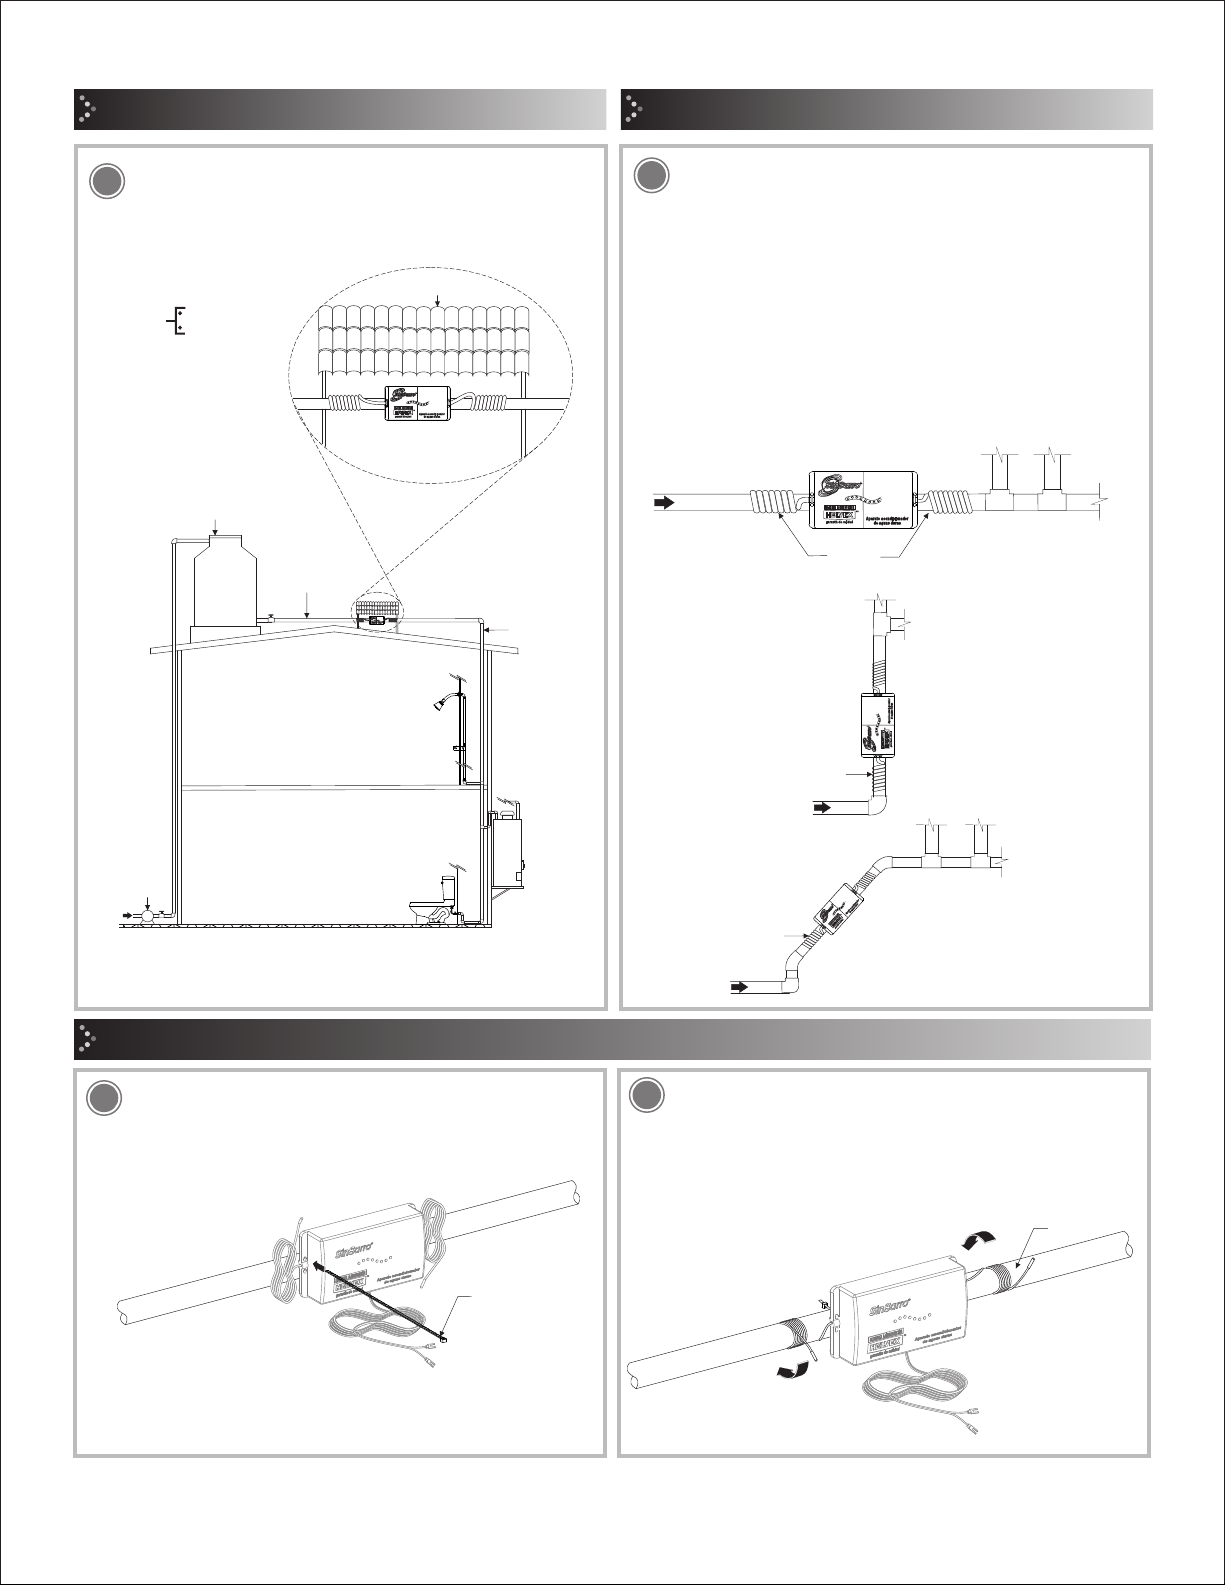
Coloque su aparato acondicionador sobre la tubería de Ø min. 1,27 cm
(½”) o Ø máx. 2,54 cm (1”),) ya sea de cobre, galvanizada o plástica. Se
puede instalar en forma horizontal, vertical o diagonal, vea las siguientes
figuras. / Place your air conditioner on the Ø min. 1,27 cm (½ ") or Ø max.
2,54 cm (1"), either copper, galvanized or plastic. Can be installed
horizontally, vertically or diagonally, see the following figures.
Alternativa 1 / Alternative 1
Alternativa 2 / Alternative 2
Se puede instalar en forma vertical.
/ Can be installed vertically.
Alternativa 3 / Alternative 3
Se puede instalar en forma diagonal.
/ It can be installed diagonally.
Se puede instalar en forma horizontal. / Can be installed horizontally.
cable de
impulso
impulse wire
Se recomienda instalar el aparato acondicionador después del
último depósito de agua (cisterna, contenedor, tinaco, etc.), no se
debe colocar a la intemperie. / It is recommended to install the
conditioning unit after the last water tank (tank, container, water
tank, etc.), it should not be placed in the open.
Instale el acondicionador a 3 metros de distancia de cualquier aparato receptor (radio,
televisión, teléfono) para evitar interferencias. /
Install the air conditioner within 3 meters of any receiving device (radio, television,
telephone) to avoid interference.
cubierta
cover
cisterna, tinaco ó ultimo
depósito de agua
/ cistern, water tank or
last water tank
Min. Ø1,27cm (½”)
Máx. Ø2,54 cm (1”)
(Planta Alta)
(Top floor)
Bomba
Water Pump
(Planta Baja)
(Low level)
Red de
Distribución
Hidráulica
/ Hydraulic
Distribution
Network
Tubería de
Alimentación
Feed Pipe
Áreas de
Empleo
Areas of
Use
casa / home
edificios / buildings
Alternativas de Instalación / Installation Alternatives
El acondicionador de aguas debe ser colocado en la tubería de
suministro de agua de la casa o de el edificio, antes de que éste se
ramifique a otras instalaciones como el calentador de agua y grifos
de agua fría. / The water conditioner should be placed in the water
supply line of the house or building before it is branched into other
facilities such as the water heater and cold water faucets.
cable de
impulso
impulse wire
cable de
impulso
impulse wire
3Fije el aparato acondicionador a la tubería con los cinchos de
plástico (incluidos). / Attach the conditioner to the pipe with the
plastic straps (included).
4Enrolle los cables de impulso alrededor de la tubería, para
obtener mejores resultados se requiere un mínimo de 7 vueltas.
Un cable deberá ser enrollado comenzando por la parte superior
de la tubería y el otro por la parte inferior de la tubería. / Wrap the
impulse wires around the pipe, for best results a minimum of 7
turns is required. One cable should be rolled starting at the top of
the pipe and the other at the bottom of the pipe.
Instalación General / General Installation
Instale el acondicionador a 3 metros de distancia de cualquier aparato receptor (radio,
televisión, teléfono) para evitar interferencias. / Install the air conditioner within 3 meters
of any receiving device (radio, television, telephone) to avoid interference.
cable de impulso
impulse wire
cincho de plástico
plastic straps
3
8
9
10
5 6
Sujete las puntas de los cables de
impulso a la tubería con los cinchos de
plástico (incluidos) y corte el sobrante. /
Attach the tips of the impulse cables to
the pipe with the plastic straps (included)
and cut the excess.
tubería de
alimentación
/ feed pipe
cincho de
plástico
plastic straps
7
conector
connector
Desenrosque los tornillos y conecte los
conectores y apriete. / Unscrew the
screws and connect the connectors and
tighten.
Conecte el transformador a la
alimentación eléctrica. / Connect the
transformer to the power supply.
Conecte a un contacto de 120 Vca a 60 Hz.
Connect to a 120 VAC contact at 60 Hz.
Verifique que los cables queden apretados.
Check that the cables are tight.
Las luces indicadoras comenzarán a parpadear en serie, lo cual
indica que ya se encuentra operando. / The indicator lights will
begin to flash in series, indicating that you are already operating.
El acondicionador debe permanecer conectado al suministro de corriente eléctrica todo el
tiempo. / The conditioner must remain connected to the electrical supply at all times.
Operación / Operation
El SINSARRO usa la tecnología del microprocesador para
generar, en forma electrónica, ondas inaudibles que ayudan a
disolver o a suspender las partículas de carbonato de calcio (sarro)
en el agua. Con el SINSARRO el campo eléctrico generado
siempre se está aplicando al agua. / SINSARRO uses
microprocessor technology to electronically generate inaudible
waves that help dissolve or suspend calcium carbonate particles
(scale) in water. With SINSARRO the generated electric field is
always applied to water.
incrustaciones
scale
partículas
disueltas
dissolved
particles
Para que el acondicionador opere eficazmente la dureza del agua no debe exceder 425 ppm (25gpg).
For the conditioner to operate effectively the water hardness should not exceed 425 ppm (25gpg).
Dureza:La dureza del agua, es la medida de concentración del calcio y del magnesio en el agua. / Hardness: The hardness of water is the
measure of concentration of calcium and magnesium in water.
Suave / Soft
Ligeramente Dura / Slightly Hard
Moderadamente Dura / Moderately Hard
Dura / Hard
Muy Dura / Very Hard
DESCRIPCIÓN DE LA DUREZA
DEL AGUA / DESCRIPTION OF
HARDNESS OF THE WATER
PARTES POR MILLON (ppm) DE
CARBONATO DE CALCIO
EQUIVALENTE / PARTS PER
MILLION (ppm) OF EQUIVALENT
CALCIUM CARBONATE
GRANOS POR GALÓN (gpg)
DE CARBONATO DE CALCIO
EQUIVALENTE / CALCIUM CARBONATE
GRAINS PER GALON (gpg) EQUIVALENT
menos de 17,1
17,1
60 a 120
120 a 180
180 y superior
menos de 1,0
1,0 a 3,5
3,5 a 7,0
7,0 a 10,5
10,5 y superior
4
01 55 53 33 94 00
Ext. 5804, 5805 y 5806 (0133) 36 19 01 13
Comunícate:
Participa en nuestros
cursos gratuitos
de capacitación.
(0181) 83 33 57 67
(0181) 83 33 61 78
In Guadalajara:
Contact:
Enter our free
training courses.
In Monterrey:
En la Ciudad de México:
In Mexico City:
En Monterrey:
En Guadalajara:
HELVEX, S. A. DE C. V. Calzada Coltongo # 293, Col. Industrial Vallejo, Del. Azcapotzalco, C. P. 02300, Ciudad de México.
Es muy importante seguir las siguientes instrucciones para conservar los
acabados de los productos HELVEX, con brillo y en perfecto estado:
1. Utilice únicamente agua y un paño limpio.
2. No utilice fibras, polvos, abrasivos, ni productos químicos.
3. No utilice objetos punzo-cortantes para limpiar los acabados.
4. Se recomienda realizar la limpieza de su producto diariamente.
Nota: Vea nuestros tips en la pag. www.helvex.com.mx
It is very important to follow the instructions below to preserve HELVEX products
finishes, shiny and in perfect condition:
1. Use only water and a clean cloth.
2. Do not use fibers, powders, abrasives, or chemicals.
3. Do not use sharp objects to clean the finish.
4. It is recommended to clean your product daily.
Note: See our tips on: www.helvex.com.mx
Recomendaciones de Limpieza / Cleaning Recommendations
Posibles Causas y Soluciones / Troubleshooting
Problema / Problem Causa
/ Cause Solución / Solution
Producto: Acondicionador de Aguas Duras
Marca: Helvex.
Modelos: SS-1
Tensión de alimentación: .18 Vca
Consumo de Energía: 5 W
Entrada: 120 Vca / 60 Hz / 0,15A
Salida : 18,8 Vca / 13,5 VA / 720 mA
Las luces indicadoras
no parpadean. / Indicator
lights do not blink.
El acondicionador perdió la secuencia de
funcionamiento. / The conditioner lost the
running sequence.
Existen variaciones de voltaje. / There are
voltage variations.
Desconecte un minuto el transformador y
vuelva a conectar. / Disconnect the transformer
one minute and reconnect.
Conecte el acondicionador a un regulador de
voltaje. / Connect the conditioner to a voltage
regulator.
El acondicionador no
funciona adecuadamente./
The conditioner does not
work properly.
Los cables de impulso están flojos. / Impulse
wires are loose.
Verifique que los cables de impulso estén bien
apretados. / Check that the impulse wires are
tight.