manuals.online logo
Brands
  1. Home
  2. •
  3. Brands
  4. •
  5. Helvex
  6. •
  7. Plumbing Product
  8. •
  9. Helvex Ergo E-39 User manual

Helvex Ergo E-39 User manual

Herramienta Requerida
perico destornillador de cruz teflón
/ Required Tools
phillips screwdriver plumber tape
adjustable
wrench
Herramienta Incluida en su Producto
/ Tools Included in your Product
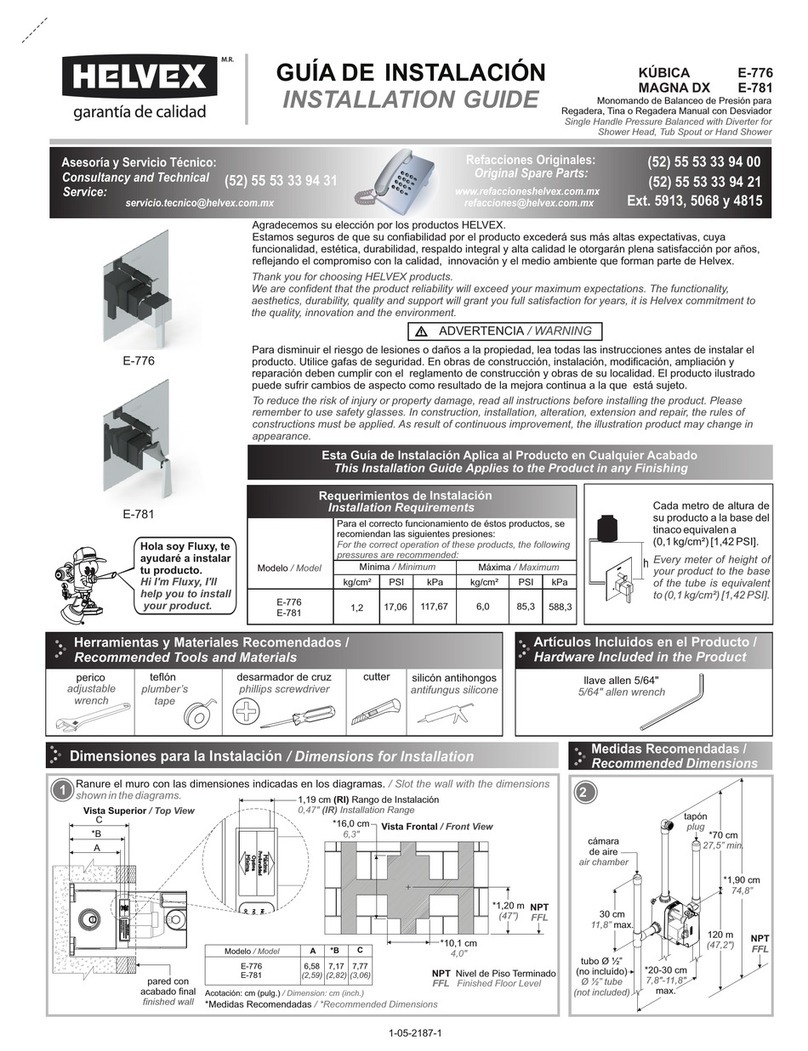
Cada metro de altura de
su producto a la base
del tinaco equivalen a
(0,1 kg/cm²) [1,42 PSI].
Every meter of height of
your product to the base
of the water tank (0,1
kg/cm²) [1,42 PSI]
equivals.
Visite nuestra página
www.helvex.com.mx,
para visualizar los videos
de instalación.
Visit our website
www.helvex.com.mx,
to view the installation
videos.
Requerimientos de
Instalación
Para el correcto funcionamiento de
este producto, la presión mínima
es de (0,6 kg/cm²) 8,53 PSI.
Relación
Altura Tinaco-Presión
5 m
6 m
7 m
PSI
Altura (h)
7,11
8,53
9,99
kg/cm²
0,5
0,6
0,7
Hola soy Fluxy, te
ayudaré a instalar
tu producto.
Instalación General
hot
cold
Caliente
Fría
*55 cm
(21,6”)
*20,3 cm
agle valves
n
vál as
vul
an
gulares
NPT
(8”)
*Recommended Actions
*Medidas Recomendadas
INSTALLATION GUIDE
GUÍA DE INSTALACIÓN
1-02-0556-8
For the correct operation of this
product, the minimum pressure is
(0,6 kg/cm²) 8,53 PSI.
Hi I'm Fluxy, I'll
help you to install
your product.
Installation Requirements Relation
Tub Height-Pressure
/ General Installation
Height (h)
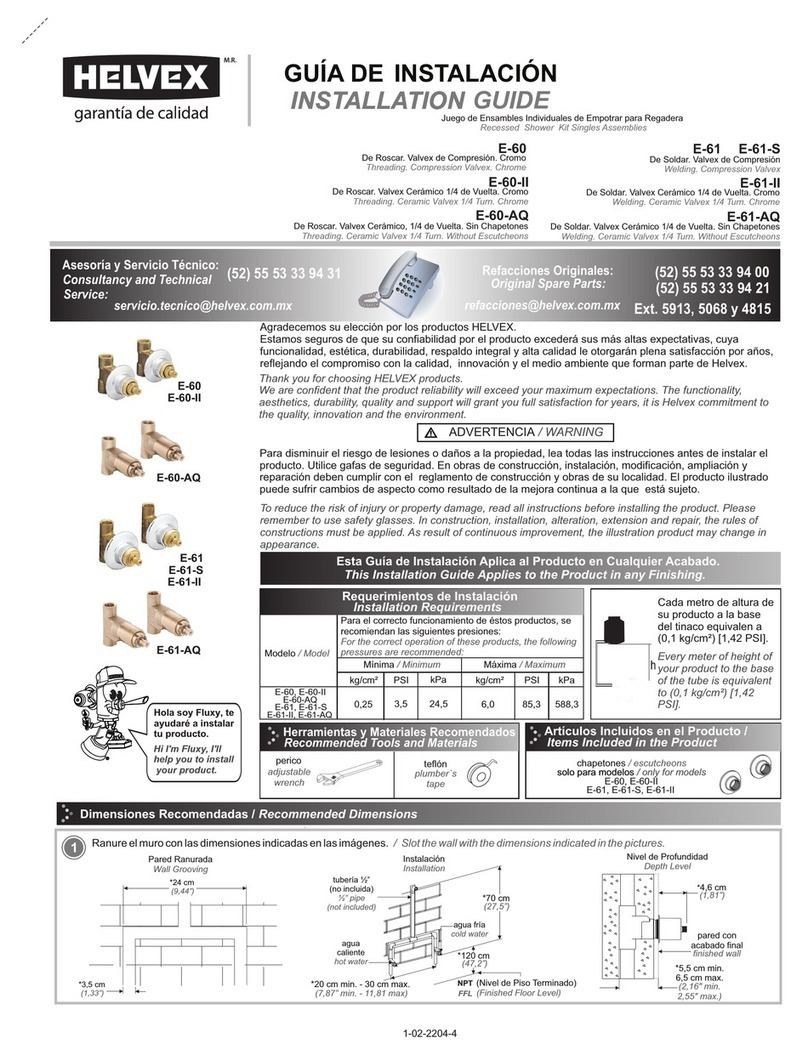
1Cierre el suministro de agua. / Close the water supply.
Ubique y cierre las válvulas de suministro de agua.
Generalmente se encuentran debajo del lavabo. Si se trata de un
reemplazo de grifo, quite el grifo viejo y limpie completamente la
superficie del lavabo.
Locate and close the water supply valves.
Usually found under the sink. If it is a replacement faucet, remove
the old faucet and clean the entire surface of the sink.
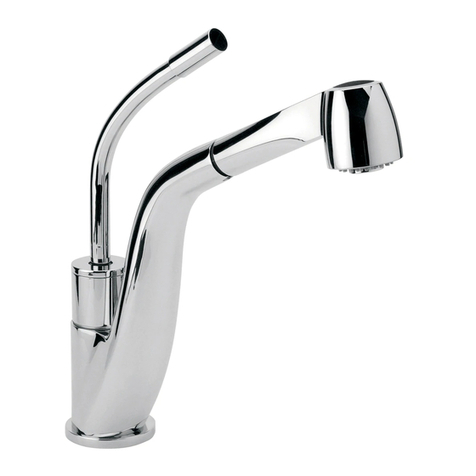
Monomando con Manguera Retráctil
/Single Control kitchen Faucet with
retractable hose
E-39 Ergo
[email protected]
Original Parts:
Consultancy and Technical
01(55)53339431
01800 909 2020 01 (55) 53 33 94 00
Refacciones Originales:
Asesoría y Servicio Técnico:
Ext. 5068, 5815 y 5913
Service:
53 33 94 21
01 800 890 0594
[email protected]
(Nivel de Piso Terminado)
(Finished Floor Level)
5/64” allen wrench
llave allen 5/64”
key holding
llave de sujeción
Este instructivo aplica al producto en cualquier acabado. / This instructive applies
to the product in any finish.
Para disminuir el riesgo de lesiones o daños a la propiedad, lea todas las instrucciones antes de instalar el
producto. Utilice gafas de seguridad. En obras de construcción, instalación, modificación, ampliación y
reparación deben cumplir con el reglamento de construcción y obras de su localidad. El producto ilustrado
puede sufrir cambios de aspecto como resultado de la mejora continua a la que está sujeto.
Agradecemos su elección por los productos HELVEX.
Estamos seguros de que su confiabilidad por el producto excederá sus más altas expectativas, cuya
funcionalidad, estética, durabilidad, respaldo integral y alta calidad le otorgarán plena satisfacción por años,
reflejando el compromiso con la calidad, innovación y el medio ambiente que forman parte de Helvex.
Thank you for choosing HELVEX products.
We are confident that the product reliability will exceed your maximum expectations. The functionality,
aesthetics, durability are at its highest quality! The comprehensive support will grant full satisfaction for years,
reflecting the commitment to quality, innovation and the environment as part Helvex.
To reduce the risk of injury or property damage, read all instructions before installing the product. Please
remember to use safety glasses. In construction, installation, alteration, extension and repair, the rules of
constructions must be applied. As result of continuous improvement, the illustration product may change in
appearance.
ADVERTENCIA / WARNING
2
2
Ista ación hapetón
nl C n l n
/Escutcheo Instal atio
I taación e asManras
ns l dl gue
I taa i of os s
/ns llton H e
Retire la tuerca tipo mariposa y ancla de sujeción. Colocar chapetón en la tarja. / Remove the butterfly-type nut and anchor fasteners. Place
escutcheon in the sink.
chapetón
escutcheon
Apriete la tuerca. /
Tighten the nut.
ancla de sujeción
anchor fastener
tuerca tipo mariposa
butterfly-type nut
34Inserte el empaque y enrosque la
tuerca con la llave de instalación
(incluida). / Insert the gasket and
screw the nut with the installation
wrench (included).
5
tuerca
nut
qs i l a
Colo ue la al da en a t rja. c/ Pla e
c t t s kfau ein he in .
Desenrosque la tuerca y retire el
empaque. / Unscrew the nut and
remove the gasket.
empaque
gasket
Lpsup fic
im ie la er ie.
l .
C ean the surface
tuerca
nut
empaque
gasket
s a i lIntal c ón Sa ida / FaucetInstal atio
l n
lín as de
e
alim nt ión
eac
fe ding lines
d
a e
gua calient
oa
h t w ter
agua fría
col a e
d w t r
tubos de
alimentación
feeding pipes
mangueras ½”-14 NPSM
x 3/8”-24 UNF x 12”
½ "-14 NPSM
x 3/8 "-24 UNF x 12" hoses
Enro que l s mang e as a los tubos de ali entación.
saur m
/C n ect hose to eeding pipes.
on s f
7
6Ab a l su ini t o de gua y ur e a l nd a im t i .
re m s r a pgu l íea e l en ac ón /
Ope t e eupply and pur e he f dding inesn hwat r sgte l .
tubo derecho agua caliente (rojo)
right pipe hot water (red)
tubo izquierdo agua fría
(azul) / pipe cold (blue)left
3
10
Purge la línea de
alimentación antes de
conectar. / Purge the
supply line before
connecting.
8Enrrosque las mangueras (incluidas)
a las válvulas angulares. / Connect
hoses (included) to shutoff valves.
válvula angular
shutoff valve
9nr qu a c a lE os e la manguer metáli a e
ub de áat o alimentación m s l rgo. /
ne o erCon ct the hose t the long
el
m ta pipe.
empaque
gsk ta e
aireador
aerator
barril
barrel
manguera retráctil
retractable hose
Coloque el contrapeso. / Place the
counterweight.
Coloque el contrapeso
a la mitad del
largo de la manguera.
aproximadamente
/ Place the
counterweight approximately
half the length of the hose.
contrapeso
counterweight
Levante la palanca para abrir o cerrar
el flujo de agua y gire la palanca
maneral para regular la temperatura. /
Pull the lever to open or close the flow
of water and turn the lever to regulate
the temperature.
12
11 Abra el suministro de agua. / Open
the water supply.
caliente
hot
cold
fría
Revise que no existan fugas
encima y debajo de la tarja.
Check for leaks up and
down the lavatory.
+ caliente
+ hot
+ fria
+ cold
abrir
open
ó
Operaci n
Op r tion
/ea
chorro
aireado
aerated jet
chorro tipo
regadera
sprinkler type jet
13 Jale hacia afuer el cabezal paraa
utilizar la manguera retráctil y presione
el botón ubicado en la parte superior
del cabezal para seleccionar el tipo de
chorro deseado. / Pull out the head to
use the retractable hose and press the
button located on the top of the spout
to select the desired type of jet.
14 15 16
Matniieto
n e m ndelireador /e a Ma nte nceA Artor ina
Desenrosque el barril con el aireador
y su empaque, retire el aireador y
límpielo con agua y un cepillo. /
Unscrew the barrel to remove aerator
and its gasket and clean with water
and a brush.
empaque
gasket
aireador
aerator
barril
barrel
Arme y enrosque nuevamente. /
Assemble and tighten again.
Pase el dedo por encima de los
anticalcáreos del cabezal para
eliminar el sarro. / Slide your finger
over the spout to remove limescale.
tubo
alimentador
feeding pipe
manguera retráctil
retractable hose
empaque /
gasket
Verifique que este
colocado el empaque.
/ Verify that this
placed the gasket..
HELVEX, S. A. DE C.V. Calzada Coltongo 293, Col. Industrial Vallejo 02300 Del. Azcapotzalco, México, D.F. Tel. (55) 53-33-94-00.
Es muy importante seguir las siguientes instrucciones para conservar los
acabados de los
1. Utilice únicamente agua y un paño limpio.
2. No utilice fibras, polvos, abrasivos, ni productos químicos.
3. No utilice objetos punzo-cortantes para limpiar los acabados.
4. Se recomienda realizar la limpieza de su producto diariamente.
Nota: Vea nuestros tips en la pag. www.helvex.com.mx
productos HELVEX, con brillo y en perfecto estado:
It is very important to follow the instructions below to preserve HELVEX products
finishes, shiny and in perfect condition:
1. Use only water and a clean cloth.
2. Do not use fibers, powders, abrasives, or chemicals.
3. Do not use sharp objects to clean the finish.
4. It is recommended to clean your product daily.
Note: See our tips on: www.helvex.com.mx
Recomendaciones de Limpieza / Cleaning Recommendations
Posibles Causas y Soluciones / Trouble Shooting
In Guadalajara:
Contact:
Enter our free
training courses.
In Monterrey:
En la Ciudad de México:
In Mexico City:
En Monterrey:
En Guadalajara:
01 55 53 33 94 00
Ext. 5804, 5805 y 5806 (0133) 36 19 01 13
Comunícate:
Participa en nuestros
cursos gratuitos
de capacitación.
(0181) 83 33 57 67
(0181) 83 33 61 78
Problema /Problem Causa / Cause Solución / Solution
La presión de operación no es la adecuada. / The
operating pressure is not adequate.
Verifique que la presión mínima de operación sea 0,6 kg/cm².
Verify that the minimum operating pressure is 0,6kg/cm².
Las válvulas angulares no están totalmente abiertas. / No
shutoff valves are fully open.
Abrir totalmente las válvulas angulares. (Pag. 3, paso 11)
Instalación general. / Fully open shutoff valves. (Page 3, step
11 General installation.
La salida está floja. / The
foucet is loose.
La tuerca espárrago no está apretada./ The stud nut is
not tight.
Apriete firmemente la tuerca espárrago (Pag. 2, paso 5). /
Tighten the stud nut (Page 2, step 5).
Hay fuga en las
conexiones. / There are
leaks in the connections.
Posiblemente no estén firmemente apretadas. / Possibly
not tight.
Apriete firmemente la conexión. (Pag. 2, paso 7) Instalación de
mangueras. / Tighten the connection. (Page 2, Step 7) Install
hoses.
No hace cambio de chorro.
/ It does not change jet. Falta presíon. / Low pressure. Verifique que la presión mínima de operación sea 0,6 kg/cm².
Verify that the minimum operating pressure is 0,6 kg/cm².
Existe poco flujo de agua. /
There is some water flow.
4
Cambio del Cartucho / Cartridge Replacement
17 Cierre el suministro de agua antes de comenzar, desenrosque
el opresor del maneral con la llave allen (incluida), retire el
maneral y el chapetón. / Close the water supply before
unscrewing the handle set screw with allen wrench (included),
remove the handle and escutcheon.
handle
maneral
escutcheon
chapetón
set screw
opresor
18 Desenrosque la tuerca de sujeción y cambie el cartucho. /
Remove the lock nut with the wrench (included) and replace the
cartridge.
tuerca de
sujeción
locknut
cartucho
cartridge

Other Helvex Plumbing Product manuals

Helvex TH-062 User manual

Helvex

Helvex TH-062 User manual

Helvex PIA-100 User manual

Helvex

Helvex PIA-100 User manual

Helvex FORZA TV-304 User manual

Helvex

Helvex FORZA TV-304 User manual

Helvex Optima H-200 User manual

Helvex

Helvex Optima H-200 User manual

Helvex Kubica TR-036 User manual

Helvex

Helvex Kubica TR-036 User manual

Helvex TV-105 User manual

Helvex

Helvex TV-105 User manual

Helvex TV-302 User manual

Helvex

Helvex TV-302 User manual

Helvex ME-3000 User manual

Helvex

Helvex ME-3000 User manual

Helvex UH-105-WOA User manual

Helvex

Helvex UH-105-WOA User manual

Helvex Access UACC-105 User manual

Helvex

Helvex Access UACC-105 User manual

Helvex 5424 User manual

Helvex

Helvex 5424 User manual

Helvex NAO WM User manual

Helvex

Helvex NAO WM User manual

Helvex 185-19 User manual

Helvex

Helvex 185-19 User manual

Helvex H1000-TR011 User manual

Helvex

Helvex H1000-TR011 User manual

Helvex 444 User manual

Helvex

Helvex 444 User manual

Helvex MAGNA UTV-048 User manual

Helvex

Helvex MAGNA UTV-048 User manual

Helvex 25 User manual

Helvex

Helvex 25 User manual

Helvex EP-95 User manual

Helvex

Helvex EP-95 User manual

Helvex Argos TV-296 User manual

Helvex

Helvex Argos TV-296 User manual

Helvex Kubica H-3006 User manual

Helvex

Helvex Kubica H-3006 User manual

Helvex Vertika TV-081-S User manual

Helvex

Helvex Vertika TV-081-S User manual

Helvex MAGNA DX UE-915 User manual

Helvex

Helvex MAGNA DX UE-915 User manual

Helvex 4954 User manual

Helvex

Helvex 4954 User manual

Helvex Alika E-920 User manual

Helvex

Helvex Alika E-920 User manual

Popular Plumbing Product manuals by other brands

GoldenDesigns Nebula owner's manual

GoldenDesigns

GoldenDesigns Nebula owner's manual

GoldenDesigns MX-J206-02S manual

GoldenDesigns

GoldenDesigns MX-J206-02S manual

Delta Everfly 25741LF-SP Installation instruction

Delta

Delta Everfly 25741LF-SP Installation instruction

Range Master Aquaquad 2 Monobloc TAQ2 instructions

Range Master

Range Master Aquaquad 2 Monobloc TAQ2 instructions

RamonSoler 4733T quick start guide

RamonSoler

RamonSoler 4733T quick start guide

Delta Stryke T57766-WL Series quick start guide

Delta

Delta Stryke T57766-WL Series quick start guide

Delta Windemere Series manual

Delta

Delta Windemere Series manual

Delta 15766LF Series manual

Delta

Delta 15766LF Series manual

astrawalker A81.49 installation instructions

astrawalker

astrawalker A81.49 installation instructions

Delta Rhythm 3582LF quick start guide

Delta

Delta Rhythm 3582LF quick start guide

GoldenDesigns GDI3356 owner's manual

GoldenDesigns

GoldenDesigns GDI3356 owner's manual

Kohler K-99255X-4CD Installation and care guide

Kohler

Kohler K-99255X-4CD Installation and care guide

Graff TOPAZ Installation

Graff

Graff TOPAZ Installation

Hyco SF1/3 instruction manual

Hyco

Hyco SF1/3 instruction manual

Oceanic Vision Series manual

Oceanic

Oceanic Vision Series manual

Hans Grohe Novus 70 71020000 Instructions for use/assembly instructions

Hans Grohe

Hans Grohe Novus 70 71020000 Instructions for use/assembly instructions

Omnires FRESH Installation and Maintenance

Omnires

Omnires FRESH Installation and Maintenance

VADO Life Installation & maintenance instructions

VADO

VADO Life Installation & maintenance instructions

manuals.online logo
manuals.online logoBrands
  • About & Mission
  • Contact us
  • Privacy Policy
  • Terms and Conditions

Copyright 2025 Manuals.Online. All Rights Reserved.