Hilti HDE 500-A18 User manual

*2017693*
2017693
HDE 500-A18
Operating instructions en
Mode d’emploi fr
Manual de instrucciones es
Printed: 07.07.2013 | Doc-Nr: PUB / 5142533 / 000 / 00

ݬ
ݩ
ݧ
ݨ
ݤݣ
ݥ
ݪݦ
ݫ
1
Printed: 07.07.2013 | Doc-Nr: PUB / 5142533 / 000 / 00

HIT CB 500
HIT CB 500
HIT CR 500
ݰ
ݭ
ݰ
ݭ
ݯ
ݯ
ݯ
ݱ
ݮ
POIOR]
POIOR]
HIT CR 500
POIOR]
POIOR]
POIOR]
POIOR]
2
Printed: 07.07.2013 | Doc-Nr: PUB / 5142533 / 000 / 00

34
5
6
7
89
Printed: 07.07.2013 | Doc-Nr: PUB / 5142533 / 000 / 00

10
11
12
13
14
Printed: 07.07.2013 | Doc-Nr: PUB / 5142533 / 000 / 00

15
16
17
Printed: 07.07.2013 | Doc-Nr: PUB / 5142533 / 000 / 00

15
18
19
Printed: 07.07.2013 | Doc-Nr: PUB / 5142533 / 000 / 00

ORIGINAL OPERATING INSTRUCTIONS
HDE 500-A18 dispenser
It is essential that the operating instructions
are read before the tool is operated for the
first time.
Always keep these operating instructions to-
gether with the tool.
Ensure that the operating instructions are
with the tool when it is given to other persons.
Contents Page
1 General information 1
2Description 2
3 Accessories 3
4 Technical data 3
5 Safety instructions 4
6Beforeuse 6
7 Operation 6
8 Care and maintenance 9
9 Troubleshooting 9
10 Disposal 10
11 Manufacturer’s warranty 11
1These numbers refer to the corresponding illustra-
tions. The illustrations can be found on the fold-out cover
pages. Keep these pages open while studying the oper-
ating instructions.
In these operating instructions, the designation “the tool”
always refers to the HDE 500-A18 cordless dispenser.
Parts, operating controls and indicators 1
@Cradle for foil pack holder
;Front locating lug for fitting the foil pack holder
=Rear locating lug for fitting the foil pack holder
%Parallel piston rods with grip
&Release button
(Grip
)Speed-control trigger
+Dispensing mode selector switch
§Li‑ion battery
/Battery release buttons (also used to activate the
charge status display)
¡Mixing nozzle (static mixer)
Accessories 2
:Black foil pack holder with built-in piston, 500 ml
(16.9 fl.oz.)
·Red foil pack holder with built-in piston, 500 ml
(16.9 fl.oz.)
$Release button on the foil pack holder
Consumables 2
£Black or white Hilti 2-component foil pack, con-
tents: 330 ml (11.1 fl.oz.) or 500 ml (16.9 fl.oz.)
|Red Hilti 2-component foil pack, contents: 330 ml
(11.1 fl.oz.) or 500 ml (16.9 fl.oz.)
1 General information
1.1 Safety notices and their meaning
DANGER
Draws attention to imminent danger that will lead to
seriousbodilyinjuryorfatality.
WARNING
Draws attention to a potentially dangerous situation that
could lead to serious personal injury or fatality.
CAUTION
Draws attention to a potentially dangerous situation that
could lead to slight personal injury or damage to the
equipment or other property.
NOTE
Draws attention to an instruction or other useful informa-
tion.
1.2 Explanation of the pictograms and other
information
Warning signs
General
warning
Warning:
electricity
Warning:
caustic
substances
Obligation signs
Wear eye
protection.
Wear
protective
gloves
Wear
protective
clothing
en
1
Printed: 07.07.2013 | Doc-Nr: PUB / 5142533 / 000 / 00

Symbols
Read the
operating
instructions
before use.
Return waste
material for
recycling.
National
waste
material
recycling
system
“Off” position Continuous
dispensing
Measured
dispensing
Location of identification data on the tool
The type designation and serial number can be found
on the type identification plate on the appliance. Make
a note of this data in your operating instructions and
always refer to it when making an enquiry to your Hilti
representative or service department.
Type:
Generation: 01
Serial no.:
2 Description
2.1 Use of the product as directed
The tool is designed to dispense the contents of Hilti foil packs in a controlled operation. The HDE 500‑A18 cordless
dispenser is designed to be used exclusively to dispense the contents of Hilti 330 ml (11.1 fl.oz.) or 500 ml (16.9 fl.oz.)
foil packs. Use of third-party products with the tool is not permissible.
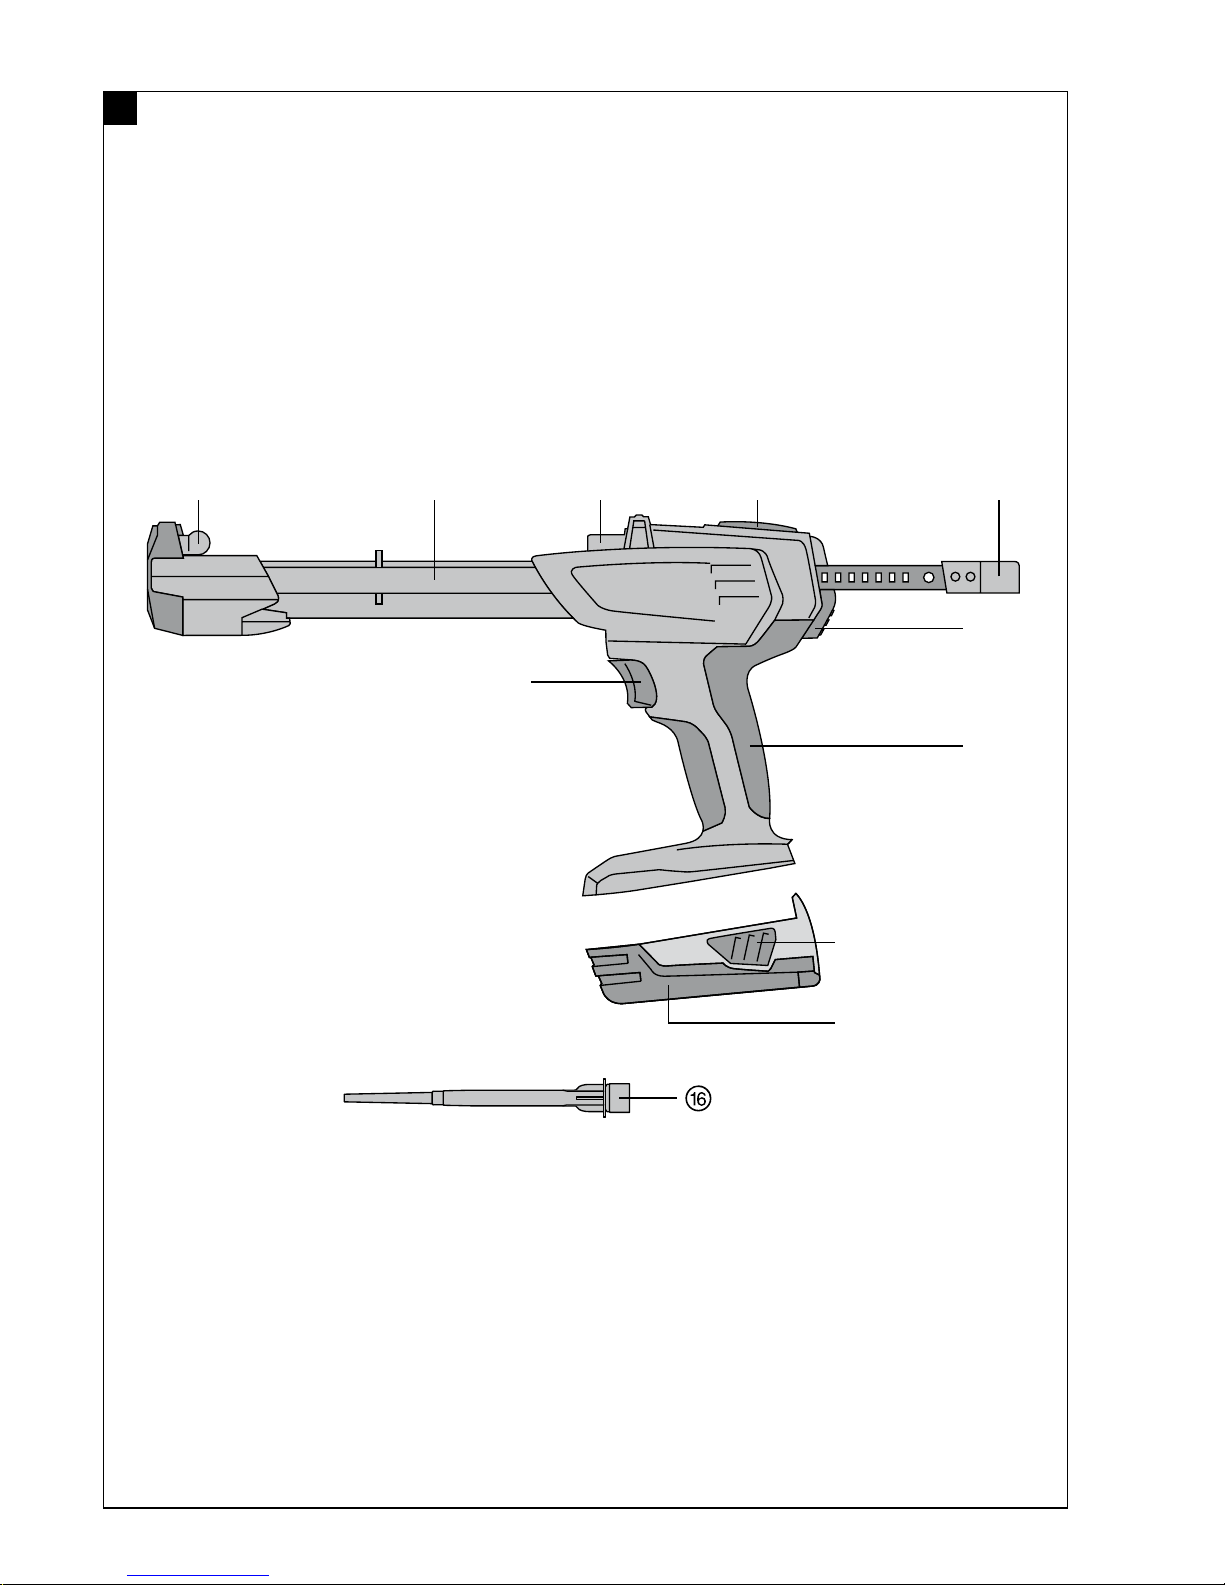
Depending on the type of foil pack, the tool can be used with either a black or a red foil pack holder (see fig. 2).
Black foil pack holder: Used to dispense Hilti mortars supplied in black or white foil packs.
Red foil pack holder: Used to dispense Hilti mortars supplied in red foil packs.
The appliance is designed for professionaluseandmaybeoperated,serviced and maintained only by trained,
authorized personnel. This personnel must be informed of any special hazards that may be encountered. The
appliance and its ancillary equipment may present hazards when used incorrectly by untrained personnel or when
used not as directed.
Never point the tool toward yourself or other persons.
Do not use the battery as a power source for other unspecified appliances.
Modification of the appliance or tampering with its parts is not permissible.
To avoid the risk of injury, use only genuine Hilti tools and accessories.
Observe the information printed in the operating instructions concerning operation, care and maintenance.
The working environment may be as follows: construction site, workshop, renovation, conversion or new construction.
Nationally applicable industrial safety regulations must be observed.
2.2 Items supplied
1 The appliance
1 Protective glasses
1 Hilti toolbox or cardboard box
1 Operating instructions
1 Foil pack holder, black (optional)
1 Foil pack holder, red (optional)
2.3 Additional items required for operating the tool
B 18/3.3 Li-Ion, B 18/2.6 Li-Ion or B 18/1.6 Li‑Ion battery and C4⁄36‑90, C4⁄36‑350, C 4/36 or C 4/36‑ACS charger.
2.4 Li-ion battery charge status and overheating indicator
LEDs light constantly LEDs blink Charge status C
LED 1,2,3,4 -C≧75%
LED 1,2,3 -50 % ≦ C < 75 %
en
2
Printed: 07.07.2013 | Doc-Nr: PUB / 5142533 / 000 / 00

LEDs light constantly LEDs blink Charge status C
LED 1,2 -25 % ≦ C < 50 %
LED 1 -10 % ≦ C < 25 %
-LED 1 C<10%
-LED 1 Battery overheated
3 Accessories
Designation Short designation Description
Battery B 18/2.6 Li‑ion
Battery B 18/1.6 Li‑Ion
Battery B 18/3.3 Li‑Ion
Charger C 4/36 or C 4/36‑ACS
Charger for Li-ion batteries C 4/36‑90
Charger for Li-ion batteries C 4/36‑350
Foil pack holder HIT CB 500 500 ml (16.9 fl.oz), black
Foil pack holder HIT CB 330 330 ml (11.1 fl.oz), black
Foil pack holder HIT CR 500 500 ml (16.9 fl.oz), red
Foil pack holder HIT CR 330 330 ml (11.1 fl.oz), red
4 Technical data
Right of technical changes reserved.
Power tool
Weight 2.62 kg (5.8 lbs)
Rated voltage (DC voltage) 21.6 V
Dimensions (L x W x H) 436 mm (17.17") x 120 mm (4.72") x 221 mm (17.2" x
4.7" x 8.7")
Dispensing mode selector switch Modes available: off, continuous dispensing, measured
volume dispensing with settings 1 to 15
Motor stop Electronic overload prevention cut-out
Battery B 22/1.6 Li‑Ion B 22/2.6 Li‑Ion B 22/3.3 Li‑Ion
Rated voltage 21.6 V 21.6 V 21.6 V
Capacity 1.6 Ah 2.6 Ah 3.3 Ah
Energy content 34.56 Wh 56.16 Wh 71.28 Wh
Weight 0.48 kg (1.06 lb) 0.78 kg (1.72 lb) 0.78 kg (1.72 lb)
Temperature monitoring Yes Yes Yes
Deep discharge protec-
tion
Yes Yes Yes
Type of cell Li‑ion Li‑ion Li‑ion
No. of cells 6 12 12
en
3
Printed: 07.07.2013 | Doc-Nr: PUB / 5142533 / 000 / 00

5 Safety instructions
The safety rules in section 5.1 contain all general safety
rules for power tools which, in accordance with the
applicable standards, require to be listed in the operating
instructions. Accordingly, some of the rules listed may
not be relevant to this tool.
5.1 General power tool safety warnings
a)
WARNING
Read all safety warnings and instructions. Failure
to follow the warnings and instructions may result
in electric shock, fire and/or serious injury. Save all
warnings and instructions for future reference.
The term “power tool” in the warnings refers to
your mains-operated (corded) power tool or battery-
operated (cordless) power tool.
5.1.1Workareasafety
a) Keep work area clean and well lit. Cluttered or dark
areas invite accidents.
b) Do not operate power tools in explosive atmo-
spheres, such as in the presence of flammable
liquids, gases or dust. Power tools create sparks
which may ignite the dust or fumes.
c) Keep children and bystanders away while operat-
ing a power tool. Distractions can cause you to lose
control.
5.1.2 Electrical safety
a) Power tool plugs must match the outlet. Never
modify the plug in any way. Do not use any adapter
plugs with earthed (grounded) power tools. Un-
modified plugs and matching outlets will reduce risk
of electric shock.
b) Avoid body contact with earthed or grounded
surfaces such as pipes, radiators, ranges and
refrigerators. There is an increased risk of electric
shock if your body is earthed or grounded.
c) Do not expose power tools to rain or wet condi-
tions. Water entering a power tool will increase the
risk of electric shock.
d) Do not abuse the cord. Never use the cord for
carrying, pulling or unplugging the power tool.
Keep cord away from heat, oil, sharp edges or
moving parts. Damaged or entangled cords increase
theriskofelectricshock.
e) When operating a power tool outdoors, use an
extension cord suitable for outdoor use. Use of
a cord suitable for outdoor use reduces the risk of
electric shock.
f) If operating a power tool in a damp location is
unavoidable, use a residual current device (RCD)
protected supply. Use of an RCD reduces the risk
of electric shock.
5.1.3 Personal safety
a) Stay alert, watch what you are doing and use
common sense when operating a power tool. Do
not use a power tool while you are tired or under
the influence of drugs, alcohol or medication. A
moment of inattention while operating power tools
may result in serious personal injury.
b) Use personal protective equipment. Always wear
eye protection. Protective equipment such as dust
mask, non-skid safety shoes, hard hat, or hearing
protection used for appropriate conditions will reduce
personal injuries.
c) Prevent unintentional starting. Ensure the switch
is in the off‐position before connecting to power
source and/or battery pack, picking up or carrying
the tool. Carrying power tools with your finger on the
switch or energising power tools that have the switch
on invites accidents.
d) Remove any adjusting key or wrench before turn-
ing the power tool on. A wrench or a key left at-
tached to a rotating part of the power tool may result
in personal injury.
e) Do not overreach. Keep proper footing and bal-
ance at all times. This enables better control of the
power tool in unexpected situations.
f) Dress properly. Do not wear loose clothing or
jewellery. Keep your hair, clothing and gloves
away from moving parts. Loose clothes, jewellery
or long hair can be caught in moving parts.
g) If devices are provided for the connection of dust
extraction and collection facilities, ensure these
are connected and properly used. Use of dust
collection can reduce dust-related hazards.
5.1.4 Power tool use and care
a) Do not force the power tool. Use the correct
power tool for your application. The correct power
tool will do the job better and safer at the rate for
which it was designed.
b) Do not use the power tool if the switch does not
turn it on and off. Any power tool that cannot be
controlled with the switch is dangerous and must be
repaired.
c) Disconnect the plug from the power source
and/or the battery pack from the power tool
before making any adjustments, changing
accessories, or storing power tools. Such
preventive safety measures reduce the risk of
starting the power tool accidentally.
d) Store idle power tools out of the reach of chil-
dren and do not allow persons unfamiliar with the
power tool or these instructions to operate the
power tool. Power tools are dangerous in the hands
of untrained users.
e) Maintain power tools. Check for misalignment or
binding of moving parts, breakage of parts and
any other condition that may affect the power
tool’s operation. If damaged, have the power tool
repaired before use. Many accidents are caused by
poorly maintained power tools.
f) Keep cutting tools sharp and clean. Properly main-
tained cutting tools with sharp cutting edges are less
likely to bind and are easier to control.
en
4
Printed: 07.07.2013 | Doc-Nr: PUB / 5142533 / 000 / 00

g) Use the power tool, accessories and tool bits etc.
in accordance with these instructions taking into
account the working conditions and the work to
be performed. Use of the power tool for opera-
tions different from those intended could result in a
hazardous situation.
5.1.5 Battery tool use and care
a) Recharge only with the charger specified by the
manufacturer. A charger that is suitable for one type
of battery pack may create a risk of fire when used
with another battery pack.
b) Use power tools only with specifically designated
battery packs. Use of any other battery packs may
create a risk of injury and fire.
c) When battery pack is not in use, keep it away
from other metal objects, like paper clips, coins,
keys, nails, screws or other small metal objects,
that can make a connection from one terminal to
another. Shorting the battery terminals together may
cause burns or a fire.
d) Under abusive conditions, liquid may be ejected
from the battery, avoid contact. If contact acci-
dentally occurs, flush with water. If liquid contacts
eyes, additionally seek medical help. Liquid ejected
from the battery may cause irritation or burns.
5.1.6 Service
a) Have your power tool serviced by a qualified repair
person using only identical replacement parts.
This will ensure that the safety of the power tool is
maintained.
5.2 Additional safety rules
5.2.1 Battery tool use and care
a) Ensure the switch is in the off position before
inserting battery pack. Inserting the battery pack
into power tools that have the switch on invites
accidents.
b) Do not expose batteries to high temperatures or
fire. This presents a risk of explosion.
c) Do not disassemble, squash or incinerate bat-
teries and do not subject them to temperatures
over 80°C (176°F). A risk of fire, explosion or in-
jury through contact with caustic substances may
otherwise result.
d) Avoid ingress of dampness.Dampness may cause
a short circuit resulting in a risk of burning injury or
fire.
e) Do not use batteries other than those approved
for use with the applicable tool or appliance. Use
of other batteries or use of the battery for purposes
for which it is not intended presents a risk of fire and
explosion.
f) Observe the special instructions applicable to the
transport, storage and use of Li-ion batteries.
g) Avoid short-circuiting the battery.Before inserting
the battery in the tool or appliance, check that the
terminals of the battery and the tool or appliance are
free from foreign objects. Short-circuiting the battery
terminals presents a risk of fire, explosion or contact
with caustic substances.
h) Do not charge or continue to use damaged bat-
teries (e.g. batteries with cracks, broken parts,
bent or pushed-in and/or pulled-out contacts).
i) Hold tool by insulated gripping surfaces when
performing an operation where the cutting tool
may contact hidden wiring or its own cord. Contact
with a “live” wire will make exposed metal parts of
the tool “live” and shock the operator.
j) If the battery gets too hot to touch, this may indicate
that it is faulty. Place the tool in a location where
it can be kept under observation, well away from
flammable materials, and allow it to cool down.
Contact Hilti Service after the battery has been
allowedtocool.
5.2.2 Power tool use and care
a) The tool may be operated only when in faultless
condition.
b) Use only foil pack holders of a type approved for
use with the tool.
c) Do not use damaged foil pack holders or damaged
foil packs.
d) The tool, the cradle for the foil pack holders,
the piston rods with pressure pieces and the foil
pack holders must be clean and free from foreign
matter.
e) Remove the battery before storing or transporting
the tool.
5.2.3 Work area safety
a) Ensure that the workplace is well ventilated.
b) Children must be instructed not to play with the
appliance.
c) This appliance is not intended for use by per-
sons (including children) with reduced physical,
sensory or mental capabilities, or lack of experi-
ence and knowledge, unless they have been given
supervision or instruction concerning use of the
appliance by a person responsible for their safety.
5.2.4 Personal protective equipment
a) Wear personal protective equipment while the
tool is in use: closely fitting protective glasses
or face shield, protective gloves and protective
clothing. Wearing personal protective equipment re-
duces the risk of injury.
b) Persons in the immediate vicinity must also wear
personal protective equipment while the tool is in
use.
en
5
Printed: 07.07.2013 | Doc-Nr: PUB / 5142533 / 000 / 00

6Beforeuse
6.1 Battery use and care
NOTE
Use a battery only when it has been fully charged. This en-
sures that maximum battery capacity is available. Change
to the second battery as soon as a drop in performance
is noticed. Recharge the battery immediately so that it is
ready for reuse.
Battery performance drops at low temperatures. For op-
timum results it is recommended that the items to be
used are at room temperature before work begins. The
battery must be kept warm, i.e. within its normal oper-
ating temperature range, when working outdoors in low
temperatures.
6.2 Charging the battery
DANGER
Use only the Hilti batteries and Hilti chargers listed
under “Accessories”.
6.2.1 Charging a new battery for the first time
Charge the battery fully before using it for the first time.
6.2.2 Charging a previously used battery
Ensure that the outer surfaces of the battery are clean
and dry before inserting it in the corresponding charger.
Read the operating instructions for the charger for further
information about the charging procedure.
Li-ion batteries are ready for use at any time, even when
only partly charged. Charging progress is indicated by
the LED display (see charger operating instructions).
6.3 Fitting the battery 34
CAUTION
Before inserting the battery, check that the dispenser
output selector switch is in the “off” position. Use only
the Hilti batteries approved for use with this power
tool.
CAUTION
Before inserting the battery in the tool or appliance,
check that the terminals of the battery and the tool or
appliance are free from foreign objects.
1. Push the battery into the tool from the rear as far as
it will go and until it is heard to engage with a click.
2. CAUTION A falling battery may present a risk of
injury to yourself or others.
Check that the battery is seated securely in the tool.
6.4 Removing the battery
1. Press both release buttons.
2. Pull the battery out of the power tool toward the
rear.
6.5 Transport and storage of battery packs
Pull the battery pack out of the locked position (working
position) and move it into the first click-stop position
(transport position).
If you disconnect a battery pack from the power tool
for transport or storage, make sure that the contacts of
the battery pack are not short-circuited. Remove loose
metal parts such as screws, nails, clamps, loose screw
bits, wires or metal swarf from the case, toolbox or
transport container, or prevent these parts from coming
into contact with the battery packs.
Observe national and international transport regulations
when shipping battery packs (transportation by road, rail,
sea or air).
7Operation
7.1 Further instructions for use
CAUTION
Risk of pinching your fingers! Keep your hands clear
of the cradle area when pivoting the foil pack holder
into position.
WARNING
Observe the information on the safety data sheets, on
the packaging and in the instructions for use before
using the product.
WARNING
Always set the dispensing mode selector switch to
the “0” (off) position before transporting or storing
the tool. This will prevent inadvertent battery discharge
or mortar ejection.
en
6
Printed: 07.07.2013 | Doc-Nr: PUB / 5142533 / 000 / 00

The tool begins to operate if the trigger is pressed while
the dispensing mode selector switch is in the “dispens-
ing” position. To prevent inadvertent operation causing
battery drain or mortar being dispensed, the dispensing
mode selector switch must be left in the “off” position
during transport or storage.
Use of genuine Hilti parts ensures maximum safety. The
dispenser, the foil pack holder and the foil packs are
perfectly matched to each other.
The tool will achieve high performance, high battery
capacity and long life if handled carefully and maintained
correctly.
IMPORTANT! The motor cut-out will be activated if the
tool is overloaded. The tool relieves pressure automati-
cally and is subsequently ready for further operation.
7.2 Dispensing mode selector switch positions
NOTE
Thevolumetobedispensedcannotbeadjustedwhile
the trigger is pressed.
7.2.1 “0” (off) position
The tool is switched off.
No mortar can be dispensed.
7.2.2 Volume settings 1 to 15
NOTE
The volume settings required may vary according to foil
pack type and temperature. The values given here are to
be used as a guide.
1. Select the required volume.
1 = 1 stroke (approx. 5 ml (0.17 fl.oz.))
15 = 15 strokes (approx. 75°ml (2.55 fl.oz.))
2. Press the trigger and maintain pressure on it until
the tool stops automatically after ejection of the
selected volume.
7.2.3 Switch position for sustained operation
1. Press the trigger to begin dispensing and control
the flow rate.
Increase pressure on the trigger to increase the flow
rate and reduce pressure to reduce the flow rate.
2. Release the trigger when you wish to interrupt or
stop the dispensing operation.
Pressure on the foil pack is released automatically
so no further mortar escapes from the mixing nozzle.
7.3 Selecting the foil pack holder 2
CAUTION
Check the foil pack holder for damage and/or soiling.
Both pistons must move smoothly and easily in both
directions over the full length of their travel in the foil
pack holder. Damaged and/or badly soiled foil pack
holders must be replaced.
NOTE
Foil pack holders are available as accessories.
Select the correct foil pack holder according to the color
of the foil pack.
Black foil pack holder: BLACK or WHITE foil pack
Red foil pack holder: RED foil pack
7.4 Inserting the foil pack in the foil pack
holder 56789
NOTE
Follow the instructions for use of the foil pack.
WARNING
Check the foil pack for damage. Never use damaged
foil packs.
1. Press the release button and maintain pressure on
it.
2. Pull the piston rods all the way back.
3. Remove the foil pack holder from the tool by tilting
it slightly and applying light pressure from below.
4. Grip the tool with the foil pack holder from the side
with one hand and push the foil pack into the holder
from the front, as far as it will go.
5. Screw the mixing nozzle all the way onto the foil
pack.
6. Insert the foil pack holder with the foil pack into the
tool, tilting it slightly and applying light pressure until
it clicks into place.
7.5 Discarding the initial quantity of mortar
dispensed
CAUTION
The initial quantity of mortar dispensed is not suitable
for use. The quantity to be discarded is product spe-
cific and is indicated in the applicable instructions for
use. The initial quantity must also be discarded after
changing a mixing nozzle.
WARNING
Never point the tool toward yourself or other persons.
WARNING
Begin dispensing mortar only after the mixing nozzle
has been screwed on.
NOTE
The foil pack opens automatically when dispensing be-
gins. The two components can be seen to mix inside the
mixing nozzle.
en
7
Printed: 07.07.2013 | Doc-Nr: PUB / 5142533 / 000 / 00

1. Set the mode selector switch to “continuous opera-
tion”.
2. Press the trigger until the mixing nozzle is completely
full.
3. Set the dispensing selector switch to the mortar
volume to be discarded (number of strokes) in ac-
cordance with the instructions for use of the mortar.
4. Discard this initial quantity of mortar dispensed.
7.6 Dispensing
WARNING
Never point the tool toward yourself or other persons.
WARNING
Begin dispensing mortar only after the mixing nozzle
has been screwed on.
CAUTION
The tool / foil pack must not be under pressure when
themixingnozzleischanged.
NOTE
Mortar in the mixing nozzle hardens if dispensing is
interrupted for a long period. Screw on a new mixing
nozzle when you wish to continue dispensing mortar.
NOTE
Please refer to the instructions for use of the foil pack for
further information about use of the mortar.
NOTE
Store partly-used foil packs in the foil pack holder with the
mixing nozzle screwed on. Partly-used foil packs have a
limited shelf life. Please refer to the instructions for use
of the foil pack.
7.7 Changing the foil pack
NOTE
All 4 LEDs on the battery blink briefly to indicate when a
foil pack is completely empty.
1. Press the release button and maintain pressure on
it.
2. Pull the piston rods all the way back.
3. Remove the foil pack holder from the tool by tilting
it slightly and applying light pressure from below.
4. Grip the empty foil pack by the mixing nozzle and
pull it out of the foil pack holder.
5. Push a new foil pack into the holder as far as it will
go and screw on a new mixing nozzle.
6. Re-insert the foil pack holder in the tool, applying
light pressure until it clicks into place.
7.8 Disposing of a foil pack
CAUTION
Dispose of completely emptied foil packs in accor-
dance with nationally applicable instructions.
NOTE
For information about disposing of full, partly-used and
completely empty foil packs, please refer to the instruc-
tions for use of the product or the applicable safety data
sheets.
7.9 Removing the foil pack holder from the
tool
1. Press the release button and maintain pressure on
it.
2. Pull the piston rods all the way back.
3. Remove the foil pack holder from the tool by tilting
it slightly and applying light pressure from below.
4. Grip the foil pack holder by the large cylinder.
5. Keep the release button at the rear end of the foil
pack holder pressed in.
6. Disengage the foil pack holder from the rear locating
lug.
7. Pull the eye on the foil pack holder off the front
locating lug and remove the foil pack holder from
the tool.
7.10 Inserting the foil pack holder in the
tool
1. Press the release button and maintain pressure on
it.
2. Pull the piston rods all the way back.
3. Fit the eye on the foil pack holder onto the locating
lug at the front end of the tool.
4. Guide the rear of the foil pack holder under the rear
locating lug until it engages in place.
5. Insert the foil pack holder in the tool by tilting it
slightly and applying light downward pressure until
it clicks into place and is seated correctly.
7.11 Reading the charge status LED display on
Li‑ion batteries
NOTE
Thechargestatuscannotbeindicatedwhilethetool
is in operation. LED 1 blinks when the battery is fully
discharged or when it is too hot (temperature above 80°C
(176°F)). The battery must then be inserted in the charger.
The Li-ion battery features a charge status LED display.
The charge status is indicated by the LEDs on the battery
during charging (please refer to the operating instructions
for the charger). When the battery is not in use, pressing
one of the battery release buttons or inserting the battery
into the tool causes the battery charge status to be
displayed by the four LEDs for three seconds.
7.12 Transport and storage
1. Set the dispensing mode selector switch to the “off”
position before transporting or storing the tool.
2. Remove the battery from the tool before transport
and storage.
en
8
Printed: 07.07.2013 | Doc-Nr: PUB / 5142533 / 000 / 00

8 Care and maintenance
CAUTION
Before beginning cleaning, remove the battery from
the power tool or appliance in order to prevent unin-
tentional starting.
8.1 Care of the tool
CAUTION
Keep the appliance, especially its grip surfaces, clean
and free from oil and grease. Do not use cleaning
agents which contain silicone.
Do not permit foreign objects to enter the interior of the
tool. Clean the outside of the tool at regular intervals with
a slightly damp cloth. Do not use a spray, steam pressure
cleaning equipment or running water for cleaning. This
may negatively affect the electrical safety of the tool.
Use a cloth to remove any mortar adhering to the tool and
foil pack holder as soon as possible, before it hardens.
Hardened mortar can be removed only by mechanical
means. Take care to ensure that the tool is not damaged
by cleaning. Never dip or soak the tool or its parts in
solvents.
Lubricate the piston rods with oil when necessary. Check
that the pistons move freely in the foil pack holder.
8.2 Care of the Li-ion battery
Avoid entrance of moisture.
Charge the battery fully before using it for the first time.
In order to achieve maximum battery life, stop using the
battery as soon as a significant drop in performance is
noticed.
NOTE
If use of the power tool or appliance continues, battery
discharge is stopped automatically (indicated by LED 1
blinking) before the battery cells suffer damage.
Charge the battery with the Hilti charger approved for use
with Li-ion batteries.
NOTE
- A conditioning charge (as is required with NiCd or
NiMH batteries) is not necessary.
- Interruption of the charging procedure has no negative
effect on battery life.
- Charging can be started at any time, irrespective of
battery charge status, without any negative effect on
battery life. There is no memory effect (as with NiCd or
NiMH batteries).
- For best results, batteries should be stored fully
charged in a cool dry place. Avoid storing the battery
in places subject to high ambient temperatures (e.g. at
a window) as this has an adverse effect on battery life
and increases the rate of self-discharge.
- If the battery no longer reaches full charge, it may
have lost capacity due to aging or overstressing. It
is possible to continue working with a battery in this
condition but it should be replaced in good time.
8.3 Maintenance
WARNING
Repairs to the electrical section of the appliance may
be carried out only by trained electrical specialists.
Check all external parts of the appliance for damage
at regular intervals and check that all controls operate
faultlessly. Do not operate the appliance if parts are
damaged or when the controls do not function faultlessly.
If necessary, the appliance should be repaired by Hilti
Service.
8.4 Checking the tool after care and maintenance
After carrying out care and maintenance, check that mov-
ing parts function faultlessly, that no parts are sticking,
broken or damaged and that the tool operates faultlessly.
9 Troubleshooting
Fault Possible cause Remedy
The tool doesn’t work. The battery is discharged or fitted
incorrectly.
The battery must engage with an au-
dible click or, respectively, needs to
be charged.
Electrical fault. Remove the battery from the power
tool and contact Hilti Service.
The dispensing mode selector switch
is set to “0”.
Select the desired dispensing mode.
The tool doesn’t work and all 4
LEDs blink.
The overload cut-out is activated; The
mortar in the mixing nozzle has hard-
ened.
Change the mixing nozzle.
The overload cut-out is activated; The
dispensing pressure required is too
high for the tool.
Raise the temperature of the foil pack
(observe the instructions for use of
the foil pack). Select and use a suit-
able tool for the application.
en
9
Printed: 07.07.2013 | Doc-Nr: PUB / 5142533 / 000 / 00

Fault Possible cause Remedy
The tool doesn’t work and all 4
LEDs blink.
The foil pack is empty. Change the empty foil pack.
The power tool doesn’t work
and 1 LED blinks.
The battery is discharged. Change the battery and recharge the
discharged battery.
The battery is too hot or too cold. Bring the battery to room tempera-
ture.
The battery runs down more
quickly than usual.
Battery condition is not optimal. Have the battery condition checked
by Hilti or replace the battery.
The battery doesn’t engage with
an audible click.
The retaining lugs on the battery are
dirty.
Clean the retaining lugs and check
that the battery engages securely.
Contact Hilti Service if the problem
persists.
The tool or battery get very hot. Electrical fault. Switch the tool off immediately, re-
move the battery and contact Hilti
Service.
The power tool has been overloaded
(application limits exceeded).
Use the right power tool for the job
(don’t use a low-powered tool for
heavy work).
The foil pack cannot be tilted
and pushed down into the tool.
The foil pack is not pushed fully into
the holder.
Push the foil pack into the holder as
far as it will go.
The piston rods are not pulled back
fully.
Press the release button and pull the
piston rods back as far as they will
go.
The foil pack holder doesn’t en-
gage with an audible click.
The retaining catches are dirty /
clogged.
Clean the retaining catches and en-
gage the foil pack holder fully.
The retaining lugs are defective. Fit another foil pack holder.
Contact Hilti Service if the problem
persists.
10 Disposal
CAUTION
Improper disposal of the equipment may have serious consequences: The burning of plastic components generates
toxic fumes which may present a health hazard. Batteries may explode if damaged or exposed to very high
temperatures, causing poisoning, burns, acid burns or environmental pollution. Careless disposal may permit
unauthorized and improper use of the equipment. This may result in serious personal injury, injury to third parties and
pollution of the environment.
CAUTION
Dispose of defective batteries without delay. Keep them out of reach of children. Do not attempt to open or dismantle
batteries and do not dispose of them by incineration.
CAUTION
Dispose of the batteries in accordance with national regulations or return them to Hilti.
Most of the materials from which Hilti tools or appliances are manufactured can be recycled. The materials must
be correctly separated before they can be recycled. In many countries, Hilti has already made arrangements for
taking back old tools and appliances for recycling. Ask Hilti customer service or your Hilti representative for further
information.
en
10
Printed: 07.07.2013 | Doc-Nr: PUB / 5142533 / 000 / 00

11 Manufacturer’s warranty
Hilti warrants that the tool supplied is free of defects in
materialandworkmanship.Thiswarrantyisvalidsolong
as the tool is operated and handled correctly, cleaned
and serviced properly and in accordance with the Hilti
Operating Instructions, and the technical system is main-
tained. This means that only original Hilti consumables,
components and spare parts may be used in the tool.
This warranty provides the free-of-charge repair or re-
placement of defective parts only over the entire lifespan
of the tool. Parts requiring repair or replacement as a
result of normal wear and tear are not covered by this
warranty.
Additional claims are excluded, unless stringent na-
tional rules prohibit such exclusion. In particular, Hilti
is not obligated for direct, indirect, incidental or con-
sequential damages, losses or expenses in connec-
tion with, or by reason of, the use of, or inability to
use the tool for any purpose. Implied warranties of
merchantability or fitness for a particular purpose are
specifically excluded.
For repair or replacement, send the tool or related parts
immediately upon discovery of the defect to the address
of the local Hilti marketing organization provided.
This constitutes Hilti’s entire obligation with regard to
warranty and supersedes all prior or contemporaneous
comments and oral or written agreements concerning
warranties.
en
11
Printed: 07.07.2013 | Doc-Nr: PUB / 5142533 / 000 / 00

*2017693*
2017693
Hilti Corporation
LI-9494 Schaan
Tel.: +423/234 21 11
Fax: +423/234 29 65
www.hilti.com
Hilti = registered trademark of Hilti Corp., Schaan
W 4065 | 0613 | 00-Pos. 3 | 1
Printed in Liechtenstein © 2013
Right of technical and programme changes reserved S. E. & O. 2017693 / A2
Printed: 07.07.2013 | Doc-Nr: PUB / 5142533 / 000 / 00
Other manuals for HDE 500-A18
2
Table of contents
Other Hilti Tools manuals

Hilti
Hilti dx 2 User manual

Hilti
Hilti NURON SC 6WP-22 User manual

Hilti
Hilti DCG 500-S User manual

Hilti
Hilti NPU 100 IP-A22 User manual

Hilti
Hilti TE DRS 4/6 User manual

Hilti
Hilti NPR 019 IE-A22 User manual

Hilti
Hilti HIT-CT 1 User manual

Hilti
Hilti DX 5 GR User manual

Hilti
Hilti te6-a User manual

Hilti
Hilti NPR 32XL-22 User manual

Hilti
Hilti DD VP-U User manual

Hilti
Hilti GX 2 User manual

Hilti
Hilti NURON SJD 6-22 User manual

Hilti
Hilti UD16 User manual

Hilti
Hilti NPR 019 IE-A22 User manual

Hilti
Hilti TE DRS-B User manual

Hilti
Hilti TE 60-AVR User manual

Hilti
Hilti DCH 150-SL User manual

Hilti
Hilti NURON PC 2-22 User manual

Hilti
Hilti NPU 100 IP-A22 User manual