Hioki BT5525 Instructions for use

Revision 02
1
BT5525 Sample Application Manual
Overview
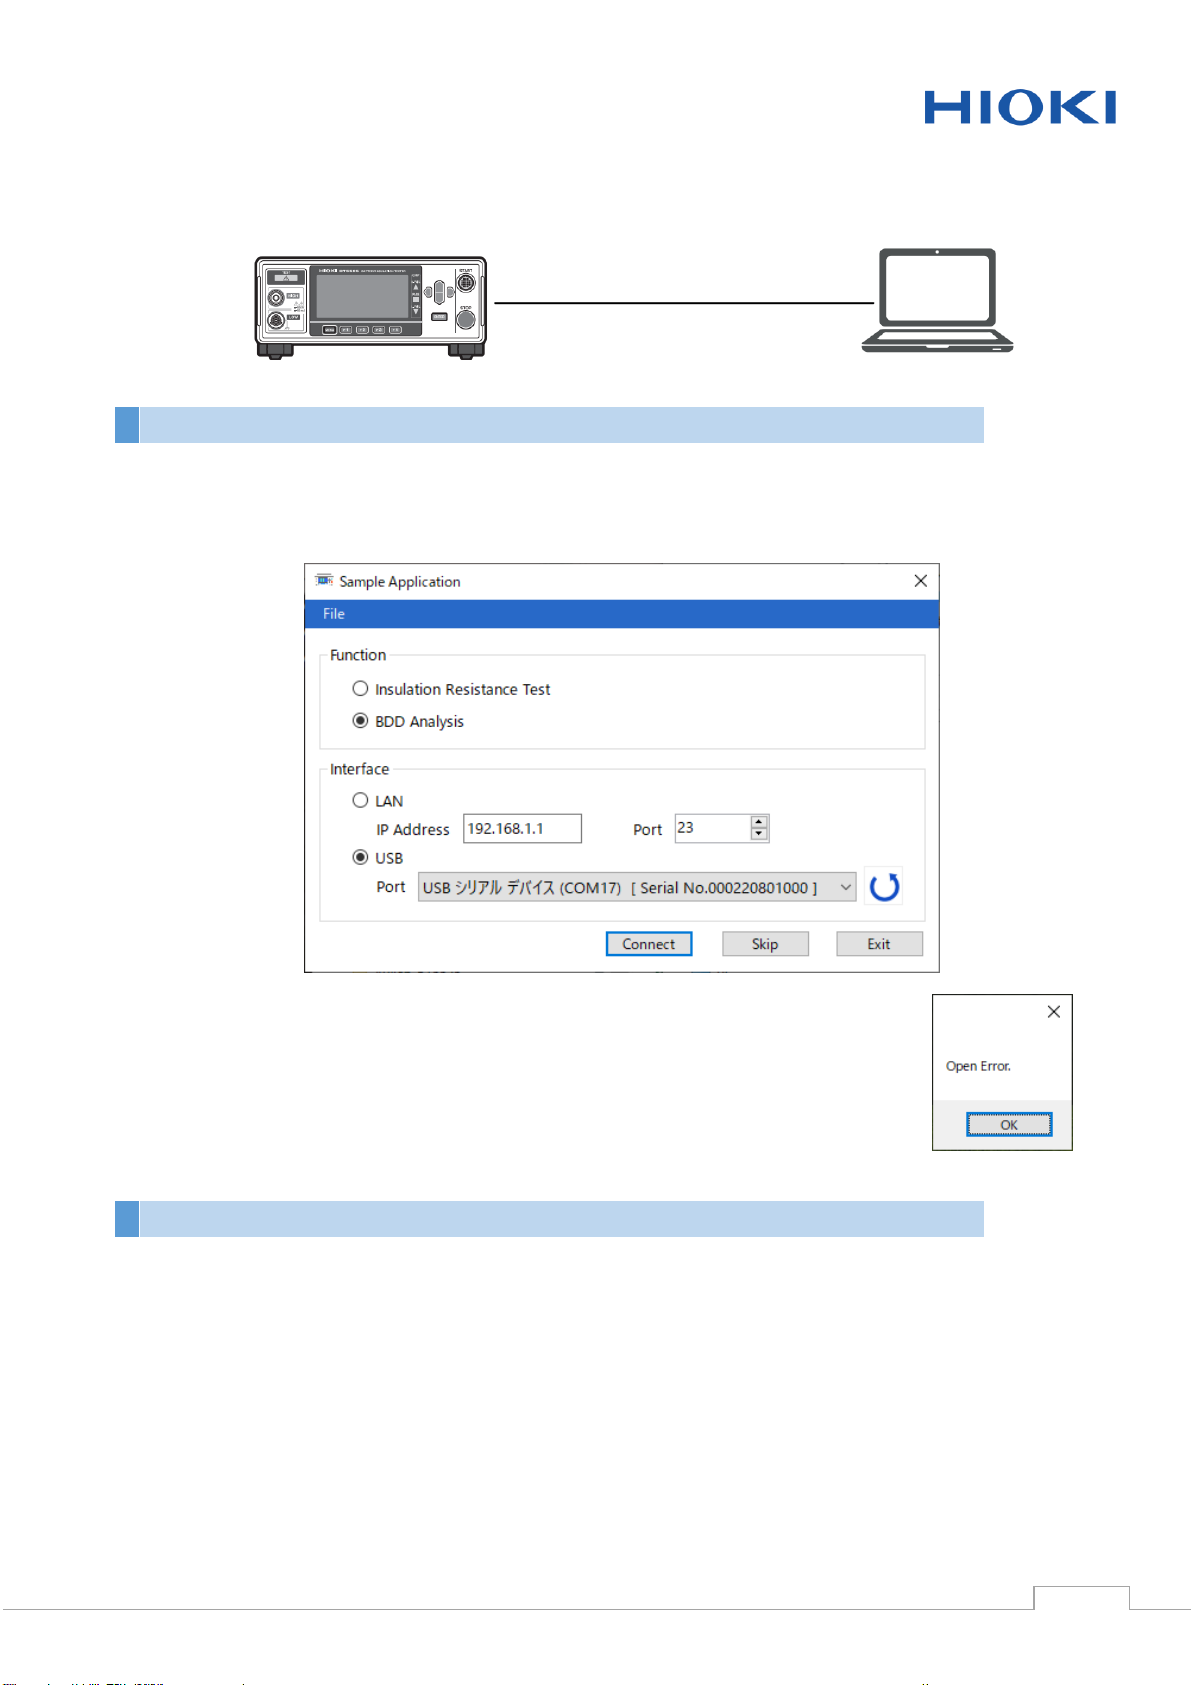
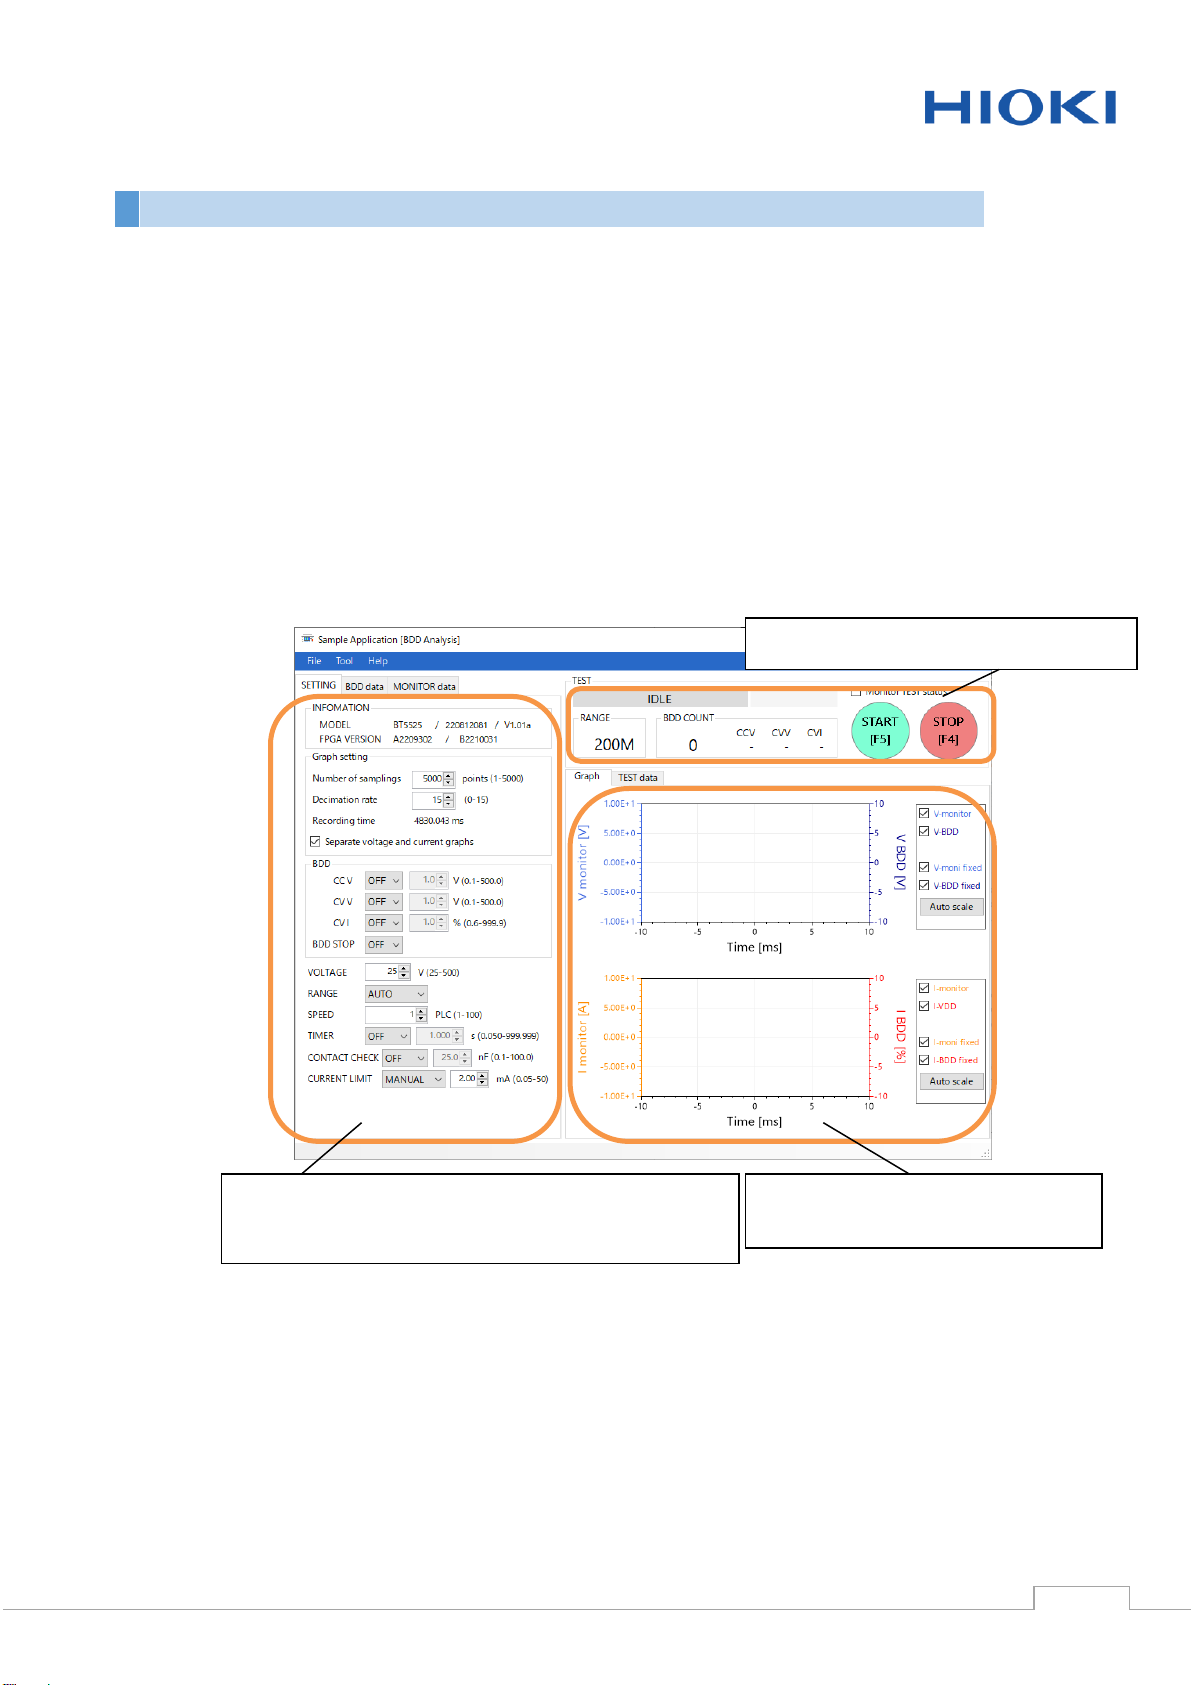
BT5525 Sample Application (this application) can perform the following operations on the BT5525:
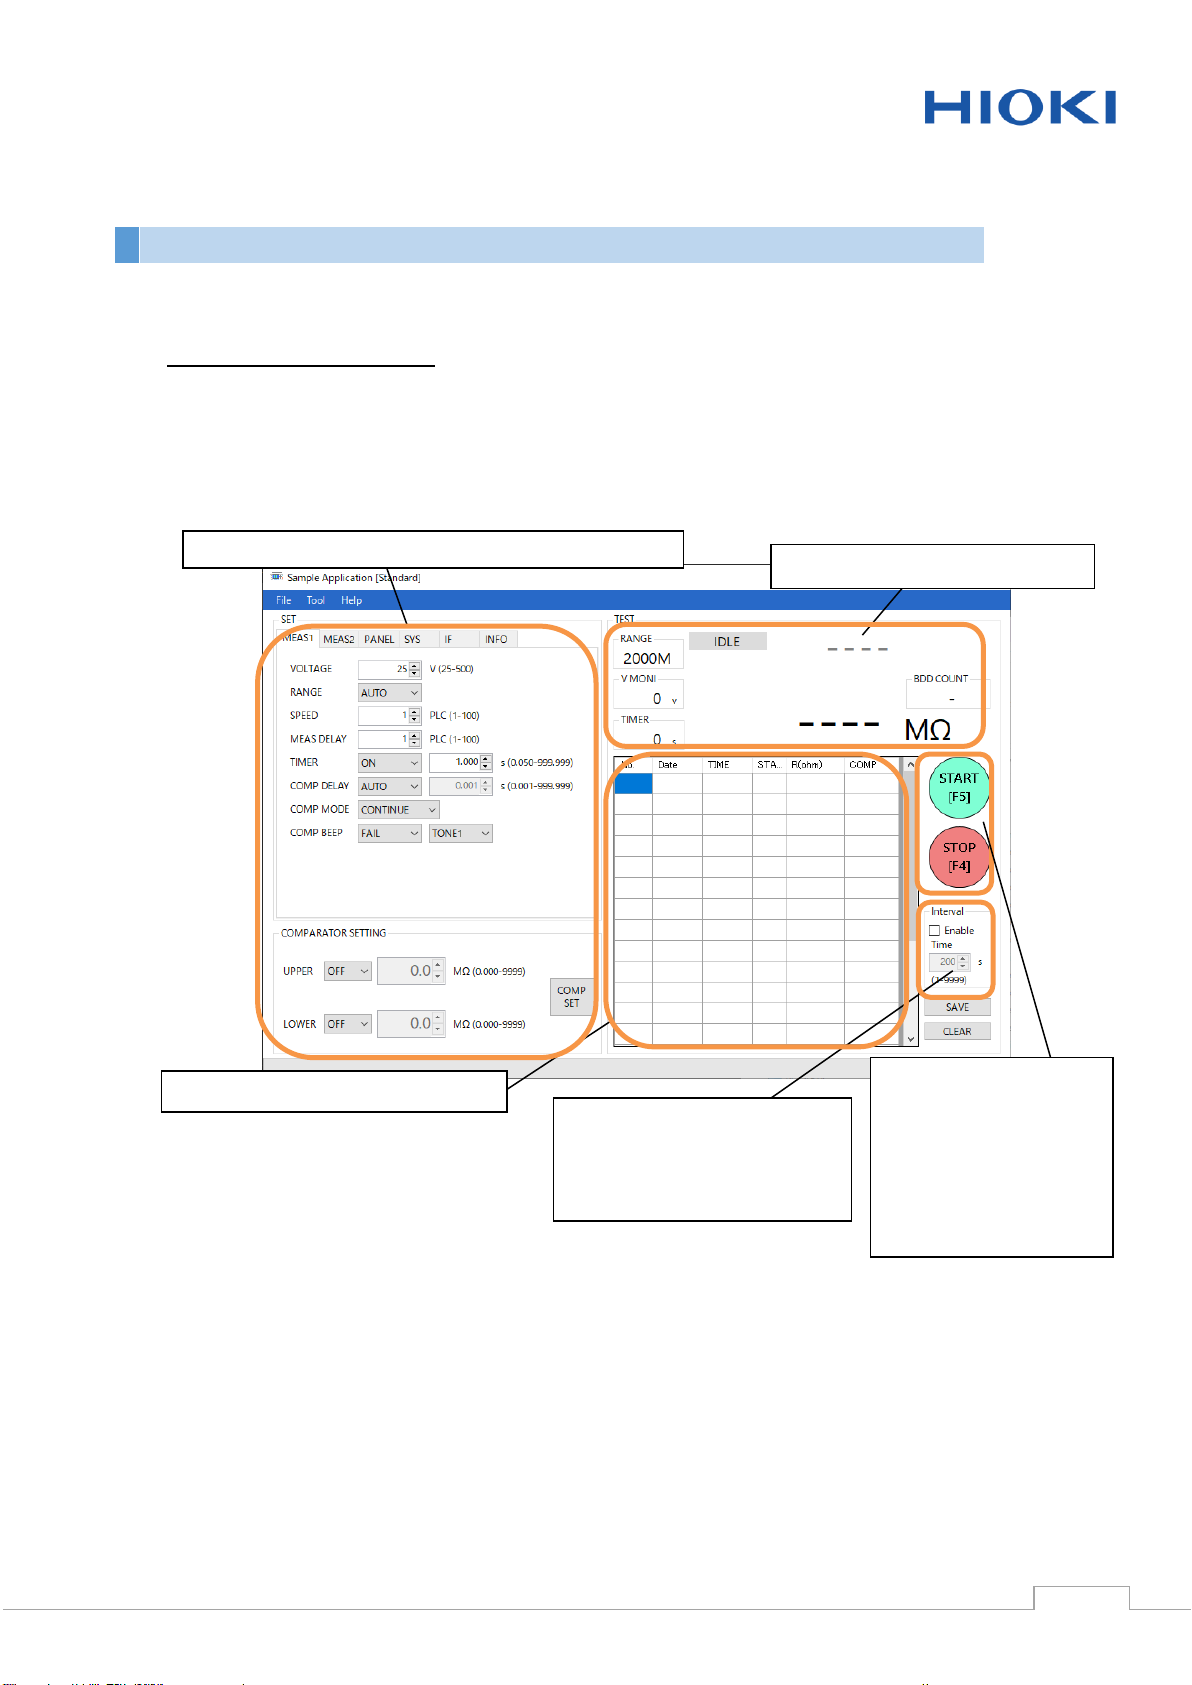
Setting for BT5525
Display of measured values (measurement or update of measured values at specified time
intervals)
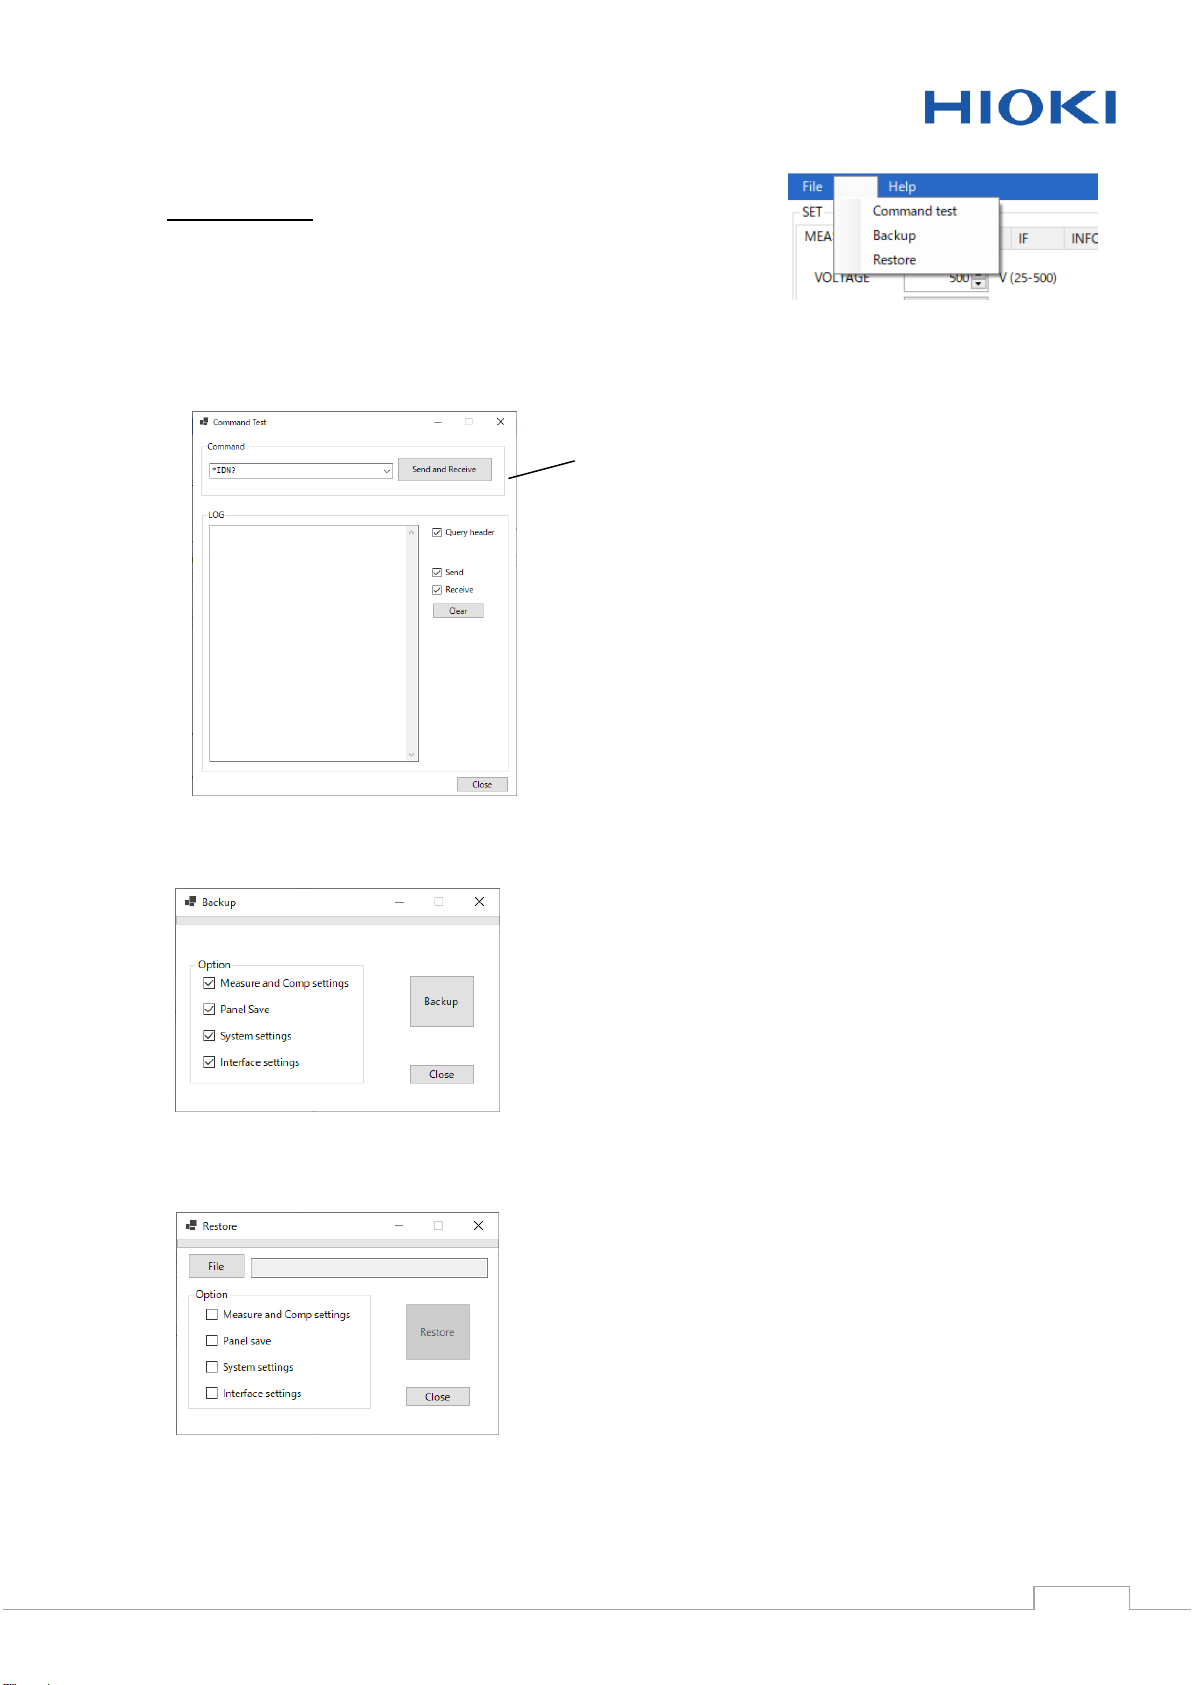
Backup and Restoration of the instrument's settings
Sending and receiving communication commands
Displaying and saving monitor data
Displaying and saving BDD data
System requirements
CPU: 1 GHz or greater
Memory: 512 MB or more
OS: Windows10, Windows11
Microsoft .NET Framework 6.0
Interface: USB 2.0 (virtual COM port), LAN
Monitor resolution: 1024 x 768 dots or greater
Hard disk: 5 MB free space or more (However, if .NET Framework 6.0 is not installed,
approximately 2.5 GB is required separately)
Installing the application
1. Double-click “ setup_BT5525 Sample Application.exe”.
2. The installer screen will appear.
3. Click Next every time when it appears.
4. Installation will begin. When the installation is complete, a shortcut icon
will be created on the desktop.
Uninstalling the application
Windows10, 11
The application can be uninstalled by opening the Windows Setting, choosing Apps.
Connecting the instrument to your computer
Connecting the instrument via USB
Works with standard Windows drivers.

Revision 02
2
Connecting the instrument via LAN
You’ll need a LAN cross cable.
Launching and connecting to the application
1. Double-click the application’s shortcut on the desktop. The measurement screen will be
displayed.
2. Select the Function and Interface then click [Connect].
3. If you get an error message like the one on the right,
please make sure that you are using the correct IP address and port.
Also, the port may be used by other applications.
Application interface
This application will force the following settings upon connection. When the application is closed, the
following settings will be restored to the original settings at the time of connection.
※If it does not exit successfully or cannot communicate on exit, the settings remain as follows.
・Response of measured value and status. :MEASure:VALid 255
・Command monitor OFF.
・Automatic data output setting OFF.

Revision 02
3
Selecting the delimiter character for text (CSV) files
This application has the ability to save data to a text (CSV) file
You can set the separator used for data delimitation from the menu.
Please set the separator according to your environment.
・Comma (",") separator
・Semicolon (";") separator

Revision 02
4
Insulation Resistance Test
Operate this instrument from the application to perform an insulation resistance test.
Overview of Main Screen
When this application is launched, it synchronizes with the settings of the instrument.
When you change the settings on the screen, the settings on the instrument will
automatically change as well. Please note that if you change the settings from the
instrument, the settings on the screen will not be reflected.
Displays measurement results.
You can set up and check the instrument.
Displays the measured value.
Press the button to
perform the TEST,
which can also be
operated with the
F5/F4 keys.
Interval Measurement
Records test results at
each set time interval.

Revision 02
5
MEAS1、MEAS2
All test settings that can be configured on the instrument can be changed.
COMPARATOR SETTING
Reflects the setting in this instrument.
PANEL
Saves the settings to the specified panel
number. If panel data already exists, it is
overwritten.
Loads the settings for the specified panel
number.
Renames the specified panel number. (Max.
10 single-byte alphanumeric characters)
Deletes the setting of the specified panel
number.
Specify the panel number.

Revision 02
6
SYS, IF
[RESET] : The settings of the instrument other than the communication settings and panel
are initialized.
LAN: To change the LAN settings, press [Reflect]. The instrument's LAN settings will not be
changed until [Reflect] is pressed; if a LAN connection has been made, it will be
reconnected.
Some functions cannot be set from the application.
INFO
Information on this instrument can be checked.
Obtains error information from the instrument.
For details on various errors, refer to the
":SYSTem:ERRor?" command page in the instrument's
instruction manual.

Revision 02
7
Various Tools
The following windows open from [Tool] on the top toolbar.
When the window is closed, it returns to the original screen.
The instrument will be synchronized with the instrument at that time.
Command test
Send and receive arbitrary commands.
Backup
Backs up the instrument's settings and saves a
dedicated settings file.
Check the items to be backed up and click [Backup]
to open the folder selection screen. When "Complete
Backup" is displayed, the backup is complete. If
multiple PANELs are set up, it may take some time.
Restore
Restore the instrument's settings from the dedicated
settings file created by the above backup.
Press [File] and select the backup file from the
folder.
Press [Restore] to execute the restoration, which is
complete when "Complete Restore" is displayed. If
multiple PANELs are set up, it may take some time.

Revision 02
8
BDD Analysis
BDD Analysis
Insulation resistance test is performed, and when the test stops, monitor voltage and current values
(reference values) from the start of the test are acquired, displayed on the data grid, and waveforms
are displayed on the graph.
Waveform data can be saved as CSV. (Note that this is different from the actual detection waveform
of the BDD function.)
Overview of Main Screen
When this application is launched, it synchronizes with the settings of this instrument.
When the screen settings are changed, the settings of this unit are automatically changed as
well.
You can set up and check the instrument.
Displays monitor data and BDD data acquired
after the test.
Press the button to perform the test.
Display a graph of monitored data
and a list of test results.

Revision 02
9
SETTING
Graph setting
Sets the number of waveforms sampled.
Sets the degree to which sampled waveforms
are thinned out. Larger values result in lower
resolution, but allow acquisition of waveforms of
longer duration.
The recording time with the above settings is
shown.
If checked, the voltage and current graphs are
displayed separately.
BDD setting
Enable BDD setting, set threshold
CCV: Detects V in CC (charging) state
CVV: Detects V in CV (steady) state
CVI: Detects I in CV (steady) state
When turned ON, the test is stopped when the
BDD count reaches 1 or more.
TEST
When checked, the test status of this instrument is
monitored; check this box if you want to control the
test with EXT I/O. The operation of this instrument
will not be possible because it will always be in the
remote state (RMT). Uncheck the check box if you
want to operate the instrument.
Displays the test status of the instrument.
IDLE: Waiting
TEST: Testing
DISCHARGE: Discharging
INTERLOCK: Waiting at interlock
Displays measurement results.
Displays the number of BDD
counts and their breakdown.

Revision 02
10
BDD data / MONITOR data
After the test STOP, it is read from the
instrument and the display is updated.
It can be saved as CSV by [SAVE].
Vmoni and Imoni are reference values.
BDD data displays the result when BDD
COUNT is 1 or more, and the unit of BDD value
is [V] when Type is CCV or CVV, and [%] when
CVI.
Note that the % of CVI is a percentage of the
BT5525's own reference value and cannot be
converted to a current value.
Graph / TEST data
Graph
Displays monitor value
waveforms of voltage and
current.
Displays the detection time and
magnitude of BDD as dots with
bars.
Move, zoom in/out, and copy
images on the graph by mouse
operation.
Check boxes allow you to switch
between showing/hiding the
waveforms and fixing the axes.
TEST data
Lists the test results.
For details, refer to the
":MEASure?" and
":CONTactcheck:CAPacitance?"
command pages of the instrument's
user manual.

Revision 02
11
Option
The [Tool] on the top toolbar opens the [Option] window.
Auto save function
At the end of the test, the checked items
are automatically saved in CSV format. If
none of the items are checked, the file will
not be automatically saved.
Enter the location to save the CSV file.
Click [OK] to save the settings and apply
them from the next test.
The file name to be saved automatically changes depending on the data checked.
File name :yyyy-MM-dd_HH-mm-ss_auto_xxxx.csv (xxxx is the type of storage and number
of data)
Date and time the file was saved, information.
Measurement Setting
Saves when SETTING is checked.
TEST result
Saves when TEST data is checked.
BDD data, MONITOR data
If either BDD data or MONITOR data is
checked, it will be saved.
If both BDD data and MONITOR data
are checked, both data are combined
and sorted by Time and saved.

Revision 02
12
Application acceleration
Checking the option speeds up the
operation of this application. If you
have a lot of data you want to
auto-save and the test interval is
short, etc., and data cannot be read out
in time, please try speeding up the
process.
Press [OK] to save and apply the
settings.
Disclaimer
This application is free software. HIOKI ELECTRIC CO., LTD. assumes no responsibility for any
damage caused by the use of this application. Also, HIOKI Electric Corporation assumes no
responsibility for any bugs or other inconveniences that may occur with the software. Please note
that HIOKI is unable to respond to questions about this software. Thank you for your understanding.
Other manuals for BT5525
2
Table of contents
Other Hioki Test Equipment manuals