Introduction
Thank you for purchasing the HIOKI “3454-11 DIGITAL MΩHiTESTER”. To
obtain maximum performance from the instrument, please read this manual
first, and keep it handy for future reference.
Initial Inspection
When you receive the instrument, inspect it carefully to ensure that no damage
occurred during shipping. In particular, check the accessories, panel switches,
and connectors. If damage is evident, or if it fails to operate according to the
specifications, contact your dealer or Hioki representative.
Preliminary Checks
• Before using the instrument the first time, verify that it operates normally to
ensure that the no damage occurred during storage or shipping. If you find
any damage, contact your dealer or Hioki representative.
• Before using the instrument, make sure that the insulation on the test leads
and connection cords is undamaged and confirm that the white or red portion
(insulation layer) inside the cable is not exposed. If a color inside the cable is
exposed, do not use the cable. Using the product in such conditions could
cause an electric shock, so contact your dealer or Hioki representative for
replacements (Model L9787).
Maintenance and Service
• To clean the instrument, wipe it gently with a soft cloth moistened with water or
mild detergent. Never use solvents such as benzene, alcohol, acetone, ether,
ketones, thinners or gasoline, as they can deform and discolor the case.
• If the instrument seems to be malfunctioning, confirm that the batteries are
not discharged, and that the test leads and fuse are not open circuited before
contacting your dealer or Hioki representative.
• When an indication Err.9 appears, send the instrument for repair.
General Specifications
rdg. :reading value (The value currently being measured and indicated on the
measuring instrument)
dgt. :resolution (The smallest displayable unit, i.e., the input value that causes
the digital display to show a "1".)
Insulation Resistance Measurement
* Resistances of 1000 MΩor higher are indicated in increments of 10 MΩi.e.,
1010 MΩ, 1020 MΩ, etc.
Operation uncertainty B: ±18% (1st effective measurement range)
Measurement terminal voltage characteristic.
Effect of radiated radio-frequency electromagnetic field: 3 V/m, within +10%rdg.
Resistance Measurement
Short circuit current: 200 mA or more, open circuit voltage: 5 VDC±1 V
Operation uncertainty B: ±30% (0.2 to 400 Ω)
AC Voltage Measurement
Input resistance: 100 kΩor more, Frequency range: 50 to 60 Hz
Measurement Categories
This instrument complies with CAT III safety requirements. To ensure safe
operation of measurement instruments, IEC 61010 establishes safety stan-
dards for various electrical environments, categorized as CAT
II
to CAT IV, and
called measurement categories.
CAT II: Primary electrical circuits in
equipment connected to an AC electri-
cal outlet by a power cord (portable
tools, household appliances, etc.)
CAT II covers directly measuring electri-
cal outlet receptacles.
CAT III: Primary electrical circuits of
heavy equipment (fixed installations)
connected directly to the distribution
panel, and feeders from the distribution
panel to outlets.
CAT IV:The circuit from the service drop to the service entrance, and to the
power meter and primary overcurrent protection device (distribution panel).
Using a measurement instrument in an environment designated with a higher-
numbered category than that for which the instrument is rated could result in a
severe accident, and must be carefully avoided.
Use of a measurement instrument that is not CAT-rated in CAT II to CAT IV
measurement applications could result in a severe accident, and must be care-
fully avoided.
Safety Symbol
This manual contains information and warnings essential for safe operation of
the instrument and for maintaining it in safe operating condition. Before using it,
be sure to carefully read the following safety precautions.
The following symbols in this manual indicate the relative importance of cau-
tions and warnings.
Indicates that incorrect operation presents an extreme hazard that could
result in serious injury or death to the user.
Indicates that incorrect operation presents a significant hazard that could
result in serious injury or death to the user.
Indicates that incorrect operation presents a possibility of injury to the user or
damage to the instrument
Indicates advisory items related to performance or correct operation of the
instrument.
Follow these precautions to ensure safe operation and to obtain the full bene-
fits of the various functions.
• To avoid battery depletion, turn the function selector OFF after use (the Auto
Power Save feature consumes a small amount of current).
• The safety sleeve is attached to the test lead plug.Remove the sleeve before
connecting to the instrument.
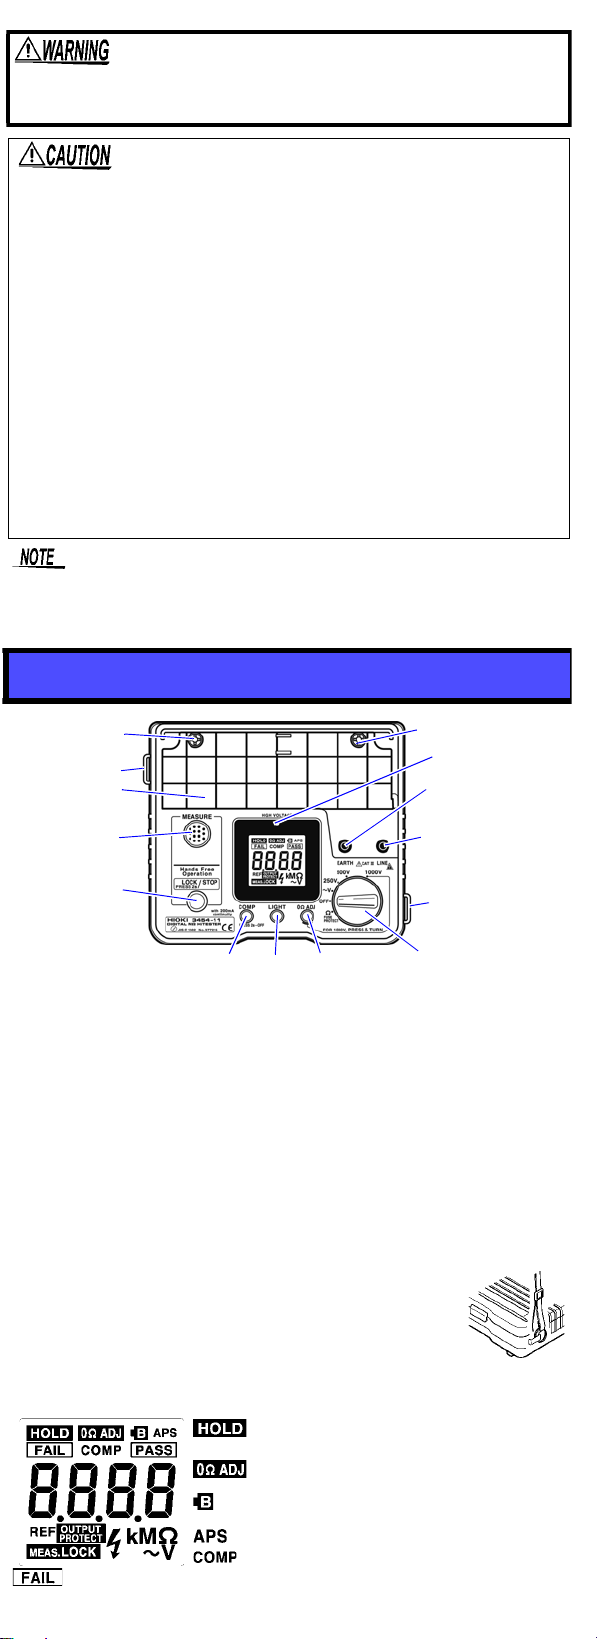
1. Function Selector: Selects among power ON/OFF, the output voltage for
insulation resistance measurement, ACV, or resistance (Ω).
2. MEASURE Key: Used to measure resistance and insulation resistance.
This key remains ON while it is held down.
3. LOCK Key: Used to measure resistance and insulation resistance. This key
switches ON if held down for more than 2 seconds. Press the key again to
turn it OFF.
4. COMP Key: Used for the comparator function
5. LIGHT Key: Turns the display light ON/OFF. The light automatically
switches OFF after 30 seconds.
6. 0ΩADJ Key: Used for the zero-adjust function in resistance measurement
Used when "1000 V" is selected in insulation-resistance measurement
Used to select the buzzer sound in the comparator function
7. High-voltage warning lamp: Begins flashing if the input voltage exceeds AC
70 V (±10 V) and during insulation resistance measurement.
8. EARTH Measurement Terminal: Connect the black test lead to this terminal.
9. LINE Measurement Terminal: Connect the red test lead to
this terminal.
10.Strap Hole: Pass the strap through this hole.
11.Test lead Housing: Houses the test leads. The test leads may be
housed without disconnecting them from the terminals after use.
12.Sleeve stand: Attach the sleeve removed from the tip of the
test lead.
Display Block
: Lights up when the measured value is less than the criterion for the comparator
function during insulation-resistance measurement, or when the measured value
is greater than the criterion during resistance measurement.
Specifications
Guaranteed accuracy
period 1 year at
23°C
±
5°C (73°F
±
9°F) and 90% RH
Display Max. 4000 LCD
Sampling rate twice/second
Response time Insulation resistance (∞0, ∞center value),
resistance: Within 5 s, ACV: Within 2 s
Operating Temperature
&Humidity 0 to 40
°C (32 - 104°F)
, 90%RH or lower
(non-condensating)
Storage Temperature
&Humidity -20 to 50
°C (-4 - 122°F)
, 90%RH or lower
(non-condensating)
Operating Environment Indoors, altitude up to 2000 m (6562-ft.) ASL,
Pollution Degree 2
Effect of temperature
0 to 18
°C
, 28 to 40
°C
(32 to 64
°F
, 82 to
104
°F
)
±2% of reading ±5 dgt,
plus basic allowance
(Resistance Measurement 4 MΩ range: ±5% of reading
plus basic allowance)
Influence quantity
E1 (Position) : 0%
E2 (Supply voltage) : Twice of the intrinsic uncertainty
E3 (Temperature) : ±2%±5d
gt.
(Influencing factor non-applicable for E4to E10)
Degree of protection IP40 (condition which the test lead is connected)
Power source Rated power voltage: 1.5 V DC × 4,
R6P manganese battery × 4 or LR6 alkaline battery × 4
Maximum rated power 3 VA
3454-11
DIGITAL MΩHiTESTER
Instruction Manua
January 2012 Revised edition 13
Printed in Japan
3454A981-13 12-01H
Continuous operating
time Insulation ∞measurement at 250 V and 500 V for
about 10 hours, at 1000 V for about 10 hours (with
manganese battery)
Possible number of
measurements
250 V at 0.25 MΩ300 times (R6P battery), 1600 times
(LR6 battery)
500 V at 0.5 MΩ250 times (R6P battery), 1400 times
(LR6 battery)
1000 V at 1.0 MΩ200 times (R6P battery), 1000 times
(LR6 battery)
Ωat 1.0 Ω1000 times (R6P battery), 1000 times (LR6
battery)
Additional function Automatic power-saving mode, Comparator, High-volt-
age warning, Warning indication of false voltage input,
Data hold, Display lighting, 1000 V output error protec-
tion, Zero adjustment
Dielectric strength 5550 V AC 50/60 Hz for one minute
Between electric circuit and case
Maximum input voltage
Maximum rated voltage
to earth 600 V AC,
Measurement Category III
(Anticipated Transient Overvoltage: 6000 V)
Input error protection
for 10 second
(overvoltage protection)
600 V AC
(ACV function: 800 V AC)
(MΩ-1000 V function: 1200 V AC)
Dimensions
(excluding protrusions) 175W × 148H × 56D mm approx.
6.89"W × 5.83"H × 2.20"D approx.
Mass 530 g, 18.7 oz. approx. (including batteries)
Accessories L9787 Test Lead, Instruction Manual,
R6P manganese battery × 4, Strap
Options
L9787-91 Breaker Pin, 9804-02 Magnetic Adapter,
L9787 Test Lead
Standards applying Safety EN61010
EMC EN61326
EN 61557-1/-2/-4
Rated output voltage (DC) Max. effective reading Center scale reading
250 V / 500 V 500 MΩ10 MΩ
1000 V 4000 MΩ100 MΩ
Rated output voltage Display range Max. reading Resolution
250 V / 500 V / 1000 V 4 MΩrange 4.000 MΩ0.001 MΩ
40 MΩrange 40.00 MΩ0.01 MΩ
400 MΩrange 400.0 MΩ0.1 MΩ
250 V / 500 V 500 MΩrange 500 MΩ1 MΩ
1000 V 4000 MΩrange 4000 MΩ1 MΩ*
Rated output
voltage Name of measurement
range Measurement range Accuracy & Intrinsic
uncertainty A
250 V / 500 V
1st effective
measurement range
0.200 to 50.0 MΩ±3%rdg. ±4dgt.
2nd effective
measurement range
50.1 to 500 MΩ±5%rdg. ±5dgt.
other measurement range
0 to 0.199 MΩ
1000 V
1st effective
measurement range
0.200 to 200.0 MΩ±3%rdg. ±4dgt.
2nd effective
measurement range
200.1 to 4000 MΩ±5%rdg. ±5dgt.
other measurement range
0 to 0.199 MΩ
Rated
output
voltage Open circuit
voltage Lower limit measurement
resistance value to be maintained
rated output voltage Rated
current Short circuit
current
250 V 1 to 1.2
times of
nominal
testvoltage
0.25 MΩ
1 to 1.2 mA 1.2 mA
max.
500 V 0.5 MΩ
1000 V 1 MΩ
Display range Max. reading Resolution Accuracy & Intrinsic
uncertainty A
(After 0 Ω Adjustment)
40 Ωrange 40.00 Ω0.01 Ω
±3%rdg. ±6dgt.
400 Ωrange 400.0 Ω0.1 Ω
4 kΩrange 4.000 kΩ0.001 kΩ
40 kΩrange 40.00 kΩ0.01 kΩ
400 kΩrange 400.0 kΩ0.1 kΩ±5%rdg. ±6dgt.
4 MΩrange 4.000 MΩ0.001 MΩ
Display range Max. reading Resolution Accuracy
(
Guaranteed at 600 V or less)
600 V range 750 V 1 V ±3%rdg. ±6dgt.
Safety
This instrument is designed to comply with IEC 61010 Safety Standards,
and has been thoroughly tested for safety prior to shipment. However,
mishandling during use could result in injury or death, as well as damage
to the instrument. Using the instrument in a way not described in this
manual may negate the provided safety features.
Be certain that you understand the instructions and precautions in the
manual before use. We disclaim any responsibility for accidents or inju-
ries not resulting directly from instrument defects.
In the manual, the symbol indicates particularly important
information that the user should read before using the instrument.
The symbol printed on the instrument indicates that the user
should refer to a corresponding topic in the manual (marked with
the symbol) before using the relevant function.
Indicates that dangerous voltage may be present at this terminal.
Indicates a double-insulated device.
Indicates AC (Alternating Current).
Indicates DC (Direct Current).
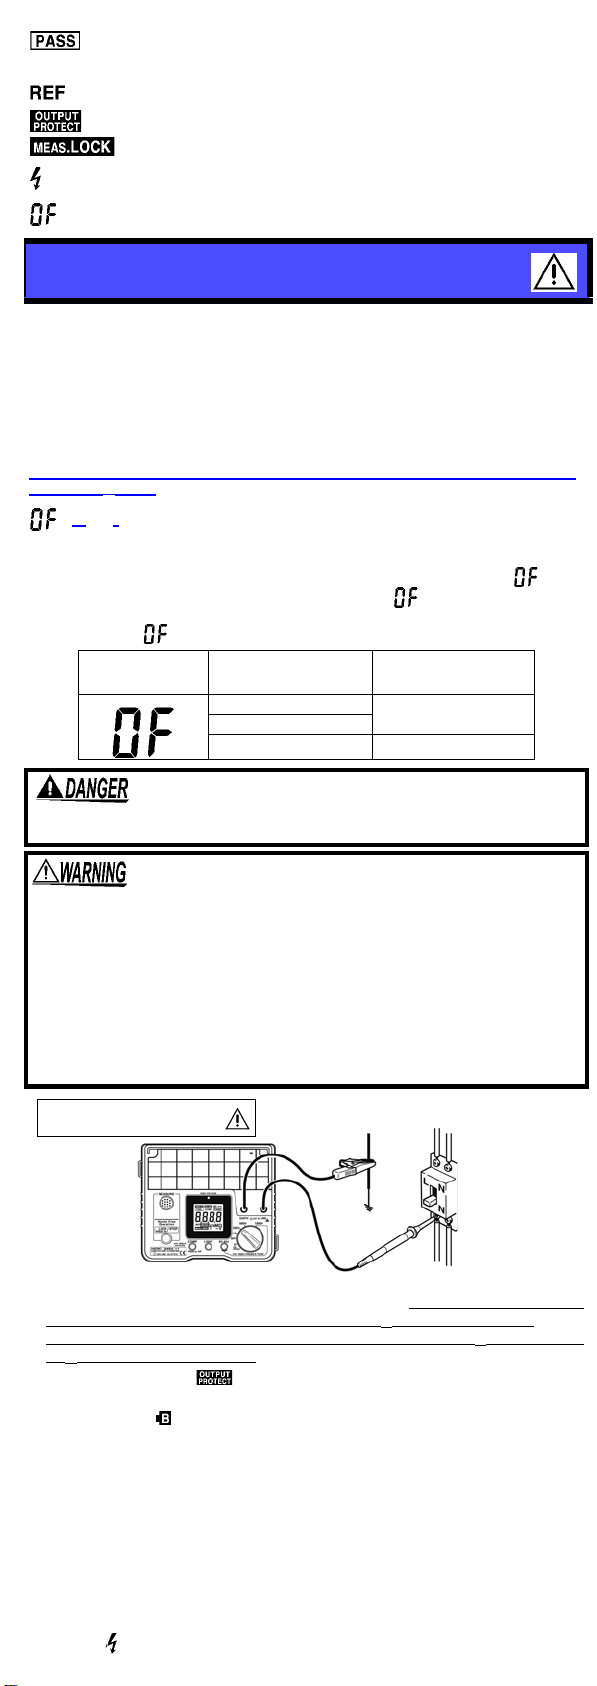
Usage Notes
Observe the following precautions to avoid electric shock.
• Be sure to disconnect the test lead from the object to be measured
and turn the function switch OFF before connecting or disconnecting
the test lead from the MΩHiTESTER.
• Always verify the appropriate setting of the function selector before
connecting the test leads.
Disconnect the test leads from the measurement object before
switching the function selector.
• Do not use the instrument where it may be exposed to corrosive or com-
bustible gases. The instrument may be damaged or cause an explosion.
• Do not allow the instrument to get wet, and do not take measurements
with wet hands. This may cause an electric shock.
• Do not use any other electrical source other than the batteries. The
use of any other sources may result in damage of the instrument or
the object to be measured and also may cause electric shock.
• Before using the instrument, make sure that the insulation on the test
leads and confirm that the white or red portion (insulation layer) inside
the cable is not exposed. If a color inside the cable is exposed, do not
use the cable. Using the product in such conditions could cause an
electric shock, so contact your dealer or Hioki representative for
replacements (Model L9787).
• Do not use the instrument where it may be exposed to oil, chemicals, or
solvents. Contact with these substances may cause cracking in the
instrument, resulting in damage or electric shock.
• If the protective functions of the instrument are damaged, either remove it
from service or mark it clearly so that others do not use it inadvertently.
• This instrument is designed for use indoors. It can be operated at temper-
atures between 0 and 40°C without degrading safety.
• Do not store or use the instrument where it could be exposed to direct sun-
light, high temperature or humidity, or condensation. Under such condi-
tions, the instrument may be damaged and insulation may deteriorate so
that it no longer meets specifications.
• For safety reasons, when taking measurements, only use the L9787 Test
Lead (or optional) provided with the instrument.
• To avoid damage to the instrument, protect it from physical shock when
transporting and handling. Be especially careful to avoid physical shock
from dropping.
• Calibration and repair of this instrument should be performed only under
the supervision of qualified technicians knowledgeable about the dangers
involved.
• Removable sleeves are attached to the metal pins at the ends of the test
leads. To prevent a short circuit accident, be sure to use the test leads with
the sleeves attached when performing measurements in the CAT III mea-
surement category. Remove the sleeves from the test leads when perform-
ing measurements in the CAT I and CAT II measurement categories. For
details on measurement categories, see "Measurement categories" in the
instruction manual.
Names and Functions of Parts
3.
2.
11.
10.
4. 5. 6. 1.
10.
9.
8.
7.
12.
12.
: Lights up when the measured value is held during
the resistance/insulation-resistance measurement.
: Lights up when 0Ωadjustment is made during
resistance measurement.
: Indicates that battery power is low. (during which
time accuracy cannot be guaranteed).
: Lights up when auto power save is enabled.
: Lights up when the comparator function is enabled.