Huawei Aero User manual

Kиївстар
Aero
Мобільний телефон

Copyright © Huawei Technologies Co, Ltd 2011. All rights reserved.
Trademarks and Permissions
, , are trademarks or registered trademarks of Huawei Technologies Co., Ltd.
Other trademarks, products, services or companies mentioned herein are property of their respective owners.
GUARANTEE WAIVER
THE CONTENTS OF THIS GUIDE ARE GIVEN “AS IS”. EXCEPT AS REQUIRED BY THE APPLICABLE LAW NO WARRANTIES
OF ANY KIND INCLUDING BUT NOT LIMITED TO THE IMPLIED WARRANTIES OR MERCHANTABILITY AND FITNESS FOR A
PARTICULAR PURPOSE ARE MADE IN RELATION TO THE ACCURACY, RELIABILITY OR CONTENTS OF THIS GUIDE.
DISCLAIMER
TO THE EXTENT PERMITTED BY THE APPLICABLE LAW, UNDER NO CIRCUMSTANCES SHALL HUAWEI TECHNOLOGIES CO.,
LTD. BE RESPONSIBLE FOR ANY INCIDENTAL OR INDIRECT DAMAGES, LOSS OF INCOME, BUSINESS, PROFITS, DATA, IMAGE
OR POSSIBLE SAVINGS HOWSOEVER CAUSED.
MAXIMUM RESPONSIBILITY (THIS LIMITATION DOES NOT APPLYTO THE RESPONSIBILITY FOR INJURIES TO THE EXTENT IF
THE APPLICABLE LAW PROHIBITS SUCH LIMITATION) OF HUAWEI TECHNOLOGIES CO., LTD., CONNECTEDWITH THE USE OF
THE PRODUCT DESCRIBED HEREIN SHALL BE LIMITED TO THE ACQUISITION COST OFTHIS PRODUCT FOR A CONSUMER.
Attention! SIM-card from the set must be activated: call 466 or check the account with
the help of USSD-combination *111# .
Detailed terms and conditions of the tari plan and special services that help to save
money are available by number 922*922*(calls are free).
Detailed information at the website www.kyivstar.ua . JSC Kyivstar, 03110, Kyiv, 51
Chervonozoryany Ave.

Content
1. Content of packaging ....................................................................................... 6
2. Details about Your cell phone................................................................................. 6
Keys and functions..................................................................................... 7
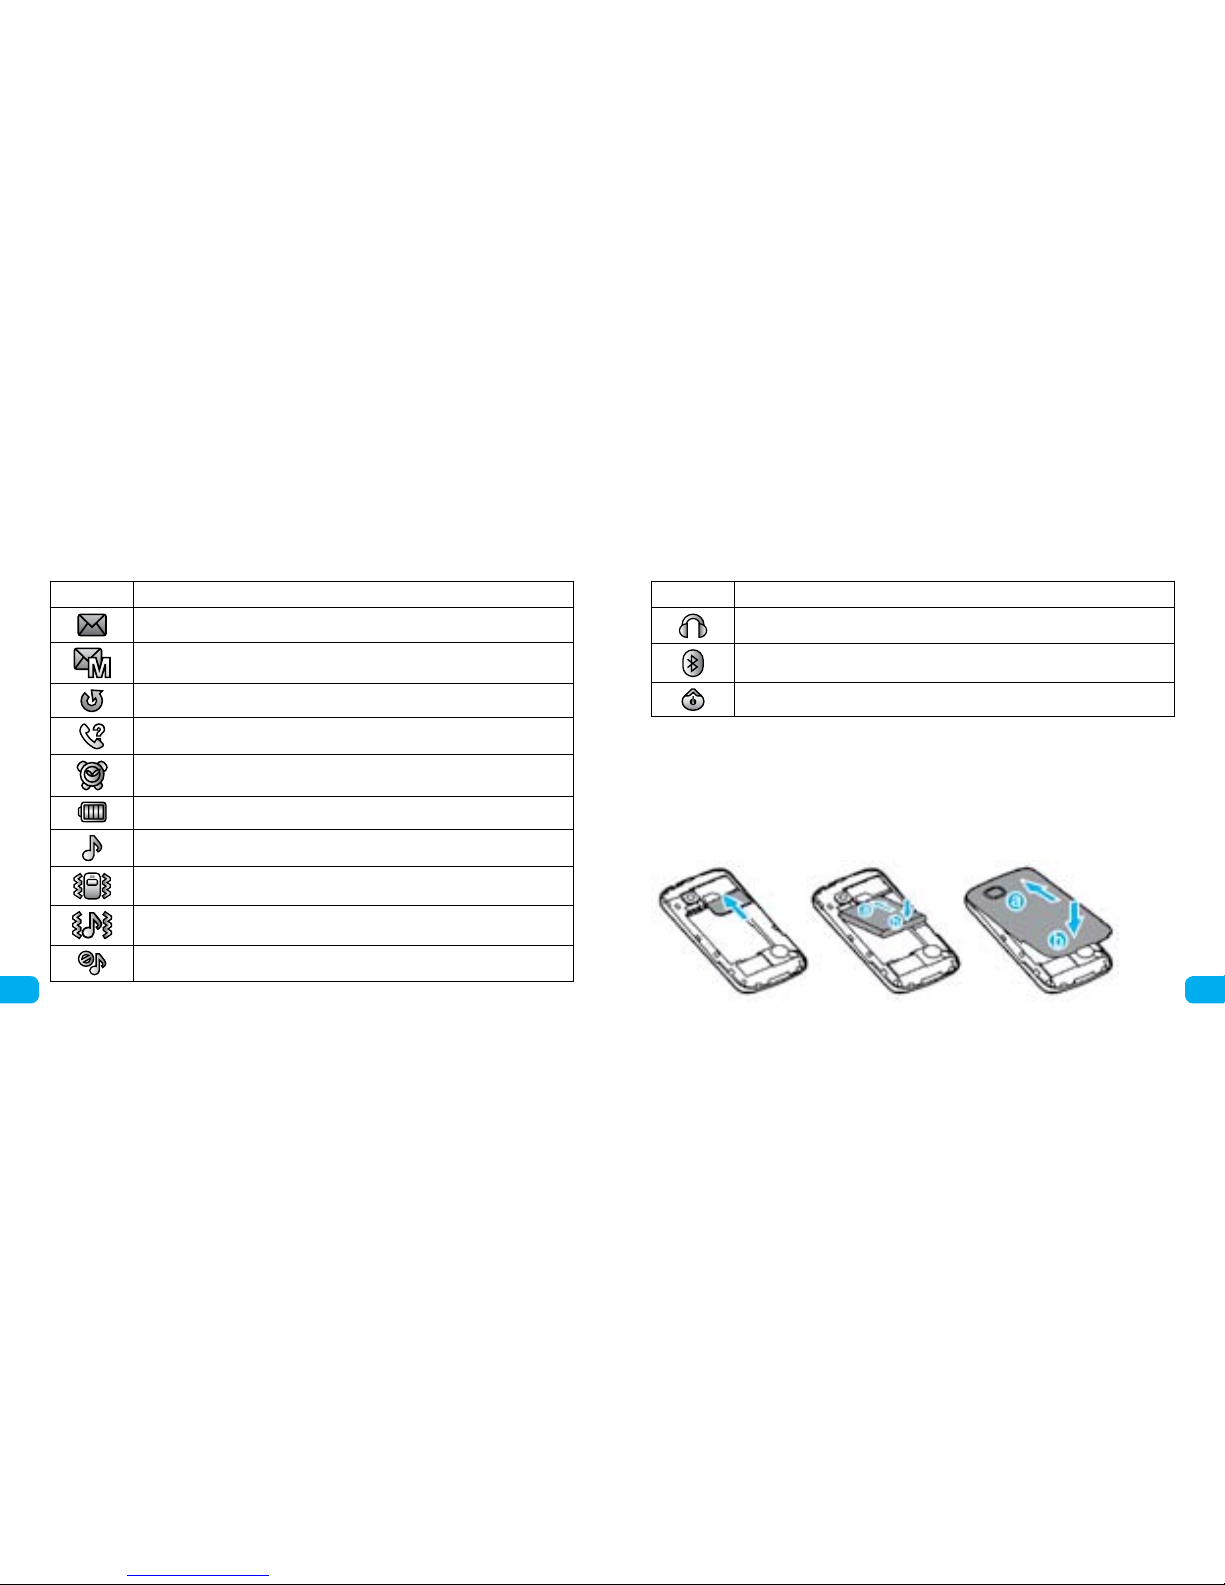
Display icons .......................................................................................... 7
3.Get started................................................................................................. 9
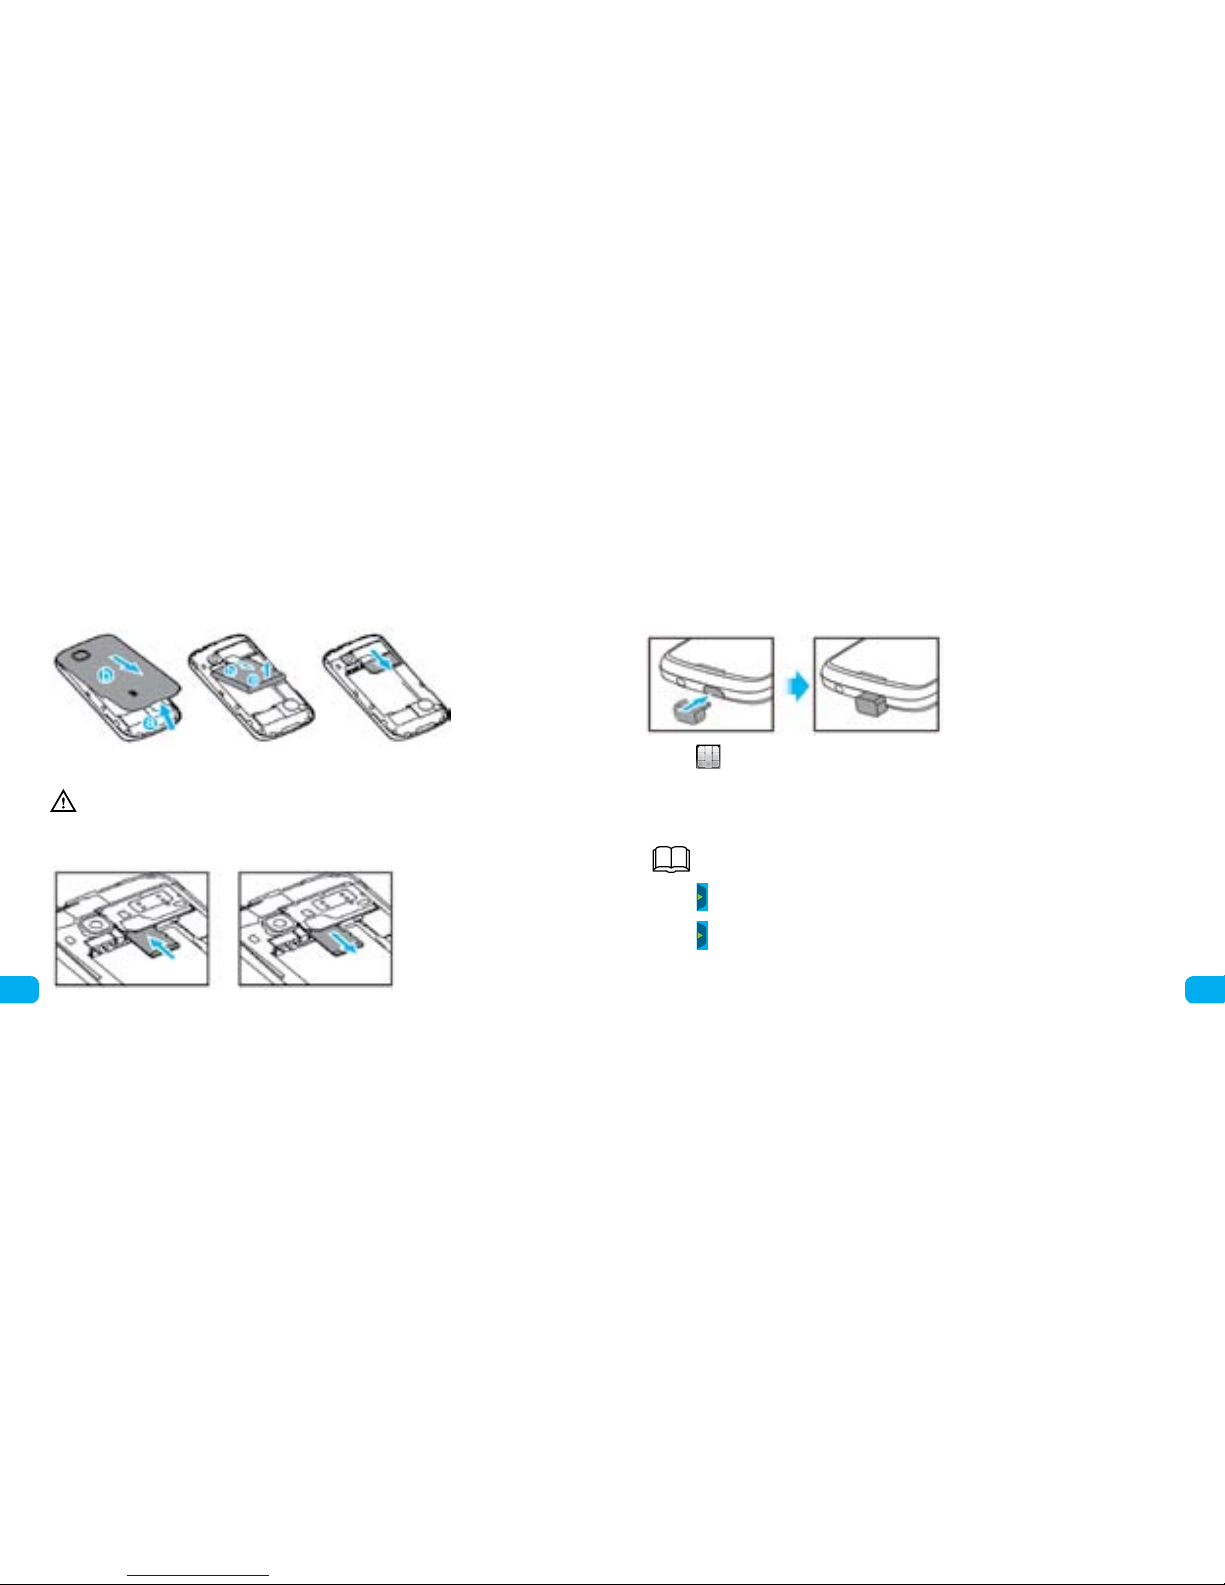
Installing a SIM card and battery......................................................................... 9
Removing a SIM card and battery ........................................................................ 9
Install and remove a microSD card.......................................................................10
Charge the battery....................................................................................10
Screen calibration.....................................................................................11
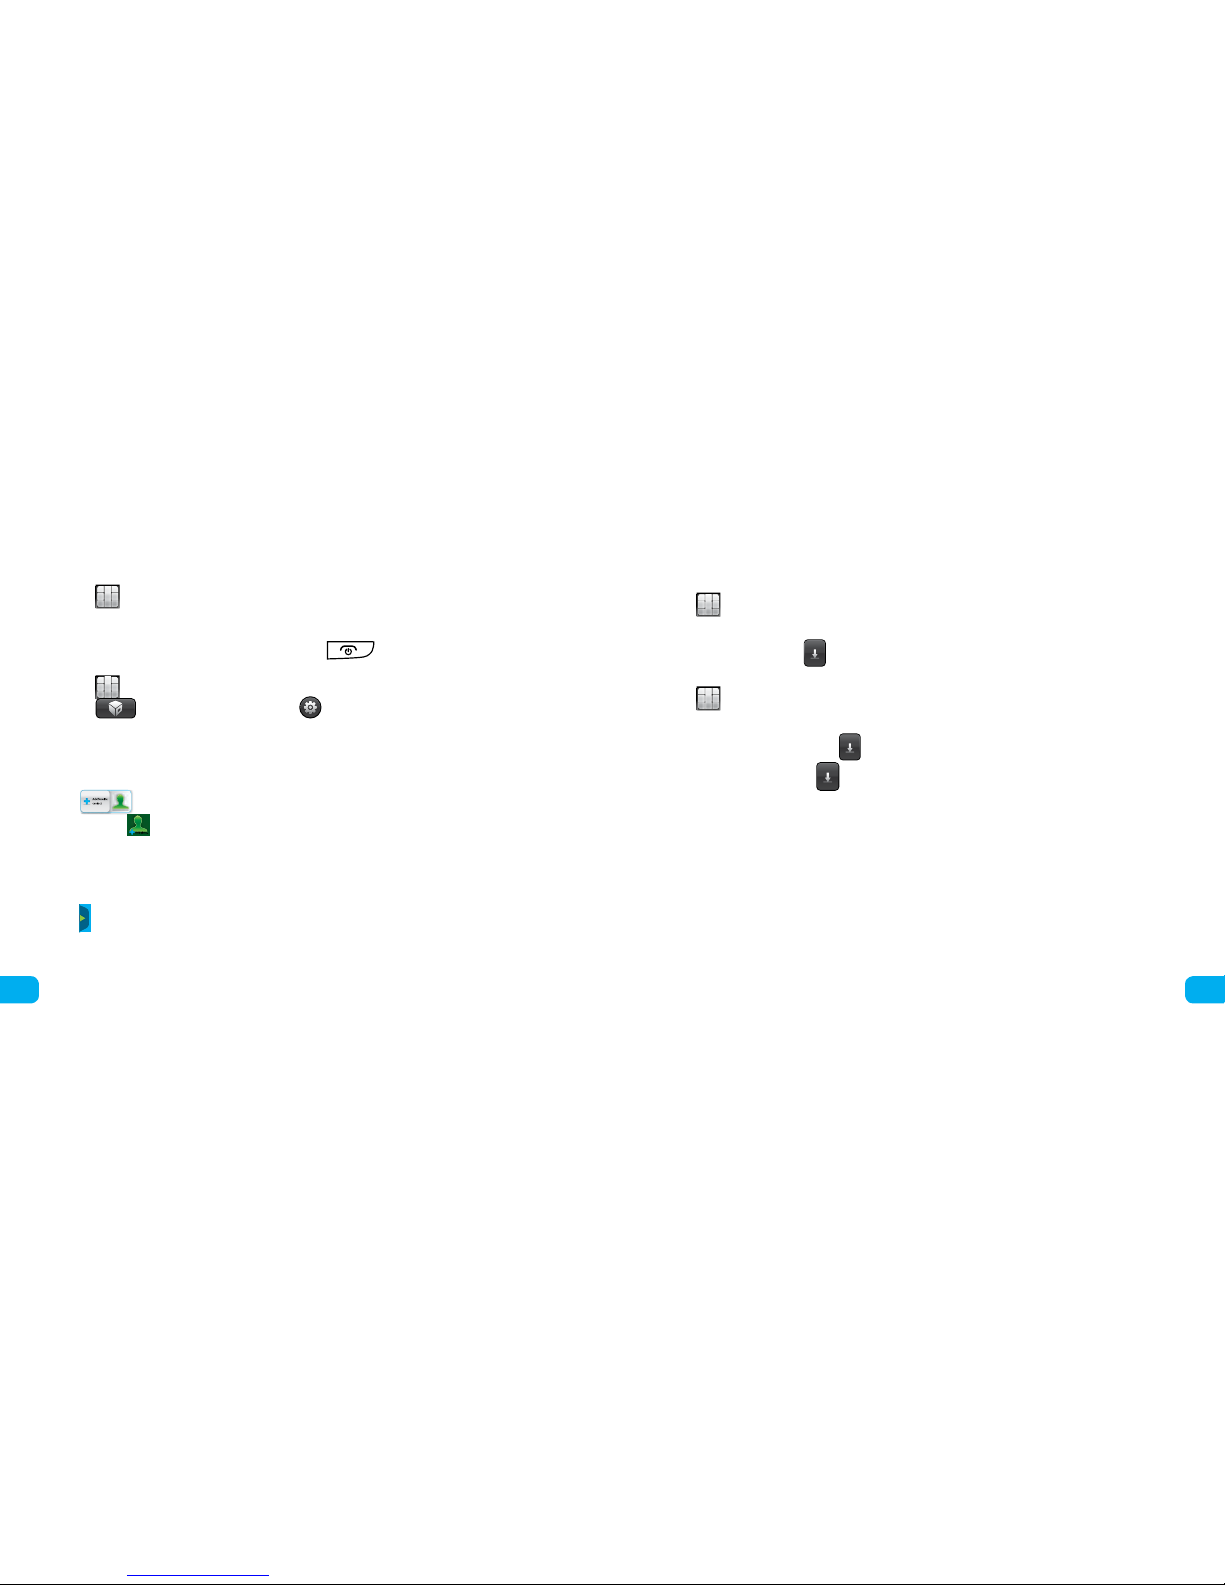
Navigate the menus...................................................................................11
Access to applications ................................................................................. 12
Phone locking........................................................................................ 12
Storage device .......................................................................................13
Keyboard ...........................................................................................14
Making a call.........................................................................................14
Call answer .......................................................................................... 15
5. Entering text..............................................................................................15
Change of the text input mode .........................................................................15
Entering gures ......................................................................................16
Entering symbols .....................................................................................16
6. Messages ................................................................................................16
Write and send a message ............................................................................. 17
Write and send a multimedia message ..................................................................17
7. E-mail ...................................................................................................18
Creation of an e-mail account ..........................................................................18
Activation of the E-mail account ........................................................................18
Writing and sending E-mail messages ...................................................................18
8. Phonebook ...............................................................................................19
Contact creation ......................................................................................19
Contact search .......................................................................................19
Selection of the place of saving .........................................................................19
Copy contacts ........................................................................................19
Group of contacts ....................................................................................20
9. Multimedia...............................................................................................21
Camera .............................................................................................21
Record a video ....................................................................................... 21
Media player......................................................................................... 22
Image view ......................................................................................... 23
10. Browse .................................................................................................23
Editing the data account .............................................................................. 23
Connection to the local WIFI network . . . . . . . . . . . . . . . . . . . . . . . . . . . . . . . . . . . . . . . . . . . . . . . . . . . . . . . . . . . . . . . . . . . . 24
Change of browser settings . . . . . . . . . . . . . . . . . . . . . . . . . . . . . . . . . . . . . . . . . . . . . . . . . . . . . . . . . . . . . . . . . . . . . . . . . . . . 24
Site review ..........................................................................................25
11. Bluetooth ............................................................................................... 25
Connection of Bluetooth headset to your phone ..........................................................25
12. File manager ............................................................................................26
13. Programs ...............................................................................................26
Installing Java applications.............................................................................26
Starting Java applications..............................................................................26
Deleting a Java application.............................................................................27
14. Warnings and safety measures .............................................................................27

7
1. Content of packaging
• Cell phone.
• Charger.
• USB cable.
• Battery.
• Headset.
• Short user guide.
• Safety guide.
2. Details about
Your cell phone
1. Earpiece.
2. Display.
3. Call/answer key.
4. Menu/OK key.
5. End/power key.
6. Volume keys.
7. Headset jack.
8. Connection of charger or data cable (USB).
ІThe above picture shows the design of your
cell phone.
Keys and functions
Press To
• Make a call.
• Answer a call.
• View the list of calls in standby mode.
• Switch on or switch o power of the phone (press and hold for about 3 seconds).
• Finish or divert a call.
• Return to standby mode.
• Get power-saving mode in standby mode.
• Get the main menu in standby mode.
• Conrm selection.
• Increase volume (press ) or decrease volume (press ) during conversation.
Display icons
Icon Description
Network signal strength.
Media player in use.
Local wireless network connected (WLAN).

9
8
Icon Description
New messages.
New multimedia messages.
Call diverting in use.
Missed calls.
Alarm clock is set.
Battery charge level.
Active proles“General”or “My style”in use.
Prole“Meeting”in use.
Prole“Outdoor”in use.
Prole“Silent”in use.
Icon Description
Headset connected.
Bluetooth active.
Stop watch switched on.
3.Get started
Installing a SIM card and battery
Upon installing a SIM card make sure the gold contact area is facing downwards and the beveled edge of the SIM
card gets directly to the slot for SIM card.
Removing a SIM card and battery

11
10
Before you remove a SIM card and battery make sure the phone is switched oе.
Install and remove a microSD card
Before you install and remove a microSD card you should switch o the phone. After the phone is switched on the
display shows if the microSD card is correctly installed..
You can enlarge the memory volume of your phone having installed a microSD card. Installing a microSD card,
make sure golden contacts are on its lower surface..
Charge the battery
1. Connect the smaller USB cable end into the phone and the bigger end – into the charger.
2.Wait till the battery is fully charged.
While the battery is charging, the charge icon
is blinking. When the icon stops blinking the
battery is fully charged.
2. 3.Disconnect the charge from the wall outlet
and USB cable – from the connection socket
Screen calibration
After calibration the phone reacts more precisely to
screen touches.
1. Touch in standby mode and select Settings>Calibration. Several icons appear during calibration.
2. Touch the icons to nish calibration.
Touch the widget icon and hold it until it lightens. Drag the icon to the desired place on the screen. To delete the
widget from the main screen take the following steps
To bring widgets to the main screen make the following steps:
During calibration touch the icons in the usual manner in order to provide precise phone response to
your touch.:
1. Touch in standby mode in order to open the widget menu (mini-applications).
2. Touch and hold the widget icon on the main screen till it lightens; drag it to the widget menu.
3. Touch , to close the widget menu.
Navigate the menus
To navigate with the help of the main menu:

13
12
1. Touch in standby mode..
2. “Scroll”with your nger to the left or to the right, touch the selected application.
3. “Scroll”with your nger up or down and touch the selected application..
4. Touch option “Back”to return the previous menu or press to return to standby mode.
Your phone consists of three screens of the main menu.To change them do the following:
1. Touch in standby mode .
2. Touch to get to“Tornado”imaging. Touch to switch to“Cosmic ray”imaging.
Access to applications
“Scroll”with your nger to the left or to the right in standby mode to get to applications:
Favorite contacts
Touch to add favorite contacts to standby menu. If the contact is added, you can attach the contact
image touching make a call to the contact or send him/her a message from standby menu.
View messages
Read incoming messages “scrolling up or down”with your nger in order to scroll the current message. Touch the
icons below the current message to write, answer or delete the message.
Widget enclosure
Touch to move to the widget enclosure.To replace the widget icon touch and hold it till it lightens; drag it to the
selected place on the display.
Phone locking
Phone locking protects it against unauthorized use. At present PIN code is 1234. By default phone locking is switched
o. After phone protection is switched on you should enter the PIN code every time you switch it on.
To switch on locking:
1. Touch and select Settings>Security>Phone locking.
2. Touch the text input eld to get to the display keyboard.
3. Enter the PIN code and touch and OK.
To change the current PIN code:
1. Touch and select Settings>Security>Change password>Phone password.
2. Touch the text input eld to get to the display keyboard.
3. Enter the current PIN code and touch and OK.
4. Enter a new PIN code and touch and OK.
5. Enter the new PIN code again to conrm it. If you forget the PIN code, contact your authorized service center..
Storage device
If the phone is connected to a PC through a USB cable, “Storage device” appears on the display. In the “Storage
device”mode you can manage les kept within the phone and microSD card with le manager functions.
The phone and its microSD card are displayed on your PC as removable disks. You can perform the following
operations:
• Open the disk with double pressing.
• Copy, paste or delete les.
• Disconnect the phone from the PC.
• Make sure the USB cable is connected and disconnected properly.
• Do not start format command on the PC to format the phone memory – it may damage the phone

15
14
memory.може.
• You can transmit data and charge the phone having connected it to the PC through a USB cable.
Keyboard
Press in standby mode to lock the keyboard. Move from left to right to unlock the keyboard.
The keyboard will be automatically blocked by switching on “Automatic locking” of the keyboard if the phone has
been in standby mode for a certain time.
To switch on “Automatic locking” of the keyboard touch select Setting>Security>Automatic locking of
keyboard and select necessary time of switching on.
If the keyboard is locked you can press , to answer or make an immediate call.
4. 4 Voice services
Making a call
1. Touch , in standby mode to open the display keyboard.
2. Enter the phone number.
• To make an international call touch two times to enter symbol (+). Then enter the country or area
code and phone number.
• To connect to an internal number enter the phone number, touch three times to enter P or four times
to enterW and dial the internal number.
3. Press ,to dial the number.
4. Press ,to nish the call.
• You can also make calls using option“Call history”and from menus“Contacts”or“Messages”.
• Press , during calling to adjust the volume level.
Call answer
To answer an incoming call take the following steps:
• Press or touch option“Answer”to accept the call.
• Touch “Options”and select“Answer to accept the call.
• Press or touch option“Reject” to reject the call.
• Touch option “Silent”to switch o sound of the call.
5. Entering text
Change of the text input mode
The current mode of text input is shown in the upper left corner of the display. Touch on the entry display
to change the language and text mode.
Indication Mode of text input
ABC, abc or Abc Mode of repeated touch
sABC, sabc and sAbc Intellectual input mode
123 Digital input mode
• Touch to hide the keyboard on the display, touch the text box to open the keyboard on the display.

17
16
• Touch one time to delete the last entered symbol or hol to delete all symbols.
• Touch to transfer to the QWERTY input display.
• Touch to switch between the QWERTY and alphanumeric displays.
• On the QWERTY display touch to begin a new line, touch to enter a spacebar.
• Touch on the alphanumeric display to open the gure bar, touch to open the symbol bar and
to add a spacebar.
Entering gures
• Touch on the QWERTY display to open the gure/symbol bar; enter selected gures.
• Touch on the alphanumeric display to open the gure bar, enter necessary gures.
• Touch keys with necessary gures in the gure input mode.
Entering symbols
Touch , on the QWERTY input display to open the gure/symbol bar with the most frequently used symbols.
If the necessary symbol is not displayed, touch to open the symbol keyboard fully. Touch on the
alphanumeric display to open the symbol keyboard; touch or to get the selected symbol. If you want
to enter several symbols till it changes to and touch the selected symbols.
6. Messages
By default messages are stored in the phone memory.
Write and send a message
1. Touch and select Message>Write message.
2. Write a message.
3. Touch functions“Options”and“Send”.
4. Touch the option “Enter recipient’s number” and enter the addressee’s phone number or touch the option “Add
from phonebook memory”.
5. Repeat the above step to add several recipients.
6. Find the necessary recipient of message and touch Options to select one of the options:
• Send message: sending a message to the recipient.
• Edit the recipient: changes the recipient.
• Delete the recipient: deletes the recipient.
• Delete all recipients: deletes all recipients.
• Save: saves messages in the “Drafts” le, exit from the“Write message”menu.
Write and send a multimedia message
1. Touch and select option Message>Write message.
2. Write a message.
3. Touch Options to select the following:
• Add picture: adds a picture to the message.
• Add sound: adds an audio le to the message.
• Add video: adds a video clip to the message.
• Add subject: adds a subject to the message.
• Slide options: adds a presentation slide to the message or identies an interval between presentation
slides.
• Scroll to MMS: scrolling from a text message to a multimedia message.

19
18
If you choose options “Add picture”, “Add sound”, “Add video”, “Add subject”, your text message will be
automatically converted to a multimedia message
4. Touch Options on the“Write message”display and choose the“Send”option.
5. Touch the “Add recipient” option and enter the addressee’s phone number or touch the “Add from phonebook
memory”option and add the recipient from the phonebook memory.
6. Repeat the above step to add several recipients.
7. E-mail
Before sending and receiving e-mail messages you should create and activate your accoun.
Creation of an e-mail account
1. Touch and select the“E-mail” option.
2. Set necessary parameters and save the e-mail account.
Activation of the E-mail account
1. Touch and select the“E-mail” option.
2. Find the necessary account and select Options>E-mail account.
3. Touch the necessary E-mail account and select Options>Set by default to activate the account.
Writing and sending E-mail messages
1. Touch and select the“E-mail” option.
2. Select the account and touch Options>Write message.
3. Touch “Recipient”to add the recipient’s address.
4. Touch “Subject”to add the subjec.
5. Touch , to insert an enclosure.
6. Touch the text box to edit the message.
7. Touch Options to select the following:
• Send: sends the E-mail.
• Priority: sets the message priority“High” or“Low”. .
• Save in drafts: saves E-mail messages in Drafts, exit from the menu of editing messages.
• Exit: exit from the menu of editing messages without saving.
8. Phonebook
Contact creation
1. Touch and select Contacts>Add a new contact.
2. Enter contact information and save the contact.
3. Touch Options>Save.
Contact search
1. Touch and select Contacts.
2. Enter the rst letter of the contact in the search eld.
3. Contacts beginning with this letter are displayed.
Selection of the place of saving
1. Touch and select Contacts>Options>Phonebook settings>Desired storage.
2. Select a SIM card, Phone or Both optional.
3. Touch OK.
Copy contacts
You can copy contacts into the phone, SIM card or le.

21
20
Copy one contact
1. Touch and select Contacts.
2. Enter the rst letter of the contact in the search eld. Contacts beginning with this letter are displayed.
3. Touch the necessary contact.
4. Select Options>Copy.
5. Select the phone, SIM card or le to copy to the necessary place.
Copy several contacts
1. Touch and select Contacts>Options>Phonebook settings>Copy contacts.
2. Select necessary option: from SIM card to phone or from phone to SIM card.
3. Touch necessary contacts to mark them and touch Options >Copy selected contacts.
4. Touch Yes to copy contacts to the selected place.
Group of contacts
You can create a group of contacts, for example,“Family”, “Classmates” or “Colleagues”and add respective contacts
to these groups. Members of the group can be distinguished: for example, they can have a common ringtone or
call image.
To create a group of contacts:
1. Touch and select Contacts>Options>Groups>Add a new group.
2. Set Name of the group, Call image and Call ringtone.
3. Select Options>Save>Yes.
To add contacts to a group of contacts:
4. Touch and select Contacts>Options>Groups.
5. Select a group of contacts and select Options>View participants.
6. Touch Add and select contacts from the Contacts menu.
7. Touch the contact to add it to the group.To add several contacts – repeat steps 6 and 7.
9. Multimedia
Camera
The phone is equipped with a 3,2-megapixel camera.
To take a picture:
1. Touch and select Camera.
2. On the viewnder display:
• Touch to view pictures or change the respective settings.
• Touch to set exposure.
• Touch to enlarge or decrease scale.
• Touch to select the Scene mode.
• Touch to select Autorelease.
3. Focus the camera and press or touch to take a picture.
4. Touch to save the picture or , delete it.
Record a video
To make a video record:
1. Touch and select Camera.

23
22
2. Touch to move to the video record mode. In this mode:
• Touch o change corresponding settings.
• Touch to start recording.
• Touch to pause and conrm recording.
• Touch to set exposure.
• Touch to enlarge or decrease scale.
• Touch to stop recording and save the video tape footage.
Media player
The media player reproduces audio and video clips that are saved in Audio andVideo les in the phone memory and
on the microSD card.
You can get Audio and Video les through the Media album.
Use headset to listen to audio les of high quality.
To view video:
1. Touch and select Player.
2. Select an audio or video clip and touch to reproduce it.
You can do the following during playback:
• Press to adjust sound.
• Touch and to return to the previous clip or select the next one.Touch to pause or continue.
3. Touch to return to the previous menu.
The player only supports mp4 and 3gp formats.
Image view
Touch and select Camera and touch . There are several options for all images stored in the phone
memory and on the microSD card.
1. Touch to View, Set preview style, Send (as a multimedia message, by e-mail or Bluetooth), Use as
(Wallpaper, Screensaver, Screen of switching on or switching o the device, contact image), Rename, Delete,
Classify by (Name,Type, Time, Size etc.), Delete all les or Select place of saving.
2. Touch to rotate the photo to the left at 90°.
10. Browse
You can use your phone to access Internet and WAP sites. To view Internet sites you should order the corresponding
service at your operator, all necessary settings of your phone have already been made.You should not change your
account or browser settings in order to view sites.
Вам не потрібно змінювати Ваш обліковий запис чи налаштування браузера, щоб переглядати сайти.
Editing the data account
Data accounts. To edit the prole:
1. Touch and select Connection>Account.
2. Select an account.

25
24
3. Select Options>Edit.
4. Change corresponding settings.
5. Touch OK and Yes.
Connection to the local WIFI network
1. Touch and select WIFI.
2. Activate WIFII.
On rst connection to WIFI you receive a tip forWIFI activationI.
3. Select a WIFI network.
On WIFI connection your phone will automatically search the available network.
4. Touch Options to select the following options:
• Connect: connect with the selected WIFI network.
• Add: add wireless communication manually.
• Determine access point: allows viewing and editing the list of wireless communication networks.
• Current state: allows viewing the MAC address of your phone.
• Deactivate WIFI: switches o WIFI.
• Upgrade: search of available networks.
Change of browser settings
To change browser settings:
1. Touch and select Browser.
2. Touch Setting>Data account.
3. Select an account.
4. Touch OK.
Touch , select Browser, touch , and then Settings>Data account>Local wireless
communication and select a network to make sure that your phone is connected to the
available network.
Site review
To get to a web site:
1. Touch and select Browser.
2. Enter URL of the selected site.
3. Touch Forward.
11. Bluetooth
Your phone provides the Bluetooth function. You can exchange data between your phone and other devices and talk
on the phone using the Bluetooth headset.
You can activate Bluetooth changing Bluetooth settings.
Connection of Bluetooth headset to your phone
To connect the Bluetooth headset to the phone take the following steps:
1. Touch and select Bluetooth>On/O.
2. Select Search of audio device to nd available Bluetooth headsets.
3. Find the necessary Bluetooth headset and touch the“Make pair”option.
4. Enter password to make a pair between the phone and Bluetooth headset.
If the Bluetooth headset is connected to the phone headset, an icon is displayed that indicates possibility of using
the headset.
The Bluetooth headset is not included to the product set, you can buy it separately.

27
26
12. File manager
Your phone is equipped with a media album. You can use the File manager option to classify les contained in
the phone and on the microSD card. You can also use the album to read e-books, listen to music and review video.
To get to the File manager touch and select the File manager option in standby mode.
13. Programs
To open Programs touch and select the Programs option.
You can set Java settings of other developers to enlarge the possibilities of your phone in relation to programs and
games.
Deleting a Java application
1. Touch and select Programs>Java.
2. Find the necessary Java application.
3. Select Options>Delete>Yes.
4. If the application is deleted, the“Deleted”message appears on the display
14. Warnings and safety measures
This section contains important information concerning the operating manual of the device. It also contains information on how to use
the device safely. Before using the device read this section.
Electrical appliances
Switch o the device if the use of electrical appliances is forbidden. Do not use the device if it hinders operation of electrical devices.
Medical devices
• Follow rules and guidelines established in hospitals and medical institutions. Do not use the device if its use is not allowed.
• Manufacturers of pacemakers recommend keeping minimum distance – 15 cm between the pacemaker and the device in order to
prevent possible interference of the pacemaker operation.
Potentially explosive environment.
Switch o your device when in any area with a potentially explosive environment and obey all signs and instructions. Potentially
explosive environments include areas where you would normally be advised to turn o your vehicle engine. Sparks in such areas could
cause an explosion or re resulting in bodily injury or even death. Switch o the device at refueling points such as near gas pumps at
service stations. Observe restrictions on the use of radio equipment in fuel depots, storage, and distribution areas; chemical plants; or
where blasting operations are in progress. Examine the place for the purpose of potentially explosive media before using the device;
such places are not always clearly marked. They include below deck on boats, chemical transfer or storage facilities and areas where
the air contains chemicals or particles such as grain, dust, or metal powders.You should check with the manufacturers of vehicles using
liqueed petroleum gas (such as propane or butane) to determine if this device can be safely used in their vicinity.
Road safety
Follow local laws and rules while using the device. Moreover, you should follow the following rules of use of the device when you drive
• зGive full attention to driving.Your initial task is driving the car safely.
• Do not talk on the phone when you drive. Use a hands-free kit, if available
• Not all Java applications are compatible with your phone. If upon setting a Java application, press
to return to standby mode and delete the application on the phone.
• Some Java applications need connection to the operator’s network. Make sure that GPRS settings of
your phone are made correctly.
Installing Java applications
1. Select the Java installation le in the .jar or .jad format from the phone memory or memory card, touch Options
and select Install to start installation.
2. Touch Yes to conrm certication information.
3. Select the Phone or Memory card option to install the Java application. If installation is nished, the“Installed”
message appears on the display.
Starting Java applications
1. Touch and select Programs>Java.
2. Find the necessary Java application.
3. Select Options>Start to start the Java application.

29
28
• Pull o the road and park before making or answering a call.
• RF energy may aect some electronic systems in your vehicle. To get additional information, contact the vehicle manufacturer
• When your vehicle is equipped with an air bag, do not obstruct it with installed or portable wireless equipment. It can cause the air
bag to fail or cause serious injury due to improper performance..
• Using your device while ying in an aircraft is prohibited. Switch o your device before boarding an aircraft. The use of wireless
teledevices in an aircraft may be dangerous to the operation of the aircraft, disrupt the wireless telephone network, and may be
illegal..
Operating environment
• Do not use or store the device in dusty, dirty areas or areas with magnetic elds. Its moving parts and electronic components can be
• damaged.
• Do not phone during a thunderstorm; do not charge it in order to prevent danger because of lightning.
• Do not touch the antenna during communication by phone. It can worsen the quality of communication and result in an increase of
power consumption. As a result, the time of operation of the phone in communication mode or standby mode is reduced.
• Follow local regulations and rules when you use the phone and respect privacy of other persons and their legal rights.
• Ambient temperature during phone charging must be 0 ° С to 40 ° С.
Hearing aids
Damage to your hearing can occur if you are exposed to loud sound. We recommend decreasing the volume level to a safe and
reasonable level in order to reduce the risk of hearing damage.
Children’s safety
Follow all precautions concerning children’s safety. Make sure that small children are out of reach to devices and accessories. Small parts
that can be pulled away are dangerous by swallowing.
Accessories
Use accessories supplied by the manufacturer. Use of accessories of other manufactures or sellers may cause loss of warranty for the
device and disturbance of operation of the phone and may also be a cause of danger.
Battery and charger
• Disconnect the charger from power supply and from the phone if it is not in use.
• Battery can be charged and discharged many times but it will eventually wear out. When the talk and standby times are noticeably
shorter than normal, replace the battery.
• Use a power supply source of alternating current stated in the device specications. Incorrect supply voltage may cause explosion
or malfunction of the charger.
• Do not connect two poles of the battery to metallic objects such as metallic materials, keys or gold and silver ware. It may result in
short-circuit and cause injuries and burns of body.
• Do not disassemble the battery or solder of battery poles. It may cause electrolyte leakage, overheating, re or explosion.
• If electrolyte leaked out, make sure it did not touch your skin and eyes. If electrolyte came into contact with your skin or eyes ush
your skin or eyes immediately with water or consult a doctor.
• If the battery was distorted, changed color or becomes too warm during charging, pull out the battery and do not use it. Otherwise
it can result in electrolyte leakage, overheating, explosion or re.
• ЯIf the power cord is damaged (for example, the cord is bared or does not operate) or the charger plug is detached, stop using the
cord immediately. Otherwise it may result in electric shock, short-circuit of the charger or re.
• Do not dispose of batteries in a re as they may explode. Batteries may also explode if damaged.
• The battery can explode if it is replaced incorrectly. Dispose of batteries according to local regulations or the reference guide supplied
with the phone.
Care and maintenance
• The device, battery and charger are not waterproof. Keep them dry. Do not expose the product, battery and charger to water or
damp inuence. Do not touch the device or charger with wet hands. Otherwise it may result in short-circuit, device failure and
electric shock.
• Do not place the device, battery and charger in places where they can be damaged through mechanical eect. Otherwise it may
result in electrolyte leakage, malfunction, overheating, re or explosion.
• Do not place magnetic media such as magnetic cards and discs near the device. Device radiation can erase information stored on
them.
• Do not leave the device, battery and charger in extremely cold or hot places. Otherwise it won’t operate properly, and this may also
result in re or explosion. If temperature is below 0 ° С it inuences the battery eciency.
• Do not store sharp metallic objects such as pins near the earphone. The earphone can catch these objects and hinder you when
using the phone.
• Switch o and disconnect the phone from the charger before cleaning or storing..
• Do not use harsh chemicals, cleaning solvents, or other chemicals (for example, alcohol and patrol) to clean the device and charger.
It may cause re or small parts of the device to be damaged.You can clean the device and charger with wet soft antistatic cloth.
• Do not disassemble the device or accessories. In this case warranty will be invalid and the manufacturer will not be responsible
for damages.

31
30
Emergency call
You can use the phone to make emergency calls in the service zone. However, connection under all conditions cannot be guaranteed.You
should never rely solely on any wireless device for essential communications like important information.
Certication information (SAR))
This mobile device meets the guidelines for exposure to radio waves.
Your mobile device is a radio transmitter and receiver. It is designed not to exceed the limits for exposure to radio waves recommended
by international guidelines. These guidelines were developed by the independent scientic organization, International Commission on
Non-Ionizing Radiation Protection (ICNIRP), and include safety margins designed to assure the protection of all persons, regardless of
age and state of health.
Specic absorption rate (SAR) is the unit of measurement of quantity of RF energy absorbed by a human body during the use of the
device. The SAR value is determined by maximum power under laboratory conditions but the actual level of SAR of the device during
operation can be lower. The actual SAR level of an operating device can be below the maximum value because the device is designed to
use only the power required to reach the network.
The SAR limit stated in the USA and Canada is 1.6 watts/kilogram (W/kg) averaged over 1 gram of tissue.The highest value according to
FCC and IC for this type of device during testing at ear is 0.964W/kg and on proper bearing on body – 1.12 W/kg and within application
of Wi-Fi point – 1.210 W/kg The SAR limit stated in the USA and Canada is 1.6 watts/kilogram (W/kg) averaged over 1 gram of tissue.
The highest value according to FCC and IC for this type of device during testing at ear is 0.964W/kg and on proper bearing on body – 1.12
W/kg and within application ofWi-Fi point – 1.210W/kg.
The SAR limit accepted in Europe is 2.0W/kg over 1 gram of tissue.
The highest SAR value for use of the device at the ear is 0.821 W/kg and on body – 0.669W/kg.
FCC standards
This device was tested and admitted as the device that complies with restrictions for class B digital devices in accordance with part 15
of the FCC rules.These limitations were made in order to provide corresponding protection from interferences in residential premises.
This device generates, uses and can emit RF power, and if this device is used incorrectly, it can cause interference for wireless
communication. Nevertheless there is no guarantee that interferences won’t occur within a separate device. If this device causes
interferences for radio or TV that can be determined on switching o and on the equipment, the user should try to eliminate these
interferences taking one of the following actions:
- Redirect or displace the antenna.
- Increase the distance between the equipment and receiver.
- Plug the device into the socket in the range dierent from the range to which the receiver is connected.
- Contact the local dealer or qualied radio/TV specialist.
Changes or modications of this device not approved by Huawei Technologies Co, Ltd may result in loss of the FCC license concerning
operation of this device.
Adjustment of the EU compliance
Herewith Huawei Technologies Co, Ltd declares that this device complies with main requirements and other corresponding provisions
of Directive 1999/5/EU.
Information about the declaration of conformity is available on the web site.
http://www.huaweidevice.com/certication
Attention! Observe local rules and regulations in place of use of the device. This device can have limitations concerning its use in some
or all member states of the European Union (EU).
№ 6010590 Version:01

Table of contents
Other Huawei Cell Phone manuals

Huawei
Huawei BAH2-L09 User manual

Huawei
Huawei P9 lite mini User manual

Huawei
Huawei C2906 User manual

Huawei
Huawei P40 Pro+ User manual

Huawei
Huawei Ascend P6 User manual

Huawei
Huawei PAL-LX9 User manual

Huawei
Huawei C5005 User manual

Huawei
Huawei Ascend Y320 User manual

Huawei
Huawei Ascend G 312 User manual

Huawei
Huawei U8185 Dimensions

Huawei
Huawei U8185-7 User manual

Huawei
Huawei Mate 50 User manual

Huawei
Huawei CherryPlus Dimensions

Huawei
Huawei G750-U10 Technical specifications

Huawei
Huawei Ascend Y511 User manual

Huawei
Huawei U8350 User manual

Huawei
Huawei Y6 User manual

Huawei
Huawei Y360-U03 Installation guide

Huawei
Huawei P8 lite User manual

Huawei
Huawei G6610 User manual