Huawei Virqin media VM720 User manual

Heaven sent
Getting to know your amazing little VM720

Contents
1 Getting to Know Your Phone 1
Your Phone 1
Keys and Functions 2
Main Screen Icons 2
2 Getting Started 4
Installing the SIM Card and the Battery 4
Removing the Battery and the SIM Card 4
Installing a microSD Card 4
Charging the Battery 5
Calibrating the Screen 6
Accessing a Shortcut Menu 6
Working with the Main Menu 7
Phone Lock 8
Mass Storage 8
PIN and PUK 9
Locking the Keypad 10
3 Voice Services 11
Making a Call 11
Receiving a Call 11
4 Text Input 12
Changing the Text Input Mode 12
Multi-Tap Input Mode 13
Predictive Input Mode 13
Entering Digits 14
Entering Symbols 14
Copyright © Huawei Technologies Co., Ltd. 2011. All rights reserved.
Trademarks and Permissions
and are trademarks or registered
trademarks of Huawei Technologies Co., Ltd.
Other trademarks, product, service and company names mentioned
are the property of their respective owners.
No Warranty
THE CONTENTS OF THIS MANUAL ARE PROVIDED “AS IS”. EXCEPT AS
REQUIRED BY APPLICABLE LAWS, NO WARRANTIES OF ANY KIND, EITHER
EXPRESS OR IMPLIED, INCLUDING BUT NOT LIMITED TO, THE IMPLIED
WARRANTIES OF MERCHANTABILITY AND FITNESS FOR A PARTICULAR
PURPOSE, ARE MADE IN RELATION TO THE ACCURACY, RELIABILITY OR
CONTENTS OF THIS MANUAL.
TO THE MAXIMUM EXTENT PERMITTED BY APPLICABLE LAW, IN NO CASE
SHALL HUAWEI TECHNOLOGIES CO., LTD BE LIABLE FOR ANY SPECIAL,
INCIDENTAL, INDIRECT, OR CONSEQUENTIAL DAMAGES, OR LOST PROFITS,
BUSINESS, REVENUE, DATA, GOODWILL OR ANTICIPATED SAVINGS.
i | | ii

5 Messaging 15
Writing and Sending a Text Message 15
Writing and Sending a Multimedia Message 16
6 Email 18
Creating an Email Account 18
Activating an Email Account 18
Writing and Sending an Email 18
7 Voicemail 20
8 Phonebook 21
Creating a Contact 21
Searching for a Contact 21
Setting the Preferred Storage 21
Copying Contacts 21
Contact Group 22
9 Multimedia 23
Camera 23
Video Recorder 23
Media Player 24
Image Viewer 25
FM Radio 25
Sound Recorder 26
10 WAP Browser 27
Editing the Data Account 27
Connecting to a WLAN 27
Selecting the WAP Parameters 28
Accessing a Website 28
11 Bluetooth 29
Connecting a Bluetooth Headset to Your Phone 29
Transferring Data 30
12 Media album 31
13 Tools 32
Alarm 32
Calendar 32
Tasks 32
Calculator 32
14 Games & apps 33
Installing a Java Application 33
Running a Java Application 34
Removing a Java Application 34
Unit Converter 34
Currency Converter 34
15 FAQs 35
iii | | iv

Getting to Know Your Phone 1
Your Phone
1Earpiece 5End/Power key
2Screen 6Volume keys
3Call/Answer key 7Headset jack
4 Conrmkey 8Charger jack/Universal serial
bus (USB) port
The gure above shows the appearance of your phone and is
provided only for your reference.
1 | | 2
Keys and Functions
Press… To…
Make a call.
Answer a call.
View all call history in standby mode.
Power the phone on or off (press and hold for about
3 seconds).
End or reject a call.
Return to the standby mode.
Lock the keypad in standby mode.
Access to main menu in standby mode.
Confirm a selection.
Increase the volume (by pressing ) or decrease
the volume (by pressing ) during a call.
Main Screen Icons
Icon Indicates…
Signal strength.
Media player enabled.
WLAN connected.

Main Screen Icons
Icon Indicates…
New text messages.
New multimedia messages.
Call forwarding enabled.
Missed calls.
Alarms enabled.
Battery level.
General or My style profile activated.
Meeting profile activated.
Outdoor profile activated.
Silent profile activated.
Headset connected.
Bluetooth activated.
Stopwatch enabled.
3 | | 4
Getting Started 2
Installing the SIM Card and the Battery
When installing a SIM card, ensure that the golden contact area on
the SIM card is facing downward and that the beveled edge of the
SIM card is properly aligned with that of the SIM card slot.
Removing the Battery and the SIM Card
Before removing the battery and the SIM card, ensure that your
phone is powered off.
Installing a microSD Card
Before installing or removing a microSD card, power off the
phone. After the phone is powered on, it will indicate
whether the microSD card has been installed properly.

5 | | 6
You can install a microSD card to expand the memory capacity
of your phone. When inserting the microSD card, ensure that the
golden contact area on the microSD card is facing downward.
Charging the Battery
To charge the battery, do the following:
1. Connect the smaller end of the USB cable to the charger jack on
the phone and the larger end to the charger.
2. Connect the charger to a power socket.
3. Wait until the battery is fully charged.
During charging, an animated charging icon is displayed. When
the charging icon is static, the battery is fully charged.
4. Disconnect the charger from the power socket, and then from
the phone.
Calibrating the Screen
The phone responds to the touch of your finger on the screen
accurately after screen calibration.
1. In standby mode, tap and then select Settings > Pen
calibration.
2. Use your finger to tap the three-point marks that appear on the
screen in sequence as prompted to complete screen calibration.
During the calibration, tap each three-point mark accurately
to ensure that the phone can respond to your tap and text
entry on the screen correctly after the calibration.
Accessing a Shortcut Menu
In standby mode, slide your finger horizontally across the screen to
go to the left or right screen to select the following shortcuts:
Add favorite contact: tap to add a favorite contact from
phone, and then tap the selected favorite contact to add contact
photo (by taping ), Call mobile or Send message.
Call history: view All calls or Missed calls and you can also
select a call record to view the phone number, make a call, send
message, add new contact or replace existing.
Audio player: tap the icons displayed on the screen to a related
settings or tap to choose the desired music. You can also
tap to have more options.
Shortcuts list: tap the desired icon to access to the desired shortcut
menu and tap to add a shortcut icon from a pop-up list.
Widgets menu: tap to open the widget menu, then tap and hold
the icon of the widget until the color of the icon becomes light, and
drag it to the desired position on the screen.

7 | | 8
Settings: enable or disable Bluetooth, My device, WIFI, Search
for networks, Profiles, Auto keypad lock, and you can also set
Wallpaper, Brightness and Shell settings.
Photo viewer: slide your finger along with the photo to switch
photos and tap the icons on the screen to arrange the related
settings.
Message (inbox): slide your finger vertically across the message
body to scroll inbox messages, and you can also tap the icons
displayed on the screen to write message, reply the message, view
the list of the inbox message or delete message.
Working with the Main Menu
To work with the main menu, do the following:
1. In standby mode, tap to access the main menu.
2. Slide your finger horizontally across the screen to go to the next or
previous screen, and then tap the desired submenu to access it.
3. Slide your finger vertically across the screen to scroll through
options, and then tap the desired option to access it.
4. Tap Back to return to the previous menu.
To return to the standby mode, press .
Your phone has two main menu screens. To switch between main
menu screens, do the following:
1. In standby mode, tap to access main menu.
2. Tap to access to Fancy settings Tornado, then press
to switch Space beam.
Phone Lock
The phone lock protects your phone from unauthorized use. By
default, the phone lock is disabled. After the phone lock is enabled,
the phone requests the phone code each time it is powered on.
To enable the phone lock, do the following:
1. Tap and then select Settings > Security settings >
Phone lock.
2. Tap the text box to open the onscreen keypad, enter the phone
code, tap and then OK.
You can change the default phone code (1234) to any numeric
string of four to eight digits.
To change the phone code, do the following:
1. Tap and then select Settings > Security settings >
Change password > Phone password.
2. Tap the text box to open the onscreen keypad, enter the old
phone code, tap and then OK.
3. Enter the new phone code, tap and then OK.
4. Enter the new phone code again to confirm it.
If you forget the phone code, contact your service provider.
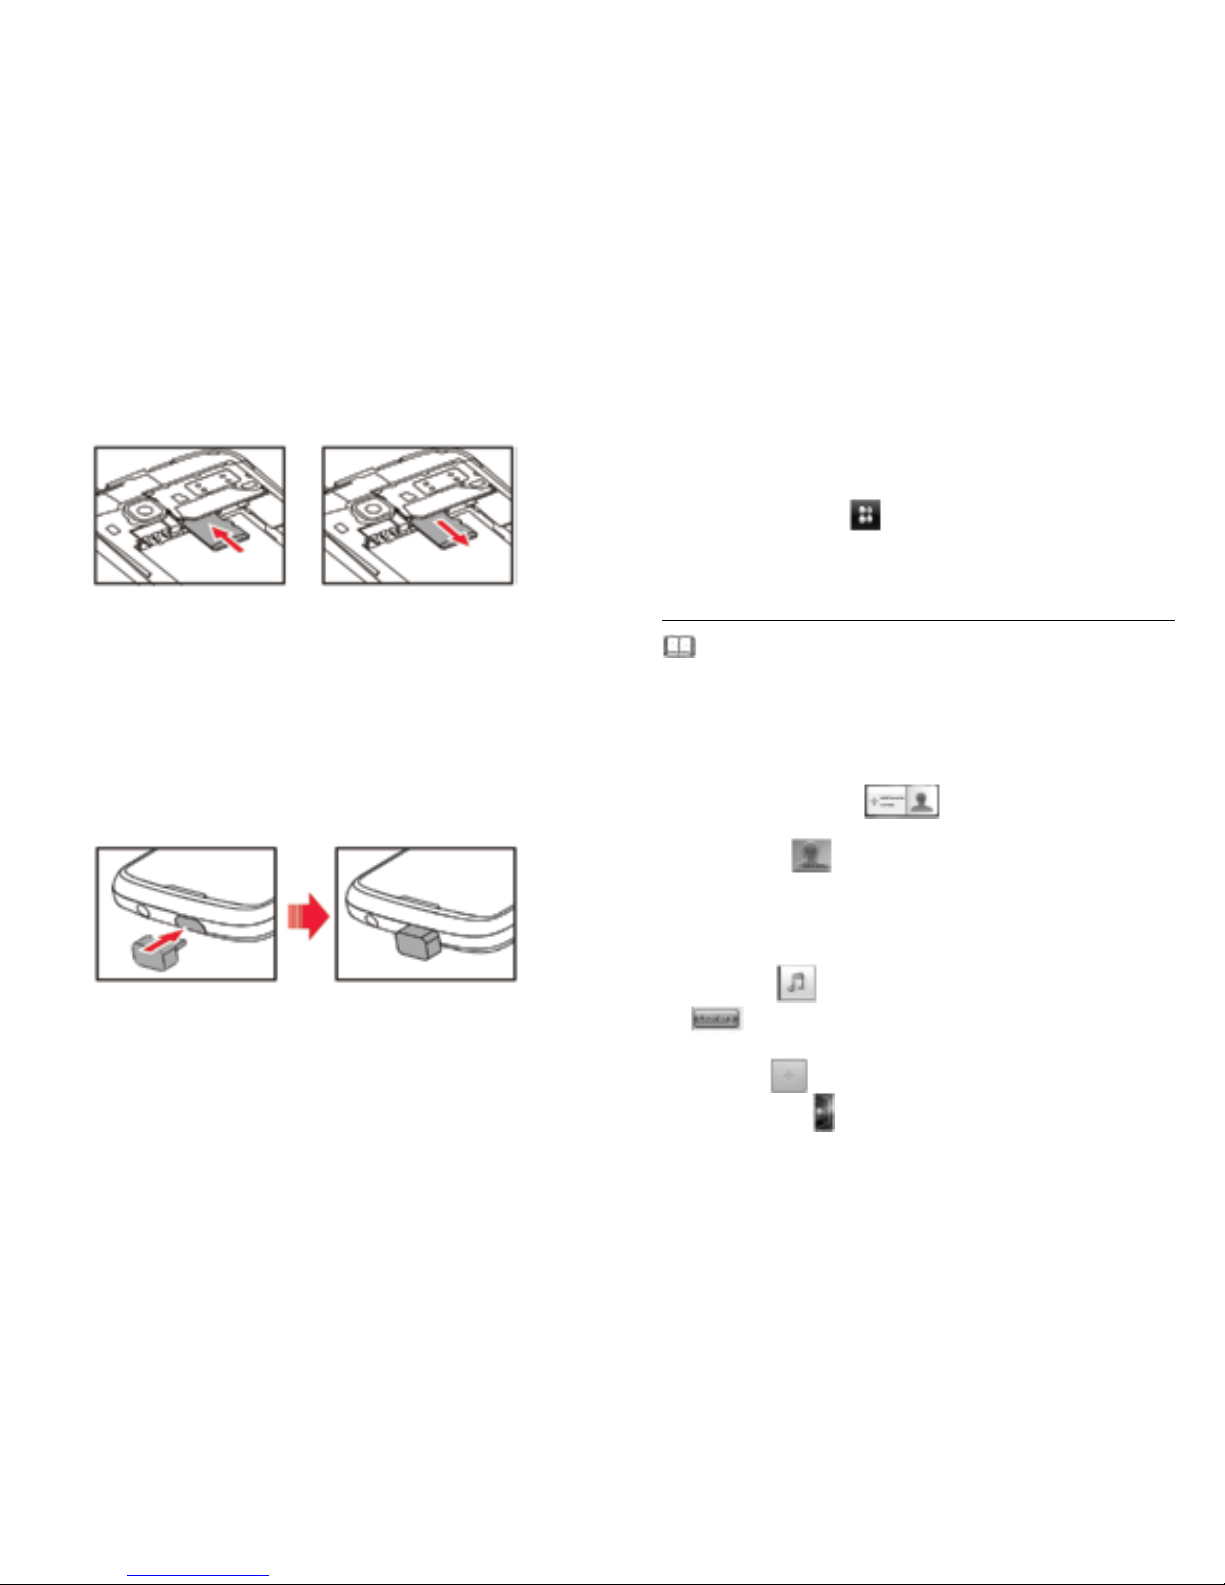
Mass Storage
When the phone is connected to a PC through a USB cable, the
option Mass storage is displayed on the phone screen.
If you select Mass storage, you can manage the files stored in the
phone memory and on the microSD card.

9 | | 10
The microSD card and the phone memory are displayed as removable
disks on the PC. You can perform the following operations:
Double-click a disk to open it.
Copy, paste, or delete files on the disk.
Disconnect the phone from the PC.
Ensure that you connect and disconnect the USB cable
properly.
Do not run the formatting command on the PC to format
the phone memory; and it may damage the phone memory
permanently.
You can transfer data and charge the battery by connecting
the phone to the PC through the USB cable.
PIN and PUK
The personal identification number (PIN) protects your SIM card
from unauthorized use. The PIN unblocking key (PUK) unlocks the
blocked PIN. Both the PIN and the PUK are provided with the SIM
card. For details, contact your service provider.
To enable the PIN lock, do the following:
1. Tap and then select Settings > Security settings > SIM
lock.
2. Tap the text box to open the onscreen keypad, enter the PIN,
tap and then OK.
If you enter incorrect PINs for a specified number of times
consecutively, the phone prompts you to enter the PUK.
If you enter incorrect PUKs for a specified number of times
consecutively, the SIM card becomes permanently invalid. In this
case, contact your service provider for a new SIM card.
Locking the Keypad
To lock the keypad, tap Lock in standby mode. To unlock the
keypad, slide from left to right.
If the auto keypad lock function is enabled and the phone is in
standby mode for a preset period, the phone locks the keypad
automatically.
To enable the auto keypad lock function, tap and then select
Settings > Security settings > Auto keypad lock, and then
select the desired duration.
When the keypad is locked, you can press to
answer a call or make an emergency call.

11 | | 12
Voice Services 3
Making a Call
To make a call, do the following:
1. In standby mode, tap Dial to open the onscreen keypad.
2. Enter the phone number.
To make an international call, tap twice to enter the plus
sign (+), and then enter the country or region code, area code,
and phone number in sequence.
To call an extension, enter the phone number, tap three
times to enter P, or four times to enter W, and then enter the
extension number.
3. Press to dial the number.
4. Press to end the call.
You can also make calls from the call history, phonebook,
and messages.
During a call, you can press adjust the in-call volume.
Receiving a call
When there is an incoming call, do the following:
Press or tap Answer to answer the call.
Tap Option and select Answer to answer the call.
Press or tap Reject to reject the call.
Tap Silent to mute the speaker.
Text Input 4
Changing the Text Input Mode
The indicator of the current text input mode is displayed on the top
of the screen. You can tap to select the text input mode.
Indicator Text Input Mode
ABC, abc, Abc Multi-tap input mode
Smart ABC, Smart abc, Predictive input mode
Numeric Number input mode
Tap to close the keyboard and tap the text box to
open the keyboard.
Tap once to delete the last entered character. You can
also touch and hold to clear all the entered characters
at a time.
When the onscreen keyboard is Alphanumeric virtual
keyboard tap to switch to QWERTY virtual
keyboard, and when the onscreen keyboard is QWERTY
virtual keyboard tap to switch to Alphanumeric virtual
keyboard.

13 | | 14
Multi-Tap Input Mode
In multi-tap input mode, do the following to enter letters:
When the onscreen keyboard is QWERTY virtual keyboard, tap
the desired letter key.
When the onscreen keyboard is Alphanumeric virtual keyboard,
tap a key once to enter the first letter labeled on that key, twice to
enter the second letter, and so on.
When the onscreen keyboard is QWERTY virtual keyboard,
tap to open the numeric and symbol keyboard,
tap to start a new paragraph, or tap to enter
a space.
When the onscreen keyboard is Alphanumeric virtual
keyboard, tap to open the numeric keyboard,
tap to open the symbol keyboard, and tap
enter a space.
Predictive Input Mode
In predictive input mode, when the onscreen keyboard is
Alphanumeric virtual keyboard, do the following to enter a word:
1. Tap each key once according to the spelling sequence of the
desired word.
The phone displays the commonly used words according to the
sequence of key taps.
2. Tap or to scroll left or right.
3. Tap the desired word.
In predictive input mode, if the onscreen keyboard is
QWERTY virtual keyboard, predictive input is not supported.
Entering Digits
In number input mode, tap the desired number key.
In multi-tap input mode, when the onscreen keyboard is
Alphanumeric virtual keyboard, tap the number key labeled with
the desired digit consecutively until the digit appears on the
screen.
Entering Symbols
When the onscreen keyboard is Alphanumeric virtual keyboard, do
the following to enter symbols:
1. Tap to open the symbol keyboard.
2. Tap or to scroll up or down.
3. To enter symbols, do the following:
To enter only one symbol, tap the desired symbol.
To enter multiple symbols, tap to change the icon to and
then tap the desired symbols.
When the onscreen keyboard is QWERTY virtual keyboard, do the
following to enter symbols:
1. Tap or to open the symbol keyboard.
2. Tap the desired symbol.

Messaging 5
By default, messages are stored in the phone memory.
Writing and Sending a Text Message
To write and send a text message, do the following:
1. Tap and then select Messaging > Write message.
2. Write the message.
3. Tap Options, and then Send to.
4. Tap Enter recipient and enter the phone number of a recipient;
or tap Add from Phonebook and add a recipient from the
phonebook.
To add multiple recipients, repeat this step.
Press or tap Options, and then select one of the following options:
Send: to send the message to the recipient.
Edit recipient: to edit the recipient.
Remove recipient: to remove the recipient.
Remove all recipients: to remove all recipients.
Save: to save the message to Drafts and exit the Write message
screen.
15 | | 16
Writing and Sending a Multimedia Message
To write and send a multimedia message, do the following:
1. Tap and then select Messaging > Write message.
2. Write the message.
3. Tap Options to select one of the following options:
Add picture: to add a picture to the message.
Add sound: to add an audio clip to the message.
Add video: to add a video clip to the message.
Add subject: to add a subject to the message.
Slide options: to add a slide to the message, set the playing
interval between two slides and so on.
Switch to MMS: to change from a text message to a multimedia
message.
If you select Add picture, Add sound, Add video, or Add
subject, the message automatically changes from a text
message to a multimedia message.
4. On the Write message screen, press or tap Options, and
select Send to.
5. Tap Enter recipient and enter the phone number of a recipient;
or tap Add from Phonebook and add a recipient from the
phonebook.
To add multiple recipients, repeat this step.
6. Scroll to the desired recipient, press or tap Options, and select
one of the following options:
Send: to send the message to the recipient.
Send options: to set the send options.

17 | | 18
Edit recipient: to edit the recipient.
Remove recipient: to remove the recipient.
Remove all recipients: to remove all recipients.
Change to Cc: to copy the message to the recipient.
Change to Bcc: to blind copy the message to the recipient.
Save to Drafts: to save the message to Drafts and exit the Write
message screen.
For the availability of the Multimedia Messaging Service
(MMS) and the method for subscribing to the service,
please contact your service provider.
Your phone supports a multimedia message with a
maximum size of 600 KB.
Open multimedia messages with caution. Objects in
multimedia messages may contain viruses (such as
malicious software) that can damage your phone.
Email 6
Before sending or receiving emails, you must create and activate
an email account.
Creating an Email Account
To create an email account, do the following:
1. Tap and then select Email.
2. Tap the desired type from a list including Gmail, Yahoo,
Hotmail, and Other Email accounts.
3. Set the relevant parameters and save the email account.
Activating an Email Account
To activate an email account, do the following:
1. Tap and then select Email.
2. Select an email account and tap Options, then tap Email
account.
3. Tap the desired email account and tap Options, then tap Set
as default account to activate the email account.
Writing and Sending an Email
To write and send an email, do the following:
1. Tap and then select Email.

19 | | 20
2. Select an email account to send an email and tap Options, then
tap Write Email.
3. Tap To to add the email address of a recipient.
4. Tap Subject to edit the email subject.
5. Tap to add an attachment.
6. Set the email Priority.
7. Tap the text box to edit the email.
8. After editing, tap Options to select one of the following options:
Send: to send the email.
Priority: to set the email priority between High and Low.
Save to Drafts: to save into Drafts and exit the editor screen.
Exit: to exit the email editor screen without saving the email.
Voice Mail 7
To add a voicemail number or change the existing voicemail
number, do the following:
1. Tap and then select Messaging > Message settings >
Text message > Voicemail server.
2. Tap Options and then tap Edit.
3. Edit the voicemail name and number.
4. Tap OK to save the setting.
To dial the existing voicemail number, do the following:
1. Tap Menu > Messaging > Message settings > Text
message > Voicemail server.
2. Tap the voicemail number, or tap Options and then tap Call
voicemail.
You can also tap Dial in standby mode, and then touch
and hold 1 key to dial the voicemail.

21 | | 22
Phonebook 8
Creating a Contact
To create a contact, do the following:
1. Tap and then select Phonebook.
2. Tap Add new contact.
3. Enter the contact information and save the contact.
Searching for a Contact
1. Tap and then select Phonebook.
2. Enter the first letter of the contact name in the text box.
3. Tap to select the desired contact.
Setting the Preferred Storage
To select the storage where you want to save new contacts, do the
following:
1. Tap and then select Phonebook.
2. Tap Options and select Phonebook settings > Preferred storage.
3. Scroll to SIM, Phone, or Both as desired.
4. Tap OK to select the preferred storage.
Copying Contacts
You can copy contacts to the phone, the SIM card, or a file.
Copying One Contact
To copy one contact, do the following:
1. Tap and then select Phonebook.
2. Enter the first letter of the contact name in the text box.
3. Tap the desired contact.
4. Tap Options and select Copy.
5. Select To phone, To SIM, or To file to copy the contact to the
desired location.
Copying Multiple Contacts
To copy multiple contacts, do the following:
1. Tap and then select Phonebook.
2. Tap Options and select Phonebook settings > Copy contacts.
3. Tap the desired option, such as SIM to phone or Phone to SIM.
4. Tap the desired contacts to mark them, and then tap Copy marked.
5. Tap Yes to copy contacts to the desired location.
Contact Group
You can create a contact group, such as family, classmates, or
workmates, and then add relevant contacts to the group. The
members in the group have some common features, such as Caller
ringtone and Caller picture.
To create a contact group, do the following:
1. Tap and then select Phonebook.
2. Tap Options and select Caller groups > Add new group.
3. Set Group name, Caller picture, Caller ringtone, and Caller
video, and then tap Options and select Save.
4. Tap Yes to save the contact group.
To add contacts to a contact group, do the following:
1. Tap and then select Phonebook.
2. Tap Options and select Caller groups.
3. Scroll to the contact group, tap Options and select View members.
4. Tap Add and select the desired contacts from Phonebook.
5. Tap the desired contacts to add them to the contact group.

23 | | 24
Multimedia 9
Camera
The phone features a built-in 3.0-megapixel complementary metal-
oxide-semiconductor (CMOS) camera.
1. Tap and then select Camcorder to access Camera.
2. On the picture taking screen, do the following:
Tap to view photos or configure relevant settings.
Tap to adjust the exposure value.
Tap to zoom in or to zoom out.
Tap to select Scene mode and tap to configure Self-timer.
3. Focus the camera on the scene and press or tap to
take a picture.
4. Tap to save the picture. You can take another picture or
tap and to delete the picture.
Video Recorder
To record a video clip, do the following:
1. Tap and then select Camcorder , and the tap to
switch to Video recorder mode.
2. In video recording mode, you can do the following:
Tap to configure the relevant settings.
Tap to start recording or to pause.
Tap to adjust the exposure value.
Tap to zoom in or zoom out.
Tap to stop recording and save the video clip as instructed.
Media Player
The media player plays audio clips stored in the Audio folder and
video clips stored in the Videos folder in the phone memory or on
the microSD card. The Audio folder and the Videos folder can be
accessed from File manager. To obtain better sound quality, it is
recommended that you use the headset to listen to audio clips.
To play a clip, do the following:
1. In standby mode, tap and then select Media Player.
2. Select a video or audio file, and then tap to start playing
the clip.
When the clip is being played, you can do the following:
Press to adjust the volume, or tap to adjust the volume.
Tap and to switch between clips.
Tap to pause playing the clip.
Tap to go to the previous menu.

25 | | 26
All audio and video files are automatically added to Media player.
And you can also manual add a audio or video file to Media
player, do the following:
1. In standby mode, tap and then select Media Player
2. Select All songs and tap Options, and then tap Add from
folder to add a audio file from Phone or Memory card. The
method off adding video file is similar.
Only files in .mp4 and .3gp formats are supported. Files in
other formats may not play.
Image Viewer
Tap and then select Camcorder, and then tap to access
Image Viewer. Image Viewer provides the following options for all
pictures in the phone memory and on the microSD card:
1. Tap to View, Browse style, Send (by MMS, Bluetooth
or Email), Use as (Wallpaper, Screen saver , Power on display,
Power off display or Caller picture), Rename, Delete, Sort by
(Name, Type, Time, Size or None), Delete all files and Storage
selection.
2. Tap to view the reeling photo list just like the phone turn
lef t 90°.
FM Radio
The headset cable also functions as an antenna. To ensure
reception of radio programs, do not disconnect the headset from
the phone or bend the headset cable.
1. Connect the headset to the phone.
2. In standby mode, tap and then select FM radio to access
When listening to the radio, you can do the following:
Tap to stop or continue the playing.
Tap to record the program.
Press or to adjust the volume.
Tap or to adjust the frequency at a precision of
0.1 MH z.
Press the button on the headset cable to switch between channels.
Tap to view or edit the channel list, manually set a
frequency, automatically search for and save channels, configure
the relevant settings, record the audio clip, and so on.
Sound Recorder
The sound recorder functions as a digital recorder.
To record an audio clip, do the following:
1. Tap and then select Games & apps > Sound recorder to
access Sound recorder.
2. Tap to record an audio clip.
During the recording, tap to pause or to continue.
3. Tap to stop recording the audio clip, and then tap Yes to
save the recorded clip as instructed.
Tap to view the list of the recorded files, and you can also
tap to add a new record, view the list of the recorded files,
setting the Storage and File format.

27 | | 28
WAP Browser 10
You can access Wireless Application Protocol (WAP) sites and use
WAP-based services on your phone. To access WAP sites, you need to
subscribe to the service from your service provider and set the relevant
parameters on your phone.
For details about the service and the charges, contact your service
provider.
To access WAP sites, you don’t need to set your data account and WAP
parameters.
Editing the Data Account
Data account is supported by your service provider already exists,
you can also edit it, do the following:
1. Tap and then select Connectivity > Data account.
2. Select a existed data account
3. Tap Options and select Edit.
4. Set the parameters based on the information provided by your
service provider.
5. Tap OK and then Yes to save the settings.
Connecting to a WLAN
1. Select and then select Settings > Connectivity > WLAN.
2. Turn on WLAN. If you enter WLAN at the first time, it will ask you
turn on WLAN.
3. Select a WLAN. Your phone will automatically search for available
WLAN after you turn on WLAN.
4. Tap Options. You can do the following:
Connect: to connect to the selected WLAN.
Add: to manually enter relevant parameters to add a new wireless
LAN network.
Define access point: to view or edit the list of the wireless LAN
networks to which you selected.
WLAN status: to view your phone’s MAC address.
Disable WLAN: to turn off WLAN.
Refresh: to search for available wireless LAN networks.
Selecting the WAP Parameters
To select the WAP data account parameters, do the following:
1. Tap and then select Internet > Settings > Data account >
Primary account.
2. Select an account.
3. Tap OK to save the settings.
Select and then select Internet > Settings > Data
account > Primary account. > WLAN to ensure the phone
has connected to an available wireless LAN network and
then select the WLAN.
Accessing a Website
To access a website, do the following:
1. Tap and then select Internet > Input address.
2. Enter a Uniform Resource Locator (URL) address.
3. Tap Options and select Go to to access the website.

29 | | 30
Bluetooth 11
The Bluetooth function enables you to exchange data with other
Bluetooth devices, and connect a Bluetooth headset to your
phone.
You can turn on the Bluetooth function by configuring
Bluetooth settings.
Synchronizing Data
Before synchronizing data between a PC and your phone, ensure
that the PC supports the Bluetooth function and that the operating
system of the PC is Windows 2000 or Windows XP.
1. Tap and then select Connectivity > Bluetooth > Power,
and then tap On to turn on the Bluetooth function.
2. Start the Bluetooth driver on the PC.
3. Pair the PC with the phone.
After pairing, you can synchronize data between the PC and the
phone.
4. You can set Menu > Connectivity > Bluetooth > Advanced
> Sharing permission to Full control or Read only for PC’s
permission.
Connecting a Bluetooth Headset to Your Phone
To connect a Bluetooth headset to your phone, do the following:
1. Tap and then select Connectivity > Bluetooth > Power,
and then tap On to turn on the Bluetooth function.
2. Select Search audio device to search for available Bluetooth
headsets.
3. Scroll to the desired Bluetooth headset and tap Pair.
4. Enter the password to pair the Bluetooth headset with your
phone.
When the Bluetooth headset is connected to your phone, the
headset icon is displayed on the standby screen indicating that you
can use the headset.
No Bluetooth headset is included in the product package.
If you need a Bluetooth headset, please purchase one
separately.
Transferring Data
To transfer data, do the following:
1. Tap and then select Connectivity > Bluetooth > Power,
and then tap On to turn on the Bluetooth function.
2. Select My device > Search new device to search for available
Bluetooth devices.
3. Scroll to the desired Bluetooth device and tap Pair.
When the Bluetooth device is connected to your phone for
the first time, you need to enter the password to pair it with your
phone.
4. Transfer data between your phone and the Bluetooth device.

31 | | 32
Media album 12
You can use Media album to organize files stored on your phone
and microSD card.
To access Media album, tap and then select Media album
in standby mode.
You can enjoy music, read ebook and enioy videos in Media
album by access the folders in your phone.
Tools 13
Alarm
You can set five alarms on your phone.
To set an alarm, tap and then select Alarm in standby mode,
enable or disable the alarm, and then set the alert time, repeat mode,
snooze duration, and alert type.
Once the alarm is enabled, the alarm icon is displayed on the standby
screen.
Calendar
You can add events to the calendar and keep track of important events.
To access Calendar, tap and then select Calendar in standby
mode.
Tasks
You can add tasks to the phone. You can also view, edit, and delete
tasks as desired.
To access Tasks, tap and then select Tasks in standby mode.
Once a task is enabled, and the preset time arrives, the phone rings
as a reminder.
Calculator
To access Calculator, tap and then select Calculator in
standby mode.
To calculate, enter the number to be calculated, select a mathematical
operation by tapping the corresponding key, enter another number to
be calculated, and then tap to obtain the result.

33 | | 34
Games & apps 14
To access Games & apps, tap and then select Games &
apps in standby mode.
You can install third-party Java applications to expand the
capabilities of your phone.
Not all Java applications are compatible with your phone.
If you have trouble in installing or running a Java
application, press to return to the standby mode, and then
remove the application from your phone.
Certain Java applications require network connections.
Therefore, ensure that the GPRS connection is properly
set up.
Installing a Java Application
To install a Java application on your phone, do the following:
1. Select a Java installation file in .jar or .jad format from Phone or
Memory card, tap Options, and then select Install to start
the installation.
2. Tap Yes to confirm the certification information.
3. Select Phone or Memory card to install the Java application.
When the installation is completed successfully, the message
“Installed” is displayed.
Running a Java Application
To run a Java application, do the following:
1. Tap and then select Games & apps > Java.
2. Select a Java application and tap Options.
3. Select Launch to run the Java application.
Removing a Java Application
To remove a Java application installed on your phone, do the
following:
1. Tap and then select Games & apps > Java.
2. Select a Java application and tap Options.
3. Select Delete to remove the application.
4. Tap Yes to confirm the certification information.
After the Java application is removed, the message “Deleted”
is displayed.
Unit Converter
To access Unit Converter, tap and then select Games &
apps > Unit converter in standby mode.
Tap Weight or Length, select the unit, enter the value, tap and
then tap OK to obtain the result.
Currency Converter
To access Currency converter, tap and then select Games
& apps > Currency converter in standby mode.
Enter the rate, tap and then tap OK. Enter the local currency value,
and then tap OK to obtain the result.
Table of contents
Other Huawei Cell Phone manuals

Huawei
Huawei Acsend G600 User manual

Huawei
Huawei Ascend P7 User manual

Huawei
Huawei P40 Pro+ User manual

Huawei
Huawei MYA-L11 User manual

Huawei
Huawei Y6 User manual

Huawei
Huawei U8800 Pro User manual

Huawei
Huawei Honor User manual

Huawei
Huawei VOG-L29 User manual

Huawei
Huawei AMN-LX9 User manual

Huawei
Huawei ANA-LX4 User manual

Huawei
Huawei P30 Pro User manual

Huawei
Huawei MAR-LX3A User manual

Huawei
Huawei Ascend Y User manual

Huawei
Huawei BLA-L29 User manual

Huawei
Huawei C2930 User manual

Huawei
Huawei U8300 User manual

Huawei
Huawei Y7p User manual

Huawei
Huawei Mate 50 Pro User manual

Huawei
Huawei U5120 User manual

Huawei
Huawei CMR-W19 User manual