HUROM H-AI Series User manual

02
04
06
07
08
12
14
16
18
19
22
24
Safety Precautions
Parts and Accessories
How to Disassemble Chamber
How to Prepare Ingredients
How to Assemble (Smart Hopper/Dual Hopper)
Cautions during Operation
How to Use (Smart Hopper/Dual Hopper)
How to Use Control Lever (by mode/by ingredients)
Screw Stops during Operation
How to Clean
Before Requesting for Repair
Product Specifications / Warranty
H-AI Series ( For Household Use Only / Warranty Included )
CONTENTS
Instruction Manual
TM
1. Read ‘Safety Precautions’ (p. 2) and use the appliance properly.
2. After reading the manual, keep it in a convenient location for future reference.
3. Do not use it abroad which has different power supply and voltage.
4. Any quality improvements is subject to change without notice.
Safety Precautions
Parts and Accessories
How to Disassemble Chamber
How to Prepare Ingredients
How to Assemble
Cautions during Operation
How to Use
How to Use Control Lever
When Screw Stops during Operation
How to Clean
Before Requesting for Repair
Product Specifications / Warranty

02
Safety Precautions
01 You should read <Safety Precautions>
02 You should follow <Safety Precautions>
03 Precautions are classified as follows.
Warning Violating the labeling requirement,
may cause serious injury or death.
DO NOT PLUG IN NOR UNPLUG WITH WET HANDS. It may cause electric shock or
injury.
-
mal performance. If the voltage is different, it may shorten the life of the motor or cause
a failure.
It
ARD.
It can cause
injury, accident, or trouble
or injury.
Be careful not to let any liquids or other substances get into the switch on the appliance.
DO NOT OPERATE THE POWER DIAL WITH WET HANDS.
It may cause injury, accident or failure.
It may cause an injury or a failure.
It may cause injury or failure.

03
It can cause injury, accident, or trouble.
If not, it can cause injury, accident, or trouble.
It may cause injury or failure.
If the juicer does not run continuously, it can cause damage to parts due to motor
overheat or performance degradation. If the trouble persists, stop the product and
contact our customer center.
It may cause an injury or a
It can cause damage or breakage.
It may cause injury or failure.
and operate it again.
When using a new appliance, it gives off a smell, which
disappears naturally over time.
00
It may cause a trouble or a deformation of part.
When you carry the appliance by the chamber or by the side of the main body, the main
body might fall and cause an injury or a trouble.
Please contact the Customer Service Center for the advice on using the product for
commercial purposes.
Caution Violating the labeling requirement,
may cause serious injury or damage to the
appliance.

04
02 Dual Hopper
Hopper
Cover
Safety
Sensor
Hopper
Chute
C- Wing
T- Wing
Mid Gear
Pulp Outlet
Control Lever
Juice Cap
03 Screw
Juuce Outlet
Juice Cap Packing
Safety
Sensor
Parts and Accessories
Fine Strainer Coarse Strainer
Strainer
Bump
Silicon Brush
Brush Holder

Parts and Accessories
Body
Bump
Motor
Spin
Safety Sensor
13 Pusher

06
Please clean all parts before the first use.
Turn the hopper lid counterclockwise
to open and remove mixing bar, and
separate the chamber and hopper by
turning the hopper counterclockwise.
Pull up the strainer including the
screw and spinning brush from the
chamber to remove.
Hold the wing of the screw and pull
up to remove.
How to Disassemble Chamber
Disassemble the spinning brush and
strainer.

07
►If you are allergic to some ingredients, you need to choose ingredients carefully according to your condition.
►Please refer to the recipe book about how to use the juicer for each ingredient and cautions you need to take.
►
►
Apple·Pear
Oriental melon
Kiwi
Watermelon
melon·Orange
Grapefruit·Lemon
Mango·Peach
Persimmon
Plum·Cherry
Wheat·Chives
Water parsleys
Angelica·Celery
Kale
Pomegranate ·
Grapes
Mango·Banana
(Smart Hopper Only)
How to Prepare Ingredients
Ginger · Garlic
(Dual Hopper Only)
For fruits such as pear, kiwi, and oriental melon, cut the flesh with the seeds
Separate grapes from the vine.
For pomegranates, remove the husk and only take the flesh.
For fruits such as watermelon, orange, grapefruit, melon, and lemon, remove the
husk and cut the flesh to 3 cm in size.
Mango, persimmon, peach, plum, cherry, cactus, etc., have seeds
that are too solid to chew and swallow. Solid seeds can stop the motor or break
For ingredients with long and tough fiber such as water parsley, angelica, wheat
sprout, and chives, cut them to 3cm in size before use.If not prepared, stalk
Soft ingredients such as banana and mango might pile up inside or would not
ingredients or watery ingredients.
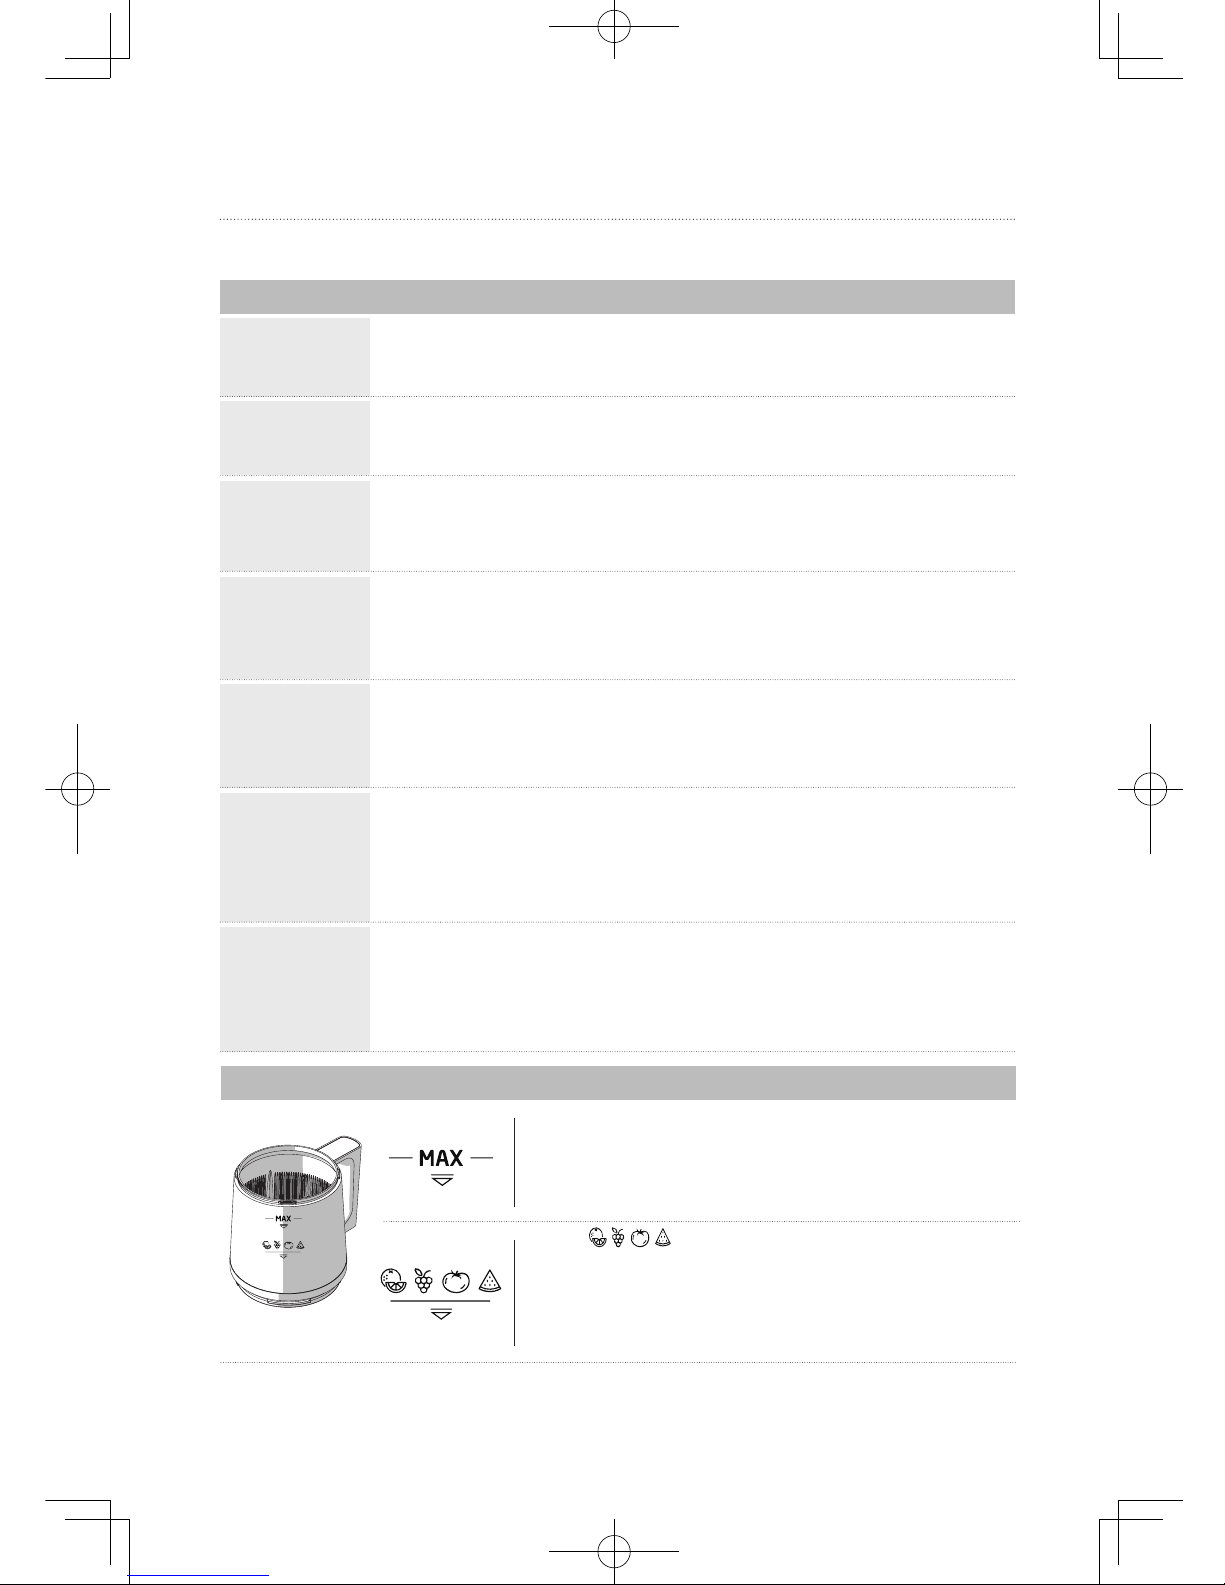
The [
of ingredients inside the hopper. Make sure the ingredients in the
Smart Hopper Icon
The [ ] icon on the hopper indicates the limit for
the volume of ingredients in the hopper for ingredients with
large water content. Orange, grapes, tomato, watermelon, etc.
contain a large amount of water and might run over the chamber.
Please keep the indicated line when filling up the hopper with the
ingredients.
For ingredients containing a lot of fibers such as ginger, remove the peel, cut
them into thin slices, and insert little by little. For root vegetables (carrot, potato,
sweet potato, deodeok, dandelion, etc.), wash them in running water to remove
of ingredients”.
How to Prepare Ingredients

08
2
STEP
1
STEP
3 4
STEP STEP
Smart Hopper
After [ Step 3 ], match [ ] of the hopper
to [ ] on top of the chamber in a
straight line and turn it clockwise until it
comes to [ ].
Assemble fine strainer and spinning
brush. Push in until they are completely
assembled.
Assemble the screw into [STEP1].
Place the assembly form [ Step 2 ] into the
chamber and turn left and right until the
bump on the bottom of the net falls into the
groove inside the chamber.
▲
How to Assemble

09
7 8
STEP STEP
6
STEP
5
STEP
Smart Hopper
After [ Step 4 ], fit the mixing bar on
the shaft of the screw.
Set the adjusting lever of the chamber set
to [ CLOSE]
Match the bump on the main body so that
the hopper’s handle faces towards the
main body.
Finally, close the pulp cup lid
and push in until it clicks.
After [ Step 5 ], align [ ] on the lid with
[ ] on the upper side of the hopper in
a straight line and turn it clockwise until
the icon on the lid points [ ].
▲
How to Assemble

10
4
STEP
2
STEP
1
STEP
3
STEP
Assemble fine strainer and spinning
brush. Push in until they are completely
assembled.
Assemble the screw into [STEP1].
Place the assembly form [ Step 2 ] into the
chamber and turn left and right until the
bump on the bottom of the net falls into the
groove inside the chamber.
After [ Step 3 ], match [ ] of the hopper
to [ ] on top of the chamber in a
straight line and turn it clockwise until it
comes to [ ].
▲
How to Assemble Dual Hopper

11
5 6
STEP STEP
Set the adjusting lever of the chamber set
to [ CLOSE]
Assemble the bottom of the chamber to
bump of the body.
Finally, close the pulp cup lid
and push in until it clicks.
How to Assemble Dual Hopper

12
Ingredients which needs caution.
- For fruits with hard seeds such as mango, persimmon, peach, plum, cherry etc. that are too hard to
- Do not put in fruits preserved in alcohol, sugar, honey, etc. (grapes, apricot, berries, etc.)
and enzymes (glasswort, houseleek, etc.). It may cause damage or failure.
and ginger. It may cause damage or failure.
Soft ingredients such as banana and mango might pile up inside or would
watery ingredients.
hopper.
- If the parts are not assembled properly, the juicer may not operate or it can cause breakage.
- This is a safety mechanism designed to protect the product from damage and is normal.
(It may cause damage or failure. )
Do not operate the appliance without ingredients inside.
- Inserting such as chopsticks etc. into Pulp outlet during operation may cause them to stuck into the
spinning brush and cause damage to the parts.
- Refer to Finishing Mode in p. 16 to discharge remaining pulp. The hopper will open easily
afterwards.
Do not operate the power dial with a wet hand
alien substances.
Cautions during Operation

13
the juicer.
- [ MAX ] and [ ] icons on the side of the hopper indicate the limit for the volume of
ingredients in the hopper depending on the water content of the ingredients.
lead to the leakage of juice through the gap between chamber of hopper.
the chamber smoothly.
- The hopper can’t be opened or it may cause damage when the pressure in the chamber increases.
Do not operate the switch with wet hands.
- It may cause electric shock or fire. Do not put foreign objects near the switch.
Strainer
Dual Hopper
It is to make juice with soft fruits and thick juice like banana, strawberry,
and also useful for smoothie, latte, or soup.
Fine
Strainer
Coarse
Strainer
Note
Ingredients that have been shriveled after refrigerated for a long time may produce small
amount of juice or may not produce any juice. If the unit is not cleaned immediately after use, the
pulp may dry andstick to the unit. This will make assembling and cleaning difficult and may also
lead to performance degradation.
Cautions during Operation

14
1
3
2
4
How to Use
according to their characteristics, and insert them
into the hopper.
Check the [MAX] and [ ] icons on the side
of the hopper and make sure the ingredients in the
strain the juicer.
Insert the prepared ingredients and close
the lid.
set.
Set the lever to [ ] (Half Open) when all
ingredients go down through the chamber set
and operate until no more pulp comes out of the
juicer.
For safety, the main body does not operate by
itself. It will only operate when it is properly
assembled with the chamber set.
Note
When turning the dial to [ON] or [REV], turn it only after
the screw stops completely.
The chamber may not be assembled onto the
[] position.
For performance and safety, the juicer will not
stop instantly but slow down to a stop when the
dial is turned.
◑
◑
Smart Hopper

How to Use
Put ingredients gradually in the hopper
chute and press with the pusher.
operating.
[◑
ingredients.
The hopper will be opened easily as long as the
residues in the strainer are released.
Stop the machine slowly after press the button for
safety and product performance.
the pusher provided.
Cut stalk vegetables with tough fibers such as
Insert diced apple, cherry tomato, and the like
through the side chute for convenience.
the control lever every 400ml to emit the pulp.
The chamber will not be assembled with body if
]
position.
For your safety, this appliance only works when
it's correctly assembled with chamber set.
1
2
3
4
Note
make sure that the auger stops completely.
Pusher
Upper
hopper
chute
Side
hopper
chute
Dual Hopper

16
How to Use Control Lever
Note
If the hopper does not open easily after use, set the lever to ◑ (Half Open) and turn the dial to [REV] for
3~5 seconds and stop. Repeat this twice or three times. You will be able to open it easily afterwards.
[ CLOSE ]
After all ingredients go down the chamber set, turn the
lever to [ ] (Half Open) and run the juicer until no more
pulp comes out of the juicer.
You need to discharge pulp to open the hopper easily.
[◑]
When detaching and cleaning the chamber, turn the lever
to [OPEN ◯] completely. You can easily and conveniently
clean the chamber.
You cannot move the control lever to [OPEN ◯] position
when the chamber is placed on the main body.
[ OPEN◯
◑

17
How to use control lever by ingredients (Juicing)
Apple, Pear, Melon, Watermelon, Strawberry, Blueberry, Orange, Grapefruits, Lemon, Mango,
Plum, Peach, Cherry, Persimmon, Pineapple, Wheat-Grass, Parsley, Celery, Dandelion, Carrot,
Ginger, Potato, Beet, Tomato, Paprika, Broccoli, Cauliflower, Cabbage, Kale, Spinach (Cooked)
Sweet Potato, Pumpkin, Corn
Start from control lever in [
control lever into [◑] half-opened position.
When juice starts to come out, place the control
[◑] half-opened position.
1. Start from control lever in
[
Use the control lever by the properties of each ingredients, you can make a more
delicious juice. When you extract over 400ml at once, please open the control lever
every 400ml to emit the pulp. The hopper can’t be opened or it may cause damage
when the pressure in the chamber increases.
Note
Ingredients
Ingredients with seed

18
When Screw Stops during Operation
Caution in Using Power Dial
1
2
Note
If the screw still does not turn after following said directions, unplug the power cord, disassemble
chamber set, clean the parts, and try again.
design of the motor, it will not stop instantly,
but will slow down to a complete stop in the direction it was rotating.
Note
and stop and repeat this twice or
The reverse rotation releases
ingredients tangled inside the
chamber. The reverse option is
active only when you hold the dial
in the reverse position and the
screw will stop when you release
the dial.
When you turn the dial to [ON]
comes to a complete stop and
then turn the dial to the direction
you want.

19
How to Clean
the chamber by referring to p. 13 (Finishing Mode)
before washing.
After the juicer comes to a complete stop, pull out the
power cord with a dry hand.
Move the chamber set by holding the chamber and the
hopper’s handle with both hands.
Disassemble the chamber set and wash the parts in
running water using the cleaning brush.
wash the chamber.
The intermediate gear inside the chamber can be
removed for washing.
Silicon packings can be also separated for washing.
(Juice Cap Packing, Silicon Brush)
vinegar for 30 minutes for sterilization.
Clean the main body with dried towel or soft cloth.
01
02
03
04
06
07
08
09
Note
If the unit is not cleaned immediately after use, the pulp may dry and stick to the unit.
This will make disassembling and cleaning difficult and may also lead to performance
degradation. Do not wash with hot or boiling water, an iron scrubber, abrasive material, sink
solvents, or sharp cleaning tools. Do not put it in a dishwasher or dish dryer. After washing,
thoroughly and naturally dry, and store in a clean area.
◯

20
If the chamber is not easily separated from the
hopper, separate the hopper, while the chamber is
connected to the main body, and wash the hopper
in running water.
If the hopper does not open easily after use
Set the lever to[ ] (Half Open) position and remove
three times. You will be able to open the chamber
lid easily afterwards.
The chamber packing can't be disassembled.
Do not disassemble the chamber packing.
If you try to disassemble the chamber packing,
it might be damaged.
When you clean the chamber set, wash the residue
inside and bottom of the chamber under running
water.
How to Clean : Chamber Set
Hopper
Chamber
packing
◑
Table of contents
Other HUROM Juicer manuals

HUROM
HUROM HW Series User manual

HUROM
HUROM HG Elite User manual

HUROM
HUROM HV Series User manual

HUROM
HUROM HH-SBB11 User manual

HUROM
HUROM H-100S Series User manual

HUROM
HUROM H-200 Series User manual

HUROM
HUROM HH series User manual

HUROM
HUROM H-310A User manual

HUROM
HUROM H-AA Series User manual

HUROM
HUROM HU-100 Ultem User manual

HUROM
HUROM HU-100 Ultem User manual

HUROM
HUROM H-AF User manual

HUROM
HUROM HP Series User manual

HUROM
HUROM HP Series User manual

HUROM
HUROM HW Series User manual

HUROM
HUROM HH series User manual

HUROM
HUROM HQ Series User manual

HUROM
HUROM HU-100SB User manual

HUROM
HUROM H-AA Series User manual

HUROM
HUROM H-101 Series User manual