03
When using the product, be careful so that a tie,
long necklace, scarf, etc. doesn’t get into the inlet.
Place this product on an even and stable surface
for use.
When inserting ingredients into the inlet, do not
use a chopstick, spoon, any hard object or anything
other than the pusher.
Do not use the product for more than 30 minutes
continuously each time. It may overheat the motor
to cause malfunction. To operate it again, completely
stop the device for about 5 minutes before use.
Do not exert any excessive shock to or drop the
product.
If the device produces any unusual sounds,
excessive heat or smoke, stop using it immediately
and contact the Customer Service Center. The smell
experienced when using a new product will naturally
go away over time.
Pull the power cord plug from the outlet when it is
not in use. Also, when pulling the power cord, make
sure to grab the plug to pull it.
Do not clean the product at a temperature of 80°C
or higher. Do not place it in a dishwasher, dryer,
microwave, etc. It may cause malfunction and/or
deformation of parts.
The product weighs approximately 6.2 kg. When
moving the product, make sure to securely hold
the product body with both hands. If you move it by
holding just the chamber or the sides of the product
body, the body may fall to cause a bodily injury or
malfunction.
Do not use this household-use product for
commercial purposes. Excessive extraction of a
large amount of ingredients may cause damage
to the parts. In case it is to be used for commercial
purposes, please contact the Customer Service
Center on the method of use.
Make sure to thoroughly understand how to
prepare ingredients and prepare them properly
before inserting them.
-Poorly prepared ingredients may hinder the
extraction process and/or cause damage to the product.
Ingredients in need of extra care
- When using boiled ingredients, such as boiled
potatoesandboiled sweetpotatoes,or softingredients,
such as bananas, ripened kiwis, or tomatoes, alone,
the juice may pool inside the chamber and not be
extracted properly. Insert only a small amount or use
them with other ingredients.
-When inserting walnuts, peanuts, almonds,
sunflower seeds, pine nuts, beans, etc., add only a
2. Precautions During Use
small amount or add them with other ingredients
after soaking them in water.
Ingredients unable to be juiced
- Do not insert ingredients that cannot be juiced such
as sesame seeds, coffee beans, Chinese peppers,
tree barks and pine needles. Do not insert mudfish,
eels, shrimp, marsh snails, squids, etc.
- Do not insert fruits soaked in alcohol, honey or
sugar (grapes, raspberries, mulberries, etc.) and
enzymes (glasswort, rock pine enzymes, etc.).
- Do not insert ingredients whose attributes make
them difficult to be juiced such as silverberries, aloe,
cactus, quince, yams, kudzu root, sugar cane, acorn
and dandelions.
- Do not insert ice made by freezing water.
It is recommended that you consume extracted
vegetable juice immediately, if possible, and do not
refrigerate it for a long period of time.
Do not use this product for pulverizing grains. It
may cause damage or malfunction.
Do not re-extract juice from pulp that has already
been juiced.
Do not conduct any idle run of the product before
inserting any ingredients.
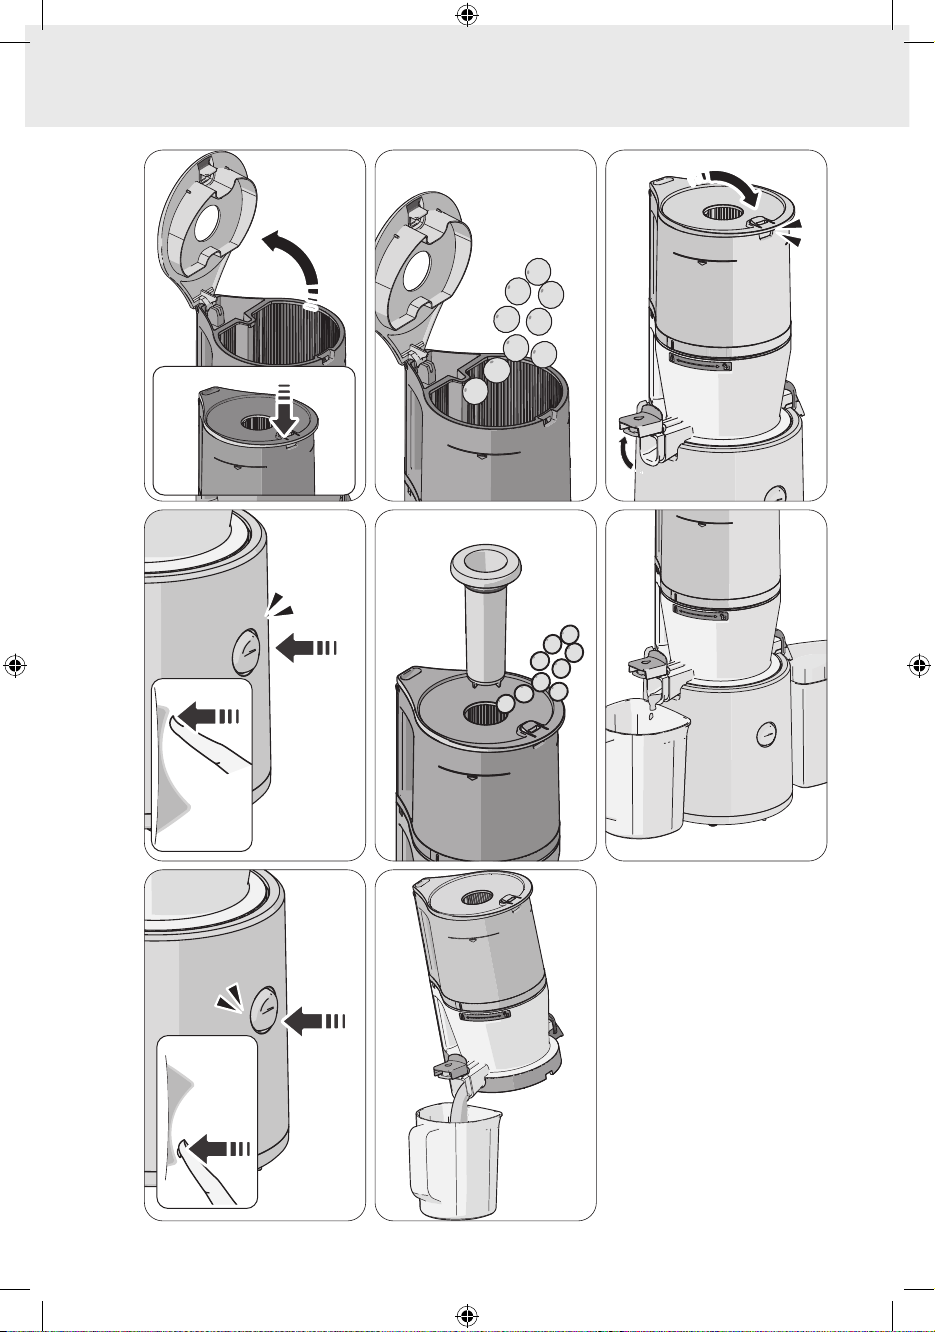
Do not insert ingredients into the hopper above
the guided limit mark.
Do not use it for more than 30 minutes
continuously.
- It may overheat the motor to cause malfunction.
However, when using it continuously, pause the
operation and use it after a break of over 5 minutes.
Do not insert a chopstick or spoon into the juice/
pulp outlet during operation.
When inserting ingredients, do not use anything
other than the pusher. It may damage the parts or
cause a bodily injury and/or malfunction.
Do not operate the power switch with wet hands.
- It may cause electric shock, short circuit and/or
fire. Do not get foreign substances on or near the
power switch.
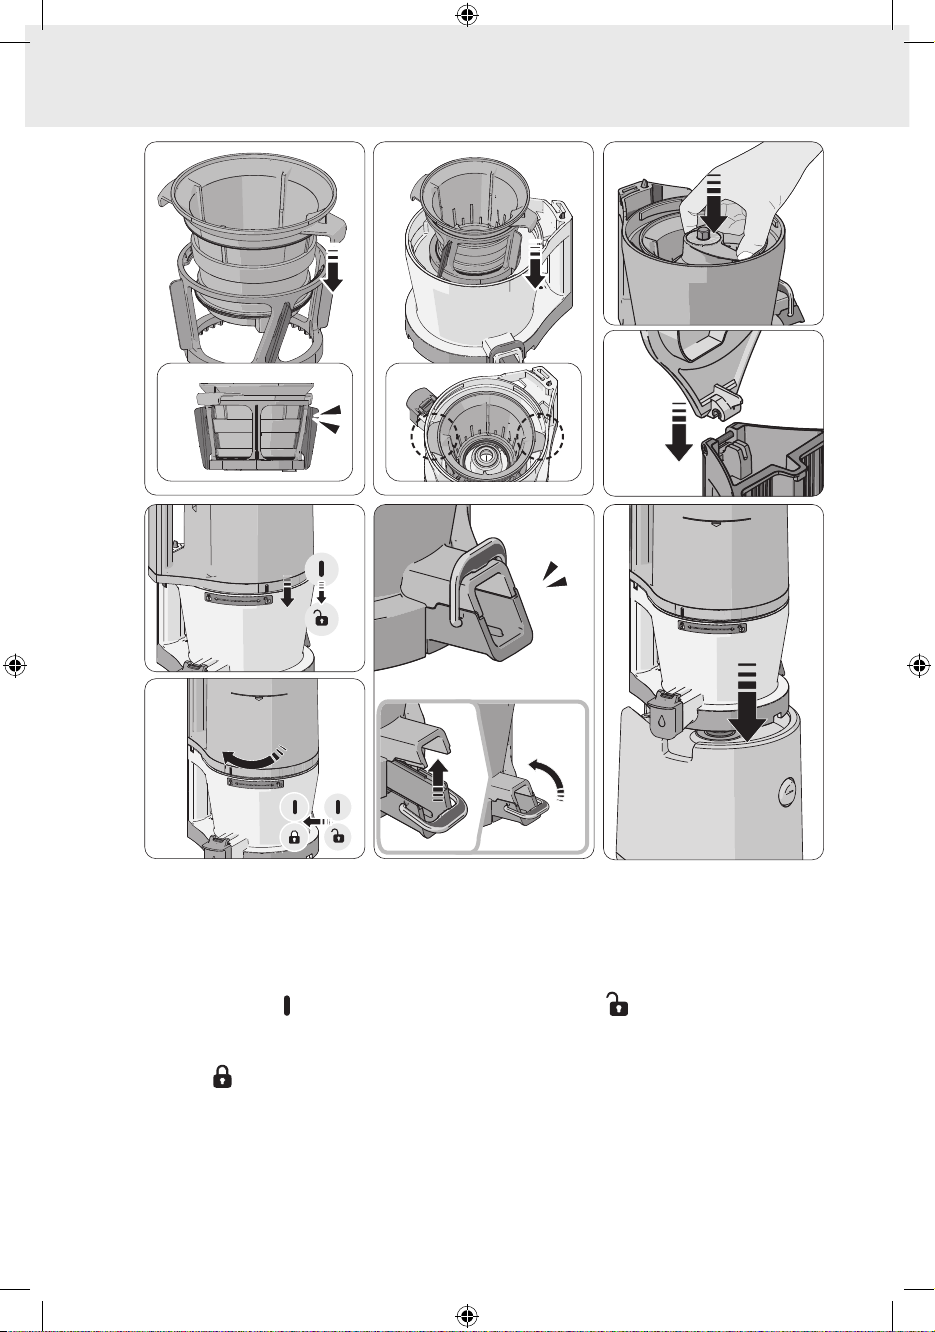
Use it with the juice cap open.
- The juice can flow backwards into the hopper if the
juice cap is closed while juicing.
Do not use it when the top of the product body is
wet from extracted juice or water.
Note
1. Withered ingredients, which have been stored for
a long time in the refrigerator, or frozen fruits may
produce only a small amount of juice or none at all.
2. If the product is not cleaned immediately after
use, the pulp may dry up, which makes it difficult to
disassemble and clean it and also cause performance
impairment. So, if possible, clean it immediately after
use.