manuals.online logo
Brands
  1. Home
  2. •
  3. Brands
  4. •
  5. HYPE
  6. •
  7. Toy
  8. •
  9. HYPE FOCKE WULF FW-190 User manual

HYPE FOCKE WULF FW-190 User manual

This manual suits for next models

1

Other HYPE Toy manuals

HYPE G-103 Twin III Acro User manual

HYPE

HYPE G-103 Twin III Acro User manual

HYPE EDGE 540 User manual

HYPE

HYPE EDGE 540 User manual

HYPE Swift User manual

HYPE

HYPE Swift User manual

HYPE Focus User manual

HYPE

HYPE Focus User manual

HYPE FunFly User manual

HYPE

HYPE FunFly User manual

HYPE Miss America P-51 User manual

HYPE

HYPE Miss America P-51 User manual

HYPE Freestyler User manual

HYPE

HYPE Freestyler User manual

HYPE FOX User manual

HYPE

HYPE FOX User manual

HYPE F-35 Lightning User manual

HYPE

HYPE F-35 Lightning User manual

HYPE TROJAN T-28D User manual

HYPE

HYPE TROJAN T-28D User manual

HYPE DG-1000 User manual

HYPE

HYPE DG-1000 User manual

HYPE ASW-17 User manual

HYPE

HYPE ASW-17 User manual

Popular Toy manuals by other brands

FUTABA GY470 instruction manual

FUTABA

FUTABA GY470 instruction manual

LEGO 41116 manual

LEGO

LEGO 41116 manual

Fisher-Price ColorMe Flowerz Bouquet Maker P9692 instruction sheet

Fisher-Price

Fisher-Price ColorMe Flowerz Bouquet Maker P9692 instruction sheet

Little Tikes LITTLE HANDIWORKER 0920 Assembly instructions

Little Tikes

Little Tikes LITTLE HANDIWORKER 0920 Assembly instructions

Eduard EF-2000 Two-seater exterior Assembly instructions

Eduard

Eduard EF-2000 Two-seater exterior Assembly instructions

USA Trains EXTENDED VISION CABOOSE instructions

USA Trains

USA Trains EXTENDED VISION CABOOSE instructions

Modellbau Laffont Z1601 Assembly instructions

Modellbau Laffont

Modellbau Laffont Z1601 Assembly instructions

NOCH 12905 instruction manual

NOCH

NOCH 12905 instruction manual

Eduard Ki-61-Id quick start guide

Eduard

Eduard Ki-61-Id quick start guide

Viessmann Vollmer 45616 Mounting instruction

Viessmann

Viessmann Vollmer 45616 Mounting instruction

Vollmer 42004 Mounting instruction

Vollmer

Vollmer 42004 Mounting instruction

Phoenix Model CLASSIC-EP instruction manual

Phoenix Model

Phoenix Model CLASSIC-EP instruction manual

H-KING Sopwith Camel British WW1 Fighter instruction manual

H-KING

H-KING Sopwith Camel British WW1 Fighter instruction manual

MODSTER Predator 4x4 Crawler user manual

MODSTER

MODSTER Predator 4x4 Crawler user manual

DHK Hobby 8136 User instruction manual

DHK Hobby

DHK Hobby 8136 User instruction manual

THUNDER TIGER Raptor 50 V2 kit manual

THUNDER TIGER

THUNDER TIGER Raptor 50 V2 kit manual

Timberkits Skateboarder instructions

Timberkits

Timberkits Skateboarder instructions

Hangar 9 Funtana 125 Assembly manual

Hangar 9

Hangar 9 Funtana 125 Assembly manual

manuals.online logo
manuals.online logoBrands
  • About & Mission
  • Contact us
  • Privacy Policy
  • Terms and Conditions

Copyright 2025 Manuals.Online. All Rights Reserved.

Bauanleitung / Instruction Manual
manuale d'istruzione
Ein Qualitätsprodukt aus dem Hause
Die Focke-Wulf FW-190 gilt als eines der besten deutschen Jagdugzeuge im Zweiten Weltkrieg. Der Prototyp
machte seinen Erstug am 1. Juni 1939. Trotz einiges Misstrauens des Reichsluftfahrtministeriums in Bezug auf
luftgekühlte Sternmotoren, wurde der BMW 139 14-Zylinder-Doppelstern-Motor in den ersten Prototypen sehr
erfolgreichen Flugversuchen unterzogen. Ab August 1941 wurde die FW-190 bei ersten Einsätzen über England
gesichtet. Unser Modell der Focke Wulf FW-190 gehört zweifellos zu den gelungensten Nachbauten dieses Flug-
zeugtyps. Neben funktionsfähigen Landeklappen, die vorbildgetreu als Spreizklappen ausgeführt sind, verfügt die
Hype FW-190 über ein fertig eingebautes Einziehfahrwerk. Das Modell ist in geschäumter Bauweise aufgebaut.
Dabei kommt der besonders leichte und haltbare Werkstoff HypoDur® zum Einsatz. Alle Formteile sind fertig in dem
gezeigten Tarnmuster lackiert. Das mehrfarbige Dekor ist bereits auf Rumpf, Tragäche und Leitwerk aufgebracht.
Der Brushless-Direktantrieb mit vorbildgetreuer Dreiblattluftschraube, wird von einem 3s-LiPo-Akku versorgt und
verleiht dem Modell ein kraftvolles Flugbild. Damit setzt sich das Modell auch bei windiger Wetterlage eindrucksvoll
in Szene und verfügt über eine vorbildgetreue Flugperformance.
The Focke Wulf FW-190 was one of the best German ghter planes in World War II. Our FW-190 is undoubtedly
one of the most successful imitations of this aircraft type. In addition to functioning aps, which are designed as split
aps, the pursuit plane has a built-in full functional retractable landing gear. The model is made of the innovative
light weight and strong foam material HypoDur®. This material features maximum resistance to impacts caused
by hard landings. All parts are painted in the shown camouage pattern, the decals are already attached to the
fuselage, wing and stabilizer. The efcient brushless direct drive with a scale three-blade propeller is powered by
a 3s LiPo battery and gives the model a powerful ight performance. The kit contents 5 micro servos, brushless
motor and speed controller.
Focke Wulf FW-190 è stato uno dei caccia tedeschi migliori usati nella Seconda Guerra Mondiale. L‘aeromodello
Hype FW-190 è senza dubbio una delle riproduzioni più riuscite di questo caccia. Oltre ad avere i aps funzionanti
(sono disegnati come split aps), Hype Focke FW-190 ha il carrello retrattile già montato. Il modello è realizzato
in un innovativo materiale espanso molto robusto denominato HypoDur®; questo materiale si distingue per massi-
ma resistenza agli impatti, per esempio durante atterraggi bruschi. Tutte le parti sono già colorate con lo schema
mimetico, le decalcomanie sono già incollate sulla fusoliera, sull‘ala e sul direzionale. L‘efciente motorizzazione
brushless diretta con elica tripala va alimentata da una batteria LIPO 3s, per una performance in volo molto potente.
Il modello viene fornito comprensivo di 5 servi micro, il motore BLS e il regolatore brushless.
Best.-Nr. 022-1400 (ARF)
Wichtiger Hinweis:
Bitte bewahren Sie diese Dokumentation für Ersatzteilbestellungen auf.
Dieses
Modell ist kein
Spielzeug, geeignet
für Modellsportler ab 14 Jahren.
Technische Daten
Spannweite: 1.135 mm; Länge: 998 mm; Gewicht
ca.: 1.150 g; Motor: Brushless; Akku: LiPo 11,1 V
/ 1.800 mAh; RC-Anlage: 6 Kanäle; Maßstab
ca.: 1:9
RC-Funktionen
Höhenruder, Seitenruder, Querruder, Motor,
Landeklappen, Einziehfahrwerk
Technical Data
Wingspan: 1.135 mm; Length: 998 mm; Weight
approx.: 1.150 g; Motor: Brushless; Battery: LiPo
11,1 V / 1.800 mAh; RC-System: 6 channels;
Scale approx.: 1:9
RC-Functions
Elevator, Rudder, Aileron, Motor, Flaps, Retrac-
table Landing Gear
Caratteristiche tecniche
apertura alare: 1.135 mm; lunghezza: 998 mm;
peso circa.: 1.150 g; motore: Brushless; batteria:
LiPo 11,1 V / 1.800 mAh; radiocomando: 6 canali;
scala circa.: 1:9
funzioni radio
piano di quota, direzionale, alettoni, motore, aps,
carrello retrattile
FOCKE WULF FW-190
Seite 2 Best.-Nr. / Item-No. / art. 022-1400
1. Inhaltsverzeichnis / Content / Indice
1. Inhaltsverzeichnis / Content / indice
2. Lieferumfang / Kit Content / contenuto del kit
3. Die Montage des Modells / The Assembly / L'assemblaggio
4. Hinweise zur Bedienung / How To Use / l'utilizzo
5. Sicherheitshinweise / Safety Instructions / per la vostra sicurezza
6. Ersatzteile / Spare Parts / ricambi
7. Garantiebedingungen / Warranty / garanzia
• Entsorgung / Disposal / smaltimento
Bitte entsorgen Sie Elektronik ausschließlich in den dafür vorgesehenen Behältnissen.
Please dispose defective electronic parts in special marked containers.
I riuti elettronici vanno smaltiti negli appositi contenitori e seguendo le leggi del rispettivo paese.
Seite 3
Best.-Nr. / Item-No. / art. 022-1400
2. Lieferumfang / Kit Content / Contenuto del kit
1 - Rumpf / Fuselage / fusoliera
2 - Tragäche / Main Wing / ala
3 - Höhenleitwerk / Elevator / piano di quota
4 - Luftschraube / Propeller / elica
5 - Mitnehmer / Propeller Hub / trascinatore dell'elica
6 - Spinnerrückteil / Spinner Backplate / piattello dell'ogiva
7 - Spinner / Spinner / ogiva
8 - Propelleradapter / Propeller Adapter / adattatore elica
9 - M3-Schrauben / Screws M3 / viti M3
10 - M6-Schraube / Screw M6 / viti M6
11 - V-Kabel / Y Servo Extension / prolunga a Y
1
2
3
4
5
6
7
8
9
10
11
Seite 4 Best.-Nr. / Item-No. / art. 022-1400
3. Die Montage des Modells / The Assembly /
L'assemblaggio
Schieben Sie das Höhenleitwerk von der linken Seite aus
(in Flugrichtung gesehen) in den Rumpf ein, wie darge-
stellt. / Slide the elevator from the left side (in ight direc-
tion) into the fuselage as shown. / Inlare il piano di quota
da sinistra (visto in direzione del volo) nella fusoliera.
Höhenleitwerk mittig ausrichten und mit der beiligenden
M3-Schraube von unten sichern. / Slide the elevator into
the middle and secure it with the M3 screw from the bot-
tom side. / Centrare il piano di quota e ssare da sotto con
le viti M3.
Entfernen Sie den Kunststoffclip vom Höhenruderge-
stänge und hängen Sie das Gestänge im Ruderhorn ein,
wie dargestellt. Anschließend das Gestänge mit dem
Kunststoffclip sichern. / Remove the plastic clip from the
elevator linkage and put the linkage into the rudder horn
as shown. Afterthat install the plastic clip on the linkage
again. / Rimuovere il clip in nylon dai tiranti del piano di
quota e agganciare i tiranti nella squadretta come mostra-
to. Poi ssare i tiranti con il clip in nylon.
Seite 5
Best.-Nr. / Item-No. / art. 022-1400
Als nächstes werden die Servos am Empfänger ange-
schlossen. Verwenden Sie für die drei Servos in der
Tragäche jeweils ein 20cm Verlängerungskabel. Verlegen
Sie anschließend die Empfängerantenne(n). Beachten
Sie hierzu die Herstelleranweisungen der RC-Anlage! /
As the next step connect the servos to the receiver. For
the servos in the wing please use three 20cm extension
cords. Afterthat install the antenna(s) in the model. Please
note the manual from the radio manufacturer accordingly.
/ Ora collegare i servocomandi alla ricevente. Usare per i
tre servi nell'ala una prolunga da 20 cm cad. Ora installate
la/le antenn/ae ricevente, rispettando le indicazioni del
produttore del radiocomando.
Schieben Sie die Tragäche in den Rumpf wie dargestellt.
Achten Sie darauf, dass die Servokabel nicht zwischen
Rumpf und Fläche eingequetscht werden. / Slide the wing
into the fuselage as shown. Take care, that the servo
cords are not squeezed between the wing and the fuse-
lage. / Inlate l'ala nella fusoliera come mostrato in foto,
facendo attenzione che le prolunghe dei servi non venga-
no schiacciate tra ala e fusoliera.
Nehmen Sie die M6-Kunststoffschraube zur Hand und si-
chern Sie die Tragäche am Rumpf. / Take the M6 plastic
screw and x the wing at the fuselage. / Prendete la vite in
nylon M6 e ssate l'ala alla fusoliera.
Seite 6 Best.-Nr. / Item-No. / art. 022-1400
Nehmen Sie die gezeigten Teile für die Montage der Luft-
schraube zur Hand. / Take the shown parts for installing
the propeller. / Ora preparate le parti mostrate in queste
due foto per montare l'elica.
Montieren Sie den Luftschraubenmitnehmer und die Spin-
nerrückplatte auf der Motorwelle, wie dargestellt. / Install
the propeller adapter and the spinner backplate as shown
on the motor shaft. / Montate il trascinatore dell'elica e il
piattello dell'ogiva sull'albero motore.
Setzen Sie den Dreiblatt-Propeller auf die Welle auf. Rich-
ten Sie den Propeller dabei so aus, dass die Luftfenster in
der Spinnerrückplatte nicht verdeckt werden. / Attach the
propeller to the motor shaft. Align the propeller in a way
that it does not cover the air windows in the backplate of
the spinner. / Inlate l'elica tripala sull'albero motore. Alli-
neate l'elica in maniera tale che non copre le aperture per
prendere aria nel piattello dell'elica.
Seite 7
Best.-Nr. / Item-No. / art. 022-1400
Nehmen Sie die M6 Mutter zur Hand und sichern Sie die
Luftschraube auf der Welle. Ziehen Sie die Mutter mit
einem Sechskantschlüssel gut fest! Anschließend die
Spinnerkappe mit der beiliegenden M3 Schraube montie-
ren und gut festziehen. / Take the M6 nut and put it on the
motor shaft. Use a wrench and tighten the nut securely!
Afterthat install the spinner cap and x it securely with the
M3 screw. / Prendete l'elica M6 ssate l'elica sull'albero.
Serrare bene il dado con una chiave esagonale. Poi mon-
tate l'ogiva con la vite M3 e serrate bene!
Öffnen Sie das Akkufach auf der Unterseite des Rumpfes
und setzen Sie den Flugakku ein, wie dargestellt.
Akku jetzt noch nicht am Regler anschließen! / Open the
battery hatch on the bottom side of the fuselage and insert
the LiPo battery. Do not connect the battery with the speed
controller now! / Aprire il vano batteria sulla parte inferiore
della fusoliera e montate la batteria LIPO. Non collegate
ancora la batteria con il regolatore di giri!!!
Prüfen Sie nun, ob sich alle Ruder korrekt bewegen. Zu-
erst den Sender einschalten - danach den geladenen An-
triebsakku im Modell anschließen. Betätigen Sie der Reihe
nach alle Funktionen am Sender. Vorsicht im Umganmg
mit der drehenden Luftschraube! Beim Ausschalten zuerst
den Akku im Modell trennen! / Check the function of all
rudders. Switch on the transmitter rst! Then connect
the LiPo-Battery to the controller in the model. Move all
rudders one by one. Attention! Be careful with the rotating
propeller! When switching off, disconnect the battery in
the model rst! / Vericate ora che tutte le parti mobili si
muovano correttamente: accendere la trasmittente e col-
legare la batteria caricata al regolatore. Ora provare tutte
le funzioni radio, una per una. Attenzione a non ferirvi con
l'elica in rotazione!
Stellen Sie die maximalen Ruderausschläge gemäß der
nachfolgenden Werte ein. / Adjust the maximum travel of
the control aps according to the sketch below. / regolare
le escursioni massime dei piani mobili come segue:
Querruder & Landeklappen
Aileron & Flaps
alettoni & aps
Höhenruder
Elevator
piano quota
Seitenruder
Rudder
direzionale
hier messen
measure here
misurare qui
hier messen
measure here
misurare qui
hier messen
measure here
misurare qui
hier messen
measure here
misurare qui
Seite 8 Best.-Nr. / Item-No. / art. 022-1400
Abschließend muss der Schwerpunkt am Modell über-
prüft werden. Dazu werden alle Komponenten (auch der
Akku!) im Modell montiert. Der Schwerpunkt liegt 76 mm
hinter der Nasenleiste. Unterstützen Sie das Modell mit
zwei Fingern exakt an diesen Punkten und beobachten
Sie, wie das Modell auspendelt. Die Nase des Modells
sollte sich leicht nach unten neigen. Dann ist der Schwer-
punkt optimal justiert. / Before the rst ight you have
to check the center of gravity. For doing so you have to
mount all components (also the battery!) in to the model.
The CG is placed 76 mm behind the nose cone of the
main wing. Support the model exactly in the shown area.
Put the model on two ngers and watch the fuselage. The
nose should point slightly to the ground. Then the CG is
placed correctly! / Vericare il centro di gravità. Dovrete
usare il modello completo della batteria! Il CG è a 76 mm
dietro il bordo d'entrata dell'ala. Tenere il modello tra due
dita come mostrato e guardate la fusoliera. Il muso do-
vrebbe puntare leggermento verso il basso.
Schwerpunkt / CG / baricentro
Seite 9
Best.-Nr. / Item-No. / art. 022-1400
Regler-Setup MIT Bremse / Setup WITH Brake / setup
del regolatore con freno
1. Sender einschalten und Gasknüppel auf Vollgas stel-
len. / Switch your Transmitter on and set the throttle to its
maximum position / Accendere la TX e mettere lo stick
motore in posizione massimo motore.
2. LiPo-Akku am Regler anschließen. / Connect the
battery pack to the speedcontroller. / Collegare la batteria
LIPO con il regolatore.
3. Warten Sie ca. 5 Sekunden bis zwei Beep-Signale
ertönen - die Bremse ist jetzt aktiviert. / Wait about 5
seconds until you hear two short beep signals, conrming
that the break now is activated. / attendere circa 5 secon-
di nché sentite due beep, ora il freno è attivato.
4. Gasknüppel danach auf Leerlauf stellen - es ertönen
erneut zwei Beep-Signale, der Regler ist jetzt betriebsbe-
reit. ACHTUNG, der Motor ist jetzt scharfgeschaltet! / Put
the throttle stick to minium position, the speed controllers
sends two beep signals. Now the controller is ready to
go. ATTENTION, the motor is now activated! / Portare lo
stick motore in posizione minimo, sentite altri due beep,
ora il regolatore è pronto. ATTENZIONE, da adesso il mo-
tore è attivato e può partire!!
Regler-Setup OHNE Bremse / Setup WITHOUT Brake /
setup del regolatore senza freno
1. Sender einschalten und Gasknüppel auf Vollgas stel-
len. / Switch your Transmitter on and set the throttle to its
maximum position / Accendere la TX e mettere lo stick
motore in posizione massimo motore.
2. LiPo-Akku am Regler anschließen. / Connect the
battery pack to the speedcontroller. / Collegare la batteria
LIPO con il regolatore.
3. Warten Sie ca. 5 Sekunden bis ein Beep-Signal ertönt
- die Bremse ist jetzt deaktiviert. / Wait about 5 seconds
until you hear one short beep signal, conrming that the
break now is deactivated. / attendere circa 5 secondi,
nché sentite un beep, ora il freno è disattivato.
4. Gasknüppel danach auf Leerlauf stellen - es ertönt
erneut ein Beep-Signal, der Regler ist jetzt betriebsbereit.
ACHTUNG, der Motor ist jetzt scharfgeschaltet! / Put the
throttle stick to minium position, the speed controllers
sends one beep signal. Now the controller is ready to go.
ATTENTION, the motor is now activated! / Portare lo stick
del motore in posizione minimo, il regolatore emetterà
un beep. Ora il regolatore è pronto, ATTENZIONE ora il
Bedienungsanleitung für eingebaute Drehzahlsteller in Hype-Flugmodellen.
Instruction Manual for integrated speed controllers for Hype airplanes.
Istruzioni per regolatori di giri elettronici installati negli aeromodelli HYPE.
Der im Modell eingebaute Brushless-Drehzahlsteller ist
bereits fertig programmiert und perfekt auf das Modell
abgestimmt. Sollten Sie jedoch Änderungen an dem
Regler-Setup vornehmen wollen, nden Sie nachfolgend
die Programmieranleitung zu dem Regler. Wir empfehlen
ausdrücklich nur erfahrenen Piloten, Änderungen am
Regler-Setup vorzunehmen! / The installed brushless-
speedcontrollers is ready to go programmed so thst it
ts perfectly for this model. In case you want to change
setup parameters you will nd the programming manu-
al in the following. Please note that only experienced
pilots should do changes on the speedcontroller setup! /
Il regolatore di giri brushless montato nel modello è già
programmato. Se desiderate fare delle modiche, qui
trovate le istruzioni per la programmazione. Consigliamo
espressamente solo a piloti esperti di apportare modi-
che al setup del regolatore!!
Features / Features / Caratteristiche
• Max. Strom: 30A / max. current: 30A / max. current 30A
• LiPo 2-3s / LiPo 2-3s / 2-3 s Lipo
• Bremse an/aus / Brake on/off / freno on/off
• BEC 5,0V / BEC 5,0V / BEC 5,0V
• Anlaufschutz / Start Protection / protezione partenza
• Weiches Regelverhalten / Smooth throttle step / transi-
zione morbida del gas
• Überlastschutz / Stall protection / protezione contro il
blocco meccanico dell'elica
• Unterspannungsschutz / Low-voltage cutoff /cut off a
bassa tensione
• Abschaltung bei Signalverlust / Auto shut down when
signal is lost / spegnimento a perdita del segnale radio
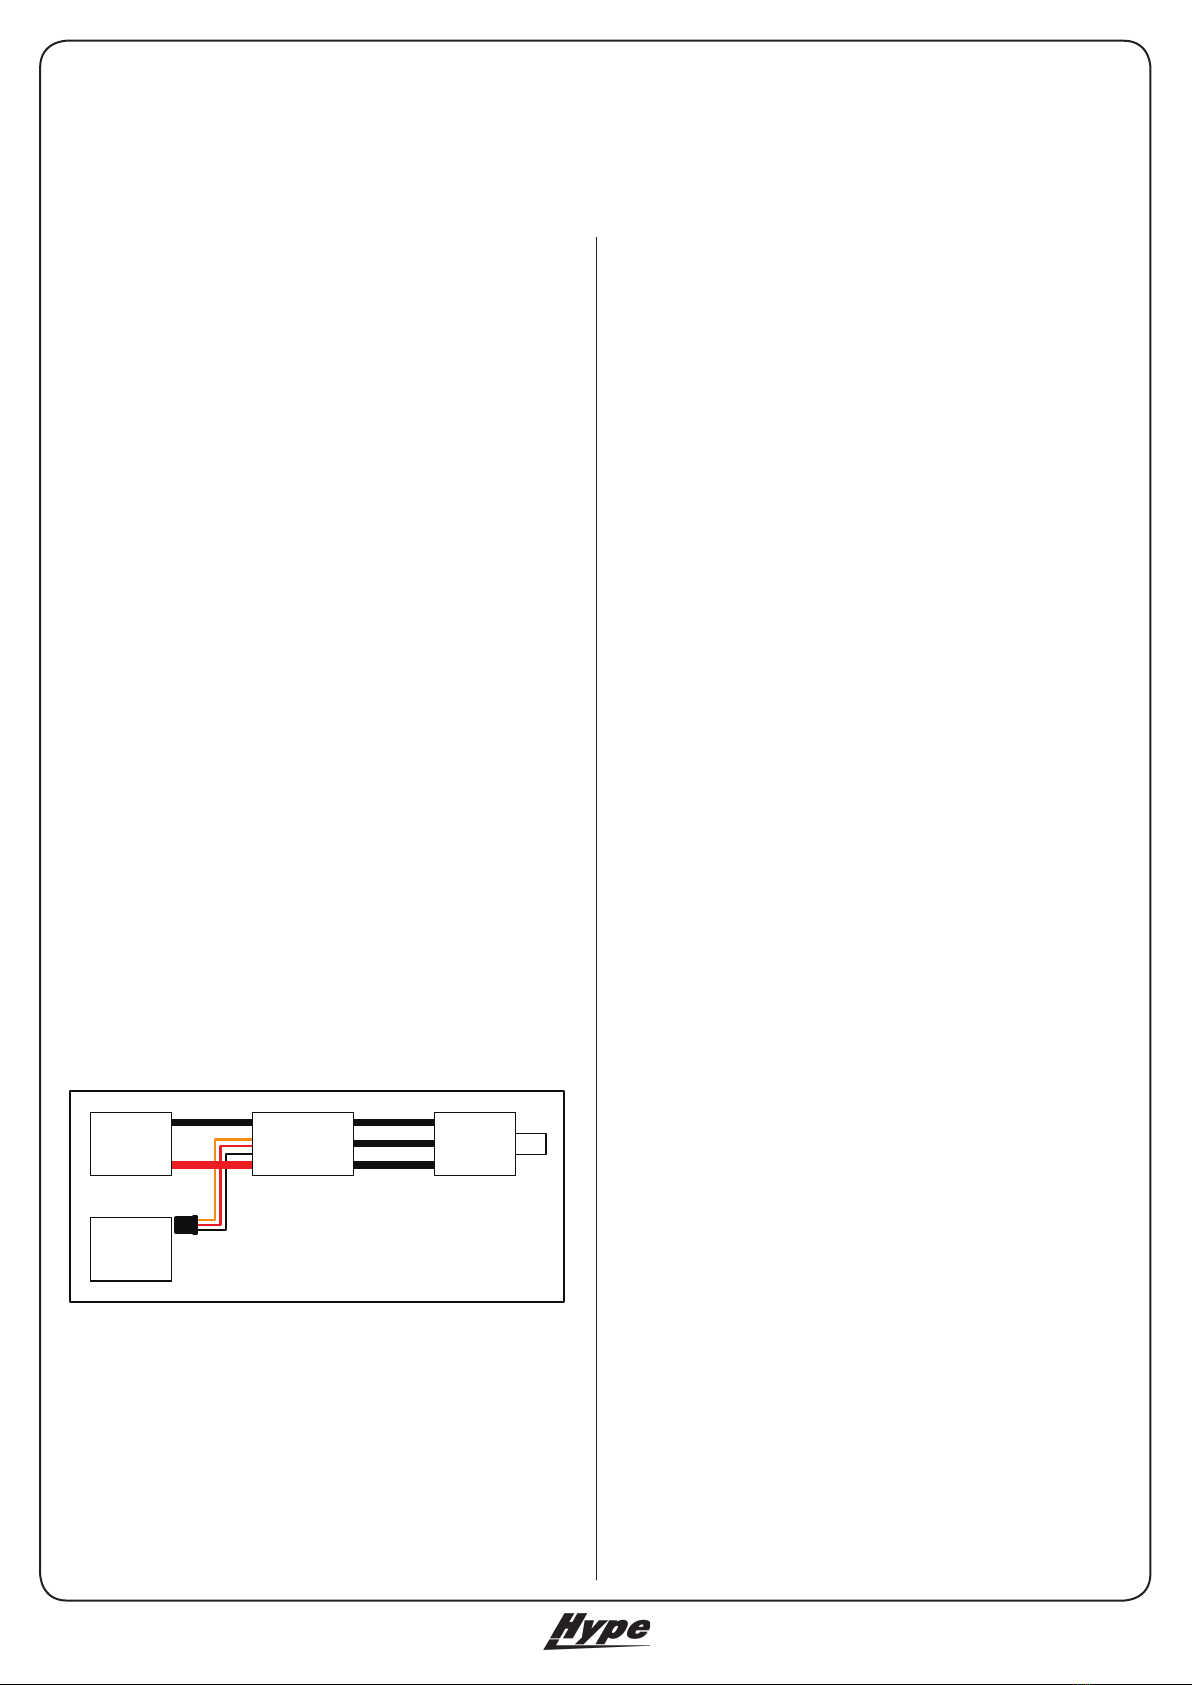
Anschlussdiagramm / How to connect /
schema di collegamento
BLDC
Motor
2~4
Li-xx cells
Receiver To Throttle Channel
SU/BLE
C
B
A
+
-
+
-
red
black
Brushless-Motor
Brushless-Motor
motore brushless
Brushless-Regler
Brushless-Controller
regolatore di giri bls
LiPo-Akku
LiPo-Battery
batteria LIPO
Empfänger
Receiver
ricevente
schwarz / black / nero
rot
red
rosso
Kanal für Motor
To throttle channel
canale del motore
Seite 10 Best.-Nr. / Item-No. / art. 022-1400
4. Hinweise zur Bedienung / How To Use / istruzioni d'uso
4.1 Laufrichtung der Ruder / Sterring Direction Of Flight Controls / direzione dei piani mobili
Vor dem Erstug des Modells muß unbedingt die Laufrichtung aller Ruder überprüft werden. / Before the rst ight of the model, the
steering direction must be checked carefully! / prima del primo volo dovrete controllare il senso di escursione dei piani mobili
Höhenruder / Elevator / piano di quota
Wird der Höhenruderknüppel am Sender nach hinten gezogen, muß das Höhenruder nach oben ausschlagen. Wird der Höhenruder-
knüppel nach vorn gedrückt, muß das Höhenruder nach unten ausschlagen. / When you pull the elevator stick, the elevator has to
move up, the model will climb. When you push the elevator stick, the elevator has to move down, the model will decline. / Tirando lo
stick del piano di quota, il piano mobile deve andare in sù, spingendolo in avanti, il piano deve andare giù.
Seitenruder / Rudder / direzionale
Das Modell wird von hinten betrachtet. Wird der Seitenruderknüppel am Sender nach links bewegt, muß das Seitenruder nach links
ausschlagen. Entsprechend umgekehrt erfolgt der Ausschlag für die andere Richtung. / Take a look to the model from behind. When
you move the rudder stick to the left, the rudder has to move to the left. For the right side it works accordingly. /Guardare il modello da
dietro: muovendo lo stick del direzionale a sinistra, il piano mobile si muove a sinistra e vice versa.
Querruder / Aileron / alettoni
Das Modell wird von hinten betrachtet. Wird der Querruderknüppel am Sender nach links bewegt, muß die linke Querruderklappe nach
oben und die rechte Querruderklappe nach unten ausschlagen. Entsprechend umgekehrt erfolgen die Ausschläge für die andere Rich-
tung. / Take a look to the model from behind. When you move the aileron stick to the left, the left ap has to move up and the right ap
has to move down. For the right side it works accordingly. / Guardando il modello da dietro e muovendo lo stick degli alettoni a sinistra,
l'alettone sinistra deve andare sù e quello destro in giù. E vice versa.
Motor / Motor / motore
Wird der Gasknüppel in die Leerlauf Position gebracht, muß der Motor stillstehen. Bei Vollgas muss der Motor seine maximale Dreh-
zahl erreichen. / When you move the throttle stick to idle, the motor has to stop completely. Putting the throttle stick to full power, the
motor has to reach its maximum rpm. / Portando lo stick motore in posizione minimo, il motore si deve fermare, in posizione massima
invece deve andare ai massimi giri.
4.2 Startvorgang / Take Off / partenza
• Starten Sie prinzipiell immer gegen den Wind! / Alwas start the model against the wind! / Partite sempre contro il vento.
• Überprüfen Sie die Funktion aller Ruder vor jedem(!) Start. / Check all rudder controls before each(!) start. / Controllate tutti i piani
mobili prima della partenza.
• Geben Sie Vollgas und korrigieren Sie in Bodennähe nur mit kleinen Steuerausschlägen. / For take off always use maximum power.
When you are near the ground only small control action is recommended. / Per la partenza accelerare al massimo.
• Steigen Sie in einem achen Winkel. / Climb in a smooth angle. / Salire in un angolo piatto.
4.3 Landevorgang / Landing Procedure / Atterraggio
• Drosseln Sie den Motor und iegen Sie in 30 m Entfernung mit Rückenwind parallel zur Landebahn. / Reduce motor power and y
parallel to the runway in a distance of 30 meters. / Diminuire i giri motore e volare a 30 m di distanza parallelamente alla pista di atter-
raggio.
• Fliegen Sie eine 90° Kurve in Richtung Landebahn und bauen Sie Höhe ab. / Turn 90° to the runway and decline continously. / Effettu-
ate ora una virata a 90° in direzione della pista di atterraggio e diminuite la quota.
• Fliegen Sie erneut eine 90° Kurve, Sie iegen nun direkt auf die Landebahn zu. Turn again 90° to the runway and decline continously.
You are now approaching the runway. / Effettuate un'ulteriore virata a 90° in direzione della pista e continuate a scendere.
• Lassen Sie das Modell weiter sinken bis das Modell 1 m über der Landebahn schwebt. / Decline until you are about 1 meter over the
runway. / Continuate la discesa no a librarvi 1 m sulla pista.
• Ziehen Sie den Höhenruderknüppel etwas stärker und halten Sie ihn gezogen. / Pull the elevator carefully and keep it pulled. / Tirate
lo stick del piano di quota un po' di più e tenetelo tirato.
• Je mehr sich das Modell dem Boden nähert, desto mehr muß der Höhenruderknüppel gezogen werden. Da das Modell ständig lang-
samer wird, setzt es sich praktisch von allein auf die Landebahn. / The closer you come to the ground the more you have to pull the
elevator. As the model gets slower, it will land more or less automatically. / Più vi avvicinate al suolo, più dovrete tirare il piano di quota.
Il modello rallenta continuamente atterrando praticamente da solo sulla pista.