manuals.online logo
Brands
  1. Home
  2. •
  3. Brands
  4. •
  5. Hytronik
  6. •
  7. Accessories
  8. •
  9. Hytronik HC438V User manual

Hytronik HC438V User manual

INSTRUCTION MANUAL FOR DETACHED LINEAR SENSOR
DAYLIGHT INTERACTIVE VERSION, MODEL NO.:HC438V + HIR01
Technical Specifications
PIR Sensor
120-277V 50Hz/60Hz
120V ~ / 1.7A / 200VA
277V ~ / 1.5A / 400VA
360°
<1W
Max. 6 x 3m
30s ~ 30min.
2 ~ 50Lux; disable
0s, 10s ~ 30min, +∞
10% ~30%
Indoors, ceiling & wall mounted
0 ~ +50OC
30s
PRODUCT TYPE:
OPERATING VOLTAGE:
RATED LOAD (capacitive load):
DETECTION ANGLE:
POWER CONSUMPTION:
DETECTION RANGE (DxH):
HOLD TIME:
DAYLIGHT SENSOR:
STAND-BY PERIOD:
STAND-BY DIMMING LEVEL:
MOUNTING:
WORKING TEMP.:
WARM-UP:
Note: during the warm-up period when first power on,luminiares
always stay on 100% without daylight interactive.
HC438V
1-10V-
RJ12 connector Push
L’
N
L
N
1-10V+
120
30
4.5
110.5
4.5
21
PIR Sensor Head
Model: HIR01
Lens
RJ12 connector
Installation hole
SECTION 1 INSTALLATION AND WIRING
1.1 Ensure that the electricity supply is switched off before installing or servicing this product.
1.2 Wiring diagram
1-10V
LED Driver
1-10V
LED Driver
N
L
1-10V+
1-10V
-
N
L
1-10V+
1-10V
-
1-10V+
1-10V
P
L’
N
N
L
-
L
N
3rd Floor, block C, complex building, 155#, Bai'gang road south,
Bai'gang village, Xiao Jin Kou town, Huicheng district, Huizhou 516023
Tel:86-752-2772020 F:86-752-2777877
E: [email protected] W:www.hytronik.com
CHINA FACTORY
Room D, 10/f, Tower A, Billion Center, 1 wang Kwong Road,
Kowloon Bay, Kowloon, Hongkong
T: 00852-35197525 F: 00852-30116936
E: [email protected]
HYTRONIK INDUSTRIAL LIMITED
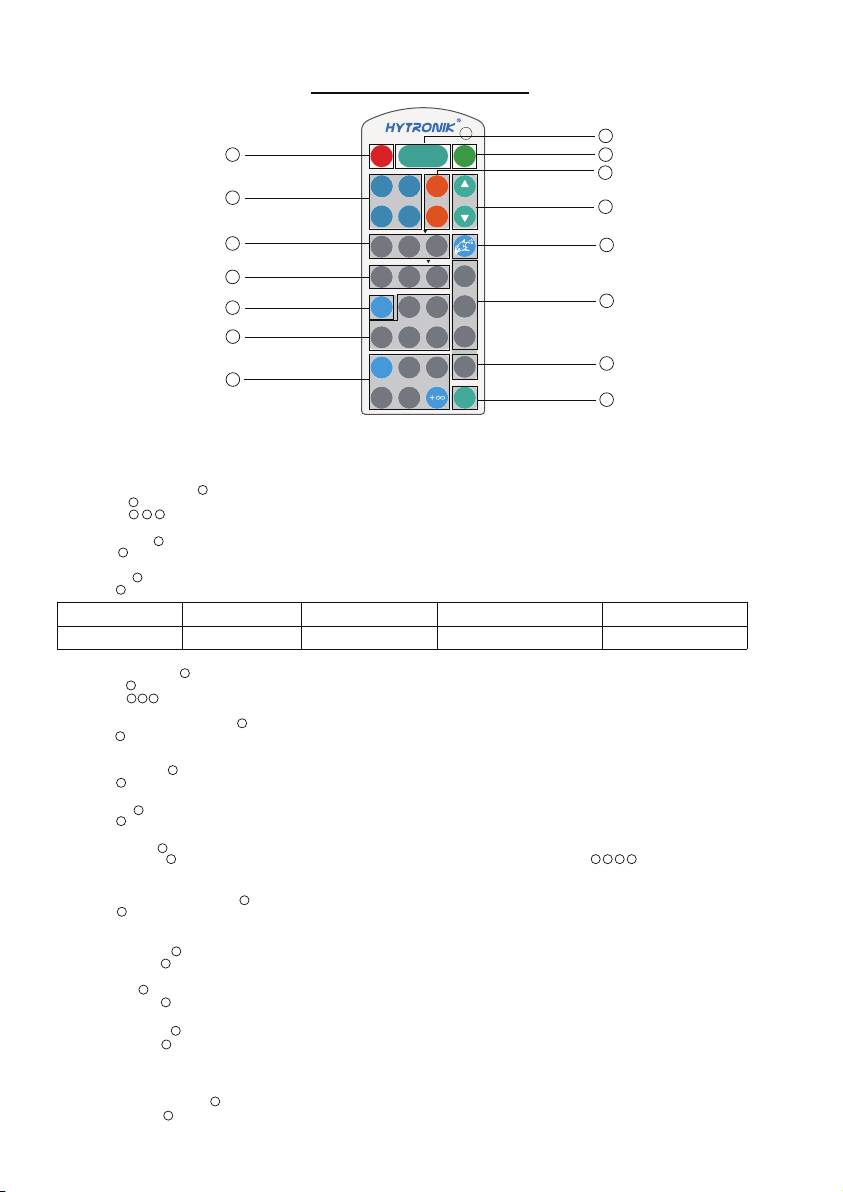
Permanent ON/OFF [ ]
1. Press button , to select permanent ON or permanent OFF mode.
2. Press button to resume automatic operation. (Please refer to explanation below)
Auto Mode [ ]
Press button to in initiate automatic mode. The sensor starts working and all settings remain as before the light was switched ON/OFF.
1
2
234
button 1
button 2
SECTION 2 REMOTE CONTROL
5
9
4
11
12
Stand-by dimming level
Detection range
ON/
OFFAuto ModeReset
Power
80%
Test
2s
10%20%
30s 1min
100%
30min10min5min
0s 10s1min
30%
SC1SC2
SC3
Scene mode
10min
50%10%
30min
Hold-time
Stand-by period
5min
Lux
Disable
2Lux
10Lux
50Lux
Daylight Sensor
SC4
Power
100% +
-
Dim
M/A
3
1
2
7
8
6
10
13
14
15
HRC-05
Note: the buzzer beeps one time when RC
receives signal successfully
RESET [ ]
Press button , all settings go back to default settings:
Test 2s function [ ]
1.Press button ,the sensor goes into test mode (hold time2s). N.B. the stand-by period and daylight sensor settings are disabled in test mode.
2.Press button to exit from this mode, and the sensor settings are changed accordingly.
Ambient daylight threshold [ ]
Press button , the latest surrounding lux value overwrites previous lux value learned, and is set as the daylight threshold. This feature enables the fixture
to function well in any environment.
Detection range[ ]
Press buttons in zoneto set detection range at 100% / 50% / 10%.
Hold time [ ]
Press buttons in zoneto set hold time at 30s / 1min / 5min / 10min / 30min.
Stand-by period [ ]
Press buttons in zone to set the stand-by period at 0s / 10s / 1min / 10min / 30min / +∞.
Note: “0s” means on/off control; “+∞” means bi-leve of dimming control, the light will never switch off.
(i.e. the light remains at the stand-by dimming level until motion is detected.)
Stand-by dimming level [ ]
Press buttons in zoneto set the stand-by dimming level at 10% / 20% / 30% .
3
button 3
8
3
10
6
Press button ,the sensor goes to manual override or semi-auto function.
15
11
12
7
4
11
button 8
button
10
Power output [ ]
Press button , the output shifts between 80% and 100%, for energy saving purposes.
5
button 5
Dim +/- [ ]
Press button to adjust the light brightness between 10%~100% during hold-time.“+” increases the light level, “-” will decrease the light level.
9
button 9
Lux disable [ ]
When you press button ,then no daylight interactive function even if any movement detected and you can press or long push for the
push-dim dimmer(connected to push terminal of HC438V) to return back to daylight interactive mode.
14 4 9 10 13
button
14
Manual override/ Semi-auto [ ]
Note: The buzzer beeps twice if it is in manual override mode, and beeps once if shifts to semi-auto mode.
button
15
zone 6
zone
11
zone
12
zone
7
Detection range Hold time Stand-by period Stand-by dimming level Daylight sensor
100% 5min 10min 10% disable
SECTION 4 FUNCTION
Double L N terminal makes it easy for wire loop-in and loop-out, and saves the cost of terminal block and assembly time.
This sensor maybe over-ridden by the end-users to switch on/off the lights manually, or adjust the maximum brightness during motion hold-time with the
push-switch. This makes the product more user-friendly and offers more options to fit for extra-ordinary demands.
* Short push (<1s): on/off function;
ON → OFF: the light turns off immediately and cannot be lighten for a certain time (equals to hold time preset) even there is movement is detected. After
this period, the sensor goes back to auto sensor mode.
OFF → ON: the light turns on 100% and goes to auto sensor mode, even when ambient Lux level exceeds the daylight threshold.
* Long push (>1s): adjust the maximum brightness (between 10% and 100%) during hold-time. Both the settings on DIP switch and manual override can
overwrite each other, the latest action controls.
* If no end-user adjustment is desired, simply leave this terminal disconnected.
4.1 Manual Override
4.2 Loop-in and Loop-out Terminal
SECTION 5 TROUBLE SHOOTING
MALFUNCTION CAUSE REMEDY CAUSE REMEDY
The light will not come on
The lamp is always on
Incorrect light-control setting selected
Continuous movement in the detection zone
Faulty lamp
No power supply
Adjust daylight threshold setting
Replace lamp
Check power to sensor
Check detection area setting
Scene mode options [ ]
Note: the end-user can fine tune the settings by pressing buttons of detection range / hold time / stand-by period / stand-by dimming level
/daylight sensor , the last setting will over-write that feature of the pre-set scene.
611
13
12
7
zone 4
There are 4 scene modes built into the remote control for different applications:
Scene options Detection range Hold time Stand-by period Stand-by dimming leve Daylight sensor
SC1 100% 1min 10min 10% 2Lux
SC2 100% 5min 10min 10% 2Lux
SC3 100% 10min 30min 10% 10Lux
SC4 100% 10min + 10% 50Lux
8
Daylight sensor []
Press buttons in zone to set daylight sensor at 2lux / 10lux / 50lux.
13
zone 13

This manual suits for next models

1

Other Hytronik Accessories manuals

Hytronik HC403VRC-KD User manual

Hytronik

Hytronik HC403VRC-KD User manual

Hytronik HMW35 Quick guide

Hytronik

Hytronik HMW35 Quick guide

Hytronik DUAL sense HIM11 Quick guide

Hytronik

Hytronik DUAL sense HIM11 Quick guide

Hytronik HIM31 Quick guide

Hytronik

Hytronik HIM31 Quick guide

Hytronik HCD418/I User manual

Hytronik

Hytronik HCD418/I User manual

Hytronik HMW38/RF Quick guide

Hytronik

Hytronik HMW38/RF Quick guide

Hytronik HIM38/RF User manual

Hytronik

Hytronik HIM38/RF User manual

Hytronik HC401SRC/R User manual

Hytronik

Hytronik HC401SRC/R User manual

Hytronik HC018V User manual

Hytronik

Hytronik HC018V User manual

Hytronik HMW12 Quick guide

Hytronik

Hytronik HMW12 Quick guide

Hytronik HC038V User manual

Hytronik

Hytronik HC038V User manual

Hytronik HIR28 User manual

Hytronik

Hytronik HIR28 User manual

Hytronik HMW20 Quick guide

Hytronik

Hytronik HMW20 Quick guide

Hytronik HEC9025/I Quick guide

Hytronik

Hytronik HEC9025/I Quick guide

Hytronik HIM12 User manual

Hytronik

Hytronik HIM12 User manual

Hytronik HCD418 User manual

Hytronik

Hytronik HCD418 User manual

Hytronik HC009S-KD/I Quick guide

Hytronik

Hytronik HC009S-KD/I Quick guide

Hytronik HIM16 User manual

Hytronik

Hytronik HIM16 User manual

Hytronik HMW24 User manual

Hytronik

Hytronik HMW24 User manual

Hytronik HEC7428 User manual

Hytronik

Hytronik HEC7428 User manual

Hytronik HMW12 Quick guide

Hytronik

Hytronik HMW12 Quick guide

Hytronik HIR27 Quick guide

Hytronik

Hytronik HIR27 Quick guide

Hytronik HMW34 Quick guide

Hytronik

Hytronik HMW34 Quick guide

Hytronik HIM39/RF Quick guide

Hytronik

Hytronik HIM39/RF Quick guide

Popular Accessories manuals by other brands

wattstopper FM-105 installation instructions

wattstopper

wattstopper FM-105 installation instructions

Eldat Easywave RCP04E5001-15 manual

Eldat

Eldat Easywave RCP04E5001-15 manual

CARLO GAVAZZI ROG400 instruction manual

CARLO GAVAZZI

CARLO GAVAZZI ROG400 instruction manual

StarTech.com ST122DVIA user guide

StarTech.com

StarTech.com ST122DVIA user guide

ETC Unison Aero installation guide

ETC

ETC Unison Aero installation guide

Topcom CF-201 user guide

Topcom

Topcom CF-201 user guide

i-gatU POD-30 user manual

i-gatU

i-gatU POD-30 user manual

Quantum FC420 user guide

Quantum

Quantum FC420 user guide

Gilson Mini Digital Incubator user guide

Gilson

Gilson Mini Digital Incubator user guide

Kemper KHS CoolFlow operating instructions

Kemper

Kemper KHS CoolFlow operating instructions

Swann WARMNITE WN47003N manual

Swann

Swann WARMNITE WN47003N manual

RUMED 3000 Operating and maintenance instructions

RUMED

RUMED 3000 Operating and maintenance instructions

Action Sports Stats instruction manual

Action Sports

Action Sports Stats instruction manual

Hamilton Beach 74250 - ELECTRIC KNIFE COLOR manual

Hamilton Beach

Hamilton Beach 74250 - ELECTRIC KNIFE COLOR manual

Panasonic MA24D51 Specification sheet

Panasonic

Panasonic MA24D51 Specification sheet

Philips HF3507 quick start guide

Philips

Philips HF3507 quick start guide

Eurochron EUB 1000 operating instructions

Eurochron

Eurochron EUB 1000 operating instructions

KITMA FCB23F instruction manual

KITMA

KITMA FCB23F instruction manual

manuals.online logo
manuals.online logoBrands
  • About & Mission
  • Contact us
  • Privacy Policy
  • Terms and Conditions

Copyright 2025 Manuals.Online. All Rights Reserved.