Imit SILVER CR S User manual

(IT)
SILVER CR S
CRONOTERMOSTATO SETTIMANALE DIGITALE
DESCRIZIONE PRODOTTO
SILVER CR S è un cronotermostato settimanale digitale programmabile con algoritmo
TPI, ideale per regolare il riscaldamento o il raffrescamento. Il display LCD
retroilluminato visualizza temperatura rilevata, ora e temperatura impostata, modalità
di funzionamento attiva e la programmazione oraria in uso. Offre 3 diversi programmi
preimpostati (Comfort, Economy e Vacanza) oltre alla possibilità di impostare un
programma manuale o settimanale personalizzato in passi da 1 ora, su due livelli di
temperatura (comfort e ridotta, giorno e notte). Include la funzione Antigelo e consente
la calibrazione della temperatura con un range di ±8°C.
• Programmazione giornaliera e settimanale
• Alimentazione a batteria (incluse nella confezione)
• Diverse opzioni di modalità
• Calibrazione del riscaldamento/raffrescamento
• Controllo ON/OFF
• Connessione via cavo alla caldaia
• Modalità riscaldamento/raffrescamento
• Algoritmo TPI
• Misurazione precisa della temperatura
DICHIARAZIONE DI CONFORMITÀ
Direttive compatibili:
Regolamento sulla compatibilità elettromagnetica 2014/30 / UE (EN 61000-6-3: 2021, EN
61000-6-1: 2019)

Direttiva sulla bassa tensione 2014/35/EU (EN IEC 60730-2-9:2019/A2:2020, IEC
60730-1:2013/AMD2:2020)
SPECIFICHE TECNICHE
Dimensioni: 85mm / 125mm / 20mm
Corrente di funzionamento:
3V DC (2 batterie alcaline AAA)
Relè NO Corrente di commutazione:
2A/30VDC (Carico resistivo)
2A/250VAC (Carico resistivo)
Precisione della misurazione della temperatura: 0,1°C
Sensibilità operativa: 0,3°C
Intervallo di temperatura di funzionamento: 5°÷30°C
Durata della batteria: 1 anno (2 x AAA)
Temperatura di funzionamento: -10°÷50°C
Temperatura di conservazione: -20°÷60°C
LEGENDA COMANDI E DISPLAY
Funzioni dei pulsanti
!
"#$%&'()*+,-.,&//&*%)0/&'&$)
1
"#$%&'()*23*&#/)'(-*2)$$&*()/+),&(#,&*4*5#
6
73%8&$2&/)'(-97&:,)%8&/)'(-
;
"#$%&'()*23*23/3'#<3-')*2)$$&*()/+),&(#,&*4*=3>
?
"#$%&'()*/-2&$3(@
A
B'9B:*C*5D$-88-*(&%E),&

Legenda dello schermo
INSTALLAZIONE
POSIZIONAMENTO TERMOSTATO AMBIENTE
Il termostato ambiente deve essere posizionato nella stanza utilizzata più
frequentemente. Ad esempio; soggiorno o salotto. Installare il dispositivo lontano da
fonti di calore e correnti d’aria, a circa 1,50 m dal pavimento.
Attenzione! Si raccomanda di eseguire l’installazione del termostato rispettando
scrupolosamente le norme di sicurezza e le disposizioni di legge vigenti. Prima di
effettuare qualsiasi collegamento, accertarsi che l’interruttore generale sia stato
disattivato.
!
B,&
1
F)/+),&(#,&*&/D3)'()
6
G-2&$3(@*H8-'-/I
;
G-2&$3(@*J-/K-,(
?
G-2&$3(@*L&8&'<&
A
",-.,&//&<3-')*%)0/&'&$)
M
N'238&(-,)*2)$*.3-,'-
O
P$-88-*%8Q),/-
R
N'238&(-,)*D&S),3&
!T
F)/+),&(#,&*3/+-%(&(&
!!
N'238&(-,)*,3%8&$2&/)'(-*
4*5)*$U3'238&(-,)*23*,3%8&$2&/)'(-*$&/+)..3&V*$U#'3(@*23*,3%8&$2&/)'(-*W*3'*K#'<3-')X*
4*5)*$U3'238&(-,)*23*,3%8&$2&/)'(-*W*Y%%-V*$U#'3(@*23*,3%8&$2&/)'(-*'-'*W*3'*K#'<3-')X
!1
N'238&(-,)*,&:,)%8&/)'(-*
4*5)*$U3'238&(-,)*23*,&:,)%8&/)'(-*$&/+)..3&V*$U#'3(@*23*,&:,)%8&/)'(-*W*3'*
K#'<3-')X*
4*5)*$U3'238&(-,)*23*,&:,)%8&/)'(-*W*Y%%-V*$U#'3(@*23*,&:,)%8&/)'(-*'-'*W*3'*
K#'<3-')X

POSIZIONAMENTO DELLA BATTERIA
Prima di iniziare, spegnere il dispositivo collegato al termostato ambiente e assicurarsi
non sia alimentato da tensione.
Come mostrato nell'immagine, spingere delicatamente il cacciavite negli spazi
appositi, piegare le linguette e separare il coperchio anteriore dalla base. Inserire 2
nuove batterie alcaline AAA nell'alloggiamento seguendo la corretta direzione dei poli.
Sostituire entrambe le batterie contemporaneamente. Quindi allineare la parte
anteriore del termostato ambiente alla base e spingere per riagganciare.
SOSTITUZIONE BATTERIE
Quando l'icona appare sullo schermo, significa che le batterie sono scariche. Si
consiglia di sostituirle il prima possibile.
Avvertenza: Quando il prodotto non viene utilizzato per un lungo periodo (più di 15
giorni), rimuovere le batterie. In caso contrario, i malfunzionamenti che potrebbero
verificarsi sarebbero fuori garanzia. Si prega di smaltire correttamente le batterie
scariche, negli appositi contenitori per rifiuti.

SCHEMA ELETTRICO TERMOSTATO AMBIENTE
UNITÀ DI RISCALDAMENTO/RAFFREDDAMENTO
Attenzione!
Gli interventi all'unità di riscaldamento/raffreddamento o all'impianto elettrico devono
essere eseguiti da professionisti qualificati.
TARATURA TEMPERATURA TERMOSTATO AMBIENTE
I sensori di temperatura utilizzati nei termostati ambiente sono molto sensibili. Potrebbe
essere necessario calibrare il termostato ambiente, se si desidera ottenere gli stessi
valori di temperatura rilevati da altri termometri presenti.
Mentre il dispositivo è spento, tenere premuto il pulsante “On/Off” per 3 secondi.
Premere il pulsante “On/Off” finché non viene visualizzata la scritta "CAL". Per
visualizzare la temperatura desiderata, impostare la differenza di temperatura
premendo “Su” o “Giù”. Questo valore può essere impostato tra -8°C e +8°C.
Per salvare le impostazioni e uscire, premere il pulsante “On/Off” fino allo spegnimento
del dispositivo.
Nota: la calibrazione della temperatura consigliata è 0,0°C.
RIPRISTINO DELLE IMPOSTAZIONI DI FABBRICA
È possibile ripristinare le impostazioni di fabbrica predefinite (i valori di temperatura
preimpostati, calibrazione, modalità di riscaldamento/raffreddamento).
Mentre il dispositivo è spento, tenere premuto il pulsante “On/Off” per 3 secondi.
Premere il pulsante “On/Off” finché non viene visualizzata la scritta “RST”.
Nel menu "RST", selezionare l'opzione "YS" utilizzando i pulsanti “Su” o “Giù” e premere il
pulsante “On/Off”.
Il dispositivo verrà spento e ripristinato alle impostazioni di fabbrica.
BLOCCO
Nel termostato ambiente è presente una funzione di blocco dei tasti per evitare
qualsiasi contatto involontario. Per sbloccare il blocco dei tasti del termostato
ambiente, è necessario premere il pulsante “On/Off” per 3 secondi. Se i pulsanti sul
termostato ambiente non vengono toccati per 10 secondi, il blocco tasti verrà riattivato.

IMPOSTAZIONE GIORNO E ORA
Mentre il termostato ambiente è acceso, tenere premuto il pulsante “Programma
settimanale” per 3 secondi.
Alla prima schermata che appare, l’ora sul display lampeggerà. È possibile impostare
l'ora con i pulsanti “Su” e “Giù”.
Dopo aver impostato l'ora, è necessario premere una volta il pulsante “Riscaldamento/
Raffrescamento”. Per l'impostazione dei minuti, la parte dei minuti lampeggerà. È
possibile impostare i minuti con i pulsanti "Su" e "Giù".
Dopo aver impostato i minuti, è necessario premere una volta il pulsante
“Riscaldamento/Raffrescamento” per impostare il giorno della settimana.
Il lunedì è fissato come primo giorno della settimana e indicato con il numero “1”.
I numeri indicano i giorni a seguire, quindi: 2-martedì, 3-mercoledì, 4-giovedì, 5-
venerdì, 6-sabato e 7-domenica
Al termine dell'impostazione, è possibile uscire premendo il pulsante "Programma
settimanale" per 3 secondi.
FUNZIONAMENTO
IMPOSTAZIONE DELLA MODALITÀ
MODALITÀ DI FUNZIONAMENTO
Il tuo termostato ambiente ha 5 diverse modalità. 3 di esse (Comfort, Economy e
Vacanza) sono modalità preimpostate. Le altre sono la modalità manuale e la
modalità programma settimanale.
Nelle modalità preimpostate, i valori di temperatura sono impostare dall'utente
all’inizio. La modalità manuale consente al termostato ambiente di funzionare alla
temperatura richiesta e impostata direttamente dall'utente. La modalità programma
settimanale continua a funzionare secondo il programma settimanale determinato
dall’utente.
Per modificare i valori di temperatura delle modalità preimpostate:

Tenere premuto il pulsante "Modalità" per 3 secondi mentre il termostato ambiente è
acceso.
Apparirà il valore della temperatura della Modalità Comfort. È possibile regolare il
valore della temperatura della modalità Comfort premendo i pulsanti "Su" e "Giù".
Al termine dell'impostazione, è possibile regolare il valore della temperatura della
modalità Economy con i pulsanti "Su" e "Giù" premendo nuovamente il pulsante
"Modalità".
È possibile uscire dalla schermata di impostazione premendo il pulsante "Mode" per 3
secondi.
MODALITÀ MANUALE
Per modificare la temperatura della modalità manuale, premere il pulsante "Su" o "Giù"
nella schermata principale. Il termostato ambiente passerà alla modalità manuale una
volta premuto il pulsante "Su" o "Giù".
È possibile premere il pulsante "Mode" per passare alle altre modalità.
PROGRAMMA SETTIMANALE
È possibile impostare il programma di funzionamento del termostato ambiente con la
modalità programma settimanale. Nella programmazione settimanale è possibile
impostare 7 diversi valori di temperatura per ogni giorno. Questi valori sono impostabili
nelle maschere di regolazione della temperatura ''P0-P6''.
Per impostare il programma settimanale, tenere premuto il pulsante "Programma
settimanale" per 3 secondi mentre il termostato ambiente è acceso. Apparirà
l'impostazione “Ora, Minuti e Giorno”. Premere il pulsante “Riscaldamento/
Raffrescamento” fino a quando non viene visualizzato il menu “Programma
settimanale” (P0).
I giorni della settimana lampeggeranno sullo schermo. È possibile avviare
l'impostazione del programma settimanale se si desidera impostare lo stesso
programma per tutti i giorni della settimana.
Premere una volta il pulsante “Su” se si desidera impostare la stessa programmazione
per i giorni della settimana. I primi cinque giorni della settimana lampeggeranno sullo
schermo.
Premere ancora una volta il pulsante "Su" se si desidera impostare lo stesso
programma solo per il fine settimana. Gli ultimi due giorni della settimana
lampeggeranno sullo schermo.
Premere il pulsante "Su" ancora una volta se si desidera impostare la stessa
programmazione per tutti i giorni della settimana. Il primo giorno della settimana
lampeggerà sullo schermo. È possibile passare da un giorno all'altro premendo il
pulsante "Su". Premere il pulsante "Giù" per passare al giorno precedente.
Premere una volta il pulsante "Programma settimanale" per impostare un programma.

"P0" lampeggerà sullo schermo. Impostare il valore di temperatura di “P0” premendo
ancora una volta il pulsante “Programma Settimanale”. L'impostazione dell'ora di “P0”
non può essere modificata poiché è l'impostazione di fabbrica.
Premere nuovamente il pulsante "Programma settimanale". L'indicatore del giorno
lampeggerà. Se non si desidera modificare il giorno, premere nuovamente il pulsante
"Programma settimanale" e passare all'impostazione "P1" premendo il pulsante "Su".
L'impostazione dell'ora apparirà sullo schermo. Una volta completata l'impostazione
dell'ora, regolare l'impostazione dei minuti premendo il pulsante "Programma
settimanale". Dopo l'impostazione dei minuti, premere il pulsante “Programma
Settimanale” per impostare il valore della temperatura.
Segui gli stessi passaggi per le altre impostazioni di programmazione.
Una volta apportate tutte le modifiche, premere e tenere premuto il pulsante
"Programma settimanale" per 3 secondi per salvare.
Nota: per controllare il programma settimanale impostato senza apportare modifiche,
premere una volta il pulsante "Programma settimanale" mentre il termostato ambiente
è acceso. Premere i pulsanti “Su” e “Giù” per vedere i giorni, premere il pulsante “Mode”
per vedere le impostazioni tra “P0-P6”.
LOGICA DI FUNZIONAMENTO DEL TERMOSTATO AMBIENTE TPI
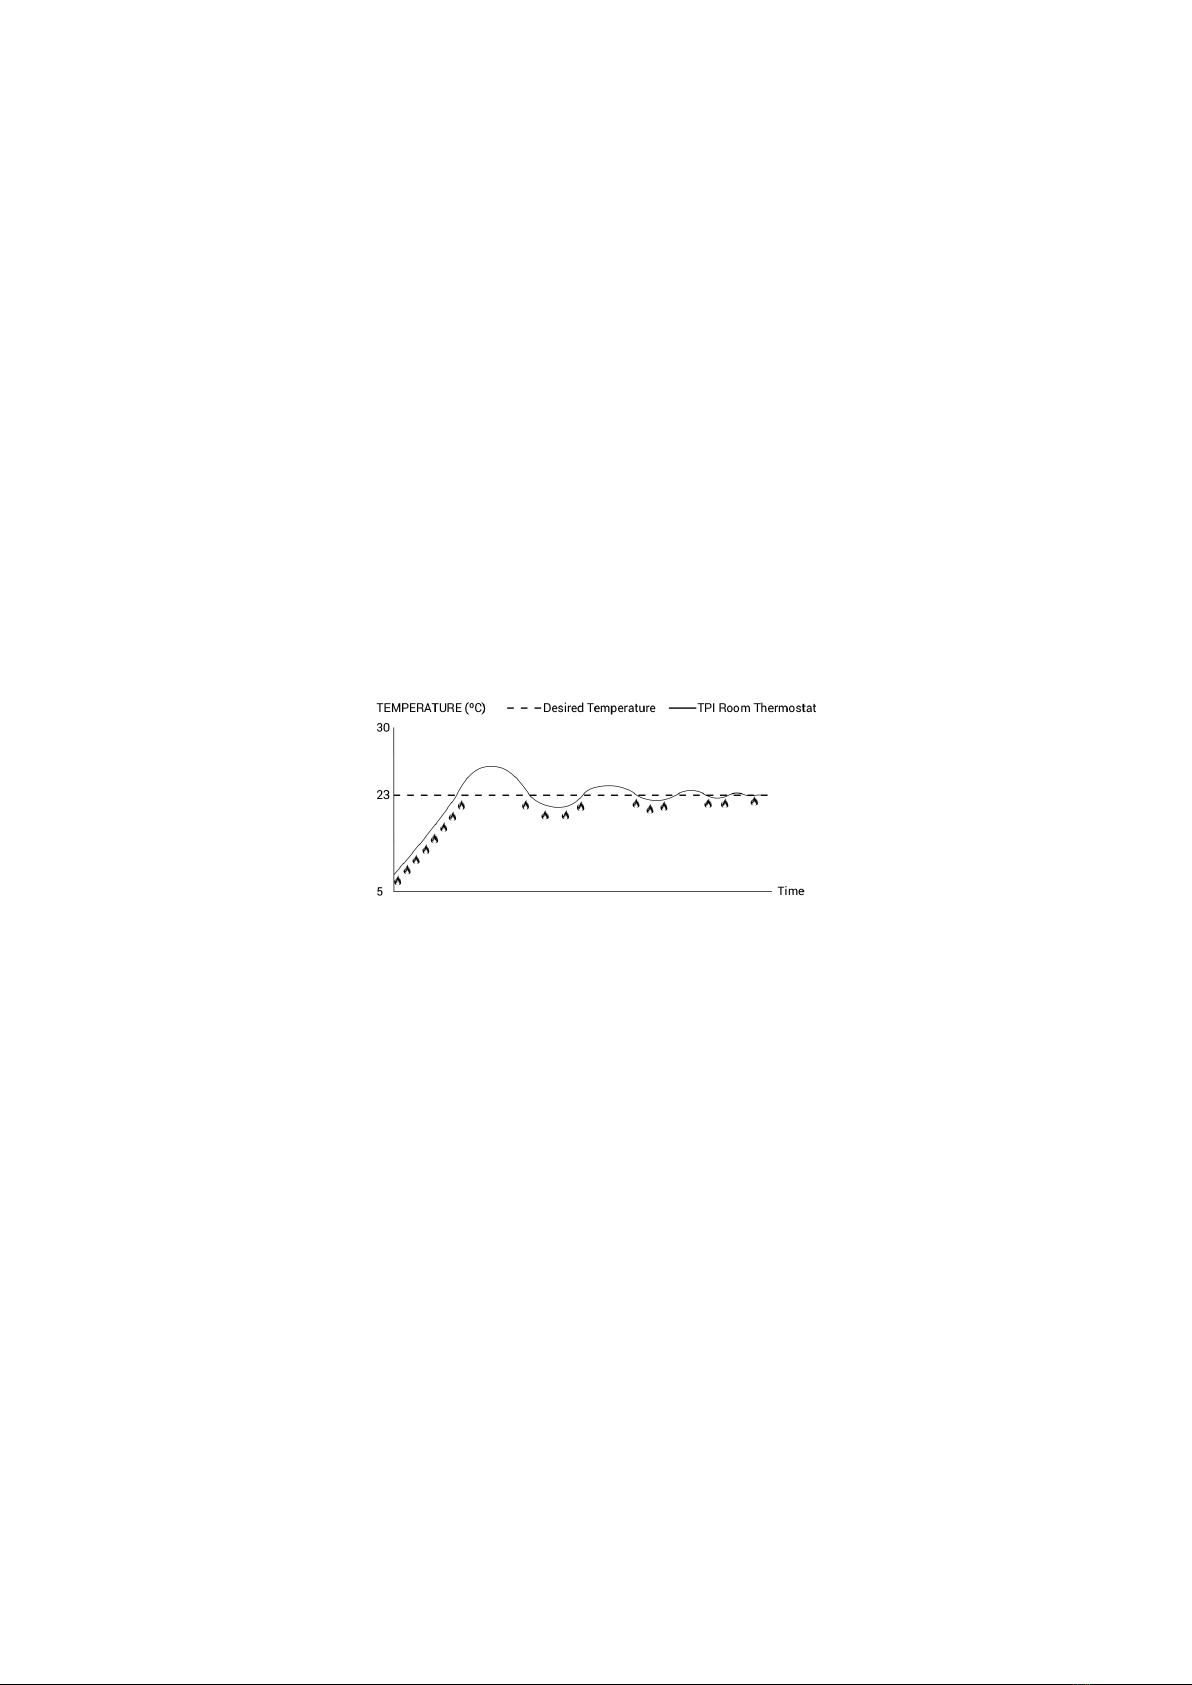
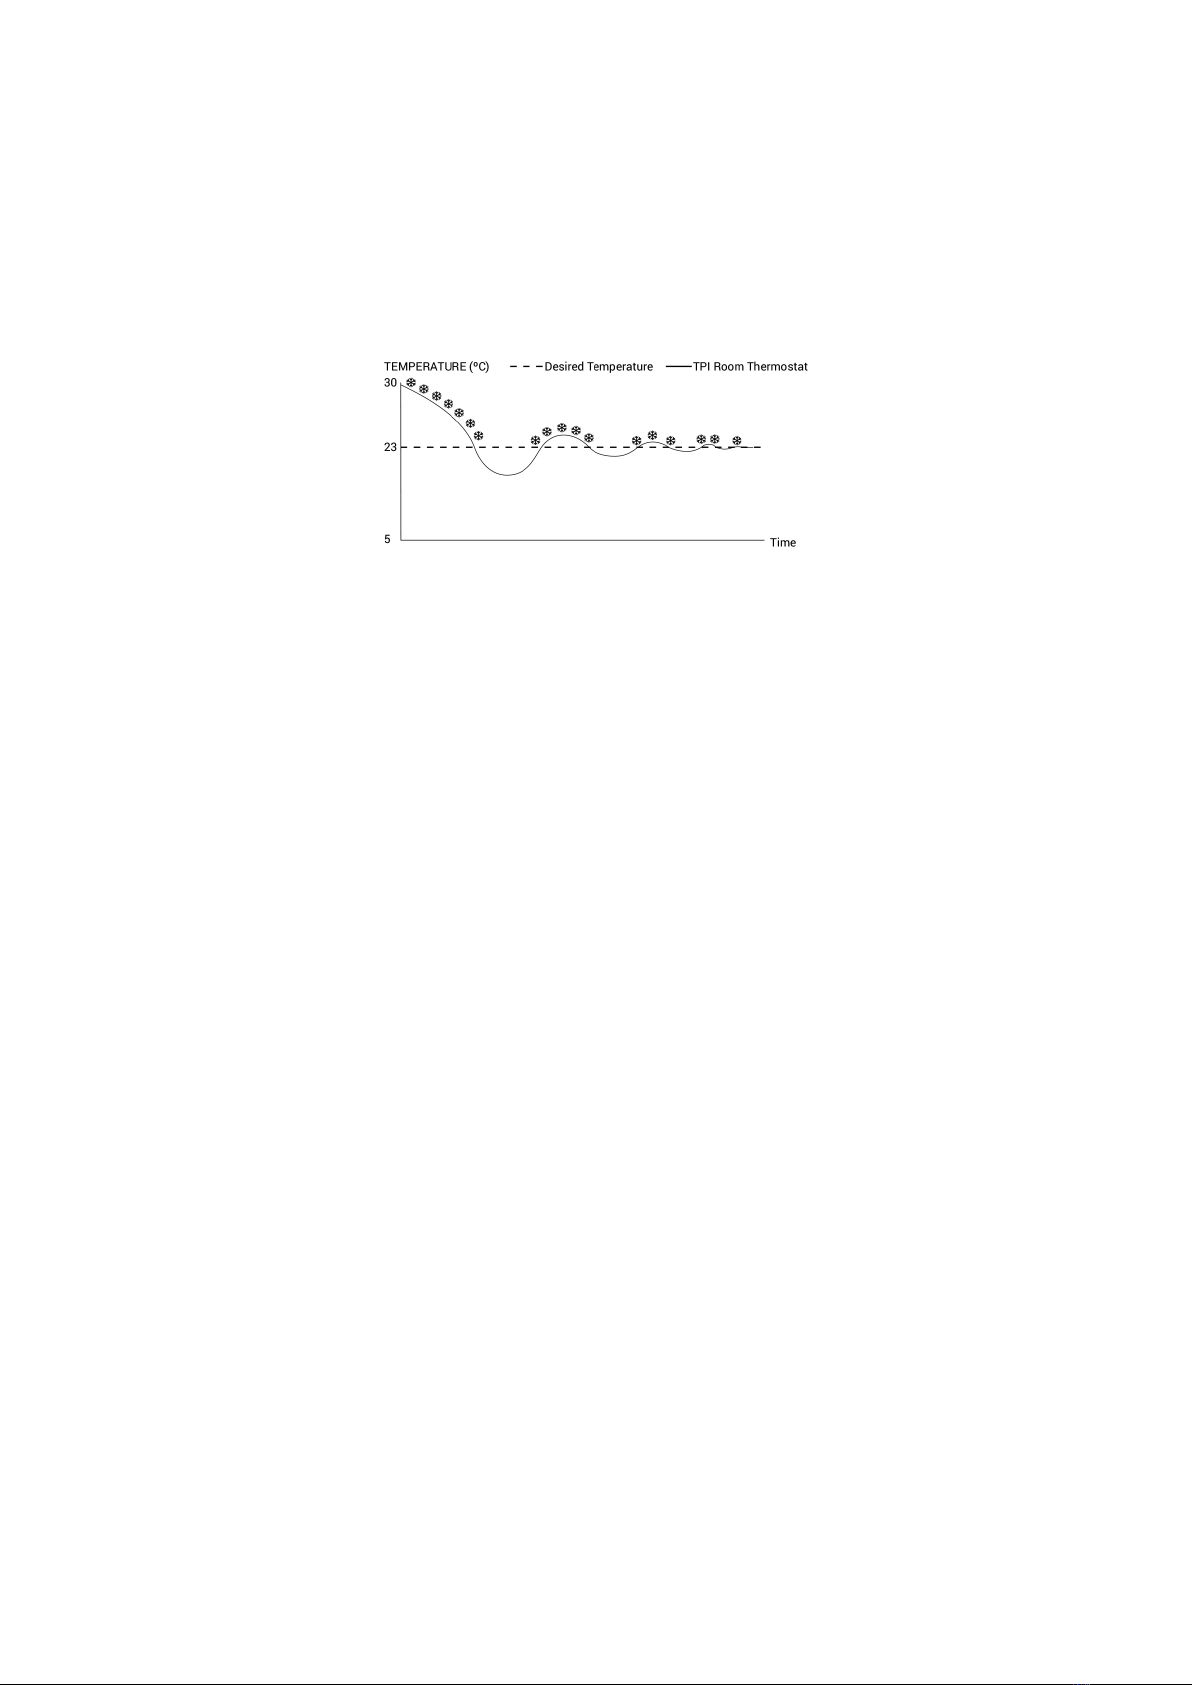
Il tuo termostato ambiente funziona con l'algoritmo TPI. I termostati ambiente che
utilizzano la tecnologia TPI prevedono quando la temperatura della tua casa salirà al di
sopra o al di sotto della temperatura impostata e accenderanno e spegneranno di
conseguenza l'unità di riscaldamento/raffreddamento. Ciò garantisce che la tua casa
rimanga alla temperatura impostata senza sbalzi di temperatura.
Cos'è TPI?
La tecnologia TPI è progettata per garantire la migliore efficienza energetica possibile
dal sistema di riscaldamento/raffrescamento. Anticipa o posticipa l’attivazione
dell’unità di raffreddamento o raffrescamento per mantenere la tua casa al livello di
temperatura impostato.
Come funziona TPI?
Grazie all'avanzata tecnologia di intelligenza artificiale presente nel software, si adatta
al cambiamento di temperatura dell'ambiente in cui si trova. Creando un grafico della
temperatura della tua casa, impara quanto tempo ci vuole a raggiungere la
temperatura ambiente desiderata e come mantenerla. In questo modo, consente il
minimo consumo energetico calcolando per quanto tempo dovrebbe funzionare la tua
unità di riscaldamento/raffrescamento.
Qual è la differenza?
Nei termostati ambiente non TPI il gruppo riscaldamento/raffrescamento funziona e si
ferma continuamente fino al superamento del valore di temperatura impostato. Se la
temperatura impostata scende al di sotto di un certo valore, l'unità di riscaldamento/
raffreddamento funzionerà di nuovo. Questo crea maggiori fluttuazioni di temperatura

e meno controllo energetico. I termostati ambiente TPI, invece, garantiscono maggiore
risparmio e comfort rispetto ai termostati ambiente On/Off, con i vantaggi che ne
derivano.
MODALITÀ RISCALDAMENTO
Il termostato ambiente considera come base la temperatura ambiente media degli
ultimi 40 secondi. L'algoritmo TPI crea un grafico generale della temperatura della tua
casa, e apprende quanto tempo ci vuole per raggiungere la temperatura ambiente
impostata e come mantenerla. Pertanto, garantisce che la temperatura ambiente
rimanga entro un certo intervallo.
GRAFICO DI FUNZIONAMENTO TERMOSTATO AMBIENTE TPI - MODALITÀ RISCALDAMENTO
TEMPERATURA (ºC)
Temperatura desiderata
Termostato ambiente TPI
TEMPO
MODALITÀ DI RAFFRESCAMENTO
Il termostato ambiente considera come base la temperatura ambiente media degli
ultimi 40 secondi. L'algoritmo TPI crea un grafico generale della temperatura della tua
casa, e apprende quanto tempo ci vuole per raggiungere la temperatura ambiente
impostata e come mantenerla. Pertanto, garantisce che la temperatura ambiente
rimanga entro un certo intervallo.

GRAFICO DI FUNZIONAMENTO TERMOSTATO AMBIENTE TPI - MODALITÀ
RAFFRESCAMENTO
TEMPERATURA (ºC)
Temperatura desiderata
Termostato ambiente TPI
TEMPO
COSA SAPERE SUL TERMOSTATO AMBIENTE TPI
Se la posizione dei termostati ambiente TPI viene modificata, il processo di
apprendimento verrà riavviato. Se viene sostituita la batteria, il processo di
apprendimento ricomincerà. Il processo di apprendimento dovrebbe essere
considerato di almeno 7 giorni.
DOMANDE FREQUENTI
• Il termostato ambiente è compatibile con l’unità di riscaldamento/raffrescamento
presente?
Se la tua unità di riscaldamento/raffrescamento ha connessioni on-off, il tuo
termostato ambiente è compatibile. È possibile trovare informazioni sulla propria unità
di riscaldamento/raffreddamento nel manuale d'uso dell'unità di riscaldamento/
raffreddamento o presso l'assistenza dell'unità di riscaldamento/raffreddamento.
• Come si collega il termostato ambiente all'unità di riscaldamento/raffrescamento?
Si consiglia di far eseguire il collegamento tra il termostato ambiente e l'unità di
riscaldamento/raffrescamento solo da professionisti qualificati. Un cavo 2x0,75 mm è
sufficiente per il collegamento termostato ambiente e unità di riscaldamento/
raffrescamento.
Collegare un'estremità della coppia di cavi ai morsetti di collegamento del termostato
ambiente indicati nel manuale d'uso dell'unità di riscaldamento/raffrescamento.
Collegare l'altra estremità della coppia di cavi agli ingressi COM e NO del terminale
all'interno del supporto a parete del termostato ambiente come mostrato nella sezione
"SCHEMA ELETTRICO".
La direzione delle estremità del cavo non ha importanza.

(EN)
SILVER CR S
DIGITAL ROOM THERMOSTAT
GENERAL SPECIFICATIONS
SILVER CR S is a programmable digital weekly chronothermostat with TPI algorithm,
ideal for regulating heating or cooling. The backlit LCD display shows the temperature
detected, the time and temperature set, the active operating mode and the time
programming in use. It offers 3 different pre-set programs (Comfort, Economy and
Holiday) as well as the possibility of setting a customized manual or weekly program in
1-hour steps, on two temperature levels (comfort and reduced, day and night). Includes
the Antifreeze function and allows temperature calibration with a range of ±8°C.
•Daily and weekly programming
•Battery powered (included in the package)
•Different mode options
•Heating/cooling calibration
•ON/OFF control
•Cable connection to the boiler
•Heating/cooling mode
•TPI algorithm
•Precise temperature measurement
•
DECLARATION OF CONFORMITY
Compatible Directives:
Electromagnetic Compatibility Regulation 2014/30/EU (EN 61000-6-3: 2021, EN 61000-6-1:
2019)
Low Voltage Directive 2014/35/EU (EN IEC 60730-2-9:2019/A2:2020, IEC 60730-1:2013/
AMD2:2020)

TECHNICAL DATA
Dimensions: 85mm / 125mm / 20mm
Operating Current: 3V DC (2 x AAA alkaline battery)
Relay NO Switching Current:
2A/30VDC (Resistive load)
2A/250VAC (Resistive load)
Temperature Measurement Accuracy: 0,1°C
Operating Sensitivity: 0,3°C
Operating Temperature Range: 5°÷30°C
Battery Life: 1 Year (2 x AAA)
Operating Temperature: -10°÷50°C
Storage Temperature: -20°÷60°C
CONTROLS AND DISPLAY LEGEND
Buttons Functions
!
Z))[$I*",-.,&/*P#S-'
1
F)/+),&(#,)*\2]#%(/)'(*P#S-'*^F-*N'8,)&%)_
6
`)&E'.*a*J--$3'.*B+E-'
;
F)/+),&(#,)*\2]#%(/)'(*P#S-'*^F-*b)8,)&%)_
?
G-2)*P#S-'
A
B'9B:*P#S-'*C*c'$-8[*P#S-'

Screen Indicators
INSTALLATION
ROOM THERMOSTAT PLACEMENT
Room Thermostat needs to be placed in the room which is used most frequently. For
instance; living room or lounge. Placing the Room Thermostat in a spot that have air
circulation like entrance of a room or side of window should be avoided. Also anywhere
close to heating/cooling units such as radiator, stove and spots which get direct sun
lights would not be suitable. Room Thermostat needs to be located above the floor 150
cm height. Few trials may be made to find the most convenient spot.
Warning! It is recommended to install the thermostat scrupulously complying with the
safety standards and legal provisions in force. Before making any connections, make
sure that the main switch has been turned off.
!
`-#,*N'238&(-,
1
7--/*F)/+),&(#,)
6
H8-'-/I*G-2)
;
J-/K-,(*G-2)
?
`-$32&I*G-2)
A
Z))[$I*",-.,&/*G-2)
M
b&I*N'238&(-,
O
58,))'*d-8[
R
P&S),I*N'238&(-,
!T
5)(*F)/+),&(#,)
!!
`)&E'.*N'238&(-,*
4*NK*(Q)*`)&E'.*N'238&(-,*3%*D$3'[3'.V*(Q)*Q)&E'.*#'3(*3%*e-,[3'.X*
4*NK*(Q)*`)&E'.*N'238&(-,*3%*%()&2IV*(Q)*Q)&E'.*#'3(*3%*'-(*e-,[3'.X
!1
J--$3'.*N'238&(-,*
4*NK*(Q)*J--$3'.*N'238&(-,*3%*D$3'[3'.V*(Q)*8--$3'.*#'3(*3%*e-,[3'.X*
4*NK*(Q)*J--$3'.*N'238&(-,*3%*%()&2IV*(Q)*8--$3'.*#'3(*3%*'-(*e-,[3'.X

BATTERY PLACEMENT
Before starting, power off the device connected to the Room Thermostat and make
sure that the energy is cut off.
As shown in the picture above, press the screwdriver forward from the space shown,
bend the tabs and separate the front cover. Insert 2 new AAA alkaline batteries in the
battery housing with the correct battery direction. Replace both batteries at the same
time. Then align the front part of your Room Thermostat to the back and squeeze it
towards the back.
Low Battery Warning: When the “ ” icon appears on the screen, it means “low battery
warning”. It is recommended to replace the batteries when this warning appears.
Warning: When the product is not used for a long period (more than 15 days), remove
the batteries. Otherwise, malfunctions that may occur would be out of warranty.
Please throw your dead batteries into the waste bin for batteries.

ROOM THERMOSTAT WIRING DIAGRAM
HEATING/COOLING UNIT
Warning!
Operations within the heating / cooling unit or the electrical installation must be carried
out by professionally qualified persons.
ROOM THERMOSTAT TEMPERATURE CALIBRATION
Temperature sensors which are used in Room Thermostats are highly sensitive. You
may need to calibrate your Room Thermostat if you would like to get the same
temperature values with other thermometers in your living space.
While your device is turned off, press and hold the “On/Off“ button for 3 seconds.
Press the "On/Off" button until the “CAL” menu appears. In order to see the desired
temperature, set the temperature difference by pressing the “Temperature Adjustment
Buttons”. This value can be arranged between “-8° C" and “+8° C".
In order to save the settings and exit, press the "On/Off" button until the device turns off.
Note: Recommended temperature calibration is “0.0°C”.
FACTORY SETTINGS RESET
You can reset your Room Thermostat to its default factory settings. This operation
resets the mode temperature values, calibration setting and heating/cooling modes to
factory setting. In order to reset your Room Thermostat to factory setting:
While your device is turned off, press and hold the “On/Off” button for 3 seconds.
Press the “On/Off” button until the “RST” menu appears.
While in the “RST” menu, select the “YS” option by using the “Up” or “Down” buttons and
press the “On/Off” button.
Your device will be turned off and reset to factory settings.
KEY LOCK
In the Room Thermostat there is a key lock function to avoid any unintended contact.
In order to unlock the Room Thermostat's key lock the “On/Off” button should be
pressed for 3 seconds. If buttons on Room Thermostat are not touched for 10 seconds,
key lock will be reactivated.

DAY AND HOUR SETTINGS
While your Room Thermostat is on, keep pressing the “Weekly Program” button for 3
seconds.
At the first screen that appears, hour part will be blinking. You may set the time with the
“Up” and “Down” buttons.
After setting the time, the “Heating & Cooling Option” button needs to be pressed once.
For minute setting, minute part will be blinking. You may set the minute with the “Up”
and “Down” buttons.
After setting the minute, the “Heating & Cooling Option” button needs to be pressed
once to set the day of the week.
Monday has set as the first day of the week and indicated with number “1".
Numbers indicate the following days respectively 2-Tuesday, 3-Wednesday, 4-
Thursday, 5-Friday, 6-Saturday and 7-Sunday
When setting is done, you may exit by pressing the “Weekly Program” button for 3
seconds.
OPERATION
MODE SETTING
Your Room Thermostat has 5 different modes. 3 of them (Comfort and Economy Mode)
are preset modes. Other modes are manual mode and weekly program mode.
In preset modes, temperature values are based on user's choices which have been set
in the beginning. Manual mode allows the Room Thermostat to operate within the
temperature which is required and set directly by user. Weekly Program mode
continues to work according to the weekly schedule determined by the user.
In order to change the temperature values of preset modes:
Press and hold the “Mode” button for 3 seconds while your Room Thermostat is on.
Comfort Mode temperature value will appear. You may adjust the temperature value of
Comfort Mode by pressing the “Up” and “Down” buttons.
When setting is done, you may adjust the temperature value of Economy Mode with the
“Up” and “Down” buttons by pressing the “Mode” button again.
You may exit the setting screen by pressing the “Mode” button 3 seconds.
In order to change the manual mode temperature, press the “Up” or “Down” button
while in the main screen. The Room Thermostat will switch to Manual Mode once
pressed the “Up” or “Down” button.

You may press the “Mode” button to switch to the other modes.
MANUAL MODE
In order to change the manual mode temperature, press the “Up” or “Down” button
while in the main screen. The Room Thermostat will switch to Manual Mode once
pressed the “Up” or “Down” button.
You may press the “Mode” button to switch to the other modes.
WEEKLY PROGRAM
You may set the operating schedule of your Room Thermostat with weekly program
mode. 7 different temperature values can be set for each day in weekly programming.
These values can be set in temperature adjustment screens '' P0-P6''.
In order to set the weekly schedule, press and hold the “Weekly Program“ button for 3
seconds while your Room Thermostat is on. The “Hour, Minute and Day” setting will
appear. Press the “Heating & Cooling Option” button until the “Weekly Program” menu
(P0) appears.
Days of the week will be blinking on the screen. You can initiate the weekly program
setting if you wish to set the same schedule for every day of the week.
Press the “Up“ button once if you wish to set the same schedule for the weekdays. First
five days of week will be blinking on the screen.
Press the “Up“ button once more if you wish to set the same schedule only for the
weekend. Last two days of the week will be blinking on the screen.
Press the “Up“ button one more time if you wish to set the same schedule for every day
of the week. 1st day of the week will be blinking on the screen. You can switch between
the days by pressing the “Up“ button. Press the “Down“ button in order to switch to the
previous day.
Press the “Weekly Program“ button once to set a schedule.
“P0” will be blinking on the screen. Set the temperature value of “P0” by pressing the
“Weekly Program“ button once more. The hour setting of “P0” cannot be changed since
it's factory setting.
Press the “Weekly Program” button again. Day indicator will be blinking. If you will not
change the day, press the “Weekly Program” button again and switch to the “P1” setting
by pressing the “Up” button.
First, hour setting will appear on the screen. Once you complete the hour setting, adjust
the minute setting by pressing the “Weekly Program” button. After the minute setting,
press the “Weekly Program” button to set the temperature value.
Follow the same steps for other schedule settings.
Once all changes made, press and hold the “Weekly Program” button for 3 seconds to
save.

Note: In order to check the weekly schedule which has been set without making any
changes, press the “Weekly Program” button once while your Room Thermostat is on.
Press the “Up” and “Down” buttons to see the days, press the “Mode” button to see the
settings between “P0-P6”.
TPI ROOM THERMOSTAT WORKING LOGIC
Your Room Thermostat works with the TPI algorithm. Room Thermostats using TPI
technology predict when the temperature of your home will rise above or below the set
temperature and turn the heating / cooling unit on and off accordingly. This ensures
that your home stays at the temperature you set without maximum deviations up and
down.
What is TPI?
TPI technology is designed to ensure that you get the best possible energy efficiency
from your heating / cooling system. It measures and applies the best possible timings
to deliver and maintain your home at the set temperature level.
How does TPI work?
Thanks to the advanced artificial intelligence technology found in the software, it
adapts to the temperature change of the environment in which it is located. By creating
a general temperature map of your home, it learns how long it takes to reach the
desired room temperature and how to maintain this temperature. In this way, it
provides minimum energy consumption by calculating how long your heating / cooling
unit should work for.
What is the difference?
In non-TPI room thermostats, the heating / cooling unit works and stops continuously
until it exceeds the set temperature value. If the set temperature drops below a certain
amount, the heating / cooling unit will work again. This creates greater temperature
fluctuations and less energy control. TPI Room Thermostats, on the other hand, provide
higher savings and comfort compared to On/Off room thermostats with the
advantages it has.
Heating Mode
Your room thermostat takes the average room temperature of last 40 seconds as
basis. With the TPI algorithm in the product by creating a general temperature map of
your home, it learns how long it takes to reach the desired room temperature and how
this temperature is maintained. Thus, it ensures that the room temperature remains
within a certain range.

TPI ROOM THERMOSTAT HEATING MODE WORKING GRAPHIC
Cooling Mode
Your room thermostat takes the average room temperature of last 40 seconds as
basis. With the TPI algorithm in the product by creating a general temperature map of
your home, it learns how long it takes to reach the desired room temperature and how
this temperature is maintained. Thus, it ensures that the room temperature remains
within a certain range.
TPI ROOM THERMOSTAT COOLING MODE WORKING GRAPHIC
WHAT TO KNOW ABOUT TPI ROOM THERMOSTAT
If the placement of the TPI Room Thermostats is changed, the learning process will
restart.
If the TPI Room Thermostats are de-energized (battery replacement), the learning
process will restart. The learning process should be considered as 7 days.
FREQUENTLY ASKED QUESTIONS
• Is my Room Thermostat compatible with my heating/cooling unit?
If your heating / cooling unit has on-off connections, your Room Thermostat is
compatible. You can find information about your heating / cooling unit from your
heating / cooling unit operating manual or from your heating / cooling unit service.
• How will I connect my Room Thermostat to the heating/cooling unit?
We recommend that the connection between your Room Thermostat and the Heating/
Cooling unit should be made by professionally qualified persons.
2x0.75 mm cable is sufficient for the Room Thermostat – heating/cooling unit
connection.
Connect one end of the cable pair to the room thermostat connection terminals stated
in the user manual of the heating/cooling unit.
Table of contents
Languages:
Other Imit Thermostat manuals