manuals.online logo
Brands
  1. Home
  2. •
  3. Brands
  4. •
  5. Inepro
  6. •
  7. Payment Terminal
  8. •
  9. Inepro PayMatic P2000 User manual

Inepro PayMatic P2000 User manual

© 2019 Inepro B.V. All rights reserved
Installation Manual | PayMatic P2000
PayMatic P2000
PayMatic P2000
Congratulations on your selection of the Inepro PayMatic P2000. We are certain you
will be pleased with your purchase of one of the flexibele solutions of the market.
We want to help you get the best result from your PayMatic P2000. This manual
contains information on how to do that; please read it carefully. Due to continuous
product improvements this manual is subject to changes without notice.
We strongly recommend you read the license agreement to fully understand its
coverage and your responsibilities of ownership.
Your Inepro dealer is dedicated to your satisfaction and will be pleased to answer your
questions and your concerns.
Best wishes,
Inepro BV.
The most versatile payment solution
All rights reserved. No parts of this work may be reproduced in any form or by any means -
graphic, electronic, or mechanical, including photocopying, recording, taping, or information
storage and retrieval systems - without the written permission of the publisher.
Products that are referred to in this document may be either trademarks and/or registered
trademarks of the respective owners. The publisher and the author make no claim to these
trademarks.
While every precaution has been taken in the preparation of this document, the publisher and
the author assume no responsibility for errors or omissions, or for damages resulting from the
use of information contained in this document or from the use of programs and source code
that may accompany it. In no event shall the publisher and the author be liable for any loss of
profit or any other commercial damage caused or alleged to have been caused directly or
indirectly by this document.
Created: August 2019 in Nieuw-Vennep.
Publisher
Managing Editor
Technical Editors
Cover Design
Inepro B.V.
K. de Graaf
P. Grimmerink
K. de Graaf
Production
Inepro B.V.
Team Coordinator
R. Groen
H. Wagenaar
J. van den Berg
PayMatic P2000
P. Blom
Table of Contents
Introduction 1
Open / disassemble the PayMatic 3
Installation 6
Notes 8
ATTENTION!!
Read this manual carefully before installing the Pay Matic P2000!
Mains connection
Guar entee
Security
Before connecting the appliance to the mains, check that the mains supply v oltage corresponds
to the v oltage printed on the ty pe plate of the adapter. If the mains v oltage is different, consult
y our supplier.
No guarantee can be giv en if safety regulations are not follow ed.
A lw ay s disconnect the pow er supply before handling any thing inside the dev ice.
This dev ice is in conformity w ith the EM C directiv e and low -v oltage directiv e.
CE Confor mité Eur opeène (C onform European Nor m)
WEEE Dir ective ( Waste of Electr ical and Electronic Equipment)
Inepro considers it important to properly take the climate into account. We therefore produce as
many climate-friendly products. Your new dev ice contains materials w hich can be recy cled and
then reused. A t the end of life, specialized companies can dismantle the dev ice, to materials w hich
can be reused in order to recy cle and reuse. F or example, the materials that must be discarded w ill
be limited to a minimum. P lease take into account the rules and regulations in y our area regarding
the rules about disposal of packaging materials, exhausted bateries and old equipment.
Thank y ou, Inepro BV
This dev ice may only be used indoors.
Indoor User O nly
Directives
Due to continuous product improv ements this manual is subject to change without notice. This
document describes the technical and functional operation of the Pay Matic P2000. Greatest care
has been taken drafting the information in this manual and it may be said that it is reliable.
How ev er, the producer is not liable for any shortcomings in the text or incompleteness of the
information. Thank y ou for y our decision to use the Pay M atic P2000.
T his document:
I
Introduction
Part
Introduction
2
Introduction
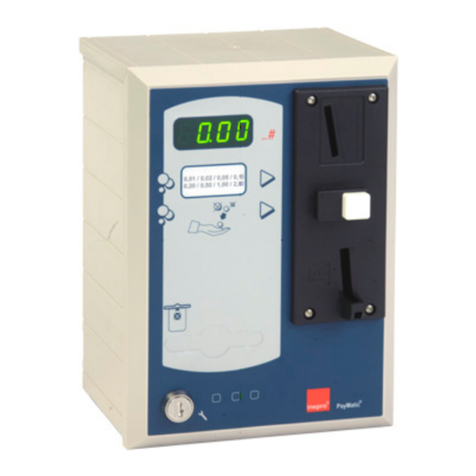
The PayMatic P2000 is the simplest unit of the series coin machines and
is meant to be connected to any device with a timer system which goes
out automatically if necessary. Upon introduction of a coin, this PayMatic
emits only a normally open or a normally closed signal to activate the
device connected to the coin machine.
The PayMatic housing is made of crash- and scratch-resistant plastic.
The mechanical slot meter accepts only one type of coin (token). This
PayMatic is not equipped with a return key, return box and it has no
display either due to the lack of any electronic components.
II
Open / disassemble the PayMatic
Part
Open / disassemble the PayMatic
4
Open / disassemble the PayMatic
1. Lay the Pay Matic, if possible,
on its back.
2. Open the bottom lid. If the coin box is
mounted on a pillar:
. Open and remov e the padlock
at the back of the pillar.
. Take out the cash box, remov e
the locking bolts f ixed on the
upper side of the pillar.
3. Take out the two security pins.
Open the f ront plate under a 15 degree angle.
4. Slide the f ront plate down under that angle.
5 - PayMatic P2000
5. Slide the top to the back.
6. Lif t the top of the case.
For more information use the QR code or URL to watch the YouTube
instruction movie.
http://www.youtube.com/watch?v=fnpTfANu6c4
7) The housing can be installed by means of the 4 units M5 x 16
mm. screws, included in this delivery, when using a fastening
bow, or by means of 4 screws (M4 x 40mm) when fixing the
housing to the wall.
For construction follow steps 1-6 in reverse. Do not forget
to replace the included locking bolts (Stap 3)!!
III
Installation
Part
7 - PayMatic P2000
Installation
Connect the wiring to the indicated positions on the terminal strip.
Make sure the connection wires leave as short as possible the
machine housing.
Aansluitingen:
Solution
Contact
Usage
1
Normally closed
(n.c.) contact
Use the brown (1) and the green (2)
cable marked on the terminal
strip.
2
Normally open
(n.o.) contact
Use the brown (1) and the y ellow
(3) cable marked on the terminal
strip.
Voltage / current microswitch;
250Vac, 4A resistive / 1A inductive
Switching time
The switching time of the microswitch
depends on two factors, the size of the
inserted coin and its rate of fall.
Nevertheless, with independence of
these two variable factors, the activation
time of the microswitch is always from
20 ms to 200 ms.
The device has to be connected by authorised and
prepared personnel only!
IV
Notes
Part
9 - PayMatic P2000
Notes
This area is meant for the reader's notes:
Notes
10

Other Inepro Payment Terminal manuals

Inepro PayCon Touch - Pillar User manual

Inepro

Inepro PayCon Touch - Pillar User manual

Inepro Sales Master User manual

Inepro

Inepro Sales Master User manual

Inepro Back Office Suite User manual

Inepro

Inepro Back Office Suite User manual

Inepro Card Master CM500 User manual

Inepro

Inepro Card Master CM500 User manual

Inepro PayMatic AD 2400 User manual

Inepro

Inepro PayMatic AD 2400 User manual

Inepro PayCon Touch - First Time Log On User manual

Inepro

Inepro PayCon Touch - First Time Log On User manual

Inepro PayMatic - D2000 - Internet Timer User manual

Inepro

Inepro PayMatic - D2000 - Internet Timer User manual

Inepro PayMatic 4B - Xerox MFP Manual

Inepro

Inepro PayMatic 4B - Xerox MFP Manual

Inepro PM - Copy 1600T for iR1600 User manual

Inepro

Inepro PM - Copy 1600T for iR1600 User manual

Inepro PM - Copy Coin CM7000 - Xerox Config User manual

Inepro

Inepro PM - Copy Coin CM7000 - Xerox Config User manual

Popular Payment Terminal manuals by other brands

USA Technologies ePort G10-S quick start guide

USA Technologies

USA Technologies ePort G10-S quick start guide

AU AU1 Operation manual

AU

AU AU1 Operation manual

PAX D190 installation manual

PAX

PAX D190 installation manual

PayRange BluKey Select Reference manual

PayRange

PayRange BluKey Select Reference manual

Pax Technology S920 user manual

Pax Technology

Pax Technology S920 user manual

Sentinel Unitec owner's manual

Sentinel

Sentinel Unitec owner's manual

Paymate OnTheGo iCMP quick start guide

Paymate OnTheGo

Paymate OnTheGo iCMP quick start guide

VeriFone VX805 CTLS manual

VeriFone

VeriFone VX805 CTLS manual

VeriFone T650p user guide

VeriFone

VeriFone T650p user guide

Ingenico 7910 user guide

Ingenico

Ingenico 7910 user guide

Nayax VPOS Touch user guide

Nayax

Nayax VPOS Touch user guide

Westpac Presto Smart VX690 user guide

Westpac

Westpac Presto Smart VX690 user guide

CCV Fly A77 manual

CCV

CCV Fly A77 manual

Ingenico Telium Series User quick reference guide

Ingenico

Ingenico Telium Series User quick reference guide

Moneris Go Plus manual

Moneris

Moneris Go Plus manual

Ingenico group Self/4000 quick start

Ingenico group

Ingenico group Self/4000 quick start

Moneris transelect v2000 operating manual

Moneris

Moneris transelect v2000 operating manual

VeriFone P400 Activation guide

VeriFone

VeriFone P400 Activation guide

manuals.online logo
manuals.online logoBrands
  • About & Mission
  • Contact us
  • Privacy Policy
  • Terms and Conditions

Copyright 2025 Manuals.Online. All Rights Reserved.