ISDT C4 User manual

D5!杶镾擄翄鏍撋慘㛺暺霎
D5ㄘ┒┫ㄧ擄䈌鏍僉怾㖰暺桚
C4 Smart Charger Operating Instructions
C4 Chargeur Intelligent Mode d'emploi
Manual de instrucciones del cargador inteligente C4
C4 Smart Charger - Bedienungsanleitung
Инструкция по эксплуатации смарт-зарядного устройства C4

Disclaimer and warning
Thank you for purchasing the ISDT C4 Smart Charger.
The C4 Smart Charger oers excellent all round performance
andsupports most popular rechargeable battery types such
as Li-lon, LiHv,IMR, INR, NiMH, NiCd, LiFePO4 and eneloop. The
high contrast full colour IPS display has a wide viewing angle
which clearly displays detailed option parameters and
real-time task progress. Dierent batteries can be placed into
dierent slots and operate independently of each other and
the charger can automatically identify battery types and
choose the appropriate charge settings.
Please read this user manual in detail and follow the
instructions carefully before using your new charger.
1. Never attempt to charge a broken surface of insulation or a
non-rechargeable battery.
2.Keep the charger away from humidity and high tempera-
ture while charing, and ensure the cooling fan heats sinking
smoothly.
3. Do not let the children operate the charger.
4.Make sure the charging and discharging parameter setting
is correct, incorrect setting will result in disastrous
consequences.
1
2
3
45 6 7
1 Touch Key
2 Battery Slot
3 IPS Display
4 Micro USB Update Port
5 USB Port
6 Fan Outlet
7 DC Input
* The lateral length of xx650 batteries needs to be
between 65mm-66.7mm
Specication
Model
Input Power
Circuit Power
Battery Count
Battery Size
OperatingVoltage Range
Battery ChemistryType
Charge Current Range
Discharge Current Range
Operation Modes
Cycle Count
Display
Beep Sound
Temperature Sensors
OperatingTemperature
Calibration
Voltage Measurement
Current Measurement
Standby Current Drain
External Ports
USB Power Output
Firmware Update
Reverse polarity protection
Over temperature protection
Over capacity protection
Dimensions (L×W×H)
Material
Weight
C4
DC 12V-24V/2.5A
max. Charge power 25W
max. Discharge power 10W
1 - 4 single cells, cylindrical
AAA,AA,10440,10500,
12500,12650,13500,13650,
14500,14650,16650,17650,
18650,20650,22650,26650
0.2V - 5.0V/slot
NiMH, NiCd, NiZn,
Eneloop, Li-Ion, LiHv, LiFePO4
0.1A - 3.0A/slot
0.1A - 1.5A
Charge, Discharge, Storage,
Cycle, Activation, Analysis
1 - 66 cycles
320×240 IPS LCD
Multi-tone
5 for inner
0°C - 40°C
Factory calibration
±10mV internal resolution
±10mA internal resolution
<0.05mA/battery
DC Input, Micro USB Link,
USB power output
DC 5V / 2.1A
Yes
support
support
support
122×85×38mm
PC+ABS casing, aluminum heatsink
153g(approx.)
English | 02

Mj.Jpo Dibshjoh
5/1:W!0!1/91B
96n℃!0!4:-
297nBi
11;24;19
96 3 80
Place a battery into a suitable charging slot and the
charger will start charging automatically (if set to auto
start by default). Alternatively users could press the
touch key to remain on the task page and change each
parameter manually. The options are as follows:
Usually, the battery chemistry type and the rated voltage
is stated on the sleeve of the battery. The charger will
attempt to automatically identify the battery type based
on the built-in detection algorithm but please select the
battery types manually if the charger chooses the wrong
one.
* NiZn and LiHv batteries need to be selected manually.
1) Connect the charger to an AC outlet (100-240V)
or a 12V vehicle adapter.
2) Insert a battery into the C4 while observing the
correct polarity and once the battery has been identied
charging will commence and the charging screen will
appear to display the charging state (as below)
The taskbar shows the status of each task visually.
means charging means discharge,activate,
means circulate, analyze. After any task is complet-
ed, the will be displayed on the screen instead of
the battery percentage. You can cycle between the
detailed task pages by using the up and down arrow
buttons.
Task setting
Automaticmode
manual mode
Interface 1.Battery type
2. Operation status
3. Capacity charged
4. Present voltage & current
5. Task operation time
6. Resistance & temperature
7. Voltage curve
8. Taskbar
9. Battery charge %
10. Battery discharge %
11. Charging nished
12. Battery circulate %
1
910 11 12
3 4
6
5
7
8
2
Battery types
Task
Current setting
cycle index
Start task
Back
Select battery type
Select task content: Charge,Discharge,Storage,Cycle,Activation,Analysis
Select current:charge/storage:0.1-3.0A;discharge:0.1A-1.5A
cycle index:1-66
Start to execute task
Back
How to conrm battery types
Default battery types and task parameters
Rated Voltage
Full charge voltage
Storage voltage
Discharge voltage
1.20V
1.65V
X
0.90V
1.5V
1.9V
X
1.20V
3.70V
4.2V
3.70V
3.10V
3.80V
4.35V
3.80V
3.30V
3.30V
3.65V
3.20V
2.90V
1.20V
1.65V
X
0.90V
NiCd/NiMH NiZn Li-lon LiHv LiFePo4 Eneloop
Default charging current: AAA/10440-0.5A
AA/10500-1A
18650-2A
26650-2.5A
The default charging current is automatically selected
according to the length of a battery. Please select the
current manually if the battery has a long length and
small capacity, for example 14650/16650 etc.
99 3.63
BB0S70VN.4025611
Cbuufsz
Ubtl
Dvssfou
Dzdmf
Tubsu
Cbdl
Dibshf
Ejtdibshf
Tupsbhf
Dzdmf
Bdujwbujpo
Bobmztjt
03 | English

Always follow your battery manufacturers charging
instructions as it is important to know the maximum
charging current of the battery as applying excessive
charge current could inuence the life span of a battery
and/or cause damage. In addition, excessive current can
cause heating and/or explosion of the battery during the
charging process. The charging and discharging capacity
of a Lithium battery is often marked with a C value.
Multiplying the charging C value and the battery
capacity generally determines the maximum charging
current supported by the battery. For example, for a
1000 mAh battery with a charging capacity of 0.5C, the
maximum charging current would be 1000 * 0.5 =
500mA; therefore,
the maximum charging current is 0.5A. For a lithium
battery, if it is not possible to conrm the supported
charging C value, please set the charging current below
1C for safety and to protect any lithium battery. Charge
time will be directly proportional to charging current
and due to dierences in battery conversion eciency,
the time taken to complete charging might be extended
for dierent battery types and capacities.
In this mode the battery will start a cycle of charging and
discharging which can be congured up to 66 cycles.
Cycle function
Please select the storage function if the battery will not
be use for a long time. When selecting storage functions,
automatic charging might be initiated if the battery
voltage is lower than the preset storage voltage; likewise,
automatic discharging can be initiated if the battery
voltage is higher than the preset storage voltage.
Storage functions
Occasionally a NiCd or NiMH battery may become so
discharged that it can 't be recharged under normal
conditions, especially if the voltage is extremely low.
Battery activation uses a low current to perform an
activation cycle which will charge-discharge-charge the
battery. The battery might be activated during this
process and sometime it needs 2-3 cycles to activate it. If
such a battery cannot be activated then do not continue
and dispose of the battery.
Activation function
The analysis function can be applied to a battery that is
under-performing or if you are doubting performance in
general. This function could be also used to identify and
match the working capacities of batteries.
Analyze function
You can use the USB output to charge any device that
would normally be charged with a USB charge cable.
The maximum output current of the USB port is 2.1A.
Please note that using the USB output whilst also
charging batteries will automatically reduce the
charging power to the batteries.
The charger is equipped with a function for measuring
the internal resistance of individual cells. The internal
resistance is measured and calculated after the charging
task has been initiated for 10 seconds. The internal
resistance of a battery can display a small variation under
dierent electrical quantities while the measured
resistance value is usually relatively low as the electric
quantity is large.
USB charge function
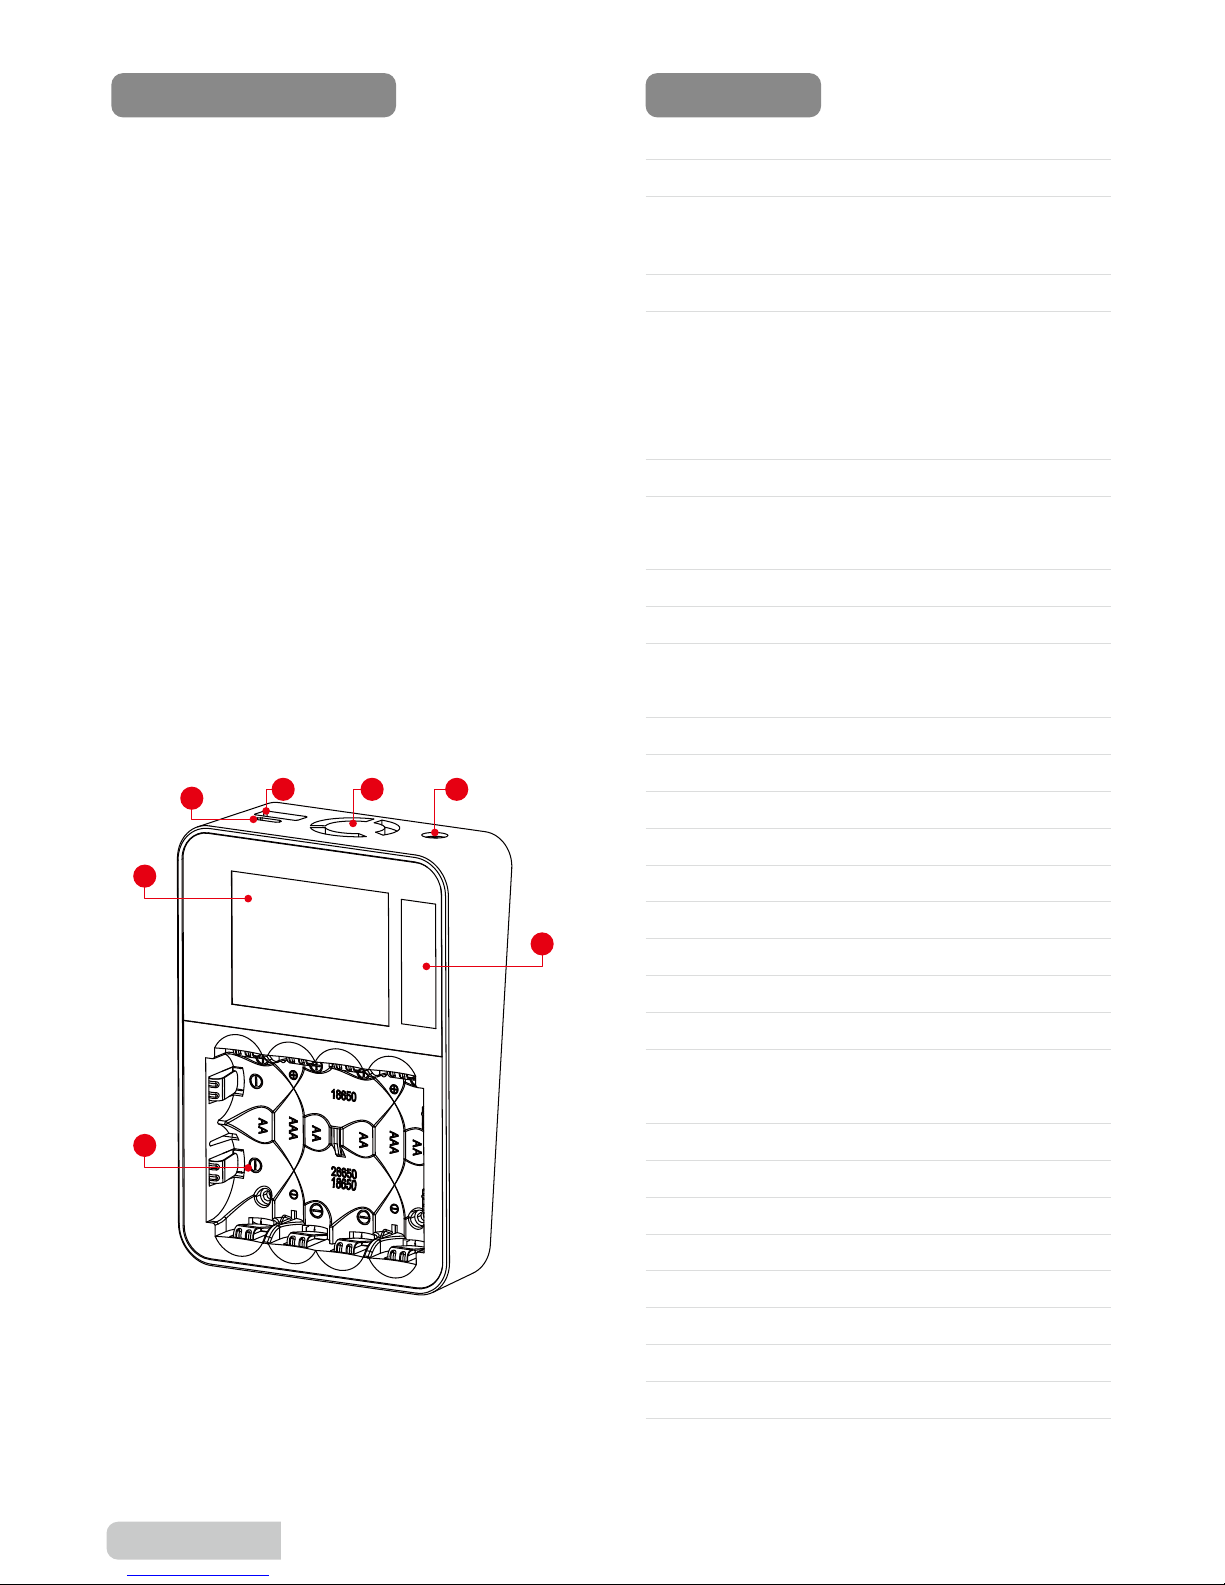
When a battery has been inserted with the wrong
polarity the corresponding slots status will be displayed
as below:
Battery short circuit and reverse
polarity protection
How to conrm Charging Current
-- -- --
Cbuufsz!Sfwfstf
Internal resistance measurement function
Once charging has completed, the will be displayed
on the screen instead of a battery percentage. It is
normal for voltage decline to occur once charging
completes. As the number of the charge cycles
increases, the performance of a battery decreases and
the voltage decline phenomenon becomes more
obvious. To charge a battery with a larger current would
also cause a more obvious voltage decline after the
charging is complete.
Judgment of complete charging
English | 04

Q: Q: Why couldn't the charger identify the battery?
A: Remove and reinsert the battery to ensure that all
connections are making good contact; Try placing the
battery in a dierent slot to see if the battery can be
identied. Check whether the battery is over-discharged
to an empty voltage. If the battery continues to be
unrecognised, please check whether the metal parts on
the battery interface are oxidized or burned resulting in
an unreliable connection.
Q: Could I use the C4 to discharge a Li-ion or alkaline
non-rechargeable battery? I want to verify the battery
capacity.
A: The C4 could be used to discharge non-rechargeable
batteries. But please note: Never charge a nonrecharge-
able battery.
Q: Error in power on self-testing:
A: The charger can automatically carry out a self-testing
routine when connected to a power supply. A selftesting
sound should be heard when the charger is connected
to the battery; power o and on after removing the
battery for 5 minutes if an error condition exists.
Q: I put 4 AA batteries into C4 and set the charging
current to 3A, why is it that the actual current could not
reach 3A?
A: The maximum charging power is 30W. The charger
will automatically change to a suitable current before
starting to charge if the setting exceeds the total power.
ISDT focus on the pursuit of perfection.
Each and every performance improvement, algorithm
enhancement and visual optimization is built slowly
over time by our passionate and dedicated engineers
and is reected in the evolution of our rmware.
For more details about rmware updates please check
the download section of our website.
www.isdt.co/download
rmware upgrade
To enter the System Settings screen remove all
batteries from the charger and then press and hold the
button
C4 smart charger conforms to relevant CE command and
relevant commands in B: 2010,CHAPTER 15, FCC
For electronic products with this marking in
their manuals, please separately dispose
them with family garbage. When a charger
gets spoilt and cannot be used anymore,
please take it to a nearby garbage station or
recycle center.
System default FAQ
Product qualication declaration
Buzzer volume: the default is OFF, and operational
sounds would be blocked, but not error warnings
which will continue to sound.
System Information
Factory Parameter
Language
Volume
Backlight
Capacity Limit
Auto Charge
Cycle Display
Back
System software information
Reset to factory defaults
Default language setting
Three gears: high, medium, low; and o
Three gears: high, medium, low
Set the maximum battery capacity
Set the wait time before auto-charging
Cycle mode details : Manual or Auto
back
Testing standards
EN 61000-6-3:2007 + A1:2011
EN 61000-6-3:2007
Tfuujoht
Tztufn!Jogpsnbujpo
Gbdupsz!Qbsbnfufs
Mbohvbhf
Wpmvnf
Cbdlmjhiu
Dbqbdjuz!Mjnju
Bvup!Dibshf
Dzdmf!Ejtqmbz
Cbdl
///
///
Fohmjti
Mpx
Ijhi
Po
4t
21t
result
Yes
Yes
05 | English

Avertissements
Merci d'avoir acheté le chargeur ISDT C4.
Le C4 est un des chargeurs intelligents qui possède
d’excellentes performances et qui accepte presque tous les
types de batteries comme les Li-Ion,Lihv,IM-R, ,IN-R,NiM-
H,Ni-cd,Lifepo4,eneloop. L’écran possède un grand angle
de visibilité, des paramètres détaillés, et la progression de
charge. Plusieurs types de batteries peuvent être installés
dans diérents emplacements et être chargés
individuellement. Le chargeur identiera le type de batterie
et la chargera de la manière la plus correspondante.
Lisez ce guide d’utilisateur et suivez les instructions
précisément avant d’utiliser votre nouveau chargeur.
1. N'utilisez pas de piles non-rechargeables ; N'utilisez pas de
piles dont l'isolant de surface est endommagé.
2. Gardez le chargeur à l'abri de la chaleur et de l'humidité
pendant l'utilisation, et faites attention à la ventilation et à la
dissipation de la chaleur.
3.Ne pas laisserdes enfants utiliser le chargeur.
4.Assurez-vous que les paramètres de charge et de décharge
sont corrects. Des paramètres incorrects pourraient
engendrer des conséquences désastreuses.
1
2
3
45 6 7
1 Bouton principal
2 Emplacement batterie
3 Ecran IPS
4 Port Micro USB de mise à jours
5 Port USB
6 Ventilateur de sortie
7 Entrée d'alimentation
* La largueur des batteries doivent etre controlée
entre 65mm et 66,7mm
Spécicités
Modèle
Alimentation
Puissance
Nombre de batteries
Formats Batteries
Tension de fonctionnement
Type Batterie
Courant de charge
Cournant de décharge
Mode de fonctionnement
Compteur de cycles
Achage
Signal sonore
Capteur de temperature
Temperatures de fonctionnement
Calibration
Mesure de tension
Mesure de courant
Consommation de courant en pause
Ports externes
Puissance sortie Port USB
Mise à jours logiciel
Protection d'inversion de polarité
Protection de surchaue
Protection de surcharge
Dimensions (L×W×H)
Materiaux
Poids
C4
DC 12V - 2.5A
Puissance max. de charge 25W
Puissance max. de décharge 10W
1 - 4 Cellule(s) individuelle(s), cylindrique
AAA,AA,10440,10500,
12500,12650,13500,13650,
14500,14650,16650,17650,
18650,20650,22650,26650
0.2V - 5.0V / Emplacement
NiMH, NiCd, NiZn,
Eneloop, Li-Ion, LiHv, LiFePO4
0.1A - 3.0A / Emplacement
0.1A - 1.5A
Charge, Décharge, Stockage,
Cycle, Activation, Analyse
1 - 66 cycles
320×240 IPS LCD
Multi-Tonalité
5 à l'interieur
0°C - 40°C
Calibration d'usine
±10mV
±10mA
<0.05mA / batterie
Port d'alimentation, Port Micro USB,
Alimentation externe USB
DC 5V / 2.1A
Oui
intégré
intégré
intégré
122×85×38mm
Boitier: PC+ABS , Radiateurs aluminium
153g(approx.)
Français | 06

La barre des tâches ache toutes les tâches à un seul
endroit. Indique la charge Indique la décharge
Indique le cycle, après que chaques tâches se
termines, le sera aché sur l'ecran au lieu du
pourcentage de la batterie.La barre des tâche est aché
sur Chaque page des modes. Utilier le bouton pour
vous deplacer entre les modesmodes.
Mj.Jpo Dibshjoh
5/1:W!0!1/91B
96n℃!0!4:-
297nBi
11;24;19
96 3 80
Plusieurs combinaisons sont possibles pour charger,
décharger, stocker ou cycler les batteries comme 4x
AA/ 2x AAA/ 2x 18650 / 1x 26650 .
Installer la batterie dans le support approprié et le
chargeur démarrera la charge automatiquement après
avoir bipé 3 fois. Cependant, l’ utilisateur peut utiliser le
bouton principal pour rester dans le mode et changer
chaques paramètres manuellement. Voici le menu:
Normalement, le type de batterie et le voltage sont aux
normes. L’ utilisateur peut comparer dans la liste
ci-dessous pour conrmer. Le chargeur identiera la
batterie automatiquement, basé sur le voltage de la
batterie. Veuillez sélectionner le bon type de batterie
manuellement si le chargeur prend le mauvais.
* les batterie Nizn et Lihv sont a congurer manuellemen
1) Connectez le chargeur au secteur (100-240V) ou une
prise allume-cigare.
2) Insérez la batterie dans le C4 en vériant le sens de
connexion (positif et négatif). Et l’ écran s’ allumera et
achera l’ état de charge (comme l’ image ci-dessous)
après avoir bipé 3 fois.
Paramètre du mode
Mode Auto.
Mode Manuel
Interface 1.Type de batterie
2.Status de l'opération
3.Capacité chargée
4.Voltage et courant actuel
5.Temps passé dans l'opération
6.Résistance et température
7.Courbe de Voltage
8.Barre des tâches
9.Pourcentage de charge batterie
10.Pourcenta de décharge batterie
11.Charge terminée
12.Pourcentage de Cycle de batterie
1
910 11 12
3 4
6
5
7
8
2
Type de batterie
Tâche
Réglages courant
Index de cycles
Démarrer tâche
Retour
Sélectionner type de batterie
Sélect. type de tâche: Charge, décharge,stockage,cycle,activation,analyse
Sélect. courant: Charge/stockage: 0.1-3.0A; décharge:0.1A-1.5A
Index de cycle: 1-99
Démarrer la tâche
Retour
Comment conrmer le type de batterie
Type de batterie par défaut et
paramètres de base
Tension nominale
Tension de charge complète
Tension de stockage
Tension de décharge
1.20V
1.65V
X
0.90V
1.5V
1.9V
X
1.20V
3.70V
4.2V
3.70V
3.10V
3.80V
4.35V
3.80V
3.30V
3.30V
3.65V
3.20V
2.90V
1.20V
1.65V
X
0.90V
NiCd/NiMH NiZn Li-lon LiHv LiFePo4 Eneloop
Courant de charge par defaut: AAA/10440-0.5A
AA/10500-1A
18650-2A
26650-2.5A
Le courant de charge par défaut est sélectionné automa-
tiquement en fonction de la longueur de la batterie.
Veuillez sélectionner le courant manuellement pour les
batteries qui sont longues mais de capacité basse
comme les 14650/16650 etc.
99 3.63
BB0S70VN.4025611
Batterie
Tâche
Courant
Cycle
Démarrer
Retour
Dibshf
E…dibshf
Tupdlbhf
Dzdmf
Bdujwbujpo
Bobmztf
07 | Français

Il est très important de connaitre le courant maximum
de charge de la batterie, un courant trop fort peut
inuencer la durée de vie de la batterie et faire des
dégâts. Il est aussi possible que la batterie chaue ou
explose pendant la charge de celle-ci. La charge/
décharge de la batterie est habituellement annoncée en
valeur C. Multiplier la valeur de charge C et la capacité de
la batterie donne la valeur maximum de courant de
charge supporté par la batterie. Par exemple, pour une
batterie de 1000mAh avec une capacité de charge à
0.5C, le maximum de courant de charge est de
1000*0.5= 500mA. Donc le courant de charge maximum
est 0.5A. Pour une batterie lithium, il est impossible de
connaitre la valeur de C. Veuillez sélectionner la valeur
de courant de charge en dessous de 1C pour plus de
sécurité.
La référence de relation entre la valeur C et le temps de
charge est de ≥60 minutes/C (Cela prend entre 60~70
minutes pour compléter une charge à 1C). Due aux
diérences de valeurs de batteries, la période pour
compléter la charge peut varier.
Dans ce mode, la batterie peut être chargée et
déchargée jusque 99 cycles. Et l’ eet mémoire de la
batterie rechargeable peut être eacé dans ce mode.
Fonction de cycle
Veuillez sélectionner la fonction stockage si la batterie
n’ est pas utilisée pendant un long temps. Quand la
fonction stockage est sélectionnée, la charge automa-
tique peut être lancée si la batterie est en dessous de la
valeur de stockage en V. La décharge automatique sera
lancée automatiquement si le voltage batterie est
au-dessus de la valeur de stockage.
Fonctions de stockage
Le chargeur identiera la batterie comme nonrecharge-
able si le voltage batterie est à 0V. L’ utilisateur peut
sélectionner ce mode pour reconditionner la batterie.
Veuillez changer la batterie si elle ne se charge pas après
plusieurs activations.
L’ activation batterie utilise un courant bas pour charger
et décharger la batterie. La batterie devrait être activée
après 2 à 3 cycles.
Fonction activation
Cette fonction est appliquée à la batterie qui à été
stockée plus de 2 semaine ou avec mauvaise décharge.
Cette fonction peut être aussi utilisée pour identier et
valider la capacité de celle-ci.
Fonction analyse
La sortie maximum du port USB est de 2.1A. Le chargeur
peut charger la batterie de votre téléphone en même
temps. La puissance de charge de batterie sera réduite
automatiquement quand il charge via USB.
Le chargeur est équipé de la fonction de mesure de la
résistance interne. Le voltage de la cellule sera mesuré et
calculée après la tâche de charge qui a été lancée
pendant 10s. La résistance interne de la batterie peut
varier en fonction des diérentes quantités de mesure
de résistance vérié en général.
Le courant de charge doit être ajusté dès que le
chargeur mesure la résistance interne de la batterie.
Cependant il est normal que le courant évolue pendant
la charge.
Fonction chargeur USB
Quand la batterie est inversée ou en court-circuit, le
chargeur achera un message d’ erreur tant qu’ elle n’ a
pas été enlevée. Et le statut sera aché comme suit :
Inversion de polarité et courtcircuit
Comment conrmer le courant de charge
-- -- --
Cbuufsjf!jowfsft
Fonction mesure de résistance interne
Après que la charge soit complète, l’ icône apparait
sur l’ écran à la place du pourcentage de batterie. C’ est
normal que le voltage diminue au fur et à mesure des
charges. Comme le nombre de cycle de charge grandis,
les performances diminuent, et le voltage aussi. Charger
la batterie avec un plus grand courant va aussi diminuer
le voltage après que la charge soit complète
Jugement de charge complète
Français | 08

Q: Pourquoi le chargeur ne peut pas reconnaitre ma
batterie ?
R: Enlever et remettez la batterie an de vérier que la
connexion à bien été faite. Veuillez vérier que le
positif et le négatif de la batterie soient bien
connectés. Essayez un autre emplacement an de voir
si la batterie est reconnue. Si cela continue, veuillez
vérier si les parties en métal de la batterie ne sont pas
oxydées ou brulée suite à une mauvaise connexion.
Q: Puis-je utiliser le C4 pour décharger une batterie
non rechargeable en Li-ion ou alcaline ? Je veux
vérier sa capacité.
R: Le C4 peut être utilisé pour décharger une batterie
non rechargeable. Mais veuillez noter qu’il ne faut
JAMAIS charger une batterie non rechargeable.
Q: J’ai une erreur d’alimentation au démarrage.
R: Le chargeur peut automatiquement eectuer un
test quand il est connecté a une alimentation. Un son
peut être entendu quand le chargeur est connecté à
une batterie. Allumez le chargeur 5 min après avoir
enlevé la batterie.
Q: J’ai mi 4 batterie AA dans le C4 et lancé la charge à
3A. Pourquoi la charge n’arrive pas à monter à 3A ?
R: La puissance de charge maximal est de 30W . Le
chargeur va automatiquement changer la valeur du
courant pour commencer la charge si le réglage
dépasse la puissance totale
ISDT est toujours concentré sur la recherché de la
perfection, chaque évolutions et améliorations
d’ algorithme ainsi que l’ optimisation de l’ apparence est
fabriqué lentement au travers du temps par tous nos
ingénieurs. Et Tout cela apparait dans les mises à jour.
Pour plus de détails sur la dernière mise à jours, veuillez
regarder sur notre site internet. Etapes de mise à jour du
C4:
1.Connectez le C4 au PC via le câble micro USB
2.Allumez le C4 pour démarrer la mise à jours, le
chargeur va entrer en mode mise à jours automatique-
ment.
3.Utilise le « Updata program » pour commencer la mise
à jours.
Mise à jours
Appuyez sur (sans avoir branché de batterie) pour
que le menu système apparaisse avec les informations
qui suit:
Le chargeur intelligent C4 est conforme aux normes
CE et aux normes B : 2010, CHAPITRE 15, FCC
Pour les produits électroniques avec cette
information marquée dans le manuel,
Veuillez ne pas les jeter dans les ordures
ménagères. Quand un chargeur est
défectueux et ne peut être utilisé, veuillez le
jeter dans une déchèterie ou un centre de
recyclage.
Menu Système FAQ
Normes produit
Le volume du son est par défaut sur OFF. Les sons
normaux peuvent être bloqué , mais pas ceux d’erreur.
Info. Système
Réglages d'usine
Langue
Volume
Rétro-éclairage
Limite de capacité
Charge Auto.
Achage du cycle
Retour
Information logiciel sysème
Remettre réglages d'uine par défaut
Réglages de la langue par défaut
Trois niveaux: Haut, moyen, bas et O
Trois niveaux: Haut, moyen, bas
Régler la capacité maximum
Régler le temps d'attente de la charge auto.
Modes de cycles détaillés dans le manuel
Retour
Testing standards
EN 61000-6-3:2007 + A1:2011
EN 61000-6-3:2007
S…hmbhft
Jogp/!tztu‖nf
S…hmbhft!e(vtjof
Mbohvf
Wpmvnf
S…usp.…dmbjsbhf
Mjnjuf!ef!dbqbdju…
Dibshf!Bvup/
Bggjdibhf!ev!dzdmf
Sfupvs
///
///
Gsboçbjt
Cbt
Ibvu
Bdujwfs
4t
21t
resultats
Oui
Oui
09 | Français

Отказ от ответственности и
предупреждение
Благодарим вас за покупку смарт-зарядного устройства
ISDT C4.
C4-это одно из интеллектуальных зарядных устройств,
которое обладает превосходной производительностью и
под-держивает практически все типы батарей
(аккумуляторов), таких как Lilon, Lihv, IMR, IN-R, Ni-MH,
Ni-cd, Lifepo4, eneloop. Оно имеет дисплей IPS c большими
углами обзора, подробное отображение параметров и
процесса выполнения задач. Батареи различного типа
могут быть вставлены вразные слоты и работать
независимо. Зарядное устройство идентифицирует тип
батареи и выбирает подходящий способ зарядки.
Перед использованием нового зарядного устройства
внимательно прочитайте данное руководство
пользователя и следуйте инструкциям.
1. Не используйте неперезаряжаемые батареи;Не
используйте батареи с поврежденной поверхностной
изоляцией
2. Держите зарядное устройство вдали от тепла и
влажности во время использования и обратите внимание
на вентиляцию и теплоотдачу.
3. Не разрешайте детям работать с зарядным устройством;
4.Правильно установите параметры заряда аккумулятора и
параметры разряда. Неправильные настройки могут
привести к несчастным случаям.
1
2
3
45 6 7
1 Сенсорные кнопки
2 Слот для батарей
3 IPS дисплей
4 Порт micro-USB
5 Порт USB
6 Вентилятор
7 Разъем для адаптера
питания * необходимо контролировать длину батарей
Она должна быть 65-66,7 мм
Спецификация
Модель
Входное напряжение
Мощность
Количество батарей
Размер батарей
Диапазон рабочих напряжений
Типы батарей
Зарядный ток
Разрядный ток
Режимы работы
Количество циклов
Экран
Звуковой сигнал
Датчики температуры
Рабочие температуры
Калибровка
Измерение напряжения
Измерение тока
Ток в ждущем режиме
Внешние порты
USB выходная мощность
Обновление прошивки
Защита от переполюсовки
Защита от перегрева
Защита по емкости
Размеры (Д×Ш×В)
Материал
Вес
C4
Постоянное 12V - 2.5A
макс. 25W (заряд)
10W (разряд)
1 - 4 шт
цилиндрические AAA,AA,
10440,10500,12500, 12650,13500,13650,
14500,14650,16650,17650,
18650,20650,22650,26650
0.2V - 5.0V/slot
NiMH, NiCd, NiZn,
Eneloop, Li-Ion, LiHv, LiFePO4
0.1A - 3.0A/слот
0.1A - 1.5A
Заряд, разряд, хранение, циклирование,
восстановление, исследование
1 - 66 циклов
320×240 IPS LCD
Многотоновый
5 внутренних
0°C - 40°C
Заводская калибровка
±10mV внутреннее разрешение
±10mA внутреннее разрешение
<0.05mA/батарею
DC вход, Micro USB для PC,
USB для заряда
DC 5V / 2.1A
Да
поддерживается
поддерживается
поддерживается
122×85×38мм
корпус PC+ABS, алюминиевый радиатор
153г(примерно)
Pусский | 10

Панель задач показывает состояние каждого задания,
зарядка, разрядка, восстановление,
циклирование, исследование. После того как
задание выполнено будет показана на экране
вместо процентов. Каждая подробная страница
задания будет циклически показываться в окне.
Используйте для переключения между режимами.
Mj.Jpo Dibshjoh
5/1:W!0!1/91B
96n℃!0!4:-
297nBi
11;24;19
96 3 80
Множество комбинаций может быть использовано
для заряда, разряда, хранения, циклирования
батарей, например 4s AA / 2s AAA/ 2s 18650/ 1s 26650
Установите батарею в соответствующий слот, и
зарядное устройство начнет автоматически заряжать
после 3-х звуковых сигналов. Сенсорной кнопкой
можно изменить каждый параметр вручную. Детали
показаны ниже на картинке:
Обычно тип батареи или рабочее напряжение
написаны на корпусе батареи. Пользователи могут
использовать таблицу, приведенную ниже, для
проверки. Зарядник определяет тип батареи
автоматически по номинальному напряжению.
Пожалуйста, выберите тип батареи вручную, если
зарядник определил его неправильно.
* батареи NiZn,LiHv д.б. выбраны вручную.
1) Подключите зарядку к сети (AC 100-240V) или
автомобильному адаптеру.
2) Вставьте батарею в C4, соблюдая правильную
полярность. Появится экран загрузки и отобразится
состояние зарядки (см. рис. ниже) после 3-х кратного
звукового сигнала.
Установка задания
Автоматический режим
Ручной режим
Interface 1.Тип батареи
2. Рабочий режим
3. Закаченная емкость
4. Текущее напряжение и ток
5. Время выполнения задания
6. Сопротивление и температура
7. График напряжения
8. Панел задач
9. Процент заряда батареи
10. Процент разряда батареи
11. Зарядка окончена
12. Процент циклирования
1
910 11 12
34
6
5
7
8
2
Тип батареи
Задание
Установки тока
Кол-во циклов
Старт задания
Возврат
Выбрать тип батареи
Заряд, разряд, хранение, циклирован., восстановлен., исследование
Выбрать ток:заряд/хранение:0.1-3.0A; разряд:0.1A-1.5A
1-99
Начать выполнение задания
Возврат
Как определить тип батареи
Стандартные типы батарей и
параметры задания
Номинальное
Полный заряд
Хранение
Разряд
Напряжение
1.20V
1.65V
X
0.90V
1.5V
1.9V
X
1.20V
3.70V
4.2V
3.70V
3.10V
3.80V
4.35V
3.80V
3.30V
3.30V
3.65V
3.20V
2.90V
1.20V
1.65V
X
0.90V
NiCd/NiMH NiZn Li-lon LiHv LiFePo4 Eneloop
Стандартные токи заряда: AAA/10440-0.5A
AA/10500-1A
18650-2A
26650-2.5A
Стандартный ток заряда будет выбран автоматически
в соответствии с длиной батареи. Пожалуйста,
выберите ток вручную, если если батарея длинная и
маленькой емкости, например 14650/16650 и т.д.
99 3.63
BB0S70VN.4025611
Батарея
Задание
Ток
Циклирование
Старт
Возврат
Заряд
Разряд
Хранение
Циклирование
Восстановление
Исследование
11 | Pусский

Очень важно знать максимальный ток заряда батареи
поскольку чрезмерный ток может влиять на
продолжительность жизни батареи и/или привести к
ее повреждению. Кроме того, чрезмерный ток может
вызвать нагревание и/или взрыва батареи во время
процесса зарядки. Зарядка и разрядка батареи
обычно указывается значением C. Величина C для
зарядки умноженная на емкость аккумулятора равна
максимальному заряднному току данной батареи.
Например, для батареи емкостью 1000 мАч с
емкостью зарядки 0.5C максимальный ток заряда
будет составлять 1000*0.5=500 ма, или 0.5А.
Для литиевой батареи, если невозможно определить
значение тока зарядки в C, установите зарядный ток
ниже 1C ради безопасности (литиевая батарея).
Справочное соотношение между значением C и
временем заряда: время заряда ≥60 минут/заряд до
значение C (поэтому нужно около 60~70 минут для
полной зарядки током 1С). Из-за различий в
эффективности преобразования энергии в батарее,
время для завершения зарядки может быть продлено.
В этом режиме батарея может заряжаться и
разряжаться до 99 циклов. И эффект памяти может
быть устранен в этом режиме.
Функция циклирования
Пожалуйста, выберите функции хранения, если
батарея не будет использоваться в течение
длительного времени. При выборе функций хранения
задание автоматической зарядки может быть
инициировано, если батарея ниже заданного
напряжения питания или выше заданного уровня
напряжения.
Функция хранения
Зарядное устройство идентифицирует батарею как
неисправную, если напряжение 0В. Можно
использовать этот режим для восстановления
батареи. Пожалуйста, замените батарею, если она
попрежнему не может быть заряжена после
многократного восстановления.
Для батарея используется маленький ток для циклов
заряд- разряд-заряд. Аккумулятор будет восстановлен
в циклическом процессе. Иногда требуется 2-3 цикла
на батарею для ее восстановления.
Фунция восстановления
Эта функция применяется к батарее, которая
хранится в течение более 2 недель или имеет плохие
характеристиками разряда. Эта функция может также
использоваться для определения и соответствия
емкости батареи
Функция исследования
Максимальный ток USB-порта составляет 2,1А.
Зарядное устройство может заряжать батарею и ваш
телефон в одно и то же время. Мощность зарядки
автоматически снижается при зарядке через USB.
Зарядник имеет функцию измерения внутреннего
сопротивления. Напряжение измеряется в течении
10 сек после начала заряда батареи. Внутреннее
сопротивление батареи может незначительно
меняться при различных режимах, в то время как
измеренное сопротивление обычно невелико по
мере того, как заряд подходит к концу. Зарядный ток
должен меняться постоянно при измерении
внутреннего сопротивление батареи. Это
нормальное явление для точного изменения тока во
время зарядки
Функция USB зарядки
WПри неправильном подключении или коротком
замыкании зарядник будет выдавать сообщение об
ошибке пока причина не будет устранена Пример
сообщения показан ниже:
Короткое замыкание и
переполюсовка батареи
Как определить зарядный ток
-- -- --
⒘⒆⑩⒆⑨⑧⑤Ⅳ㈠⑧⒃④⒁!⒂⒁㈡⒁⑩⒆②
Функция измерения внутреннего
сопротивления
По окончании заряда значек будет отображен на
экране вместо процентов. При этом нормально, что
напряжение снижается из-за различных причин. Так
как число циклов заряда растет, характеристики
батареи ухудшаются и эффект уменьшения
напряжения становится очевиднымм. При заряде
батареи большим током, также может наблюдаться
эффект уменьшения напряжения
Замечания о полной зарядке
Pусский | 12

Q: Почему зарядное устройство не может определить
аккумулятор?
A: Вытащите и снова включите аккумулятор, чтобы
обеспечить надежное соединение; Пожалуйста,
проверьте, хорошо ли подключен положительный и
отрицательный электрод батареи. И попробуйте
поместить его в другой слот, если аккумулятор можно
идентифицировать. Проверьте, не разряжена ли
батарея. Если сообщение об ошибке
повторяется, проверьте, окислены или сожжены
металлические детали на контактах батареи, что
часто приводит к ненадежному соединению.
Q: Могу ли я использовать C4 для разрядки
литийионной или щелочной неперезаряжаемой
батареи? Я пытаюсь проверить емкость батареи.
A: C4можно использовать для разряда
неперезаряжаемой батареи. Но обратите внимание:
никогда не заряжайте аккумуляторную батарею.
Q: Ошибка при самотестировании:
A: Зарядное устройство может автоматически
выполнять самотестирование при подключении к
источнику питания. При подключении зарядного
устройства к аккумулятору должен быть слышен
звуковой сигнал ошибки самодиагностики; включите
питание после извлечения батареи в течение 5 минут.
Q: Я подключил 4 батареи АА в C4 и установил ток
зарядки на 3A, почему фактический ток не смог
достичь 3A?
A: Максимальная зарядная мощность составляет 30
Вт. Зарядное устройство будет автоматически
переключиться на соответствующий ток, чтобы начать
заряд, если настройка превысила общую мощность.
ISDT всегда уделяет особое внимание стремлению к
совершенству. Вся производительность и улучшение
алгоритма, визуальная оптимизация постепенно
строится со временем всеми инженерами. И все это
связано с прошивкой. Подробнее о последних
версиях прошивокна нашем веб-сайте. C4
смарт-зарядное устройство:
1. Подключите C4 и ПК с помощью кабеля Micro USB
2.Включите C4, чтобы начать работу, а затем зарядное
устройство автоматически переходит в режим
обновления прошивки.
3.Используйте программу «Updata» для запуска
обновления в соответствии с запросами.
Обновление прошивки
Нажмите кнопку при отключенной батарее для
вызова меню установок по умолчанию. Это выглядит
как показано на картинке:
Смарт-зарядное устройство C4
соответствуетстандарту CE и соответствующим
стандартам B: 2010,CHAPTER 15, FCC
Для электронных изделий с этой маркировкой
в их руководствах, пожалуйста, отдельно
утилизируйте их с семейным мусором. Когда
зарядное устройство испортится и больше не
может быть использовано, отправьте его до
ближайшей станции мусора или центра
переработки.
Установки по умолчанию FAQ
Декларация о качестве продукта
Громкость звукового сигнала: по умолчанию ВЫКЛ,
при работе звук выключен, но будет воспроизведен
при ошибке.
Сист. информация
Заводск. установки
Язык
Громкость
Подсветка
Огранич. Емкости
Авто заряд
Показать цикл
Возврат
Информация о программном обеспечении
Сброс на заводские установки
Язык по умолчанию
Громкость: высокая, средняя, низкая и выкл
Посветка: высокая, средняя, низкая и выкл
Установить макс. емкость батареи
Установить время ожидания для автозаряда
Информация о циклировании
Возврат
Стандарт тестирования
EN 61000-6-3:2007 + A1:2011
EN 61000-6-3:2007
⑴㈠㈡⒁⑦⑧⒃④②
Сист. информация
Заводск. установки
Язык
Громкость
Подсветка
Огранич. емкости
Авто заряд
Показать цикл
Возврат
...
...
Русский
Низкая
Высокая
Вкл
3с
10с
результат
соответствует
соответствует
13 | Pусский

Descargo de responsabilidad y advertencias
El ISDT C4 es un cargador inteligente con un rendimiento
excepcional, compatible con casi todos los tipos de baterías
existentes, tales como; Li-lon, Lihv, IM-R, IN-R, Ni-MH, Ni-cd,
Lifepo4 y eneloop. Tiene una pantalla IPS con un alto ángulo
de visualización, que muestra el proceso y todos los parámet-
ros detalladamente. Se pueden colocar diferentes tipos de
baterías en distintos espacios y operar de forma independi-
ente. El cargador identicará el tipo de batería presente y
realizará el proceso de carga correspondiente.
Lea este manual completamente y siga las instrucciones
cuidadosamente antes de usar su nuevo cargador.
1.No use pilas no recargables; No use baterías con aislamiento
de supercie dañado
2. Mantenga el cargador alejado del calor y la humedad
durante el uso y preste atención a la ventilación y la
disipación de calor.
3. No permita que los niños operen el cargador;
4. Congure la carga de la batería y los parámetros de
descarga correctamente. La conguración incorrecta puede
causar accidentes.
1
2
3
45 6 7
1.Tecla táctil
2.Zócalo para batería
3.Pantalla IPS
4.Puerto de actualización Micro USB
5.Puerto USB
6.Salida de ventilación
7.Entrada de corriente
* La longitud de las baterías tiene que estar
contenida entre 65-66,7mm
Specication
Modelo
Corriente de entrada
Potencia del circuito
Cantidad de baterías
Tamaños de baterías
Rango operativo de voltaje
Tipos de baterías aceptadas
Rango de corriente de carga
Rango de corriente de descarga
Modos operativos
Cantidad de ciclos
Pantalla
Sonido
Sensores de temperatura
Temperatura operativa
Calibración
Medida del voltaje
Medida de la corriente
Consumo en modo reposo
Puertos externos
Potencia de salida de USB
Actualización del rmware
Proteccion de polaridad inversa
Proteccion de temperatura
Proteccion de sobre capacidad
Dimensiones (Largo x ancho x altura)
Material
Peso
C4
DC 12V - 2.5A
Potencia máxima de carga 25W
Potencia máxima de descarga 10W
1 - 4 celdas simples, cilindricas
AAA,AA,10440,10500,
12500,12650,13500,13650,
14500,14650,16650,17650,
18650,20650,22650,26650
0.2V - 5.0V/slot
NiMH, NiCd, NiZn,
Eneloop, Li-Ion, LiHv, LiFePO4
0.1A - 3.0A/slot
0.1A - 1.5A
Carga, descarga, almacenamiento
Ciclo, Reactivación y análisis
1-66 cycles
320×240 IPS LCD
Multi tono
5 internos
0°C - 40°C
Calibrado en fabrica
Resolución interna de ±10mV
Resolución interna de ±10mA
<0.05mA/batería
Entrada DC, Enlace Micro USB,
Salida de carga USB
DC 5V / 2.1A
Si
Soportado
Soportado
Soportado
122×85×38mm
Caja externa PC+ABS, disipador de aluminio
153g(aprox.)
Español | 14

Mj.Jpo Dibshjoh
5/1:W!0!1/91B
96n℃!0!4:-
297nBi
11;24;19
96 3 80
Se pueden utilizar múltiples combinaciones para realizar
la carga, descarga, almacenamiento o mantenimiento de
las baterías, como, por ejemplo: 4S AA, 2S AAA, 2S 18650,
1S 26650
Para utilizar el modo manual, hay que colocar la batería
en la ranura correspondiente. El cargador realizará 3
pitidos y comenzará el proceso de carga automática-
mente. Mientras está realizando la carga, los usuarios
pueden utilizar la tecla táctil para permanecer en la
pantalla de tareas y cambiar todos los parámetros
manualmente. Las opciones disponibles son las siguien-
tes:
Normalmente, en la supercie de la batería está el tipo
de batería o el voltaje nominal. Los usuarios pueden
comprobar el siguiente cuadro para conrmar el tipo de
batería. El cargador detecta automáticamente el tipo de
batería comprobando el voltaje de las mismas. Por favor,
seleccione el modelo correcto de batería si el cargador
no la detecta correctamente.
*Las baterías NiZn, LiHV necesitan ser seleccionadas
manualmente.
1) Conecte el cargador a una toma CA (100-240 V) o a un
adaptador de vehículo.
2) Coloque la batería a cargar de forma correcta en el
cargador C4, haciendo caso al polo positivo y negativo.
Una vez colocada correctamente aparecerá la pantalla
de inicio y mostrará el estado de carga después de hacer
3 pitidos (Tal y como se ve en la imagen a continuación).
La barra de tareas muestra el estado del cargador de una
forma muy visual, signica que está cargando, “ “
signica que está descargando o activo, “ “ signica que
está realizando mantenimiento o analizando. Cuando
una tarea se haya completado, se mostrará en la
pantalla en vez del porcentaje. Las distintas páginas con
la información de las tareas irán apareciendo de forma
sucesiva en la pantalla. Utilice los botones para
cambiar entre los modos.
Manual operativo
Modo automático
Modo manual
Interface 1.Tipo de batería
2. Estado de funcionamiento
3. Cantidad de mAh cargados
4.Voltaje y corriente actuales
5.Tiempo transcurrido
6. Resistencia y temperatura actuales.
7. Curva de voltaje
8. Barra de tareas
9. Porcentaje de carga de la batería
10. Porcentaje de descarga de la batería
11. Proceso de carga terminado
12. Porcentaje de circulación de la batería
1
910 11 12
34
6
5
7
8
2
Battery types
Task
Current setting
cycle index
Start task
Back
Seleccione el tipo de batería
Seleccionar la tarea a realizar: carga, descarga, almacenamiento, ciclo, activación y análisis
Seleccionar la corriente: carga / almacenamiento: 0.1-3.0A; descarga: 0.1A-1.5A
Índice de ciclos: 1-99
Comenzar la tarea
Atrás
Como conrmar el tipo de batería
Tipos de baterías por defecto y
parámetros de trabajo
Voltaje nominal
Voltaje carga completa
Voltaje almacenamiento
Voltaje de descarga
1.20V
1.65V
X
0.90V
1.5V
1.9V
X
1.20V
3.70V
4.2V
3.70V
3.10V
3.80V
4.35V
3.80V
3.30V
3.30V
3.65V
3.20V
2.90V
1.20V
1.65V
X
0.90V
NiCd/NiMH NiZn Li-lon LiHv LiFePo4 Eneloop
Corriente de carga por defecto: AAA/10440-0.5A
AA/10500-1A
18650-2A
26650-2.5A
La corriente de carga predeterminada se seleccionará
automáticamente de acuerdo con la duración de la
misma. Por favor, seleccione la corriente de carga
manualmente si la batería tiene una gran longitud y una
capacidad pequeña, como las baterías 14650/16650 etc.
99 3.63
BB0S70VN.4025611
Cbuufsz
Ubtl
Dvssfou
Dzdmf
Tubsu
Cbdl
Dibshf
Ejtdibshf
Tupsbhf
Dzdmf
Bdujwbujpo
Bobmztjt
15 | Español

Es muy importante conocer la corriente máxima de
carga de una batería, ya que la carga excesiva puede
provocar graves daños a la batería y afectar negativa-
mente a la vida útil de la misma. Además, una corriente
excesiva puede causar una temperatura elevada y/o la
explosión de la batería durante el proceso de carga. La
capacidad de carga y descarga de la batería suele venir
representada con un valor de C. Multiplicando el valor
de C por la capacidad de la batería, obtenemos el valor
máximo de la corriente de carga que soporta la batería.
Por ejemplo, para una batería con una capacidad de
1000 mAh y con una capacidad de carga de 5C, la
corriente de carga máxima seria 1000 x 5 = 5000 mAh,
por lo que la corriente de carga máxima es de 5A
(1A=1000mAh). Para las baterías de litio en las que no se
pueda identicar el valor de C, calcule la corriente
máxima de carga por debajo de 1C por la seguridad de
la batería de litio.
Relación entre el valor de C y el tiempo de carga: Tiempo
de carga >= 60 minutos/valor de carga C (Por lo tanto,
se necesita alrededor de 60~70 minutos para completar
la carga a 1C). Debido a las diferencias en la conversión
de eciencia de las distintas baterías, el tiempo de carga
puede extenderse.
En este modo, la batería puede cargase y descargarse en
ciclos, hasta un máximo de 99 ciclos. El efecto memoria
de las baterías se puede eliminar utilizando esta función.
Función de ciclos
Por favor, use la función de almacenamiento siempre
que las baterías no vayan a ser usadas por un largo
periodo. Cuando se selecciona la función de almace-
namiento, la carga comenzará de forma automática si el
voltaje de la batería es inferior al voltaje por defecto de
almacenamiento, en caso contrario, si el voltaje de la
batería es superior al voltaje por defecto de almace-
namiento se iniciará la descarga de forma automática.
Función de almacenamiento
El cargador identicará toda batería con un voltaje
cercado a 0V como batería no recargable. Los usuarios
pueden usar este modo especial para intentar reacondi-
cionar baterías. Por favor, si después de intentarlo en
varias ocasiones, la batería continua sin volver a
funcionar deseche la batería de forma apropiada.
Este proceso de reactivación utiliza un ciclo de
carga-descarga-carga de muy bajo voltaje. La batería se
reactivará al repetir estos ciclos. En diversas ocasiones se
necesitan hasta 2-3 ciclos para reactivar completamente
una batería.
Función de reactivación
Esta función se utiliza con las baterías que han sido
almacenadas durante más de 2 semanas o que tienen
una capacidad de descarga muy limitada. Esta función
puede ser utilizada para identicar y comprobar la
capacidad de la batería.
Función de análisis
El puerto USB tiene una potencia máxima de salida de
2.1A. El cargador C4 es capaz de cargar baterías y su
teléfono de forma simultánea. La potencia de carga de
las baterías se verá reducida automáticamente cuando
se esté usando la salida USB.
El cargador viene equipado con una función de
medición de la resistencia interna de las celdas. El voltaje
de la celda se medirá y calculará 10s después de haber
iniciado el proceso de carga. La resistencia interna de la
batería puede variar ligeramente bajo distintas
cantidades eléctricas, la resistencia medida suele ser
relativamente baja mientras la cantidad eléctrica es alta.
La corriente de carga se ajusta de forma automática
cuando el cargador mide la resistencia interna de la
batería; por este motivo, es un fenómeno completa-
mente normal que la corriente de carga se ajuste
durante el proceso de carga.
Función de carga USB
Cuando la batería esta invertida o cortocircuitada, el
cargador mostrará un mensaje de error hasta que la
batería haya sido removida. Así mismo se mostrará el
estado de error en el correspondiente zócalo.
Protección contra cortocircuito y
polaridad invertida
Como conrmar la corriente de carga
-- -- --
Cbufs“b!jowfstb
Función de medición de la resistencia interna
Cuando la carga se ha completado, se mostrará el
símbolo en la pantalla en vez del porcentaje de la
batería. Es normal que haya un declive en el voltaje
debido a diferentes rendimientos y estados de las
baterías. A medida que crecen los ciclos de carga y
descarga de una batería, el rendimiento disminuye y el
declive en el voltaje se hace más evidente. Cargar una
batería con una corriente mayor también incrementa el
declive en el voltaje de la misma.
Carga completada
Español | 16

P: ¿Porque el cargador no identica la batería?
R: Saque y vuelva a colocar la batería en el zócalo para
asegurarse de las conexiones entran en contacto. Por
favor, compruebe que el polo positivo y negativo de la
batería estén correctamente conectados. Intente colocar
la batería en otro zócalo para ver si la batería puede
identicarse. Compruebe que la batería no tiene
sobretensión o esta con 0V. En caso de que el error
persista, comprobar que los bornes de conexión no
estén oxidados o quemados, ya que de ese modo la
conexión podría ser precaria.
P: ¿Puedo usar el cargador C4 para descargar unas
baterías Li-ion o alcalinas no recargables? Quiero
asegurarme de la capacidad que tienen.
R: El cargador C4 puede descargar cualquier batería no
recargable. Pero por favor: Nunca intente cargar una
batería no recargable, podría provocar serios daños.
P: Se produce un error al enchufar el cargador durante
el test inicial
R: El cargador C4 puede iniciar un test interno para
comprobar su estada cada vez que se conecta a la
corriente. Se escuchará un sonido de advertencia de
error en la auto prueba cuando el cargador esté
conectado y la batería haya sido retirada durante más de
5 minutos.
P: He colocado 4 baterías AA en el cargador C4 y he
seleccionado una corriente de carga de 3A, ¿Porque la
corriente de carga que me muestra no llega a 3A?
R: La potencia máxima de carga es de 30W. El cargador
puede limitar la corriente de carga si la corriente
seleccionada excede la potencia máxima.
ISDT siempre busca la perfección. Todo incremento en el
rendimiento, perfeccionamiento en los algoritmos y
optimizaciones visuales, se construye lentamente a
través del tiempo por nuestros ingenieros. Todas estas
mejoras quedan reejadas en el rmware. Para más
detalles sobre el último rmware, por favor visita nuestra
página web.
Pasos que seguir para actualizar el cargador inteligente
C4
1. Conectar el cargador C4 a un ordenador PC con un
cable Micro USB
2. Encender el cargador C4 como si fuese a operar de
forma normal, el cargador entrará automáticamente en
el modo de actualización del rmware.
3. Utilice el programa "Updata program" para comenzar
el proceso de actualización. Siga las instrucciones de
pantalla.
El volumen del altavoz esta por defecto en OFF
(apagado), los sonidos al operar el cargador están
silenciados, pero no los sonidos de advertencia, fallo o
error.
Actualización de rmware
Cuando el sistema muestre el mensaje (Batería no
recargable) presiona el botón para hacer aparecer
el menú siguiente:
El cargador inteligente C4 cumple con la normativa CE
pertinente y los comandos relevantes en B:2010,
CAPÍTULO 15, FCC
Para los productos electrónicos con esta
marca en su manual, por favor no los deseche
junto con los residuos normales. Cuando el
cargador esta inutilizado y no se puede volver
a usar, haga el favor de deshacerse de él en un
centro de reciclaje adecuado.
Ajustes predeterminados FAQ: Preguntas frecuentes
Declaración de conformidad
Información del sistema
Valores de fábrica
Idioma
Volumen
Retroiluminación
Limite de capacidad
Carga automatica
Mostrar ciclos
Atrás
Información del software del sistema
Restablecer valores de fábrica
Ajuste de idioma predeterminado
Volumen; alto, medio, bajo y apagado
Retroiluminación de la pantalla. Tres opciones; alto, medio y bajo.
Establecer la capacidad máxima de la batería
Establecer tiempo de espera para la carga automática
Mostrar detalle de los ciclos en modo manual o automático
Atrás
Test
EN 61000-6-3:2007 + A1:2011
EN 61000-6-3:2007
Tfuujoht
Jogpsnbdj〔o!efm!tjtufnb
Wbmpsft!ef!g~csjdb
Jejpnb
Wpmvnfo
Sfuspjmvnjobdj〔o
Mjnjuf!ef!dbqbdjebe
Dbshb!bvupnbujdb
Nptusbs!djdmpt
Bus~t
///
///
Fohmjti
Mpx
Ijhi
Po
4t
21t
Resultados
Si
Si
17 | Español

Warn-und Sicherheitshinweise
Vielen Dank für den Kauf des ISDT C4 smart charger.
Das C4 ist ein Ladegerät aus der Reihe der iSDT smart Charger
mit hervorragenden Leistung und der Unterstützung von fast
allen Akkutypen, wie Li-Ion, Lihv, NiZn, Ni-MH, Ni-CD, Lifepo4
und Eneloop. Das IPS Display mit einem hohen Betrachtung-
swinkel zeigt detailliert Parameter und Aufgabenfortschritt an.
Verschiedene Arten von Akkus können in verschiedene
Steckplätze geladen werden. Dabei arbeiten die Steckplätze
unabhängig voneinander. Das Ladegerät identiziert den
Akkutyp und wählt das passende Ladeprogramm.
Lesen Sie diese Bedienungsanleitung und befolgen Sie die
Anweisungen sorgfältig, bevor Sie Ihr neues Ladegerät
verwenden.
1. Versuchen Sie niemals, Akkus mit beschädigter Oberäche
der Isolierung oder nicht wiederauadbare Batterie aufzulad-
en.
2. Halten Sie das Ladegerät während des Ladevorgangs von
Feuchtigkeit und hohen Temperaturen fern und stellen Sie
sicher, dass das Kühlgebläse gleichmäßig arbeitet.
3. Lassen Sie Kinder das Ladegerät nicht bedienen.
4. Stellen Sie sicher, dass die Einstellung der Lade- und
Entladeparameter korrekt ist, eine falsche Einstellung kann zu
schwerwiegenden Folgen führen.
1
2
3
45 6 7
1 Berührungstaste
2 Akku Schacht
3 IPS Display
4 Micro USB Update Port
5 USB Lade Port
6 Lüfter Önung
7 DC* Eingang * Die seitliche Länge der Akkus muss geprüft werden,
der Bereich ist 65 mm - 66.7 mm
* DC - Gleichspannung
Technische Daten
Produkt
Eingangsleistung
Ladeleistung
Entladeleistung
Akkuanzahl
Akku Größe
Arbeitsspannung
AkkuTyp
Ladestrom
Entladestrom
Betriebsmodi
Zyklenzahl
Display
Töne
Temperatur Sensoren
Arbeitstemperatur
Kalibrierung
Spannungsmessung
Strommessung
Standby Strom
Externe Anschlüsse
USB Stromausgang
Firmware Update
Verpolungschutz
Übertemperaturschutz
Überkapazitätsschutz
Abmessung (L×W×H)
Material
Gewicht
C4
DC* 12V-24V/2.5A
max. 25W
max. 10W
1 - 4 Einzelzellen, zylindrisch
AAA,AA,10440,10500,
12500,12650,13500,13650,
14500,14650,16650,17650,
18650,20650,22650,26650
0.2V - 5.0V/Schacht
NiMH, NiCd, NiZn,
Eneloop, Li-Ion, LiHv, LiFePO4
0.1A - 3.0A/Schacht
0.1A - 1.5A
Laden, Entladen, Lagerung,
Zyklus, Aktivierung, Analyse
1 - 66 Zyklen
320×240 IPS LCD
Multi-Ton
5 Stück im Gerät fest verbaut
0°C - 40°C
abWerk kalibriert
±10mV interne Auösung
±10mA interne Auösung
<0.05mA/Akku
Gleichspannungseingang, Micro USB
USB Stromausgang
DC 5V / 2.1A
Ja
unterstützt
unterstützt
unterstützt
122×85×38mm
PC/ABS Gehäuse, Aluminum Kühlkörper
153g (ca.)
Deutsch | 18

Die Taskleiste zeigt jeden Aufgabenstatus visuell an,
Laden Entladen und Aktivierung Zyklus
uns Analyse Ist ein Vorgang komplett erscheint
anstelle der Akku Prozentzahl. Die einzelnen
Vorgänge sind durch die Pfeiltasten wie mit einem
Scrollrad einfach über die Berührungstaste zu erreichen.
Mj.Jpo Dibshjoh
5/1:W!0!1/91B
96n℃!0!4:-
297nBi
11;24;19
96 3 80
Verschiedene Akku Kombinationen können verwendet
werden, um diese zu laden, zu entladen, zu lagern oder
mehrere Zyklen durchlaufen zu lassen, wie z.B. 4xAA /2x
AAA/2x 18650/1x 26650.
Legen Sie den Akku in den passenden Schacht. Das
Ladegerät startet das Laden automatisch nach einem
3-fach Ton. Durch Berühren der Berührungstaste bleibt
man auf der Menüseite und kann jeden Parameter
manuell ändern. Die Menüpunkte sind wie folgt:
Normalerweise ist der Akkutyp oder die Nennspannung
auf dem Akku vermerkt. Zur Kontrolle nutzen Sie die
folgende Liste. Das Ladegerät identiziert den Akkutyp
automatisch basierend auf einem Spannungstest des
Akkus. Wählen Sie den richtigen Akkutypen manuell aus,
sollte das Ladegerät mal den falschen Typ wählen.
* NiZn, LiHv Akkus immer manuell auswählen!
1. Schließen Sie das Ladegerät an das Netzteil oder einen
Fahrzeugadapter (12-24V) an.
2. Legen Sie den Akku entsprechend dem Plusund
Minuspol in das C4. Es erscheint dann der Startbild-
schirm und zeigt den Ladezustand (wie unten abgebil-
det). Der Summer ertönt 3-mal.
Erläuterung der Funktionen
Automatischer Modus
Manueller Modus
Index 1. Akkutyp
2. Programm
3. geladene Kapazität
4. aktuell. Spannung/Strom
5. Programmlaufzeit
6. Innenwiderstand/Temp.
7. Spannungskurve
8. Taskleiste
9. Akkuladung in %
10.Akkuentladung in %
11.Laden beendet
12.Zyklen %
1
910 11 12
3 4
6
5
7
8
2
Battery
Task
Current
Cycle
Start
Back
Akkutyp wählen
Auswahl von Laden, Entladen, Lagerung, Zyklus, Aktivierung, Analyse
Stromauswahl für Laden/Lagerung 0.1-3.0A und Entladen 0.1A-1.5A
Anzahl der Zyklen wählen: 1-66
Vorgang starten
Zurück
Bestätigung des Akkutyps
Akkutypen und Standardwerte
Nennspannung
Ladeschlussspannung
Lagerspannung
Entladespannung
1.20V
1.65V
X
0.90V
1.5V
1.9V
X
1.20V
3.70V
4.2V
3.70V
3.10V
3.80V
4.35V
3.80V
3.30V
3.30V
3.65V
3.20V
2.90V
1.20V
1.65V
X
0.90V
NiCd/NiMH NiZn Li-lon LiHv LiFePo4 Eneloop
Ladestrom Werkseinstellung: AAA/10440-0.5A
AA/10500-1A
18650-2A
26650-2.5A
Der Ladestrom laut Werkseinstellung wird automatisch
entsprechend der Akkulänge gewählt. Bitte wählen Sie
den Strom manuell, wenn der Akku lang und dünn ist
und so eine kleinere Kapazität hat, wie z.B. 14650/16650
99 3.63
BB0S70VN.4025611
Cbuufsz
Ubtl
Dvssfou
Dzdmf
Tubsu
Cbdl
Dibshf
Ejtdibshf
Tupsbhf
Dzdmf
Bdujwbujpo
Bobmztjt
19 | Deutsch

Es ist sehr wichtig, den maximalen Ladestrom des Akkus
zu kennen, da ein zu hoher Strom die Lebensdauer des
Akkus negativ beeinussen und / oder Schäden verursa-
chen kann. Ebenso führt ein übermäßiger Strom zu einer
Erwärmung während des Ladevorgangs und der Akku
könnte explodieren. Die Lade- und Entladekapazität des
Akkus ist normalerweise mit dem Lade C-Wert gekenn-
zeichnet.
Die Multiplikation des Lade-C-Wertes und der
Akkukapazität entspricht dem maximalen Ladestrom, der
vom Akku unterstützt wird. Bei einem 1000 mAh
Akku mit einem Lade C-Wert von 0,5 wäre der maximale
Ladestrom beispielsweise 1000 * 0,5 = 500 mA, also wäre
der maximale Ladestrom 0,5A. Wenn es bei einer
Lithium-Akku nicht möglich ist, den unterstützten
Lade-C-Wert zu ermitteln, stellen Sie den Ladestrom aus
Gründen der Sicherheit (LithiumAkku) bitte auf unter 1C.
Zusammenhang zwischen C-Wert und Ladezeit: Ladezeit
≥60 Minuten / Lade-C-Wert (es dauert ca. 60-70 Minuten,
um den Ladevorgang mit 1C abzuschließen). Aufgrund
von Unterschieden in der Ezienz der Akku Chemie
kann der Zeitraum bis zum Abschluss der Ladung auch
länger sein.
In diesem Modus kann der Akku mit bis zu 99 Zyklen
geladen und entladen werden. Das frischt LiXX Akku
auf und hilft gegen der Memory Eekt bei NiXX Akkus.
zyklisches Laden/Entladen
Bitte wählen Sie die Funktion Lagerung, wenn der Akku
längere Zeit nicht benutzt wird. Bei der Auswahl dieses
Programms wird entweder automatisch eine Ladeauf-
gabe ausgelöst (wenn die Zellspannung niedriger als die
voreingestellte Lagerzellspannung ist) oder eine
automatische Entladeaufgabe, wenn die Zellspannung
höher als die voreingestellte Lagerzellspannung ist.
LiXX Akkus zur Lagerung vorbereiten
Ganz leere Akkus mit nahezu 0V erkennt das Ladegerät
als eine nicht wiederauadbare Batterie. Der Aktivierung-
smodus kann zur Wiederaufbereitung solcher sehr
leeren Akkus genutzt werden. Falls nach mehrfacher
Aktivierung
der Akku immer noch nicht geladen wurde, ist dieser
defekt. Der Aktivierungsmodus verwendet einen
niedrigen Strom für den Lade-Entlade-Lade Zyklus um
den Akku zu aktivieren. Es können durch aus manchmal
2-3 Aktivierungszyklen notwendig sein.
Aktivierungsfunktion
Diese Funktion ist für Akkus die länger als 2 Wochen
nicht genutzt wurden oder die eine schlechte Entlade-
leistung aufweisen. Ebenso kann mit diesem Programm
die Akkukapazität oder ein Nachlassen dieser festgestellt
werden.
Analyse Funktion
Der maximale Ausgangsstrom des USB Anschlusses
beträgt 2.1A. Das Ladegerät kann gleichzeitig Akkus im
Schacht und ein USB Gerät laden. Jedoch wird die
Ladung der Akkus im Schacht beim Laden über USB
automatisch reduziert.
Das Ladegerät ist mit einer Funktion zur Messung des
Zellinnenwiderstands ausgestattet. Die Messung sollte
gestartet werden, nachdem der Ladevorgang
mindestens 10s läuft. Der Akkuinnenwiderstand kann je
Messung leicht variieren. Akkus mit großer Kapazität
haben eher niedrige Innenwiderstände. Zur Messung
muss das Ladegerät beginnen zu Laden. Es ist normal
das der Ladestrom dabei immer wieder wechselt.
USB Lade Funktion
Wenn der Akku verpolt angeschlossen wird oder ein
Kurzschluss im Akku vorliegt, meldet das Ladegerät
solange einen Fehler bis der Akku vom Gerät getrennt
wurde.
Im Display erscheint ein Hinweis und der betroene
Schacht wird in der Taskleiste mit einem Symbol
angezeigt:
Verpolungs- und Kurzschlussschutz
Den richtigen Ladestrom wählen
-- -- --
Bllv!wfsqpmu
Innenwiderstands Messung der Zellen (Ri)
Nachdem der Ladevorgang abgeschlossen ist, wird
anstelle der Prozent Angabe auf dem Bildschirm ein
Haken angezeigt.
Ein Abfall der Akkuspannung unmittelbar nach dem
Laden ist normal. Mit steigender Anzahl der Lade-/Entla-
dezyklen, nimmt die Leistung des Akkus ab und der
pannungseinbruch wird stärker. Ebenso ist dieser Eekt
stärker wenn mit einem höheren Strom geladen wird
und geringer bei einem kleineren Ladestrom.
Beendigung des Ladevorgangs
Deutsch | 20
Other manuals for C4
1
Table of contents
Languages:
Other ISDT Batteries Charger manuals