iSinwheel EBIKE D4 User manual

EBIKE D4
Powered by isinwheel
US Based Support
Mon-Fri: 8AM-4PM (PDT)
US:+1 (888) 496 8123
www.isinwheel.com USER MANUAL

What’s Included in the Box
LCD Display
Stem
Front Light
Taillight Hydraulic Suspension
Front Fork
Suspension
Front
Battery
Saddle
Motor Wheel Chain
Crankset
Pedals Tire Disc Brake
Seat Post
01
1x Bike Frame
+ Rear Wheel
1x Charger 1x Wrench 1x User Manual 2x Battery Key
1x Front Wheel
1x QR Skewer 2x Pedal 3x Hex Key
User’s
Manual
1x Bicycle Pump
1x Front Mudguard

02
Step 1 Stem Installation
Insert the stem into the head
tube.
1Adjust the handlebar to make it
perpendicular to the front tire.
2Open the folding lock.
3
Put down the stem.
4Tighten the bolt into the head
tube.
5After tightening the bolt, Lift
the stem and close the
folding lock firmly.
6
90°
● Please read this manual thoroughly and follow its instructions.
● Make sure all parts are intact.
● Do not install the battery or start the computer until the bike is fully installed.
● If you have any questions or can't find the information you need in the manual, Please contact
us via email.
Before Installation
Installation

03
Put the front fork on the front wheel.
Make sure the brake caliper clamps
the brake rotor and keep the fork
drop-outs to stay on the axle.
4Insert the QR skewer through
the axle and tighten the
adjusting nut.
5Use your palm to close the
QR lever.
6
Step 3 Front Wheel Installation
Take out the front wheel and
QR skewer.
1Loosen the nuts of the fork
mount and remove the fork
mount.
2Loosen the adjusting bolt of the QR
skewer, Make sure the smaller end
of the 2 cone springs facing inwards.
3
Step 2 Handlebar Angle Adjustment
Make sure the handlebar is perpendicular to the
front wheel.
2
To adjust the handlebar angle, Open the quick
release connecting the handlebar and stem.
1

04
Put the fender through the front fork. Reinstall the
bolts, Washers and nuts (in this order). Reinstall
the lower fender screws.
2
Take out the front fender and remove the nuts,
Washers and bolts on the top and bottom of the
front fork.
Step 4 Front Light and Mudguard Installation
Warnings:
● The disc brake is located on the left side in the direction of riding.
● Make sure the front wheel hub is fully engaged into the front fork drop-outs.
● Ensure that the circumference of the front wheel is completely caught in the drop-outs of the
front fork, and tighten the nuts on both sides. Recommended torque is 30 ~ 40 NM.
1

05
Press the pedals firmly by hand first. Tighten the
right pedal clockwise and the left pedal
counterclockwise.
2
Identify the correct side by finding ‘R’ and ‘L’
marks on the pedals.
1
Push the pedal inward to fold the pedals up or
down.
4
Fully tighten the pedals with a pedal wrench or
open-end wrench.
3
Step 5 Pedal Installation
L LR R
L R L R

06
Step 6 Seat Installation
Open the QR seatpost clamp and
adjust the seat height by pulling up
or pressing down the seat.
1Close the seatpost clamp and make sure
the seatpost is held in place. Don’t adjust
the seat too high (keep the safety line
mark lower than the top of the seat tube).
2Loosen the seat clamp and adjust
the seat to an appropriate angle.
3
Step 7 Battery Removal and Installation
1 2 3
For your convenience, the bike battery can be removed.
To reinstall the battery, align the slot on the bottom of the battery and reinsert the battery into the
frame. Turn the key to the locked position. If you want to know the battery level without turning the
power on, Long press the button on the top of the battery to display the current battery level.
Safety Line
Locate the seat QR lever and
flip the seat over.
Press and turn the key to
unlock position.
Carefully slide the battery up
and lift it off the frame.

07
Remove the rubber cover on the charging port
opposite the battery switch.
2
Turn the key to off position to ensure the battery
is idle.
1
Plug the charger DC connector into the battery's
charging port: When the battery is on or off the
bike, Place the charger on a flat and safe place
and connect the charger's DC output plug to the
charging port on the battery.
3
Plug the charger AC plug into a power outlet to start
charging and the LED indicator will glow red. When
battery is fully charged, the indicator turns green.
Unplug the charger from the wall outlet before
unplugging the charger output plug from the battery
charging port.
4
How to Charge the Battery

08
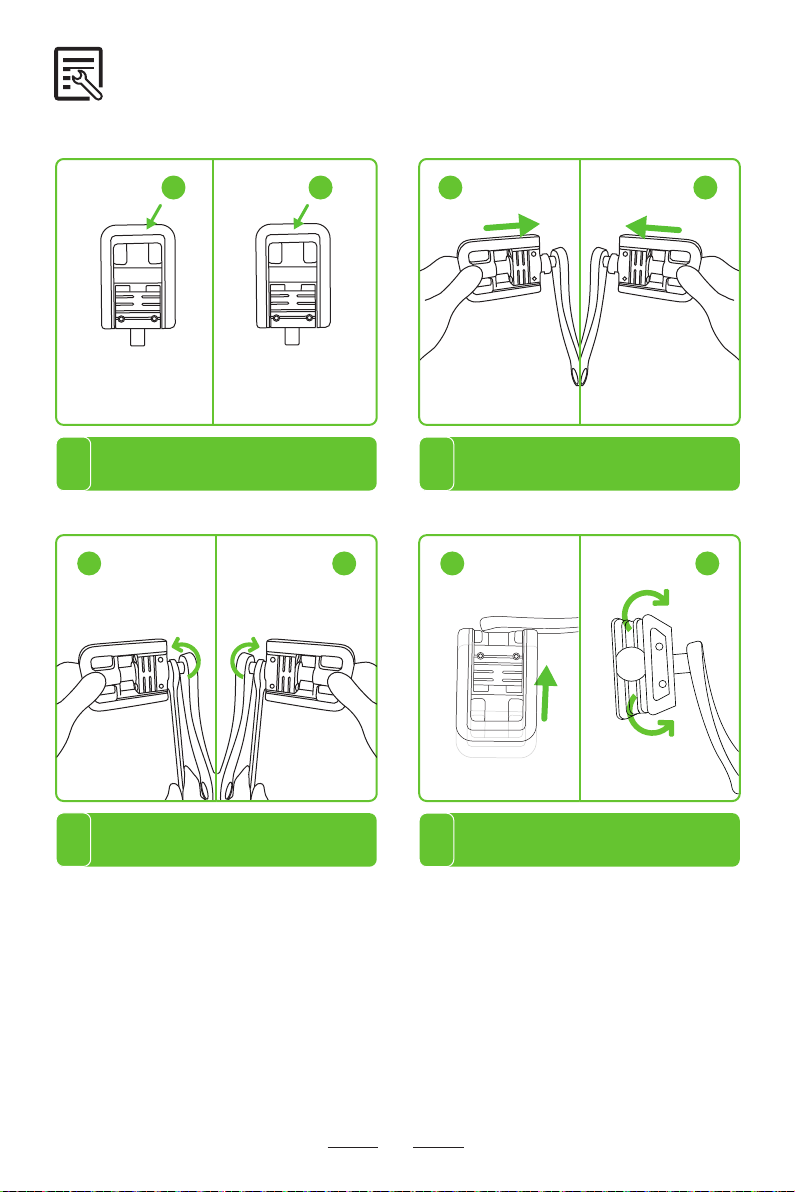
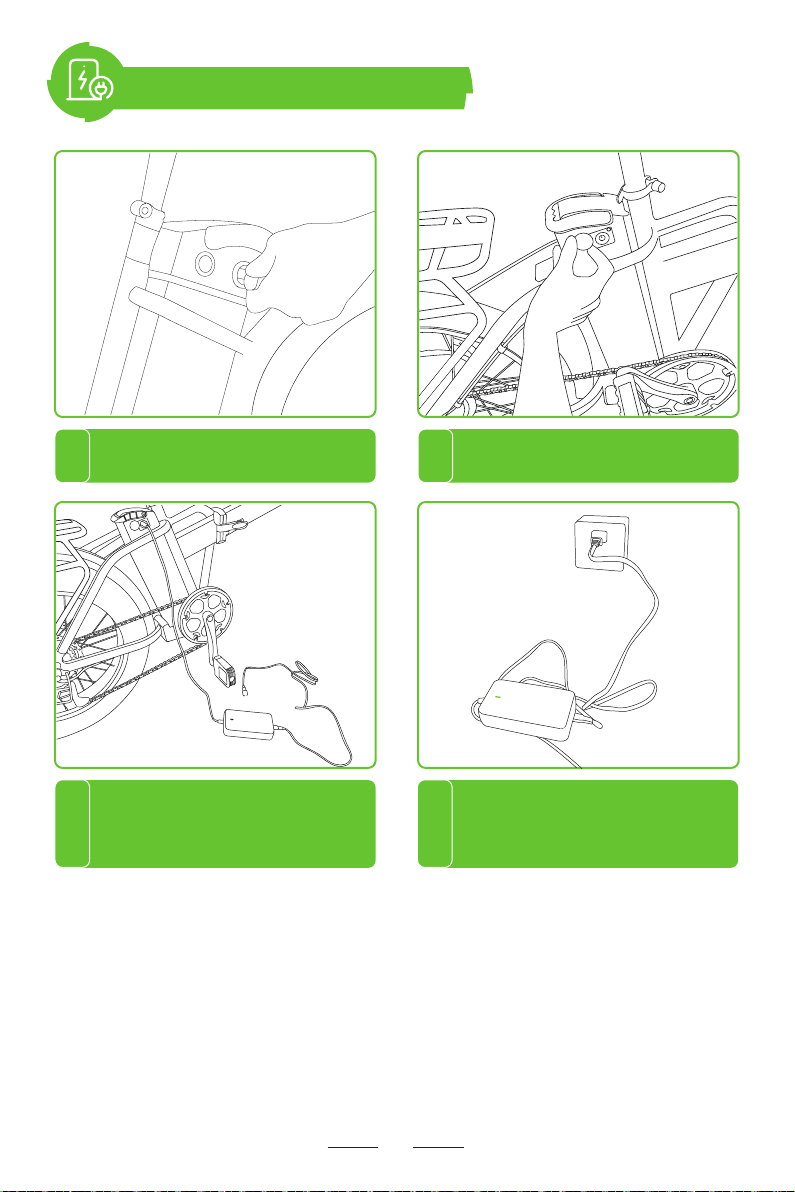
● The battery can be charged when installed on the bike. To remove the battery, Turn the key to
the unlock position. (See the Battery Removal section above). Then carefully pull the battery up
until the battery comes out of the socket.
● Remove the rubber cover on the charging port opposite the battery key switch. Connect the
charger's DC output plug to the charging port on the battery.
● Plug the charger AC plug into a power outlet to start charging and the LED indicator will glow
red. When battery is fully charged, the indicator turns green. Unplug the charger from the wall
outlet before unplugging the charger output plug from the battery charging port.
For Convenience, The Battery of the isinwheel D4 Electric
Bike is Removable.
● Please fully charge the battery before first use. It takes about 8 hours.
● Periodically visually inspect the battery connector and charging cable.
● Always keep the charging environment clean and dry.
● Do not charge the e-bike if there is liquid on the charging port.
● Avoid charging your e-bike in extremely hot or cold conditions to take full advantage of the
battery's maximum efficiency. Under no circumstances should you use the bike while it is charging
or connected to a charger.
● The charging time is about 8 hours. Prolonged charging may reduce battery life and perfor-
mance.
● Only use the charger that comes with the D4 e-bike. If the official charger is lost or damaged,
Please contact Customer Service for a replacement.
● Before using the e-bike, be sure to lock the battery with the provided battery key and remove
the battery key.
Battery Safety

Drive Modes
09
Twist Throttle
Turn on the LCD smart display and you
can switch the speed by twisting the
throttle with speed mode from 1 to 5.
PAS
Turn on the LCD smart display and you
can pedal it with PAS level from 1 to 5.
Pedal
Turn off the LCD smart display and you
can pedal the E-Bike like a normal bike.
● Fully charge the battery before riding and make sure the battery switch is in on position.
● Press and hold the power button for 2 seconds to power on the electric bike.
● Top speed (in throttle mode) is 20 MPH (32 KM/H).
● Switch between gears by pressing the gear button or pushing the gear lever. The gear button
can only increase the gear level.
● Stop: Release the accelerator and squeeze the brake lever to slow the front and rear wheels.
Drive Modes Twist Throttle Pedal Assist
0
1-5
Display OFF
Gear Twist Throttle Pedal Assist
1 9.5 MPH
12.9 MPH
15.6 MPH
19.1 MPH
20.1 MPH
9.5 MPH
12.9 MPH
15.6 MPH
19.1 MPH
20.1 MPH
2
3
4
5
Brake Lever
On/of Switch
Shift Lever
Throttle
Handlebar
Electirc Bike Display

Display and Buttons
10
Computer Display
Front Light & horn Button
● Press to turn on/off the front and rear lights
● Press or hold to activate the horn
M Button
● Press to switch speed mode from 1 to 5.
● Press and hold for 2 seconds to power on/off the
electric bike.
● Press to switch speed mode from 5 to 1.
CUR
Working Current
Front and
Rear Lights
Speedometer
(MPH)
Increase Button
Power Button
Decrease Button
Horn
Battery Level
PAS Level
Odometer

11
Functions
All on-board Information (With in 1s After Power On)
● 1. On the display
Speed, PAS level, Battery level, Fault indicator, Total travel distance, Trip distance,
Front light sign, Trip time.
● 2. Control and Settings
Power on/off control, Front light on/off control, 6 KM/H walk assist mode control,
Wheel diameter setting, Top speed setting, Auto sleep time setting, Backlight bright-
ness setting, Voltage level setting.
● 3. UART Communication Protocol: UART
Working Current
Maximum Speed
Average Speed
Speed Meter
Metric System: KM/H
Imperial System: MPH
Twist Throttle Fault
Motor Fault
Controller Fault
Brake Reminder
Under-Voltage
Pedal Assist Mode
Battery Level
Front Light
Real-time Cruise
6 KM/H Walk Assist Mode
PAS Level Adjustment
ODO: Total Travel Distance
TRIP: Trip Distance
TIME: Trip Time
VOL: Current Voltage
CUR: Working Current
DST; Not Tet Defined

Code Meaning
12
Functions
3.1 Front Light
3.2 Battery Level
3.3 Multi-Function Section
3.4 PAS Level
3.5 MAX: Trip Max. Speed AVG: Average Speed
The Meter will Calculate the Real Speed According to the Wheel
Diameter and Signal Data
6 KM/H Walk
Assist Mode
0
1
2
3
4
5
6
7
8
9
10
11
12
13
Normal
Keep
Brake
PAS Fault (Riding Sign)
6 KM/H Cruise
Real-Time Cruise
Battery Under-Voltage
Motor Fault
Throttle Fault
Controller Fault
Communication Receiving Fault
Communication Transmitting Fault
BMS Communication Fault
Front Light Fault
Real-Time
Cruise
Battery
Under-voltage Motor Fault Throttle Fault Controller
Fault
Brake
Reminder PAS Mode

13
Setting
P01: Backlight brightness: Level 1 means the darkest and level 3 means the
brightest.
P02: 0:KM;1:MILE;Odometer unit.
P08: Speed limit: 0-50 KM/H, 50 means no speed limit.
1.Non-communication state (computer control): When the speed is higher than the
set speed, The PWM output will be turned off; When the speed drops below the set
speed, The PWM output will be automatically turned on, And the drive speed is the
current speed ± 1 KM/H (No speed limit in throttle mode)
2.Communication state (Controller control): The drive speed is maintained at the set
value, Error: ±1 KM/H (Both PAS mode and throttle mode have speed limit)
Note: The speed limit value here is based on the unit of KM/H. After the unit is
switched from KM/H to MPH, The speed value on the display will automatically be
converted to the correct MPH value. But if the value set in this menu is based on
the unit of MPH, After the unit is switched to KM/H, The value will not be converted;
P16: Zeroing: Press and hold the increase button for 5 seconds to reset ODO.
Description of Button Operations
Button operations include short pressing one button, Long pressing one button, And
long pressing multiple buttons simultaneously.
Short press is used for fast and frequent operations, Such as:
There is no short pressing multiple buttons which is easy to trigger and difficult to
operate.
● 1. In riding, Short press the buttons to change PAS level or speed limit.
● 2. In riding, Short press the M button to switch to multi-function section.
Long pressing the M button is mainly used to switch mode and power on/off.
Long pressing multiple buttons is used for parameter setting, Because the
operation is complicated, it can reduce misoperation.

14
Long press ,Switch speed unit.
(Assuming it is in PAS drive mode)
1.1 Short press ,PAS level + 1.
Specific Operation Instructions:
● 1. Change PAS level or speed limit.
1.2 Short press ,PAS level - 1.
6.1 Long press the M button to save the current value and the parameter stops
blinking.
6.2 Short press the M button to switch to the next parameter and the value of the
previous parameter will be saved.
6.3 Press the increase button and decrease button to exit setting and save the
parameters. If no operation for 10 seconds, It will exit and save the parameters
automatically.
● 2. Switch speed unit.
M
+
When the bike is stationary, Press and hold the decrease button to enter walk assist
mode, Letting it go will exit walk assist mode.
When in P16 menu interface, Long press increase button for 5 seconds to reset the
odometer.
● 3. Enable/disable 6 KM/H walk assist mode, Turn on/off front light, Zero ODO.
If the display is on, Long press the M button will turn it off; If the display is off, Long
press to turn it on.
● 4. Turn on/off LCD display.
Short press to switch items in multi-function section.
● 5. Switch multi-function section information.
Long press the increase button + decrease button to enter parameter setting
interface, You can set parameters such as wheel diameter (inch), Number of
magnetic steel, LCD brightness, And under-voltage value (See setting: P01-P16);
(In setting interface, Short press the increase button or decrease button to adjust
the value. The parameters will blink after adjustment.)
● 6. Parameter setting.

15
For your safety
For safe riding, please read the following information carefully. Before riding, Be sure to
check that your brakes are working properly.
Before Your First Ride
● Check whether the quick-release screws and seat are firm, And whether the brakes
are effective.
● Check seat, Gears, And tire pressure. Proper tire inflation can reduce flat tires and
improve performance, Including distance traveled per inflation.
● Check the handlebar and screws at least weekly.
● Performing the above routine checks before and after each ride can help you keep
your bike performing at peak performance and spot potential problems before they
become a safety hazard.
Bike Mechanic Check Every Six Months
● Bikes require regular maintenance. Take your bike to your local bike shop twice a
year for tuning. Critical components should be inspected frequently, Repaired and
adjusted by an experienced mechanic.
Notice
● Wear an approved helmet and other protective equipment to reduce any possible injury.
● Helmets can reduce serious head injuries by 85%.
● Elbow pads can reduce elbow injuries by 82%.
● Knee pads can reduce knee injuries by 32%.
Warning
● To avoid accidental movement while waiting at a traffic light, Set the speed mode to
zero, Or apply brakes.
● When riding, Make sure your feet are always on the pedals and your hands on the
handlebars. It is dangerous to take your feet off the pedals in riding.
● Never ride the electric bike for dangerous actions. Failure to exercise good judgment or
heed the above warning increases the risk of serious injury and, In rare cases, Death.
● Make sure the battery is fully charged, Especially for long trips.
● For your own safety and the safety of others, Obey the speed limit, Ride at a speed you
are comfortable with, And be prepared to stop at any time.
● Keep a safe distance from other riders to avoid collisions.

16
Battery Maintenance
● Be aware of your surroundings and avoid obstacles and unsafe surfaces.
● Ride in the open and flat. Try to avoid slopes or places with many pedestrians.
● Do not ride at high speeds, On uneven terrains, In bad weather or in other unsafe
conditions.
● Never use the electric bike for anything that could cause personal injury or property
damage.
● Do not attempt to carry passengers or heavy objects. This bike can only hold the weight
of one person at a time. Do not exceed the weight limit.
● Ride e-bikes only where permitted. You must obey local laws and be courteous to
pedestrians.
Notice
● Do not perform any maintenance while the e-bike is powered on or charged.
● Do not store or charge the battery within the temperature range of 20°C-25°C / 68°F-77°F. Do
not pierce the battery.
● Do not attempt to disassemble the battery to avoid fire.
● When the ambient temperature exceeds the maximum operating temperature (see instruction
manual), Do not ride it electric bike.
● Temperature will limit maximum power/torque. Otherwise, Personal injury or property damage
may occur. Before cleaning, Make sure the power is turned off and the charging cable is
unplugged. Otherwise, You may damage electronic components. Proper cleaning of your e-bike
can guarantee a longer lifespan and a smoother ride.
● Wipe the outer body of the e-bike with a soft and dry microfiber cloth.
● Check around the wheel to make sure there are no foreign objects. The design of this electric
bike makes wheel maintenance easy.
● The E-Bike has IPX4 water resistance, Which means it can withstand splashes. However,
Don't submerge the E-Bike in water.
A well-maintained battery performs well even after high mileage. Charge the battery
after each ride to prevent the battery from draining from a full charge. Batteries perform
best when used at room temperature (70°F [22°C]). However, Using it at temperatures
below 32°F (0°C) will degrade performance. In general, at -4°F (-20°C), Battery
performance drops to half of that at 70°F (22°C). When the temperature rises, Battery
life will resume.
Under normal circumstances, A fully charged battery can hold power for 90 days in
standby mode. Remember to charge the battery after each use. Draining the battery
may cause permanent damage to the battery. Electronics inside the battery record the
charge and discharge of the battery. Damages due to over-discharge or over-discharge
are not covered by the warranty.
Refer to local laws and regulations regarding battery recycling and/or disposal.

17
Storage
Scrap Disposal
Note
● Do not use alcohol, Gasoline, Acetone, Or other corrosive/volatile solvents to clean the bike.
These substances can damage the exterior and the internal structure of the bike.
● Do not allow water and liquids to enter the electric parts or battery of the e-bike.
Notice
Do not store the electric bike outdoors for extended periods of time. Exposure to sunlight and
extreme temperatures (Both hot and cold) accelerates the aging process of plastic parts and can
reduce battery life.
Store in a cool dry place.
Do not store in dusty environments as damage may occur over time. Cover the bike to prevent
dust from entering.
● This product cannot be disposed of by incineration, Landfilling or mixing with household waste.
Improper handling of the battery in this product may cause the battery to heat, Rupture, Or ignite,
Which could result in serious injury. The substances inside the battery pose a chemical risk to the
environment. The end-of-life disposal recommendation for any iSinwheel product is to dispose of
the entire device at an e-waste recycling center or through an e-waste recycling center, Project or
facility.
● Local regulations and laws related to the recycling and disposal of lithium-ion batteries and/or
products containing lithium-ion batteries vary by national, State, And local government. In order
to properly dispose of batteries and/or products containing batteries, You must check the laws
and regulations that correspond to where you live.
● It is the user's responsibility to properly dispose of waste equipment in accordance with local
regulations and laws. For additional information on disposing of batteries and electronics or
electronic waste, Please contact your local waste management office or household waste
disposal service.
The bike should be fully charged before storage to prevent the battery from being over-dis-
charged after long-term storage.
If the electric bike is to be stored for more than a month, Discharge and charge the battery at
least once a month.

18
Item Meaning
Model Name
Net Weight
Product Dimensions
Package Dimensions
Max. Incline
Max. Capacity
Max. Speed
Range
Motor
Battery Voltage
Charge Voltage
Wheel Size
Charge Time
Water Resistance
Storage Temperature
Operating Temperature
Charging Temperature
Warranty
D4
66LBS / 30.3KG
67.7*25*49.6 IN / 172*63.5*126 CM
57.5*13.7*28.7 IN / 146*35*73 CM
11° (Rider Weighs 220.4 LBS / 100KG)
330 LBS / 150 KG
20 MPH / 32 KM/H
39-43 Miles / 63-70KM
500W
48V 15Ah
100-240V/2A
20 IN
8-9 Hours
IPX4
20°C-25°C / 68°F-77°F
-4°F-140°F /-20°C~60°C
32°F-104°F / 0°C-40°C
1 Year Limited
Specification

Contact Us
20
Contact us if you experience issues relating to riding, Maintenance and safety,
Or errors/faults with your isinwheel D4 Electric Bike.
E-mail Service: [email protected]
www.isinwheel.com
Facebook: @isinwheelOfficial
YouTube: isinwheelOfficial
ins: isinwheel_official
Table of contents
Other iSinwheel Scooter manuals