manuals.online logo
Brands
  1. Home
  2. •
  3. Brands
  4. •
  5. Jamara
  6. •
  7. Drone
  8. •
  9. Jamara Merlo Altitude HD AHP+ 2,4 GHz User manual

Jamara Merlo Altitude HD AHP+ 2,4 GHz User manual

Merlo Altitude
HD AHP+ 2,4 GHz
No. 42 2020
6TURBO
DE - Gebrauchsanleitung
GB - Instruction
FR - Notice
IT - Istruzione
ES - Instrucciones
DE - Allgemeine Hinweise
Jamara e. K. übernimmt keine Haftung für Schäden, die an dem Produkt selbst oder durch dieses
entstehen, sofern diese auf falsche Bedienung oder Handhabungsfehler zurückzuführen sind. Der
Kunde allein trägt die volle Verantwortung für die richtige Bedienung und Handhabung; dies umfasst
insbesondere die Montage, den Ladevorgang, die Verwendung bis hin zur Wahl des Einsatzberei-
ches. Bitte beachten Sie hierzu die Bedienungs- und Gebrauchsanleitung, diese enthält wichtige
Informationen und Warnhinweise.
GB - General information
Jamara e.K. is not liable for any damage caused to the product itself or through this, provided this
is due to improper operation or handling errors. The Customer alone bears the full responsibility for
the proper use and handling, including without limitation, the assembly, the charging process, the
use and choice of the operation area. Please refer to the operating and user instructions, it contains
important information and warnings.
FR - Remarques générales
La société Jamara e. K. n’est pas responsable de dommages, que ce soit au niveau du modèle ou
causé par celui-ci, résultant d’une utilisation non appropriée. Seul le client est responsable con-
cernant la mise en oeuvre et l’utilisation conforme du matériel; cela va de l’assemblage, en passant
par la charge des accus et allant jusqu’au domaine d’utilisation. Pour cela, veillez lire attentivement
la notice d’assemblage et d’utilisation, celle-ci contient d’importantes informations ainsi que les con-
signes de sécurités.
IT - Informazioni generali
Jamara e. K. non e´responsabile per danni, sostenute al prodotto stesso o attraverso questo, dovuti
ad una gestione non corretta del articolo. Solo il cliente si assume la piena responsabilità per la
manutenzione e l´utilizzo corretto dello stesso; questo include il montaggio, la ricarica, l´utilizzo,
no alla scelta della aerea di applicazione. Si prega di notare e rispettare le istruzioni d´uso, questi
contengono informazioni e avvertimenti molto importanti.
ES - Información general
Jamara K. no se hace responsable de los daños causados al producto en sí o por medio de esto,
a menos que esto se debe al mal funcionamiento o errores de manejo. El cliente solo tiene la re-
sponsabilidad completa para el uso y manejo adecuado, incluyendo, sin limitaciones, el montaje,
el proceso de carga, el uso de hasta la elección de la zona de aplicación. Por favor, consulte las
instrucciones de uso y funcionamiento, contiene información y avisos importantes.
DE - Konformitätserklärung
Hiermit erklärt JAMARA e.K., dass das Modell‚ “Merlo Altitude HD AHP+ 2,4 GHz, No. 422020“ in
Übereinstimmung mit den grundlegenden Anforderungen und den anderen relevanten Vorschriften
der Richtlinien 2014/53/EU und 2011/65/EU bendet.
Weitere Informationen nden Sie auch unter: www.jamara-shop.com/Konformitaet
GB - Certicate of Conformity
JAMARA e.K. hereb “Merlo Altitude HD AHP+ 2,4 GHz, No. 422020“ follow the regulations and re-
quirements as well as any ther relivant directives of the EEC directive 2014/53/EU and 2011/65/EU.
Further information can also be found at: www.jamara-shop.com/Conformity
FR - Déclaration de conformité
Par la présente, la société Jamara e.K. déclare que ce modèle “Merlo Altitude HD AHP+ 2,4 GHz,
No. 422020“ est conforme en tous points avec les textes de la directive de l’union européenne sous
les directives 2014/53/EU et 2011/65/EU.
Vos pourrez également trouver des informations sur notre site Internet:
www.jamara-shop.com/Conformity
IT - Dichiarazione di conformita’
Jamara e. K. dichiara qui di seguito che il modello “Merlo Altitude HD AHP+ 2,4 GHz, No. 422020“ è
in linea con le norme ed altre rilevanti disposizioni comunitarie 2014/53/EU e 2011/65/EU.
Piu informazioni: www.jamara-shop.com/Conformity
ES - Declaración de conformidad
Por medio de la presente, la empresa Jamara e. K. declara que el modelo “Merlo Altitude HD AHP+
2,4 GHz, No. 422020“ de conformidad con los requisitos esenciales y otras disposiciones pertinen-
tes de la Directiva 2014/53/EU y 2011/65/EU se encuentra.
Encontrará más información en: www.jamara-shop.com/Conformity
DE - Entsorgungshinweise
Bitte sorgen Sie für eine fachgerechte, den gesetzlichen Vorschriften entsprechende
Entsorgung der Batterien und/oder der Akkus. Bitte werfen Sie nur entladene Akkus in
die Sammelboxen beim Handel oder den Kommunen.
GB - Disposal restrictions
Please care for a environmental correct and legal way of disposing the batteries and/
or accus. Please, only throw away empty battery packs into the collect-boxes in your
local shops or commune.
FR - Consignes de recyclage
Veuillez respecter les consignes de recyclage des accus et/ou piles. Veuillez ne jeter que des piles/ac-
cus vides dans les bacs de ramassages que vous trouverez dans différents commerces ou au centre
de recyclage de votre commune.
IT - Istruzioni per lo smaltimento
Si prega di assicurarsi che le batterie (ricaricabili e non) siano smaltite a regola d‘arte, conforme-
mente alla normativa vigente. Gettare soltanto batterie scariche negli appositi contenitori presso i ri-
venditori o gli enti comunali (in genere le batterie sono scariche quando il modello non funziona più).
ES - Notas sobre el reciclado
Respete la normativa vigente sobre la eliminación de residuos, especialmente sobre baterías y
pilas. Lleve a reciclar las baterías solo si están descargadas.
DE - Dieses ferngesteuerte Modell ist kein Spielzeug!
Geeignet für Personen ab 14 Jahren.
Achtung: Für Kinder unter 36 Monaten nicht geeignet. ERSTICKUNGSGEFAHR.
Enthält verschluckbare Kleinteile. Von Kleinkindern unbedingt fernhalten.
GB - This model is not a toy!
Not suitable for people under 14 year.
Warning: Not suitable for children under 36 months. RISK OF SUFFOCATION!
Contains small parts which can be swallowed. Keep away necessarily from children.
FR - Ce modèle réduit n‘est pas un jouet!
N‘est pas adapté pour les personnes de moins de 14 ans.
Attention: Ne convient pas aux enfants de moins de 36 mois. DANGER D‘ETOUFFEMENT!
Contient de petites pièces facilement avalables. Garder lion nécessairement enfants.
IT - Questo modello non é un giocattolo!
Sconsiliato per persone inferiori di 14 anni.
Attenzione: Non adattato ai bambini inferioti ai 36 mesi. PERICOLO DI SOFFOCAMENTO!
Contiene pezzi piccoli. Tenere lontano assolutamente dei bambini.
ES - Este modelo no es un juguete!
No apropriado para menores de 14 años.
Atención: No es recomendable para los niños menores de 36 meses. ASFIXIA!
Contiene piezas pequeñas. Mantenga necesariamente lejosde los niños.
35/16
2
DE - Achtung!
Vor dem Betrieb:
Erst das Modell und dann den Sender einschalten.
Bei Beendigung:
Erst das Modell und dann den Sender ausschalten.
●Betreiben Sie Ihr Modell niemals in Distanzen die
außerhalb Ihrer Sichtweite liegen. Sowohl die max.
Sichtweite als auch die max. Reichweite Ihres Modells
hängen von vielen Faktoren wie Witterung, Einsatzort
und vorhandenen Störfrequenzen ab. Führen Sie deshalb
vor jedem Einsatz mit einer zweiten Person, die das
Modell während des Tests sicher xiert hält, einen
Reichweitentest durch und prüfen Sie auch wie sich das
Modell während des Betriebs bei einem Signalausfall wie
z.B. bei leeren Senderbatterien oder ausgeschaltetem
bzw. ausgefallenem Sender verhält.
GB - Attention!
Before operating:
Switch the model on rst then the transmitter.
When nished:
First switch off the model then the transmitter.
● Never operate your model beyond sight. Both the
maximum visibility as well as the max. range of your
model will depend on many factors such as weather,
location and interfering frequencies. Therefore,
before each use perform a range test with a second person
securely holding the model and also check how the model
reacts if there is a signal failure e.g. when empty
transmitter batteries are installed.
FR - Attention!
Avant l’utilisation:
Allumez en premier modèle puis seulement votre l’émetteur.
Après utilisation:
Arrêtez le modèle en premier puis votre radiocommande.
●N’utilisez jamais le modèle à une distance hors de votre
visibilité. La visibilité maximale ainsi que la ortée
maximale dépendent de plusieurs facteurs tels
que le temps, le lieu d’utilisation et les présentes
fréquences perturbatrices. Pour cela, avant chaque
usage, veuillez effectuer un test de visibilité et de portée
avec une deuxième personne qui tient le modèle xé et
vériez les réactions du modèle en usage en cas de pertes
de signal due par exemple à des piles usées ou à un
émetteur éteint.
IT - Attenzione!
Prima dell‘uso:
Accendete prima il modello e poi la trasmittente.
Dopo l‘uso:
Spegnere prima il modello e poi la trasmittente.
●Non utilizzare il suo modello fuori della distanzia di vista.
Sia la visibilità come la portata massima del vostro
modello dipendono da molti fattori, come il tempo,
disturbo di frequenza e il luogo di utilizzo. Eseguire un
test prima di ogni utilizzo del modello con una seconda
persona che tiene ssato il modello. Con questa
procedura potete testare come reagisce il modello
durante la perdita del segnale causato per esempio da una
batterie scarica oppure la radio spenta.
ES - ¡Atención!
Antes del uso:
Encender primero el modelo, y después la emisora.
Después del uso:
Apagar primero el modelo, y después la emisora.
●No utilizar su modelo fuera de la distancias de visibilidad.
Tanto la visibilidad como la capacidad máxima de su
modelo depende de muchos factores, tales como el
tiempo, frecuencia de interferencia y el lugar de
utilización. Realice una prueba antes de cada uso del
modelo con una segunda persona que fija el modelo. Con
este procedimiento se puede comprobar cómo el modelo
reacciona durante la pérdida de señal causada por
ejemplo por una batería descargada o la emisora apagada.
DE
Bezeichnung der Komponenten
1. Rotorblätter vorne
2. Rotorblätter hinten
3. Rotorschutz
4. LEDs gelb, vorne
5. LEDs grün, hinten
6. Kamera
7. Ein-/Ausschalter
8. Akkufach
GB
Component Description
1. Rotor blades, front
2. Rotor blades, rear
3. Protecting ring
4. LEDs yellow, front
5. LEDs green, rear
6. Camera
7. On-Off Switch
8. Battery
FR
Désignations des différentes
pièces
1. Pales du rotor avant
2. Pales du rotor arrière
3. Protection contre les pales du
rotor
4. LED jaune, avant
5. LED vert, arrière
6. Caméra
7. Interrupteur On/Off
8. Compartiment de la batterie
IT
Denominazione dei componenti
1. Pales du rotor avant
2. Pales du rotor arrière
3. Protezione dei rotori
4. LED giallo, avant
5. LED verde, dietro
6. Fotocamera
7. Interruttore ON/OFF
8. Compartimiento de la batería
ES
Descripción de las diferentes
partes
1. Palas rotor delante
2. Palas rotor atrás
3. Protección de las palas del rotor
4. LED amarillo, delante
5. LED verde, atrás
6. Cámara
7. Interruptor On/OFF
8. Compartimiento de la batería
1
2
34
5
67
8
DE
ACHTUNG!
Bei Film-/Fotoaufnahmen:
Machen Sie niemals Foto- und Film-
aufnahmen von Personen, ohne
dass diese eingewilligt haben. Das
unerlaubte Anfertigen verletzt die
Privatsphäre und Persönlichkeits-
rechte des Abgebildeten und kann
strafbar sein!
GB
ATTENTION!
Video and photo recording:
Never take photo and lm footage of
people without their permission. The
unauthorised recordings violate the
privacy and rights of the person and
may be punishable by law!
FR
ATTENTION!
Lors de prises de vues
photo / vidéo:
Ne faites jamais de prises de vue
photo ou vidéo de personnes sans
que celles-ci vous en donnent
l’autorisation. Un enregistrement
non autorisé porte atteinte à la vie
privée des personnes concernées et
est considéré comme intrusion dans
leur intimité, cela est punissable par
la loi!
IT
ATTENZIONE!
Durante i Vostri servizi fotograci
o di lmati:
Non scattare fotograe o lmati, sen-
za che le persone coinvolte hanno
dato il loro consenso. La realizzazio-
ne non autorizzata viola la privacy e
i diretti della persona rafgurata ed è
legalmente punibile!
ES
Atencion!
En Film-/Fotografía:
Nunca toma una fotografía y lma-
ciones de personas, que no los han
aceptado. La fabricación no auto-
rizada viola la privacidad y los de-
rechos de la personas representan-
da y puede ser penado por ley.
DE - Bezeichnung der
Komponenten
1. Gasknüppel /Gieren
2. Steuerhebel Nick/Roll
(links/rechts,
vorwärts/rückwärts)
3. Ein-/Ausschalter
4. Einsteiger/Pro modus
5. Videofunktion
6. Fotofunktion
7. Landeassistent
8. Nicktrimmung (vor/zurück)
9. Rolltrimmung (links/rechts)
10. Kompassfunktion/
Flybackfunktion
11. Flipmodus
12. Batteriefach
Batterien in Sender einlegen
Auf Polarität achten
GB - Component Description
1. Speed control stick/Rudder
2. Nick/Roll control stick
(left/right, forward/backward)
3. Power switch
4. Beginner and expert mode
5. Video function
6. Photo function
7. Landing assistant
8. Nick trim (forward/backward)
9. Roll trim (left/right)
10. Compass function/
Flyback function
11. Flip mode
12. Battery cover
Fitting the transmitter batteries
Observe the polarity.
FR - Désignations des différentes
pièces
1. Gaz-/manche d’anti-couple
2. Manche Roll-/Nick
(droite/gauche, avant/arrière)
3. Interrupteur On/Off
4. Mode début. et experts
5. Fonction vidéo
6. Fonction photo
7. Atterrissage assistant
8. Trim Nick (avant/arrière)
9. Trim Roll (droite/gauche)
10. Fonction boussole/
Fonction Flyback
11. Mode de Flip
12. Compartiment pour piles
Mise en place des piles
Respecter la polarité.
IT - Denominazione dei
componenti
1. Leva Gas/Coda
2. Leva Roll/Nick
(destra/sinistra, avanti/indietro)
3. Interruttore ON/OFF
4. Modo principianti e esperti
5. Funzione video
6. Funzione foto
7. Assistente di atterraggio
8. Trim Nick (avanti/indietro)
9. Trim Roll (destra/sinistra)
10. Funzione Bussola/
Fonction Flyback
11. Flip mode
12. Compartimento batteria
Montaggio delle pile
Rispettando la polarità.
ES - Descripción de las diferentes
partes
1. Gas / dirección palanqua
2. Roll-/Nick palanqua
(izquierda/derecha,
delante/atraz)
3. Interruptor ON/OFF
4. Modo principiantes y
profesionales
5. Función de vídeo
6. Función de foto
7. Asistente de aterrizaje
8. Equilibrio Nick (delante/atraz)
9. Equilibrio Roll
(izquierda/derecha)
10. Función brújula/
Función Flyback
11. Flip mode
12. Compartimento de la batería
Instalación de las pilas
Preste atención a la polaridad
4x AA
11 10
12
1
3
4
5
6
7
2
8
9
10 11
3
12
DE - Endmontage
1. Mit dem beiliegenden Schraubendreher befestigen Sie den
Rotorschutz.
2. Nehmen Sie die Landegestelle. Stecken Sie diese an die
vorgesehenen Positionen unten am Modell. Schrauben Sie
die Landegestelle mit je einer Schraube an der Unterseite des
Modells fest.
3. Schrauben Sie die vier Rotorschützer (Bild 3) wie gezeigt,
fest.
4. Achten Sie darauf, dass Sie das richtige Blatt an den richtigen
Rotor montieren. Achten Sie auch darauf welches Blatt
(A + B) links und rechts montiert wird! Orientieren Sie sich
dabei an der Abbildung 5. Bei falsch montierten Rotor-
blättern wird das Modell unkontrollierbar sein!
GB - Model assemble
1. Prepare screw driver, bracket and protect cover.
2. Take the landing skid. Insert the brackets into the bracket
holes at the bottom of the model. Firmly screw in the landing
skid to the frame with a screwdriver.
3. Insert four protection covers into the holes of the protection
cover, which beside the four blades, and use the screw knife
to lock four screws tightly.
4. Have to pay attention of the rotor position of each main blade.
Also pay attention of the left and right mounting position of the
blades (A + B)! Take an Example on the picture (pic. 5) and
the labels on the bottom of the rotor blades. If you mount the
main blades in wrong position the model will get out of
control!
FR - L‘assemblage nal
1. Utilisez le tournevis fourni, xez le train d´atterrissage et la
protection du rotor.
2. Prenez le train d‘atterrissage. Branchez-les aux endroits
appropriés ci-dessous le modèle. Visser le train d‘atterrissage
xe avec une vis à la base du modèle.
3. Vissez les 4 protections de rotor (image 3).
4. Il faut prendre soin de monter la bonne pale au rotor correct.
Faites attention quelle pale sera montée à gauche et laquelle
à droite (A + B)! Veuillez regardez attentivement l’image
(image 5) et les étiquettes sur la face bas des pales de rotor.
Le modèle sera ingérable en cas des pales de rotor sont
montées mal!
IT - Montaggio nale
1. Utilizare il cacciavite incluso, collegare il carrello e la
protezione del rotore.
2. Prendere i carrelli. Posizionarli appropriate al di sotto del
modello. Avvitare il carrello con una vita nella parte inferiore
del modello.
3. Avvitare le 4 protezioni del rotore, come mostra in gura 3
4. Si deve assicurare di montare la pala al rotore corretto.
Assicurarsi quale pala viene montata a destra e a sinistra!
Orientarsi all’immagine (gura 5) e le etichette sul lato sotto
delle pale del rotore. Se si montano le pale del rotore non
correttamente, il modello sarà incontrollabile!
ES - Montaje nal
1. Utilice el destornillador incluso, conecte el tren de aterrizaje
y la protección del rotor.
2. Tome los tren de aterrizaje. Posicionar a los lugares
apropiados por debajo de la modelo. Atornillar el tren de
aterrizaje jo con un tornillo en la parte inferior del modelo.
3. Atornillar la 4 protecciónes de rotor, como se muestra en la
imagen 3.
4. Debe asegurarse de que montar la pala en el rotor correcto
(A + B). Orientarse a la imagen (Figura 5) y las etiquetas en el
bajo de las palas del rotor. Asegúrese qual pala vien
montada a la izquierda y qual pala en la derecha!
DE - Ladevorgang USB (Akku)
- Trennen Sie die Steckverbindung vom Modell zum Akku (aus
Sicherheitsgründen wird empfohlen den Akku dem Modell zu
entnehmen).
- Stecken Sie den USB-Stecker des Ladekabels in die USB-
Buchse ihres PC`s (optional Ladeadapter, No. 179948).
- Verbinden Sie den Akku mit dem USB Stecker.
- Während des Ladevorgangs leuchtet die LED rot. Erlischt die
LED ist der Ladevorgang abgeschlossen.
Nach etwa 120 min. ist der Ladevorgang abgeschlossen, die
Flugzeit bei vollgeladenen Akku beträgt ca. 5 - 10 Min.
Achtung!
Lassen Sie dem Modell nach jedem Einsatz genügend Zeit
um abzukühlen bevor Sie es wieder in Betrieb nehmen. Beim
Verwenden eines etwaigen Tauschakkus muß zwischen je-
demAkkuwechsel mindestens eine Abkühlphase von 10 Mi-
nuten eingehalten werden bis das Modell wieder betrieben
wird. Bei Überhitzung kann Beschädigung der Elektronik
oder Brandgefahr die Folge sein.
GB - Charging by USB (Battery)
- Disconnect the connector from the model to the battery. (for
safety it is recommended to the battery taken from the
model).
- Insert the USB plug from the USB cable into the USB socket
of your PC (optional charging adapter, no. 179948)
- Connect the battery with USB charger.
- During charging, the red LED lights. The LED turns on when
charging is complete.
The charging process should take approx. 120 min. and should
give you approx. 5 - 10 min. ying time
Attention!
Let the model cool off sufciently after each use before put-
ting it back into operation. When using an additional batte-
ries let it cool off for minimum 10 minutes until the model is
operated again. Overheating can damage the electronics or
may result in re.
FR - Processus de charge USB (Accu)
- Coupez le connecteur de modéle à l’accu (pour les raisons
de sécurités on recommande d’enlever l’accu)
- Mettez le connecteur de câble chargé dans la prise USB de
votre PC (réf. 179948 chargeur USB optionel)
- Connectez l’accu avec le connecteur USB.
- Pendant le chargement la lampe LED rouge s‘allume. Le
chargement est achevé si la lampe LED s‘éteint.
La charge est complète après environ 120 minutes et la durée
de vol est de l‘ordre de 5 - 10 minutes.
Attention!
Après chaque utilisation, avant de remettre le modèle en
marche, laissez-le suf samment le temps de refroidir. Lais-
sez une phase de 10 minutes de refroidissement lorsque
vous utilisez une batterie de rechange pour redémarrer
le modèle de nouveau. En cas de surchauffe, les compo-
sants électroniques peuvent être endommagés ou un risque
d´incendie peut survenir.
12
4 5
3
B A
A B
4
12
IT - Caricamento attraverso USB (Batteria)
- Sconnettere il collegamento tra la batteria e il modello (per
motivi di sicurezza)
- Collegare il cavo USB al computer (optional caricatore
codice 179948).
- Collegare il cavo USB con il pacco batteria
- Durante la carica, il LED rosso si accende. Quando il LED si
spegne la carica è completa.
La ricarica é completata in 120 min‘ e la durata del volo é
mediamente di 5 - 10 min.
Attenzione!
Lasciate che il modello dopo ogni utilizzo il tempo suf cien-
te per raffreddarsi prima di rimetterlo in funzione. Quando si
utilizza delle batterie per cambio deve essere rispettato una
fase di raffreddamento di 10 minuti tra ogni cambio della
batteria prima di rimetterlo in funzione. Il surriscaldamento
può danneggiare l’elettronica o pericolo d’incendio posso-
no esssere le conseguenze.
ES - Cargamiento a través de USB (Batería)
- Desconecte el conector desde modelo a la batería (por
razones de seguridad, se recomeinda de sacar la batería del
modelo).
- Inserir el conector USB del cable de carga en el buje USB
de su ordenador (optional adaptador de carga, No. 179948)
- Conectar la batería con el conector USB.
- Durante la carga, el LED brilla rojo. Quando el LED se
apaga la carga está completa.
Tempo de carga: 120 min Tempo de vuelo: 5 - 10 min
¡Atención!
Deje que el modelo después de cada uso el tiempo su ci-
ente para enfriarse antes de volver a ponerlo en funciona-
miento. Cuando se utiliza baterías para cambiar se tiene que
respetar una fase de enfriamiento de 10 minutos entre cada
cambio de las baterías antes de ponerlo de nuevo en funcio-
namiento. El sobrecalentamiento puede dañar la electrónica
o peligro de incendio puden ser la consecuencia.
1
4
2 3
DE
1. Binden von Sender und Modell
Der Empfänger in Ihrem Modell ist mit einer Einschalt-Sicher-
heitsfunktion versehen. Das garantiert, dass das Modell nur
bindet wenn es ein gültiges Sendersignal erhält.
Achtung!
Erst das Modell und dann den Sender ein-
schalten.
Die korrekte Vorgehensweise ist wie folgt:
• Platzieren Sie das Modell auf einer geraden Oberäche.
• Schieben Sie den Akku ein und verbinden Sie den Akku
mit dem Modell. Schließen Sie das Akkufach und schalten
das Modell ein.
• Nun das Modell nicht mehr bewegen, damit der Gyro sich
einstellen kann. Die LEDs am Modell beginnen zu blinken.
Schalten Sie jetzt den Sender ein. Warten Sie einige
Sekunden bis die LED dauerhaft leuchtet.
2 + 3. Automatische Kalibrierung
Alle Trimmregler auf Neutral stellen.
• Stellen Sie das Modell auf eine waagrechte Oberäche
und bringen Sie vor dem Flug die beiden Steuerknüppel
für ca. 3 Sek. um 45° nach links unten bis die LEDs am
Modell blinken.
• Anschliessend für ca. 3 Sek. Um 45 Grad nach rechts
unten bis die LEDs am Modell blinken. Lassen Sie die
beiden Steuerknüppel los und die LED‘s am Modell
leuchten dauerhaft und zeigen an, dass die automatische
Kalibrierung erfolgreich abgeschlossen ist. Durch diese
Kalibrierung wird auch autom. die Kompassrichtung neu
abgespeichert in die Richtung in die das Modell während
der Kalibrierung zeigt.
4. Starten und Stoppen des Modells.
• Um das Modell zu entsichern bringen Sie beide Steuer-
Hebel 45 Grad nach unten/außen (Bild 4). Die Rotoren
beginnen im Leerlauf zu drehen und das Modell ist bereit
abzuheben. Sollte es nicht funktionieren, wiederholen
Sie den Prozess.
• Um das Modell zu sichern bringen Sie beide Steuer-
hebel 45 Grad nach unten/außen (Bild 4). Die Rotoren
stoppen ohne Verzögerung. Sollte das Modell noch in
der Luft sein während Sie diese Nothaltefunktion aus-
führen stürzt das Modell unweigerlich ab.
GB
1. Binding of transmitter and model
Your RC model is tted with a Power-On failsafe. This is
designed to ensure that the model’s motor will not start unless
it detects a suitable radio-control signal when the LiPo battery
is connected.
Attention!
Switch the model on rst then the transmitter.
The correct Start-Up sequence is as follows:
• With the model places on level surface, push the battery
pack in the direction until xed into position.
• At this time avoid moving the model so the radio and gyro
system can initialize. The LEDs on the model blinking.
Turn on the transmitter. Wait a few seconds until the LED
permanently lights up.
2 + 3. Automatic calibration
Set all trim controls to neutral.
• Place the model on level surface and bring both control
sticks 45° to the bottom left for approx. 3 seconds until the
LEDs on the model blinking.
• Bring both control sticks 45° to the bottom right for approx.
3 seconds until the LEDs on the model blinking. Let go the
control sticks back to neutral and the lights on the model
stop blinking and keep shining - this indicates that the
automatic calibration was successful. By this calibration
the compass direction automatically gets set in the
direction in which the model shows during the calibration
process.
4. Start/Stop operating method of the aircraft.
• To unlock the model press both control sticks 45 degree
down and outwards (see pic 4). The rotor blades will start
turning in idle and ready to lift off. After the radio binding
is done, you don‘t need to re-bind it anymore.
• To lock the model press both control sticks 45 degree
down and outwards (see pic 4). In case the model is
still in the air while performing this input it will crash
to the oor.
FR
1. Synchroniser le modèle avec l‘émetteur.
Le récepteur de votre modèle est équipé d‘une fonction de
sécurité. Cela garantit que le modèle se connecte
uniquement si les signaux de l’ émetteur sont valides.
Attention!
Allumez en premier modèle puis seulement votre
l’émetteur.
La procédure à suivre est la suivante:
• Placez l’modèle sur une surface horizontale plane.
• Mettez en place l’accu et branchez-le.
• Ne bougez plus l’modéle an que le gyroscope puisse se
régler. Les lumières LED à sur le châssis commencent à
clignoter. Allumez le récepteur. Attendez quelques
secondes jusqu’à ce que les voyants soient allumés en
permanence.
2 + 3. Calibrage automatique
Assurez-vous que toutes les commandes de compensation
sont au neutre.
• Marque et modèle sur une surface horizontale et appuyer
les 2 leviers de commande vers le bas à gauche pendant
environ 3 Secondes dans un angle de 45° pendant jusqu’à
ce que les LED autour du modèle commencent par
clignoter.
• Puis vers le bas jusqu‘à ce que les LED clignotent pendant
environ 3 seconde dans un angle de 45 degrés vers la
droite du modèle.. Relâchez les 2 leviers et les LED
s’allument de manière continue, ce qui prouve que
l’auto-synchronisation s’est achevée avec succès. Par
l’auto- synchronisation, la nouvelle direction pour la
boussole est aussi redénie
4. Démarrage et arrêt du modèle.
• An de déverrouiller le modèle pousser le levier de
commande à 45° vers le bas / extérieur (image 4). Les
modèle commencent à tourner au ralenti et le modèle est
prêt à décoller. Si la LED recommence à clignoter il faut
réitérer le process.
• An de assurer le modèle pousser le levier de
commande à 45° vers le bas / extérieur ( image 4). Les
hélices s’arrêtent de suite. Si le modèle est encore en
cours de vol, tout en effectuant cette fonction d‘arrêt
d‘urgence le modèle se bloquera de suite.
5
1
4
2 3
IT
1. Binding trasmettitore e modello
È importante di non toccare/sorare l’elicottero durante la
fase del binding.
Attenzione!
Accendete prima il modello e poi la trasmittente.
Altrimenti il Gyro non si può inizializzare.
• Il Binding deve avvenire su un tavolo oppure per terra.
• Collegare il pacco batteria. I LED del telaio cominciano a
lampeggiare. Accendere il trasmittente. Attendere qualche
secondo no a quando il LED si accende.
2 + 3. Calibrazione automatica
Impostare tutti i trimmer si trovano in folle.
• Posizionare il modello su una piattaforme orizzontale.
Portare le due leve di controllo per 3 secondi a 45° a
sinistra in basso nche i LED sul modello iniziano a
lampeggiare rapidamente.
• Dopodiche, per ca. 3 secondi a 45° a destra in basso
nche i LED sul modello iniziano a lampeggiare. Lasciate
le due leve di controllo in posizione neutrale e i LED sul
modello si accende continuamente e mostrano che la
calibrazione automatico è stato completata con successo.
Tramite questa calibrazione viene impostato anche la
funzione bussola, che viene programmata nella direzione
della calibrazione.
4. Decollare e stoppare del modello.
• Per sbloccare il modello portare entrambi le leve di
controllo a 45 gradi verso il basso/esterno (immagine 4).
I rotori iniziano a girare a vuoto e il modello e pronto a
decollare. In caso che il LED lampeggia, ripetete la
procedura.
• Per bloccare il modello portare entrambi le leve di
controllo a 45 gradi verso il basso/esterno
(immagine 4).
ES
1. Binding del modelo y la emisora
Si el proceso de combinar ambos se viera afectado por
interferencias, empieze de nuevo.
¡Atención!
Encender primero el modelo, y después la
emisora.
• Ponga el modelo en una supercie plana. Meta la batería
en su sitio.
• Ahora no mueva mas el modelo, para que se pueda
inicializar el giróscopo. Los LEDs comienzan a parpadear.
Encienda la emisora. Esperar unos segundos hasta que el
LED se ilumina.
2 + 3. Trim automático
Asegure que todas de a podadores de en punto muerto.
• Pone el modelo en una supercie horizontal y llevar las
dos palancas de control durante por 3 segundos a 45°
hacía izquierda abajo hasta que el LED parpadea en el
modelo.
• Luego durante 3 segundos, girar a 45 grados hacia abjao
a la derecha hasta que los LEDs en el modelo parpadean.
Dejar las dos palancas de control y los LEDs en el
modelo van a brillar de forma permanentemente y indican
que el trimming automático se ha completado
correctamente. Con esta calibración automáticamente se
guarda la dirección de la brú jula en nuevo haciá el
modelo está ajustado en el momento de la calibración.
4. Despegar y detener del modelo
• Para desbloquear el modelo llevar las dos palancas de
control a 45 grados hacia abajo/exterior (véase imagen
4. Los rotores comienzan a girar en vacío y el modelo
está listo para despegar. Si el LED vuelve a parpadear o
sigue parpadeando, repita el proceso de
combinación.
• Para bloquear el modelo llevar las dos palancas de
control a 45 grados hacia abajo/exterior (véase
imagen 4). Los rotores se detiene inmediatamente. Si
el modelo todavía está en el aire mientras se realiza la
función de bloqueo de emergencia, el modelo cae
invitablemente.
12
DE - Trimmen der Fluglage
Lassen Sie das Model ruhig auf einer Stelle schweben und be-
obachten Sie die Veränderungen beim Betätigen der jeweiligen
Trimmregler.
1. Trimmen der Nicklage
2. Trimmen der Roll-Lage
Akkubedingt müssen Sie das Model regelmäßig je nach Ak-
kustand austrimmen um eine stabile Fluglage zu erhalten.
GB - Trimming the model
Let the model hover in one spot and watch the changes in the
respective by pressing the trimm controls.
1. Trimming the pitch
2. Trim the roll position
Depending on the condition of the battery you need to get
the model regularly trimmed to get a stable ight.
FR - Trimmage du vol
Laissez planer le modèle à une certaine hauteur et observez les
changements quand vous actionnez les régulateurs du trimmage
1. Trim nick
2. Trim du roulement
Il faut régulièrement remettre le modèle dans une position
stable en effectuant un nouveau réglage à cause des accus.
IT - Trim del modello
Fare volare il modello ad una certa altezza e osservare i cambi-
amenti quando si preme i regolatori dei trim.
1. Trim nick
2. Trim roll
Tramite i trim e anche possibile regolare il modello così, che
resta praticamente fermo durante il volo. Queste regolazio-
ne sono da effettuare ogni volta che si collega la batteria,
dato che si tratta di regolazioni dipendenti dalla tensione
della batteria.
ES - Trim del modelo
Flotar tranquilamente el modelo y observar los cambios mientras
pulses el regulador de trim.
1. Trim nick
2. Trim roll
A través del trim es posible regular el modelo para obtener
un vuelo estable durante el vuelo. Esta regulación se tiene
que hacer cada vez que se conecta la batería, ya que esta
regulación depende de la tensión de la batería.
6
DE - Flugübungen
Bevor Sie mit dem Model iegen informieren Sie sich zuerst über
seine Steuerfunktionen und führen einige Übungen durch.
Platzieren Sie das Model mit der Hinterseite zu Ihnen zeigend
(schwarz) auf einer ebenen Fläche. Üben Sie zuerst den Schwe-
beug mit dem Gasknüppel zu kontrollieren. Anschließend ver-
suchen Sie die Position des Models mit Hilfe des rechten Steu-
erknüppels zu verändern (vorwärts, rückwärts und seitwärts)
und gegebenenfalls abzufangen. Zuletzt sollten Sie das Drehen
des Models um die eigene Achse mit dem linken Steuerknüppel
üben. Wenn Sie die Grundfunktionen des Models beherrschen
können Sie sich an Ihren ersten kontrollierten Flug machen.
GB - Practice simulation ight
Before ying with the model check rst about its control functions
and perform some exercises. Place the model with the back fa-
cing to you (black) on a at surface. Practice only to hover with
the throttle control. Then, you try to change the position of the
model using the right stick (forward, backward, sideways) and
possibly correct the ight. At last, you should practice turning the
model around its own axis with the left stick. If you are into the
basic functions of the model you can perform your rst controlled
ight.
FR - Voler dans la pratique
Avant de faire voler le modèle, informez vous de toutes ses fon-
ctions de contrôle et faîtes quelques essais. Placez le modèle
sur une surface platte, placez vous derrière le modèle (noir).
Essayez de le faire planer avec la manette des gaz. Ensuite
essayez de changer la position du modèle à l’aide de la manet-
te droite (marche avant, marche arrière, sur les cotés). Si vous
contrôlez toutes les fonctions de base du modèle vous pouvez
faire les premiers vols.
IT - La pratica
Prima di volare il modello, consigliamo fare conoscenza con tutte
le funzioni di controllo e di effettuare i primi voli di test. Posiziona-
re il modello su una supercie piatta, davanti al pilota. Le eliche
del modello devono essere in posizione posteriore. Per primo,
provare ad alzare il modello in volo, e tenerlo “fermo” in volo.
Poi provare a cambiare la posizione del modello utilizzando la
levetta destra (per farlo andare in avanti/indietro e destra/sinist-
ra). Appena imparato le funzioni di base, procedere ad effettuare
i primi voli.
ES - Volando en la práctica
Antes de volar con el modelo, se recomienda conocer todas la
funciones de control y hacer el primero vuelo de prueba. Posi-
cionar el modelo en una supercie plana, en frente del pilota
(negro). Las palas del modelo deben estar en la posición trasera.
En primo lugar, pruebe a despegar el modelo en vuelo, y tener
jo en el vuelo. A continuación, intente a cambiar la posición del
modelo usando la palanca derecha (para que vas hacia ade-
lante/atrás y izquierda/derecha). Cuando se ha aprendido las
funciones básico, proceda con los primero vuelos.
DE
1. Kombination von Gas, Gieren, Roll und Nick
Nach dem Sie sich mit den verschiedenen Steuermethoden
des Models vertraut gemacht haben versuchen Sie nun die
verschiedenen Steuerungen zu kombinieren.
2. Ändern der Flugperspektive
Nach dem Sie das Fliegen des Models von der Sicht von
hinten auf das Model beherrschen ist es an der Zeit den Flug
aus der seitlich vom Model stehenden Position und von der
vom Model zugewandten Seite aus zu üben. Denken Sie
daran, dass Sie zum Teil invertiert (umgekehrt) steuern
müssen.
3. Lande/Startassistent:
Wenn Sie die Taste im Stand drücken hebt das Modell
automatisch ab bzw. reduziert im Flug automatisch soweit die
Höhe bis es aufsetzt und zum Stillstand kommt. Während-
dessen muss das Modell weiterhin gesteuert werden. Der
Assistent übernimmt nur die Höhenkontrolle.
4. Notstop:
Wenn Sie während die Motoren laufen beide Steuerknüppel
nach unten außen oder nach unten innen richten stoppen die
Motoren ohne Verzögerung. Vermeiden Sie Flugmanöver die
diese Knüppelstellung enthalten da das Modell sonst
unweigerlich abstürzen wird!
GB
1. Combination of gas, rudder, roll and pitch
After you are into the different control methods of the model
now you can try to combine the various controls.
2. Change of ight perspective
After you master the ying of the model of the view from the
rear of the model it is time to practice the ight from the side of
the model and from facing towards to the model. Remember,
you need to invert the controls (vice versa).
3. Land/ Start Assistant
If you press the button while the model is standing it will
autmatically take off or automatically reduced the altitude
during ight until it touches down and will then come to a
standstill. You will have to continue stearing the model. The
assistant only takes control of the height.
4. Emergency stop
If you press both control sticks down and to the outside or
downwards and inside while the motors are running they will
stop without delay. Avoid maneuvers with the mentioned stick
positions during ight because the model will otherwise crash!
FR
1. Combinaison entre le gaz, le trim, le roulement et le nick
Si vous contrôlez toutes les différentes fonctions de contrôle,
vous pouvez combiner plusieurs fonctions entre-elles.
2. Changement de la perspective du vol
Après avoir fait des essais de vol en voyant le modèle de
l’arrière, il est maintenant temps de s’exercer en ayant le
modèle sur le coté. Pensez, qu’il faut commander le modèle à
l’inverse.
3. Atterrissage et décollage automatique
Si le modèle est au repos et que vous appuyez cette touche,
le drone décolle automatiquement. Si vous appuyez cette
touche en plein vol, l’altitude se réduira automatiquement
jusqu’à ce que le modèle atterrisse tout seul. Pendant ce
processus, vous pouvez toutefois contrôler la direction
4. Arrêt d’urgence
Si vous appuyez les deux leviers vers l’intérieur-bas ou vers
l’extérieur-bas pendant que les moteurs tournent, ces
derniers s’arrêtent systématiquement. Evitez tout manœuvre
pouvant amener les leviers dans cette position an d’éviter
une chute libre du modèle.
forwardforward
1 2
3 4
7
IT
1. Combinazione dei comandi (gas, rotazione, roll e nick)
Appena imparato i singoli comandi, provate a combinarle l’uno
con l’altro.
2. Cambiare la perspettiva del volo
Dopo i test di volo, avete imparato di comandare il modello
visto da dietro. Adesso fate volare il modello vista dal lato,
oppure davanti. In questo caso cambia il senso di comando ed
anche il grado di dif coltà.
3. Assistente per l’atterraggio/decollo:
Se si preme il pulsante in posizione il modello decolla
automaticamente ossia riduce in volo automaticamente per
quando l´altezza no a toccare il basso e si ferma. Nel
frattempo, il modello deve essere ulteriormente controllato.
L´assistente prende solo il controllo dell’altezza.
4. Emergenza-Stop:
Se durante che i motori camminano, si posizionano le due
leve di controllo verso il basso esterno o verso il basso
interno, i motori si fermano immediatamente. Evitare manovre
di volo che contengono queste posizione di leve perché il
modello precipiterà inevitabilmente
ES
1. Combinacion de los controles (gas, rotación, roll y nick)
Después de que haya familiarizado con los diferentes
métodos de control del modelo, probar ahora de combinar los
diversos controles
2. Cambio de la prespectiva de vuelo
Después de los vuelos de pruebas, has aprendido a controlar
el modelo de la vista desde atrás. Ahora hacer volar de la
vista desde el lado del modelo o delante. En esta caso cambia
el sentido de mando y tambien el grado de di cultad.
3. Asistente de aterrizar/despegar:
Si pulsa el botón en posicion el modelo despega
automáticamente o se reduce en vuelo automáticamente por
lo que la altura hasta que toque hacia abajo y se detiene.
Mientras tanto, el modelo se tiene que controlar ulteriormente.
El asistente sólo toma el control de altura.
4. Emergencia-Stop:
Si durante que los motores caminan, se posicionan las dos
palancas de control hacia abajo exterior o hacia abajo interior,
los motores se detienen inmediatamente. Evitar maniobras de
vuelo que incluyen esta posicion de palancas porque el
modelo va a caer inevitable.
forwardforward
DE
360° Flip Figur
Um einen Flip auszuführen drücken Sie die Flip-Taste und
lassen Sie sie wieder los. Gleich anschließend wählen Sie mit
dem rechten Steuerknüppel in welche Richtung das Modell den
Flip ausführen soll.
Wenn Sie die Flipfunktion ausfführen, sollten Sie in min. 2 Meter
Höhe iegen.
GB
360° ip gure
To execute a ip, press the ip button once. Once the ip button
is pressed, move the right control stick in the direction the Flip
should be performed.
If you set the ip function, you y in 2 meters in height and move
the joystick in the appropriate direction in which the model is to
perform the ip.
FR
360° Figure Flip
Pour faire un Flip appuyez sur la touche Flip et la lâchez direc-
tement. Ensuite vous choisissez avec le levier de commande
droite dans quelle direction le modèle doit faire le Flip.
Quand vous avez actionner la fonction Flip, vous volez à au
moins 2 m de hauteur. vous pouvez alors bouger le manche de
contrôle dans la direction, dans laquelle le modèle devra faire
le ip.
IT
360° Effettuare un Flip durante il volo
Per eseguire unip, premere il tasto Flip e lasciarlo. Subito dopo
scegliere con la leva di controllo destra in quale direzione il mo-
dello deve eseguire il Flip.
Attivando il Flip funzione, è mantenere almeno 2 m di altezza, si
possono effettuare dei Flip durante il volo. Basta azionare la leva.
ES
360° efectuar un Flip durante el vuelo
Para realizar un Flip pulse el botón Flip y déjalo. Inmediatamente
después elija con la palanca de control derecha en cual direcci-
ón el modelo tiene que hacer el Flip.
Activando el Flip función y mantener al modelo 2 m de altura,
se pueden efectuar Flips durante el vuelo. Semplemente activar
la palanca.
1 2
3 4
8
DE - Flyback- & Kompassfunktion:
Ihr Modell verfügt über eine Flyback- & Kompassfunktion. Das
heißt es ist in der Lage trotz einer Drehung in eine gewünschte
Richtung (der Rumpf zeigt nicht mehr in Flugrichtung) die ur-
sprüngliche Flugrichtung beizubehalten und halbautomatisch zu
Ihnen zurück zuiegen
Vorbereitung:
Zuerst sollten Sie sich Gedanken machen welche Richtung Sie
im Kompass des Models abspeichern wollen. Diese Richtung
wird beim aktivieren des Kompassmodus automatisch zur ab-
gespeicherten Flugrichtung. Möchten Sie also z.B. eine Stra-
ße entlang iegen und während dessen den Kompassmodus
verwenden wählen Sie die Richtung in die die Straße führt als
Grundrichtung für den Kompass. Wenn Sie nun das Modell im
Kompassmodus um die eigene Achse drehen lassen müssen
Sie sich keine Gedanken um die Flugrichtung an der Fernsteue-
rung machen. Wenn Sie den rechten Steuerknüppel nach vorne
drücken wird das Model in Richtung der Straße von ihnen weg-
iegen. Wenn Sie den rechten Steuerhebel zu sich herziehen
wird sich das Model der Straße entlang auf Sie zu bewegen.
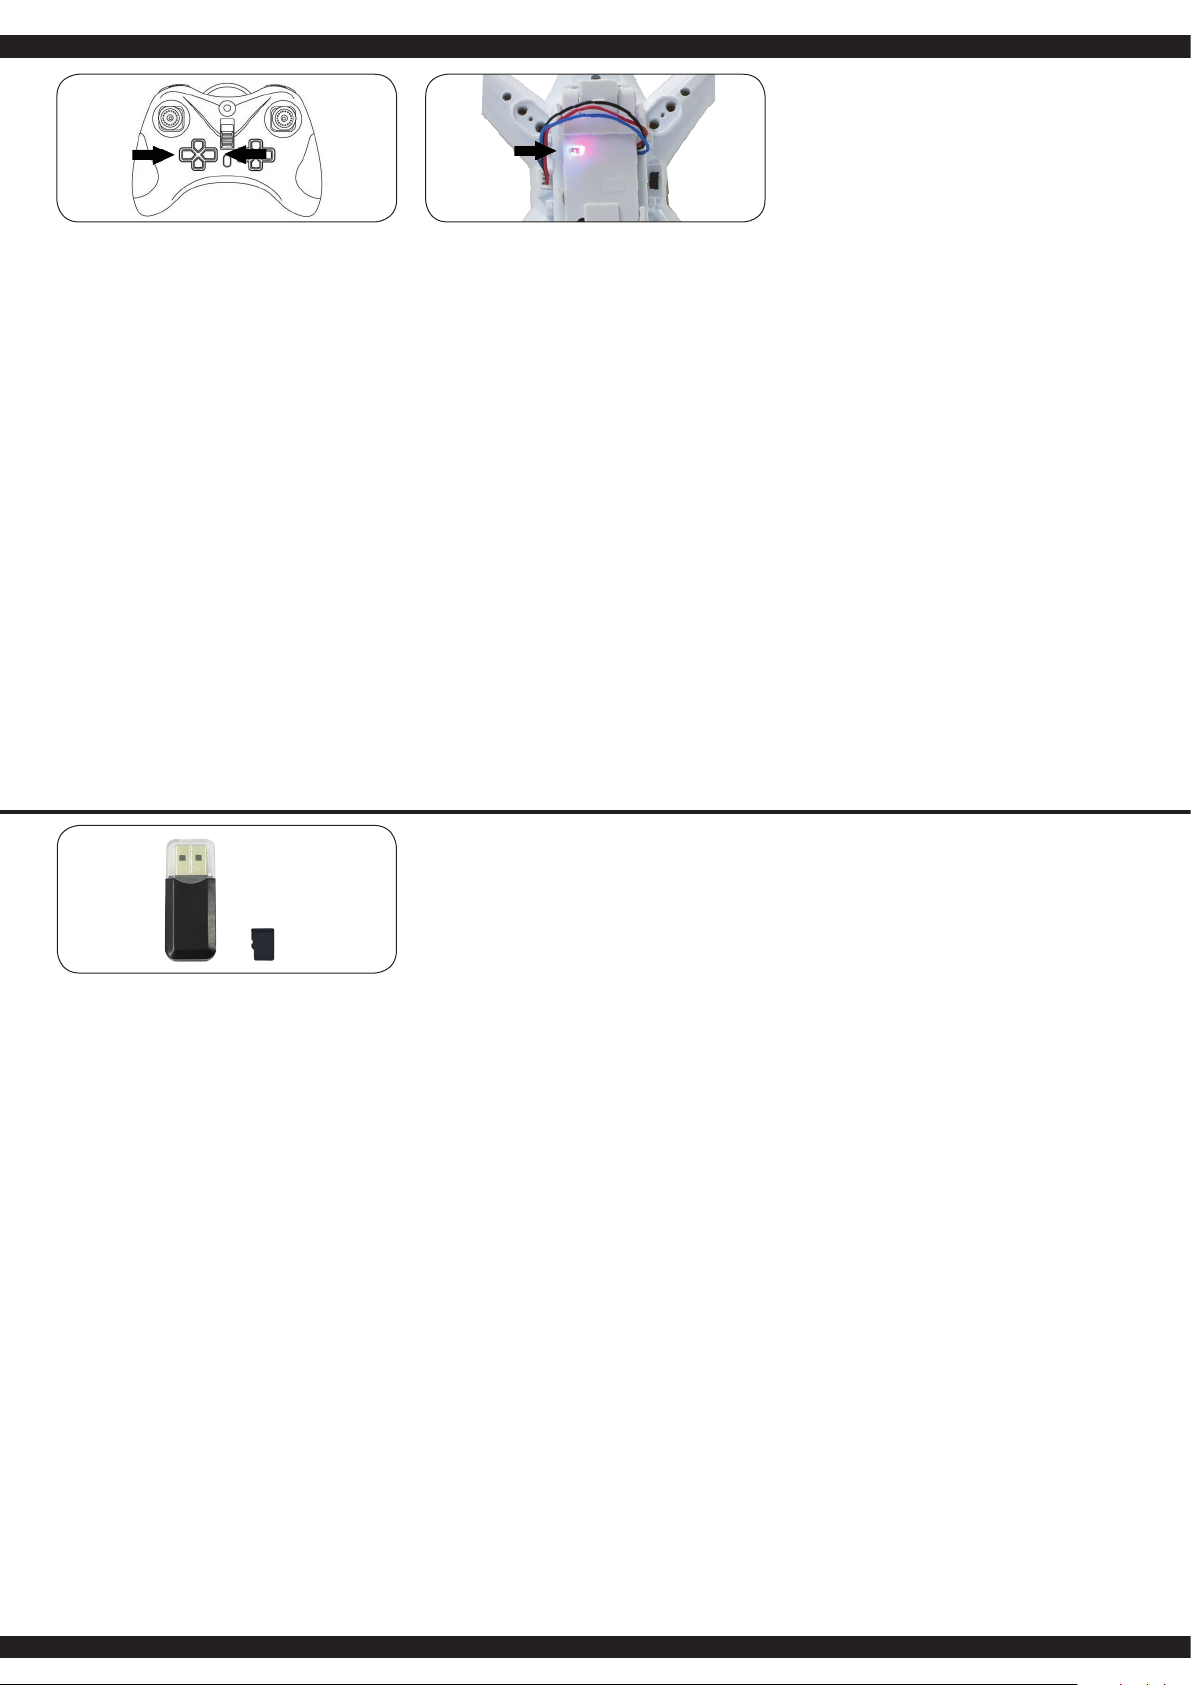
Einrichtung des Flyback- & Kompassmodus:
Die Richtung in die das Modell beim ersten Start gerichtet ist
wird fest als Flyback bzw. Kompassrichtung abgespeichert.
Die Flyback- & Kompassfunktion kann im Flug durch drücken der
Kompass- bzw. Flybacktaste aktiviert werden. Durch Blinken der
Led´s und Piepsen am Sender signalisiert das Modell das es im
Flyback- bzw. Kompassmodus ist. Das Modell folgt nun unab-
hängig in welche Richtung der Rumpf des Models zeigt der vor-
her einprogrammierten Kompassrichtung langsam zurück in die
eingrogrammierte richtung (Flyback) bis Sie den rechten Steuer-
knüppel bewegen. Nach dem Sie die Kompass-Taste A gedrückt
haben, bendet sich das Modell autom. Im Kompassmodus.
Während des Flyback- bzw. Kompassmodus müssen Sie weiter-
hin mit dem Gashebel die Höhe des Modells kontrollieren.
GB - Compass & Flyback function
Your model has a Compass & Flyback function. This means it
is able to keep the desired yback direction even if it turns in
another direction during ight (the front does not face the ight
direction anymore) and ies back to you semi-automatic.
First steps:
First of all you should choose the direction that you want to save
in the compass of the model. This direction is used by the com-
pass
as the main ight direction. For example, you y along a straight
street and would like to use the compass mode; you have to
choose the direction of the street as the main ight direction.
Now if you are using the compass mode to follow a moving ob-
ject you do not have to waste a thought on the ying direction of
the model. If you push the steering stick to the front the model
will y away from you. If you pull the steering stick to the back
the model will y back to you following the direction of the street
(Compass function).
Setting up the Compass & Flyback mode:
The direction in which the model is facing at the rst start is
saved as Compass direction.
The Compass & Flyback function can only be activated while the
model is in the air and by pressing the top button on your remote
control. Indicated by the LEDs and sound from the remote con-
trol the model is entering Compass & Flyback mode.
The model now automatically follows the programmed compass
direction in Flyback mode regardless in which direction it is fa-
cing until you move the right control stick. After moving the right
control stick the model is automatically in Compass Mode for you
to control it on the compass direction. During use of the Com-
pass & Flyback function you need to control the altitude with the
throttle stick.
FR - Fonction boussole & yback
Votre modèle a une fonction boussole et yback. Il peut garder
sa direction de vol initiale malgré une rotation dans une direction
souhaitée (le fuselage ne se trouve plus en direction du vol.) et
de façon semi-automatique revenir vers vous.
Préparation:
D’abord vous devriez rééchir à la direction dans laquelle vous
voulez sauvegarder la boussole du modèle. Cette direction
sera la nouvelle direction de vol automatiquement sauvegardée
quand vous activez la boussole. Si vous voulez voler le long de
la route et au même moment prendre le mode boussole, choisis-
sez la direction dans laquelle mène la route comme direction de
base pour la boussole. Quand vous tournez le modèle en mode
boussole sur son axe, pour lmer un objet qui se trouve à côté
de votre modèle, il ne faut pas rééchir sur la direction de vol à la
radiocommande. Si vous pressez le levier de commande droit an
avant, le modèle va s’envoler de vous en direction route. Quand
vous rapprochez le levier de commande à vous le modèle va se
bouger le long de la route vers vous.
Installation du mode compas et yback:
La direction dans laquelle le modèle est au départ placé
reste sauvegardée comme la direction compas ou yback.
La fonction compas et yback peut être activée pendant le vol.
Dirigez le modèle dans la direction souhaitée et appuyez le
bouton compas ou yback. Le clignotement des DEL vous si-
gnale que le modèle se trouve en mode compas et yback. Le
modèle suit alors la direction compas installée en avance, indé-
pendamment de la direction que montre le fuselage et retourne
lentement vers vous jusqu’à ce que vous bougez le levier droit.
Après que vous n’ayez bougé le levier droit, le modèle se retrou-
ve automatiquement en mode boussole. En mode boussole ou
yback, vous devez continuer par contrôler la hauteur du vol par
le levier d’accélération.
A
DE - Anfänger/Fortgeschritten/Pro Modus
Durch drücken des Gashebels an der Fernsteuerung, können
Sie zwischen 3 Flug-Modi wählen.
A. Einsteiger-Modus (1 x Peep)
Das Modell hat geringe Ausschläge, Steuerbefehle werden
sanft ausgeführt.
B. Fortgeschrittener-Modus (2 x Peep)
Die Ausschläge des Modells sind größer, Steuerbefehle
werden direkter ausgeführt.
C. Pro -Modus (3 x Peep)
Volle Ausschläge am Modell, Steuerbefehle werden agressiv
umgesetzt.
GB - Beginners/advanced/expert mode
By pressing the speed control stick on the transmitter you will be
able to choose from 3 ight modes.
A. Beginner mode (1 x beep)
The model has small deexions, controls are performed
smoothly.
B. Advanced mode (2 x beep)
The deexions are higher, controls are performed directly.
C. Expert mode (3 x beep)
Full deexion on model, controls are performed aggressively.
FR - Mode débutant/avancé/professionnel
En appuyant sur la manette des gaz de la télécommande, vous
pouvez choisir entre trois modes de vol.
A. Mode débutant (1 x beep)
Le modèle a des déviations insigni antes, commandes de
contrôle sont accomplis doucement.
B. Le mode avancé (2 x beep)
Les déviations sont plus grandes, commandes de contrôle
sont accomplis plus direct.
C. Le mode professionnel (3 x beep)
Déviations entières au modèle, commandes de contrôle sont
accomplis agressivement.
IT - Modus principiante/avanzato/expert
Premendo il leva gas sulla radio è possibile scegliere tra 3 mo-
dalità di volo
A. Modus principiante (1 x beep)
Il modello reagisce molto docile e “morbido” ai comandi.
B. Modus avanzato (2 x beep)
La reazione del modello e più preciso.
C. Modus expert (3 x beep)
Reazione molto precisa ai comandi.
ES - Modo Principiante/Avanzado/Experto
Presionando el gas palanqua de la emisora se puede elegir ent-
re 3 modos de vuelo.
A. Modo principiante (1 x beep)
El modelo tiene pequenas erupciones, los comandos de
control vienen efectuado delicado.
B. Modo avanzado (2 x beep)
Los erupciones son más grandes, los comandos de control
vienen efectuado directamente.
C. Modo experto (3 x beep)
Erupciones completos sobre el modelo, comandos de
controls son agresivos.
9
IT - Funzione Flyback- & Bussola:
Il modello ha una funzione Flyback- & Bussola. Questo signi-
ca che é in grado nonostante una rotazione in una direzione
desiderata (La fusoliera non è in direzione di volo) mantenere
la direzione originale del volo e semiautomatico volare di nuovo
indietro verso di voi.
Preparazione:
Per primo deve aver una idea in quale direzione desidera memo-
rizzare la bussola del modello. Questa direzione quando attiva
il modo bussola e automaticamente la nuova direzione di volo.
Quindi, se volete per esempio volare lungo la strada e usare la
modalità bussola scelga la direzione in cui la strada conduce
come la direzione di base della bussola. Se ora deve far ruota-
re il modello attorno al proprio asse in modalità bussola non ce
bisogno di preoccuparsi per la direzione di volo sulla radio. Se
preme la leva di controllo destro in avanti il modello volerà in
direzione della strada via da voi. Se preme la leva di controllo
destro verso di voi il modello volerà in direzione della strada
verso di voi.
Installazione della Modalità Flyback- & Bussola:
La direzzione in cui il modello é diretto, viene memorizzatoa
in modo permanente come Flyback ossia direzione bussola.
La funzione Flyback- & Bussola puo essere attivato durante il
volo attraverso premendo il pulsante in altro a sinistra (Bussola-
e Pulsante Flyback). Dal lampeggio del LED e segnale acusti-
co viene segnalato che il modello é in Flyback- ossia modalità
bussola. Il modello segue ora la direzione indipendente, in cui
la fusoliera del modello indica di come era stata programmata
la direzione bussola lentamente indietro verso di Lei (Flyback)
nche muovera la leva di controllo destra. Dopo aver spostato la
leva di controllo destra il modello si trova automaticamente nella
modalitá bussola. Durante la modalità Flyback- ossia bussola é
necessario continuare a controllare l’altezza del modello attra-
verso la leva del gas.
ES - Función Flyback- & Brújula:
Su modelo tiene una función Flyback- & Brújula. Esto signica
que no obstante un giro en una dirección deseada (El fuselaje no
está en la dirección de vuelo) mantiene la dirección original de
vuelo y semiautomático vola de nuevo hacia Usted.
Preparación:
Al primero usted debe tener una idea en que dirección desea
almacenar en la brújula del modelo. Esta dirección cuando se
activa el modo de brújula es automáticamente la nueva dirección
del vuelo. Así que si por ejemplo quieres volar a lo largo de una
calle y utilizar el modo de brújula selecciona la dirección en la
que el camino conduce como la dirección básica de la brújula.
Si ahora hace girar el modelo alrededor de su propio eje en el
modo de brújula no tiene que preocuparse de la dirección de
vuelo en la emisora. Si presiona la palanca de control derecha
hacia adelante el modelo va a volar en la dirección de la calle
lejos de usted. Si tire la planca de control derecha hacia usted el
modelo va a volar en la dirección de la calle hacia usted.
Instalación del modo Flyback- & Brújula:
La dirección en la que el modelo se dirige vien almacena-
do permanentemente como Flyback o bien dirección de la
brújula.
La función Flyback- & Brújula se puede activar durante el vuelo
atravez pulsar el botón en la parte superior izquierda (botón
Brújula- o Flyback). Por intermitente de los LEDs y pitidos en
la emisora le senalas que el modelo esta en el mode Flyback o
bien Brújula. El modelo ahora sigue la dirección independiente
en el que el fuselaje del modelo muestra cómo estaba progra-
mado anteriormente moverse lentamente hacia usted (Flyback)
hasta que vas a mover la palanca de control derecho. Después
de mover la palanca de control de la derecha el modelo esta en
automático en el modo brújula. Durante el modo Flyback- o bien
Brújula, se debe continuar a controlar la altura de su modelo con
la palanca de gas.
A
12
a
b
c
DE - Installation der Kamera
a. Stecken Sie die Speicherkarte richtig in die Kamera.
b. Stecken Sie den Stecker der Kamera in die Buchse unten
am Modell, bis er ganz einrastet.
c. Hängen Sie die Kamera an das Modell an.
GB - Installation of the Camera
a. Insert the memory card the correct way around into the
camera.
b. Insert the plug of the Camera in the socket below
the model, until it complete snaps.
c. Connect the Camera to the model.
FR - Installation de la caméra.
a. Insérez la carte mémoire correctement dans l´appareil photo.
b. Branchez l´appareil photo dans le connecteur sur la partie
inférieure du modèle, jusqu‘au déclic.
c. Fixer la caméra sur le modèle.
IT - L’installazione della telecamera
a. Inserire la scheda di memoria in modo corretto nella
telecamera.
b. Inserire la spina della telecamera nella presa nella parte
inferiore del modello. Finche si incastra.
c. Montare la telecamera al modello.
ES - La instalación de la cámara
a. Inserte la tarjeta de memoria correctamente en la cámara.
b. Inserte el conector de la cámara en el buje en la
parte inferior del modelo, hasta que se encastre.
c. Monte la cámara en el modelo.
10
DE - Videofunktion und Übertragung auf den PC
1. Mit den Tasten für Foto (1) bzw. Video (2) am Sender können
Sie eine Aufnahme starten.
2. Drücken Sie die Fototaste (1) einmal und lassen Sie wieder
los. Die rote LED (3) blinkt kurz.
Ein Standbild wurde abgespeichert.
3. Drücken Sie die Videotaste (2) einmal und lassen Sie sie
wieder los. Die rote LED leuchtet. Dies signalisiert das die
Aufnahme läuft. Drücken Sie die Videotaste nochmal erlischt
die rote LED wieder, die Aufnahme wird beendet und das
Video abgespeichert.
4. Die Speicherkarte kann problemlos durch eine Ersatzkarte
ausgetauscht werden. Entfernen Sie die Speicherkarte
indem Sie an der Seite des Modells leicht auf die Micro-SD-
Karte drücken, die Speicherkarte springt ein Stück heraus.
Nun können Sie die Speicherkarte leicht herausziehen.
Achtung!
● Setzen Sie die Karte mit den goldenen Kontakten nach
oben (zum Propeller) in den Einschub ein und schieben Sie
sie so weit hinein, bis sie einrastet.
GB - Photo / Video
1. Using the buttons on the transmitter for photo (1) or video (2),
you can start recording.
2. Press the Foto button (1) again and release again. The red
LED (3) ashes. A still image is stored.
3. Press the Video button (2) once and release it again. The red
LED is lit permanently. It signals that the recording. Press the
Video button again turns off the LED and the recording is
stopped and the video will be saved.
4. To view recording remove the Micro SD Card from the side of
the model, by slightly depressing the Micro SD Card and
allowing it to then spring out enough to grab it and pull it out of
the slot.
Attention!
● Micro SD card should be placed with the little gold
connections upward (to the propeller)
FR - Fonction photos / vidéo
1. Avec la touche pour photos (1) et vidéo (2) de l’émetteur vous
pouvez démarrer les prises de vues.
2. Appuyez sur la touche photo (1) une fois et la lâchez tout
aussitôt. LED rouge (3) clignote.
Une image xe était sauvegardée
3. Appuyez sur la touche vidéo (2) une fois et la lâchez tout
aussitôt. La LED s’allume continuellement pour signaliser
que l’enregistrement est en court. Appuyez à nouveau sur la
touche vidéo, la LED rouge s’éteint, l’enregistrement est
terminé et est sauvegardé.
4. La carte mémoire peut être échangée par une carte
équivalente. Enlevez la carte mémoire par appuyer sur la
carte SD micro à la face du modèle. La carte mémoire
disjoncte et vous pouvez la puiser facilement.
Attention !
● Mettez la carte avec le point de contact doré vers le haut
(au hélice) dans le tiroir.
IT - Foto/Video
1. Utilizzando i pulsanti sul trasmittente per foto (1) o video (2),
si avvia la registrazione
2. Premere il pulsante immagine (1) di nuovo e rilasciarlo di
nuovo. Il LED rosso (3) lampeggia. Un immagine viene
memorizzata.
3. Premere il pulsante video (2) una volta e rilasciarlo
nuovamente.Il LED rosso si accende in modo permanente. Si
segnala che la registrazione e in corso. Ripremere il pulsante
video e la LED rossa si spegne è la registrazione viene
interrotta e il video viene salvato.
4. La scheda di memoria può essere facilmente sostituito da una
carta sostitutiva. Rimovere premendo sul lato della modello
facilmente sulla scheda Micro SD, la scheda di memoria
uscirá leggermente. Ora può facilmente estrarre la scheda di
memoria
Attenzione!
● Inserire la scheda con il contatto dorata verso l‘alto (al
elica) nella fessura e spingerla no a quando non si
incastri.
ES - Función Foto/Vídeo
1. Utilizando los botones de la emisora para foto (1) o video (2),
puedes iniciar la grabación.
2. !Pulse el botón de imagen (1) y vuelva a soltar. El LED rojo
(3) parpadea. Una imagen se ha memorizado.
3. Pulse el botón de vídeo (2) una vez y suelte de nuevo. El LED
rojo se ilumina de forma permanente. Señala que la grabación
se esta realizando. Pulse el botón de vídeo otravez, se apaga
la luz LED roja y la grabación se detiene y el vídeo se
memoriza.
4. La tarjeta de memoria puede ser fácilmente sustituida por una
tarjeta de reemplazo. Remover la tarjeta de memoria
pulsando fácilmente en la lateral de la modelo, la tarjeta de
memoria saldrá ligeramente. Ahora se puede sacar la tarjeta
de memoria.
Atención!
● Inserte la tarjeta con el contacto dorado hacia arriba (al
helice) en la ranura y empujarlo hasta que se encastre.
12 3
DE - USB
1. Stecken Sie die Speicherkarte in den USB-Adapter und
diesen in den USB-Anschluß ihres PCs oder Laptop.
2. Der USB-Adapter sollte von ihrem Computer automatisch
erkannt werden und wird als Laufwerk angezeigt.
Das Anschauen der Videos sollte mit verschiedenen Media-
Playern möglich sein.
Achtung!
● Sollten Sie Probleme beim abspielen der Daten haben,
probieren Sie es mit einem anderen Mediaplayer. Sie können
Online nach einem kostenlosen Download eines AVI- oder
VLC-Players suchen.
● Mit der Videofunktion können nur Videos aufgenommen
werden. Tonaufnahmen sind nicht möglich.
GB - USB
1. Insert the memory card into the USB adapter and these in the
USB port of your PC or laptop.
2. The USB adapter should be automatically detected by your
computer and appears as a drive. The viewing of the video
should be possible with different media players.
Attention!
● If you have trouble playing the les with Quicktime try your
other media players. You can also look online for
recommended free downloadable AVI player.
● Video camera does not record sound.
FR - USB
1. Engagez la carte mémoire dans le lecteur USB puis branchez
l’ensemble sur un des ports USB de votre PC ou ordinateur
portable.
2. L‘adaptateur USB doit être automatiquement détecté par
votre ordinateur et apparaît comme un lecteur. En regardant
la vidéo devrait être possible avec des joueurs de différents
médias.
Attention!
● Si vous avez des soucis pour lire vos enregistrements,
veillez changer de lecteur media. Vous pouvez télécharger
Online des lecteurs AVI ou VLC non payants.
● Avec la fonction vidéo vous ne pouvez enregistrer que des
vidéos sans son. L’enregistrement de son n’est pas possible.
IT - USB
1. Inserire la scheda di memoria nel adattatore USB e poi nella
porta USB del suo PC o del portatile.
2. L‘adattatore USB dovrebbe essere rilevato automaticamente
dal computer e appare come un disco. Guardareil video
dovrebbe essere possibile con vari Media-Player.
Attenzione!
● Se avete difficoltà a guardare i dati, provare a utilizzare un
altro Mediaplayer. È possibile cercare online per il download
gratuito di AVI- o VLC-Players.
● Con la funzione video solo le immagini possono essere
registrate. Non é possibile registrare l’audio.
ES - USB
1. Inserir la tarjeta de memoria en el adaptador USB y este en la
conexion USB de su ordenador o portátil.
2. El adaptador USB debe ser detectado automáticamente por
el ordenador y aparece como una unidad. Mirando el vídeo
debe ser posible con con varios Media Players.
Atención!
● Si tiene problemas en ver los datos, tienes que usar un otro
Mediaplayer. Puedes buscar online para descargar
gratuitivamente un Player AVI- o VLC.
● Con la función de vídeo sólo se pueden grabar las imágenes.
La grabación de sonido no es posible.
11
DE
Problembehebung und Lösungen
Die Empfangselektronik blinkt.
1. Das Modell empfängt kein Signal.
- Überprüfen Sie ob das Modell gebunden ist und der Sender
eingeschaltet ist.
Das Modell reagiert nicht.
1. Sie sind ausser Reichweite.
- Verringern Sie die Distanz zum Modell
2. Die Senderbatterien sind zu schwach.
- Erneuern Sie die Senderbatterien.
Die Rotoren machen ungewöhnliche Geräusche.
1. Ein Rotorblatt ist beschädigt.
- Wechseln Sie das Rotorblatt.
Nach dem Blatt-Tausch iegt das Modell nicht richtig.
1. Die Blätter sind falsch montiert.
- Montieren Sie die Blätter richtig.
Nach dem Laden hebt das Modell nicht ab.
1. Akku oder Ladegerät sind defekt.
- Akku oder Ladegerät ersetzen.
2. Der Akku ist nicht voll aufgeladen.
- Laden Sie den Akku immer vollständig auf.
Die Kamera blinkt und eine Aufnahme ist nicht möglich.
1. Die Speicherkarte ist voll oder nicht eingelegt.
- Bereinigen Sie die Speicherkarte bzw. legen Sie die
Speicher karte ein.
GB
Problems and solutions
The LED on the receiver is blinking.
1. The receiver don´t recieve a signal.
- Check the binding of the model and make sure that the
transmitter is turned on.
The model don´t recognize.
1. You are out of reach.
- Decrease the distance to the model.
2. The transmitter batterys are to low.
- Put new batterys into the transmitter.
The rotor is making strange noises.
1. The rotor blade is damaged.
- Replace the rotor.
After changing the blades the model don´t ies properly.
1. The blades are not installed properly.
- Install the blades properly
The model don´t rise up after charging.
1. Battery or charger are damaged.
- Replace battery or charger.
2. The battery was not charged enough.
- Always charge the battery till it is full charged.
The camera is blinking.
1. The memory card is full or not inserted.
- Emtying the memory card resp. Insert the memory card.
FR
Problèmes possibles et solutions
L‘électronique récepteur clignote.
1. Le modèle ne reçoit pas de signal
- Vériez si le modèle est connecté et l‘émetteur est mis en
marche.
Le Modèle ne réagit pas.
1. Vous êtes hors d‘atteinte
- Diminuez la distance au modèle
2. Les piles de l‘émetteur sont trop faibles
- Renouvelez les piles de l‘émetteur.
Les rotors font des bruits inhabituels.
1. Un rotor est abîmé.
- Remplacez la pale.
Après l‘échange de pale le modèle ne vole pas
correctement.
1. Les pales sont montées mal.
- Montez les pales correctement.
Le modèle ne décolle pas.
1. L‘accu ou le chargeur sont en panne.
- Remplacez l‘accu ou le chargeur.
2. L‘accu n‘est pas chargé complètement.
- Chargez l‘accu toujours totalement.
La caméra clignote et une prise n’est pas possible.
1. La carte de mémoire est pleine ou pas mis en place.
- Videz la carte de mémoire ou mettez la en place.
IT
Soluzione del problema
La ricevente elettronica lampeggia.
1. Il modello non riceve alcun segnale
- Vericare se il modello e stato fatto il binding e la radio sia
accesa.
Il modello non risponde.
1. Siete fuori della autonomia.
- Ridurre la distanza dal modello.
2. Le batterie della radio sono deboli.
- Cambiare le batterie della radio.
I rotori fanno rumori insoliti
1. Una pala e danneggiate.
- Cambiare la pala.
Dopo aver cambiato la pala, il modello non vola
correttamente.
1. Le pale sono montate non correttamente.
- Montare le pale correttamente.
Dopo la carica, il modello non decolla.
1. Batteria o caricatore sono difettosi.
- Sostituire la batteria o caricatore
2. La batteria non e completamente caricata.
- Caricare la batteria sempre completamente
La fotocamera lampeggia e la registrazione non è possibile.
1. La scheda di memoria é piena o non inserita.
- Pulire la scheda di memoria e inserire la scheda di memoria.
ES
Solución de problemas y soluciones
La electrónica receptor parpadea.
1. El modelo no recibe ninguna senal.
- Comprobar si el modelo está echo el binding y la emisora
encendida.
El modelo no responde.
1. Usted está fuera de su alcance.
- Reduzca la distancia en su modelo.
2. La baterías son débiles.
- Reemplace las baterías de la emisora.
Los rotores hacen ruidos inusuales.
1. Una pala de rotor está dañada.
- Cambiar la pala.
Después de sustituir la pala, el modelo no vuela
correctamente.
1. Las palas no estan montado bien.
- Montar las palas correctamente.
Después de la carga, el modelo no esta
despegando.
1. Batería o el cargador estan defectuoso.
- Cambiar la batería o el cargador.
2. La batería no esta cargada completamente.
- Cargar la batería siempre completamente.
La cámara parpadea y la grabación no es posible.
1. La tarjeta de memoria está llena o no insertada.
- Limpiear la tarjeta de memoriay inserte la tarjeta de
memoria.
DE - Ersatzteile | GB - Spare parts | FR - Pièces détachées | IT - Pezzi di ricambio - ES - Lista de repuestos
No. 423148
Kamera
Camera
Caméra
Camera
Cámara
No. 423144
Rotorblätter
Rotorblades
Rotor principal
Pale principali
Rotores
No. 423142
Hauptzahnrad 4 Stück
Main Gear 4 pieces
Courronne principale 4 pièces
Corona principale 4 pezzi
Corona principal 4 piezas
No. 423141
Rumpf Oberteil
Fuselage upper part
Cabine partie upper
Cappottina parte superiore
Cabina parte superior
No. 423146
Landegestell
Landing gear
Patin d‘atterrissage
Carello
Patines de aterrizaje
No. 423147
Empfangselektronik
Receiver electronics
Eléctronique de réception
Ricevente
Receptor
No. 423145
Rotorblattschutz
Protecting ring
Pale de Protection Rotor
Protezione dei rotori
Protección de las palas del
rotor
No. 423126
Akku
Battery
Accu
Batteria
Baterìa
No. 423143
Rumpf Unterteil
Fuselage upper part
Cabine partie upper
Cappottina parte superiore
Cabina parte superior
No. 423149
Motor
Motor
Moteur
Motore
Motor
No. 423150
Fernsteuerung
Transmitter
Radiocommande
Trasmittente
Emisora
12
DE - Sicherheitshinweise
• Bitte lesen Sie die Bedienungsanleitung und Sicherheitshinweise
sorgfältig durch bevor Sie das Modell in Betrieb nehmen.
• Dieses Gerät ist nicht dafür bestimmt, durch Personen (einschließlich Kinder) mit
eingeschränkten physischen, sensorischen oder geistigen Fähigkeiten oder man-
gels Erfahrung und/oder mangels Wissen benutzt zu werden, es sei denn, sie
werden durch eine für ihre Sicherheit zuständige Person beaufsichtigt oder erhiel-
ten Anweisungen, wie das Gerät zu benutzen ist.
• Der Benutzer ist im vollem Umfang für den richtigen Umgang mit dem Modell
verantwortlich.
• Achtung:
Gefahr von Augenverletzungen! Halten Sie einen Sicherheitsabstand von 1 -
2 Meter um sich oder andere vor Verletzungen zu schützen.
• Jegliche Manipulation an der Struktur des Modells ist nicht erlaubt und führt zum
sofortigen Verlust der Gewährleistung.
• Fliegen Sie in keiner Umgebung mit mehr als +45°C und weniger als 10°C.
• Setzen Sie das Modell keiner direkten Sonneneinstrahlung, hoher Luftfeuchtigkeit
oder Staubeinwirkung aus.
• Achten Sie darauf, dass manche Teile am Modell heiß werden können.
Betrieb
• Achtung!
In einigen Ländern ist es vorgeschrieben für den Betrieb eines Modells eine
spezielle Modellhalterhaftpichtversicherung abzuschließen. Informationen hierzu
bekommen Sie bei den Modellsportverbänden oder bei einer Versicherung.
• Benutzen Sie das Fluggerät niemals in der Nähe von Flughäfen, Bahnanlagen
oder Straßen. Halten Sie immer ausreichend Abstand von den gefahrenträchtigen
und besonders geschützten Bereichen.
• Betreiben Sie Ihr Modell nicht in der Nähe von Funkstationen, Hochspannungs-
leitungen, Transformatorkästen oder ähnlichem! Diese Einrichtungen können
Funkstörungen verursachen!
• Um Unfälle zu vermeiden, iegen Sie das Modell nie in der Nähe von Personen,
Tieren oder sonstigen Hindernissen. Hände, Haare und lose Kleidung vom Rotor
entfernt halten. Nicht in die Rotoren greifen!
• Setzen Sie Outdoor-Modelle nur bei gutem Wetter ein. Bei Regen, Sturm oder gar
Gewitter dürfen Sie diese Modelle nicht betreiben
• Suchen Sie ein Fluggelände, das den gesetzlichen Voraussetzungen entspricht
und frei von Hindernissen wie Bäumen, Häusern usw. ist.
• Aus Gründen der Sicherheit und um zufriedenstellende Flugergebnisse zu er-
zielen, ist auf einen ausreichend großen freien Raum (ca. 6 x 5 x 2,5 m) zu achten.
Dabei muss der Raum frei von Hindernissen (Lampen, losen Gegenständen, etc.)
sein. Außerdem sollte kein Luftzug vorhanden sein.
• Das Modell nicht aus großen Höhen fallen oder abstürzen lassen. Dies kann die
Flugeigenschaften und die Lebenszeit des Modells beeinträchtigen.
Akkusicherheitshinweise
Durch die hohe Energiedichte (bis zu 150Wh/kg) sind die Zellen nicht ungefährlich
und bedürfen einer besonderen Sorgfalt! Die Firma JAMARA schließt daher aus-
drücklich jegliche Haftung für Schäden aus, die durch den fehlerhaften Umgang mit
den Lithium-Polymer-Zellen entstehen.
• Bei unsachgemäßer Verwendung des Akkus besteht Brand- oder Verätzungs-
gefahr.
• Überladen, zu hohe Ströme, oder Tiefentladen zerstört die Zelle.
• Vor mechanischer Belastung (Quetschen, Drücken, Biegen, Bohren) schützen.
• Akkus keinesfalls öffnen oder aufschneiden, nicht ins Feuer werfen, von Kindern
fernhalten.
• Behandeln Sie beschädigte oder auslaufende Akkus mit äußerster Vorsicht. Es
können Verletzungen oder Schäden am Gerät entstehen.
• Akkus auf keinen Fall kurzschließen und immer auf die richtige Polung achten
• Akkus vor Hitzeeinwirkung über 65°C schützen, fern von heißen Teilen (z. B.
Auspuff) montieren.
• Vor der Lagerung (z. B. im Winter) die Akkus laden - nicht im entladenen und nicht
im vollgeladenen Zustand lagern! Bei längerer Lagerzeit sollte der Ladezustand
gelegentlich kontrolliert werden.
• Der Inhalt der Zelle ist schädlich für Haut und Auge.
• Nach Hautkontakt mit viel Wasser abspülen und benetzte Kleidung ablegen.
• Nach Augenkontakt mit viel Wasser abspülen und einen Arzt konsultieren.
Sollte die Zelle sich überhitzen, aufblähen, rauchen oder brennen, darf dieses
nicht mehr berührt werden. Halten Sie Sicherheitsabstand und stellen Sie ge-
eignete Löschmittel bereit (kein Wasser Explosionsgefahr, gut trockener Sand,
Feuerlöscher, Löschdecken, Salzwasser).
GB - Security instructions
• Read the instructions and security instructions carefully before using the
model.
• This product is not intended for use by individuals (including children) with reduced
physical, sensory or mental capabilities or lack of experience and / or knowledge,
unless they are supervised by a person responsible for their safety and is able to
give instructions about how the product should be used. Children should be super-
vised to ensure that they do not play with the product.
• The User is fully responsible for the correct use of the model.
• Warning:
Risk of eye injury! Keep a safe distance of 1 - 2 meters to yourself or others to
protect against injury.
• The model should not be changed in any way, doing so will invalidate the
guarantee.
• Do not y in temperatures above + 45° C or below 10° C.
• Protect the model from strong sunlight, moisture and dust.
• Be aware that some parts of the model may get hot.
Operating
• Attention!
In some countries it is a legal requirement to carry third party indemnity insurance
when operating a radio controlled model. Please ask your local dealer, governing
body or your insurance company for details.
• Never use the model near an airport, railway or roads. Always keep a safe distance
from potentially hazardous and specially protected areas.
• Do not operate your model near radio stations, power lines, transformer boxes or
similar facilities! This can result in radio interference, causing loss of control over
the model.
• It must be observed that neither persons or animals or other obstacles are within
the operating enviroment. Keep hands, hair and loose clothing away from the rotor,
not reach into the rotors.
• The Outdoor-model can only be own in good weather. Do not y in wind, rain or
thunder storms.
• Find a place to y which complies with any laws, and is free from obstacles such as
trees, houses and / or other obstacles.
• To ensure safety and for best results, the model may only be own in a large open
room (~ 6 x 5 x 2,5 m), free of obstacles such as lights or furniture. In addition, no
draft should be available.
• Do not let the model fall or crash from high height. This may affect the ight
characteristics and lifetime of your model.
Safety precausions for battery
Because of the high power compactivity (up to 150 Wh/kg) the cells are quite dan-
gerous and need special care! The company Jamara excludes explicitly, all types of
liability for damages, that can occure when using the Lithium-Polymer-
Cells indequate.
• When using the battery incorrect there is a risk of getting re or acid-injuries.
• Overcharging, too high power, or discharging at low level destroys the cell.
• Protect from mechanical stress (squeezing, pushing, bending, drilling).
• Never open or cut batteries, do not throw into re, keep away from children.
• Handle damaged or leaking battery with care. Injuries or damages to the product
can occure.
• Under no circumstance short-circuit the device and always watch out for correct
polarity.
• Protect batteries from heat above 65 °C , mount away from hot objects (for example
exhaust pipe).
• Before storing batteries (for example in the winter) charge the battery. Do not store
in fully charged or in non charged state!
• The contents of the cell is harmfull for skin and eye.
• If the content comes into contact with skin, clean with plenty of water and take off
moisted clothes.
• If the content comes into contact with the eyes, clean with plenty of water and
consult a doctor.
If the cell overheats, swells, burns or smoke is coming from it, do not touch it
under any circumstances. Keep away in a safe distance and prepare adequate
extinguishing agents such (No water explosion, well dry sand, re extinguis-
hers, re blanket, salt water).
13
FR - Consignes de sécurités
• Veillez lire attentivement la notice et sécurités d’utilisation avant
d’utiliser!
• Ce dispositif n‘est pas destiné à être utilisé par des personnes (y compris les
enfants) dont les capacités physiques, sensorielles ou mentales ou manque
d‘expérience et / ou les connaissances pour être, sauf s‘ils sont surveillés par une
personne responsable de leur sécurité ou reçu des instructions sur la façon dont
l‘appareil doit être utilisé. Les enfants doivent être surveillés pour s‘assurer qu‘ils ne
jouent pas avec l‘appareil.
• L’utilisateur prend la responsabilité entière du correct maniement du modèle.
• Attention:
Risque de blessures à l‘oeil! Distance de sécurité d‘au moins 1 à 2 mètres à
eux-mêmes ou d‘autres protègent contre les blessures.
• Manipulez les éléments endommagés avec énormément de précautions. Des
brûlures acides ou des dommages sur l‘appareil. Sont à craindre.
• Ne volez pas si l‘air ambiant fait plus de +45°C ou moins de 10°C.
• N‘exposez jamais votre modèle directement dans les rayons du soleil, ne l‘utilisez
pas par temps avec humidité relative élevée ou dans un endroit plein de poussière.
• Attention, certaines pièces de votre modèle peuvent chauffer.
Mise en marche
• Attention !
Dans quelques pays il est nécessaire de souscrire à une assurance spéciale si
vous souhaitez utiliser des modèles réduits. Pour avoir plus d‘informations à ce
sujet, veillez vous adresser au club de modèles réduits le plus proche ou un
organisme d‘assurance.
• N‘utilisez jamais votre modèle volant dans les environs d‘un aérodrome ou
aéroport, installations de chemins de fer ou de routes. Gardez toujours une
distance sufsante par rapport au zones de dangers ou protégées.
• N’utilisez jamais votre modèle dans les environs de stations d’émissions, lignes à
haute tensions, transformateurs ou équi valent! Ces installations peuvent
provoquer des perturbations et entraîner la perte du contrôle de votre modèle ou
même du modèle lui-même!
• Aucune personne, aucun animal ou outre obstracle ne dolvent se trouter dans
l‘espace de fonctionnement de modèle. Gardez les mains, cheveux et vêtement à
bonne distance des parties en rotations, pas la main dans les rotors.
• N’utilisez votre modèle outdoor que par temps ensoleillé. Surtout pas s’il pleut, s’il
y a beaucoup de vent ou lors d’un orage.
• Choisissez un terrain répondant aux exigences des textes de lois en vigueur pour
faire évoluer votre modèle et libre de tout obstacle comme par exemple arbres ou
maisons etc.
• Pour des raisons de sécurités et an de proter pleinement du plaisir en vol, veillez
toujours utiliser votre modèle dans un endroit ayant sufsamment de place
(~ 6 x 5 x 2,5 m) pour évoluer. Pour cela il est conseillé d‘avoir le moins d‘obstacles
possibles (lampes, bibelots,…) pouvant être fatal pour votre modèle. Uniquement
utiliser à l‘intérieur, à l‘abri des courants d‘air.
• Ne pas laisser tomber le modèle de hauteurs élevées; ceci pourrait limiter les
qualité de vol et la durée de vie du modèle.
Consignes de sécurité de la accu
De part leur énorme densité énergétique (jusqu‘à 150Wh/Kg), les éléments Lithium
ne sont pas sans dangers et nécessitent un soin accu! De ce fait, la société Jamara
décline toute garantie pour les dégâts qui peuvent résulter d‘une utilisation non con-
forme des éléments Lithium.
• Une utilisation non conforme peut déclencher un incendie ou des brûlures acides.
• Surcharge, des courants trop élevés ou une trop grande décharge détruisent les
éléments.
• Protégez les éléments contre des chocs mécaniques (pincement, pression, torsion,
perçage).
• N‘ouvrez ou ne découpez en aucun cas les accus, ne les jetez pas dans le feu, et
tenez les à bonne distance des enfants.
• Manipulez les éléments endommagés avec énormément de précautions. Des
brûlures acides ou des dommages sur l‘appareil. Sont à craindre.
• Ne court-circuitez en aucun cas les accus et veillez à toujours respecter la bonne
polarité.
• Protégé les accus d‘une température au-dessus de 65°C et eloignez ceux-ci de
corps chauffants (par ex.: pots d‘échappements).
• Chargez les accus avant stockage (par ex.: en hivers). Ceux-ci ne doivent pas être
ni dans un état déchargé ni pleinement chargé.
• Le contenu des éléments est très dangereux pour les yeux et peau.
• Après un contact avec la peau, rincez la zone avec beaucoup d‘eau et enlevez les
vêtements touchés.
• Après un contact avec les yeux, rincez avec beaucoup d‘eau et consultez un
médecin.
Si les éléments venaient à surchauffer, goner ou prendre feu, il ne surtout
plus les toucher. Tenez-vous à bonne distance de celles-ci et cherchez un ex-
tincteur adapté (Pas l‘eau (risque d’explosion), ainsi le sable sec, extincteur,
l‘eau salée).
IT - Istruzioni per la sicurezza
• Vi preghiamo di leggere attentamente le istruzioni e Istruzioni per la
sicurezza prima di usare il modello.
• Questo prodotto non è destinato ad essere utilizzato da persone (bambini
compresi) con capacità siche limitate, con limitazioni sensoriale o mentali oppure
mancanza di esperienza e/o di conoscenza. A meno che siano sorvegliate da una
persona responsabile della loro sicurezza o ricevano istruzioni su come usare il
prodotto in modo corretto. Bambini devono essere supervisionati per assicurare
che non giocano con l’apparecchio.
• L’utente é responsabile in pieno per il corretto utilizzo del modello.
• Attenzione:
Rischio di lesioni agli occhi! Distanza di sicurezza di 1 - 2 metri per sé o per altri
protezione contro eventuali lesioni. Vola il modello mai in prossimità di persone.
• Ogni modica alle parti di un kit ne annulleranno la garanzia.
• Non volate con temperature superiori a 45°C e meno di 10°C.
• Non usate il modello direttamente ai raggi solari, ambienti troppo umidi, polverosi o
troppo soleggiati.
• Assicurarsi che alcune parti del modello possono essere caldi.
Funzionamento
• Attenzione!
In molti Paesi l‘ impiego di modelli radiocomandati richiede una assicurazione
obbligatoria. Informatevi perciò presso il vostro assicuratore o presso il vostro
negoziante di ducia.
• Non utilizzare mai l´unita di volo nelle vicinanze di aeroporti, ferrovie o stazioni
ferroviarie e strade. Mantenere sempre una distanza di sicurezza adeguata dalle
zone potenzialmente pericolose o di alta protezione.
• Non usate il modello nelle vicinanze di stazione radio, linea di alta tensione, casse
di trasformazione oppure simile. Queste installazioni causano disturbi frequenza
che portano alla perdita del controllo no alla perdita del modello!
• Nel luogo di funzionamento non devono essere presenti persone o animali né
ostacoli di alcun tipo. Tenete mani, capelli e parti svolazzanti lontane dalle pale in
rotazione, non toccare i rotori.
• Evitate di volare con vento forte, pioggia o temporale.
• Volate sempre in aree libere legalmente autorizzate, lontane da case, alberi e/o altri
ostacoli.
• Fate volare il vostro modello lontano da ostacoli ed in uno spazio (~ 6 x 5 x 2,5 m)
abbastanza grande da evitare che il modello possa scontrarsi con ostacoli che lo
danneggerebbero. Utilizzare esclusivamente in ambiente interno privo di correnti
d‘aria.
• Non lasciate che il modello precipita di una grande altezza. Questo può inuenzare
le caratteristiche di volo e la durata del modello.
Sicurezza della batteria
Dovuto al grande carico energetico (no a 150 KW/h le batterie Litio non vanno sot-
tovalutate e prese alla leggera, ma richiedono una particolare cura. Per questo JA-
MARA e.K. declina ogni responsabilità sull‘ impiego di queste batterie e dai danni che
potrebbero derivare dal loro utilizzo.
• Un uso non appropiato di queste batterie può provocare incendi. E relative ustioni.
• I sovraccarichi ad alta intensità o le scariche profonde possono danneggiarle.
• Evitate le sollecitazioni meccaniche (schiacciare, piegare, forare.)
• Non aprite, non gettate nel fuoco e non lasciate vicino ai bambini
• Manipolate con molta attenzione le batterie danneggiate o con perdita di liquido.
Possono causare danni alle apparecchiature
• Non cortocircuitatele e vericate sempre che la polarità sia corretta.
• Vericate che non sorpassino mai i 65°C e non montatele vicino a fonti di calore
(tubi di scarico dei motori o simili)
• Prima di metterle via per una sosta nel loro impiego, caricatele solo a metà. Non
conservatele mai a pieno carico. Durante il periodo di conservazione controllatele
periodicamente.
• Il liquido contenuto nelle batterie é dannoso per la pelle e per gli occhi.
• In caso di contatto con gli occhi, lavate abbondantemente con acqua e consultate il
medico.
• In caso di contatto con la pelle, lavate con acqua e togliete immediatamente i vestiti
che si siano.
In caso che il pacco batterie si dovrebbe riscaldare troppo rapidamente, gon-
arsi, fumare o prendere fuco non la prendete nelle mani e non toccatela. Man-
tenete und distanza di sicurezza e in caso di incendio, spegnarla con polvere
antifuoco oppure con sabbia (No, acqua, pericolo di esplosione, sabbia asciut-
ta, estintore, coperta anti incendio, acqua di mare).
14
ES - Seguridad
• Lea atentamente las instrucciones y seguridad antes de poner el
modelo en funcionamiento!
• Es producto no es para personas (incluidos niños) con discapacidad física, mental
y sensonriais. O ninguna experiencia ni conocimiento, a menos que vayan
acompañados de un responsable o recibir instrucciones ¿Cómo se debe usar. Los
niños deben ser supervisados para asegurarse de que no te metas con el producto.
• El usario es responsable en su totalidad para el uso correcto del modelo.
• Precaución: peligro de lesiones en los ojos! Distancia de seguridad mínima de 1-2
metros a sí mismos oa otros protegen contra lesiones.
• Se prohíbe cualquier modicación de la estructura del modelo ya que anulará la
garantía inmediatamente.
• Nunca vuele en entornos donde la temperatura sea superior a +45° o inferior a
10°C.
• No exponga el modelo a los rayos solares directos, a altos índices de humedad o
entornos muy polvorientos.
• No olvide que muchas piezas del modelo pueden calentarse.
Operación
• ¡Atención!
En algunos países es imprescindible suscribir una póliza de seguros especial con
cobertura para la práctica del aeromodelismo. Encontrará más información sobre
esto en su club local o contactando con una aseguradora.
• Nunca utilizar el aparato de vuelo cerca de los aeropuertos, ferrocarriles o
carreteras. Mantenga siempre una distancia segura de las áreas potencialmente
peligrosas y especialmente protegida.
• No haga funcionar su modelo en las proximidades de las estaciones de radio,líneas
eléctricas, cajas de transformadores, o como! Esto signi ca que puede la
interferencia de radio princi pal causa la pérda de control sobre el modelo!
• En el entorno de funcionamiento no deben haber personas, animales ni otros
obstáculos. Mantenga las manos y el cabello lejos del rotor, no introduzca las
manos en los rotores.
• Utilice el modelo outdoor solo cuando las condiciones atmosféricas sean Buenas.
No debería utilizar el modelo si llueve, hay tormentas o se prevén malas
condiciones atmosféricas.
• Busque un espacio abierto, que cumpla con la normativa vigente, y libre de
obstáculos como árboles, edicios y/o otros obstáculos.
• Para garantizar la seguridad, se debe volar en las divisiones (~ 6 x 5 x 2,5 m)
amplias y sin obstáculos, como lámparas y muebles. Use el modelo sólo en un
interior sin corriente de aire.
• No deje que el modelo cae desde una gran altura. Este puede afectar a las
características de vuelo y la duración del modelo.
Seguridad de la batería
¡Debido a su densidad energética (hasta 150Kw/Kg.), los elementos no son inofen-
sivos y necesitan de unos cuidados mínimos!. La empresa Jamara e. K., de manera
explicita, declina cualquier responsabilidad sobre los daños causado o derivados, por
un manejo erróneo de las baterías Litio.
• Una utilización inapropiada conlleva riesgo de lesiones y/o incendios.
• Los elementos se dañarán por sobrecargas, corrientes muy altas, o descargas
profundas.
• Proteja las baterías de golpes, dobleces, perforaciones, tensiones, etc.
• Bajo ningún concepto las abra o corte, no las arroje al fuego, manténgalas lejos del
alcance de los niños.
• Si están oxidadas o pierden electrolitos, manéjelas con mucho cuidado. Pueden
estropear el dispositivo o causarle lesiones.
• Nunca las cortocircuite, respetando en todo momento la polaridad.
• No permita que se calienten a más de 65ºC, aléjelas de partes calientes (P. Ej., la
salida del escape).
• Cárguelas antes de guardarlas (p.ej., en invierno) - ¡No las guarde descargada ni
tampoco a plena carga! Controle regularmente el nivel de carga durante los
periodos de almacenamiento prolongados.
• El contenido de los elementos es dañino para la piel y los ojos.
• Si entra en contacto con la piel, lávese con agua y quítese la ropa usada.
• En contacto con los ojos, enjuáguese con abundante agua y visite al médico.
En caso de sobrecalentamiento de la batería, o cuando se ina, humea o em-
pieza a quemarse, ya no debe tocarse de ningún modo. Por favor manténga una
distancia de seguridad y ponga a disposición agentes para extinción adecua-
dos (No hay peligro de explosión en el agua, arena seca, extintores, mantas,
agua salada).
15
DE - Servicehändler | GB - Service centre | FR - Revendeur de service | IT - Centro assistenza | ES - Servicio asistencia
Reitter Modellbau Versand
Patricia Reitter
Degerfeldstrasse 11
72461 Albstadt
Tel 07432 9802700
Fax 07432 2009594
Mail [email protected]
Web www.modellbauversand.de
Extra Trade
Rudolf Müller & Gerrit Müller GdbR
Lindenstraße 82
66787 Wadgassen
Tel 06834 9604952
Fax 06834 9604963
Mail [email protected]
Web www.extra-trade.de
Sigi‘s Modellbau Shop
Siegfried Costa
Bundesstr. 30
AT -6923 Lauterach
Tel +43 557483657
Fax +43 557483657
Mail [email protected]
Web www.playland-modellbau.at
Modellbau Zentral
Peter Hofer
Bresteneggstrasse 2
CH -6460 Altdorf
Tel +41 794296225
Fax +41 418700213
Mail [email protected]
Web www.modellbau-zentral.ch
Bay-Tec Modelltechnik
Martin Schaaf
Am Bahndamm 6
86650 Wemding
Tel 07151 5002192
Fax 07151 5002193
Mail [email protected]
Web www.bay-tec.de
DE DE
DE
Aigner Modellbau
Edmund Aigner
Graben 2
AT -3300 Amstetten
Tel +43 747224655
Fax +43 747223358
Mail of[email protected]
Web www.modellbau-amstetten.at
CH
AT AT
Irrtum und technische Änderungen vorbehalten. Copyright JAMARA e.K. 2015
Kopie und Nachdruck, auch auszugsweise, nur mit Genehmigung von JAMARA e. K.
All rights reserved. Copyright JAMARA e.K. 2015
Copying or reproduction in whole or part, only with the expressed permission of JAMARA e.K.
JAMARA e.K.
Inh. Manuel Natterer
Am Lauerbühl 5 - DE-88317 Aichstetten
Tel. +49 (0) 75 65/94 12-0 - Fax +49 (0) 75 65/94 12-23
[email protected] ●www.jamara.com
Service - Tel. +49 (0) 75 65/94 12-66
kundenservice@ jamara.com
Fordern Sie noch Heute den aktuellen Hauptkatalog mit
unserem gesamten Warensortiment an.
Name _______________________________
Vorname _______________________________
Straße _______________________________
Wohnort _______________________________
Telefon _______________________________
E-mail _______________________________
Bitte senden Sie den Katalog für mich an folgenden
Fachhändler:
Ihr Fachhändler
_______________________________________________
_______________________________________________
_______________________________________________
_______________________________________________
Der Katalog wird mit der nächsten Bestellung des Händ-
lers auf Ihren Namen mitgeliefert.
Order the current catalogue with our complete
assortment of modelling goods today.
Name _______________________________
First name _______________________________
Street _______________________________
City _______________________________
Phone _______________________________
E-mail _______________________________
Please send the catalogue to the following specialist
dealer:
Your dealer
_______________________________________________
_______________________________________________
_______________________________________________
_______________________________________________
We will include a catalogue for your attention with the
next order placed by your dealer.
Gutschein Coupon

This manual suits for next models

1

Other Jamara Drone manuals

Jamara Camostro HD AHP+ 2,4 GHz User manual

Jamara

Jamara Camostro HD AHP+ 2,4 GHz User manual

Jamara F1X Altitude AHP+ User manual

Jamara

Jamara F1X Altitude AHP+ User manual

Jamara Angle 120 Altitude 2,4 GHz User manual

Jamara

Jamara Angle 120 Altitude 2,4 GHz User manual

Jamara Loony Frog 3D AHP+ User manual

Jamara

Jamara Loony Frog 3D AHP+ User manual

Jamara 42 2027 User manual

Jamara

Jamara 42 2027 User manual

Jamara Q-Drohne AHP User manual

Jamara

Jamara Q-Drohne AHP User manual

Jamara Angle 120 Altitude 2,4 GHz User manual

Jamara

Jamara Angle 120 Altitude 2,4 GHz User manual

Jamara Angle 120 AHP+ User manual

Jamara

Jamara Angle 120 AHP+ User manual

Jamara MiCoSpy AHP+ User manual

Jamara

Jamara MiCoSpy AHP+ User manual

Jamara QCF-110 User manual

Jamara

Jamara QCF-110 User manual

Jamara HL20 User manual

Jamara

Jamara HL20 User manual

Jamara Loky User manual

Jamara

Jamara Loky User manual

Jamara FlyScout AHP+ User manual

Jamara

Jamara FlyScout AHP+ User manual

Jamara 42 2002 User manual

Jamara

Jamara 42 2002 User manual

Jamara Q4X User manual

Jamara

Jamara Q4X User manual

Jamara Q-Drohne 03 8050 User manual

Jamara

Jamara Q-Drohne 03 8050 User manual

Jamara X-HORNET User manual

Jamara

Jamara X-HORNET User manual

Popular Drone manuals by other brands

Mariner Waterproof Quad-Copter instruction manual

Mariner

Mariner Waterproof Quad-Copter instruction manual

Brookstone 324464 Safety and operating instructions

Brookstone

Brookstone 324464 Safety and operating instructions

Heliceo Fox6 user manual

Heliceo

Heliceo Fox6 user manual

TYPHOON RS-V1.2 user manual

TYPHOON

TYPHOON RS-V1.2 user manual

Autel Robotics EVO 2 user manual

Autel Robotics

Autel Robotics EVO 2 user manual

Valore Smartfly manual

Valore

Valore Smartfly manual

DroneTech Gannet II+ user manual

DroneTech

DroneTech Gannet II+ user manual

JJRC JJPRO EPIK manual

JJRC

JJRC JJPRO EPIK manual

dji PHANTOM Quick start manual

dji

dji PHANTOM Quick start manual

Wingsland M5 quick start guide

Wingsland

Wingsland M5 quick start guide

ParaZero SafeAir M-30 user manual

ParaZero

ParaZero SafeAir M-30 user manual

Rage RC STINGER 3.0 instruction manual

Rage RC

Rage RC STINGER 3.0 instruction manual

ZERO-X Raven+ user manual

ZERO-X

ZERO-X Raven+ user manual

YUNEEC H920 PLUS user manual

YUNEEC

YUNEEC H920 PLUS user manual

MultiGP NVISION Junior Racer RTF Quick start manual

MultiGP

MultiGP NVISION Junior Racer RTF Quick start manual

MODSTER BLIZZARD GPS user manual

MODSTER

MODSTER BLIZZARD GPS user manual

SYMA X5SW-V3 user manual

SYMA

SYMA X5SW-V3 user manual

Storm LOKI X3 user manual

Storm

Storm LOKI X3 user manual

manuals.online logo
manuals.online logoBrands
  • About & Mission
  • Contact us
  • Privacy Policy
  • Terms and Conditions

Copyright 2025 Manuals.Online. All Rights Reserved.