jbc ADVANCED DR 5600 User manual

DESOLDERING IRON
DR 5600
GARANTIE DEUTSCH
FürdasvorliegendeGerätübernimmt
JBCeineGarantievon2Jahre,füralle
Fabrikationsfehler. Diese Garantie
schliesstdieReparaturbzw.denErsatz
der defekten Teile sowie die
entsprechendenArbeitskostenein.
Ausgeschlossen von dieser
Garantieleistung sind durch
unsachgemässen Gebrauch
hervorgerufeneBetriebsstörungenund
normaleGebrauchsabnützungen.
ZurInanspruchnahmedieserGarantie
muss das Gerät portofrei an den
Vertriebshändlergeschicktwerden,bei
demesgekauftwurde.FügenSiedieses
vollständig, ausgefüllte Blatt, bei.
GARANZIA ITALIANO
La JBC garantisce quest'apparato 2
annicontroognidifettodifabbricazione,
ecoprelariparazioneelasostituzione
deipezzidifettosi,includendolamano
d'operanecessaria.
Sono escluse da questa garanzia le
avarie provocate da cattivo uso
dell'apparatoelogoriodautilizzo.
Per usufruire di questa garanzia, è
indispensabileinviare,inportofranco,
l'apparatoaldistributorepressoilquale
è stato acquistato, unitamente a
questofogliodebitamentecompilato.
DATEOFPURCHASE
FECHADECOMPRA
DATED'ACHAT
KAUFDATUM
DATADIACQUISTO
STAMPOFDEALER
SELLODELDISTRIBUIDOR
CACHETDUDISTRIBUTEUR
STEMPELDESHÄNDLERS
TIMBRODELDISTRIBUTORE
SERIALNº
0780592-0
MANUFACTURED BY
JBC Industrias, S.A.
Ramón y Cajal, 3 - 08750 MOLINS DE REI - SPAIN
Tel.: +34 93 325 32 00
Fax: +34 93 680 49 70
http://www.jbctools.com
e-mail:[email protected]
DR 5600 Ref.5600000 AM 6000 rework station
Ref.6000200
AR 5500 desolderingstation
Ref.5500200
DesolderingironDR 5600
Ref.5600000
Desolderingironstand
DR8500
Ref.0788500
DESOLDERINGTIPS
A ø
B ø
Ref. 5600-001 5600-002 5600-003 5600-004 5600-005 5600-006 5600-007
5600
A outer ø
B hole ø
max. pin ø to
desolder
001
1.4
0.6
0.4
002
1.8
0.8
0.6
003
2.7
1
0.8
004
3.2
1.3
1.1
005
3.4
1.6
1.4
006
4.2
2
1.7
007
4.8
2.5
2.3

We appreciate the confidence you have shown in
JBC by purchasing the desoldering iron DR 5600
Ref. 5600000. It has been manufactured with the
highest standards of quality to ensure reliable
service.
The DR 5600 desoldering iron includes the
following:
-Desoldering iron DR 5600 Ref. 5600000 with
the tip 5600-003 ref. 5600003.
-Spanner for change the desoldering tip Ref.
0780550.
-Instructions manual.
-Transport packaging.
The desoldering iron DR 5600 only works
connected to the following JBC stations:
-AR 5500 desoldering station.
-AM 6000 rework station.
The desoldering iron is connected to the station
followingthebelowprocedure:
The cable connection of the desoldering iron is
connected to the plug in the desoldering iron stand
DR 8500 and the vacuum hose is connected to the
vacuum connection of the station. The cable
connection of the desoldering iron stand is plugged
into the terminal DESOLD of the station. Please
find the connection plan on figure in the rear page.
Desoldering process
Use the tip model with a larger diameter than the
pad to be desoldered, so as to achieve maximum
aspiration and thermal efficiency.
1Apply the desoldering iron tip so that the
component terminal penetrates within its orifice.
2When the solder liquefies, start gently to rotate
the desoldering tip so that the component’s
terminal can be eased away from the sides.
3Press then, not before, the vacuum pump
push-button just long enough to aspirate the solder.
WARRANTY ENGLISH
TheJBC2yearswarranty,guarantees
thisequipmentagainstallmanufacturing
defects, covering the replacement of
defectivepartsandallnecessarylabour.
Warranty doesnotcoverproductwear
due to use or mis-use.
In order for the warranty to be valid,
equipment must be returned, postage
paid, to the dealer where it was
purchasedenclosingthis,fullyfilledin,
sheet.
GARANTIA ESPAÑOL
JBC garantiza este aparato durante 2
años, contra todo defecto de
fabricación,cubriendolareparacióncon
sustitución de las piezas defectuosas
eincluyendolamanodeobranecesaria.
Quedanexcluidasdeestagarantíalas
averías provocadas por mal uso del
aparato y desgaste por uso.
Esindispensableparaacogerseaesta
garantía el envio del aparato al
distribuidordondeseadquirió,aportes
pagados, adjuntando esta hoja
debidamentecumplimentada.
GARANTIE FRANÇAIS
JBC garantit cet appareil 2 ans contre
tout défaut de fabrication. Cela
comprendlaréparation,leremplacement
des pièces défectueuses et la main
d'oeuvrenécessaire.
Lagarantienecouvrepasl’usureliéeà
l’utilisation et à la mauvaise utilisation
dumatériel.
Pour bénéficier de cette garantie il est
indispensabled'envoyerl'appareilchez
le distributeur où il a été acquis, en
ports payés, en joignant cette fiche
dûmentremplie.
1 2 3
DR5600Ref.5600000
Desoldering tip
Heating element
Pushbutton vacuum pump Vacuum hose
Desoldering iron cable
Solder tin deposit Metal
Glass
Change of desoldering tip
This operation should be done while the tip is
hot, at a minimum temperature of 250°C, so that
any tin left inside is in molten state.
-Rest the desoldering iron body in the support
and unscrew the tip to be replaced, with the aid
of the spanner supplied.
-Fit the new tip, and tighten up with the spanner
to achieve a good air tightness.
Ref. 0780550
After pressing the desoldering key there is a
slight delay until the self-contained vacuum pump
stops, this is to make sure that the vacuum
circuit is completely empty.
If any solder remains are left on any terminal after
attempting to desolder it, resolder it with fresh
solder and repeat the desoldering operation.and
replaced if dirty or damaged.
Tip care
-The largest rod that fits in the tip hole should
periodically be passed through in order to
clean the intake tube.
-To clean the tips, use the sponge included
with the stand and check it is lightely moisted.
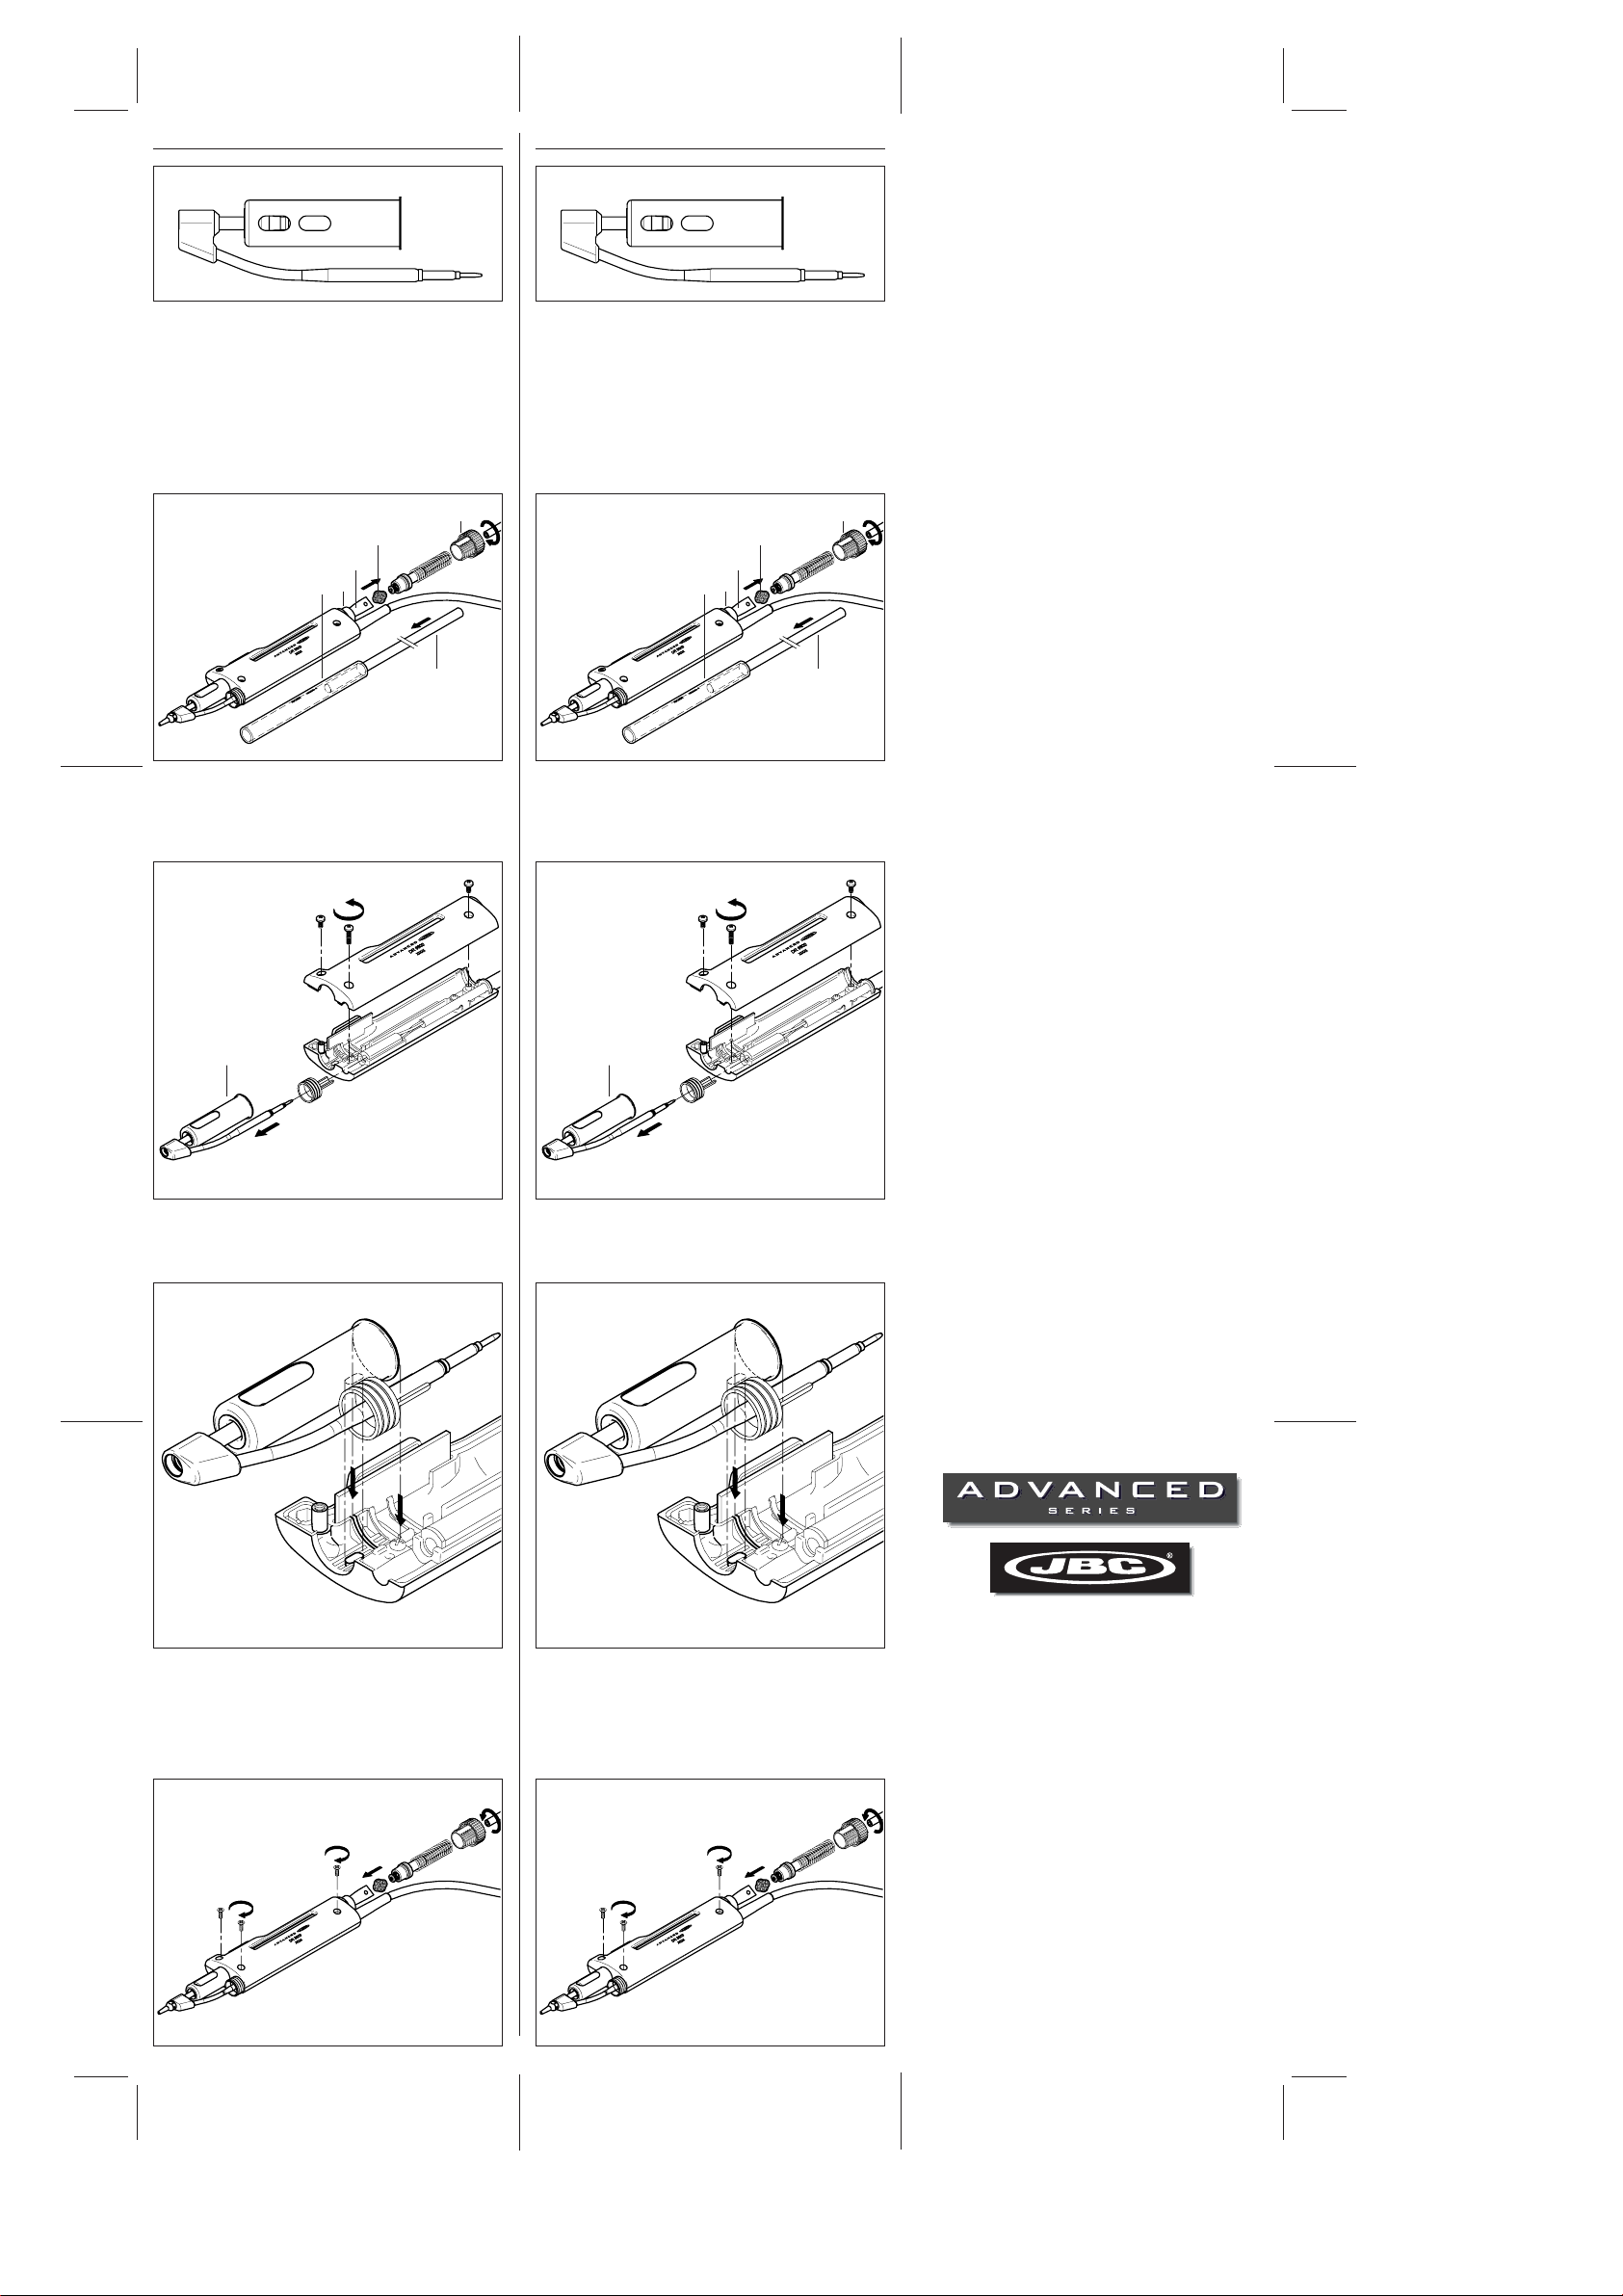
To emptythesolder tin depositandchangethefilter
For this, the lid needs to be unscrewed and first
the tin deposit and then its spiral must be
removed to clean the inner part of the deposit
with a brush.
-The condition of the filter must be checked
and replaced if dirty or damaged.
-The deposit needs to be inserted with spiral
filter put into place. Then the whole must be
closed by screwing the lid shut.
Solder tin deposits
It can be chosen between two different deposit
types:
-Metal Ref. 0812630.
-Glass Ref. 0812620.
Lid
Brush
Ref. 0786640
Filter Ref. 0780840
Deposit
Spiral
-Do not file the tips or use abrasive tools
which may damage the tip’s protective surface
coating and avoid knocking them about.
-If the tip has been a long time without being
tinned, use a metal brush to remove any dirt
and oxid.
IMPORTANT::
::
: DO NOT press the pushbutton
vacuum pump while tinning the desoldering tip,
as the fumes given off by the flux would quickly
soil the ducts and filter of the air circuit.
-Place the new heating element. Check that
the right extremity of the upper part of the
heating element is inserted in the slot
located inside the body of the desoldering
iron (see drawing hereunder).
-Screw out the body of the desoldering iron.
Open up the body and remove the heating
element.
-Screw in the body of the desoldering iron.
Put the spiral and the filter back into the
deposit. Place the deposit inside the body
of the desoldering iron and screw in the
shut lid.
Lid
Brush
Ref. 0786640
Filter Ref. 0780840
Deposit
Spiral
Heating element
Ref. 5600010
Change of the heating element of the desoldering
iron (Ref. 5600010)
-To realize this operation, the lid needs to
be unscrewed and first the tin deposit and
then its spiral and filter must be removed
to clean the inner part of the deposit with a
brush.

Advanced
desoldering iron
heating element
MANUFACTURED BY
JBC Industrias, S.A.
Ramón y Cajal, 3 - 08750 MOLINS DE REI - SPAIN
Tel.: +34 93 325 32 00
Fax: +34 93 680 49 70
http://www.jbctools.com
e-mail:[email protected]
0780604-0
5600010
Kartuschen Ref. 5600010
-Ziehen Sie die Schrauben der Abdeckung an.
Setzen Sie die Spirale und den Filter erneut
auf das Depot. Setzen Sie das Depot in den
Entlötkolben ein und abschließend schrauben
Sie den Depotverschluss ein.
Kartusche
Ref. 5600010
Depotverschluss
Reinigungsstock
Ref. 0786640
Baumwollfilter
Lötzinndepot
Spirale
Kartuschenwechsel des Entlötkolbens (Ref.
5600010)
-Um diese Operation durchzuführen, muss
zunächst der Verschluss herausgeschraubt
und das Depot herausgenommen werden.
Anschließend entfernen wir den Filter und die
Spirale und reinigen mit einem
Reinigungsstock das Innere des Depots.
-Schrauben Sie die drei
Befestigungsschrauben der Abdeckung des
Entlötkolbens los. Heben Sie die Abdeckung
an und entnehmen Sie die Kartusche.
-Legen Sie die neue Kartusche ein. Überprüfen
Sie, dass das Kartuschenrohr in der
Griffaussparung liegt (siehe Abbildung).
Cartuccia Rif. 5600010
-Avvitare le viti del coperchio. Collocare di
nuovo la spirale e il filtro nel serbatoio di
raccolta stagno. Inserire il serbatoio all'interno
del dissaldatore e infine chiudere con il tappo.
Cartuccia
Rif. 5600010
Tappo deposito
Bacchetta
Rif. 0786640
Filtro di cotone
Deposito
Spirale
Cambio della cartuccia del dissaldatore (Rif.
5600010)
-Per effettuare questa operazione bisogna
staccare il tappo e togliere il deposito, in
seguito estrarre il filtro e la spirale e con
la bacchetta pulire l'interno del deposito.
-Svitare le tre viti di fissaggio del coperchio
del dissaldatore. Togliere il coperchio e
staccare la cartuccia.
-Collocare la nuova cartuccia. Controllare che
la cartuccia sia inserita correttamente nel
manico (vedi figura).
DEUTSCH ITALIANO

Cartucho Ref. 5600010
-Enrosque los tornillos de la tapa. Coloque
de nuevo la espiral y el filtro en el depósito.
Ponga el depósito dentro del desoldador y
finalmente enrosque el tapón del depósito.
Cartucho
Ref. 5600010
Tapón depósito
Baqueta
Ref. 0786640
Filtro de algodón
Depósito
Espiral
Cambio del cartucho del desoldador (Ref.
5600010)
-Para realizar está operación debe
desenroscar el tapón y retirar el depósito,
seguidamente extraiga el filtro y la espiral
y con una baqueta limpie el interior del
depósito.
-Desenrosque los tres tornillos de fijación
de la tapa del desoldador. Levante la tapa
y retire el cartucho.
-Coloque el nuevo cartucho. Compruebe que
el extremo del tubo se sitúa en la ranura
del mango (ver figura).
Élément chauffant Réf. 5600010
-Revisser la partie supérieure du corps du
fer. Remettre en place la spirale et le filtre
dans le dépôt, insérer ce dernier dans le
corps du fer et visser l'arrêtoir du dépôt.
Élément chauffant
Réf. 5600010
Bouchon dépôt
Baguette
Réf. 0786640
Filtre en coton
Dépôt
Spirale
Changement de l'élément chauffant du fer à
dessouder (Réf. 5600010)
-Pour réaliser cette opération, vous devez
devisser le bouchon et retirer le dépôt; par
la suite extraire le filtre et la spirale et à
l’aide d’une baguette nettoyer l’intérieure
du dépôt.
-Dévisser la partie supérieure du corps du
fer. L'ouvrir et retirer l'élément chauffant.
-Positionner le nouvel élément chauffant.
S'assurer que son extrêmité supérieure
droite est parfaitement inséré dans la
rainure situeé dans la partie inférieure du
corps du fer à dessouder (voire le schéma).
Heating element Ref. 5600010
-Screw in the body of the desoldering iron.
Put the spiral and the filter back into the
deposit. Place the deposit inside the body
of the desoldering iron and screw in the
shut lid.
Heating element
Ref. 5600010
Lid
Brush
Ref. 0786640
Filter of cotton
Deposit
Spiral
Change of the heating element of the
desoldering iron (Ref. 5600010)
-To realize this operation, the lid needs to
be unscrewed and first the tin deposit and
then its spiral and filter must be removed
to clean the inner part of the deposit with
a brush.
-Screw out the body of the desoldering
iron. Open up the body and remove the
heating element.
-Place the new heating element. Check that
the right extremity of the upper part of the
heating element is inserted in the slot
located inside the body of the desoldering
iron (see drawing hereunder).
ENGLISH ESPAÑOL FRANÇAIS
This manual suits for next models
1
Other jbc Power Tools manuals
Popular Power Tools manuals by other brands

Ingersoll-Rand
Ingersoll-Rand PowerForce PF850 instructions

Milwaukee
Milwaukee HEAVY DUTY M12 PCSS Original instructions

EINHELL
EINHELL TC-DH 43 Original operating instructions

Reliable Equipment
Reliable Equipment REL-60DA Basic Assembly Instructions

Clarke
Clarke Woodworker CPT600 Operating & maintenance instructions

Pittsburgh
Pittsburgh TORQUE WRENCH 239 Assembly and operating instructions