manuals.online logo
Brands
  1. Home
  2. •
  3. Brands
  4. •
  5. Johnson Controls
  6. •
  7. Security Sensor
  8. •
  9. Johnson Controls LC-224 User manual

Johnson Controls LC-224 User manual

Installation Instructions
LC-224
1
ISTISJCELC224 0.0
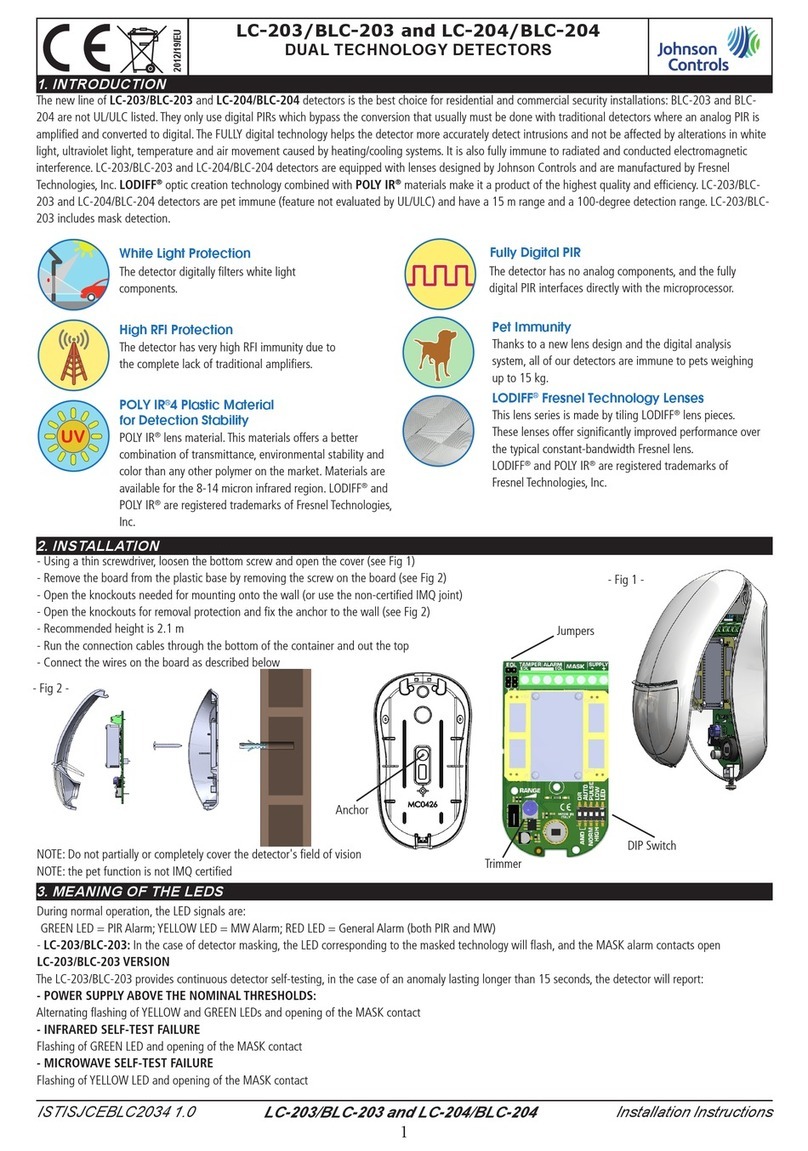
1. INTRODUCTION
The LC-224 detector represents the best choice for residential and industrial installations in the security sector. It only use digital PIRs which bypass the
conversion that usually must be done with traditional detectors where an analog PIR is amplified and converted to digital. The FULLY digital technology
helps the detector more accurately detect intrusions and not be affected of alterations in white light, ultraviolet light, temperature and air movement
caused by heating/cooling systems. It is also fully immune to radiated and conducted electromagnetic interference. The LC-224 detector is equipped with
lenses designed by Johnson Controls and are manufactured by Fresnel Technologies, Inc. LODIFF®optic creation technology combined with POLY IR®
materials make it a product of the highest quality and efficiency. The LC-224 detector is pet immune (feature not evaluated by UL/ULC) and have a 15 m
range and a 100-degree detection range. The LC-224 is equipped with latest generation microwave modules, with very low background noise.
2. INSTALLATION
- Using a thin screwdriver, loosen the bottom screw and open the cover (see Fig 1)
- Remove the board from the plastic base by removing the screw on the board (see Fig 2)
- Open the knockouts needed for mounting onto the wall or use the optional swivel (not UL/ULC evaluated)
- Open the knockouts for removal protection and fix the anchor to the wall (see Fig 2)
- Recommended height is from 1.8 m to 2.5 m
- Run the connection cables through the bottom of the container and out the top
- Connect the wires on the board as described below
3. MEANING OF THE LEDS
During normal operation, the LED signals are:
- GREEN LED = PIR Alarm
- YELLOW LED = MW Alarm
- RED LED = General Alarm (both PIR and MW)
NOTE: Do not partially or completely cover the detector’s field of vision
LC-224
DUAL TECHNOLOGY DETECTOR
POLY IR®4 Plastic Material
for Detection Stability
POLY IR®lens material. This materials offers a better
combination of transmittance, environmental stability and
color than any other polymer on the market. Materials are
available for the 8-14 micron infrared region. LODIFF®
and POLY IR®are registered trademarks of Fresnel
Technologies, Inc.
LODIFF®Fresnel Technology Lenses
This lens series is made by tiling LODIFF®lens pieces.
These lenses offer significantly improved performance
over the typical constant-bandwidth Fresnel lens.
LODIFF®and POLY IR®are registered trademarks of
Fresnel Technologies, Inc.
High RFI Protection
The detector has very high RFI immunity due to
the complete lack of traditional amplifiers.
White Light Protection
Pet Immunity
Thanks to a new lens design and the digital analysis
system, all of our detectors are immune to pets weighing
up to 15 kg.
The detector has no analog components, and the fully
digital PIR interfaces directly with the microprocessor.
Fully Digital PIR
The detector digitally filters white light
components.
- Fig 1 -
- Fig 2 -
DIP Switch
Trimmer
Anchor
Installation Instructions
LC-224
2
ISTISJCELC224 0.0
Technical Features
RANGE 15 m
HORIZONTAL COVERAGE 100°
LENSES LODIFF® Fresnel Lens
POLY IR®4 material
LED green, yellow, red
ALARM DURATION 2 s
SELF-DIAGNOSTIC -
WALK TEST LED YES
MICROWAVE FREQUENCY 10.525 Ghz
MAXIMUM RADIO-
FREQUENCY POWER +14 dBm
SOLID STATE RELAY YES
INTERNAL EOL RESISTORS -
CREEP ZONE DEVICE YES
CASE TAMPER YES
BACK TAMPER YES
ANTI-MASKING -
PULSE COUNTER YES
RFI PROTECTION 30 V/m
HEAT COMPENSATION YES
FULLY DIGITAL YES
SWIVEL YES
POWER SUPPLY 9-15 VDC / 56 mA
UL/ULC tested: 10.6-13 VDC / 56 mA
COVER MATERIAL ABS
PET IMMUNITY YES
OPERATING TEMPERATURE
0°C to 49°C
HUMIDITY 93% RH
DIMENSIONS 114 x 63 x 40 mm
101W. MORNINGSIDE DR. FORT WORTH, TX 76110, U. S. A. (817) 926-7474, FAX:(817)926-7146
fresnel technologies inc.
2003
SIDE VIEW:
2.1m
(6.8ft)
TOP VIEW:
10m
(33ft)
(50ft)
15m
FRONT VIEW:
(50ft)
15m
5m
(16ft)
jay
WP 0.9 GI 6 T1
PET IMMUNE ARRAY
(28.2ft)
8.6m
(15.7ft)
4.8m
(6.8ft)
2.1m
35.6mm
(1.4 in)
49.8 mm
(1.96 in)
12.5 mm
(0.49 in)
95°
5m
(16ft)
10m
(33ft)
(50ft)
15m
0
Figure 7
4. CONNECTION AND SETUP
Dip LED --> off = LED off - on = LED on
Dip RANGE --> off = 15 m - on =7 m range
Dip PULSE --> off = 1 pulse - on = 2 pulses
Dip OR-AUTO* --> off-off = AND; on-off = OR; on-on = auto OR
Trimmer RANGE = used only for microwave. NOTE: The RANGE trimmer
may need to be adjusted to the maximum position in order to achieve maxi-
mum area of coverage as indicated in Figure 3.
TAMPER terminals: Normally closed contact that opens when you open the
detector cover or remove the detector from the wall
NC terminals: Normally closed contact that opens when the detector goes
into alarm status
NO terminals: Normally open contact that closes when the detector goes
into alarm status
SUPPLY terminals: Power supply 9-15 VDC / 56 mA. UL/ULC tested: 10.6-13
VDC / 56 mA. NOTE: For UL/ULC installations the detector shall be provided
with minimum of 4 hours of standby power from either a listed compatible
control unit or power supply. Output contacts ratings: 28 VDC / 100 mA. Use
only resistive loads on the outputs.
Note: Incorrect connections may result in failure or improper operation. Inspect wiring and ensure connections are correct before turning on the power.
* For UL/ULC installations use the OFF-OFF configuration only.
DEOL supervision
with type C alarm contact
NO (no EOL supervision)
Not used on UL/ULC
listed installations
DEOL supervision
with type C alarm contact
and device tamper
- Fig 3 -
ZxCOM
–
+TAMPER
NO NC
LC-224
SUPPLY
–
+CTAMPER
5.6 kohm
5.6 kohm
Negative connected
Tamper
Panel
Internally
connected
ZxCOM
–
+TAMPER
NO NC
LC-224
SUPPLY
–
+CTAMPER
5.6 kohm
5.6 kohm
Negative connected
Tamper
Panel
Internally
connected
Zx COM
–
+TAMPER
NO NC
LC-224
SUPPLY
–
+CTAMPER
Negative connected
Tamper
Panel
Internally
connected
Installation Instructions
LC-224
3
ISTISJCELC224 0.0
Installation must be carried out by trained personnel according to professional standards.
The manufacturer accepts no responsibility if the product is tampered with by unauthorized persons.
The alarm system should be checked for proper operation at least once a month. However, a reliable electronic alarm system does not prevent intrusion, robbery, fire or anything else
but merely decreases the risk of such situations occurring.
UL/ULC has certified the model LC-224 in accordance with UL639 and ULC-S306 for use in Residential and Commercial Burg applications (In Canada for Security Level I-II type
applications). Use in dry, indoor ordinary locations, within the protected premises. The detectors shall be tested annually. The installation and wiring methods shall be in accordance
with the National Electrical Code, NFPA 70 and CSA C22.1, Canadian Electrical Code, Part I, Safety Standard for Electrical Installations.
NOTE: This equipment has been tested and found to comply with the limits for a Class B digital device, pursuant to Part 15 of the FCC Rules. These limits are designed to provide
reasonable protection against harmful interference in a residential installation.This equipment generates uses and can radiate radio frequency energy and, if not installed and used in
accordance with the instructions, may cause harmful interference to radio communications. However, there is no guarantee that interference will not occur in a particular installation.
If this equipment does cause harmful interference to radio or television reception, which can be determined by turning the equipment off and on, the user is encouraged to try to
correct the interference by one or more of the following measures:
– Reorient or relocate the receiving antenna
– Increase the separation between the equipment and receiver
– Connect the equipment into an outlet on a circuit different from that to which the receiver is connected
– Consult the dealer or an experienced radio/TV technician for help.
Warning! Changes or modifications to this equipment not expressly approved by the party responsible for compliance (Tyco Safety Products Canada Ltd.) could void the user’s
authority to operate the equipment.
This device complies with part 15 of the FCC rules. Operations are subject to the following two conditions: (1) This device may not cause harmful interference and (2) This device must
accept any interference received, including interference that may cause undesired operation.
FCC RF Exposure Statement
This equipment complies with FCC radiation exposure limits set forth for an uncontrolled environment. This transmitter must not be co-located or operating in onjunction with any
other antenna or transmitter. In order to avoid the possibility of exceeding the FCC radio frequency exposure limits, this equipment should be installed and operated with minimum
distance 20 cm (7.9 inches) between the antenna and your body during normal operation. Users must follow the specific operating instructions for satisfying RF exposure compliance.
ISED non-interference disclaimer
This device contains licence-exempt transmitter(s)/receiver(s) that comply with Innovation, Science and Economic Development Canada’s licence-exempt RSS(s). Operation is subject
to the following two conditions:
(1) This device may not cause interference.
(2) This device must accept any interference, including interference that may cause undesired operation of the device.
This device complies with the Canadian ICES-003 Class B specifications. CAN ICES-003(B) / NMB-003 (B).
L’émetteur/récepteur exempt de licence contenu dans le présent appareil est conforme aux CNR d’Innovation, Sciences et Développement économique Canada applicables aux
appareils radio exempt de licence. L’exploitation est autorisée aux deux conditions suivantes :
(1) L’appareil ne doit pas produire de brouillage;
(2) L’appareil doit accepter tout brouillage radioélectrique subi, même si le brouillage est susceptible d’en compromettre le fonctionnement.
Cet appareil numérique de la Canadian ICES-003. Cet appareil numérique de la classe B est conforme à la norme NMB-003 du Canada.
ISED RF Exposure statement
This equipment complies with ISED RSS-102 radiation exposure limits set forth for an uncontrolled environment. This equipment should be installed and operated with minimum
distance 20 cm (7.9 inches) between the radiator and any part of your body.This transmitter must not be co-located or operating in conjunction with any other antenna or transmitter.
Cet équipement est conforme aux limites d’exposition aux radiations ISED CNR-102 établies pour un environnement non contrôlé. Une distance de séparation d’au moins 20 cm
doivent être maintenue entre l’antenne de cet appareil et toutes les personnes. Lanceurs ou ne peuvent pas coexister cette antenne ou capteurs avec d’autres.
© 2023 Johnson Controls. All rights reserved. JOHNSON CONTROLS is a registered trademark. Unauthorized use is strictly prohibited.
Other Johnson Controls Security Sensor manuals

Johnson Controls PG9350SL User manual

Johnson Controls

Johnson Controls PG9350SL User manual

Johnson Controls LC-203 User manual

Johnson Controls

Johnson Controls LC-203 User manual

Johnson Controls RLD-H10G User manual

Johnson Controls

Johnson Controls RLD-H10G User manual

Johnson Controls tyco Bentel Security BW-IRC User manual

Johnson Controls

Johnson Controls tyco Bentel Security BW-IRC User manual

Johnson Controls PG9200AX User manual

Johnson Controls

Johnson Controls PG9200AX User manual

Johnson Controls PGP922 User manual

Johnson Controls

Johnson Controls PGP922 User manual

Johnson Controls PENN RLD-H10P Manual

Johnson Controls

Johnson Controls PENN RLD-H10P Manual

Johnson Controls HTD-432 PG2 User manual

Johnson Controls

Johnson Controls HTD-432 PG2 User manual

Johnson Controls tyco Bentel Security BW-DTM User manual

Johnson Controls

Johnson Controls tyco Bentel Security BW-DTM User manual

Johnson Controls Tyco Kantech T.REX Assembly instructions

Johnson Controls

Johnson Controls Tyco Kantech T.REX Assembly instructions

Johnson Controls LC-203 User manual

Johnson Controls

Johnson Controls LC-203 User manual

Johnson Controls F62AA User manual

Johnson Controls

Johnson Controls F62AA User manual

Johnson Controls PG8932 User manual

Johnson Controls

Johnson Controls PG8932 User manual

Johnson Controls NEXT CAM PG+ Instruction sheet

Johnson Controls

Johnson Controls NEXT CAM PG+ Instruction sheet

Johnson Controls PG9350SL User manual

Johnson Controls

Johnson Controls PG9350SL User manual

Johnson Controls PG9200AX User manual

Johnson Controls

Johnson Controls PG9200AX User manual

Johnson Controls PGP914 User manual

Johnson Controls

Johnson Controls PGP914 User manual

Johnson Controls LC-200 User manual

Johnson Controls

Johnson Controls LC-200 User manual

Johnson Controls FTX-P2J User manual

Johnson Controls

Johnson Controls FTX-P2J User manual

Johnson Controls MP-802 PG+ User manual

Johnson Controls

Johnson Controls MP-802 PG+ User manual

Johnson Controls DSDN User manual

Johnson Controls

Johnson Controls DSDN User manual

Johnson Controls FS-1300 User manual

Johnson Controls

Johnson Controls FS-1300 User manual

Johnson Controls Tyco Visionic MP-843/XHM2 User manual

Johnson Controls

Johnson Controls Tyco Visionic MP-843/XHM2 User manual

Johnson Controls Tyco SR Series User manual

Johnson Controls

Johnson Controls Tyco SR Series User manual

Popular Security Sensor manuals by other brands

Air Specialties Express SL-2000-N Installation, operation and maintanance instructions

Air Specialties Express

Air Specialties Express SL-2000-N Installation, operation and maintanance instructions

Hilti PS 1000 X-Scan Tips and tricks

Hilti

Hilti PS 1000 X-Scan Tips and tricks

Zimmer MFS02-S-KHC-IL Installation and operating instructions

Zimmer

Zimmer MFS02-S-KHC-IL Installation and operating instructions

netvox RA08D Series user manual

netvox

netvox RA08D Series user manual

AVIRE E-MOTIVE EPS installation guide

AVIRE

AVIRE E-MOTIVE EPS installation guide

Baso L62AA installation instructions

Baso

Baso L62AA installation instructions

NAPCO PIR1680 Series datasheet

NAPCO

NAPCO PIR1680 Series datasheet

MSA ExtendAire II Series User instructions

MSA

MSA ExtendAire II Series User instructions

Blocklychain MD-104 instruction manual

Blocklychain

Blocklychain MD-104 instruction manual

Rielta ORLAN-D installation guide

Rielta

Rielta ORLAN-D installation guide

Vaxcel Lambda T0625 Assembly and installation instructions

Vaxcel

Vaxcel Lambda T0625 Assembly and installation instructions

Heitronic 37356 Installation and operating instructions

Heitronic

Heitronic 37356 Installation and operating instructions

Satel SLIM-DUAL-PRO manual

Satel

Satel SLIM-DUAL-PRO manual

U-Prox PIR quick start guide

U-Prox

U-Prox PIR quick start guide

Bresser 7009981 instruction manual

Bresser

Bresser 7009981 instruction manual

Pfeiffer Vacuum ASM 306S Additional Installation, Operation and Maintenance Instructions

Pfeiffer Vacuum

Pfeiffer Vacuum ASM 306S Additional Installation, Operation and Maintenance Instructions

Takex PA-6614E instruction manual

Takex

Takex PA-6614E instruction manual

EDWARDS SYSTEMS TECHNOLOGY IRC-3 Maintenance and troubleshooting manual

EDWARDS SYSTEMS TECHNOLOGY

EDWARDS SYSTEMS TECHNOLOGY IRC-3 Maintenance and troubleshooting manual

manuals.online logo
manuals.online logoBrands
  • About & Mission
  • Contact us
  • Privacy Policy
  • Terms and Conditions

Copyright 2025 Manuals.Online. All Rights Reserved.