Joie I1404C User manual

INSTALLATION
INSTRUCTIONS
MODEL I1404C
i-Gemm
IMPORTANT: KEEP THIS INSTRUCTION BOOKLET IN
THE PLACE PROVIDED ON THE CHILD RESTRAINT
P-IM0217P

1
INSTALLATION
DO NOT USE THIS CHILD RESTRAINT UNTIL YOU HAVE
READ AND UNDERSTOOD THE INSTRUCTIONS IN THIS
USER GUIDE AND IN YOUR VEHICLE OWNERS MANUAL
Quick Reference .............................................................. 2
WARNINGS .................................................................... 3
Additional Warnings ................................................ 4 & 5
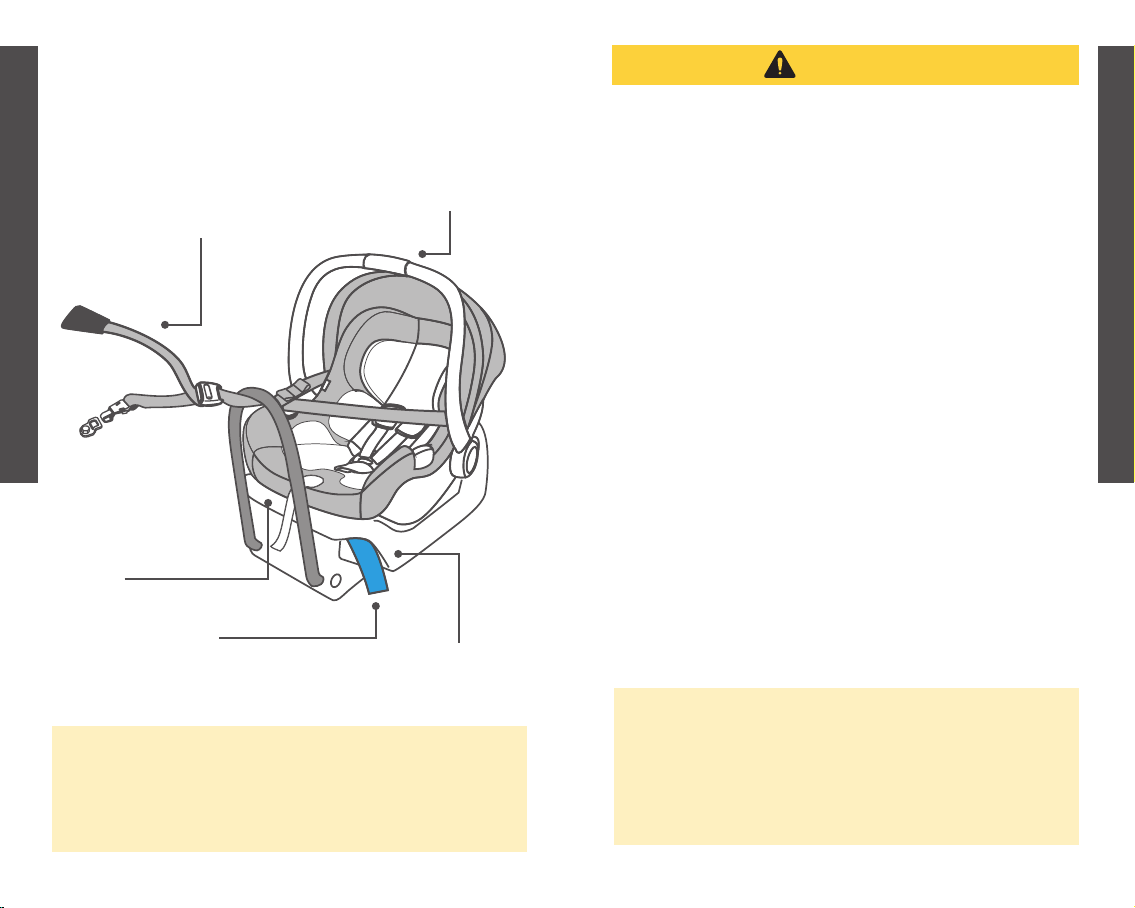
Features .......................................................................... 6
Installation - General ................................................. 7 & 8
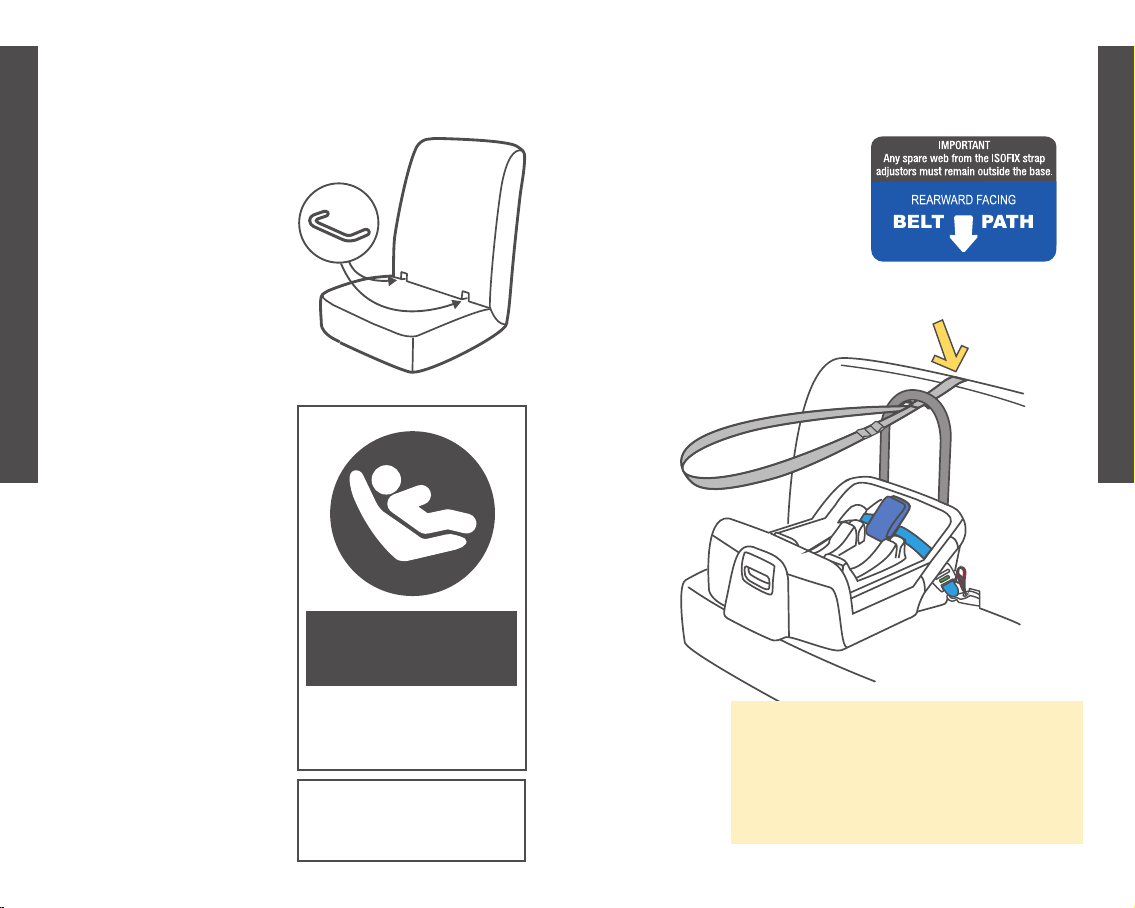
Installation - Vehicle Belts ........................................ 9 &10
Checklist - Vehicle Belt Installation .............................. 11
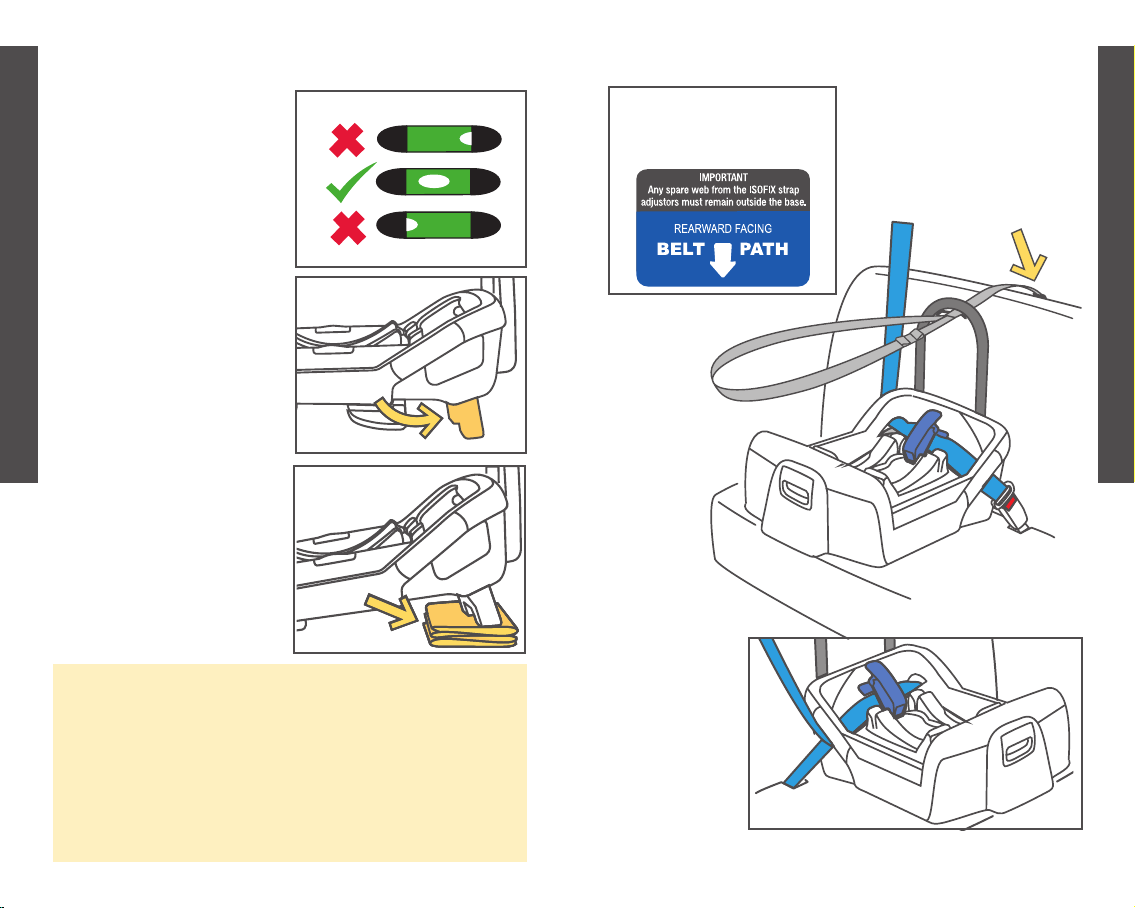
Installation - ISOFIX Compatible Connectors ..........12 –15
Checklist - ISOFIX Installation ......................................16
Fitting Restraint to Base.................................................17
WARNINGS – Tether Strap ............................................18
How to use the Tether Strap ................................... 19 - 21
Checklist - Tether Strap .............................................. 22
Installation – Tether Anchorage............................... 23 - 25
Use with Strollers .......................................................... 26
Cleaning and Maintenance ........................................... 27
Contents
Keep these Instructions for future reference.
Distributed by Nuna Baby Australia Pty Ltd
ACN: 642 240 140
Unit 1, 35 Lyn Parade Prestons,
NSW Australia 2170
For after-sales & warranty service, contact:
1800 951 070
customerservice@nunababy.com.au
This Child Restraint is suitable for children up to approxi-
mately 12 months of age.
Before installation and use of this child restraint check that
it is suitable for the size of your child.
See pages 7 & 8 of the USE Instructions for more informa-
tion.
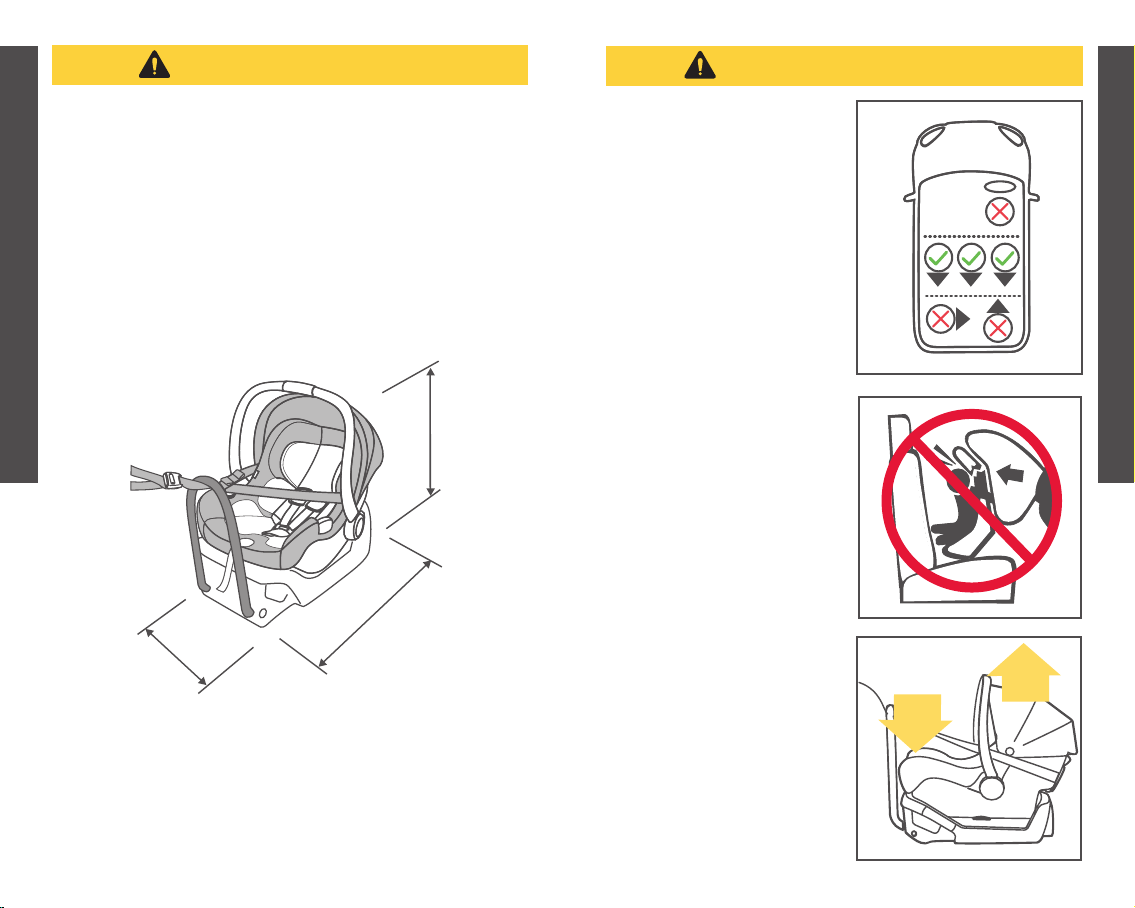
This is a rear facing child
restraint. Do not face
forward.

32
INSTALLATION
INSTALLATION
Vehicle Belt or ISOFIX
straps
must always be secure
and pulled tight.
See pages 9 –11
Carry Handle
must always be locked
into position.
Tether Strap
must always be used when the
restraint is installed in a vehicle.
Store end of tether in bag.
See page 19 - 21
Base Recline Adjustment
base must be reclined correctly
See pages 7 & 8
Secure Latching
restraint must be
securely latched
into base.
See page 17
Read the whole of these instructions carefully and if there
is any doubt about the method of installation, consult the
child restraint manufacturer or agent, or a child restraint
fitting station authorized by the relevant transport authority,
or in New Zealand an agent for the vehicle.
Overview
• Use the restraint exactly as shown in the instructions.
• Fit the restraint firmly to the car seat.
• A loose harness or restraint is dangerous.
• Destroy the restraint if it has been in a severe crash,
even if no damage is visible.
• Do not alter or modify this restraint.
• Repairs must only be done by the manufacturer or
agent.
• DO NOT USE A REAR FACING CHILD RESTRAINT
WHERE AN AIRBAG IS FITTED IN FRONT OF THE
SEATING POSITION.
• Only use this restraint with the base it was supplied
with. If a second or replacement base is required it
must be a matching model number.
WARNING
NOTE: The warnings on these pages are those
required by the Australian and New Zealand
Standard AS/NZS 1754 for this type of child
restraint. Other warnings specific to this
particular child restraint will be found throughout
these instructions.
IMPORTANT: Also read the following instructions carefully

54
INSTALLATION
INSTALLATION
TO BE USED WITH A LAP-SASH/LAP ONLY SEATBELT
OR ISOFIX LOW ANCHORAGES IN THE BACK OF MOST
CARS WITH FORWARD FACING SEATS.
This restraint is 700 mm long, 440 mm wide and 480 mm
high (with the handle down). Check the measurement
between the front of the seat back of the rear seat and all
front seats in the car in which the restraint is intended to
be used to ensure the space available is sufcient.
Seat belt extenders are not recommended if the car seat
belt is too short to secure the child restraint. If the car
seat belt is too short get advice from a child restraint tter
regarding use of these.
Never install the Child Re-
straint in a seat with a front
airbag. DEATH or SERIOUS
INJURY may occur. Refer to
your vehicle Owners Manual
for airbag warnings and in-
formation.
Only install child restraint
in a forward facing vehicle
seat. Never install in a seat
that faces the rear or the
side of the vehicle.
This is a rearward facing
child restraint. Do not install
facing the side or forwards.
Always check child restraint
to base connection.
ADDITIONAL WARNINGS ADDITIONAL WARNINGS
CLICK
1
2
CHECK
480
440
700

76
INSTALLATION
INSTALLATION
INSTRUCTIONS
Features
9
12
1 Tether Strap
2 Child Restraint Release
Lever
3 Snap Hook
4 Tether Strap Anchorage
5 Tether end storage
6 Rebound Bar
7 Vehicle Belt Lock-Off
8 Bubble Level Indicator
9 Recline Foot Fold Latch
10 Recline Foot
11 ISOFIX compatible
connectors
12 Instruction Manual
Storage
11 11
10
Where to install the child
restraint?
Only install the child re-
straint in a forward facing
vehicle seat.
Do not install in a seat that
faces the rear or the side of
the vehicle.
Install in the rear seat, the
safest place is normally the
centre.
The base can be installed
on vehicles seats tted with
either a lap belt or a lap/
sash belt or ISOFIX anchor-
ages.
To install correctly the
vehicle must be on a level
surface.
IMPORTANT:
Correct position and
installation is essential
for your child's safety.
Installation - General
4
2
1
5
8
7
6
3

98
INSTALLATION
INSTALLATION
1
1 Position base on a
forward facing vehicle
seat.
Adjust base so bubble
is between the black
patches.
2 Use recline adjustment,
if needed, to achieve
correct angle for
installation.
Recline adjustment foot
snaps into position.
3 If the recline adjustment
foot does not give
sufcient recline, add a
folded towel or similar
rm padding.
IMPORTANT:
Any extra padding placed
under the base must be
rmly folded so that when
the vehicle belts are
pulled up tight, the base
is secure.
Always secure the base
with a vehicle belt, even
when the restraint is not
tted to it.
An unsecured base may
be dangerous in an ac-
cident or sudden stop.
Installation — Vehicle Belts
REARWARD-FACING
BELT PATH
INSTALLED
BASE
Use the Belt Path
labels as a guide for
correct belt placement.
Installation - General
2
3
Top Tether
Anchorage

1110
INSTALLATION
INSTALLATION
3. Buckle the vehicle belt.
1. Open the belt lockoff.
4. Push the base into the
vehicle seat rmly Aand
pull the vehicle belts
tight B.
5. Hold vehicle belts tight
and engage the belt
lockoff.
3
4
1
3. Vehicle belt is not
twisted.
4. Level indicator
bubble is fully in the
clear area.
2. Vehicle belt is tight.
2
Checklist — Vehicle Belt Installation
1. Vehicle Buckle
engaged.
1
5
4
3
IMPORTANT
Pull belts tight.
Loose belts are
dangerous.
2. Pass the vehicle belt
through the openings in
the base labeled ‘BELT
PATH’
2
Installation — Vehicle Belts
A
B
IMPORTANT
Belts must not be
twisted.
Place the base on the
vehicle seat in line with a
top tether anchorage point.
"CLICK"

1312
INSTALLATION
INSTALLATION
ISOFIX
Typical marking showing
location of ISOFIX low
anchorage points.
Installation — ISOFIX
Compatible Connectors
LATCH
Some vehicles sourced
from the USA may be
marked LATCH.
ISOFIX and LATCH low
anchorage points are the
same.
Some vehicles are tted
with ISOFIX low anchorage
points.
These are are found at the
bottom of the back seat
backrest.
This child restraint has con-
nectors to attach to them.
If the ISOFIX low anchorage
points are not clearly vis-
ible the vehicle seat will be
marked with labels to show
their location.
If in doubt that the vehicle
is tted with such points
check the Vehicle Owners
Manual.
Installation — ISOFIX
Compatible Connectors
The ISOFIX straps pass
through the same openings
in the base as used for the
vehicle belts.
Use the Belt Path labels
as a guide for correct belt
placement.
IMPORTANT
Always secure the base even when
the restraint is not tted to it.
An unsecured base may be danger-
ous in an accident or sudden stop.
Top Tether
Anchorage

1514
INSTALLATION
INSTALLATION
Installation — ISOFIX
Compatible Connectors
1
3
INSTRUCTIONS
Open Recline Foot
Release Connectors
2
See general installation
instructions on pages 7 & 8.
1 Turn base over. Bring the
recline foot to the open po-
sition. Release each ISOFIX
compatible connectors from
the steel rod.
Position the ISOFIX
compatible connectors at
either side of the base.
2. Place base in position
on the vehicle seat. Check
the bubble level indicator
to see if recline foot needs
to be out. Fold away if not
required.
3. Attach each connector to
the vehicle ISOFIX anchor-
ages.
4. Pull each adjustment
strap equally until the ten-
sion indicators show green.
5. Reposition the spare web
to outside the base.
IMPORTANT
Straps must be pulled
tight
4
5
NOTE: in some vehicles the shape or softness of the
vehicle seat cushion may prevent the indicators from
showing fully green.
Usually in these vehicles the strap tension is adequate.
If in doubt check with a licensed child restraint tter.
IMPORTANT
Straps must not be
twisted.

1716
INSTALLATION
INSTALLATION
Checklist — ISOFIX Installation
1. Level indicator
bubble is fully in the
clear area.
2. Belt is tight.
2
1
3. No twists in belts. 4Belts tensioned,
indicator shows green.
IMPORTANT Do not attach the lower attachment con-
nectors of two separate child restraints to the same
ISOFIX low anchorage in your car.
Always attach the top tether strap to the child restraint
upper anchorage in your car.
Child restraint lower attachment connectors and the
ISOFIX low anchorages in your car are designed to
withstand only those loads imposed by a correctly tted
child restraint.
WARNING
Fitting Restraint to Base
To Install
First make sure there is
nothing in or on the base
(blankets, toys etc).
These may stop the restraint
from latching securely.
Lower the restraint down
into the base. Listen for a
"CLICK" from the latches in
the base.
Pull up on the restraint to
ensure it is securely latched.
To Release
Lift the restraint with one
hand while pulling up on the
release latch at the back of
the base.
"CLICK"
3
4
3

1918
INSTALLATION
INSTALLATION
WARNINGS – Tether Strap
TETHER STRAP
THIS RESTRAINT MUST BE ATTACHED TO A CHILD
RESTRAINT UPPER ANCHORAGE POINT IN THE CAR.
REFER TO CAR OWNERS HANDBOOK FOR LOCATION
OF ANCHORAGE POINTS.
REFER TO A CHILD RESTRAINT FITTING STATION IF NO
ANCHORAGE POINTS ARE IN THE MOTOR CAR.
THIS RESTRAINT IS NOT SUITABLE FOR USE WHERE
THE TOP TETHER STRAP MAY FALL INTO A SPLIT IN
THE SEAT BACK OR OFF THE SIDE OF THE SEAT.
Always secure the loose end of the top tether strap to
prevent it hanging out of the car or being accessible by the
child. It should be stored in the bag provided on the end of
the strap.
Do not use the child restraint where this strap may fall into
a split in the seat back or off the side of the seat.
ALWAYS ATTACH HOOK AND REMOVE SLACK.
CAUTION: CHILDREN CAN BE INJURED OR RE-
STRAINTS AND TOP TETHER STRAP DAMAGED BY
UNSECURED CARGO IN A COLLISION.
SECURE OR REMOVE HAZARDOUS CARGO BEFORE
USING THIS CHILD RESTRAINT.
How to use the Tether Strap
Always use the tether strap.
Connect the tether strap to the built-in anchorage tting
in the vehicle, or if there is not one available, install the
anchor tting supplied with this restraint.
Store the extra webbing in the bag attached to the end of
the tether.
Snap Hook
Tether
Anchorage
Tether Adjustor
Tether End
Storage Bag
NOTE: the tether strap wraps around the sides of
the restraint, not over the top.
If the canopy is fitted the tether passes outside it.
When the
restraint is in a
vehicle always
fit the tether
into the guide
at the back.

2120
INSTALLATION
INSTALLATION
How to use the Tether Strap
Do not adjust so tight that
it lifts the child restraint off
the vehicle seat.
Store unused web in bag on
end of tether.
How to use the Tether Strap
Straps must
not be twisted
In some vehicles without a xed parcel shelf an
extension tether strap may be required. These are
available in several different lengths and can be
obtained from child restraint retail outlets.
2. To increase webbing
tension pull upper strap
through adjustor.
PULL
3. To release webbing
tension press adjustor
button and pull lower
strap.
PULL
PRESS
DO NOT attach the
hook to a parcel tie
down point.
1. Connect the snap hook
securely to the anchorage
tting.
Note: there are several
different looking types of
anchorage, yours may not
look like this.
Check the vehicle owners
manual.
2
3
1

2322
INSTALLATION
INSTALLATION
Most cars have several
threaded holes to t the
tether anchorage to.
Refer to the vehicle owners
handbook for information
on the location of these
points.
Using the bolt provided
attach the anchor tting to
the mounting point behind
where the child restraint is
to be installed.
See more detailed informa-
tion on the next page.
The threaded hole for
the anchorage bolt
may have a plastic
cover over it
centre-line of seating position
100 mm
minimum
The anchor tting must be
aligned as shown unless
stated otherwise in the ve-
hicle owners handbook.
If drilling a new hole, select
a position on the centre line
of the seating position, and
no closer than 100 mm from
the front edge of the parcel
shelf.
Installation — Tether Anchorage
Checklist — Tether Strap
1. Is snap hook securely
attached to tether anchor-
age?
2. Is tether strap correctly
tensioned?
3. Is tether strap twisted?
4. Is loose end of tether
stored in bag?

2524
INSTALLATION
INSTALLATION
If the car is fitted with a
child restraint anchorage
point:
Locate the anchorage point
behind the rear seating
position (consult the vehicle
owners handbook for loca-
tion of the anchorage point).
Remove the thread plug from
the parcel shelf/oor/roof
and install the attachment
bolt as shown opposite.
CAUTION:
DO NOT OVERTIGHTEN
THE ATTACHMENT BOLT.
MAXIMUM TORQUE 20Nm.
WARNING
CHILD RESTRAINTS MUST NOT BE ATTACHED
TO UNSOUND METAL OR WOOD OR SYNTHETIC
STRUCTURES. WHEN DRILLING THE 9 MM HOLE DO NOT
DRILL THROUGH FUEL LINES, FUEL TANKS, ELECTRICAL
WIRING, OR RADIO SPEAKERS. WEBBING STRAPS MUST
BE PROTECTED FROM SHARP CORNERS AND EDGES.
THE ANCHOR FITTING MUST BE USED ONLY AS
DESCRIBED ABOVE. IT MUST NOT BE HOOKED ONTO
ANY OTHER OBJECT.
Installation — Tether Anchorage
Attachment
Bolt
Lock
Washer
Spacers (if
required)
Anchor
Fitting
Vehicle
Metal
Structure
Vehicle
Trim
FRONT OF VEHICLE
If the car is not fitted with
a child restraint anchorage
point:
For sedans only - drill a 9
mm hole in the parcel shelf
on the centre line of the
seating position as shown
on page 22.
Install the anchor bolt as
shown opposite.
It is recommended that this
installation be carried out by
a child restraint tting station
or licenced motor mechanic.
For vehicles other than se-
dans - In Australia, consult
your nearest child restraint
tting station or trafc
authority for vehicle inspec-
tion to nd the best, correct
position for the placement of
the anchorage point, and for
the correct attachment bolt
length and use of spacers.
In New Zealand, consult the
agent for the vehicle.
Attachment
Bolt
Spacers
(if required)
Anchor
Fitting
Vehicle
Metal
Structure
Vehicle Trim
FRONT OF VEHICLE
Lock
Washer
Nut
Reinforcing
Washer
Installation — Tether Anchorage

2726
INSTALLATION
INSTALLATION
Use with Strollers
This Joie™child restraint can attach to Joie strollers using
adapters. Instructions are included with the adapters, which
are sold separately.
Seat Cover
Wash with cold water and mild detergent.
Do not iron.
Do not bleach or dry clean.
Do not twist the soft goods to dry with great force. It may
leave the seat cover with wrinkles.
Hang dry the seat cover in the shade.
Plastic and Metal Parts
Use only mild detergent, water and a soft cloth to clean the
car seat shell, handle and harness straps. Air dry.
Do not use undiluted detergent, or other solvents to clean -
these may cause damage.
Harness Buckle
To clean the buckle: rinse using warm water. DO NOT use
any soaps, solvents or lubricants. Using anything other than
water can cause the buckle to malfunction. Air dry.
When the buckle is operating correctly the tongues will push
in easily and will CLICK when they latch into place.
If the buckle does not appear to be working correctly get it
checked or replaced by contacting the retailer from where it
was purchased.
Harness Straps
Spot clean. If damaged contact the retailer from where the
restraint was purchased to have them replaced.
Storage
Remove the child restraint from the vehicle seat if not in use
for a long period of time. Put the child restraint in a cool, dry
place and somewhere your child cannot access it.
Cleaning and Maintenance
Table of contents
Other Joie Car Seat manuals

Joie
Joie juva User manual

Joie
Joie i-Gemm User manual

Joie
Joie bold R User manual

Joie
Joie stages isofix User manual

Joie
Joie Trillo C1220GA User manual

Joie
Joie i-Gemm2 User manual

Joie
Joie i-Spin Safe User manual

Joie
Joie trillo User manual

Joie
Joie Curve C 0925 User manual

Joie
Joie Every Stage FX User manual

Joie
Joie i-Trillo FX User manual

Joie
Joie trillo shield User manual

Joie
Joie elevate User manual

Joie
Joie Tilt Locking Clip User manual

Joie
Joie i-Jemini User guide

Joie
Joie duallo User manual

Joie
Joie i-Snug User manual

Joie
Joie gemm I0911DA User manual

Joie
Joie steadi User manual

Joie
Joie signature i-Plenti User manual