Juguetronica VR HD NANO DRONE User manual

1
Age: 14+
INSTRUCTION MANUAL
VR HD NANO DRONE
Thank you for purchasing our VR HD Nano Drone.
Please read the instructions carefully to fully learn about the drone and fly it safely.
Save this instructions manual for future reference.

IMPORTANT NOTICE
SAFETY CAUTION AND WARNINGS
BOX CONTENTS
1. This aircraft is not a toy. It is an equipment that integrates precise electrical and mechanical
components with an aerodynamic design that emits high-frequency signals. It is necessary
to manipulate it (assembly and dismantling) correctly, in order to avoid any accidents. The
owner must fly it and control it with due regard to minimum safety standards.
2. JUGUETRÓNICA is not liable for any damages that may be caused to the owner arising
from misuse or mishandling.
3. This aircraft requires certain knowledge in piloting and flying experience and age over
14 years.
4. Once the product is purchased, JUGUETRÓNICA is not responsible for its safety or the
safety of its environment while being flown by its owner.
5. If you detect any malfunction, get in touch with the establishment where the drone was
purchased.
This drone includes dangerous parts. It is therefore important that you consider the following
recommendations:
You must always have visual contact with your drone, not exceeding 120m in altitude under
any circumstance.
Although it is not necessary to be an official pilot, you must always fly safely.
You can only fly your drone in suitable areas for this, such as airfields or depopulated areas.
Damages caused by the drone are the responsibility of the person steering it.
You Can Never:
Fly in urban areas.
Fly over crowds of people: parks, beaches, concerts, rallies, etc...
Fly at night.
Fly near airports, aerodromes, etc...
Fly in areas where they fly with other aircrafts at low altitude (paragliding, skydiving, heliports,
etc...).
Do not endanger others.
For more information, visit: www.seguridadaerea.gob.es
List of components:
1 x VR Nano Drone HD Nano Drone
2 x Batteries
4 x Spare propellers
1 x 2,4Ghz Transmitter
1 x Smartphone Support
1 x USB Charger
1 x Screwdriver
1 x Instruction Manual
1 x VR Drone Glasses

3
TRANSMITTER COMPONENTS
TRANSMITTER BATTERY INSTALLATION
On/Off
Smartphone support
Acrobatics
Absolute Control
Acceleration,
up /down and
turns
Left turn trimming
Right turn
trimming
Left displacement trim
Advancement Trimming
Direction Control
Light Control
Speeds
Return Home
Battery Cover
4 x AAA | 1,5V
Remove the battery cover by
unscrewing the screw. Place 4 “AAA”
batteries (not included) and place
battery cover by screwing the screw.
1. Place the batteries in the right direction.
2. Do not mix new batteries with old ones.
3. Do not mix different types of batteries.
Slider to adjust smartphone width
Smartphone inclination adjustment
Return trimming
Right movement trimming

SMARTPHONE USE
There are several functions on your VR HD Nano Drone that you can enjoy through your
smartphone. For this, you must download the official App from the products’ website:
www.juguetronica.com/extras/vr-nanodrone-hd
Once the App has been installed, turn drone on to set up Wi-Fi. Look for the Wi-Fi on your
smartphone and connect your smartphone to it (password not needed). Then, open the App.
When you access the App, you will see on your smartphone screen the real-time broadcast
of what is being captured by the drone’s camera.
Camera
In the upper part of the screen, you will see that you can choose either the photo or video
button. By simply touching the icon you can automatically generate a capture. If you press
the icon , the camera will begin recording a video. Press again to stop recording. All files,
both photos and videos, are automatically saved to your smart phone. The App itself includes
an instruction manual to learn how to edit features such as the transmission rate or the folder
where the files are saved.
Drone control
The App offers the possibility to control the drone from the smart phone by using it instead
of the transmitter. To do this, you must switch from Off to On in the second button from the
right of the main screen of the application. Instead of broadcasting the camera image, the
screen will display 2 virtual levers (see picture) that you can use to control the drone instead
of the levers of the transmitter.
App Screen

5
To use the drone with the VR Drone Glasses (included), tap the App “settings,” represented
by the icon and select the icon from the drop-down menu. You will see that the camera
image is divided in two to adapt to the vision of the glasses. Then, extract the support from
the glasses (see image 1), place your smartphone in the direction shown in image 2 and
reintroduce the support in the glasses with the smartphone inside. Then, put the glasses on
and adjust the distance and focus of the lenses using the top buttons (image 3) until optimal
visualization is obtained. You can start flying now!
12
3
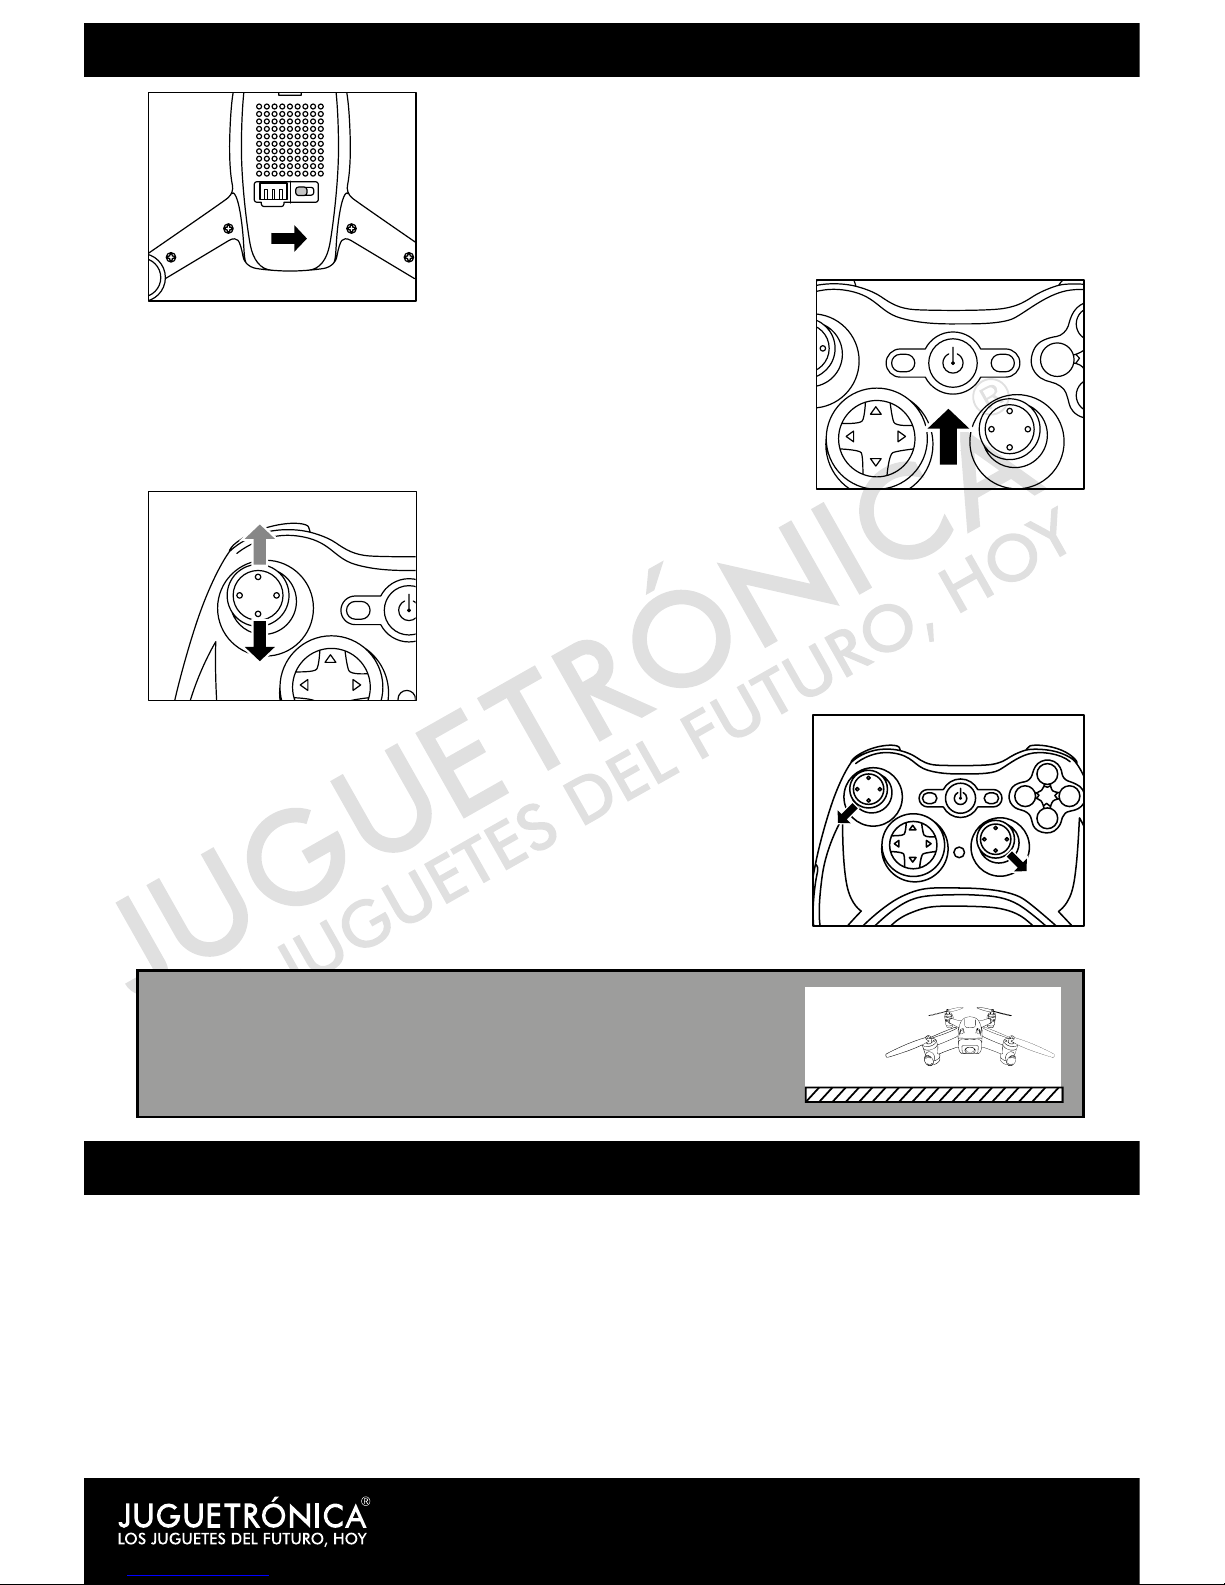
TIPS: With the VR Drone Glasses, at
first, movement perception entails
some difficulty and, for a few moments,
there may be some latency in Wi-Fi
transmission. Therefore, before using
them, remember: Fly in an open space
and, if possible, indoors. • Never fly
when it is windy. • Place the protective
case of the drone. • Make sure the
drone is perfectly trimmed.
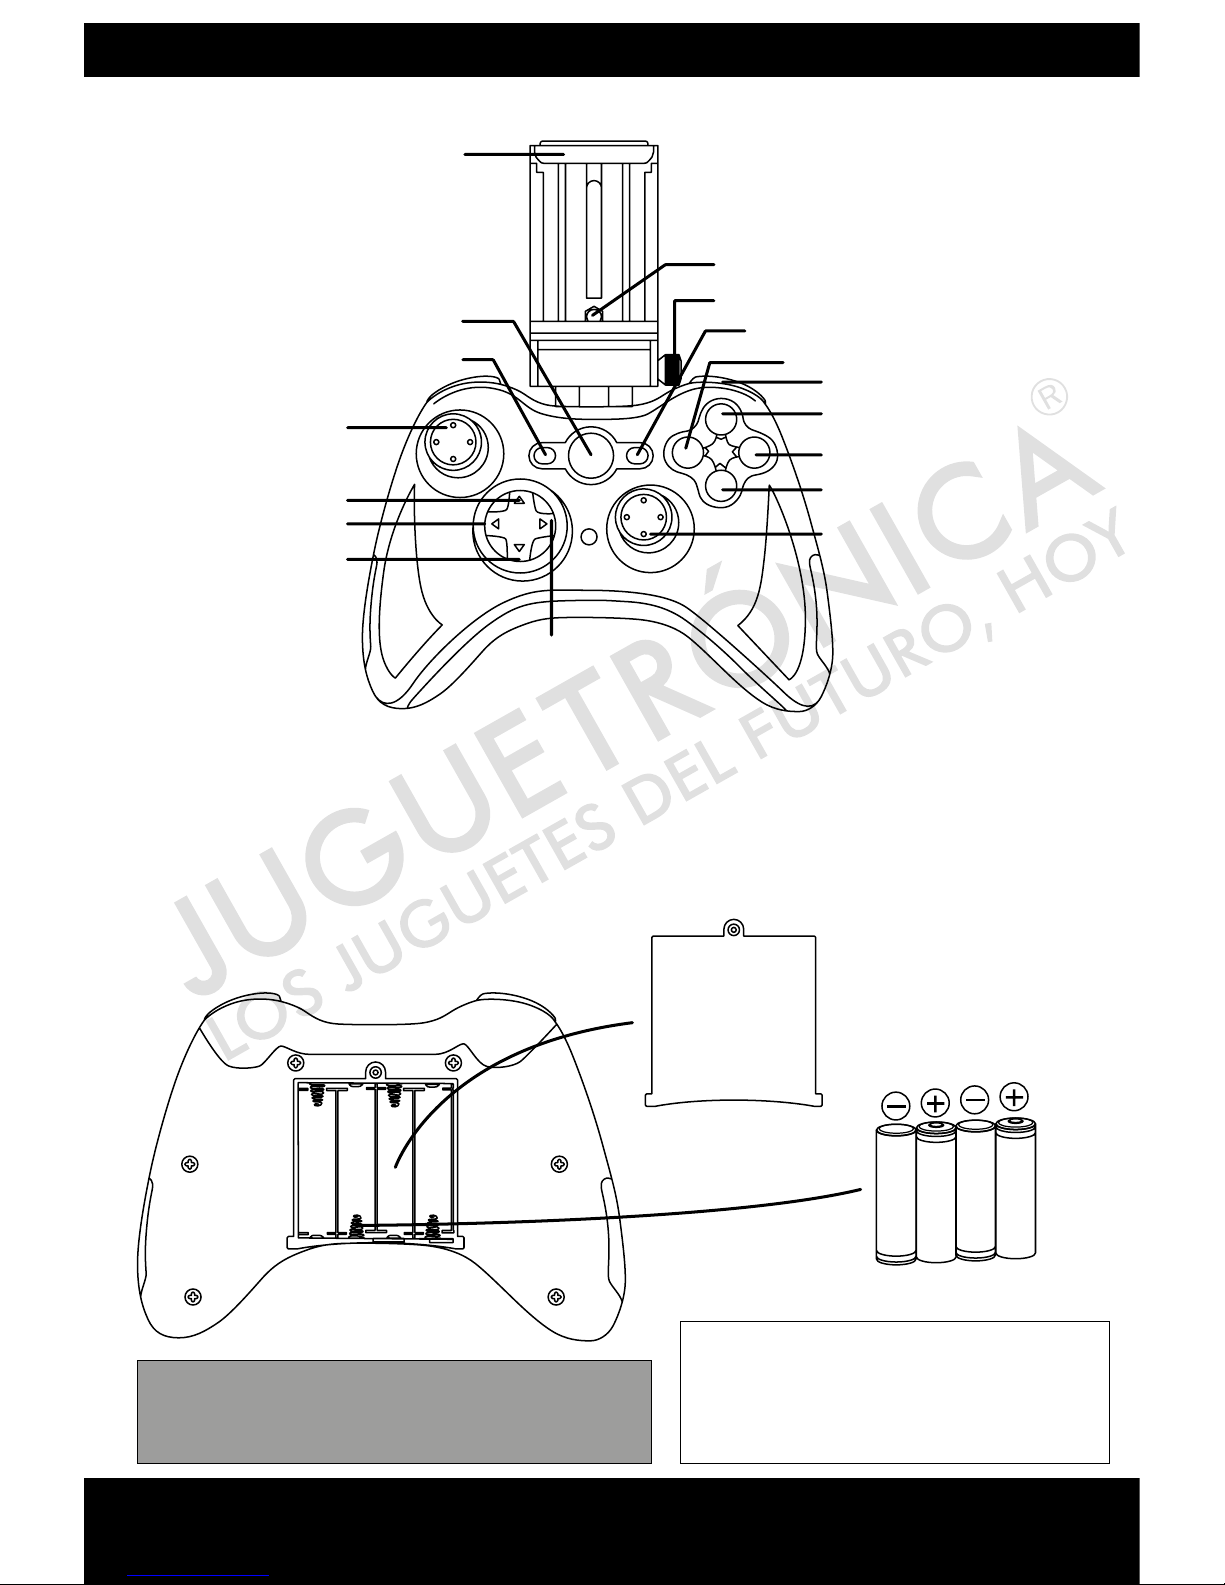
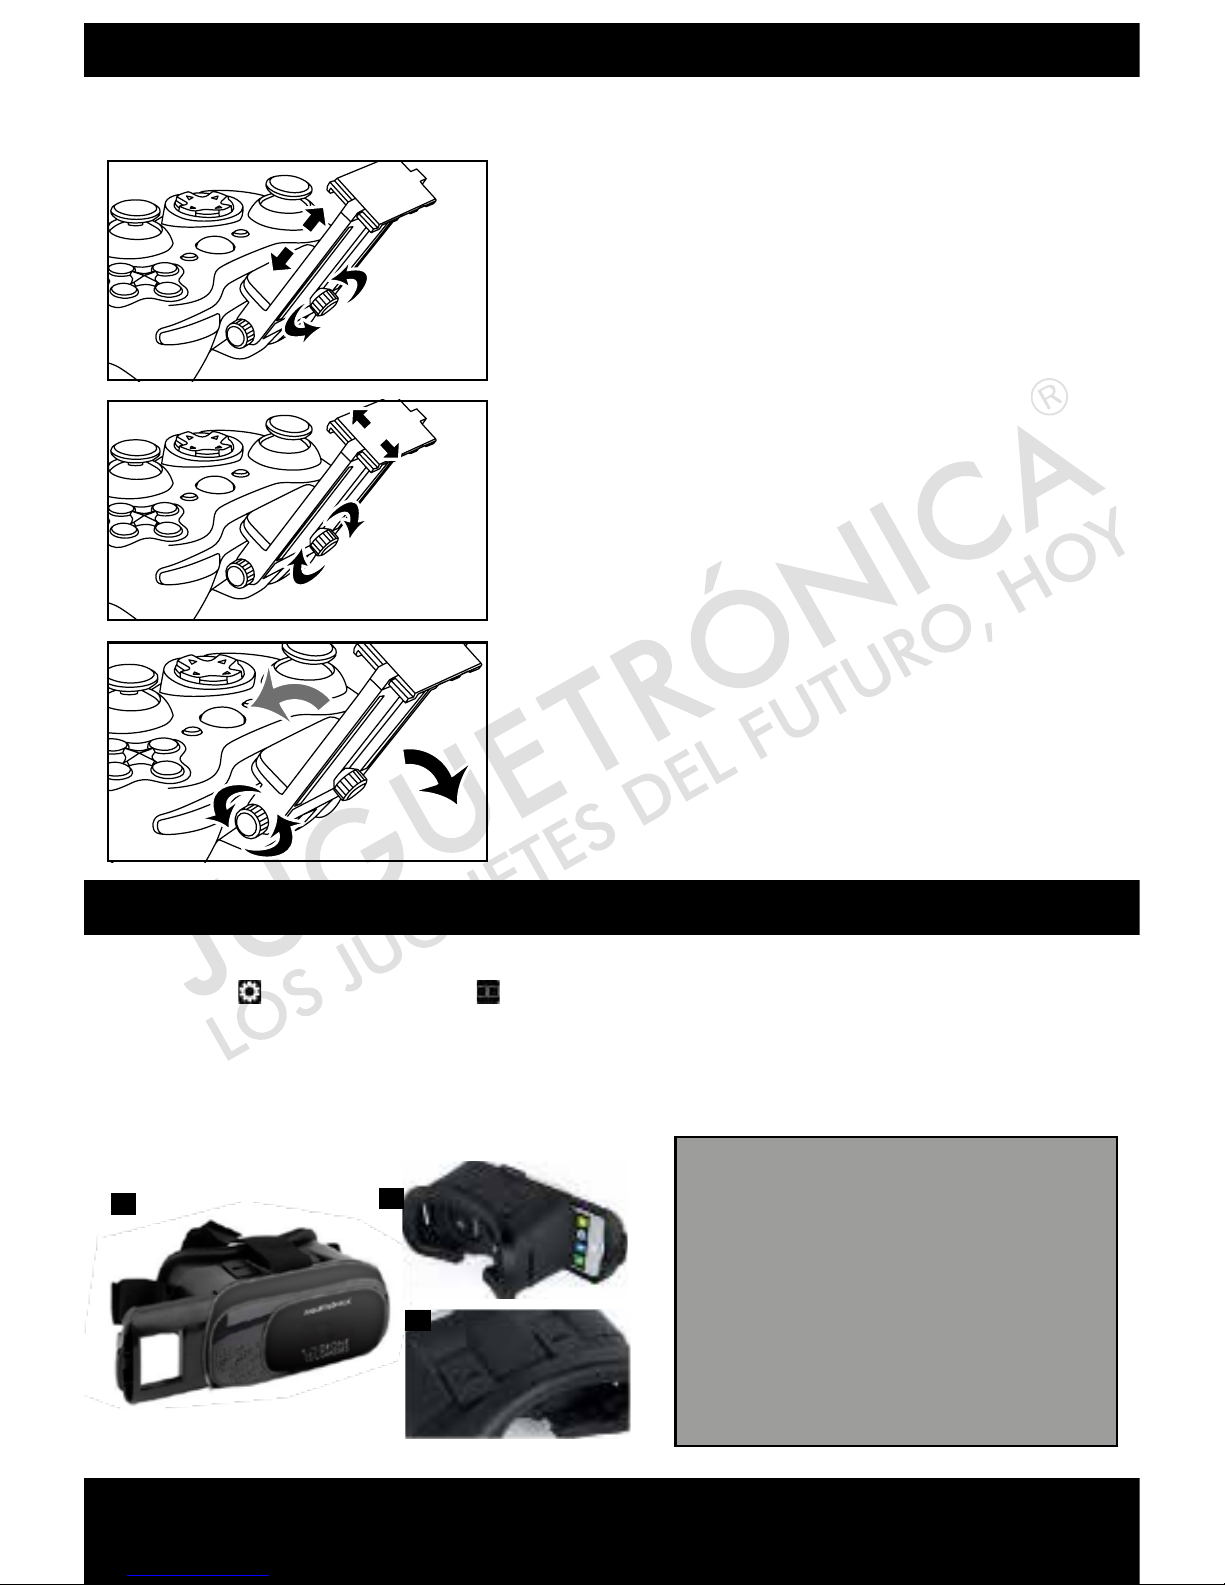
SUPPORT ADJUSTMENTS OF THE TRANSMITTER
1. With the support embedded in the transmitter,
turn the rear support screw counterclockwise to
release the height adjuster. Then stretch the height
adjuster until it fits the width of your smart phone.
2. Adjust the upper regulator to fit the thickness of
your smart phone. Once width and thickness have
been fixed, turn the rear screw clockwise to block
the support.
3. Turn the side screw counterclockwise to change
the tilt of the smart phone screen. When you have
obtained the optimal inclination, turn the screw
again, this time clockwise, so the position is fixed.
FPV EXPERIENCE WITH THE VR DRONE GLASSES
To use the mobile phone as a screen for FPV, follow these 3 steps to attach it to the transmitter:

START UP
PRECAUTIONS
1. When the transmitter’s LED stays on but the drone’s LED blinks slowly, it is an indication
that the synchronization has not been successful. Turn the transmitter and drone off and
perform the “start-up” again from the beginning.
2. If when you start flying, the drone does not maintain stability, land, turn off the transmitter
and the drone and synchronize again paying close attention to the drone being placed on a
flat, horizontal surface to the floor.
3. When the drone’s LED slowly blinks, it means that the battery is running low. Land and put
the drone’s battery to charge with the USB charger provided.
Horizontal
position
ADVICE:
When you synchronize your VR HD Nano Drone, make
sure it is on a flat and horizontal surface, so the flight is
stable.
OFF ON
CHA
1. Turn on VR HD Nano Drone
Turn drone over, and move switch, it will be found
under it towards the right (position “ON”).
3. Raise power level to the max, then, lower it to the lowest
position.
The transmitter will issue a prolonged beep which is the
signal that transmitter and drone are synchronized.
2. Turn on transmitter by pressing the on/off button. The
transmitter will beep 3 times and the red LED will come on
and keep blinking.
4. Push both levers simultaneously and diagonally outward
and downward, as shown in the image. The drone
unlocks, and the motors will be launched. Just push the
left lever up, so the drone rises. Since it has automatic
altitude control, the VR HD Nano Drone will maintain
the position when the lever is released.

7
DRONE BATTERY CHARGE
1. Turn Off VR HD Nano Drone
Turn over your drone and move the switch
that you will find under it towards the left
(position “OFF”).
2. Now remove the battery by pulling it in
the direction of the arrow.
3. To charge the battery, insert this into the
charger as shown in the image (ensure the
position is correct and do not force it). Now
connect the other end to the USB port of a PC.
The charger’s LED will be off during charging,
and will turn on when the battery is charged.
Charging Times:
The battery takes about 70 minutes to charge for a range of 6-8 minutes per battery.
ONoff
CHA
ONoff
CHA
1 2
3
3
PRECAUTIONS DURING BATTERY CHARGE
1. During charge, place the battery and the charger in an area that is dry, ventilated, and
away from intense heat sources or flammable products.
2. During charge, disconnect the battery from drone. It is important that the battery charge is
supervised by an adult to prevent accidents.
3. Do not charge the battery right after flying. Wait until the battery has cooled down.
Otherwise, it may swell or even burn and explode.
4. Be sure to use the original USB charger provided with the drone. When you have used the
battery for a long time or feel it is somewhat swollen, change it.
5. A battery that is not used for a long period will lose its charge.
6. Frequently charging or discharging a battery shortens battery life.

BATTERY MAINTENANCE
MOVEMENTS CONTROL
FLIGHT SPEEDS
UP AND DOWN
LEFT AND RIGHT TURNS LATERAL MOVEMENTS
FORWARD AND BACKWARD
1. The battery must be placed in a dry and ventilated area at a room temperature between
18 and 25° C.
2. In order to extend battery life, avoid making repeated charges or excessive discharges.
3. When storing the battery for a long time, charge the battery first and store it with at least
50-60% of the total allowed charge.
4. If you are not going to use it for more than a month, it is highly recommended that you
measure the voltage of the battery every month to ensure that this does not fall below 3V.
Otherwise, repeat step 3.
Lift the power lever (left) for the drone to
go up.
Lower the power lever (left) for the drone
to go down.
For you to make progress and start controlling the drone, you
can increase the difficulty level. The VR Nanodrone HD counts
with a three-speed selector: low, medium, and high.
The speed can be selected by pressing the lower cursor, as the
lateral picture shows it.
Move the power lever (left) to the
right or left for the drone to turn to the
corresponding side.
Move the steering lever (right) to the
right or left for the drone to move to the
corresponding side.
Lift the steering lever (right) for the drone
to go forward.
Lower the steering lever (right) for the
drone to go backward.

9
TRIMMING
VR NANODRONE HD FUNCTIONS
FORWARD AND
BACKWARD TRIMMING
LEFT AND RIGHT
TURN TRIMMING
LATERAL TRIMMING
Protection against voltage drop:
The engines interrupt their supply if the drone’s battery is not charged enough. It is an
automatic protection system of the battery.
Protection against high voltage:
The supply system stops the engines when the propellers hit an object or get stuck, they start
again once the propeller is free.
Light control:
The LED lights of the drone can be activated or deactivated
from the transmitter by pressing the upper cursor as it is
shown in the lateral picture. The LED lights will turn on after
the first tap and they will turn off with a second tap.
Going back home function:
When you want the drone to go back to the starting point
automatically, stand in front of it and press the button on
the left image once. When the drone is going back, you only
need to keep the power lever (left) stable.
When the drone goes
forwards and backwards
wrongly, you can fix the flight
by pressing the forward and
backward trimming button
correspondingly.
When the drone flies
uncontrollably, you can fix
the flight by pressing the
right and left trimming button
correspondingly.
When the drone moves to the
sides wrongly, you can fix the
flight by pressing the right or
left movement trimming button
correspondingly.
TURNING THE ENGINES OFF
Once you have made
the drone land, keep the
power lever down during
3 or 4 seconds in order to
turn the engines off.
Another way of turning
the engines off is to push
both levers diagonally
inside and downwards,
as it is shown in the
picture
IMPORTANT: Never use
the off mode if the drone
is still in the air.

Hard Reset:
When the drone flies uncontrollably and it is impossible to fix those flight mistakes, the best
option is to re-establish it to factory settings. This will make the drone have the factory settings
it had when you bought it.
Follow these steps in order to perform the hard reset:
4. Place the drone on a
horizontal and flat surface and
move the right and left levers
on the left bottom corner of
the transmitter for 2-3 seconds. The LED indicator will change
from permanent light to fast blinking.
2-3 seconds after the LED indicator goes back to permanent
light, the drone will be restored correctly.
3. When the LED of the drone starts blinking fast, move the
power lever (left) up and down. The LED of the drone will start
blinking slowly and then the LEDs will remain fixed.
Total control function:
While the drone is functioning in normal mode, without total control, the pilot will have to
control the front and back parts of the drone as well as the lateral parts in order to give
the right movement orders during the flight. In this flight mode, you need to know that the
controls will be inverted when the drone goes back to you. The VR Nanodrone HD integrates
a total control system which makes it easier to pilot.
ACROBATIC MODE:
Once you have controlled the flight and the basic functioning of
the drone, you will be ready to make some impressive tricks and
acrobatics.
First of all, you have to fly higher than 3 meters because all
acrobatics involve a loss of height, and that way you will avoid the
danger of crashing against the floor.
To perform the acrobatics, you have to press the button “acrobatics”
(it is on the right front part) and then, push the direction lever (right)
towards the desired direction to perform the 360º acrobatics.
When total control is activated, the drone orientation does
not affect movements because the drone will move in relation
to the position the pilot is and not in relation to the drone’s
orientation.
To activate total control mode, press the button showed on the
right picture.
Press it again in order to deactivate it.
1. Turn on
the drone. 2. Turn on
the transmitter.
ONoff
CHA
ADVICE ON THE ACROBATICS FLIGHT MODE:
Make sure to have enough battery at the moment of performing the acrobatics.

11
Taking photographs:
The pictures are taken from the App (see page. 4) on the smart phone. When the drone is
flying, press the shot button in the App. The front lights of the drone will turn on for a second
to indicate that the picture was taken.
Video:
Videos are made from the App too. The camera will start filming when the appropriate button
is pressed and the frontal lights of the drone will turn on and start blinking. Press the button
again in order to stop filming. The LED indicators will stop blinking showing that the filming
has stopped.
Spare parts and accessories you might purchase to complete your VR Nanodrone HD.
The drone does
not respond
to transmitter
commands.
The drone takes
time to respond
or responds
with difficulty
to transmitter
commands.
1. The drone does not have
enough battery.
2. The transmitter does not have
enough battery
3. The transmitter frequency does
not match that of the drone.
1. The transmitter has not enough
power.
2. There is another RC device
nearby running on the same
control frequency.
1. Change transmitter battery.
2. Remove the other radio-frequency
device from the drone’s coverage area.
1. Charge the drone.
2. Change transmitter batteries.
3. Re-synchronize transmitter and drone.
Blades Battery Charger
Camera indicators
HOW TO USE THE CAMERA
ACCESSORIES AND SPARE PARTS
TROUBLESHOOTING
PROBLEM CAUSE SOLUTION

Warranty and National Technical Service.
Store: C/ Alberto Aguilera, 1 - 28015 Madrid - Spain
Post-sale service: C/ Acuerdo, 36 - 28015 Madrid - Spain
JUGUETRÓNICA, SL - NIF: B83788414
Thank you for purchasing this product.
Find more information and updates at:
www.juguetronica.com/extras/vr-nanodrone-hd
Download the App at:
Table of contents
Other Juguetronica Drone manuals

Juguetronica
Juguetronica MICRODRONE AUTOFLIGHT User manual

Juguetronica
Juguetronica NANODRONE VCAM HD 3 Manual

Juguetronica
Juguetronica BRICK DRONE User manual

Juguetronica
Juguetronica SMARTVIEW Manual

Juguetronica
Juguetronica RACING DRONES GAME User manual

Juguetronica
Juguetronica JUG0246 User manual

Juguetronica
Juguetronica MICRO HEXADRONE VCAM HD User manual

Juguetronica
Juguetronica VR AUTOFLIGHT User manual

Juguetronica
Juguetronica THE FOLLOWER User manual

Juguetronica
Juguetronica NANODRONE EVOLUTION Manual