Karma BX 6822AB User manual

www.karmaitaliana.it
Manuale di istruzioni
Instruction manual
IE
BX 6822
BX 6822AB
Diusore
Speaker

32
ITALIANO
Complimenti per la sua ottima scelta.
Ci complimentiamo vivamente per la Sua scelta, il prodotto Karma da Lei acquistato
è frutto di un’accurata progettazione da parte di ingenieri specializzati.
Per la sua realizzazione sono stati impiegati materiali di ottima qualità per garantirne
il funzionamento nel tempo. Il prodotto è stato realizzato in conformità alle severe
normative di sicurezza imposte dalla Comunità Europea, garanzia di adabilità e
sicurezza. Vi preghiamo di leggere attentamente questo manuale prima di cominciare
ad utilizzare l’apparecchio al ne di sfruttarne appieno le potenzialità.
La Karma dispone di numerosi prodotti accessori che potranno completare il vostro
apparecchio. Vi invitiamo quindi a visionare l’intera gamma dei nostri prodotti visitando
il sito internet: www.karmaitaliana.it sul quale troverete, oltre a tutti i nostri articoli,
descrizioni accurate e documentazioni aggiuntive sviluppate successivamente
all’uscita del prodotto. Ci auguriamo che rimarrete soddisfatti dell’acquisto e Vi
ringraziamo nuovamente per la ducia riposta nel nostro marchio.
Precauzioni ed avvertenze
• Conservare il manuale per future consultazioni e allegatelo se cedete l’apparecchio ad altri.
• Assicuratevi sempre di collegare l’apparecchio con il voltaggio adeguato.
• Questo prodotto non è adatto ad usi esterni (in presenza di umidità)
• Per evitare il rischio di incendi o cortocircuiti non esponete mai l’apparecchio alla pioggia o all’umidità.
• Non utilizzare con temperature ambiente superiori ai 35C°.
• In caso di problemi di funzionamento interrompete l’uso immediatamente. Non tentate di
riparare l’apparecchio per conto vostro, ma rivolgetevi all’assistenza autorizzata.
• Riparazioni eettuate da personale non competente potrebbero creare gravi danni sia all’apparecchio
che alle persone.
• Controllate che il cavo di alimentazione non sia rovinato.
• Non staccate il cavo di alimentazione tirandolo dal lo.
ATTENZIONE:
Nel momento in cui hai acquistato il prodotto avresti dovuto vericare che
il pacco fosse integro, non danneggiato e/o aperto. Anche con imballo
integro sei comunque tenuto a vericare lo stato del Prodotto entro tre
(3) giorni dall’acquisto. Eventuali anomalie riscontrate devono essere
comunicate immediatamente al venditore e ai nostri uci, anche tramite
e-mail, specicando nel dettaglio il danno subito. Ogni segnalazione
oltre i suddetti termini non sarà presa in considerazione. È consigliato
conservare tutti gli imballi, etichette, documento di consegna e quant’altro
possa servire per favorire la rapida soluzione del problema.

Ulteriori informazioni su: www.karmaitaliana.it
32
POWER
AC230V/50Hz
AC115V/60Hz
115V 230V
C PIL
US B+ SD+FM+BLUETOOTH PL AYER
MO DE
USB
VOL+
VOL-
SCAN
SD/MMC
BX 6822AB
POWER
AC230V/50Hz
AC115V/60Hz
115V 230V
C PIL
US B+ SD+FM+BLUETOOTH PL AYER
MO DE
USB
VOL+
VOL-
SCAN
SD/MMC
BX 6822AB
ITALIANO
BX 6822
BX 6822AB
1
2
3
4
5
6
7
8
9 10
11
12
13
14
15
16
17
Speakon IN/OUT
Cavi +/-
Jack 6,3mm
IN/OUT
19
B C D EF G H
A

54
ITALIANO
SE AVETE ACQUISTATO IL MODELLO PASSIVO BX 6822:
Collegate il diusore ad un amplicatore utilizzando il connettore corretto. A disposizione
avete i normali morsetti rosso/nero (+/-), jack 6,3mm e i più professionali connettori
SPEAKON.
Assicuratevi che l’amplicatore a cui collegherete il diusore, non fornisca potenza
maggiore di quanto supportato dal diusore o rischierete di danneggiarlo. Woofer e
tweeter non sono coperti da garanzia.
SE AVETE ACQUISTATO IL MODELLO AMPLIFICATO BX 6822AB:
• Accertatevi che il diusore sia spento con tasto POWER(10) su OFF e che il cavo
di alimentazione non sia inserito nella presa(11). Tutte le operazioni di installazione
vanno eettuate in assenza di corrente elettrica.
• Posizionate in un luogo idoneo il vostro nuovo diusore avendo cura che tale
luogo non sia umido, esposto ai raggi diretti del sole. Per lo spostamento utilizzate
le maniglie di trasporto laterali.
• Vericate che il voltaggio selezionato(9) sia corretto. Voltaggi dierenti dalla
corrente elettrica presente danneggerebbe seriamente l’apparecchio e potrebbe
causare pericolosi cortocircuiti.
• Collegate un eventuale microfono, munito di connettore XLR alla presa “MIC”(3).
Nel caso abbiate un microfono con connettore Jack 6,3mm mono, potrete utilizzare
la presa (2).
• Il segnale in ingresso, proveniente da mixer, lettore CD o altro apparecchio di
tipo “line”, potrà essere connesso alle prese “Line input” di tipo RCA(6) o di tipo
XLR(5).
• L’eventuale uscita ad altro diusore amplicato è disponibile sotto forma di segnale
audio di linea, alla presa “Line Output” di tipo XLR(7) mentre se volete collegare un
diusore passivo a 8 Ohms mod. BX 6822 potrete sfruttare la presa speakon(8). Il
diusore amplicato amplicherà anche il diusore passivo.
• Se desiderate posizionare il vostro diusore su supporto a treppiede, utilizzate
l’apposito bicchierino posto sulla parte inferiore. Il diametro è di 35mm
• Terminati i collegamenti, regolate tutti i volumi dell’amplicatore sul minimo cioè
tutti ruotati in senso antiorario. Collegate il cavo di alimentazione alla presa(11) e
quindi alla rete elettrica 230V.
• Accendete l’amplicatore tramite l’apposito tasto(10). Il Led
Power(14) si illuminerà e ne indicherà l’avvenuta accensione.
Qualora posizionando il tasto(10) su ON il led(14) rimanesse spento ed il diusore
non funzionasse, prima di contattare l’assistenza tecnica, scollegate il cavo di
alimentazione e controllate l’integrità del fusibile di protezione contenuto nella
presa di alimentazione(11). Eventualmente sostituitelo con uno di uguale valore
amperometrico. Durante l’utilizzo, le alette di rareddamento(12) potrebbero
diventare molto calde. Evitate di toccarle per non rischiare alcun tipo di ustione.

Ulteriori informazioni su: www.karmaitaliana.it
54
ITALIANO
• Attivate l’eventuale apparecchiatura che fornisce il segnale audio il quale
verrà amplicato. Il volume di ogni segnale amplicato potrà essere
regolato tramite apposito comando: per il microfono usate il comando
rotante(1), per il segnale di linea, utilizzate il comando rotante(4)
Il comando rotante Master(15) regola il livello generale del segnale in uscita. Il led
CLIP(13) potrà lampeggiare segnalando eventuali picchi di segnale. Nel caso in
cui rimanga acceso per più di 2/3 secondi, abbassate immediatamente i volumi dei
segnali in ingresso per evitare di danneggiare l’apparecchio.
• Il pratico equalizzatore a 5 bande(17) permette di regolare con precisione l’incidenza
delle tonalità riprodotte guadagnando parecchio in termini di qualità e potenza.
LETTORE MP3
Il vostro nuovo diusore è provvisto di lettore per schede SD e chiavette USB e vi
permetterà di riprodurre les MP3 in esse contenuti. E’ suciente inserire un supporto
nell’apposita presa(B/C) e agire sul tasto PLAY(D) per riprodurre, mettere in pausa o
cambiare brano(G/H). Il display(A) mostra le principali informazioni relative al brano
riprodotto. Il tasto(F) permette di impostare la riproduzione di una singola traccia o di
tutti i brani. Il tasto MODE(E) permette di passare di una funzione all’altra. Le funzioni
disponibili sono:
- Lettore MP3
- Radio FM
- Bluetooth
Il comando di volume(16) regola il livello dell’audio proveniente dal lettore MP3.
FUNZIONE BLUETOOTH
Premete il tasto MODE(E) e selezionate la funzione bluetooth. Cercate sul vostro
smartphone o tablet, il diusore nel menù bluetooth e selezionatelo. Una volta
accoppiato, il diusore riprodurrà la musica proveniente dallo smartphone.
TELECOMANDO
Nella confezione è presente un pratico telecomando(19) a raggi infrarossi che consente
di pilotare le principali funzioni del modulo MP3 a distanza.

76
Congratulation for your choice!
Congratulations for your choice! The Karma product you have purchased is the result
of careful planning by specialized engineers . High quality materials have been used
for its construction, to ensure its functioning over time. The product is manufactured
in compliance with strict regulations imposed by the European Union, a guarantee
of reliability and safety. Please read this manual carefully before starting to use the
xture in order to exploit its full potential.
Karma has several products’ accessories that can complete your device. We invite
you to see the whole range of our products by visiting our website: www.karmaitaliana.
it., where you will nd , in addition to all our items, detailed descriptions and further
documents related to the product. We hope that you will be satised with your purchase
and we thank you again for your trust in our brand.
Safety notes
• Keep this User Manual for future reference. If you sell the product to another user, be sure to give this
manual to the next owner.
• Make sure the voltage of the power source used for the product is correct.
• This product is not suitable for outdoor use.
• To avoid the risk of re or short-circuits never expose the xture to rain or moisture.
• Do not operate the product in an ambient temperature higher than 35°.
• In the event of a serious operating problem, stop using the product immediately. Never try to repair the
product, but contact the authorized technical assistance center.
• Repairs carried out by untrained people can lead to damage both to the xture and to persons.
• Make sure the power cord is not damaged.
• Never disconnect the product from the power source by pulling on the cord.
CAUTION:
When you receive the product you have to check carefully that the parcel is not
damaged from shipping or open. Even if the packaging is not damaged you
have to check the product’s conditions within three (3) days from the reception.
For any kind of problem found on the item, it is necessary to address a claim
to the seller and to our oces (also by e-mail), describing in detail the damage.
Any claim received beyond the 3-day time limit, will not be accepted. It is
suggested to save all the packaging, labels, delivery bill and all that can be
useful to solve quickly the problem.
ENGLISH

Ulteriori informazioni su: www.karmaitaliana.it
76
ENGLISH
POWER
AC230V/50Hz
AC115V/60Hz
115V 230V
C PIL
US B+ SD+FM+BLUETOOTH PL AYER
MO DE
USB
VOL+
VOL-
SCAN
SD/MMC
BX 6822AB
POWER
AC230V/50Hz
AC115V/60Hz
115V 230V
C PIL
US B+ SD+FM+BLUETOOTH PL AYER
MO DE
USB
VOL+
VOL-
SCAN
SD/MMC
BX 6822AB
BX 6822
BX 6822AB
1
2
3
4
5
6
7
811
12
13
14
15
16
17
19
B C D EF G H
A
Speakon IN/OUT
Wires +/-
Jack 6,3mm
IN/OUT

98
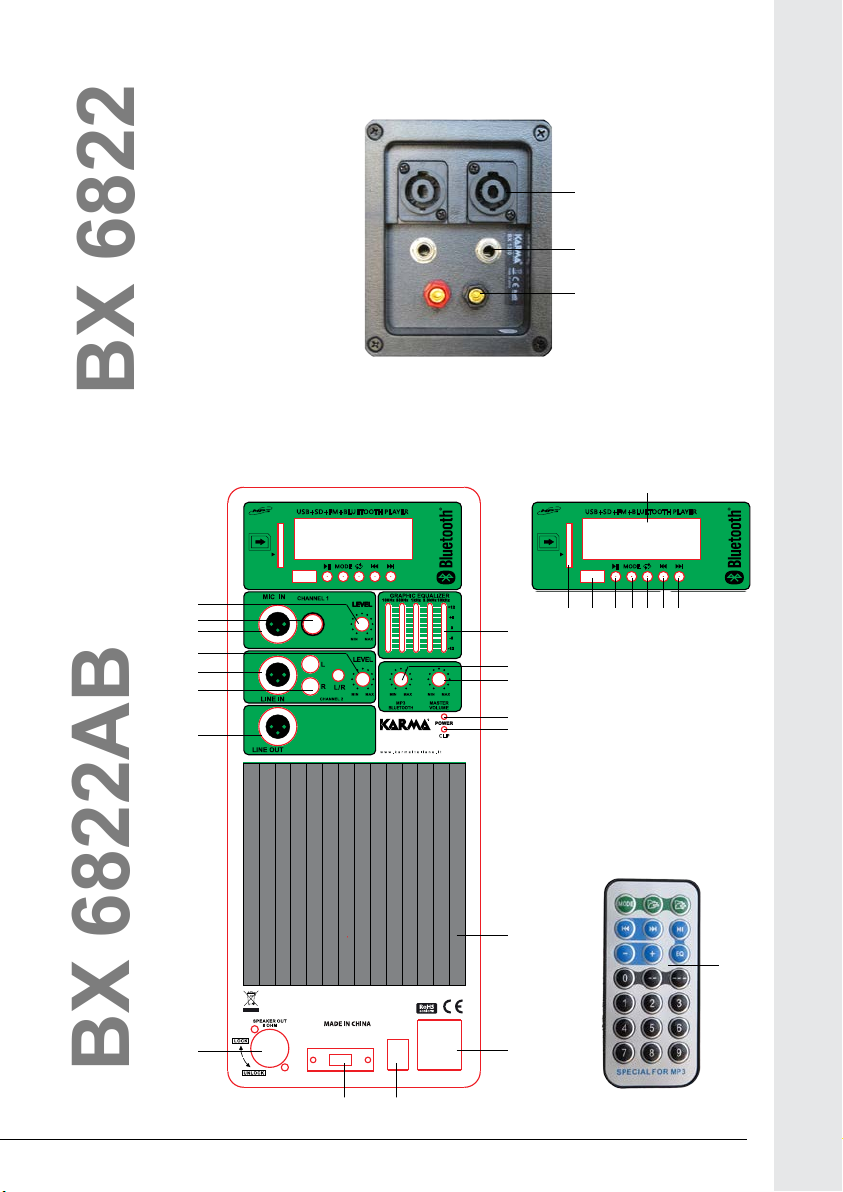
IF YOU BOUGHT THE PASSIVE MODEL BX 6822:
Connect the speaker to an amplier using the correct connector. You can use the
ordinary red/ black plugs(+/-), jack 6,3 and the more professional jack 6,3 mm.
Be sure that the amplier doesn’t supply an higher power than the speaker or you will
risk to damage it. Woofer and tweeter are not covered by warranty.
IF YOU BOUGHT THE POWERED MODEL BX 6822AB:
• Be sure that the speaker is switched o with the POWER button (10) in OFF
position and that the power cord (11) is not plugged into the mains socket. All
operations should be carried out without power.
• Place your speaker in a suitable place, keeping it away from moisture and direct
sun rays. Use the side handles to carry the xture.
• Check that the selected (9) voltage is correct. A wrong voltage could seriosly
damage the xture and cause dangerous short-circuits.
• You can plug a microphone with XLR connector in the MIC socket (3). If you have
a microphone with 6,3 mono jack connector, you can use the socket (2).
• The input signal, coming from a mixer, a CD player or another “line” device, can be
connected to the RCA (6) or XLR (5) “line input” sockets.
• A further output for another powered speaker is available as an audio line signal,
on the “line output” XLR socket (7), while if you want to connect at 8 Ohms a
passive speaker mod. BX 6822 you can use the speakon (8) socket. The powered
speaker will amplify also the passive one.
• If you wish to place your speaker on a tripod stand, please use the mount hole on
the bottom. It has a standard 35 mm diameter.
• Once made the connections, please put all the amplier volumes at their minimum
position (completely turned anti-clockwise). Connect the power cord to the socket
(11) and then to the mains (230V)
• Turn on the amplier through the POWER button (10). The power led (14) will light
up to indicate that the speaker is on. If with the button (10) in ON position the led
(14) remains oo and the speaker doesn’t work, before contacting the technical
service, disconnect the power cord and check if the protection fuse of the power
socket (11) is ok. If it is blown replace it with one of the same amperage. During
use, the cooling wings could get very hot. Don’t touch them to avoid the risk of
burning yourself.
• Turn on the xture providing the audio signal. The signal will be amplied. The
volume of each amplied signal can be adjusted through the specic control: for
the microphone use the rotating knob (1), for the line signal use the rotating knob
(4). The rotating knob Master (15) controls the general lever of the output signal.
The led CLIP(13) can ash to indicate signal peaks. If it remains on for more than
2 or 3 seconds, you must immediately turn down the volumes of input signals to
ENGLISH

Ulteriori informazioni su: www.karmaitaliana.it
98
avoid to damage the xture.
• The useful 5 bands equalizer (17) allows to adjust with precision the incidence of
the tones reproduced, with increased performance in quality and power.
MP3 PLAYER AND RADIO
Your new speaker is provided with USB sticks and SD cards reader to play MP3 les.
It is enough to plug your mobile device into the specic socket (B/C) and use the PLAY
button to play, pause or change track. The display (A) shows main information of the
track that is being reproduced. The (F) key allows to set reproduction of a single
track or of all the tracks. The MODE (E) allows to skip from a function to another. The
available functions are:
- MP3 player
- FM tuner
- Bluetooth
The volume control (16) adjusts the level of audio coming from the MP3 player
BLUETOOTH FUNCTION
Press the MODE (E) key and select the bluetooth function. Search for the speaker
on your smartphone or tablet in the bluetooth menu and select it. Once matched, the
speaker will play the music coming from your smartphone.
REMOTE CONTROL
The packaging includes a useful infrared remote control (19) that allows to manage the
main functions of MP3 module also if you are distant.
ENGLISH

1110
Il prodotto è coperto da garanzia in
base alle vigenti normative.
Vi suggeriamo di consultare sul sito
internet: www.karmaitaliana.it le
“Condizioni Generali di Garanzia”
riportate nella sezione “FAQ”.
Di seguito un breve estratto:
1) Si prega, dopo l’acquisto di procedere
alla registrazione del prodotto sul
nostro sito internet accedendo
alla sezione assistenza(occorre
registrarsi). In alternativa, è possibile
registrare il prodotto compilando ed
inviando la scheda accanto.
2) Sono esclusi i guasti causati da
imperizia a da uso non appropriato
dell’apparecchio
3) La garanzia non ha più alcun eetto
qualora l’apparecchio risulti
manomesso.
4) La garanzia non prevede la
sostituzione del prodotto.
5) Sono escluse dalla garanzia le parti
esterne, le batterie, le manopole,
gli interruttori, e le parti asportabili o
consumabili.
6) Le spese di trasporto e i rischi
conseguenti sono a carico del
proprietario dell’apparecchio
7) A tutti gli eetti la validità della
garanzia è avallata unicamente dalla
presentazione della fattura o scontrino
d’acquisto.
COME PROCEDERE ALL’INVIO
DEL MODULO DI REGISTRAZIONE
PRODOTTO:
1) Nel caso in cui non abbiate eettuato
la registrazione del prodotto sul nostro
sito www.karmaitaliana.it Vi invitiamo
a farlo ritagliando il modulo riportato
nella pagina accando e ad inviarlo
presso i nostri uci.
2) Ricordatevi di compilare entrambi i
moduli in quanto una copia rimarrà
legata al manuale e potrà servirvi in
futuro.
CERTIFICATO DI GARANZIA | GUARANTEE CARD

Ulteriori informazioni su: www.karmaitaliana.it
1110
CERTIFICATO DI GARANZIA
GUARANTEE CERTIFICATE
CERTIFICATO DI GARANZIA
GUARANTEE CERTIFICATE
MODULO DI REGISTRAZIONE
REGISTRATION MODULE
MODULO DI REGISTRAZIONE
REGISTRATION MODULE
COPIA DA INVIARE A:
COPIADACONSERVARE
Spett.le
KARMA ITALIANA Srl
Via Gozzano, 38 bis
21052 - Busto Arsizio (VA)
%

1312
Speciche Tecniche
Speciche tecniche
Speciche tecniche
MODELLO / MODEL
MODELLO / MODEL
DATA D’ACQUISTO
PURCHASING DATE
DATA D’ACQUISTO
PURCHASING DATE
N. SCONTRINO O FATTURA
RECEIPT/INVOICENUMBER
N. SCONTRINO O FATTURA
RECEIPT/INVOICENUMBER
TIMBROEFIRMADELRIVENDITORE
DEALER’S STAMPAND SIGNATURE
TIMBROEFIRMADELRIVENDITORE
DEALER’S STAMPAND SIGNATURE
ACQUISTATO DA / PURCHASED BY
COGNOME / SURNAME
COGNOME / SURNAME
NOME/ NAME
NOME/ NAME
VIA / ADDRESS
VIA / ADDRESS
N°
N°
PROV.
PROV.
CITTÀ / CITY
CITTÀ / CITY
C.A.P. / ZIP CODE
C.A.P. / ZIP CODE
BX 6822__
BX 6822__

Ulteriori informazioni su: www.karmaitaliana.it
1312
Questo simbolo vi avverte della presenza di istruzioni d’uso e manutenzione importanti,
nel manuale o nella documentazione che accompagna il prodotto
This symbol alerts you to the presence of important operating and maintenance, in the
manual or in the documentation accompanying the product
Questo simbolo indica la conformità del prodotto alle normative internazionali RoHS
(Restriction of certain Hazardous Substances) che limita l’impiego di determinate sostanze
pericolose nelle apparecchiature elettriche ed elettroniche immesse sul mercato europeo
dal 1° luglio 2006. Fa parte di una serie di Direttive UE sull’ambiente ed e’ connessa
strettamente alla Direttiva RAEE (Riuti di Apparecchiature Elettriche ed Elettroniche).
This symbol indicates that the product complies with international standards RoHS
(Restriction of certain Hazardous Substances) which restricts the use of certain hazardous
substances in electrical and electronic equipment put on the European market from 1 July
2006. It is part of a series of EU Directives and environment and ‘ closely connected to the
WEEE Directive ( Waste Electrical and Electronic Equipment).
Ai sensi dell’art. 13 del decreto Legislativo 25 Luglio 2005, n. 151 “ Attuazione delle
Direttive 2002/95/CE, 2002/96/CE e 2003/108/CE, relative alla riduzione dell’uso di
sostanze pericolose nelle apparecchiature elettriche ed elettroniche, nonchè allo
smaltimento dei riuti”.
Il simbolo del cassonetto barrato riportato sull’apparecchiatura indica che il prodotto alla
ne della propria vita utile deve essere raccolto separatamente dagli altri riuti. L’utente
dovrà, pertanto, conferire l’apparecchiatura integra dei componenti essenziali giunta a
ne vita agli idonei centri di raccolta dierenziata dei riuti elettronici ed elettrotecnici,
oppure riconsegnandola al rivenditore al momento dell’acquisto di nuova apparecchiatura
di tipo equivalente, in ragione di uno a uno. L’adeguata raccolta dierenziata per l’avvio
successivo dell’apparecchiatura dimessa al reciclaggio, al trattamento e allo smaltimento
ambientale compatibile contribuisce ad evitare possibili eetti negativi sull’ambiente e
sulla salute e favorisce il riciclo dei materiali di cui è composta l’apparecchiatura. Lo
smaltimento abusivo del prodotto da parte dell’utente comporta l’applicazione delle
sanzioni amministrative di cui al D.Lgs n. 152/2006 (parte 4 art.255)
The symbol of the crossed-out dustbin indicates that the product at the end of its life must
be collected separately from other waste . The user must , therefore , take the remote
control integrates the essential components come to an authorized disposal center for
collection of waste electronic and electrical , or returning it to the dealer when buying new
equipment of equivalent type , at a rate of one to one. Appropriate separate collection for
the decommissioned equipment to recycling , treatment and environmentally compatible
disposal helps to prevent negative impact on the environment and human health and
promotes recycling of the materials making up the product. Illegal dumping of the product
by the user entails the application of administrative sanctions pursuant to Legislative
Decree n . 152/2006 ( Art.255 Part 4 )
Il marchio CE indica che questo prodotto è conforme alle norme della Comunità Europea:
EMC (Compatibilità Elettromagnetica) e LVD (Direttive sulla Bassa Tensione). La
documentazione di conformità in forma completa è reperibile presso la società Karma
Italiana Srl.
The CE mark indicates that this product complies with the European Community standards
EMC ( Electromagnetic Compatibility) and LVD ( Low Voltage Directive ). Compliance
documentation in complete form is available at the company Karma Italian Srl.
Karma Italiana srl, in order to improve its products, reserves the right to modify the characteristics whether technical or
aesthetic , at any time and without notice.
La Karma Italiana srl, allo scopo di migliorare i propri prodotti, si riserva il diritto di modi care le caratteristiche
siano esse tecniche o estetiche, in qualsiasi momento e senza alcun preavviso.

1514
BX 6822
Alimentazione: 110V o 230V / 50Hz
Potenza Max: 300 W
Potenza RMS: 150 W
Struttura Box: Stampo a iniezione di polipropilene
Woofer 12”
Impedenza Woofer: 8 Ohms
Tweeter: 1”
Risposta in frequenza: 50 Hz - 20 KHz (-10dB)
SPL 92 dB
Lettore MP3 No
Bluetooth No
Regolazione toni No
Dimensioni: 360 x 580 x 290 mm
Peso: 10 Kg
BX 6822AB
Alimentazione: 110V o 230V / 50Hz
Potenza Max: 160 W
Potenza RMS: 80 W
Struttura Box: Stampo a iniezione di polipropilene
Woofer 12” (25 cm)
Impedenza Woofer: 8 Ohms
Tweeter: 1”
Risposta in frequenza: 50 Hz - 20 KHz (-10dB)
SPL 92 dB
Lettore MP3 Si tramite SD o USB
Bluetooth Si
Regolazione toni Alti e bassi
Dimensioni: 360 x 580 x 290 mm
Peso: 12,3 Kg
SPECIFICHE TECNICHE / SPECIFICATIONS

Ulteriori informazioni su: www.karmaitaliana.it
1514
NOTE / NOTES

ver. 16.1
Via Gozzano 38 bis
21052, Busto Arsizio (VA) - Italy
Telefono +39 0331.628.244
Fax +39 0331.622.470
www.karmaitaliana.it made in China
This manual suits for next models
1
Table of contents
Languages:
Other Karma Speakers manuals

Karma
Karma PSB 12 User manual

Karma
Karma HPS B6M User manual

Karma
Karma BX 7408A User manual

Karma
Karma VORTEX 4 User manual

Karma
Karma CLUB 08 User manual

Karma
Karma HPS 44 User manual

Karma
Karma INFINITY User manual

Karma
Karma BM 863 User manual

Karma
Karma BM 108TX User manual

Karma
Karma BM 661USB-1 User manual

Karma
Karma BX 7412A User manual

Karma
Karma NEMESI User manual

Karma
Karma BK 8A User manual

Karma
Karma BS 83 User manual

Karma
Karma GT 1230 User manual

Karma
Karma BM 863RM User manual

Karma
Karma DOUBLE GO User manual

Karma
Karma MARINE 5 User manual

Karma
Karma HPSB 12S User manual

Karma
Karma RDM 8A User manual