manuals.online logo
Brands
  1. Home
  2. •
  3. Brands
  4. •
  5. KI
  6. •
  7. Indoor Furnishing
  8. •
  9. KI Soltice Metal User manual

KI Soltice Metal User manual

Assemble units as described herein only. To do otherwise
may result in instability. All screws, nuts and bolts must be
tightened securely and must be checked periodically after
assembly. Failure to assemble properly, or to secure parts
may result in assembly failure and personal injury.
Required Tools
• Phillips screwdriver or #2 Phillips
driver bit and electric drill
Connecting Tables Assembly
Note: Multiple seating must
be joined together first, before
assembling connecting tables.
Once assembled together, do not
move seating units that exceed
three seating positions without the
assistance of a second person, as
damage may occur to the assembly.
1. Carefully un-pack all contents
from packaging. Arrange seating
to the approximate location per the
space-planning layout, leaving a gap
between the seats intended to join
with tables (Figure 1).
Note: Center connecting tables
and 45 degree connector tables
are supported by the two adjoining
seating units using connecting table
brackets. End tables are supported
by one adjoining seating unit with a
connecting table bracket, 90 degree
connector tables are supported by
two adjoining seating units using
connecting table brackets and both
table units require the installation of
a leg for additional support. If center
connecting tables or 45 degree
connector tables are to be installed,
proceed to “Center Connecting
Table & 45 Degree Connector Table
Assembly” instructions on this page.
If ONLY end or 90 degree connector
tables are to be installed, proceed
“Connecting End Table & 90 Degree
Connector Table Assembly”
instructions on the next page.
Assembly Instructions
Soltice®Metal
Connecting Tables
August 2019
Center Connecting Table &
45 Degree Connector Table
Assembly
1. Move two multiple seating
units close enough together so
the tabletop to be installed can
be supported by pre-installed
connecting table brackets of both
seating units (Figure 1).
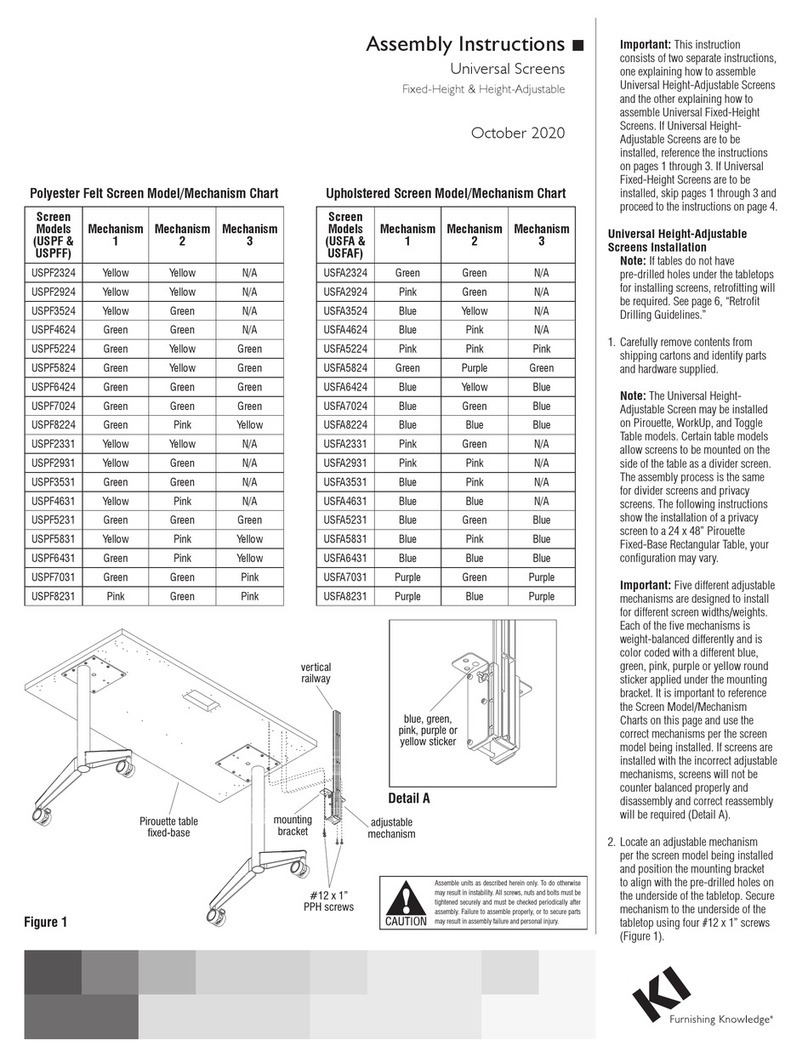
2. Place the center connecting table
(Figure 1) or 45 degree connector
table (Figures 1 & 2) onto the two
table brackets. Align the pre-drilled
holes of the underside of the tabletop
with the mounting holes of each
table bracket and secure using six
#10 x 3/4” wood screws per bracket
(Figures 1 & 2).
Figure 1
connecting
table bracket
#10 x /”
Phillips wood
screws
3
4
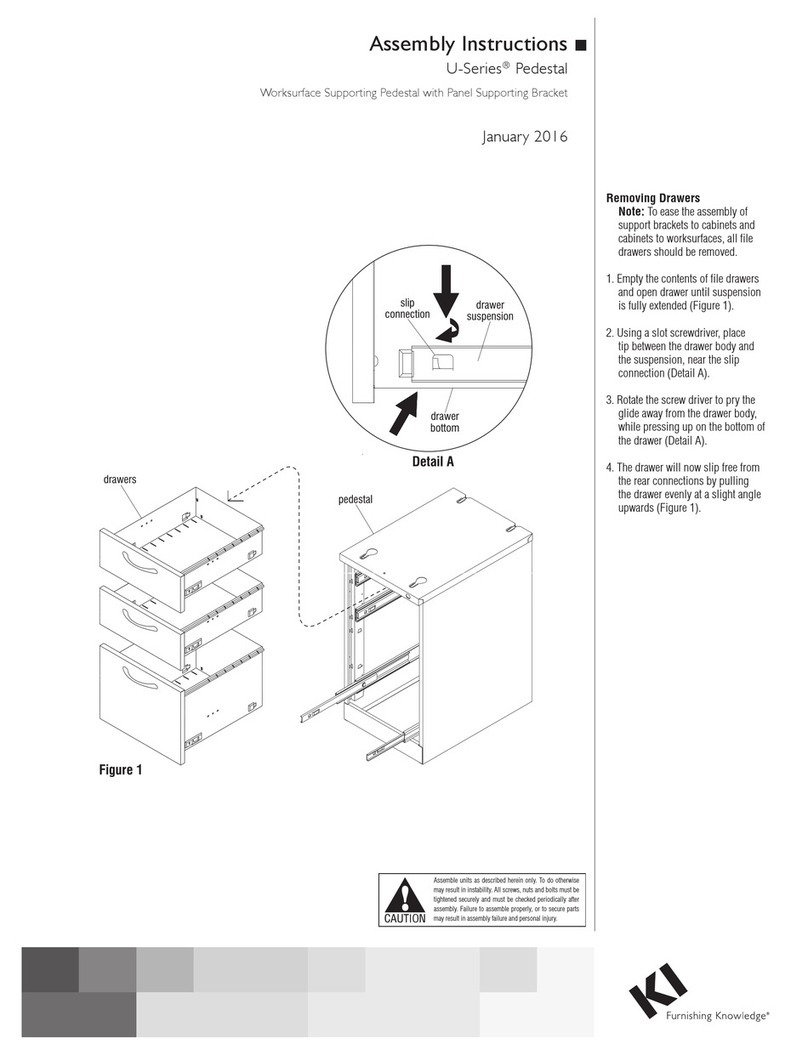
center
connecting
table
45 degree
connector
table (inside)
Figure 2
45 degree
connector
table (outside)
connecting
table bracket
#10 x /”
Phillips wood
screws
3
4
Assemble units as described herein only. To do otherwise
may result in instability. All screws, nuts and bolts must be
tightened securely and must be checked periodically after
assembly. Failure to assemble properly, or to secure parts
may result in assembly failure and personal injury.
1330 Bellevue Street • P.O. Box 8100 • Green Bay, WI 54308-8100 • Tel 1-800-424-2432 • www.ki.com
© 2019 Krueger International, Inc. All Rights Reserved • Code KI-000053/KI/PDF/0819
Soltice®Metal - Connecting Tables
Assembly Instructions
Figure 3
connecting
end table
leg
plate
90 degree
connector
table
leg
plate
#10 x /”
Phillips wood
screws
3
4
support
leg
support
leg
#10 x /”
Phillips wood
screws
3
4
Connecting End Table and
90 Degree Connector Table
Assembly
1. Carefully place connecting end
table or 90 degree connector
table upside down on a soft,
protective surface. Align the
mounting holes of the support
leg mounting plate with the
pre-drilled leg holes in the
underside of the table. Secure the
leg plate to the table using four
#10 x 3/4” wood screws provided
(Figure 3).
2. To connect the 90 degree
connector table, place the table
(with support leg attached) onto
the pre-installed connecting table
brackets of the seats it will join
to. Align the pre-drilled holes of
the underside of the table with
the mounting holes of the table
brackets and secure using six
#10 x 3/4” wood screws
(Figures 4 & 5).
3. To connect the connecting
end table, place the table (with
support leg attached) onto the
pre-installed connecting table
bracket of the seat it will join to.
Align the pre-drilled holes of
the underside of the table with
the mounting holes of the table
bracket and secure using six
#10 x 3/4” wood screws
(Figure 4).
Figure
4
connecting
end table
90 degree
connector
table (inside)
connecting
table bracket
#10 x /”
Phillips wood
screws
3
4
#10 x /”
Phillips wood
screw
3
4
Figure 5
90 degree
connector
table (outside)
table
bracket
#10 x /”
Phillips wood
screws
3
4
Other KI Indoor Furnishing manuals

KI Uniframe Table Guide

KI

KI Uniframe Table Guide

KI USPF2324 User manual

KI

KI USPF2324 User manual

KI 700 Series User manual

KI

KI 700 Series User manual

KI Trek User manual

KI

KI Trek User manual

KI Intellect Wave Chair Guide

KI

KI Intellect Wave Chair Guide

KI Jubilee Lounge Seating Guide

KI

KI Jubilee Lounge Seating Guide

KI Engage Task Chair Installation instructions

KI

KI Engage Task Chair Installation instructions

KI 700 Series User manual

KI

KI 700 Series User manual

KI Instruct All Terrain Sloped Landing Pad Kit User manual

KI

KI Instruct All Terrain Sloped Landing Pad Kit User manual

KI InTandem User manual

KI

KI InTandem User manual

KI Aristotle Casegoods Wall-Mounted Overhead... User manual

KI

KI Aristotle Casegoods Wall-Mounted Overhead... User manual

KI CrossRoads Newspaper Display Unit User manual

KI

KI CrossRoads Newspaper Display Unit User manual

KI WorkUp FX User manual

KI

KI WorkUp FX User manual

KI Lancaster Auditorium Seating User manual

KI

KI Lancaster Auditorium Seating User manual

KI Extol Installation instructions

KI

KI Extol Installation instructions

KI Pirouette User manual

KI

KI Pirouette User manual

KI Oath Installation instructions

KI

KI Oath Installation instructions

KI Altus Mesh Back Task Chairs Guide

KI

KI Altus Mesh Back Task Chairs Guide

KI Matrix Guide

KI

KI Matrix Guide

KI All Terrain Modular Storage Tower User manual

KI

KI All Terrain Modular Storage Tower User manual

KI FourC Task Chair Guide

KI

KI FourC Task Chair Guide

KI Enlite ENRC Series User manual

KI

KI Enlite ENRC Series User manual

KI U Series User manual

KI

KI U Series User manual

KI System 3000 Countertop User manual

KI

KI System 3000 Countertop User manual

Popular Indoor Furnishing manuals by other brands

American Standard Ariana 6024EZ installation instructions

American Standard

American Standard Ariana 6024EZ installation instructions

Sauder Hudson Court 425833 manual

Sauder

Sauder Hudson Court 425833 manual

STABILO BASE Instructions for use

STABILO

STABILO BASE Instructions for use

Home Decorators Collection LAILA Assembly instructions

Home Decorators Collection

Home Decorators Collection LAILA Assembly instructions

Mocka Zara Assembly instructions

Mocka

Mocka Zara Assembly instructions

Golden Relax The Back Bordeaux PR805 owner's manual

Golden

Golden Relax The Back Bordeaux PR805 owner's manual

TOV BEATRIX Assembly instructions

TOV

TOV BEATRIX Assembly instructions

drew & jonathan Scott Living Keoki SL36WBKK-4 manual

drew & jonathan

drew & jonathan Scott Living Keoki SL36WBKK-4 manual

Frank Olsen Intel LED Lamp Table Assembly instructions

Frank Olsen

Frank Olsen Intel LED Lamp Table Assembly instructions

MDR Riva Assembly instructions

MDR

MDR Riva Assembly instructions

Seconique Furniture NEVADA Assembly instructions

Seconique Furniture

Seconique Furniture NEVADA Assembly instructions

Prince Castle 918-B Specification sheet

Prince Castle

Prince Castle 918-B Specification sheet

Leigh Country Aspen Series manual

Leigh Country

Leigh Country Aspen Series manual

Howdens 931 installation manual

Howdens

Howdens 931 installation manual

Walker Edison BRSPDB Assembly instructions

Walker Edison

Walker Edison BRSPDB Assembly instructions

HOMCOM 831-494V90 manual

HOMCOM

HOMCOM 831-494V90 manual

HULALA HOME SBBSD0588 manual

HULALA HOME

HULALA HOME SBBSD0588 manual

CONFORAMA LIT COZY Assembling Instruction

CONFORAMA

CONFORAMA LIT COZY Assembling Instruction

manuals.online logo
manuals.online logoBrands
  • About & Mission
  • Contact us
  • Privacy Policy
  • Terms and Conditions

Copyright 2025 Manuals.Online. All Rights Reserved.