manuals.online logo
Brands
  1. Home
  2. •
  3. Brands
  4. •
  5. KI
  6. •
  7. Indoor Furnishing
  8. •
  9. KI Tattoo Chest User manual

KI Tattoo Chest User manual

Assemble units as described herein only. To do otherwise
may result in instability. All screws, nuts and bolts must be
tightened securely and must be checked periodically after
assembly. Failure to assemble properly, or to secure parts
may result in assembly failure and personal injury.
Required Tools
• 12 mm Hex Wrench
• Power Drill Driver
• #3 Phillips Tip
• 8” Drill Extension
Note: Leg posts are designed to
receive either casters or glides,
based on their overall length. Leg
posts at 57/16” long are designed for
casters, while 63/4” long leg posts
are for glides. If your installation
contains a mix of units with casters
and units with glides, take care to
not mix up the leg components, or
disassembly and re-assembly will be
required to correct the unit heights.
Leg Installation
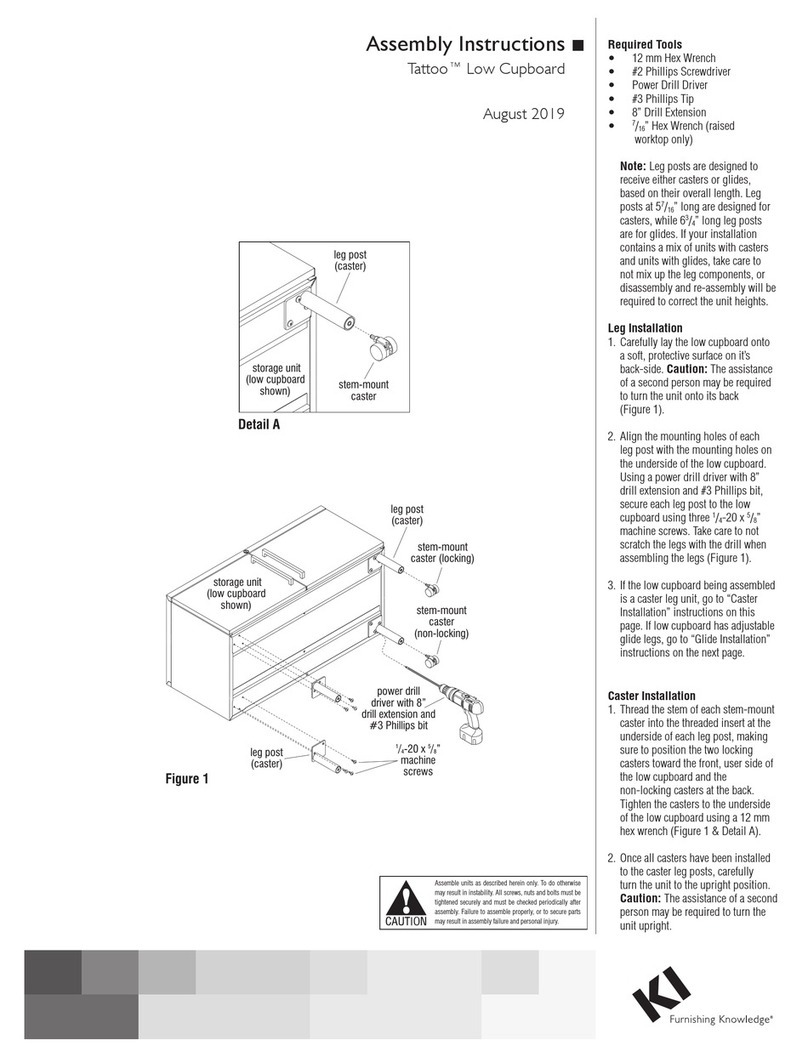
1. Carefully lay the low cupboard onto a
soft, protective surface on its
back-side. Caution: The assistance
of a second person may be required
to turn the unit onto its back
(Figure 1).
2. Align the mounting holes of each
leg post with the mounting holes on
the underside of the storage unit.
Using a power drill driver with 8”
drill extension and #3 Phillips bit,
secure each leg post to the storage
unit using three 1/4-20 x 5/8” machine
screws. Take care to not scratch the
legs with the drill when assembling
the legs (Figure 1).
3. If the storage unit being assembled
is a caster leg unit, go to “Caster
Installation” instructions on this
page. If unit has adjustable glide
legs, go to “Glide Installation”
instructions on the next page.
Caster Installation
1. Thread the stem of each stem-mount
caster into the threaded insert at the
underside of each leg post, making
sure to position the two locking
casters toward the front, user side of
the storage unit and the non-locking
casters at the back. Tighten the
casters to the underside of the leg
post using a 12 mm hex wrench
(Figure 1 & Detail A).
2. Once all casters have been installed
to the caster leg posts, carefully
turn the unit to the upright position.
Caution: The assistance of a second
person may be required to turn the
unit upright.
Assembly Instructions
Tattoo™ Chest, Tower & Vanity
August 2019
Figure 1
storage unit
(vanity shown)
power drill
driver with 8”
drill extension and
#3 Phillips bit
leg post
(caster)
stem-mount
caster (locking)
stem-mount
caster
(non-locking)
15
/ -20 x /”
machine
screws
48
leg post
(caster)
Detail
A
stem-mount
caster
leg post
(caster)
storage unit
(vanity shown)
2
Assemble units as described herein only. To do otherwise
may result in instability. All screws, nuts and bolts must be
tightened securely and must be checked periodically after
assembly. Failure to assemble properly, or to secure parts
may result in assembly failure and personal injury.
Tattoo™Chest, Tower & Vanity
Assembly Instructions
Figure 2
storage unit
(vanity shown)
leg post
(glide)
stem-mount
glide
stem-mount
glide
Glide Installation
1. Thread the stem of each glide into
the threaded insert at the underside
of each leg post. Twist the glides in
clock-wise, fully to the bottom of
the leg post. This will allow level
adjustment of the storage unit if
required when placed in it’s final
location (Figure 2 & Detail B).
2. Once all glides have been installed
to the underside of the leg posts,
carefully turn the unit to the upright
position. Caution: The assistance of
a second person is required to turn
larger storage or tower units to the
upright position.
3. Place the storage unit in its final
location. To raise a leg of the unit for
leveling, rotate a glide out as needed.
To lower a low cupboard leg after it
has been raised, turn the glide back
into the leg as needed. Only adjust
the glides as needed to make the low
cupboard level.
stem-mount
glide
leg post
(glide)
Detail B
storage unit
(vanity shown)
3
Assemble units as described herein only. To do otherwise
may result in instability. All screws, nuts and bolts must be
tightened securely and must be checked periodically after
assembly. Failure to assemble properly, or to secure parts
may result in assembly failure and personal injury.
Tattoo™Chest, Tower & Vanity - Door Hinge Adjustment
Assembly Instructions
Door Hinge Adjustment
Note: If doors on the storage unit
are not aligned, follow instructions
below to adjust doors until square
on the unit.
1. For door height adjustment of
+/-2 mm, loosen the two height
adjust screws on each hinge and
move door up or down. Re-tighten
screws (Figure 3).
2. For door depth adjustment, first
loosen the depth adjust screw, then
slide the key hole of the hinge to
the desired location. Re-tighten the
screw (Figure 4).
3. For side-to-side adjustment, turn
the side-to-side adjust screw in or
out. The screw works in conjunction
with the inner leaf of the hinge arm to
move the door back or forth without a
change in gap between the door and
the cabinet (Figure 5).
4. To disassemble door from cabinet,
press the button on the rear of the
hinge tail inside the unit. Pull the
door slightly forward to disengage
the hinge connection. Repeat for the
other door hinge to remove the door
from the unit (Figure 6).
Figure 3 - Door Height Adjustment
door
hinge
Figure 4 - Door Depth Adjustment
door
hinge
keyhole
of the
hinge
Figure 5 - Side-to-Side Adjustment
side-to-side
adjust
screw
door
hinge
side-to-side
adjust
screw
door
hinge
Figure 6 - Door Removal
door
hinge
button on the
rear of the
hinge tail
Tattoo™Chest, Tower & Vanity
Assembly Instructions
1330 Bellevue Street • P.O. Box 8100 • Green Bay, WI 54308-8100 • Tel 1-800-424-2432 • www.ki.com
© 2019 Krueger International, Inc. All Rights Reserved • Code KI-AI-000035R1/KI/PDF/0819
Part # 2.57090

This manual suits for next models

2

Other KI Indoor Furnishing manuals

KI WorkZone User manual

KI

KI WorkZone User manual

KI Extol Installation instructions

KI

KI Extol Installation instructions

KI Vertical Cable Manager User manual

KI

KI Vertical Cable Manager User manual

KI Piretti Torsion Installation instructions

KI

KI Piretti Torsion Installation instructions

KI Intellect Book Box User manual

KI

KI Intellect Book Box User manual

KI Intellect Chair Guide

KI

KI Intellect Chair Guide

KI WorkUp CR User manual

KI

KI WorkUp CR User manual

KI Altus Task Seating Installation instructions

KI

KI Altus Task Seating Installation instructions

KI Enlite ENRC Series User manual

KI

KI Enlite ENRC Series User manual

KI 700 Series User manual

KI

KI 700 Series User manual

KI InTandem Installation instructions

KI

KI InTandem Installation instructions

KI Likha Casegoods User manual

KI

KI Likha Casegoods User manual

KI CafeWay ECRCB Maintenance manual

KI

KI CafeWay ECRCB Maintenance manual

KI Grazie Installation guide

KI

KI Grazie Installation guide

KI CrossRoads Shelving Single Face Metal with Back... User manual

KI

KI CrossRoads Shelving Single Face Metal with Back... User manual

KI Impress Guide

KI

KI Impress Guide

KI InTandem User manual

KI

KI InTandem User manual

KI Doni User manual

KI

KI Doni User manual

KI RT User manual

KI

KI RT User manual

KI Doni Guide

KI

KI Doni Guide

KI Unite System User manual

KI

KI Unite System User manual

KI Uniframe Conver User manual

KI

KI Uniframe Conver User manual

KI Uniframe Table Guide

KI

KI Uniframe Table Guide

KI Rapture Stack Chair User manual

KI

KI Rapture Stack Chair User manual

Popular Indoor Furnishing manuals by other brands

Wren Kitchens Vogue BASE UNIT 500 3 Drawer Assembly guide

Wren Kitchens

Wren Kitchens Vogue BASE UNIT 500 3 Drawer Assembly guide

Kvik DSH2812 Assembly manual

Kvik

Kvik DSH2812 Assembly manual

Coaster 2258W Assembly instructions

Coaster

Coaster 2258W Assembly instructions

Whitewood Furniture SH-3223A Assembly instructions

Whitewood Furniture

Whitewood Furniture SH-3223A Assembly instructions

calligaris KEY CS/4044 Customer information

calligaris

calligaris KEY CS/4044 Customer information

Sauder Harbor View 416797 manual

Sauder

Sauder Harbor View 416797 manual

Avenue Six DAVIS DVS51 Assembly instructions

Avenue Six

Avenue Six DAVIS DVS51 Assembly instructions

Abble Tufted Round Cocktail Ottoman 300540 Assembly instruction

Abble

Abble Tufted Round Cocktail Ottoman 300540 Assembly instruction

Polini kids Fun 3290 manual

Polini kids

Polini kids Fun 3290 manual

BCP SKY2708 instruction manual

BCP

BCP SKY2708 instruction manual

Coaster Bennington 222712 Assembly instructions

Coaster

Coaster Bennington 222712 Assembly instructions

Royalcraft Faro 4pcs Assembly instructions

Royalcraft

Royalcraft Faro 4pcs Assembly instructions

FROST UNU U4135 FITTING INSTRUCTION

FROST

FROST UNU U4135 FITTING INSTRUCTION

Furniture of America CM3984SC-2PK Assembly instructions

Furniture of America

Furniture of America CM3984SC-2PK Assembly instructions

Sera Porto 48 installation instructions

Sera

Sera Porto 48 installation instructions

J.Burrows JBIR41810B Assembly instructions

J.Burrows

J.Burrows JBIR41810B Assembly instructions

Essentials For Living ADLER MEDIA SIDEBOARD Assembly instructions

Essentials For Living

Essentials For Living ADLER MEDIA SIDEBOARD Assembly instructions

Wren Kitchens Vogue TOWER UNIT Boiler Housing Assembly guide

Wren Kitchens

Wren Kitchens Vogue TOWER UNIT Boiler Housing Assembly guide

manuals.online logo
manuals.online logoBrands
  • About & Mission
  • Contact us
  • Privacy Policy
  • Terms and Conditions

Copyright 2025 Manuals.Online. All Rights Reserved.