manuals.online logo
Brands
  1. Home
  2. •
  3. Brands
  4. •
  5. KI
  6. •
  7. Office Equipment
  8. •
  9. KI All Terrain Wall Rail User manual

KI All Terrain Wall Rail User manual

Assembly Instructions
All Terrain® Wall Rail
July 2012
Assemble units as described herein only. To do otherwise
may result in instability. All screws, nuts and bolts must be
tightened securely and must be checked periodically after
assembly. Failure to assemble properly, or to secure parts
may result in assembly failure and personal injury.
1. Orient the wall rail with the top
hook edge facing up (Figure1&
Detail A). Slideamounting bracket
into each end of the wall rail
extrusion, with the narrow portion
of the keyhole pointing up as
illustrated.
2. Position the mounting brackets to
the outside of the wall rail for better
stability (Figure 1).
seaspirit level under the
wall rail to assure the wall rail is
straight and m
3. Hold the wall rail with correctly
positioned brackets up to the wall at
1- /”below the desired mounting
location. U
akeamark at two
locations directly above each
keyhole location in the mounting
bracket. Remove the wall rail with
brackets, and confirm withaspirit
level that the marked holes are level.
4. Drill holes into studs, or into wall
locations as specified by customer
supplied fasteners then install
customer supplied fastening device
appropriate to the wall.
5. Line up keyholes in brackets with
fasteners, press the larger end of
the keyholes over the fasteners, and
pull down until is locked in snug.
Adjust fasteners if required for
secure fit.
Keyhole hasaclearance of
½”andakeyway /”wide.
1
13
8
64
Note:
Assembly Instructions
AllTerrain Wall Rail
Detail A
AT-WlRail
hook
edge
(top)
wall
wall rail
extrusion
mounting
bracket
Figure 1
keyhole
fastener
(customer supplied)
wall rail
extrusion
mounting
bracket
1330 Bellevue Street • P.O. Box 8100 • Green Bay, WI 54308-8100 • Tel 1-800-424-2432 • www.ki.com
© 2012 KI All Rights Reserved • Litho in USA • Code KI-61508R1/KI/PDF/0712
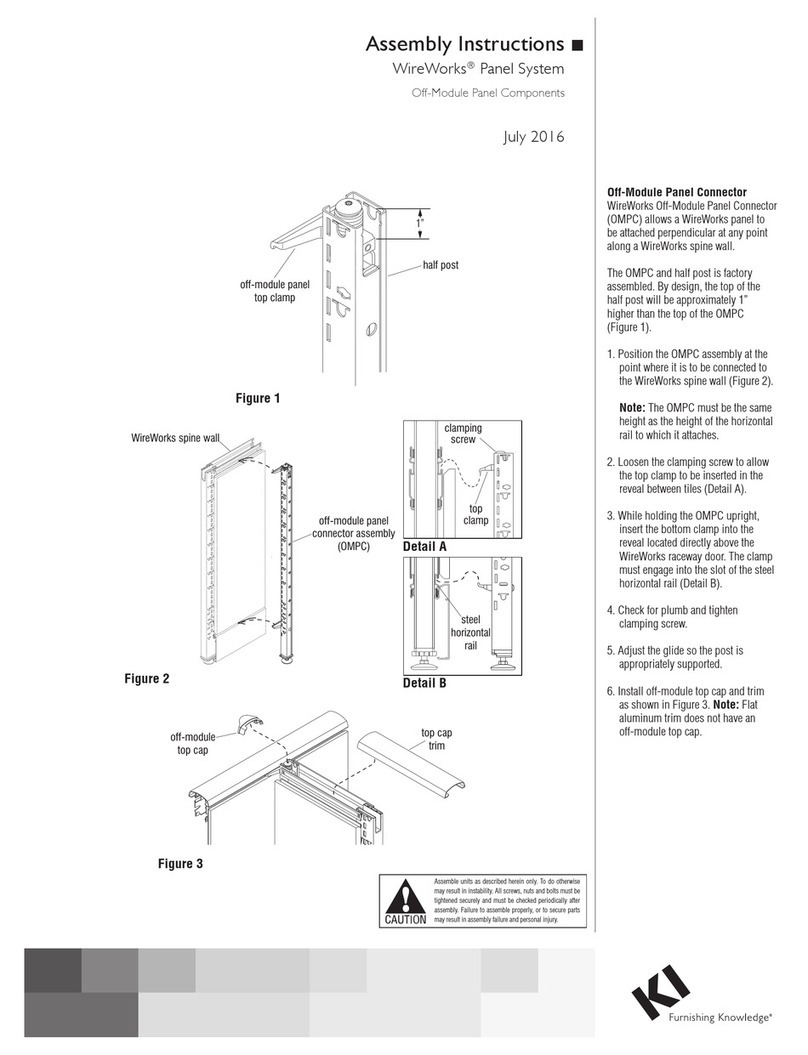
1. Orient the wall rail with the top hook
edge facing up (Figure 1 & Detail A).
Slide a mounting bracket into each
end of the wall rail extrusion, with
the narrow portion of the keyhole
pointing up as illustrated.
2. Position the mounting brackets to
the outside of the wall rail for better
stability (Figure 1).
3. Hold the wall rail with correctly
positioned brackets up to the wall
at 11/8” below the desired mounting
location. Use a spirit level under
the wall rail to ensure the wall rail
is straight and make a mark at two
locations directly above each keyhole
location in the mounting bracket.
Remove the wall rail with brackets,
and confirm with a spirit level that
the marked holes are level.
4. Drill mounting holes into studs, or
into wall locations as specified by
customer supplied fasteners then
install customer supplied fastening
device appropriate to the wall.
5. Line up keyholes in brackets with
fasteners, press the larger end of
the keyholes over the fasteners, and
pull down on the wall rail/bracket
assembly until it is locked in snug.
Revove wall rail and adjust fasteners
if required for a more secure fit.
Note: Keyhole has a clearance of ½”
and a keyway 13/64” wide.
Part #80500
Assembly Instructions
All Terrain®Panel Rail
July 2012
Assemble units as described herein only. To do otherwise
may result in instability. All screws, nuts and bolts must be
tightened securely and must be checked periodically after
assembly. Failure to assemble properly, or to secure parts
may result in assembly failure and personal injury.
AT-TLRail-Pnl
Assembly Instructions
AllTerrain PanelRail
Note: The following instructions
refer to the installation of an All
Terrain Panel Rail to panel/wall
system using WireWorks panel-
mount brackets. Different brackets
may be used, depending on type
of panel/walls. Panel rails can be
mounted "off-module", so rail may
be longer than the width of the
wall panel to which it’s installed.
1. Orient the panel rail with the
tapered edge down and the hook
end up, as illustrated (Detail A).
2. Determine which panel-mount
brackets are right- and left-hand
and position accordingly (Figure
1). Slide brackets into the panel
rail extrusion ends and align the
bracket hooks with the width of
the slotting patternin panel walls.
Ensure that the panel rail is level
and slide the top hooks of the
brackets into wall slots at the
desired height. Rotate lower
hooks into slots and press down
to secure (Figure 2).
panel rail
(side view)
tapered
edge
hook
edge
(top)
36" wide
panel
48" wide
panel rail
panel-mount
bracket
(left-hand)
panel-mount
bracket
(right-hand)
panel rail
extrusion
Figure 1
Figure 2
Detail A
1330 Bellevue Street • P.O. Box 8100 • Green Bay, WI 54308-8100 • Tel 1-800-424-2432 • www.ki.com
© 2012 KI All Rights Reserved • Litho in USA • Code KI-61508R1/KI/PDF/0712
Note: The following instructions refer
to the installation of an All Terrain
Panel Rail to panel/wall system
using WireWorks® panel-mount
brackets. Different brackets may be
used, depending on type of panel/
walls. Panel rails can be mounted
“off-module”, so rail may be longer
than the width of the wall panel to
which it’s installed.
1. Orient the panel rail with the tapered
edge down and the hook end up, as
illustrated (Detail A).
2. Determine which panel-mount
brackets are right- and left-hand and
position accordingly (Figure 1). Slide
brackets into the panel rail extrusion
ends and align the bracket hooks with
the width of the slotting pattern in
panel walls. Ensure that the panel rail
is level and slide the top hooks of the
brackets into wall slots at the desired
height. Rotate lower hooks into slots
and press down to secure (Figure 2).
Part #80500

Other KI Office Equipment manuals

KI WireWorks User manual

KI

KI WireWorks User manual

KI RoomScape User manual

KI

KI RoomScape User manual

KI WireWorks User manual

KI

KI WireWorks User manual

KI WireWorks User manual

KI

KI WireWorks User manual

KI Pull Out Worksurface Storage User manual

KI

KI Pull Out Worksurface Storage User manual

KI WireWorks User manual

KI

KI WireWorks User manual

KI Likha Casegoods User manual

KI

KI Likha Casegoods User manual

KI Tattoo Flex Screen User manual

KI

KI Tattoo Flex Screen User manual

KI Backbone Media Platform User manual

KI

KI Backbone Media Platform User manual

KI 810 User manual

KI

KI 810 User manual

KI Laptop Garage Manual

KI

KI Laptop Garage Manual

KI WireWorks User manual

KI

KI WireWorks User manual

Popular Office Equipment manuals by other brands

Formax FD 402TA1 Operator's manual

Formax

Formax FD 402TA1 Operator's manual

ABSTRACTA Plenty Pod Large Fix Assembly instructions

ABSTRACTA

ABSTRACTA Plenty Pod Large Fix Assembly instructions

ESI SOLUTION 2 Installation and use

ESI

ESI SOLUTION 2 Installation and use

Mayline Medina Series Assembly instructions

Mayline

Mayline Medina Series Assembly instructions

LDI SAFCO 3045 Assembly instructions

LDI

LDI SAFCO 3045 Assembly instructions

UMI M21 installation guide

UMI

UMI M21 installation guide

Creative ESCLIP user manual

Creative

Creative ESCLIP user manual

Evolve SHOWROOMS installation guide

Evolve

Evolve SHOWROOMS installation guide

LDI SAFCO 5374 Assembly instructions

LDI

LDI SAFCO 5374 Assembly instructions

VS V94 manual

VS

VS V94 manual

Vicoustic VicBooth Office installation manual

Vicoustic

Vicoustic VicBooth Office installation manual

Spectrum Industries Flip-up Shelf for Link Lectern 55540 Assembly instructions

Spectrum Industries

Spectrum Industries Flip-up Shelf for Link Lectern 55540 Assembly instructions

Brother MFC-5460CN user guide

Brother

Brother MFC-5460CN user guide

Marsh TD2100 owner's manual

Marsh

Marsh TD2100 owner's manual

Quality Clever PivyCord-V user guide

Quality Clever

Quality Clever PivyCord-V user guide

Steelcase Turnstone Small Office Solution Set Assembly instructions

Steelcase

Steelcase Turnstone Small Office Solution Set Assembly instructions

NEARITY NearHub Board S55 user manual

NEARITY

NEARITY NearHub Board S55 user manual

U-Line H-8381 manual

U-Line

U-Line H-8381 manual

manuals.online logo
manuals.online logoBrands
  • About & Mission
  • Contact us
  • Privacy Policy
  • Terms and Conditions

Copyright 2025 Manuals.Online. All Rights Reserved.