manuals.online logo
Brands
  1. Home
  2. •
  3. Brands
  4. •
  5. KI
  6. •
  7. Office Equipment
  8. •
  9. KI Pull Out Worksurface Storage User manual

KI Pull Out Worksurface Storage User manual

Kit Parts:
(1) Slide Rail
(10) #8 x 1⁄2" Pan-Head Screws
(2) Recessed Bumpers
(2) #6 Wood Screws
(1) Wire Rack
(1) Shoulder Bolt
(2) Nylon Washers
(1) Rotating Arm Assembly
(2) Slide Guides
(1) SnapRackTM CD Rack (two parts
that snap together)
(1) All Terrain Bin
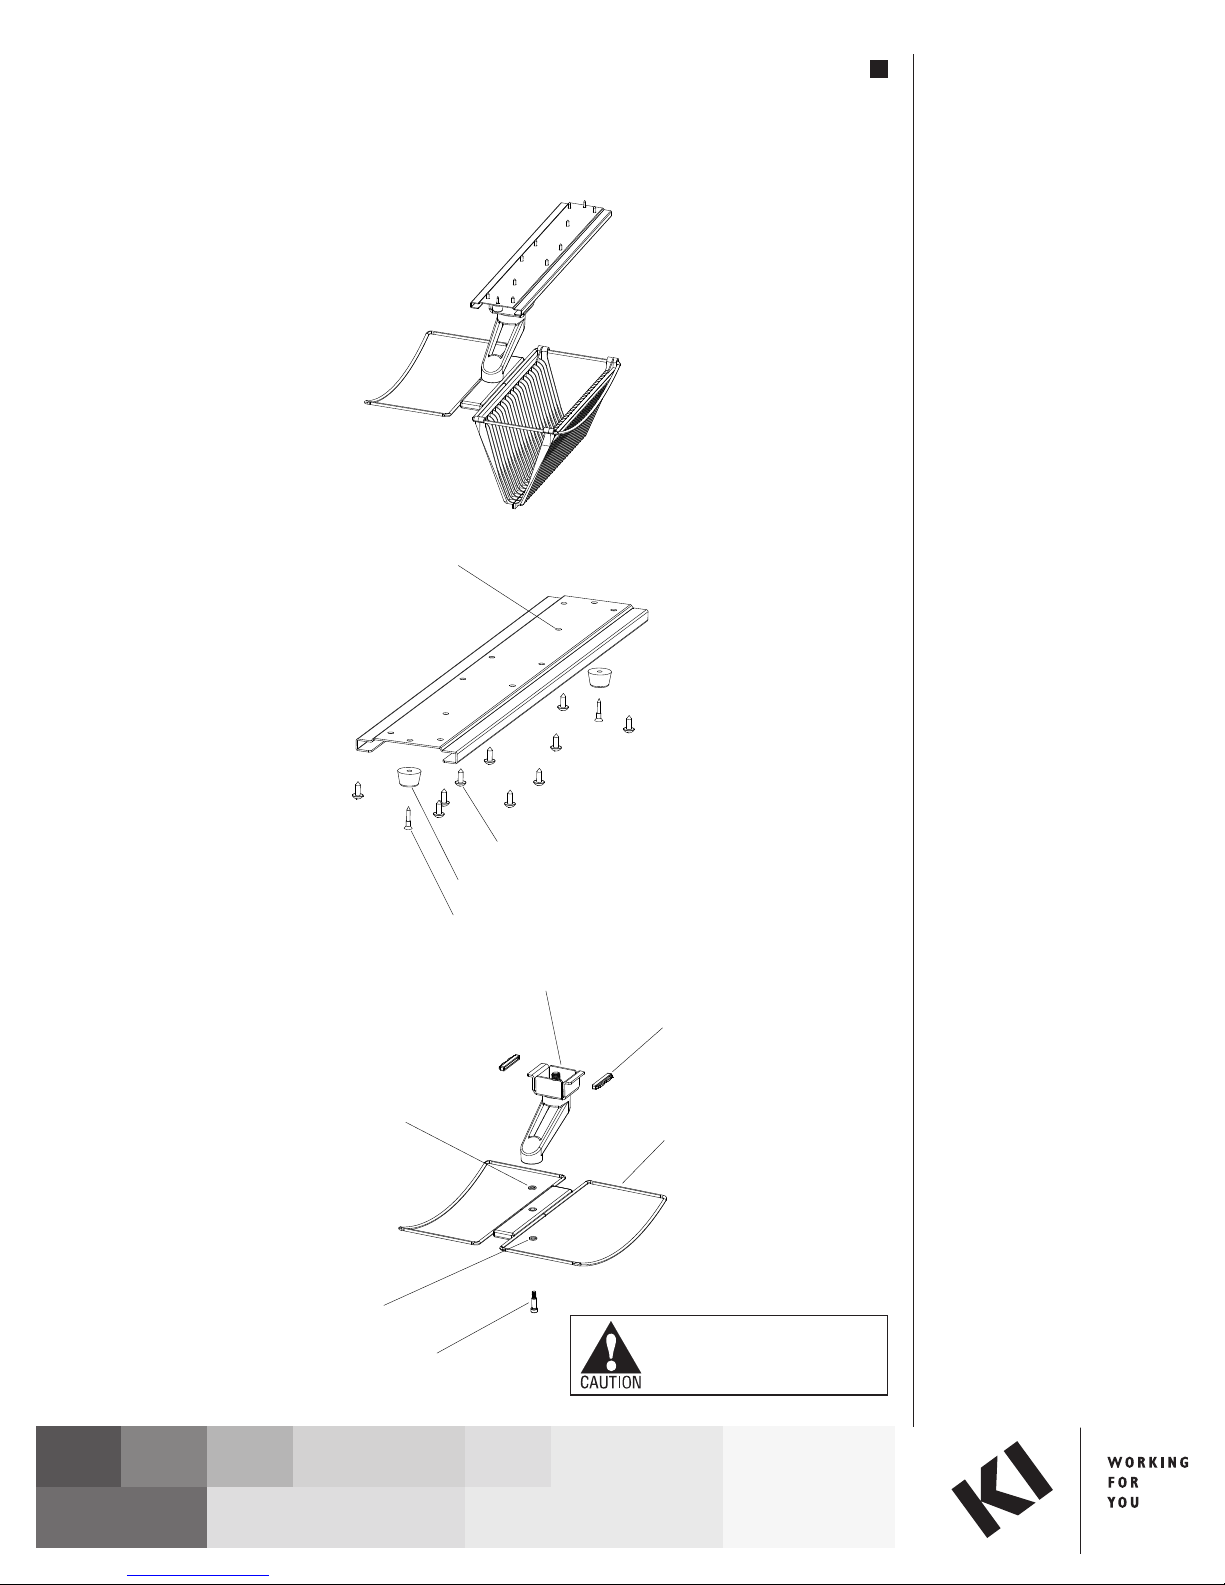
1. Install the Slide Rail. Hold the
slide rail on the bottom of the
work surface to be mounted.
Mark the hole locations for
mounting. Please reserve the
center screw hole on each end for
the recessed bumpers. Remove
the slide rail and pre-screw four
#8 x 1⁄2" pan-head screws into the
work surface at both ends using
the outside two holes, then
remove. Next, hold the slide rail
in place and mount four #8 x 1⁄2"
pan-head screws into the pre-
screwed holes until flush,
continue placing the remaining
six mounting screws (Figure 1).
2. Install Recessed Bumper. Using
one #6 wood screw, mount one
recessed bumper into the center
screw hole at far end of the slide
rail, away from the front of the
desk. This will keep the rotating
arm assembly from sliding out of
the back of the rail (Figure 1).
3. Assemble the Rotating Arm.
Place one nylon washer onto the
shoulder bolt, then place the
shoulder bolt through the bottom
of the wire rack.
Note: The wire rack is in up
position when the arc is a “U”.
Place one nylon washer onto the
opposite end of the shoulder
bolt. By hand, mount the
shoulder bolt into the end of the
rotating arm assembly, until it
catches, then using the Allen
wrench, tighten until snug. Place
one slide guide on each end of
the rotating arm assembly
(Figure 2).
Assembly Instructions
Pull Out Worksurface Storage
November 2004
Assemble units as described herein only. To do otherwise
may result in instability. All screws, nuts and bolts must be
tightened securely and must be checked periodically after
assembly. Failure to assemble properly, or to secure parts
may result in assembly failure and injury.
1330 Bellevue Street • P. O. Box 8100 • Green Bay, WI 54308-8100 • Tel 1-800-424-2432 • www.ki.com
© 2004 KI All Rights Reserved • Litho in USA • Code KI-61645/TM/GT/1104
Figure 1
Figure 2
#8 x 1/2” pan-head screw (10 req’d)
recessed bumper (2 req’d)
#6 wood screw (2 req’d)
rotating arm assembly
slide guide (2 req’d)
wire rack
nylon washer bushing
flat nylon washer
5/16 shoulder bolt
slide rail
4. Install Rotating Arm Assembly to
Slide Rail. Slide the rotating arm
in the slide rail. Push all the way
back until it stops (Figure 3).
5. Install Last Recessed Bumper.
Using one #6 wood screw, mount
the remaining recessed bumper
in the center hole at the front end
of the slide rail (Figure 4).
6. Assemble the SnapRackTM CD
Rack. Snap the two sides of the
CD rack together by lining up the
snap detail at the bottom, making
a "V" shape. Place in the wire
rack assembly (Figure 5).
7. Install the All Terrain bin
(Figure 6).
Assemble units as described herein only. To do otherwise
may result in instability. All screws, nuts and bolts must be
tightened securely and must be checked periodically after
assembly. Failure to assemble properly, or to secure parts
may result in assembly failure and injury.
Pull Out Worksurface Storage
Assembly Instructions
Figure 4
Figure 5
Figure 6
SnapRack CD rack
recessed
bumper
snap together at the bottom
slide rail assembly
Figure 3
slide rail
rotating arm

Other KI Office Equipment manuals

KI Tattoo Flex Screen User manual

KI

KI Tattoo Flex Screen User manual

KI Likha Casegoods User manual

KI

KI Likha Casegoods User manual

KI All Terrain Wall Rail User manual

KI

KI All Terrain Wall Rail User manual

KI 810 User manual

KI

KI 810 User manual

KI WireWorks User manual

KI

KI WireWorks User manual

KI Backbone Media Platform User manual

KI

KI Backbone Media Platform User manual

KI WireWorks User manual

KI

KI WireWorks User manual

KI WireWorks User manual

KI

KI WireWorks User manual

KI Laptop Garage Manual

KI

KI Laptop Garage Manual

KI RoomScape User manual

KI

KI RoomScape User manual

KI WireWorks User manual

KI

KI WireWorks User manual

KI WireWorks User manual

KI

KI WireWorks User manual

Popular Office Equipment manuals by other brands

Steelcase Avenir Movable Walls PAB-9 Joining Panels manual

Steelcase

Steelcase Avenir Movable Walls PAB-9 Joining Panels manual

Neopost NJOG-1011 operating guide

Neopost

Neopost NJOG-1011 operating guide

Plus N-32S Service manual

Plus

Plus N-32S Service manual

Askia Kameleon K6 Assembly instructions

Askia

Askia Kameleon K6 Assembly instructions

Stretch Now Mobel Motion MK 2 user guide

Stretch Now

Stretch Now Mobel Motion MK 2 user guide

VADDIO AutoVIEW Installation and user guide

VADDIO

VADDIO AutoVIEW Installation and user guide

Kyocera PF-410 Service manual

Kyocera

Kyocera PF-410 Service manual

Eurobib Direct Info Pod E4383 user manual

Eurobib Direct

Eurobib Direct Info Pod E4383 user manual

Steelcase Migration SE Boundary Screen quick start guide

Steelcase

Steelcase Migration SE Boundary Screen quick start guide

UVic MacLaurin D115 Helpful Guide

UVic

UVic MacLaurin D115 Helpful Guide

Formax FlashCard Operator's manual

Formax

Formax FlashCard Operator's manual

Berea HardWoods Round Top European Double Twist quick start guide

Berea HardWoods

Berea HardWoods Round Top European Double Twist quick start guide

MEAVO CAMDEN MEETING POD owner's manual

MEAVO

MEAVO CAMDEN MEETING POD owner's manual

LDI Spaces Safco Onyx 6453 Assembly instructions

LDI Spaces

LDI Spaces Safco Onyx 6453 Assembly instructions

Herman Miller Canvas Office Landscape Installation and Disassembly for Recycling Instructions

Herman Miller

Herman Miller Canvas Office Landscape Installation and Disassembly for Recycling Instructions

RIGHT ANGLE PRL installation instructions

RIGHT ANGLE

RIGHT ANGLE PRL installation instructions

Regency LES STATIONS LRDDS7135 instructions

Regency

Regency LES STATIONS LRDDS7135 instructions

Roberts 10-412 owner's manual

Roberts

Roberts 10-412 owner's manual

manuals.online logo
manuals.online logoBrands
  • About & Mission
  • Contact us
  • Privacy Policy
  • Terms and Conditions

Copyright 2025 Manuals.Online. All Rights Reserved.