manuals.online logo
Brands
  1. Home
  2. •
  3. Brands
  4. •
  5. KMC Controls
  6. •
  7. Accessories
  8. •
  9. KMC Controls STE-6014-10 User manual

KMC Controls STE-6014-10 User manual

This manual suits for next models

4

Other KMC Controls Accessories manuals

KMC Controls Conquest STE-90 Series User manual

KMC Controls

KMC Controls Conquest STE-90 Series User manual

KMC Controls STE-6014 User guide

KMC Controls

KMC Controls STE-6014 User guide

KMC Controls STE-8001 User manual

KMC Controls

KMC Controls STE-8001 User manual

KMC Controls NetSensor KMD-1162 Operating instructions

KMC Controls

KMC Controls NetSensor KMD-1162 Operating instructions

KMC Controls SSS-1000 Series User manual

KMC Controls

KMC Controls SSS-1000 Series User manual

KMC Controls STE-6010-10 User manual

KMC Controls

KMC Controls STE-6010-10 User manual

KMC Controls THE-1105 User manual

KMC Controls

KMC Controls THE-1105 User manual

KMC Controls SSS-1000 Series User manual

KMC Controls

KMC Controls SSS-1000 Series User manual

KMC Controls STE-6010 User guide

KMC Controls

KMC Controls STE-6010 User guide

KMC Controls STW Series User manual

KMC Controls

KMC Controls STW Series User manual

KMC Controls STE-6014 User manual

KMC Controls

KMC Controls STE-6014 User manual

KMC Controls STW-6010 User manual

KMC Controls

KMC Controls STW-6010 User manual

KMC Controls KMD-1183 Operating instructions

KMC Controls

KMC Controls KMD-1183 Operating instructions

KMC Controls NetSensor KMD-1261 Operating instructions

KMC Controls

KMC Controls NetSensor KMD-1261 Operating instructions

KMC Controls STE-1421 User manual

KMC Controls

KMC Controls STE-1421 User manual

Popular Accessories manuals by other brands

Quincy lab 140AE-1 operating manual

Quincy lab

Quincy lab 140AE-1 operating manual

HomePro ZIR000 user manual

HomePro

HomePro ZIR000 user manual

DOL 20SCR Technical user guide

DOL

DOL 20SCR Technical user guide

RAB Smart Task installation manual

RAB

RAB Smart Task installation manual

Kemppi KMS 300 quick guide

Kemppi

Kemppi KMS 300 quick guide

Stearns 57,500 Series Installation and service instructions

Stearns

Stearns 57,500 Series Installation and service instructions

iGuzzini TWILIGHT COPENAGHEN manual

iGuzzini

iGuzzini TWILIGHT COPENAGHEN manual

Adelaide Annexe & Canvas Avan Deluxe installation guide

Adelaide Annexe & Canvas

Adelaide Annexe & Canvas Avan Deluxe installation guide

OHAUS 5000 instruction manual

OHAUS

OHAUS 5000 instruction manual

HOME8 WLS1300 quick start guide

HOME8

HOME8 WLS1300 quick start guide

MAXBOTIX MaxSonar quick start guide

MAXBOTIX

MAXBOTIX MaxSonar quick start guide

ioSmart iSmart56 Installation and user guide

ioSmart

ioSmart iSmart56 Installation and user guide

Focusrite Scarlett 18i8 user guide

Focusrite

Focusrite Scarlett 18i8 user guide

Velleman ED38105 user manual

Velleman

Velleman ED38105 user manual

JumpSport SkyBounce user manual

JumpSport

JumpSport SkyBounce user manual

Prima-Temp PRIYA Instructions for use

Prima-Temp

Prima-Temp PRIYA Instructions for use

Tefcold BC85I-BC85I W user manual

Tefcold

Tefcold BC85I-BC85I W user manual

Vaisala WMS302 user guide

Vaisala

Vaisala WMS302 user guide

manuals.online logo
manuals.online logoBrands
  • About & Mission
  • Contact us
  • Privacy Policy
  • Terms and Conditions

Copyright 2025 Manuals.Online. All Rights Reserved.

STE-6014/6017/6018/6019/6020 Room Temperature Sensors 1 Installation Guide
2.438
2.250
R 3.094
R .187
.643
STE-6019/6020
.475
max.
STE-6014/6017/6018
Modular
RJ-45
Jack
Four-pin
EIA-485
PC Data
Port
Clamp
(Screw-type)
Terminals
.422
Installation Guide
Room Temperature Sensors (with Rotary Dials)
STE-6014/6017/6018/6019/6020
Mounting 1
Location and Cover Removal 1
Handy Box Installation (Recommended) 1
Hollow Wall Installation 1
Wiring 2
STE-6014/6017/6018 2
STE-6019/6020 2
Maintenance 2
More Information 2
Important Notices 2
All dimensions are in inches
1. WithasmallPhillipsscrewdriverorhexwrench,
press in and hold the tab buon that snaps into
the center hole on the boom cover.
2. Carefullypullorprythebackpanelfromthe
frontcover.
Handy Box Installation (Recommended)
1. MountauniversalbackplateHMO-6036orHMO-
6036Wtothehandybox
usingthetwoscrews
provided.
2. Removethecoverfrom
thebackpanel.
3. Aachthebackpanelto
thebackplateusingthe
twoscrewsprovided.
4. Aachthecabletothe
terminalblockorjack
accordingtotheappropriatewiringdiagramon
thenextpage.
5. Replacethecover.
Hollow Wall Installation
1. Removethecoverfromthebackpanel.
2. Usingthebackpanelasatemplate,drilltwoholes
formountingscrews(7/64inchesor3mmindi-
ameterand1.4inches,1-13/32inches,or35.6mm
apart)andcutacenterhole(sizeneededisdepen-
dentonmodel)fortheterminalblockorjack.
3. Aachthebackpaneltothewallusingtwo
#6self-threadingscrews.(Plasticanchorsare
recommended,andthesizeoftheholeswillthen
needadjusting.)
4. Aachthecabletotheterminalblockorjack
accordingtotheappropriatewiringdiagramon
thenextpage.
5. Replacethecover.
Location and Cover Removal
Installthesensoronaninsidewallwhereitcansense
theaverageroomtemperatureandbeawayfrom
directsunlight,heatsources,windows,airvents,
andaircirculationobstructions(curtains,furniture,
etc.).Itcanbemountedonahollowwallor(with
auniversalbackplateHMO-6036/6036W)toa2x4
inchhandybox.
Thecoverisheldtotheblack,backpanelbythree,
small,roundpegsthattintheholesofthecover.
Theboompegisonatabandsnapsintothecenter
boomhole.
Mounting
STE-6014 STE-6018/6020STE-6017/6019
Model
Number
Interface
Features
Cable
Connections
Override
Button
LED
Status
Indicator
Screw
Clamp
Terminals
RJ-45
Connector
EIA-485
Data
Port
STE-6014-10 X X
STE-6017-10 X X X
STE-6019-10 X X
STE-6018-10 X X X X
STE-6020-10 X X X
STE-6014/6017/6018/6019/6020 Room Temperature Sensors 2 Installation Guide
STE-6014/6017/6018
ConnectinganyofthesemodelstoaKMCcontroller
requiresaspecialcablewith(onthesensorend)an
RJ-45connectorand(onthecontrollerend)anRJ-11
connectorwithanadditionalthreewires(asrelevant
tothemodel)forcontrollerinputs.Purchasing
preassembledcablesfromKMCismorecost-
eectiveandreliablethancreatingcustomcablesin
theeld.Useoneofthefollowingcables:
• KMD-5693=25feet
• KMD-5694=50feet
• KMD-5695=75feet
Thethreeadditionalwireconnectionstothecontrol-
lerare:
• Orangeisthethermistorsignaltothecontroller’s
appropriateinput
• Orange/whiteisthesetpointsignaltothecon-
troller’sappropriateinput
• Greenisthesupply voltageof10VDCtothe
STE-6018LEDfromanoutputofthecontroller
(fortheSTE-6014/6017,cliportapetheunused
wire)
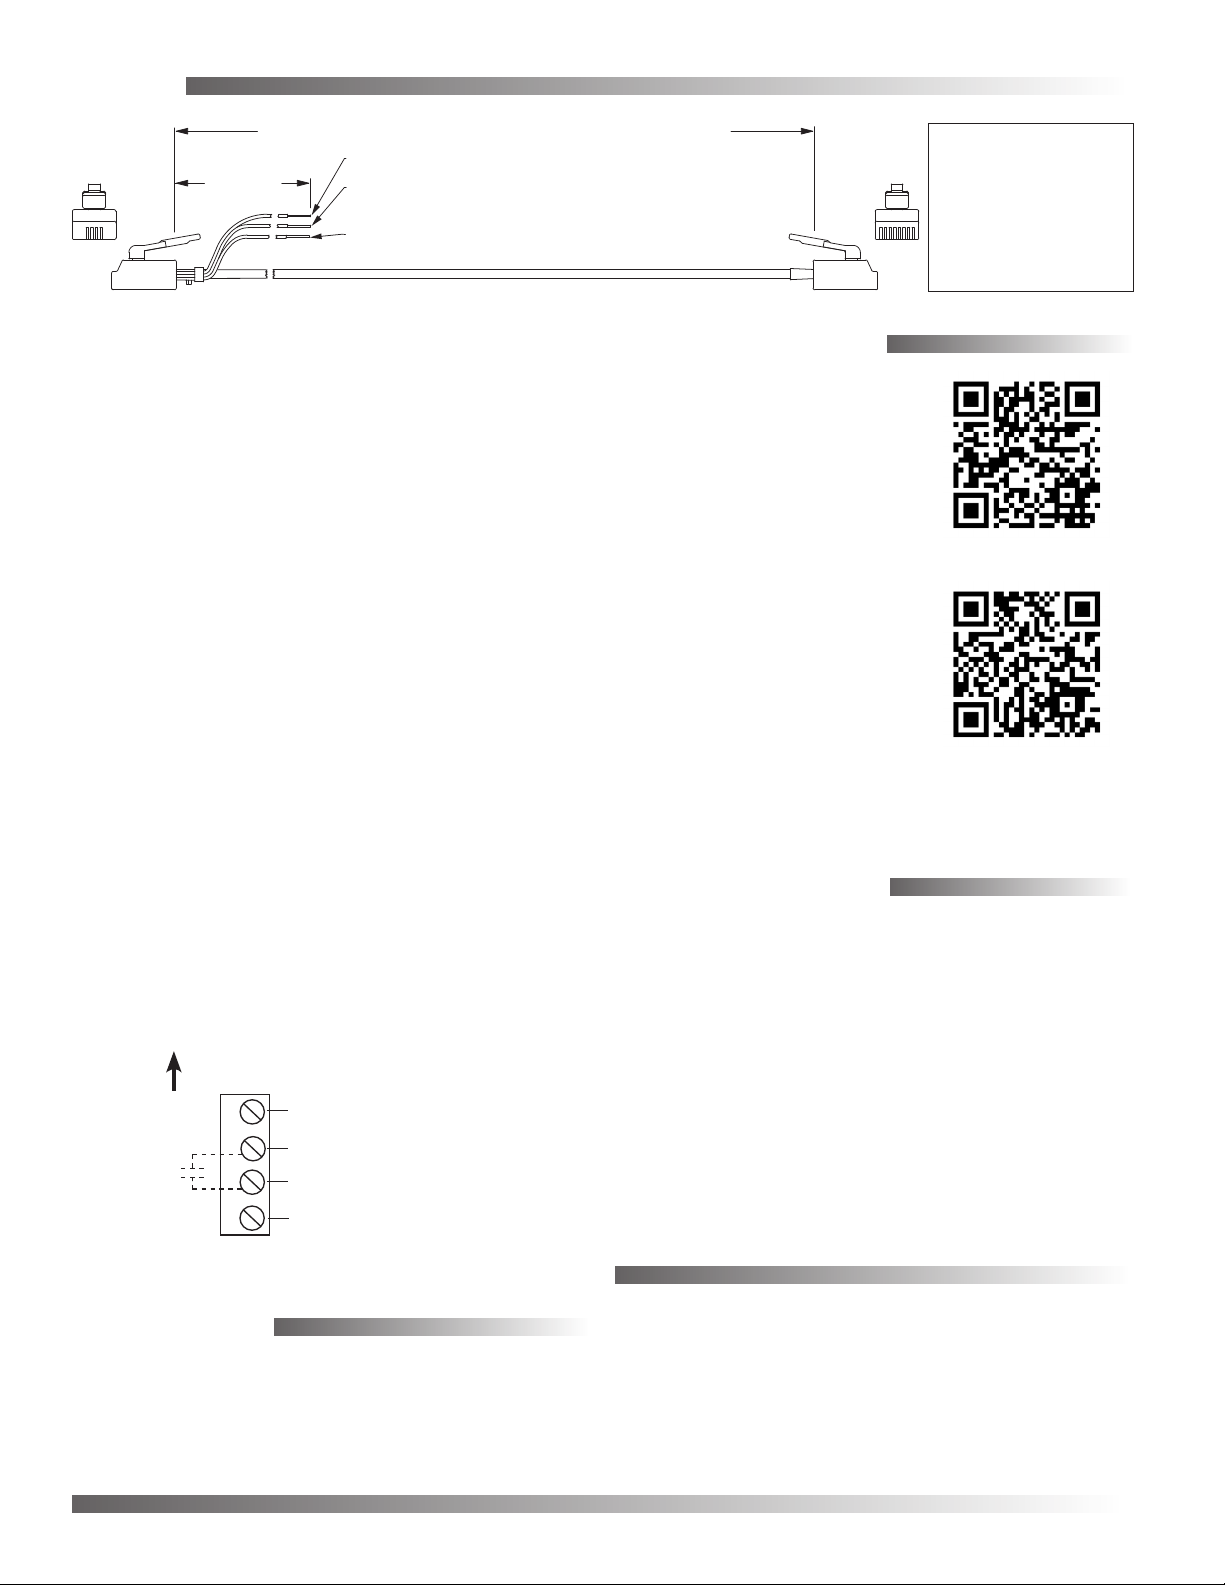
KMD–5693 = 25 feet; KMD–5694 = 50 feet; KMD–5695 = 75 feet
1 8
Orange Wire = Thermistor Input to Controller
Orange/White Wire = Setpoint Signal Input to Controller
(for STE-6014/6016/6017/6018 only; clip or tape when not used)
12 inches
52
RJ-11 and
Wire Leads
to Controller
RJ-45
to STE
Sensor
Green Wire = Aux. Supply Voltage to STE-6015/6018
(10 VDC) or STE-6016 (7.5/12 VDC) (clip or tape when not used)
RJ-11 RJ-45 Color
(Lead) 8 Orange
7 N.C.
(Lead) 6 Green
3 5 Blue
4 4 Blue/White
5 3 Green/White
2 N.C.
(Lead) 1 Orange/White
(Cables crossed, 20 AWG)
Wiring
STE-6019/6020
Common (“Ground”)
Thermistor (10K Ohms)
A
B
C
Potentiometer (0–10K)
(Override
Button)
D10 VDC LED Supply (from
Controller; for STE-6020 Only)
© 2012 KMC Controls, Inc. 866-019-04B
KMC Controls, Inc.
19476IndustrialDrive,NewParis,IN46553
574.831.5250
www.kmccontrols.com
[email protected]
More Information
Forgeneralproductinfor-
mation,seetheSTE-6000
Series Room Temperature
Sensors/Transmiers Data
SheetontheKMCControls
website.
Formountingconsid-
erations,networkcon-
nection,controllercon-
guration,programming,
troubleshooting,andother
information,seetheSTE-
6014/6017/6018/6019/6020
Application Guide.
Important Notices
Thematerialinthisdocumentisforinformation
purposesonly.The contents and the product it
describes are subject to change without notice.
KMCControls,Inc.makesnorepresentationsor
warrantieswithrespecttothisdocument.Innoevent
shallKMCControls,Inc.beliableforanydamages,
directorincidental,arisingoutoforrelatedtothe
useofthisdocument.
Maintenance
Carefulinstallationwillalsoensurelong-term
reliabilityandperformance.Removedustasneces-
saryfromholesintopandboom.Cleanwithaso,
dampclothandmildsoap.
Up (Toward Ceiling at Installation)