manuals.online logo
Brands
  1. Home
  2. •
  3. Brands
  4. •
  5. Kohler
  6. •
  7. Bathroom Fixture
  8. •
  9. Kohler ARCHER 7501X-4 User manual

Kohler ARCHER 7501X-4 User manual

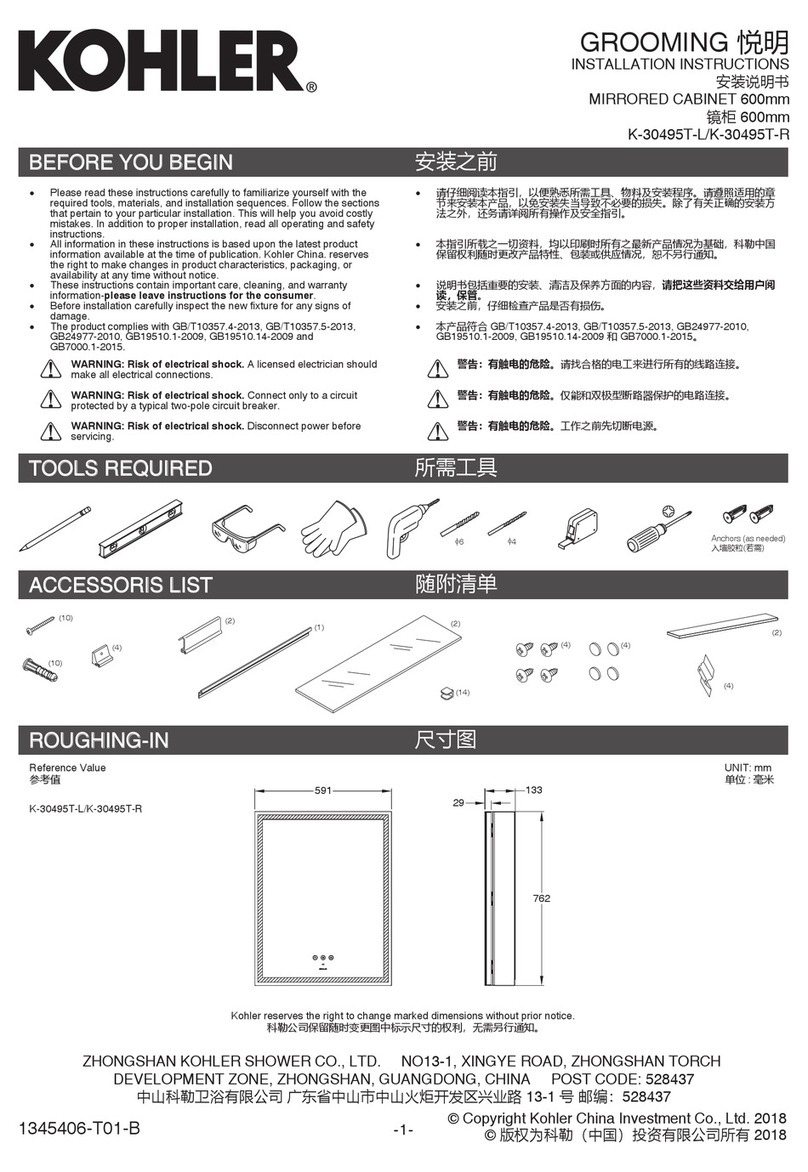
BEFORE YOU BEGIN
All information is based on the latest product
information available at the time of publication.
Kohler Co. reserves the right to make changes in
product characteristics, packaging, or availability at
any time without notice.
Please leave these instructions for the consumer.
They contain important information.
NOTES:
1. Flush the water supply pipes thoroughly to remove
debris.
2. If possible, install this faucet before installing the
bath tub.
3. Inspect the supply tubing for damage and leakage.
Replace and maintain as necessary.
4. Observe local plumbing codes.
5. Shut off the water supplies to the fitting.
HANDLE OPERATION
INSTALLATION INSTRUCTIONS
ขอแนะนําการติดตั้ง
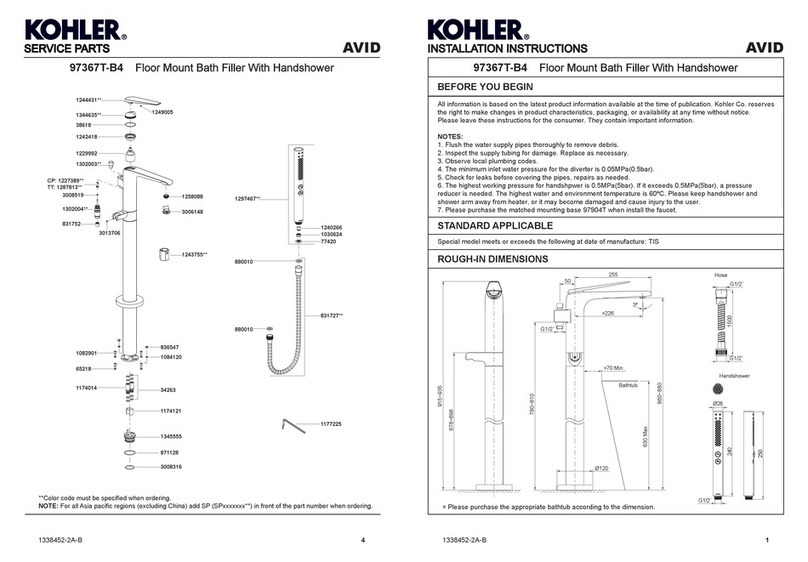
ROUGH-IN DIMENSIONS
Right handle opens with turning clockwise. Left handle
opens with turning counter-clockwise.
1152998-X2-B 1
1152998-X2-B 4
มาตรฐานผลิตภัณฑ STANDARD APPLICABLE
ผลิตภัณฑผลิตภายใตมาตรฐานผลิตภัณฑอุตสาหกรรม (มอก.)
Special model meets or exceeds the following at date
of manufacture: TIS
ระยะการติดตั้ง
กอนเริ่มการติดตั้ง
7501X-4 กอกผสมลงอางอาบน้ำ
Deck-Mount Bath Faucet
ARCHER
Ø68.5
Ø25~Ø42
Ø68.5
155~400
G1/2″
Ø32~Ø36
Max 38
ไมเกิน 38 128
90
182
15°
205
319
กอกผสมลงอางอาบน้ำ
รุน อารเชอร
การใชงานมือบิดกานโยก
ใชมือบิดกานโยกดานขวาดวยการหมุนตามเข็มนาิกา
ใชมือบิดกานโยกดานซายดวยการหมุนทวนเข็มนาิกา
ขอมูลในคูมือนี้มาจากขอมูลผลิตภัณฑลาสุดที่มีอยูในชวงเวลาการ
จัดพิมพ บริษัทฯขอสงวนสิทธิ์ในการเปลี่ยนแปลงขอมูลผลิตภัณฑ
บรรจุภัณฑที่มีอยูโดยมิตองแจงใหทราบลวงหนา
คูมือนี้มีขอมูลสำคัญ โปรดมอบเอกสารใหกับเจาของผลิตภัณฑ
ขอสังเกต:
1. เปดวาลวนํ้าทำความสะอาดทอนํ้าดี เพื่อขจัดเศษสิ่งสกปรก
ตางๆ
2. สำหรับการติดตั้งใหม ติดตั้งกอกน้ำกอนการติดตั้งอางอาบน้ำ
3. ตรวจสอบทอน้ำ หากมีการชำรุดแนะนำใหเปลี่ยนใหม
4. ตรวจสอบระบบสุขาภิบาล
5. ปดวาลวทางน้ำเขา
การรับประกันสินคา LIMITED WARRANTY
Kohler (Thailand) Public Company Limited warrants to the original
products, which are purchased from authorized distributors and dealers
within Kingdom of Thailand only, to be free of defects in material and
workmanship.
Within the below mentioned periods from the date of purchase,
Kohler(Thailand) Public Company Limited will at its election, repair,
replace or make appropriate adjustment where company’s inspection
disclose any such defect occurring in normal usage and maintenance
but is not responsible for labor charges, removal charges, installation,
or other incidental or consequential costs. In no event shall the liability of
Kohler(Thailand) Public Company Limited exceed the purchase price
of the product. This warranty applies only to Kohler Faucets installed in
Thailand.
• Ceramic Valve(leak/drip)
- Lifetime Limited Warranty* for residential use
- and Five (5) Years for commercial use
• Finish Five(5) Years
• Fitting Five(5) Years
• Automatic faucet One(1) Year
• Hygiene spray(leak/drip Five(5) Years for selected models
from hygiene spray body) only
• Shower Five(5) Years
• Bathroom accessories Five(5) Years
This limited warranty DOES NOT COVER the defect or damage caused
by accident, natural disasters such as fire, flood, or earthquake, misuse
or abuse of products. Improper care and cleaning will avoid the warranty.
Consumers are responsible for the cost of service parts and service
fee for such cases.
To ensure continuous product quality and performance, as well as
product durability and lifetime, without any damage to the product,
consumers should purchase and use only genuine service parts and
after-sales services from Kohler (Thailand) Public Company Limited or
company’s authorized service centers, distributors, or dealers only.
*KOHLER® Faucet Lifetime Limited Warranty
Kohler (Thailand) warrants its faucets manufactured after January 1,
1997, to be leak and drip free during normal residential use for as long as the
original consumer purchaser owns his or her home. If the faucet should
leak or drip during normal use, Kohler (Thailand) will, free of charge;
replace
the new cartridge necessary to put the faucet in good working
condition.
Kohler (Thailand) also warrants all other aspects of the faucet or
accessories (“Faucet”)**to be free of defects in material and workmanship
during normal residential use for as long as the original consumer
purchaser owns his or her home. If a defect is found in normal residential
use, Kohler (Thailand) will, at its election, repair, provide a replacement
part or product, or make appropriate adjustment. Damage to a product
caused by accident, misuse, or abuse is not covered by this warranty.
Improper care and cleaning will also void the warranty.
Proof of purchase (original sales receipt) must be provided to
Kohler(Thailand) with all warranty claims. Kohler (Thailand) is not respon-
sible for labor charges, installation, or other incidental or consequential
costs. In no event shall the liability of Kohler (Thailand) exceed the
purchase price of the Faucet.
Important: Never use cleaners containing abrasive cleansers, ammonia,
bleach, acids, waxes, alcohol, solvents or other products not recom-
mended for chrome. This will void the warranty.
To obtain warranty service, please contact your dealers or contact the
KOHLER (Thailand) Call Center, together with proof of purchase at;
Call Center
KOHLER (Thailand) Public Company Limited
16th Floor, Jasmine City Building
2 Soi Sukhumvit 23, Sukhumvit Road,
Wattana, Bangkok 10110
Tel: 02204-6222 Fax: 0-2204-6224
Email: [email protected]
COPYRIGHT ©2014 BY KOHLER (THAILAND) PUBLIC COMPANY
LIMITED
1152998-X2-B 3
1152998-X2-B 2
INSTALLATION
INSTALLATION CHECKOUT
การติดตั้ง
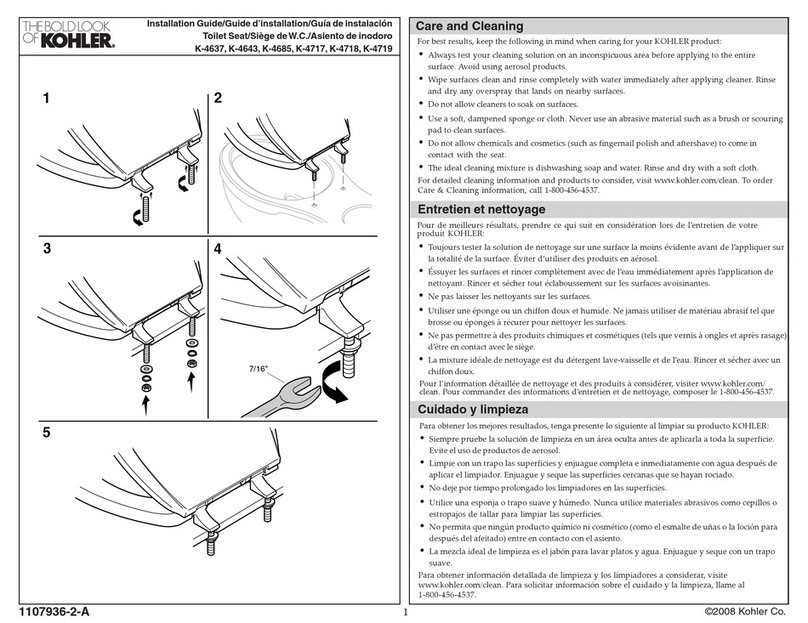
CARE AND CLEANING
For best results, keep the following in mind when
caring for your product:
•Always test your cleaning solution on an
inconspicuous area before applying to the entire
surface.
•Wipe surfaces clean and rinse completely with
water immediately after applying cleaner. Rinse and
dry any overspray that lands on nearby surfaces.
•Do not allow cleaners to soak on surfaces.
•Use a soft, dampened sponge or cloth. Never use
an abrasive material such as a brush or scouring
pad to clean surfaces.
•The ideal cleaning technique is to rinse thoroughly
and blot dry any water from the surface after each
use.
การดูแลรักษาและทําความสะอาด
เพื่อการดูแลรักษาและทําความสะอาดผลิตภัณฑของทาน
อยางมีประสิทธิภาพ โปรดปฏิบัติตามคําแนะนําดังนี้
• ทดสอบน้ำยาทําความสะอาดกับพื้นผิวผลิตภัณฑในบริเวณ
ที่ไมเปนที่สังเกตกอนใชนํ้ายาทําความสะอาด
• หลังจากที่ใชนํ้ายาทำความสะอาด เช็ดทำความสะอาดและ
ลางนํ้าออกทันที จากนั้นเช็ดใหแหง
• หามแชนํ้ายาทำความสะอาดบนพื้นผิวผลิตภัณฑ
• ใชฟองนํ้าหรือผานุมทำความสะอาดพื้นผิวผลิตภัณฑ หามใช
วัสดุหยาบ เชน แปรงหรือแผนขัด
• ขอแนะนำในการดูแลพื้นผิวผลิตภัณฑคือ ลางนํ้าสะอาดใหทั่ว
และเช็ดคราบนํ้าบนพื้นผิวผลิตภัณฑหลังจากการใชงานทุกครั้ง
ทดสอบการติดตั้ง
ตรวจสอบใหแนใจวา นอตทุกตัวขันแนน
How To Install The Spout
Remove the center tee(2), the nut(3),
the nut(4) and the steel washer(5) from
the shank(1). Slide the escutcheon(6)
onto the bottom of the shank. Slide the
rubber washer(7) into the bottom
groove of the escutcheon. Then fit the
shank into the center hole of bath.
From underside of the bath, install the
steel washer(5), the nut(4) and the
nut(3). Wrench to tighten the nut(4),
then tighten the nut(3).Thread the
centre tee to the shank until hand-tight.
2
3
How to Install The Side Bodies
And The Handles
Install the metal washer(8) onto each
side body(9). Insert side bodies through
mounting holes from bottom of the bath
(NOTE: The valve body with red dot
should be installed on the left when
facing the front of the faucet, and the
valves are in the closed position before
installing them. ).
Install the rubber washer(10) and the
nut(11) with o-ring onto each side body.
Thread the escutcheon(12) onto the
nut(11). Press the stem(13) onto each
valve stem (14), then press the
handle(15) onto each stem. Secure the
handles by the screws(16) with the
washers(17). Press the plug(18) into
the hole on the top of each handle.
Wrench tighten the nuts(19).
Put the washers(20) into the nuts of
each hose(21). The end connect to the
outlet of side body, and the other end
connect to the center tee.
1
4
5
13
6
7
8
20 9
21
10
19
11
12
14
15
16
17
How to Install The Spout
Slide the spout kit(22) onto the shank.
Adjust the spout kit so that it points to
the front. Tighten the screw(24) with the
hex wrench(23), then press the plug
button kit(25) into the rear hole.
22
24
25
18
23
Ensure that all connections are tight.
Ensure that the handles are in the off
position.
Turn on the drain and main water
supply, and check for leaks. Repair as
needed.
Remove the aerator kit(26). Turn on the
faucet. Run hot and cold water through
the faucet for about one minute to
remove any debris. Check for leaks.
Repair as needed. Remove any debris
from the aerator kit. Shut off the faucet.
Reinstall the aerator kit.
26
วิธีติดตั้งหัวกอกลงอาง
ถอดขอตอสามทาง(2) นอต(3), นอต(4)
และแหวนรองโลหะ(5) ออกจากเกลียว(1)
เลื่อนฐานรอง(6) เขากับดานใตของเกลียว
เลื่อนแหวนรองยาง(7)เขากับรองดานใตของฐานรอง
จากนั้นติดตั้งตัวเกลียวเขากับรูกอกบนอางอาบน้ำ
จากดานใตของอางอาบน้ำ ประกอบแหวนรองโลหะ(5)
นอต(4)และนอต(3) ใชประแจขันนอต(4) และนอต(3)
ขันขอตอสามทางเขากับเกลียวจนกระทั่งแนน
วิธีติดตั้งกระบอกวาลว
และมือบิดกานโยก
สวมแหวนรองโลหะ(8) เขากับกระบอกวาลว(9)
ทั้งสองฝง สวมกระบอกวาลวเขากัับรูกอกบน
อางอาบน้ำจากดานใต (ขอมูล กระบอกวาลว
ที่มีจุดสีแดงตองอยูทางดานซายเมื่อหันเขา
ดานหนากอกน้ำและวาลวตองอยูในตำแหนงปด
ในขณะติดตั้ง)
สวมแหวนรองยาง(10) และนอต(11) พรอมโอริง
เขากับกระบอกวาลว ขันฐานรอง(12)
เขากับนอต(11) กดสลักเกลียว(13)
เขากับกานวาลว(14) ทั้งสองขาง
จากนั้นกดมือบิดกานโยก(15)
เขากับสลักเกลียวทั้งสองขาง
ขันมือบิดกานโยกดวยสกรู(16)
พรอมแหวนรอง(17) สวมปุมปด(18)
เขากับรูบนมือบิดทั้งสองขาง จากนั้นขันนอต(19)
ใหแนน
สวมแหวนรองยาง(20) เขากับนอตของสายน้ำดี(21)
ประกอบปลายเขากับทางน้ำออกของกระบอกวาลว
และประกอบปลายอีกดานเขากับขอตอสามทาง
วิธีติดตั้งหัวกอกลงอาง
เลื่อนชุดหัวกอกน้ำ(22) เขากับเกลีียว
ปรับชุดหัวกอกน้ำเพื่อใหหันเขาดานหนา
ขันสกรู(24) ดวยประแจแอล(23)
จากนั้นกดปุมปด(25) เขากับรูดานหลัง
ตรวจสอบใหแนใจวา กานโยกอยูในตำแหนงปด
เปดวาลวน้ำ เพื่อตรวจสอบการรั่วซึม
ซอมแซมหากเกิดการรั่วซึม
ถอดปากกอก(26)
เปดกอกน้ำรอนและน้ำเย็นทิ้งไวสักครู
เพื่อขจัดเศษตางๆออกจากปากกอกน้ำ
ตรวจสอบการรั่วซึมปดกอกน้ำและประกอบ
ปากกอกอีกครั้ง
SERVICE PARTS
อุปกรณประกอบและอะไหล
1152998-X2-B 5
**ระบุรหัสวัสดุเคลือบผิว/สีในการสั่งซื้อผลิตภัณฑ
**Color code must be specified when ordering
Call Center: +(66) 2204 6222
e-mail: [email protected]
7501X-4 กอกผสมลงอางอาบน้ำ
Deck-Mount Bath Faucet
ARCHER
865099
Nut
นอต
1138646**
Plug Button
ปุมปด
66637
Hex Wrench
ประแจแอล
871021
Washer
แหวนรอง
1138643**
Aerator Housing
ฝาครอบปากกอกน้ำ
832940
Washer
แหวนรอง
1178391**(Hot/
น้ำรอน
)
Handle Kit
ชุดมือบิดกานโยก
3002868
Washer
แหวนรอง
835894
Aerator
ปากกอก
837206
Valve
วาลว
837207
Valve
วาลว
78125
Adapter
อะแด็ปเตอร
78125
Adapter
อะแด็ปเตอร
834554
Screw
สกรู
1178392**(Cold/
น้ำเย็น
)
Handle Kit
ชุดมือบิดกานโยก
832940
Washer
แหวนรอง
834554
Screw
สกรู
1138641**
Escutcheon
ฐานรอง
1138645**
Escutcheon
ฐานรอง
1141019
Washer
แหวนรอง
835726
Washer
แหวนรอง
32698
O-ring
โอริง
871021
Washer
แหวนรอง
830915
Washer
แหวนรอง
864342
Nut
นอต
830915
Washer
แหวนรอง
864342
Nut
นอต
820893
Centre Tee
ขอตอสามทาง
835696
Washer
แหวนรอง
880062
Slide Body Kit
ชุดกระบอกวาลว
834361
Hose
สายน้ำดี
880062
Slide Body Kit
ชุดกระบอกวาลว
865097
Shank
สลักเกลียว
860091
Nut
นอต
46112
Screw
สกรู
21290**
Plug Botton
ปุมปด
870944
O-ring
โอริง
41391
O-ring
โอริง
1138645**
Escutcheon
ฐานรอง
1138646**
Plug Button
ปุมปด
865076
Nut
นอต
865076
Nut
นอต
38676
O-ring
โอริง
38676
O-ring
โอริง
กอกผสมลงอางอาบน้ำ
รุน อารเชอร

Other Kohler Bathroom Fixture manuals

Kohler MAXISPACE 2.0 User manual

Kohler

Kohler MAXISPACE 2.0 User manual

Kohler FAMILY CARE K-23205T User manual

Kohler

Kohler FAMILY CARE K-23205T User manual

Kohler K-24985K Assembly instructions

Kohler

Kohler K-24985K Assembly instructions

Kohler K-8207 Assembly instructions

Kohler

Kohler K-8207 Assembly instructions

Kohler Sterling SC2522SBG Assembly instructions

Kohler

Kohler Sterling SC2522SBG Assembly instructions

Kohler K-1457 Quick start guide

Kohler

Kohler K-1457 Quick start guide

Kohler CITRUS 27794T User manual

Kohler

Kohler CITRUS 27794T User manual

Kohler Components 77984T-9E User manual

Kohler

Kohler Components 77984T-9E User manual

Kohler K-2440 User manual

Kohler

Kohler K-2440 User manual

Kohler K-706853-8L-SHP User manual

Kohler

Kohler K-706853-8L-SHP User manual

Kohler Iron Works K-7103 Assembly instructions

Kohler

Kohler Iron Works K-7103 Assembly instructions

Kohler SKYLINE K-22317T-FM-S User manual

Kohler

Kohler SKYLINE K-22317T-FM-S User manual

Kohler C3-050 User manual

Kohler

Kohler C3-050 User manual

Kohler K-T10340 Assembly instructions

Kohler

Kohler K-T10340 Assembly instructions

Kohler Jacob Delafon ECRIN E80300-D33 User manual

Kohler

Kohler Jacob Delafon ECRIN E80300-D33 User manual

Kohler K-2335 User manual

Kohler

Kohler K-2335 User manual

Kohler Levity Operating instructions

Kohler

Kohler Levity Operating instructions

Kohler Sterling 4700 Series Assembly instructions

Kohler

Kohler Sterling 4700 Series Assembly instructions

Kohler SHIFT+ 21335T User manual

Kohler

Kohler SHIFT+ 21335T User manual

Kohler Mira H06C User manual

Kohler

Kohler Mira H06C User manual

Kohler K-99257X-4CD Assembly instructions

Kohler

Kohler K-99257X-4CD Assembly instructions

Kohler K-2001 User manual

Kohler

Kohler K-2001 User manual

Kohler C3-230 User manual

Kohler

Kohler C3-230 User manual

Kohler Lakewood K-1649 User manual

Kohler

Kohler Lakewood K-1649 User manual

Popular Bathroom Fixture manuals by other brands

Panasonic DH-3ND1 operating instructions

Panasonic

Panasonic DH-3ND1 operating instructions

Kinedo Eden installation instructions

Kinedo

Kinedo Eden installation instructions

Blanke BAY-BOX S Installation instruction

Blanke

Blanke BAY-BOX S Installation instruction

VADO Metiz installation guide

VADO

VADO Metiz installation guide

Villeroy & Boch Subway 3.0 Waste Overflow installation instructions

Villeroy & Boch

Villeroy & Boch Subway 3.0 Waste Overflow installation instructions

Jacuzzi SPRAY GUARD installation instructions

Jacuzzi

Jacuzzi SPRAY GUARD installation instructions

Armitage Shanks SANDRINGHAM SELF CLOSING TAP S7029AA Installation and servicing instruction

Armitage Shanks

Armitage Shanks SANDRINGHAM SELF CLOSING TAP S7029AA Installation and servicing instruction

Anzzi SP-AZ8097 install guide

Anzzi

Anzzi SP-AZ8097 install guide

RAVAK EVOLUTION Mounting instructions

RAVAK

RAVAK EVOLUTION Mounting instructions

Hewi System 162 Mounting instructions

Hewi

Hewi System 162 Mounting instructions

VINNOVA 553036 manual

VINNOVA

VINNOVA 553036 manual

KWC SIRIUS SIRW721B Installation and operating instructions

KWC

KWC SIRIUS SIRW721B Installation and operating instructions

Zenith 2104W Assembly instructions

Zenith

Zenith 2104W Assembly instructions

VIGO NOMA V601009 manual

VIGO

VIGO NOMA V601009 manual

Xibu TOWEL hybrid manual

Xibu

Xibu TOWEL hybrid manual

Insignia 1500 Series installation guide

Insignia

Insignia 1500 Series installation guide

Delta COMMIX installation guide

Delta

Delta COMMIX installation guide

BETTE BetteSolid installation instructions

BETTE

BETTE BetteSolid installation instructions

manuals.online logo
manuals.online logoBrands
  • About & Mission
  • Contact us
  • Privacy Policy
  • Terms and Conditions

Copyright 2025 Manuals.Online. All Rights Reserved.