Kramer KDS-EN5 User manual

Kramer Electronics Ltd.
KDS-EN5, KDS-DEC5 –Contents
i
Contents
Introduction 1
Getting Started 1
Overview 2
Typical Applications 2
Defining KDS-EN5, KDS-DEC5 H.264 Encoder and Decoder 4
Installing KDS-EN5, KDS-DEC5 5
Connecting KDS-EN5, KDS-DEC5 6
Operating KDS-EN5, KDS-DEC5 8
Configuring Settings 9
Configuring Streaming/Encoding Settings 10
Configuring Decoding Settings 14
Configuring Network Settings 15
Locating Device 16
Configuring RS-232 over IP Settings 17
Changing the Device DNS Name 18
Upgrading the Firmware 19
Changing Password 20
Configuring Video Wall 21
Defining an Idle Image 22
Verifying Device Information 23
Technical Specifications 24
Default Communication Parameters 25
Resetting the Unit 26
Protocol 3000 27
Understanding Protocol 3000 28
Kramer Protocol 3000 Syntax 28
Protocol 3000 Commands 30

Kramer Electronics Ltd.
KDS-EN5, KDS-DEC5 –Introduction
1
Introduction
Welcome to Kramer Electronics! Since 1981, Kramer Electronics has been providing
a world of unique, creative, and affordable solutions to the vast range of problems that
confront the video, audio, presentation, and broadcasting professional on a daily
basis. In recent years, we have redesigned and upgraded most of our line, making the
best even better!
Getting Started
We recommend that you:
•Unpack the equipment carefully and save the original box and packaging
materials for possible future shipment.
•Review the contents of this user manual.
Go to www.kramerav.com/downloads/KDS-EN5 to check for up-to-date user
manuals, application programs, and to check if firmware upgrades are available
(where appropriate).
Achieving the Best Performance
•Use only good quality connection cables (we recommend Kramer high-
performance, high-resolution cables) to avoid interference, deterioration in signal
quality due to poor matching, and elevated noise levels (often associated with
low quality cables).
•Do not secure the cables in tight bundles or roll the slack into tight coils.
•Avoid interference from neighboring electrical appliances that may adversely
influence signal quality.
•Position your Kramer KDS-EN5, KDS-DEC5 away from moisture, excessive
sunlight and dust.
This equipment is to be used only inside a building. It may only be connected to other
equipment that is installed inside a building.
Safety Instructions
Caution: There are no operator serviceable parts inside the unit.
Warning:Use only the Kramer Electronics power supply that is provided with the unit.
Warning:Disconnect the power and unplug the unit from the wall before installing.
Recycling Kramer Products
The Waste Electrical and Electronic Equipment (WEEE) Directive 2002/96/EC aims to
reduce the amount of WEEE sent for disposal to landfill or incineration by requiring it

Kramer Electronics Ltd.
KDS-EN5, KDS-DEC5 –Introduction
2
to be collected and recycled. To comply with the WEEE Directive, Kramer Electronics
has made arrangements with the European Advanced Recycling Network (EARN)
and will cover any costs of treatment, recycling and recovery of waste Kramer
Electronics branded equipment on arrival at the EARN facility. For details of Kramer’s
recycling arrangements in your particular country go to our recycling pages at
www.kramerav.com/support/recycling.
Overview
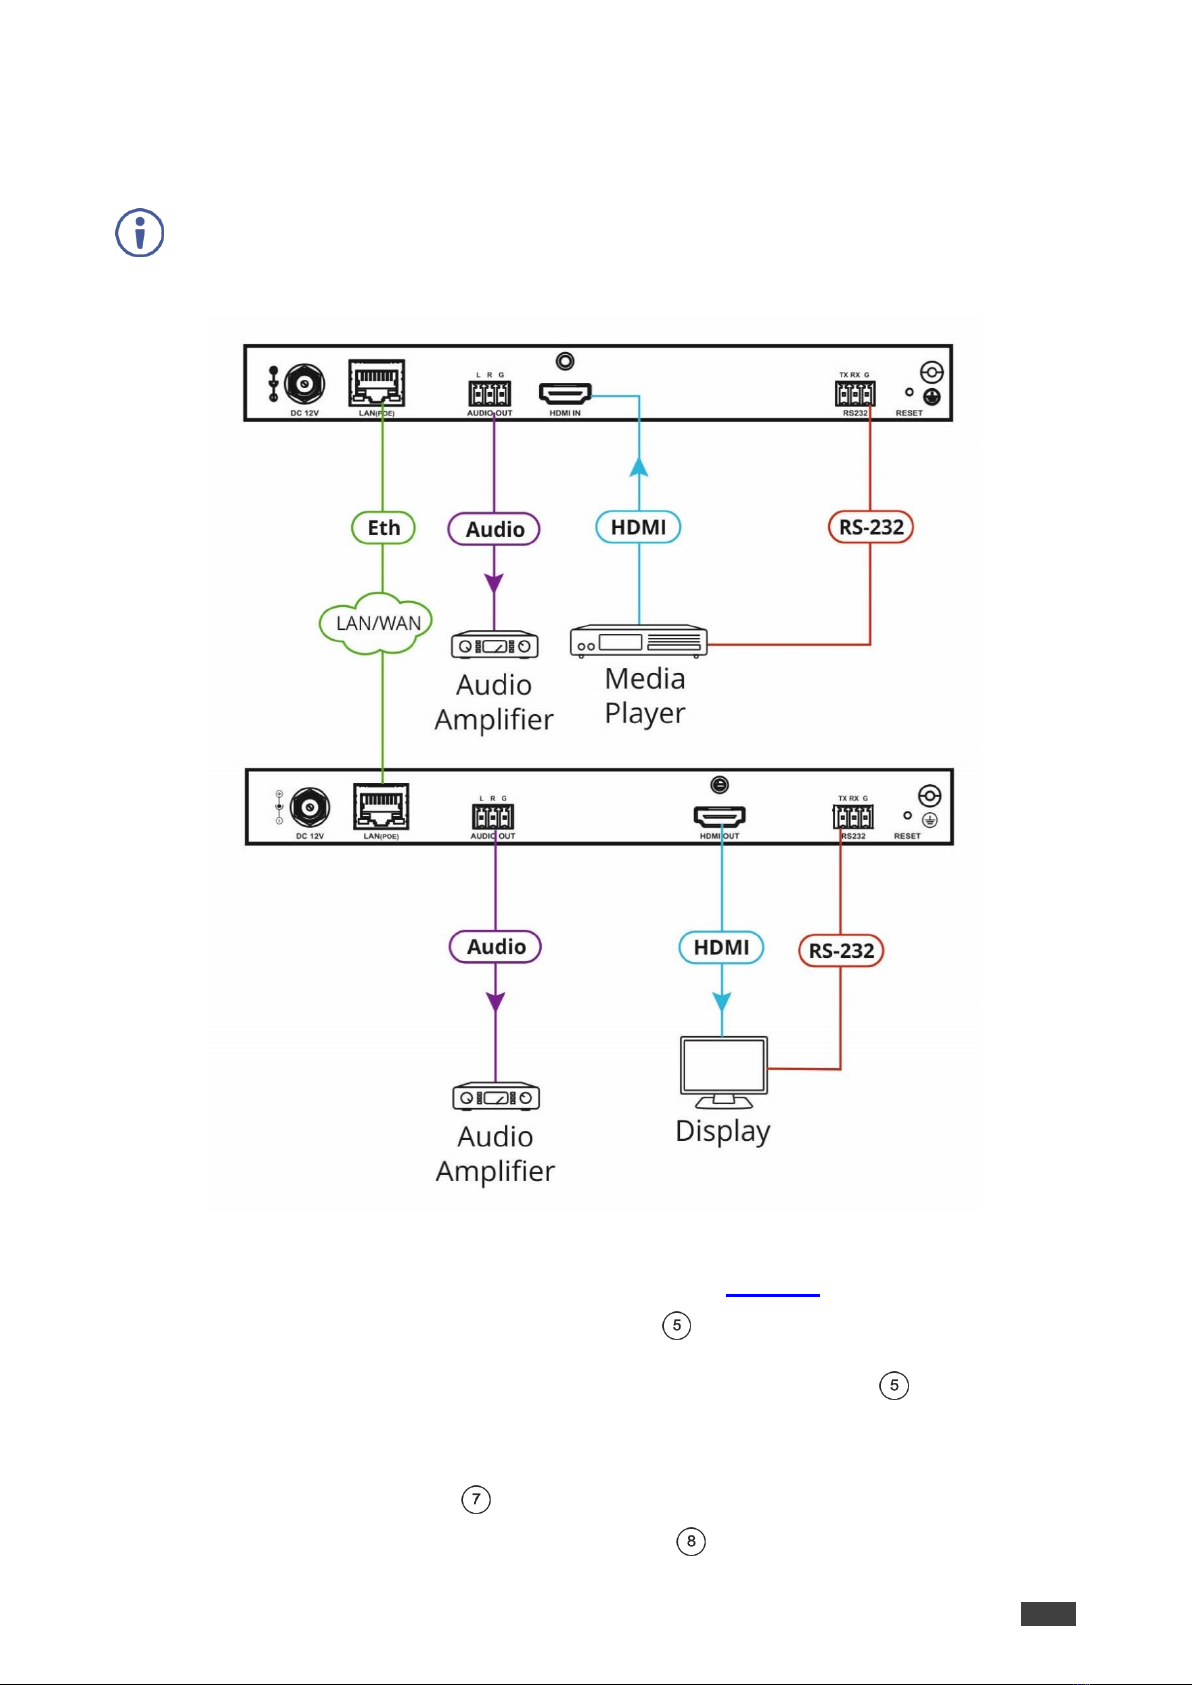
Congratulations on purchasing your Kramer KDS-EN5, KDS-DEC5 H.264 Encoder
and Decoder. KDS-EN5, KDS-DEC5 are an H.264 encoder/decoder pair for HDMITM
signals of up to 4K@30Hz (4:4:4). They provide high-quality and fully-featured end-to-
end video and audio over IP. KDS-EN5and KDS-DEC5 include AVC support for
H.264/MPEG-4 and AAC codec, open encoding that enables decoding through VLC®
player software and unicast or multicast streaming through TS and RTSP transport
protocols.
Benefits and Features
•High Resolution Video Encoding and Compression –supporting up to 4K@30Hz
(4:4:4) resolution.
•Maximum Compatibility –Fully standard and compliant H.264/MPEG-4 AVC
(Advanced Video Codec) and AAC (Advanced Audio Code) codecs, enable
compatibility with other software and hardware encoders. Open encoding enables
software decoding through VLC® player software.
•Versatile Powering Options - Powered by PoE (when using a Network switch that
supports PoE) or by external 12V power adapter.
•Standard Ethernet Network Operation –10/100/1000Mb. Managed switch: 1G,
multicast, IGMP snooping, layer 2. Configurable DHCP, Static or Auto IP.
For specific Network configuration, please contact Kramer Customer Support.
•Selectable Streaming Mode –Unicast or multicast through RTSP (Real Time
Streaming Protocol).
•Convenient Unit Control and Configuration –Distance control via user-friendly
embedded web pages via the Ethernet, Protocol 3000 API, and RS-232 serial
commands transmitted by a PC, touch screen system or other serial controller.
•Cost-Effective Maintenance - Power and link status indicators facilitate easy local
maintenance and troubleshooting. Firmware upgrade via embedded web pages
or K-Upload ensures lasting, field-proven deployment.
•Simple System Management —Remote system management support to enable
quick and efficient remote system and device life–cycle management.
Typical Applications
KDS-EN5, KDS-DEC5 is ideal for the following typical applications:
•Digital signage

Kramer Electronics Ltd.
KDS-EN5, KDS-DEC5 –Introduction
3
•Video walls
•Education
•Smart city CCTV
•Large AV Matrixes

Kramer Electronics Ltd.
KDS-EN5, KDS-DEC5 –Defining KDS-EN5, KDS-DEC5 H.264 Encoder and Decoder
4
Defining KDS-EN5, KDS-DEC5
H.264 Encoder and Decoder
This section defines KDS-EN5, KDS-DEC5.
Figure 1: KDS-EN5 Video Streamer Encoder
Figure 2: KDS-DEC5 Video Streamer Decoder
#
Feature
Function
POWER LED Indicator
Lights when the unit is powered on.
STATUS LED Indicator
KDS-EN5 –Lights when synced with a decoder.
KDS-DEC5 –Blinks slowly when not synced with an encoder.
Lights when synced with an encoder.
ID Button (KDS-DEC5)
Press to display the encoder and decoder information, such as device IP
address and ID, on the display.
DC 12V Connector
Connect to a 12V power adapter (optional –when power is not supplied
by PoE).
LAN (POE) RJ-45
Connector
Connect to a PC via a LAN to control the unit, to stream video to the unit
and to provide power via PoE.
AUDIO OUT 3-pin Terminal
Block
Connect to an unbalanced audio acceptor.
HDMI IN (KDS-EN5) / OUT
(KDS-DEC5) Connector
Connect to an HDMI source/acceptor.
RS-232 3-pin Terminal
Block Connector
Connect to an external device (e.g. a camera or display screen) that can
be controlled via RS-232 (over IP).
RESET Button
Press and hold for about 15 seconds to reset to factory default settings.

Kramer Electronics Ltd.
KDS-EN5, KDS-DEC5 –Installing KDS-EN5, KDS-DEC5
5
Installing KDS-EN5, KDS-DEC5
This section provides instructions for mounting KDS-EN5, KDS-DEC5. Before
installing, verify that the environment is within the recommended range:
•Operation temperature –0to 40C (32 to 104F).
•Storage temperature –-40to +70C (-40 to +158F).
•Humidity –10% to 90%, RHL non-condensing.
When installing, avoid hazards by taking care that:
•It is located within recommended environmental conditions. Operating
ambient temperature of a closed or multi-unit rack assembly may exceed
ambient room temperature.
•Once mounted, there is enough air flow around KDS-EN5, KDS-DEC5.
•KDS-EN5, KDS-DEC5 is placed upright in the correct horizontal
position.
Always mount KDS-EN5, KDS-DEC5 before connecting any cables or power.
You can install KDS-EN5, KDS-DEC5 using one of the following methods:
•Attach the rubber feet and place the unit on a flat surface.
•Fasten a bracket (included) on each side of the unit and attach it to a flat surface.
For more information go to www.kramerav.com/downloads/KDS-EN5.

Kramer Electronics Ltd.
KDS-EN5, KDS-DEC5 –Connecting KDS-EN5, KDS-DEC5
6
Connecting KDS-EN5, KDS-DEC5
Always switch off the power to each device before connecting it to your KDS-EN5,
KDS-DEC5. After connecting your KDS-EN5, KDS-DEC5, connect its power and
then switch on the power to each device.
Figure 3: Connecting to the KDS-EN5, KDS-DEC5 Rear Panel
To connect KDS-EN5, KDS-DEC5 as illustrated in Figure 3:
1. Connect the LAN (POE) RJ-45 Connector on each unit to the LAN
OR
Connect the units directly via the LAN (POE) RJ-45 Connector on each unit
using an Ethernet cable.
2. On KDS-EN5, connect an HDMI video source (for example, Blu-ray player) to:
▪HDMI IN Connector .
▪RS-232 3-pin Terminal Block Connector for controlling the source via the

Kramer Electronics Ltd.
KDS-EN5, KDS-DEC5 –Connecting KDS-EN5, KDS-DEC5
7
IP controller SW / API.S.
3. On KDS-DEC5, connect the HDMI acceptor (for example, TV) to:
▪HDMI OUT Connector .
▪RS-232 3-pin Terminal Block Connector for controlling the acceptor via the
IP controller SW / API.S.
4. Connect the video source
5. If desired, connect an audio amplifier to the AUDIO OUT 3-pin Terminal Block
on one or both units.
6. If PoE is not available, connect a 12V power supply (not included) to the DC 12V
Connector .

Kramer Electronics Ltd.
KDS-EN5, KDS-DEC5 –Operating KDS-EN5, KDS-DEC5
8
Operating KDS-EN5, KDS-DEC5
Configure and control your KDS-EN5, KDS-DEC5 using any of the following methods:
•Via the Ethernet using built-in, user-friendly web pages (see Configuring Settings
on page 9).
•Kramer Network Enterprise Management Platform (version 2.2 or higher –go to
www.kramerav.com/product/Kramer Network for more information).
•Protocol 3000 commands (see Protocol 3000 Commands on page 30).

Kramer Electronics Ltd.
KDS-EN5, KDS-DEC5 –Configuring Settings
9
Configuring Settings
The embedded web pages enable you to configure KDS-EN5, KDS-DEC5 via
Ethernet. The encoder and decoder each have their own web pages that are
accessed using a web browser on a connected computer.
KDS-EN5, KDS-DEC5 web pages enable performing the following:
•Configuring Streaming/Encoding Settings on page 10.
•Configuring Decoding Settings on page 14.
•Configuring Network Settings on page 15.
•Locating Device on page 16.
•Configuring RS-232 over IP Settings on page 17.
•Changing the Device DNS Name on page 18.
•Upgrading the Firmware on page 19.
•Changing Password on page 20.
•Configuring Video Wall on page 21.
•Defining an Idle Image on page 22.
•Verifying Device Information on page 23.
To browse KDS-EN5, KDS-DEC5 web pages:
1. Type the IP address of the device in the address bar of your internet browser
(default encoder address = 192.168.1.39, default decoder address =
192.168.1.40).
The Login page appears.
Figure 4: Embedded Web Pages Login Page

Kramer Electronics Ltd.
KDS-EN5, KDS-DEC5 –Configuring Settings
10
2. Enter the password (default = admin) and click Login.
The embedded web pages appear with the System page open.
Figure 5: Embedded Web Pages –System Page
3. Navigate to the desired tab by clicking the web page from the main menu and the
tab from the submenu.
After changing a setting, click Apply to save the setting.
A message appears in the upper right corner of the web page indicating if the change
was successful or not.
Figure 6: Embedded Web Pages with Operation Successful Message
Configuring Streaming/Encoding Settings
KDS-EN5 web pages enable you to configure streaming/encoding settings.
This section applies only to the encoder web pages.

Kramer Electronics Ltd.
KDS-EN5, KDS-DEC5 –Configuring Settings
11
To configure streaming/encoding settings:
1. On the KDS-EN5 web pages, click Function > Stream Settings.
The Streaming Settings tab appears.
Figure 7: Function > Steam Settings Tab
2. Under Stream Video Over IP, select Enable.
3. Under Transport Type, select one of the following:
▪tsoverudp –use Transport Stream over UDP protocol
▪tsovertcp –use Transport Stream over TCP protocol
4. If required, under Rate Limit Enable, select Enable, to limit the bitrate.
You can set the limit value in the Video Settings tab.
5. Click Video Settings.

Kramer Electronics Ltd.
KDS-EN5, KDS-DEC5 –Configuring Settings
12
The Video Settings tab appears.
Figure 8: Function > Video Settings Tab
6. Under Encoder Parameters, define the following:
▪Max Bitrate –Maximum bitrate (2000–30000kbps)
▪Max Resolution –Maximum output resolution (480p–2160p)
▪Max Frame Rate –Maximum frames per second (1–60)
7. Click Audio Settings.
The Audio Settings tab appears.
Figure 9: Function > Audio Settings Tab

Kramer Electronics Ltd.
KDS-EN5, KDS-DEC5 –Configuring Settings
13
8. Under Encoder Parameters, select the Encode Type:
▪lpcm
▪aac
9. Under AAC Parameters, select the Encode Bitrate (kbps).
To validate E2E encoding using VLC® decoding
1. Launch VLC media player.
2. Select Media > Open network stream.
3. Select Network tab.
4. Enter Encoder streaming information in the VLC open media network protocol
settings (e.g.: rtsp://192.168.0.200/sdp.live).
Refer to VLC documentation for more information.

Kramer Electronics Ltd.
KDS-EN5, KDS-DEC5 –Configuring Settings
14
Configuring Decoding Settings
KDS-DEC5 web pages enable you to configure decoding settings.
This section applies only to the decoder web pages.
To configure decoding settings:
1. On the decoder web pages, click Function > Stream.
The Stream tab appears.
Figure 10: KDS-DEC5 Function > Stream Tab
2. In the Source section, under Encoder IP or Media URL, enter the encoder IP
address (default = 192.168.1.39).
3. When using an IP camera, under Encoder Video Frame Rate (For IPC), enter the
frame rate.
The frame rate must be the same one defined on the encoder web pages
(see Configuring Streaming/Encoding Settings on page 10).
4. In the Settings section, select the Preferred Transport Mode: tcp or udp.
The transport mode must be the same one defined on the encoder web
pages (see Configuring Streaming/Encoding Settings on page 10).

Kramer Electronics Ltd.
KDS-EN5, KDS-DEC5 –Configuring Settings
15
Configuring Network Settings
KDS-EN5, KDS-DEC5 embedded web pages enable you to configure network
settings.
To configure network settings:
1. Click Network > IP Setup.
The IP Setup tab appears.
Figure 11: Network > IP Setup Tab
2. Change the network settings as required and click Apply.
–OR–
If you want the device to obtain a DHCP IP, do the following:
a. Click DHCP.
b. Click Apply.
c. Reboot the device.
The changes take effect.

Kramer Electronics Ltd.
KDS-EN5, KDS-DEC5 –Configuring Settings
16
Locating Device
KDS-EN5, KDS-DEC5 embedded web pages enable you to activate the status LED
of the encoder or decoder to which you are connected so that you can visually locate
the device in a rack.
To locate a device:
1. On the web pages of the relevant device, click System > Utilities.
The Utilities tab appears.
Figure 12: System > Utilities Tab
2. Click Locate Device.
The status LED on the device lights for several seconds.

Kramer Electronics Ltd.
KDS-EN5, KDS-DEC5 –Configuring Settings
17
Configuring RS-232 over IP Settings
KDS-EN5, KDS-DEC5 embedded web pages enable you to configure RS-232
settings for controlling an external device (e.g. a camera or display screen) via the IP
controller SW / API.S.
To configure the RS-232 over IP Settings:
1. Click Function > Serial over IP.
The Serial over IP tab appears.
Figure 13: Function > Serial over IP Tab
2. Change the Baudrate Settings as needed.

Kramer Electronics Ltd.
KDS-EN5, KDS-DEC5 –Configuring Settings
18
Changing the Device DNS Name
KDS-EN5, KDS-DEC5 embedded web pages enable you to change the device DNS
name.
To change the device DNS name:
1. Click System > Device Name.
The Device Name tab appears.
Figure 14: System > Device Name Tab
2. Enter the new name of the device in the Device Name text box.
The device name cannot include any spaces, can be up to 63 characters and can
include only letters, numbers, hyphens and underscores.
Other manuals for KDS-EN5
1
This manual suits for next models
1
Table of contents
Other Kramer Media Converter manuals

Kramer
Kramer VP-409 User manual

Kramer
Kramer 482 User manual

Kramer
Kramer VM-3A User manual

Kramer
Kramer VP-558 User manual

Kramer
Kramer FC-4002 User manual

Kramer
Kramer VM-2DH User manual

Kramer
Kramer FC-49 User manual

Kramer
Kramer FC-113 User manual

Kramer
Kramer VW-16 User manual

Kramer
Kramer VM-1045 User manual

Kramer
Kramer VM-50AN User manual

Kramer
Kramer VP-424 User manual

Kramer
Kramer VM-24HC User manual

Kramer
Kramer VW-16 User manual

Kramer
Kramer FC-6801 User manual

Kramer
Kramer FC-49 User manual

Kramer
Kramer VP-428H2 User manual

Kramer
Kramer VP-472 User manual

Kramer
Kramer FC-4000 User manual

Kramer
Kramer VP-420 User manual