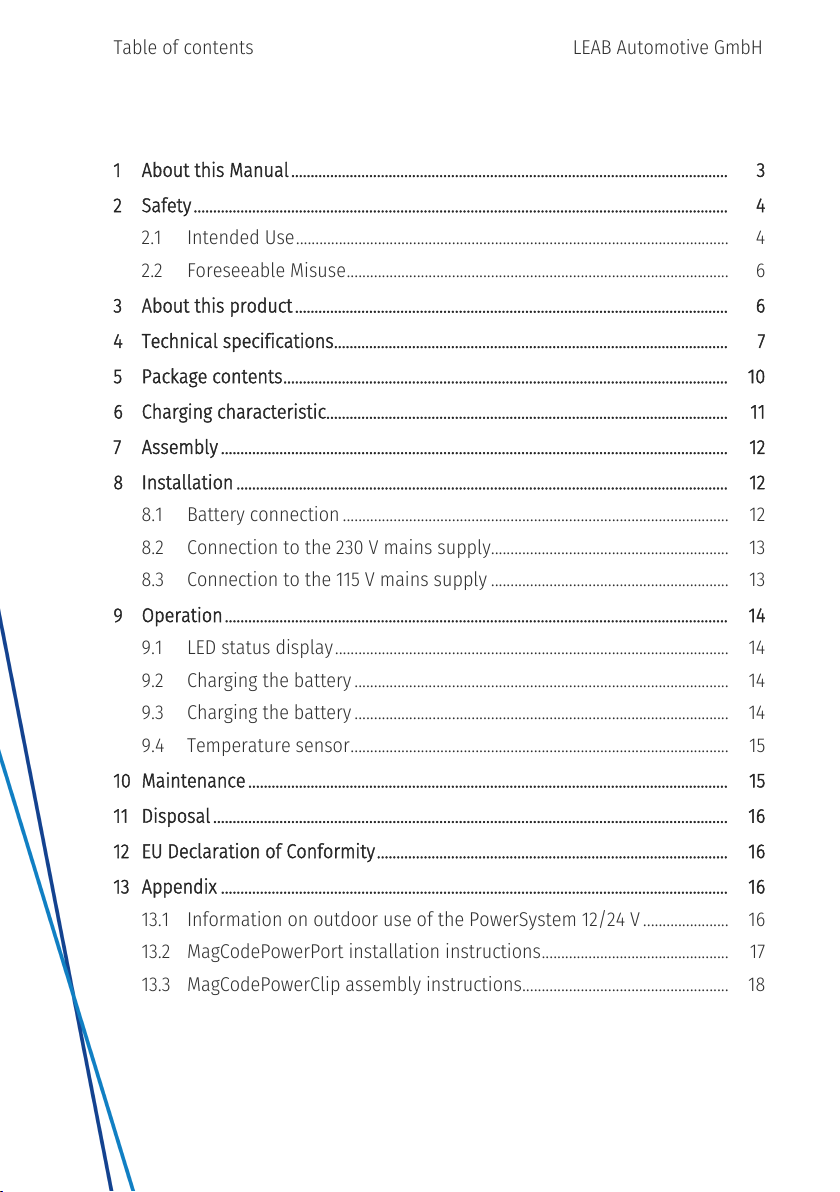
LEAB Champ User manual

www.leab.eu
USER MANUAL
VERSION 5
13/07/2021
CHARGER
CHAMP 24 V
LEAB Automotive GmbH Thorshammer 6 24866 Busdorf

Table of contents
1 About this Manual................................................................................................................ 3
2 Safety......................................................................................................................................... 4
2.1 Intended Use............................................................................................................... 4
2.2 Foreseeable Misuse.................................................................................................. 6
3 About this product............................................................................................................... 6
4 Technical specifications..................................................................................................... 7
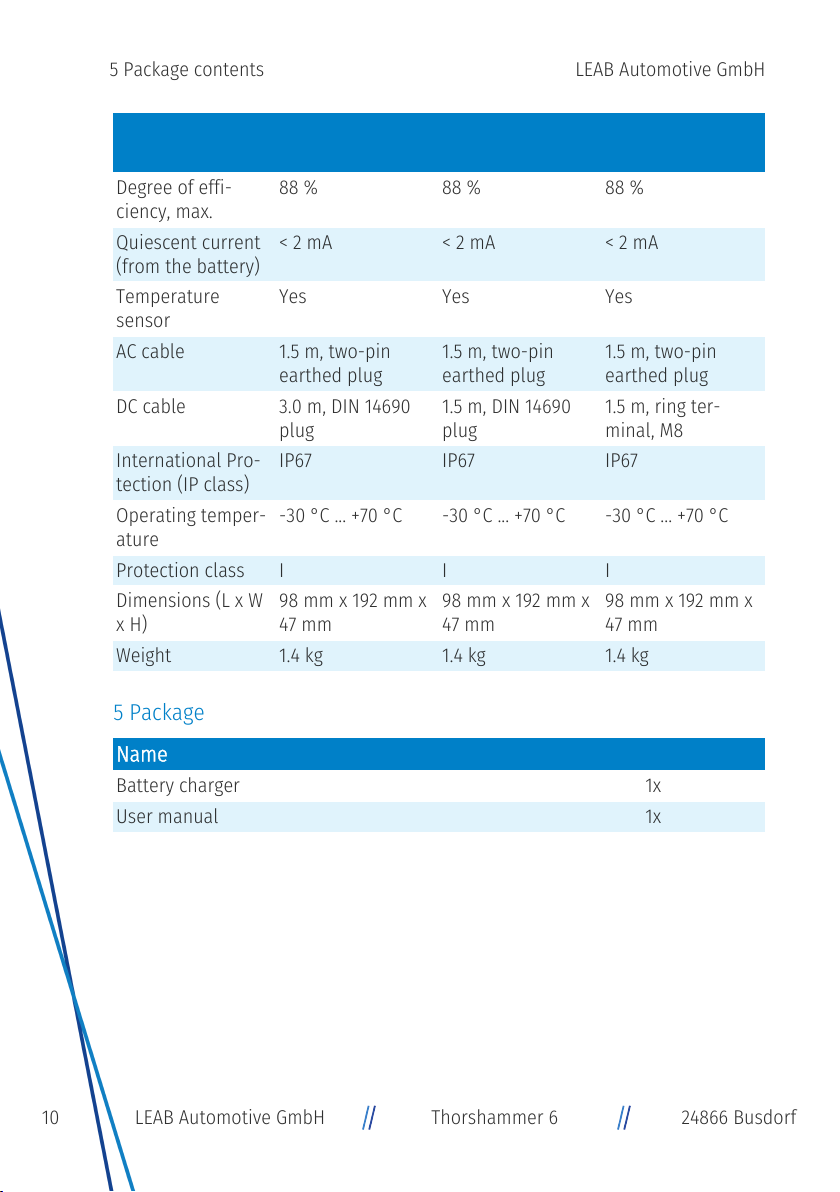
5 Package contents.................................................................................................................. 10
6 Charging characteristic....................................................................................................... 11
7 Assembly.................................................................................................................................. 12
8 Installation.............................................................................................................................. 12
8.1 Battery connection................................................................................................... 12
8.2 Connection to the 230 V mains supply............................................................. 13
8.3 Connection to the 115 V mains supply ............................................................. 13
9 Operation................................................................................................................................. 14
9.1 LED status display..................................................................................................... 14
9.2 Charging the battery................................................................................................ 14
9.3 Charging the battery................................................................................................ 14
9.4 Temperature sensor................................................................................................. 15
10 Maintenance........................................................................................................................... 15
11 Disposal.................................................................................................................................... 16
12 EU Declaration of Conformity.......................................................................................... 16
13 Appendix .................................................................................................................................. 16
13.1 Information on outdoor use of the PowerSystem 12/24 V...................... 16
13.2 MagCodePowerPort installation instructions................................................ 17
13.3 MagCodePowerClip assembly instructions..................................................... 18
Table of contents LEAB Automotive GmbH

1 About this Manual
Read this manual carefully and keep it in a safe place. This manual is aimed at
Skilled workers in the field of automotive electrics.
Any modifications to the product or its components are prohibited and do not
conform to its intended use. Only use original LEAB or LEAB-approved ac-
cessories.
Throughout the manual, you will be alerted to warnings and safety notices
about potential hazards associated with handling the device. The colours and
signal words indicate the severity of the hazard:
Notice
Possibility of material damage
The signal word
Attention
indicates that there is a possibility of
material damage. To avoid material damage, follow the
instruction.
CAUTION
Danger that can lead to minor injuries
Safety instructions with the signal word
CAUTION
indicate a
hazard which, if not avoided, can result in minor or moderate
injury. Read the safety instructions carefully and follow them to
avoid the hazard.
WARNING
Hazards that can lead to severe injuries or death
Safety instructions with the signal word
WARNING
indicate a
hazard which, if not avoided, can result in death or severe injury.
Read the safety instructions carefully and follow them to avoid
the hazard.
3LEAB Automotive GmbH Thorshammer 6 24866 Busdorf
LEAB Automotive GmbH 1 About this Manual

DANGER
Danger that will lead to severe injury or death
Safety instructions with the signal word
Danger
indicate a hazard
which, if not avoided, will result in death or severe injury. Read
the safety instructions carefully and follow them to avoid the
hazard.
You will find useful tips and tricks in certain parts of the manual. These ap-
pear as follows:
TIP
Tips provides additional, useful information.
Read the tip carefully and follow the instructions where
applicable.
2 Safety
This manual will help you to handle the device safely. Use the device solely in
accordance with its intended use. Observe the safety instructions.
The charger is a trickle and battery charger for permanent installation in
vehicles. This charger can be used to charge all types ofLead-acid batteries
(wet, gel, AGM).
Any modifications to the device or its components are prohibited and do not
conform to its intended use. Keep this manual is a place where it can be ac-
cessed quickly.
2.1 Intended Use
The charger is designed for permanent installation in vehicles with 12 or 24 V
on-board power systems for charging Lead-acid batteries (wet, gel, AGM). It is
suitable for charging and trickle charging auxiliary batteries. The device is de-
signed for a temperature range of -30 °C ... 60 °C. Do not charge batteries with
this charger outside the specified temperature range. At higher temperatures,
the output power of the charger automatically decreases.
4 LEAB Automotive GmbH Thorshammer 6 24866 Busdorf
2 Safety LEAB Automotive GmbH

WARNING
Risk of fire from overheated battery
Flammable gases can escape if the battery overheats.
1. Always charge batteries in well-ventilated rooms and away
from ignition sources.
WARNING
Risk of injury from damaged, frozen or deformed batteries
Damaged, frozen or deformed batteries can cause injuries.
1. Before using the battery, make sure that the battery is un-
damaged and the electrolyte is not frozen.
WARNING
Burns from escaping acid
Acid can leak out when handling batteries.
1. Wear acid-proof clothing when handling batteries.
Notice
Device defects from incorrect installation
Incorrect installation can result in device defects.
1. Install the device in a dry and cool location.
5LEAB Automotive GmbH Thorshammer 6 24866 Busdorf
LEAB Automotive GmbH 2 Safety

2.2 Foreseeable Misuse
The charger is designed for permanent installation in vehicles. Do not mount
the device outside the vehicle. Only charge lead-acid batteries (wet, gel/AGM)
and traction batteries with this charger.
The negative lead of the charger may contain a temperature sensor, do not
shorten or lengthen the lead under any circumstances.
Never pinch the leads of the charger to avoid damage. In the event of damage,
unplug the charger immediately and contact your dealer or LEAB.
3 About this product
The Champ charger is a trickle and battery charger designed for permanent in-
stallation in vehicles. With its pre-programmed and fixed charging character-
istic, all types of Lead-acid batteries (wet, gel, AGM) can be charged with this
charger.
1
2
3
4
Fig.1:
Champ Charger
1 AC cable 2 DC cable
3 Mounting hole 4 LED status display
6 LEAB Automotive GmbH Thorshammer 6 24866 Busdorf
3 About this product LEAB Automotive GmbH

4 Technical specifications
Part no.
0101033857 Part no.
0101033851 Part no.
0101033852
Modell Champ 2412 Champ 2412 Champ 2412
Battery type Lead (gel/AGM) Lead (gel/AGM) Lead (gel/AGM)
Battery capacity 55 Ah ... 170 Ah 55 Ah ... 170 Ah 55 Ah ... 170 Ah
Charging charac-
teristics IU1U2, pre-pro-
grammed, cannot
be changed
IU1U2, pre-pro-
grammed, cannot
be changed
IU1U2, pre-pro-
grammed, cannot
be changed
Charging current 12 A 12 A 12 A
Ripple < 3 % < 3 % < 3 %
Main charging 28.8 V 28.8 V 28.8 V
Trickle charging 27.6 V 27.6 V 27.6 V
Input voltage 230 V 230 V 230 V
Input values 190 V ... 270 V 190 V ... 270 V 190 V ... 270 V
Input frequency 40 Hz ... 60 Hz 40 Hz ... 60 Hz 40 Hz ... 60 Hz
Switching fre-
quency 100 kHz 100 kHz 100 kHz
Degree of effi-
ciency, max. 88 % 88 % 88 %
Quiescent current
(from the battery) < 2 mA < 2 mA < 2 mA
Temperature
sensor Yes Yes Yes
AC cable 1.5 m, two-pin
earthed plug 1.5 m, two-pin
earthed plug 0.2 m; DEFA
DC cable 1.5 m, MagCode Pro 1.5 m, DIN 14690
plug 1.5 m, ring ter-
minal, M8
International Pro-
tection (IP class) IP67 IP67 IP67
7LEAB Automotive GmbH Thorshammer 6 24866 Busdorf
LEAB Automotive GmbH 4 Technical specifications

Part no.
0101033857 Part no.
0101033851 Part no.
0101033852
Operating temper-
ature -30 °C ... +70 °C -30 °C ... +70 °C -30 °C ... +70 °C
Protection class I I I
Dimensions (L x W
x H) 98 mm x 192 mm x
47 mm 98 mm x 192 mm x
47 mm
Weight 1.4 kg 1.4 kg 1.4 kg
Part no.
0101033864 Part no.
0101043855 Part no.
0101033854
Modell Champ 2412 Champ 2412 Champ 2412
Battery type Lead (gel/AGM) Lead (wet) Lead (wet)
Battery capacity 55 Ah ... 170 Ah 55 Ah ... 170 Ah 55 Ah ... 170 Ah
Charging charac-
teristics IU1U2, pre-pro-
grammed, cannot
be changed
IU1U2, pre-pro-
grammed, cannot
be changed
IU1U2, pre-pro-
grammed, cannot
be changed
Charging current 12 A 12 A 12 A
Ripple < 3 % < 3 % < 3 %
Main charging 28.8 V 28.4 V 28.4 V
Trickle charging 27.6 V 27.0 V 27.0 V
Input voltage 230 V 230 V 230 V
Input values 190 V ... 270 V 190 V ... 270 V 190 V ... 270 V
Input frequency 40 Hz ... 60 Hz 40 Hz ... 60 Hz 40 Hz ... 60 Hz
Switching fre-
quency 100 kHz 100 kHz 100 kHz
Degree of effi-
ciency, max. 88 % 88 % 88 %
Quiescent current
(from the battery) < 2 mA < 2 mA < 2 mA
Temperature
sensor Yes Yes Yes
8 LEAB Automotive GmbH Thorshammer 6 24866 Busdorf
4 Technical specifications LEAB Automotive GmbH

Part no.
0101033864 Part no.
0101043855 Part no.
0101033854
AC cable 1.5 m, two-pin
earthed plug 1.5 m, two-pin
earthed plug
DC cable 1.5 m, ring terminal
lug, M8, 20 A fuse 1.5 m, ring terminal
lug, M8, 20 A fuse
International Pro-
tection (IP class) IP67 IP67 IP67
Operating temper-
ature -30 °C ... +70 °C -30 °C ... +70 °C -30 °C ... +70 °C
Protection class I I I
Dimensions (L x W
x H) 98 mm x 192 mm x
47 mm 98 mm x 192 mm x
47 mm
Weight 1.4 kg 1.4 kg 1.4 kg
Part no.
0101033867 Part no.
0101033861 Part no.
0101033351
Modell Champ 2412 Champ 2412 Champ 2405
Battery type Lead (gel/AGM) Lead (wet) Lead (gel/AGM)
Battery capacity 90 Ah ... 300 Ah 90 Ah ... 300 Ah 55 Ah ... 170 Ah
Charging charac-
teristics IU1U2, pre-pro-
grammed, cannot
be changed
IU1U2, pre-pro-
grammed, cannot
be changed
IU1U2, pre-pro-
grammed, cannot
be changed
Charging current 12 A 12 A 5 A
Ripple < 3 % < 3 % < 3 %
Main charging 28.8 V 28.4 V 28.8 V
Trickle charging 27.6 V 27.0 V 27.6 V
Input voltage 230 V 230 V 230 V
Input values 190 V ... 270 V 190 V ... 270 V 190 V ... 270 V
Input frequency 40 Hz ... 60 Hz 40 Hz ... 60 Hz 40 Hz ... 60 Hz
Switching fre-
quency 100 kHz 100 kHz 100 kHz
9LEAB Automotive GmbH Thorshammer 6 24866 Busdorf
LEAB Automotive GmbH 4 Technical specifications

Part no.
0101033867 Part no.
0101033861 Part no.
0101033351
Degree of effi-
ciency, max. 88 % 88 % 88 %
Quiescent current
(from the battery) < 2 mA < 2 mA < 2 mA
Temperature
sensor Yes Yes Yes
AC cable 1.5 m, two-pin
earthed plug 1.5 m, two-pin
earthed plug
DC cable 3.0 m, DIN 14690
plug 1.5 m, DIN 14690
plug 1.5 m, ring ter-
minal, M8
International Pro-
tection (IP class) IP67 IP67 IP67
Operating temper-
ature -30 °C ... +70 °C -30 °C ... +70 °C -30 °C ... +70 °C
Protection class I I I
Dimensions (L x W
x H) 98 mm x 192 mm x
47 mm 98 mm x 192 mm x
47 mm
Weight 1.4 kg 1.4 kg 1.4 kg
5 Package contents
Name No.
Battery charger 1x
User manual 1x
10 LEAB Automotive GmbH Thorshammer 6 24866 Busdorf
5 Package contents LEAB Automotive GmbH

6 Charging characteristic
Battery charging is fully automatic and micro-processor controlled with a 3-
stage IU1U2 characteristic curve for gentle and optimum charging of the batter-
ies.
Fig.2:
IU1U2 charging characteristic
I phase: Charging with constant current
Depending on the battery charge state, the battery is charged with maximum
charging current to store as much energy as possible in the battery. After
reaching the set main charging voltage, the charger switches to the next char-
ging phase (U1 phase). If the set main voltage is not reached within max. 10
hours, the device changes to the U2 phase.
U1 phase: Charging with constant current
In the main charging phase, the voltage is kept at a constant value. As the bat-
tery increasingly charges, the current decreases continuously and approaches
a lower limit.
Battery Type Main charge voltage
Gel battery 24 V 28.8 V
Wet cell battery 24 V 28.2 V
AGM battery 24 V 28.8 V
11LEAB Automotive GmbH Thorshammer 6 24866 Busdorf
LEAB Automotive GmbH 6 Charging characteristic

U2 phase: Charging with constant current
In this phase, the charging voltage is reduced in order to maintain the battery
charge for an unlimited period and counteract self-discharge. Additional con-
nected consumers are supplied via the charger in this phase without loading
the battery.
Battery Type Charge voltage
Gel battery 24 V 27.6 V
Wet cell battery 24 V 27.0 V
AGM battery 24 V 27.6 V
7 Assembly
To assemble the device, proceed as follows:
üChoose a cool, dry and well-ventilated assembly site.
üDo not mount the device directly next to or above batteries.
üOptimum cooling is achieved by mounting the unit vertically on a flat sur-
face.
1. Fasten the device to the 4 mounting holes on the side (3) (Ø 5 mm).
ðThe device is assembled.
8 Installation
The Champ charger is designed for permanent installation in vehicles.
8.1 Battery connection
Notice
Device defect from shortening the negative lead.
Do not shorten the negative lead under any circumstances, as it
contains a temperature sensor.
To install the device in the vehicle, proceed as follows:
1. Disconnect the battery from the vehicle power circuit.
WARNING!Disconnect the negative lead first.
12 LEAB Automotive GmbH Thorshammer 6 24866 Busdorf
8 Installation LEAB Automotive GmbH

2. Secure the positive lead of the device as close as possible to the vehicle
battery with a suitable fuse.
3. Connect the positive lead of the device to the positive terminal of the bat-
tery.
4. Connect the negative lead of the device to the negative terminal of the bat-
tery.
NOTE!Connect the cable lug directly to the negative terminal of the battery.
5. Connect the vehicle battery to the vehicle power circuit.
ðThe device is installed.
8.2 Connection to the 230 V mains supply
To connect the device to the 230 V mains, proceed as follows:
NOTE!The charger is only suitable for connection to fused, earthed 230 V
mains supplies.
1. Connect the mains plug to a 230 V mains supply.
ðThe charger is connected to the 230 V mains supply.
8.3 Connection to the 115 V mains supply
To connect the device to the 115 V mains, proceed as follows:
NOTE!The charger is only suitable for connection to fused, earthed 115 V
mains supplies.
1. Connect the mains plug to a 115 V mains supply.
ðThe charger is connected to the 115 V mains supply.
13LEAB Automotive GmbH Thorshammer 6 24866 Busdorf
LEAB Automotive GmbH 8 Installation

9 Operation
9.1 LED status display
LED display Item Meaning
Yellow LED lights up The charging process is in the I-
phase with maximum current. The
voltage drops as soon as the bat-
tery is charged.
Yellow and green
LED lights up The charger is in the main charging
phase. The battery is charged with
increased voltage.
Green LED lights up The charger is in the trickle char-
ging phase. The charger ensures
that the battery remains charged.
9.2 Charging the battery
To unpack the device, proceed as follows:
üThe device is installed.
üThe battery is connected.
1. Connect the mains plug to a 230 V mains supply.
ðCharging starts automatically, the yellow LED of the charge status indic-
ator lights up.
ðIf the charging current is 15% below the maximum value, the yellow and
green LEDs of the charging status indicator light up.
ðWhen the battery is fully charged, the green LED on the charging status
indicator lights up and indicates the trickle charge.
ðThe battery is charged.
9.3 Charging the battery
To unpack the device, proceed as follows:
üThe device is installed.
üThe battery is connected.
14 LEAB Automotive GmbH Thorshammer 6 24866 Busdorf
9 Operation LEAB Automotive GmbH

1. Connect the mains plug to a 115 V mains supply.
ðCharging starts automatically, the yellow LED of the charge status indic-
ator lights up.
ðIf the charging current is 15% below the maximum value, the yellow and
green LEDs of the charging status indicator light up.
ðWhen the battery is fully charged, the green LED on the charging status
indicator lights up and indicates the trickle charge.
ðThe battery is charged.
9.4 Temperature sensor
Depending on the model, the Champ charger has a temperature sensor loc-
ated in the negative lead. The temperature sensor corrects the charging
voltage as a function of the temperature in order to provide an optimal, ef-
fective and gentle battery charge.
10 Maintenance
Check the device as follows before using it each time:
– Check the mains cable and mains plug for damage.
– Check charging cables and connections for damage.
– Check the charger for external damage.
– Ensure that the wiring between the charging cable and the charger is se-
cure.
TIP
Battery maintenance
For battery maintenance, refer to the battery manufacturer's
instructions.
15LEAB Automotive GmbH Thorshammer 6 24866 Busdorf
LEAB Automotive GmbH 10 Maintenance

11 Disposal
Dispose of the device in accordance with the Waste Elec-
trical and Electronic Equipment Regulations (WEEE).
The system must not be disposed of with household
waste. Take it to a recycling point or return it to your
point of sale.
12 EU Declaration of Conformity
The Champ charger complies with the requirements of
the following directives:
– 2014/30/EU: EMV
– 2014/35/EU: NRL
– 2011/65/EU: RoHS
13 Appendix
13.1 Information on outdoor use of the PowerSystem 12/24 V
MagCode PowerSystems were originally developed for vehicle interiors. How-
ever, in Germany, the BGS, DRK, fire brigade, police and THW now use these
systems in addition to the DIN plug as an outdoor socket for charge mainten-
ance on their emergency vehicles.
With regard to outdoor use, please note:
Port (socket)
When installed with a sealing ring on the front (contacting side to the clip), the
port is tight in accordance with IP5K9K. If the rear of the port comes into con-
tact with water, it must be sealed.
Clip (pick-up/connector)
The clip (IP40) is not waterproof. Keep the clip protected from water.
Clip to port connection
This connection is also not waterproof. At best, it is protected against dripping
water (IP42).
16 LEAB Automotive GmbH Thorshammer 6 24866 Busdorf
13 Appendix LEAB Automotive GmbH

To prolong the life of the product, the following measures should also be
taken:
– After outdoor use, clean the port briefly with a cloth.
– Remove possible deposits of metal chips on the contact side of the port and
clip with an adhesive strip from time to time.
– Spray contact spray on port and clip contacts every 1 to 2 months.
TIP
Device defect due to faulty release under load
The MagCode PowerSystemPro 12/24 V has a mechanical bayonet
lock. It can be disconnected under load without unlocking, which
can damage the system or cause the system to fail completely.
1. Always unlock the system manually.
13.2 MagCodePowerPort installation instructions
Fig.3: MagCode
PowerSystems clip
and port
NOTE!An existing car socket can easily be replaced by a
MagCode PowerPort, as both have the same diameter. If
installing elsewhere, we recommend visiting a specialist
workshop.
To install the MagCode
PowerPort
in place of an existing
car socket, proceed as follows:
DANGER!Short circuit hazard - Remove the fuse be-
fore starting work.
1. Pull out the existing car socket.
NOTE!Note the polarity of the wires.
2. Cut the cable.
OR…
3. Drill a new installation opening (Ø 28mm).
ðThe installation opening is prepared.
4. Slide the MagCode
PowerPort
, with or without spacer
ring, into the installation opening.
17LEAB Automotive GmbH Thorshammer 6 24866 Busdorf
LEAB Automotive GmbH 13 Appendix

5. Screw the MagCode
PowerPort
on the back with a nut
(M28).
6. Connect the cables with each other by soldering,
crimping or with connection terminals.
7. Put the fuse back in place.
ðThe MagCode
PowerPort
is installed.
13.3 MagCodePowerClip assembly instructions
To install the device, proceed as follows:
1. Cut off the old connector.
NOTE!Note the polarity of the wires.
2. Screw on the MagCode
PowerClip
.
3. Select the appropriate strain relief for the cable thickness.
4. If necessary, shorten the cable grommet by passing the cables through the
grommet and the strain relief and attaching the wire end ferrules.
5. Screw the cables into the terminals.
NOTE!Note the polarity of the wires.
6. Screw the housing together.
ðThe device is assembled.
18 LEAB Automotive GmbH Thorshammer 6 24866 Busdorf
13 Appendix LEAB Automotive GmbH

19LEAB Automotive GmbH Thorshammer 6 24866 Busdorf
LEAB Automotive GmbH 13 Appendix

LEAB Automotive GmbH
Thorshammer 6
DE-24866 Busdorf
Tel: +49 (0) 4621 9 78 60-0
Fax: +49 (0) 4621 9 78 60-260
We make energy
mobile.
It is prohibited to copy, duplicate, translate or otherwise pass on the content of
this guide to third parties without the express written permission of LEAB.
This manual suits for next models
10
Table of contents
Other LEAB Batteries Charger manuals

LEAB
LEAB CHAMP 12 V User manual

LEAB
LEAB Clayton Power G3 Combi 1012-50 User manual

LEAB
LEAB TS 24/12-06 User manual

LEAB
LEAB TS 12 User manual

LEAB
LEAB ABC 1215 User manual

LEAB
LEAB 12100 User manual

LEAB
LEAB ABC SCHUTZKLASSE II User manual

LEAB
LEAB CHAMP PRO 24 V User manual

LEAB
LEAB CDR 12/24 V User manual

LEAB
LEAB Champ 1207 User manual