manuals.online logo
Brands
  1. Home
  2. •
  3. Brands
  4. •
  5. Leviton
  6. •
  7. Accessories
  8. •
  9. Leviton Lumina LURPC-00W User manual

Leviton Lumina LURPC-00W User manual

Lumina™ RF Wireless Photosensor
Cat. No. LURPC-00W
INSTALLATION ENGLISH
DI-000-LURPC-02A
OVERVIEW
The Leviton®LURPC-00W Wireless Photosensor is a battery powered light sensor that
transmits and receives wireless messages in the Lumina™ RF network wireless lighting
control system. It is intended to be mounted to the ceiling, to measure the light level in the
space. No wiring, adjustment or calibration is needed.
As part of the Lumina™ RF network system and using open, standards based Lumina™
RF wireless communications, the LURPC-00W reports real-time light measurements.
Designed to work with the Lumina™ RF network daylight harvesting solution, the
LURPC-00W enables automatic and continuous adjustment of electric light levels to auto-
defined or user-defined setpoints.
• Suitable for many applications: office, retail, education, etc.
• Ceiling surface mount, completely wireless installation.
PLACEMENT
Place the Photosensor so that it views the daylight and the electric light available in the
controlled area.
In areas with pendant fixtures providing uplighting, place the Photosensor at least 4 feet
(1.2m) away from the nearest uplighting fixture.
In areas where the primary light source is through a window, place the Photosensor
between 6 feet and 15 feet (1.8m to 4.5m) from the window.
SPECIFICATIONS
INSTALLATION
1. Determine the mounting location for the sensor based on daylight availability and task
area. See Placement for details.
2. Remove the sensor from the base by twisting it.
3. Attach the mounting base to the ceiling in the specified location. Be sure the label is
visible after mounting the base.
4. Install the batteries in the orientation
(+ -) shown on the bottom of the battery
compartments.
5. Secure the sensor to the ceiling by twisting it
onto the base.
6. Initiate the Installation Test Mode:
momentarily press the Utility button. The
green LED flashes once then the red LED
starts flashing.
NOTE: The test mode times out after 5
minutes.
• Decrease the light at the Photosensor by
covering the lens with your hand.
NOTE: The LED flashes slower.
• Increase the light at the Photosensor by
moving your hand away from the lens.
NOTE: The LED flashes faster.
7. If you observe the behaviors described in step 6, the sensor has passed the installation
test. Exit Installation Test Mode by momentarily pressing the Utility button again. If you
do not observe the proper behavior, see Troubleshooting.
8. Complete the installation by resetting the device to factory defaults. Press and hold the
Utility button for 5 seconds. Release the button when the Network LED (green) begins to
flash rapidly. The sensor attempts to join a Lumina™ RF network for up to 30 seconds.
If it is able to join, the Network LED (green) turns ON solid for 10 seconds. If it is unable
to join, it automatically retries every 15 minutes until it succeeds in joining a network.
NOTE: The sensor will not be able to join a network until a Lumina™ RF compatible
gateway is commissioned. See LED Operation table.
WARNINGS AND CAUTIONS
•
TO AVOID DEATH, SERIOUS PERSONAL INJURY OR PROPERTY DAMAGE, DO NOT RECHARGE, DISASSEMBLE OR INCINERATE BATTERY, NOR HEAT
IT ABOVE 100˚C (212˚F).
Dispose of used battery promptly. DO NOT dispose of battery in normal household waste. Keep away from children. Please contact
your local waste provider or recycling facility for proper disposal of used battery.
• To be installed and/or used in accordance with appropriate electrical codes and regulations.
• If you are unsure about any part of these instructions, consult an electrician.
• For indoor applications only.
• SAVE THESE INSTRUCTIONS.
Power supply (2) AA 3.6V Lithium-thionyl chloride
battery (included)
Battery life 5 years
Radio Properties 2.4 GHz, +7dBm transmit power
Operating Environment Indoor, dry location
Temperature 14˚ to 122˚F (-10˚ to 50˚C)
Light Sensor Range 1 to 2000 lux (0.092 to 185 fc)
Lens Field of view: 60˚ cone
Mounting (2) Screw holes on base plate; ceiling
mount; twist-lock sensor
Dimensions Diameter: 3.7 inches (95mm)
Depth: 1.3 inches (32mm)
DI-000-LURPC-02A© 2017 Leviton Mfg. Co., Inc. For Technical Assistance Call: 1-800-824-3005 (U.S.A. Only) www.leviton.com
10’
6’
4’
60˚
60
˚
Window
Light
Fixture
12’
Daylighting area
Photosensor
Lens
Utility
Button
T
est Mode LED
(red)
Network LED
(green)
For Indoor Use Only
Power Supply: Battery Li-SOC12 AA 3.6V (2)
FCC ID: NRH-ZB Z1-B
IC ID: 8984A-Z100B
ICES/NMB-003 CLASS B
Wireless Photosensor
Cat. No.: LURPC-00W
FOR CANADA ONLY:
For warranty information and/or product returns, residents of Canada should contact Leviton in writing at
Leviton Manufacturing of Canada Ltd to the attention of the Quality Assurance Department, 165
Hymus Blvd, Pointe-Claire (Quebec), Canada H9R 1E9 or by telephone at 1 800 405-5320.
TROUBLESHOOTING
If the Installation on Test procedure fails:
• Make sure that the Photosensor lens is not obstructed and there is no debris on the lens.
• Check to be sure the batteries are installed correctly, observe polarity.
• Repeat the Installation on Test.
No LEDs ever flash. Is the unit working?
When the device is operating normally and it has joined a network, the LEDs are off . If
you want to confirm that the batteries are not dead, you can initiate the Installation on Test
Mode. See step 6 under installation.
JOINING THE LUMINA™ RF LIGHTING CONTROL NETWORK
After successfully completing the Installation Test the LURPC-00W is ready to
communicate with the Lumina™ RF compatible gateway.
* A network join can be re-triggered manually at any time using one of the following
methods:
• Reset to factory defaults: This causes the device to leave any network to which it
is currently joined. Following the reset, the device attempts to join a network. Press
and hold the Utility button for 5 seconds. Release the button when the Network LED
(green) begins to flash rapidly.
• Activate device: Press and hold the Utility button for 2 seconds. If the device is already
joined to a network, the Network LED (green) flashes twice. If the device is not joined
to a network, the Network LED (green) flashes rapidly and the device will attempt to
join a network.
DI-000-LURPC-02A© 2017 Leviton Mfg. Co., Inc. For Technical Assistance Call: 1-800-824-3005 (U.S.A. Only) www.leviton.com
TRADEMARK DISCLAIMER:
Use herein of third party trademarks, service marks, trade names, brand names and/or product names
are for informational purposes only, are/may be the trademarks of their respective owners; such use is not
meant to imply affiliation, sponsorship, or endorsement.
FCC COMPLIANCE STATEMENT:
Contains FCC ID: NRH-ZB Z1-B
The enclosed device complies with Part 15 of the FCC Rules. Operation is subject to the following two conditions:
(i.) This device may not cause harmful interference (ii.) This device must accept any interference received,
including interference that may cause undesired operation. Any changes or modifications not expressly
approved by Leviton could void the user’s authority to operate this equipment. This equipment has been tested
and found to comply with the limits for a Class B digital device, pursuant to part 15 of the FCC Rules. These
limits are designed to provide reasonable protection against harmful interference in a residential installation. This
equipment generates uses and can radiate radio frequency energy and, if not installed and used in accordance
with the instructions, may cause harmful interference to radio communications. However, there is no guarantee
that interference will not occur in a particular installation. If this equipment does cause harmful interference
to radio or television reception, which can be determined by turning the equipment off and on, the user is
encouraged to try to correct the interference by one or more of the following measures:
• Reorient or relocate the receiving antenna.
• Increase the separation between the equipment and receiver.
• Connect the equipment into an outlet on a circuit different from that to which the receiver is connected.
• Consult the dealer or an experienced radio/TV technician for help.
INDUSTRY CANADA COMPLIANCE STATEMENT:
Contains IC: 8984A-Z100B
This device complies with Industry Canada license-exempt RSS standard(s). Operation is subject to the
following two conditions: (1) this device may not cause interference, and (2) this device must accept any
interference, including interference that may cause undesired operation of the device. IMPORTANT! Any
changes or modifications not expressly approved by the party responsible for compliance could void the
user’s authority to operate this equipment. This Class B digital apparatus complies with Canadian ICES-003.
LEVITON LIMITED WARRANTY
Leviton warrants to the original consumer purchaser and not for the benefit of anyone else that products manufactured by Leviton under the Leviton brand name (“Product”) will be free from defects in material and
workmanship for the time periods indicated below, whichever is shorter: • OmniPro II and Lumina Pro: three (3) years from installation or 42 months from manufacture date. • Omni LTe, Omni IIe, and Lumina: two (2)
years from installation or 30 months from manufacture date. • BitWise Controllers, Accessories: two (2) years from installation or 30 months from manufacture date. • Lumina Gateway Controllers: two (2) years from
installation or 30 months from manufacture date. • Thermostats, Accessories: two (2) years from installation or 30 months from manufacture date. • Batteries: Rechargeable batteries in products are warranted for
ninety (90) days from date of purchase. Note: Primary (non-rechargeable) batteries shipped in products are not warranted. Products with Windows®Operating Systems: During the warranty period, Leviton will restore
corrupted operating systems to factory default at no charge, provided that the product has been used as originally intended. Installation of non-Leviton software or modification of the operating system voids this warranty.
Leviton’s obligation under this Limited Warranty is limited to the repair or replacement, at Leviton’s option, of Product that fails due to defect in material or workmanship. Leviton reserves the right to replace product under
this Limited Warranty with new or remanufactured product. Leviton will not be responsible for labor costs of removal or reinstallation of Product. The repaired or replaced product is then warranted under the terms
of this Limited Warranty for the remainder of the Limited Warranty time period or ninety (90) days, whichever is longer. This Limited Warranty does not cover PC-based software products. Leviton is not responsible for
conditions or applications beyond Leviton’s control. Leviton is not responsible for issues related to improper installation, including failure to follow written Installation and operation instructions, normal
wear and tear, catastrophe, fault or negligence of the user or other problems external to the Product. To view complete warranty and instructions for returning product, please visit us at www.leviton.com.
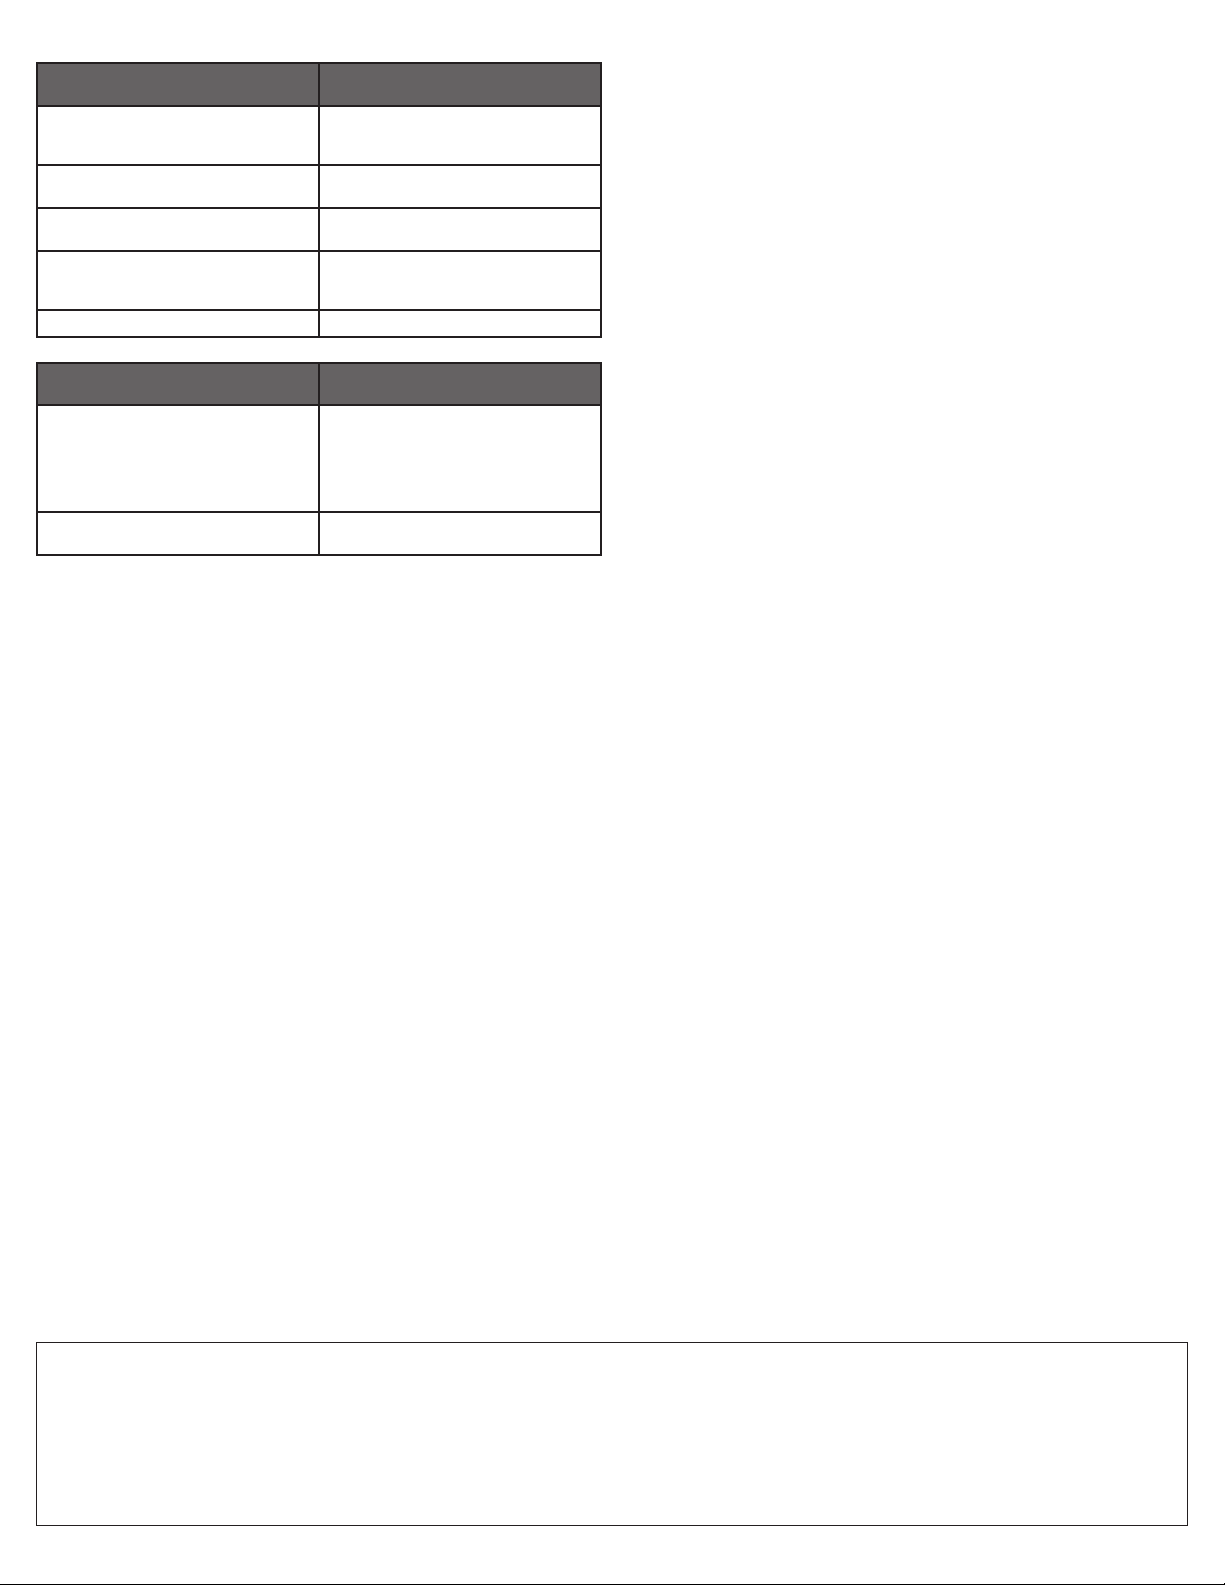
Green LED:
Network Indicator
Description
Rapid flash (12 times per second) for up to
30 seconds
Device is trying to join Lumina™ RF
network. If it fails to join, it will retry after
15 minutes.*
Solid for 10 seconds Device successfully joined a Lumina™ RF
network.
Flashes once Utility button was pressed to initiate Instal-
lation Test Mode.
Flashes twice Utility button was pressed for 2 seconds
and the device is currently joined to a
network.
ON for 2 seconds every 30 seconds Battery is low. Replace the battery.
Red LED: Installation
Test Mode, Light Level
Description
Flashes at the rate of 2 times per second
to 12 times per second
Installation Test Mode is active. The red
LED flashes at a speed proportional to the
amount of light detected. At the minimum
light level it flashes 2 times per second. At
the maximum light level it flashes 12 times
per second.
OFF Normal operation. Installation Test Mode
automatically exits after 5 minutes.
LED OPERATION
ARTWORK PRINT SPECIFICATIONS
DIMENSIONS / FOLD SCHEME / BINDERY DIAGRAM
PART NUMBER REV DESCRIPTION
Line Screen:
Angle:
Resolution:
Offset Flexo
Other
Body Material:
Bindery
Thickness:
Trim
Perfect Bind
Die cut Saddle Stitch
Drill
Fold
The information in this document is the exclusive PROPRIETARY property of LEVITON MANUFACTURING COMPANY, INC. It is disclosed
with the understanding that acceptance or review by the recipient constitues an undertaking by the recipient. (1) to hold this information in strict
confidence, and (2) not to disclose, duplicate, copy, modify or use the information for any purpose other than that for which disclosed.
PlantApprovals:
PN-ARN: Pilot Rev:ECR Number:
Released Artwork Format: Production PDF Artwork Release Date:
Artwork Print Specification Sheet Rev A11.eps
PMCQA
Artist:
Notes:
Other
Cust Other
S & A
Mktg Eng
FOR LEVITON USE ONLY
SPECIFICATIONS :
PROCESS :
MANUAL INTERIORS / BINDERY / FOLD SCHEME :
COMMENTS :
For manuals - designates cover specifications
Material:
Thickness:
Finish:
:
Spot
CMYK
1:
4:
3:
2:
Colors: over
1:
4:
3:
2:
Fonts:
Spot
CMYK
1:
4:
3:
2:
Colors: over
1:
4:
3:
2:
Fonts:
Fold Line
Die Cut Punch/Drill Hole
Glue
Kiss Cut Cellophane
Fold Line
Perforate
Die Cut
Die Line Key:
DI-000-LURPC-02A
40 lb. Black
1 1
x
Helvetica
Instruction Sheet
x
x
P. Clapp 05/30/17
LE0235-5180
T. Law
cc: R. Parks
V. LoNigro
P. Maddox F. Tse
S. Scully48
X X
X
X
X
8.5"
11
"
Part No.
FINAL
2.83"
3.67"
Part No.

This manual suits for next models

1

Other Leviton Accessories manuals

Leviton ODC10-MDW User manual

Leviton

Leviton ODC10-MDW User manual

Leviton IPP15-1L User manual

Leviton

Leviton IPP15-1L User manual

Leviton OSS10-IDx User manual

Leviton

Leviton OSS10-IDx User manual

Leviton 279-PM User manual

Leviton

Leviton 279-PM User manual

Leviton ODS15-I1I User manual

Leviton

Leviton ODS15-I1I User manual

Leviton ODD10-ID User manual

Leviton

Leviton ODD10-ID User manual

Leviton OSC04-R Series User manual

Leviton

Leviton OSC04-R Series User manual

Leviton T5631 User manual

Leviton

Leviton T5631 User manual

Leviton BR20I User manual

Leviton

Leviton BR20I User manual

Leviton AEHTK User manual

Leviton

Leviton AEHTK User manual

Leviton Acenti QuickPort AC642 User manual

Leviton

Leviton Acenti QuickPort AC642 User manual

Leviton ODC15-IDW User manual

Leviton

Leviton ODC15-IDW User manual

Leviton ODS15-ID User manual

Leviton

Leviton ODS15-ID User manual

Leviton OSSMD-FT User manual

Leviton

Leviton OSSMD-FT User manual

Leviton OSW12-MNW User manual

Leviton

Leviton OSW12-MNW User manual

Leviton OSFHD-AW Series Operation manual

Leviton

Leviton OSFHD-AW Series Operation manual

Leviton OSC04-I User manual

Leviton

Leviton OSC04-I User manual

Leviton 47605-ACN User manual

Leviton

Leviton 47605-ACN User manual

Leviton O2C Series Operation manual

Leviton

Leviton O2C Series Operation manual

Leviton Decora ODSIO-ID Series User manual

Leviton

Leviton Decora ODSIO-ID Series User manual

Leviton 9864-LED User manual

Leviton

Leviton 9864-LED User manual

Leviton Decora ODS06 Operation manual

Leviton

Leviton Decora ODS06 Operation manual

Leviton decora smart DW15R User manual

Leviton

Leviton decora smart DW15R User manual

Leviton D4200 User manual

Leviton

Leviton D4200 User manual

Popular Accessories manuals by other brands

Balluff BMF 415KW-HA Series user guide

Balluff

Balluff BMF 415KW-HA Series user guide

Philips VSS3901/00 user manual

Philips

Philips VSS3901/00 user manual

Klarstein 10032885 manual

Klarstein

Klarstein 10032885 manual

Lexicon LFI-10 user guide

Lexicon

Lexicon LFI-10 user guide

netvox R311CA user manual

netvox

netvox R311CA user manual

Celestron 93515 Catalog

Celestron

Celestron 93515 Catalog

Cooluli VIBE-15LE instruction manual

Cooluli

Cooluli VIBE-15LE instruction manual

AEG DB 70 Instructions for use

AEG

AEG DB 70 Instructions for use

Young Living ROUND DIFFUSER Operation manual

Young Living

Young Living ROUND DIFFUSER Operation manual

QC Conveyors PF51 Installation Manual, Operation & Maintenance Instructions

QC Conveyors

QC Conveyors PF51 Installation Manual, Operation & Maintenance Instructions

Vega VEGADIS 81 operating instructions

Vega

Vega VEGADIS 81 operating instructions

Yaohua Weighing System XK3190-A7 user manual

Yaohua Weighing System

Yaohua Weighing System XK3190-A7 user manual

PolyScience FT-25 Operator's manual

PolyScience

PolyScience FT-25 Operator's manual

greenapple Biocheck-in Assembly manual

greenapple

greenapple Biocheck-in Assembly manual

Hoftronic 4401368 user manual

Hoftronic

Hoftronic 4401368 user manual

Exit Pico user manual

Exit

Exit Pico user manual

Housewatch 55-190 instructions

Housewatch

Housewatch 55-190 instructions

Panasonic EX-10 Series instruction manual

Panasonic

Panasonic EX-10 Series instruction manual

manuals.online logo
manuals.online logoBrands
  • About & Mission
  • Contact us
  • Privacy Policy
  • Terms and Conditions

Copyright 2025 Manuals.Online. All Rights Reserved.