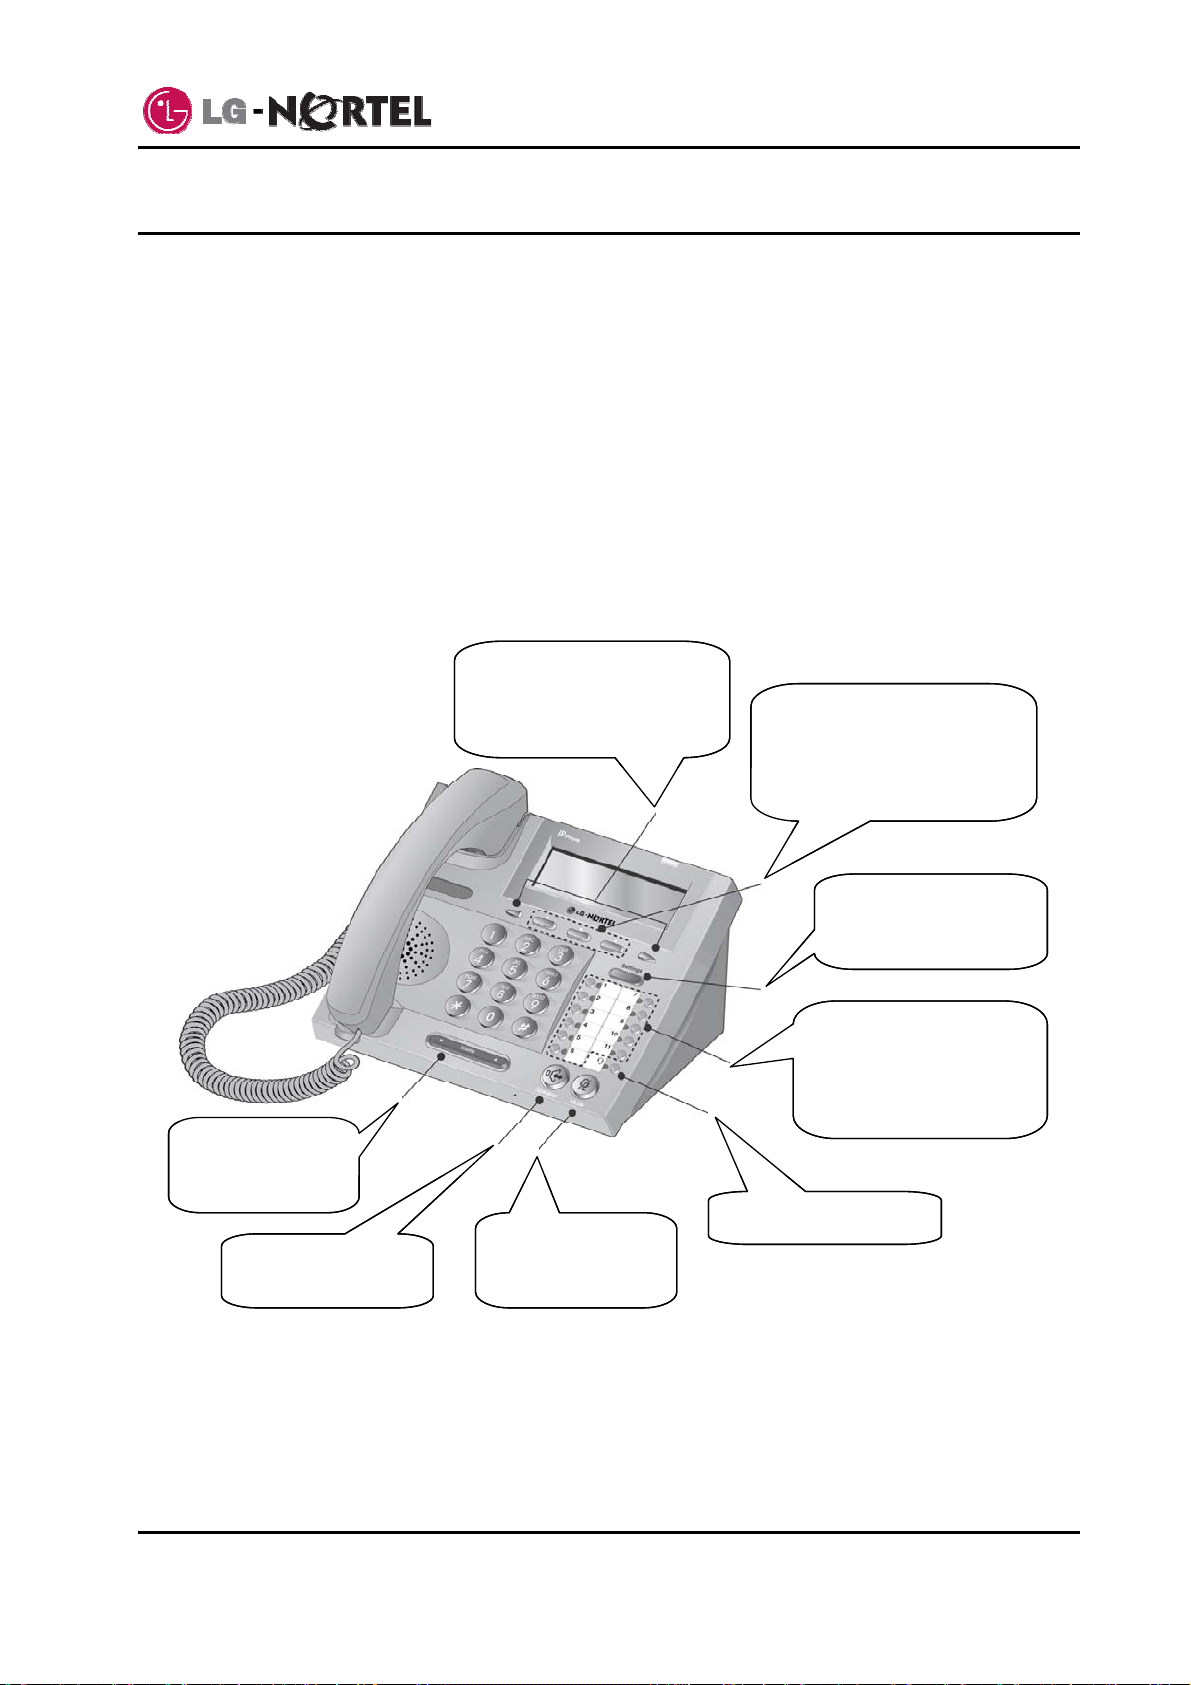
LG NORTEL 6812 User manual

LIP Phone 6812
User Guide
SIP (Session Initiation Protocol)
for Sylantro, SIP4B
Please read this guide carefully before operating your set.
Retain this guide for future reference.
LGN6812-1235SSUG-01.03 Sept 07

LIP Phone 6812
User Guide
Copyright© 2007 LG-Nortel Co. Ltd. All Rights Reserved
This material is copyrighted by LG-Nortel Co Ltd. Any unauthorized reproduction, use or disclosure of this material, or any part
thereof, is strictly prohibited and is a violation of Copyright Laws. LG-Nortel reserves the right to make changes in specifications at
any time without notice. The information furnished by LG Nortel in this material is believed to be accurate and reliable, but is not
warranted to be true in all cases.
LG-Nortel is a trademark of LG-Nortel Co. Ltd.
All other brand and product names are trademarks or registered trademarks of their respective companies.
Regulatory and Safety Notices
1. Radio Frequency Emissions:
FCC Compliance statement:
This device complies with Part 15 rules. Operation is subject to the following two conditions;
1. This device may not cause harmful interference, and
2. This device must accept any interference received, including interference that may cause undesired operation.
This Equipment has been tested and found to comply with the limits for a Class B digital device, pursuant to Part 15 of the FCC
rules. These limits are designed to provide reasonable protection against harmful interference in a residential installation. This
equipment generates, uses and can radiate radio frequency energy and, if not installed and used in accordance with the
instructions, may cause harmful interference to radio communications. However, there is no guarantee that interference will not
occur in a particular installation. If this equipment does cause harmful interference to radio or television reception, which can be
determined by turning the equipment off and on, the user is encouraged to try to correct the interference by one of the following
measures:
•Reorient or relocate the receiving antenna.
•Increase the separation between the equipment and the receiver.
•Connect the equipment into an outlet on a different circuit from that to which the receiver is connected
If problems persist, consult the dealer or an experienced radio/TV technician for help.
Canadian Compliance statement:
This Class B digital apparatus complies with Canadian ICES-003.
Cet appareil numérique de la classe B est conforme à la norme NMB-003 du Canada.
This device complies with Class B limits of Industry Canada. Operation is subject to the following two conditions;
1. This device may not cause harmful interference, and
2. This device must accept any interference received, including interference that may cause undesired operation.
European Union Declarations of Conformity:
LG-Nortel Co. Ltd. declares that the equipment specified in this document, which bears the “CE” mark, conforms to
the European Union Radio and Telecommunications Terminal Equipment Directive (R&TTE 1999/5/EC) including,
Electromagnetic Compatibility Directive (89/336/EEC) and
Low Voltage Directive (73/23/EEC)
The product fulfills the essential requirements of the harmonized standards shown above.
2. Product Safety Instructions
This product complies with and conforms to the following international Product Safety standards as applicable:
Safety of Information Technology Equipment, IEC 6095-1, including
Relevant national deviations as listed in Compliance with IEC for Electrical Equipment (IECEE)
Safety of Information Technology Equipment, CAN/CSA-C22.2 No. 60950-1/UL 60950-1
3. E-911 and use of the LIP Phone 6800 with Multi-Line Telephone Systems:
Please note the use and operation of this phone as part of a multi-line telephone system (MLTS) may be subject to
state and/or federal E-911 MLTS laws that require the MLTS to provide a caller’s telephone number, extension, and
physical location to applicable state and/or local emergency services when a caller initiates a 911 call. The MLTS
may not provide a caller’s telephone number, extension, or physical location information to emergency services when
a caller dials 911, and compliance with state and/or federal E-911 MLTS laws is the sole responsibility of the
purchaser of this phone.
4. Privacy:
LIP Phone 6812 implements security and encryption technologies however, privacy of communications may not be
ensured when using this telephone.

LIP Phone 6812
User Guide
Care & Precautions:
Before connecting or using your new phone, take a moment to consider safety and reliability. Use common sense
when locating, connecting and using your LIP Phone 6812.
•Locate on a dry level surface. Keep the phone away from the edges of the surface to avoid the potential of a
fall.
•Locate cables to avoid potential for damage. For example, do not locate under rugs or carpet as damage may
result from foot traffic or heavy objects. Also, do not locate cables between the desktop and walls where they
may be crushed, damaging the insulation.
•Check the cables regularly and, if damage is noted, disconnect your phone. Contact your local representative
for a replacement.
•Should liquid spill on the phone, disconnect the unit from power and the network.
•Do not use during lightning storms. Lightning presents a potential shock hazard.
•Clean the LIP Phone 6812 with a soft dry cloth; do not use liquid cleaners.
•Always use caution when connecting to AC power. Use only with a properly grounded standard AC power
outlet.
What is new in this release?
Issue 01.03 2007.10 Updated to 1.2.35SS software
Expanded regulatory section
Added basic installation section
Added Setting Your Preferences
Added Appendix A, Character Map
Added Appendix B Time zones
Editing throughout

LIP Phone 6812
User Guide
i Oct. 07
Table of Contents
1. LIP Phone 6812 Overview.....................................................................................1
2. Installing your LIP Phone 6812.............................................................................3
3. Using Features of LIP Phone 6812.......................................................................4
3.1. Receiving a Call............................................................................................................................ 4
3.2. Placing a Call................................................................................................................................4
3.3. Putting a Call on Hold................................................................................................................... 4
3.4. Announcing a Call Transfer.......................................................................................................... 5
3.5. Using Blind Call Transfer.............................................................................................................. 5
3.6. Call Forward ................................................................................................................................. 5
3.7. 3-Party Conference....................................................................................................................... 6
3.8. Call Waiting................................................................................................................................... 6
3.9. Redial............................................................................................................................................ 6
3.10. Last Call Return............................................................................................................................ 6
3.11. Speed Dial Buttons....................................................................................................................... 7
3.12. Speed Number Dialing.................................................................................................................. 7
3.13. DND (Do-Not-Disturb)................................................................................................................... 7
3.14. Muting a Call................................................................................................................................. 7
3.15. Accessing Your Voice Mail........................................................................................................... 8
3.16. DSS/BLF Coverage...................................................................................................................... 8
3.17. Hotline/Warm-Line........................................................................................................................ 9
4. Advanced Services and the LIP Phone 6812 LCD Menu.................................10
4.1. Using the Call Logs Menu........................................................................................................... 10
4.2. Using the Phone Book Menu...................................................................................................... 10
4.3. Park............................................................................................................................................. 12
4.4. Parked Call Pickup ..................................................................................................................... 12
4.5. Directed Call Pickup ................................................................................................................... 13
4.6. Group Call Pickup....................................................................................................................... 13
4.7. Intercom...................................................................................................................................... 13
4.8. ACD Agent Menu........................................................................................................................ 14
5. Setting Your Preferences....................................................................................16
5.1. LCD Contrast.............................................................................................................................. 16
5.2. Ring Setting................................................................................................................................16
5.2.1. Setting the Ring Type......................................................................................................... 16
5.2.2. Setting Line Ring Type and Delay...................................................................................... 17
5.3. Ringer Off.................................................................................................................................... 18
5.4. Enabling Automatic Headset Operation ..................................................................................... 18
5.5. Setting Flexible Buttons.............................................................................................................. 19
5.6. Time Configuration ..................................................................................................................... 20
5.6.1. SNTP Server Address ........................................................................................................ 20

LIP Phone 6812
User Guide
ii Oct. 07
5.6.2. Time Zone........................................................................................................................... 21
5.6.3. DST Auto Adjustment......................................................................................................... 21
5.6.4. Time Format........................................................................................................................ 22
5.6.5. Date Format........................................................................................................................ 22
5.7. Lock Outgoing Call ..................................................................................................................... 23
5.8. Enabling Speed Number Dialing ................................................................................................ 23
Appendix A Dial Pad Character Set ...........................................................................24
Appendix B Time Zones..............................................................................................25

LIP Phone 6812
User Guide
1. LIP Phone 6812 Overview
Your new LG-Nortel LIP Phone 6812 is an Internet Protocol (IP) phone employing Session Initiation
Protocol (SIP), the well-known open standard for establishing, managing and terminating a
communication session. LIP Phone 6812 interoperates with call servers, proxies and gateways to
exchange SIP signaling messages for call control. Real-Time Protocol (RTP) packets deliver voice
between the end-points over a managed IP network.
Features available to LIP Phone 6812 through SIP call servers are similar to those of a conventional
business telephone. In addition to the features described in this guide, your call server may provide
additional features, often using dialed feature codes. Refer to your system administrator for further
information.
The LIP Phone 6812 has fixed feature buttons, flexible buttons that are configurable, and dial pad buttons
as shown in the figure below.
Left (return) and right arrow buttons
for navigation. Use return arrow to
move to the previous menu. Use
right arrow to see additional LCD
Menu choices when Îappears.
Softkeys (3), which display in the
bottom line of the LCD, are
interactive, changing function based
on the LIP Phone status. The [ OK ]
softkey selects a function, which the
LIP Phone performs.
Settings button accesses the
LCD Menu for display and
modification to the LIP Phone
configuration.
Volume control button
adjusts Ring, Headset,
Handset, and Speaker
volume.
Speaker button toggles the
LIP Phone 6812 speaker-
phone on and off.
Mute button toggles audio
from the microphone to
the connected party on
and off.
Headset button toggles
the headset state.
Flexible buttons (11) with
Red/Green LEDs used for line or
feature access. Default
assignments for buttons 1 and 2
are primary and secondary line
appearance for the extension.
The eleven (11) flexible buttons access lines and features based on the LIP Phone configuration.
Flexible buttons assigned for line access, called line buttons, represent a telephone line or a SIP user. A
line may be private, calls to a private line signal at all appearances of the line but an active or held call is
only visible and accessible by the original end-points. A shared line, also known as a BLA (Bridged Line
Appearance), may appear at multiple phones and all calls are visible and accessible by all end-points,
with the line. Each line button employs LEDs to indicate status as shown below.
1 Oct. 07

LIP Phone 6812
User Guide
Line in use at this phone Green LED On
Incoming call on private line Green LED flashes at 60 ipm, fast flash
Call held at this phone Green LED flashes at 30 ipm, slow flash
BLA in use at another phone Red LED On
Incoming call on BLA Red LED fast flash
BLA Call held at another phone Red LED slow flash
Line not registered w/server Red/Orange LED flashes color, red to orange at 30 ipm
Flexible buttons not assigned for line access may access features such as Speed dial, DND, Redial and
others. Refer to the Setting Flexible buttons section under Setting Your Preferences for instruction on
defining flexible buttons.
The figure below shows other major components of LIP Phone 6812. These components include:
•Handset
•Speaker and microphone
•Message Wait Indicator (MWI) LED
•3-line, 24-character/line LCD
•2.5 mm Headset jack
2.5 mm jack
2 Oct. 07

LIP Phone 6812
User Guide
2. Installing your LIP Phone 6812
The figure below shows the cable connections for your LIP Phone. The LAN and desktop PC
connections employ standard category 5 cables terminated with RJ-45 connectors. The LIP Phone
supports PoE (Power over Ethernet) in accordance with the IEEE-802.1af standard. When connected to
a PoE complaint LAN port, the LIP Phone derives power from the port. If the LAN port does not support
PoE, use the AC/DC adaptor, available separately, for connection to power. The handset connects to the
base with the supplied standard handset coiled cord. Use the chart below to make connections to the LIP
Phone.
1
2
3
4
5
1 LAN Connect the LIP Phone LAN port to the LAN wall jack with the provided LAN
cable.
2 PC Connect the LIP Phone PC port to your desktop PC with RJ-45 terminated UTP-5
cable.
3 Power If the LAN port supports PoE (IEEE 802.3af compliant), the AC/DC adapter is not
required. If not supported, connect the LIP Phone power port to the DC out of
Power Adapter. Connect the Power Adapter AC plug to an AC wall jack.
4 Headset Connect Headset 2.5 mm plug to the LIP Phone headset jack.
5 Handset Connect the Handset coiled cord to the LIP Phone base and handset.
3 Oct. 07

LIP Phone 6812
User Guide
4 Oct. 07
3. Using Features of LIP Phone 6812
3.1. Receiving a Call
When you receive a call, your phone rings, the LCD displays the incoming call information and the
associated line button flashes.
To answer a ringing call:
oLift the handset. You may press the speakerphone button, line button or the [Answ] softkey to
activate the speakerphone. To use a headset, press the headset button.
To end the call:
oHang up the handset. If using the speakerphone, press the speakerphone button. If using the
headset, press the headset button.
To refuse a ringing call:
oPress
[Refu] softkey, the LIP Phone stops ringing and the call server routes the call.
3.2. Placing a Call
You place calls with the handset on-hook or off-hook. Similar to your mobile phone, LIP Phone 6812
uses a technique called ‘store and forward dialing’. After you dial a digit, the LIP Phone waits about 10
seconds for additional digits. If you do not dial additional digits, the LIP Phone sends the digits you dialed
to the call server for processing. To send the digits immediately, press the # button to indicate dialing is
complete, and then the LIP Phone sends the number to the call server.
To place a call:
oLift the handset. You may press the speakerphone button or line button to activate the
speakerphone. To use a headset, press the headset button.
oDial the destination number. After a short delay, the LIP Phone sends the number, or dial # to
send the dialed digits immediately.
oWhen the called party answers, begin speaking, the LCD displays the elapsed call time.
To end the call,
oHang up the handset. If using the speakerphone, press the speakerphone button. If using the
headset, press the headset button.
3.3. Putting a Call on Hold
You can place a call in a waiting state where the held party cannot hear you and you cannot hear the held
party. The held party receives MOH (Music On Hold), if configured in the call server.
While a call is on hold, you can answer or place other calls and can toggle between held calls on the
same line by pressing the line button. With Call Hold Ringback enabled, the LIP Phone rings as a
reminder of calls on hold when you return the LIP Phone to idle. Refer to your system administrator or
Installer Guide for further information.
To place a call on hold:
oPress the
[Hold] softkey. The call status changes to hold and you receive dial tone. You may
then select another line to answer or place a call. Note, if you select an idle line and take no
action for about 10 seconds, the line is disconnected.
To retrieve a held call:

LIP Phone 6812
User Guide
5 Oct. 07
oPress the slow flashing line button, or the [Rsum] softkey.
To toggle between two calls on the same line:
oPress the line button, the active call status changes to hold and the held call connects.
3.4. Announcing a Call Transfer
Using Announcing a Call Transfer, you send an active call to another extension after announcing the call
transfer to the receiving party.
To transfer an active call:
oPress the
[Trans] softkey. The active call status changes to hold and you receive dial tone.
oDial the number you wish to receive the transfer.
oAwait answer and announce the transfer.
oTo complete the transfer, hang up the handset.
To cancel a transfer, for example the second party does not answer or is busy:
oPress the
[EndC] softkey.
3.5. Using Blind Call Transfer
You can transfer an active call to another extension without talking to the party receiving the call. The call
transfers to the new party without verifying that the new party is there or willing to receive the call.
To transfer an active call without announcing the transfer:
oPress the
[Bxfr] softkey. The active call status changes to hold and you receive dial tone.
oDial the number you wish to receive the transfer.
oTo complete the transfer, hang up the handset.
To cancel a transfer, for example you mis-dial the receiving number:
oPress the
[EndC] softkey.
3.6. Call Forward
Call forward directs incoming calls to ring at another location that you designate. You can select one of
four (4) conditions that will forward your calls:
-Call Forward Busy – redirects incoming calls if the line is busy.
-Call Forward No Answer – redirects incoming calls that are not answered in the configured no
answer time.
-Call Forward Busy or No Answer – redirects incoming calls if the line is busy or not answered
after the no answer time expires.
-Call Forward All Calls – immediately redirects all incoming calls.
To set up Call Forward:
oPress the
[CFwd] softkey.
oUse the
[Prev]-[Next] softkeys to select the desired Call Forward condition.
oPress the [ OK ] softkey.
oInput the destination where your want your calls sent.
oPress the
[ OK ] softkey. The display shows “Fwd to xxx” indicating the destination for the calls.
To disable Call Forward:

LIP Phone 6812
User Guide
6 Oct. 07
oPress [CFwd] softkey. The message “Fwd to xxxx” disappears from the LCD.
3.7. 3-Party Conference
The LIP Phone has a 3-Party Conference feature that lets you converse with two other parties
simultaneously.
To set-up a conference:
oPlace first call as normal.
oPress the
[Conf] softkey. The call status changes to hold and you receive dial tone.
oDial the number you want to join the conference.
oWhen the party answers, press the [Join] softkey to establish the conference.
To end your conference and disconnect all parties:
oHang up the handset.
To cancel a conference, for example the second party does not answer or is busy:
oPress the
[EndC] softkey.
3.8. Call Waiting
With Call Waiting configured, while you are in a call the LIP Phone alerts you of an incoming call. The
line button flashes and you receive a beep tone over the active conversation to indicate the new call. In
addition, during the ring signal, the LCD displays the incoming caller id so you know who is calling before
you interrupt the current call.
To answer an incoming call while on a call:
oPress the flashing line button. The active call changes to the hold state and the new call
connects.
3.9. Redial
Your LIP Phone saves the last number you dialed and allows you to redial the number with the touch of a
button. The number is stored in memory but is lost if power to the LIP Phone is interrupted.
To redial a call:
oPress the
[Redi] softkey. The LIP Phone activates the speakerphone and places the call.
oLift the handset for privacy or press the headset button to use the headset.
3.10. Last Call Return
When you answer a call, the LIP Phone stores the caller’s contact information so you can return a call
later at the touch of a button. The number is stored in memory but is lost if power to the LIP Phone is
interrupted.
To call the last incoming caller:
oPress
[LCR ] softkey. The LIP Phone activates the speakerphone and places the call.
oLift the handset for privacy or press the headset button to use the headset.

LIP Phone 6812
User Guide
7 Oct. 07
3.11. Speed Dial Buttons
Flexible buttons not assigned as a line are available for configuration as feature buttons including Speed
dial. Pressing a Speed dial button selects your line and sends the stored number to the call server for
processing. Refer to the Setting Flexible Buttons section under Setting Your Preferences for instruction
on defining flexible buttons.
To place a call using Speed dial:
oPress the desired Speed dial flexible button. The LIP Phone activates the speakerphone and
places the call on your line. You may select a different line button on your LIP Phone prior to
selecting the Speed dial button.
oLift the handset for privacy or press the headset button to use the headset
3.12. Speed Number Dialing
LIP Phone 6812 incorporates a Phone Book with up to 100 records. Refer to section 4.2 for information
on use of the Phone Book. Each record includes a name, contact information and a Speed number, (00
to 99). When you dial a Speed number, the LIP Phone initiates a call to the contact. You must enable
Speed number dialing, see Enabling Speed Number Dialing under Setting Your Preferences to enable
Speed number dialing.
To place a call using a Speed number:
oDial the Speed number (00-99) for the desired contact. After a short delay, the LIP Phone sends
the contact information from the Phone Book. You may dial # to set up the call immediately. If
the Phone Book has no record of the Speed number, the LIP Phone sends the digits dialed to the
call server for processing.
3.13. DND (Do-Not-Disturb)
When the DND (Do Not Disturb) feature is active, the LIP Phone will not notify you of an incoming call.
The LIP Phone does not ring allowing you to work without interruption from an incoming call. The call
server configuration determines routing of the incoming call while your phone is in DND. A flexible button
configured for DND is required. Refer to the Setting Flexible Buttons section under Setting Your
Preferences for instruction on defining flexible buttons.
To activate DND:
oWhile the LIP Phone is idle, press the DND flexible button. When active, the DND flexible button
LED illuminates red, and “Do not disturb” displays in the LCD.
To deactivate DND:
oPress the illuminated DND flexible button again.
3.14. Muting a Call
Mute toggles the microphone of the Handset, Speakerphone and Headset off and on. When Mute is
active, the connected party will not receive audio from the microphone.
To mute the microphone:
oPress the Mute button. The Mute button LED illuminates red indicating mute is active.
To turn the microphone back on:
oPress the illuminated Mute button again.

LIP Phone 6812
User Guide
8 Oct. 07
3.15. Accessing Your Voice Mail
When you have a message waiting, the MWI LED flashes to indicate you have new messages in your
mailbox. The LIP Phone delivers the message waiting indication for your primary line, line button 1.
To access your voice mailbox:
oPress the
[MSG] softkey. The display indicates the number of messages waiting.
oPress [Dial] softkey. The LIP Phone activates the speakerphone and places a call to your voice
mailbox. To listen to your messages, follow the instructions for your voice mail system.
3.16. DSS/BLF Coverage
The LIP Phone 6812 has a DSS line type that addresses the special needs associated with an Attendant
or Secretarial answering position. The specific needs for these users are:
•Direct Station Selection (DSS) - one-touch calling and transfers to extensions
•Busy Lamp Field (BLF) - visual status indication of covered extensions.
•Coverage - the ability to pick up calls ringing at those extensions.
The DSS line in the LIP Phone uses the BLA assignment in the call server. Operation of the DSS/BLF
Coverage button however is distinctly different then a BLA. For more information on assigning DSS lines,
consult your system administrator.
To call an idle covered extension:
oLift the handset. You may press the speakerphone button or the headset button.
oPress the DSS line button. You may press the DSS line button prior to lifting the handset, which
activates the speakerphone and places the call.
To transfer an active call:
oPress the DSS line button. The LIP Phone places the active call on hold, and calls the extension.
oAwait answer and announce the transfer.
oTo complete the transfer, hang up the handset.
To cancel a transfer, for example the second party does not answer or is busy:
oPress the
[EndC] softkey.
To answer a call for a covered extension:
oLift the handset. You may press the speakerphone button or press the headset button.
oPress the flashing DSS/BLF Coverage button. You may press the DSS line button prior to lifting
the handset, which activates the speakerphone and answers the call.
The LED indications of the DSS line button are:
•Solid green line in use locally
•Slow blinking green Call held locally
•Solid red line in use remotely
•Fast blinking red Call appearance ringing for covered line
•Slow blinking red Remote call hold

LIP Phone 6812
User Guide
9 Oct. 07
3.17. Hotline/Warm-Line
With Hotline/Warm-Line operation configured, the LIP Phone automatically calls the defined destination
when you take the handset off-hook or press the speaker button. The call initiates immediately, Hotline,
or after a delay of up to 10 seconds, Warm-Line. The later permits you the time to access another feature
or line as needed. Note that with Hotline configured, Speed dial, redial and other automated dialing
features will not operate.
Operation of this feature is automatic.

LIP Phone 6812
User Guide
4. Advanced Services and the LIP Phone 6812 LCD Menu
This section describes how to view and use the advanced services available through the LCD menu. The
LIP Phone 6812 has three context sensitive softkeys, pressing the softkey selects the function or value
shown in the LCD just above the softkey. A left (return) and right arrow buttons navigate through menus.
The menu items and order of display may be different on your phone based on the service subscription.
Not all features may be available to you based on the call server configuration.
4.1. Using the Call Logs Menu
The LIP Phone 6812 has access to a log of all calls placed or received by the phone, including incoming
calls that were not answered (missed calls). The LCD displays the call logs that you can use to place a
call to the logged party. You access the call logs through a flexible button assigned for the Call Log
function. Refer to the Setting Flexible buttons section under Setting Your Preferences for instruction on
defining flexible buttons.
To access the Call Logs menu:
C
all Log
>1.Missed Calls
[Prev] [Next] [ OK ]
oWhile in an idle state, press the Call Log flexible button.
The Call Log menu displays with several choices
(missed, outgoing and incoming).
oUse the
[Prev]-[Next] softkeys to select the desired
log and press the [ OK ] softkey or dial the digit in front
of the desired selection.
oThe log will display information on the call along with
the received caller id. If the call log record has more
than the 24 characters, press the right arrow button to
display the additional information.
Misse
d
Calls
>1.John,4913 11/07 12:55
[Prev] [Next] [Dial] ¼
To place a call using the Call Logs:
oDial the digit preceding the desired log item or use the [Prev]-[Next] softkeys to highlight the
desired log item, and press the [Dial] softkey.
4.2. Using the Phone Book Menu
The LIP Phone 6812 has an internal Phone Book with up to 100 entries. Each record includes the
contact name, contact information, Speed number and ring type for calls from the contact. You can add,
delete, edit, dial and search entries from the Phone Book Menu. Access to the Phone Book Menu
requires a flexible button assigned for the Phone Book function. Refer to the Setting Flexible buttons
section under Setting Your Preferences for instruction on defining flexible buttons.
To access the Phone Book menu:
P
hone Book (Page 1)
>1.LG-Nortel, 1305
[Prev] [Next] [Dial] ¼
oPress the Phone Book flexible button, the LCD
displays the first Phone Book record.
To call a contact from the Phone Book:
oPress the Phone Book flexible button.
10 Oct. 07

LIP Phone 6812
User Guide
oUse the [Prev]-[Next] softkeys to display the desired record or dial the digit preceding the
desired record.
oPress the
[Dial] softkey.
To add a record to the Phone Book:
P
hone Book (Page 1)
>[01]Tom,1234
[Edit] [Add ] [Del ] ¼
oPress the Phone Book flexible button.
oPress the right arrow softkey to display the [Add ]
softkey.
oSelect the
[Add ] softkey.
oEnter the name, contact information, speed number,
and ring type for the record, selecting the [ OK ]
softkey for each entry. Use the [Mode] softkey to
enter characters. Refer to Appendix A Dial Pad
Character Set, which shows relationship between the
dial pad digits and characters.
P
hone Book : Number [1]
9876
[
»] [Mode] [ OK
]
¼
To edit a record:
P
hone Book (Page 1)
>[01]Tom,1234
[Prev] [Next ] [Del ] ¼
oPress the Phone Book flexible button.
oUse the
[Prev]-[Next] softkeys to display the desired
record or dial the digit preceding the desired record.
P
hone Book (Page 1)
>[15]Tommy,9876
[Edit] [Add ] [Dial] ¼
oPress the right arrow softkey to display the [Edit]
softkey.
oSelect the
[Edit] softkey.
oEdit the name, contact information, speed number,
and ring type for the record, selecting the [ OK ]
softkey for each entry. Use the [Mode] softkey to
enter characters. Refer to the table in to Appendix A
Dial Pad Character Set, which shows relationship
between the dial pad digits and characters.
P
hone Book : Number [1]
9844
[ »] [Mode] [ OK ] ¼
To delete a record:
P
hone Book (Page 1)
>[01]Tom,1234
[Prev] [Next] [Dial] ¼
oPress the Phone Book flexible button.
oUse the
[Prev]-[Next] softkeys to display the desired
record or dial the digit preceding the desired record.
oPress the right arrow softkey to locate the [Del ]
softkey.
oSelect the
[Del ] softkey and confirm by selecting the
[Yes ] softkey. Caution this action deletes the record
from the Phone Book.
P
hone Book (Page 1)
>[15]Tommy,9844
[Edit] [Add ] [Del ] ¼
11 Oct. 07

LIP Phone 6812
User Guide
To delete all records:
P
hone Book (Page 1)
>[01]Tom,1234
[DALL] [Find] ¼
oPress the Phone Book flexible button.
oPress the right arrow softkey to locate the [DALL]
softkey.
oSelect
[DALL] softkey and confirm the deletion by
selecting the [Yes ] softkey. Caution this action
deletes all records from the Phone Book.
P
hone Book (Page 1)
[DALL] [Find] ¼
To search for a record in the Phone Book:
P
hone Book (Page 1)
>[01]Tom,1234
[DALL] [Find] ¼
oPress the Phone Book flexible button.
oPress the right arrow softkey to locate the [Find]
softkey.
oSelect the
[Find] softkey then the [Yes ] softkey.
S
earch for: [1]
Sam
[ »] [Mode] [ OK ] ¼
oEnter the search criteria (name or contact information).
Use the [Mode] softkey to enter characters. Refer to
the table in to Appendix A Dial Pad Character Set,
which shows relationship between the dial pad digits
and characters..
oSelect
[ OK ] to view the search results.
P
hone Book (Page 1)
>(14)Sam,9543
[Edit] [Add ] [Del ] ¼
4.3. Park
This business phone feature allows you to place a call on hold so another user can access the call from
any extension. You park the active call at an internal extension then notify the internal user of the call.
The internal user then picks up the call using the Parked call pickup feature from any extension in the
system. If no [Park] softkey displays, you must use dial codes. Check with your system administrator for
dial code operation.
To park an active call:
oPress the
[Park] softkey.
I
nput Extension [1]
[
Å
][Mode][OK]
Æ
oEnter an extension number and press the [ OK ]
softkey.
oPage the party to pickup the call.
4.4. Parked Call Pickup
Parked Call pickup is a business phone feature that lets you pickup a call parked at an extension. If no
[Pick] softkey displays, you must use dial codes. Check with your system administrator for dial code
operation.
To pick-up a Parked call:
oPress the right arrow, ¼, softkey to locate the [Pick] softkey.
12 Oct. 07

LIP Phone 6812
User Guide
oPress the [Pick] softkey. The LIP Phone activates the
speakerphone and selects your line. You may select a
different line button prior to pressing the [Pick] softkey.
I
nput Extension [1]
[
Å
]
[Mode] [ OK ]
Æ
oDial the extension number where the call is parked
then press the [ OK ] softkey.
4.5. Directed Call Pickup
Directed call pick up is a business phone feature that lets a you answer a call that is ringing at another
extension. If no [DPic] softkey displays, you must use dial codes. Check with your system administrator
for dial code operation
To pick up a call ringing at another extension:
oPress the right arrow, ¼, softkey to locate the [DPic] softkey.
oPress the
[DPic] softkey. The LIP Phone activates the speakerphone and accesses your line.
You may select a different line button prior to pressing the [DPic] softkey.
oDial the extension number, and then press the [ OK ]
softkey.
I
nput Extension [1]
[
Å
] [Mode] [
OK ]
Æ
4.6. Group Call Pickup
Call pickup by group is a business phone feature that lets you answer a call ringing at an extension in
your call group. The call server maintains call group assignments. If no [GPic] softkey displays, you
must use dial codes. Check with your system administrator for dial code operation.
To pickup a call ringing at a group extension:
oPress the right arrow, ¼, softkey to locate the [GPic] softkey.
oPress
[GPic] softkey.
4.7. Intercom
Your call server may provide an intercom feature. This feature allows for Voice Announce intercom
calling with handsfree reply. If available, your LIP Phone has a button assigned to access the intercom.
Refer to the Setting Flexible Buttons section under Setting Your Preferences for instruction on defining
flexible buttons. For information on assigning Intercom Notification, check with your system administrator.
To access the intercom:
oPress the Intercom flexible button. The LIP Phone activates the speakerphone and returns dial
tone. You may lift the handset for privacy.
oDial an extension number and press the [ OK ] softkey.
I
nput Extension [1]
[
Å
][Mode][OK]
Æ
oFollowing the beep tone, announce your call.
13 Oct. 07

LIP Phone 6812
User Guide
4.8. ACD Agent Menu
Your call services may include Automatic Call Distribution (ACD). Calls to an ACD group enter a queue
and the call routes to the next available ACD agent. This feature is useful for customer support groups,
user taking reservations, or making appointments. You will require a flexible button assigned for ACD
Agent operation. Refer to the Setting Flexible Buttons section under Setting Your Preferences for
instruction on defining flexible buttons.
The ACD Agent flexible button activates the ACD Agent Menu where you control status for the agent.
Using the ACD Agent Menu, you activate ACD for a line, enter an ACD Group ID (if not preconfigured),
control the Agent status and assign the ACD Primary Line that displays agent status on the LCD while the
LIP Phone is idle.
The LCD indicates status of the ACD agent associated with the primary line. With ACD active, the line
button LED indicates agent status. The LED status indications are:
Green LED On – Agent checked in and available
Red LED flashing – Agent checked in but unavailable
Red LED On – Agent checked out
For proper operation, the LIP Phone and line require ACD to be active. Refer your system administrator
or the Installer guide for further information.
To activate ACD operation for a line and check-in to an ACD group:
oPress the assigned ACD Agent flexible button.
ACD Status (Line 1)
Check-Out
[
C.In
] [PRIM]
oPress the line button, and then press the [C.In] softkey.
The check-in softkey displays if the Agent is checked
out.
oAccept the pre-defined ACD Group ID with the [ OK ]
softkey or enter a Group ID and press the [ OK ]
softkey. Use the backspace softkey to delete the
Group ID and deactivate ACD for the line.
ACD Gr
o
up ID [1]
123
[
Å
][Mode][OK]
¼
oEnter the password of your ACD Agent group and
press the [ OK ] softkey. ACD Password [1]
[
Å
][Mode][OK]
¼
To set the extension to the available status:
oPress the ACD Agent button. The agent must be
checked in to set the available status. ACD Status (Line 1)
Unavailable
[Avail] [COut] [PRIM]
¼
oPress the line button, and then press the [Avail]
softkey. The [Avail] softkey appears only if the Agent
is unavailable.
14 Oct. 07

LIP Phone 6812
User Guide
To set the extension to the “unavailable” status:
oPress the ACD Agent button. ACD Status (Line 1)
Available
[Unvl] [COut] [PRIM]
¼
oPress the line button, and then press the [Unvl]
softkey. The [Unvl] softkey appears only if the Agent
is available.
To check-out of the ACD group:
oPress the ACD Agent button.
oPress the line button
ACD Status (Line 1)
Unavailable
[Ava
i
l] [COut] [PRIM]
¼
oPress the
[COut] softkey. The checkout softkey is
only available if the Agent is checked in.
To set the line as the primary ACD line and view the agent status in the LCD:
oPress the ACD Agent button.
oPress the line button
ACD Status (Line 1)
Unavailable
[Ava
i
l] [COut] [PRIM]
¼
oSelect the
[PRIM] softkey and press the [ OK ] softkey.
15 Oct. 07
Table of contents
Other LG IP Phone manuals