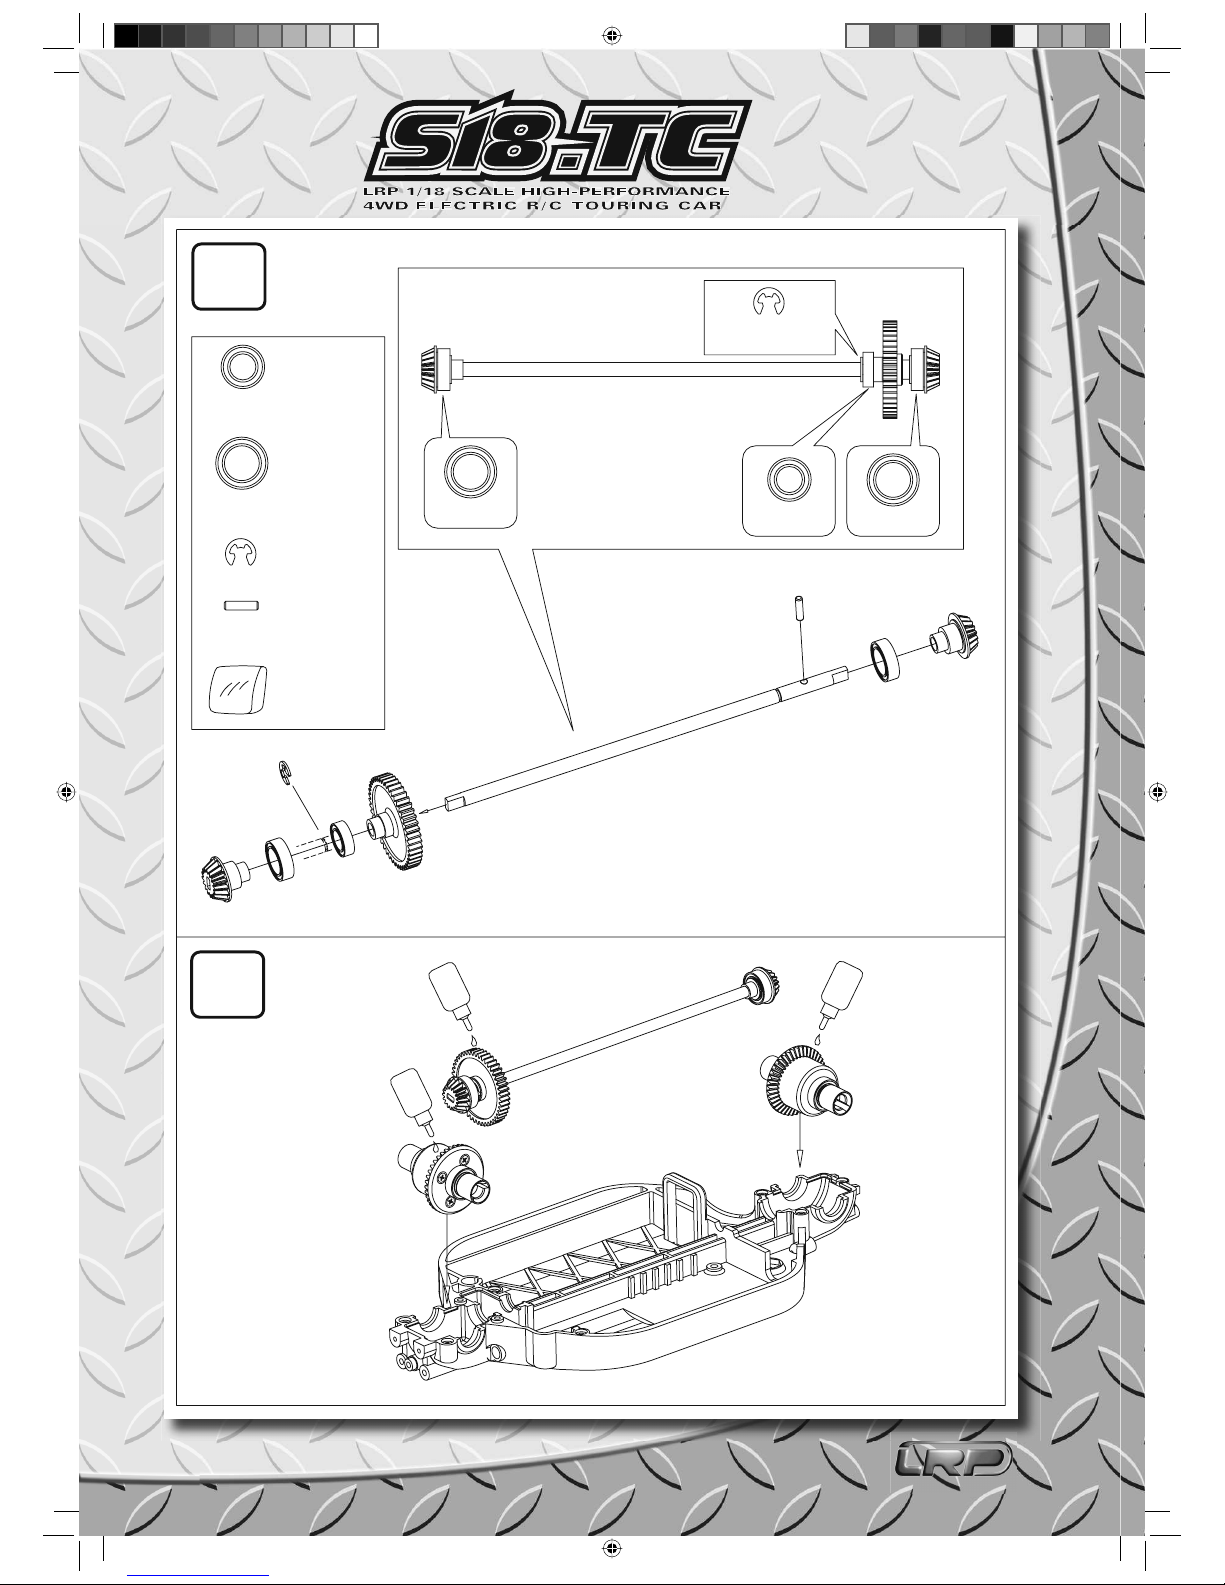
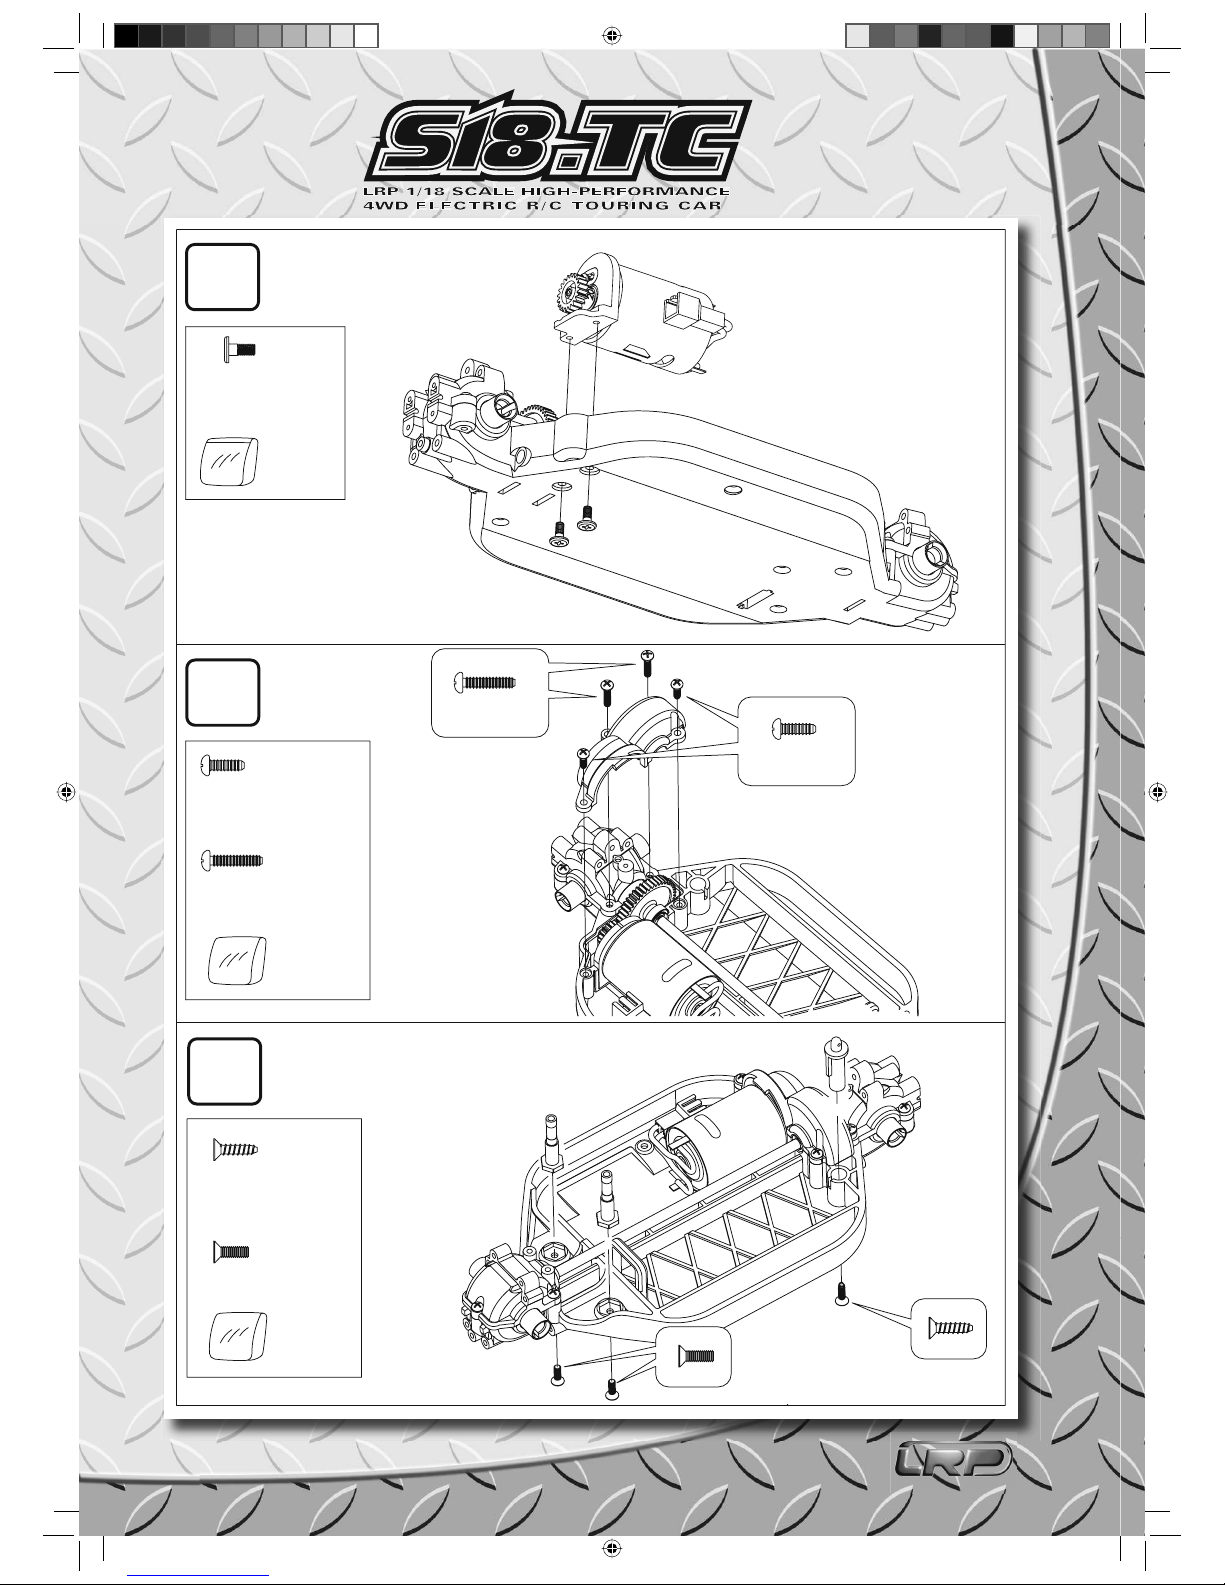
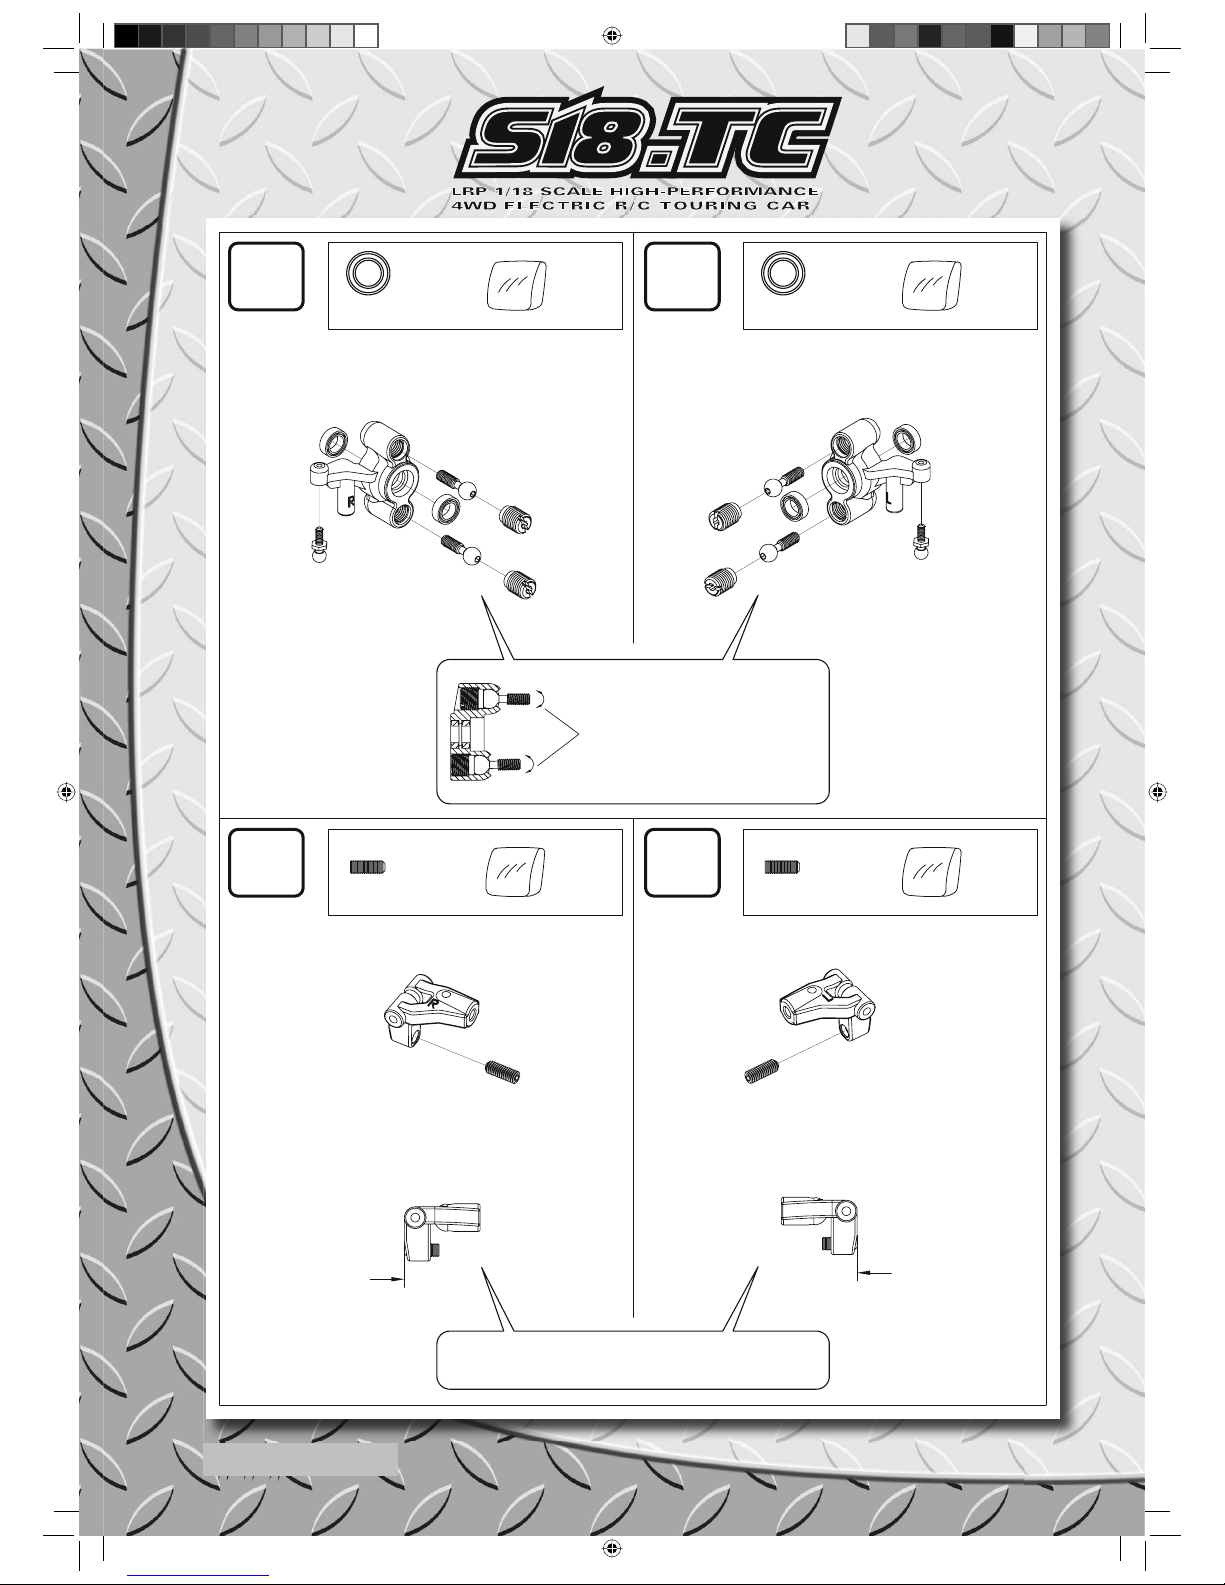
LRP LRP S18 User manual

лчиттничюнльтцию.
глтчн.Бзвыдны
www.sotmarket.ru
дбняинфмциятв,
тзывы,бзыиы
Инструкция для
LRP S18 Touring Car 1:18 KIT
Перейти в карточку товара
8 800 775 98 98

Sehr geehrter Kunde,
vielen Dank für Ihr Vertrauen in dieses LRP Produkt. Mit dem Kauf des LRP S18 TC haben Sie sich für einen Mini Tourenwagen im Maßstab 1/18 entschie-
den, der seinen 1/10 Vorbildern in nichts nachsteht. Extrem schnell, präzise und wendig ist der LRP S18 TC auf jeder Rennstrecke dieser Welt zu Hause.
Getreu dem LRP Motto „Blue is better“ garantiert der LRP S18 TC puren Fahrspaß bei der Jagd nach der besten Rundenzeit.
Dear customer,
thank you for your trust in this LRP product. By purchasing this LRP S18 TC you have chosen a 1/18 scale mini touring car based on the
model of its 1/10 idols. Extremely fast, precise and agile, any race track worldwide is the territory of the LRP S18 TC. In keeping with the
LRP motto “Blue is better”, the LRP S18 TC guarantees pure driving fun on the prowl for the best lap times.
GEBRAUCHSANWEISUNG
INSTRUCTION MANUAL
LRP S18 TOURING CAR
1:18 HIGH PERFORMANCE 4WD ELECTRIC TOURING CAR
LRP_S18-TC_Anleitung_071206_fv.indd 1LRP_S18-TC_Anleitung_071206_fv.indd 1 08.01.2008 10:40:5308.01.2008 10:40:53

2
2
Benötigtes Zubehör
Equipment Needed
2-Kanal Fernsteueranlage
(im RTR-Set enthalten)
2-Channel Radio Set
(included in the RTR-set)
8 Batterien/Akkus für Sender Größe AA
(im RTR-Set enthalten)
8 Batteries for transmitter AA-Size
(included in the RTR-set)
Elektronischer Fahrtenregler
(im RTR-Set enthalten)
Electronical Speed Control
(included in the RTR-set)
7,2V 6-Zellen Fahrakku
(im RTR-Set enthalten)
7,2V 6-cell Battery
(included in the RTR-set)
Standard Servo
(im RTR-Set enthalten)
(included in the RTR-set)
Micro Servo
oder
14-16mm
19-21mm
40-44mm
29-36mm
Größe AA
Größe AA
Größe AA
Größe AA
Größe AA
Größe AA
Größe AA
Größe AA
Benötigtes Werkzeug / Recommended Tools
Sekundenkleber
Superglue Öl/Fett
Oil / Grease Spitzzange
Needle Nosed Plier Seitenschneider
Side Cutter
Kleine Schere
Small Scissors Schraubendreher
Screwdriver
Modellbaumesser
Hobby Knife
4.5mm Steckschlüssel
4.5mm Nut Driver
LRP_S18-TC_Anleitung_071206_fv.indd 2LRP_S18-TC_Anleitung_071206_fv.indd 2 08.01.2008 10:41:0108.01.2008 10:41:01

3
3
WWW.LRP.CC
WWW.LRP.CC
1Differential vorne und hinten
Front and rear Gear Differential
Tüte A
Bag A
8x12mm Kugellager
8x12mm Ball Bearing
..........2
x2
Tüte A
Bag A
8x12mm Kugellager
8x12mm Ball Bearing
..........2
x2
Öl
Oil
x2
Tüte A
Bag A
..........2
..........2
1.5x16mm Stift
1.5x16mm Pin
1.5x16mm Achse
1.5x16mm Shaft
Öl
Oil
Öl
Oil
x2
2x6mm Schneidschraube
2x6mm TP Screw
..........8
2
3
4
LRP_S18-TC_Anleitung_071206_fv.indd 3LRP_S18-TC_Anleitung_071206_fv.indd 3 08.01.2008 10:41:0908.01.2008 10:41:09

4
4
6x10mm 8x12mm
3 mm E-Clip
8x12mm
6x10mm Kugellager
6x10mm Ball Bearing
Tüte B
Bag B
..........1
..........2
..........1
8x12mm Kugellager
8x12mm Ball Bearing
3mm E-Clip
2mm Stift
2mm Pin
Öl
Oil
Öl
Oil
Öl
Oil
6
5
LRP_S18-TC_Anleitung_071206_fv.indd 4LRP_S18-TC_Anleitung_071206_fv.indd 4 08.01.2008 10:41:1708.01.2008 10:41:17

5
5
WWW.LRP.CC
WWW.LRP.CC
..........2
..........1
..........5
12Z 15Z 18Z17Z14Z
4.7mm
Tüte B
Bag B
Tüte C
Bag C
2.6x8mm Linsenkopf-
schneidschraube
2.6x8mm TP screw
2.6x6mm Linsenkopf-
schraube
2.6x6mm Screw
3mm Madenschraube
3mm Set Screw
18Z Ritzel
18T Pinion
Mit Hilfe der Einstellplatten kann die Motorposition an die
unterschiedlichen Ritzelgrößen angepasst werden.
With the motor setting plates, the motor position can be
adjusted to fit different size pinions.
7
8
9
LRP_S18-TC_Anleitung_071206_fv.indd 5LRP_S18-TC_Anleitung_071206_fv.indd 5 08.01.2008 10:41:2508.01.2008 10:41:25

6
6
..........2
..........2
..........1
..........2
..........2
2.6x12mm
2.6x8mm
Tüte C
Bag C
2.6x6mm Motorhalter-
schraube
2.6x6mm Motor Mount
Screw
Tüte C
Bag C
Tüte D
Bag D
2.6x8mm Linsenkopf-
schneidschraube
2.6x8mm TP screw
2.6x12mm Linsenkopf-
schneidschraube
2.6x12mm TP screw
2.6x10mm Senkkopf-
schneidschraube
2.6x12mm Countersunk
TP screw
2.6x8mm Senkkopfschraube
2.6x8mm Countersunk screw
10
11
12
LRP_S18-TC_Anleitung_071206_fv.indd 6LRP_S18-TC_Anleitung_071206_fv.indd 6 08.01.2008 10:41:3408.01.2008 10:41:34

7
7
WWW.LRP.CC
WWW.LRP.CC
1.5mm E-Clip
......2
Tüte D
Bag D
Tüte D
Bag D
Tüte D
Bag D
13 14
15
16 17
Tüte D
Bag D
2.6x6mm Linsenkopf-
schraube
2.6x6mm Screw
2.6x6mm
Tüte D
Bag D
2.6x6mm Linsenkopf-
schraube
2.6x6mm Screw
2.6x6mm
2.6x12mm Schraube
2.6x12mm Screw
2.6x12mm
..........2
..........2
LRP_S18-TC_Anleitung_071206_fv.indd 7LRP_S18-TC_Anleitung_071206_fv.indd 7 08.01.2008 10:41:4308.01.2008 10:41:43

8
8
..........4
..........2
Tüte D
Bag D
Tüte D
Bag D
2.6x8mm Linsenkopf-
schneidschraube
2.6x8mm TP screw
..........4
Tüte D
Bag D
2.6x8mm Linsenkopf-
schneidschraube
2.6x8mm TP screw
Stopmutter
Lock nut
18
19 20
2.6x8mm
..........2
Kugelkopf
Ball end
2.6x8mm
LRP_S18-TC_Anleitung_071206_fv.indd 8LRP_S18-TC_Anleitung_071206_fv.indd 8 08.01.2008 10:41:5308.01.2008 10:41:53

9
9
WWW.LRP.CC
WWW.LRP.CC
21 22
23 24
..........2
Links
Left
Rechts
Right
Links
Left
Rechts
Right
5x8mm Kugellager
5x8mm Ball Bearing
Tüte E
Bag E ..........2
5x8mm Kugellager
5x8mm Ball Bearing
Tüte E
Bag E
..........1
3x8mm Madenschraube
3x8mm Set screw
Tüte E
Bag E ..........1
3x8mm Madenschraube
3x8mm Set screw
Tüte E
Bag E
Ziehen Sie die Haltemuttern nicht zu fest an.
Die pivot balls müssen sich leichtgängig
bewegen lassen, aber trotzdem kein bzw.
nur sehr wenig Spiel haben.
Do not overtighten the holding nuts. You
want the pivot balls to move free and easy,
without or only very little play.
Madenschraube anziehen bis sie plan zur Oberfläche ist.
Tighten the set screw until you get a plane surface area.
LRP_S18-TC_Anleitung_071206_fv.indd 9LRP_S18-TC_Anleitung_071206_fv.indd 9 08.01.2008 10:42:0108.01.2008 10:42:01

10
10
Links
Left
x4
Rechts
Right
Tüte E
Bag E
2mm Stift
2mm Pin
27
26
25 OK OK
LRP_S18-TC_Anleitung_071206_fv.indd 10LRP_S18-TC_Anleitung_071206_fv.indd 10 08.01.2008 10:42:1008.01.2008 10:42:10

11
11
WWW.LRP.CC
WWW.LRP.CC
28
29
30
Rechts
Right
Links
Left
2x37.5mm Achsstift
2x37.5mm Hinge Pin
2x37.5mm Achsstift
2x37.5mm Hinge Pin
2x6mm
Tüte E
Bag E
..........2
2.6x10mm Senkkopf-
schneidschraube
2.6x12mm Countersunk
TP screw
Tüte E
Bag E
..........1
..........4
2.6x10mm Senkkopf-
schneidschraube
2.6x12mm Countersunk
TP screw
..........2
2.6x10mm Schneid-
schraube
2.6x12mm Countersunk
TP screw
2.6x10mm
Einstell-Clip
Adjust spacer
LRP_S18-TC_Anleitung_071206_fv.indd 11LRP_S18-TC_Anleitung_071206_fv.indd 11 08.01.2008 10:42:1808.01.2008 10:42:18

12
12
Befestigen Sie den Karosseriesplint im 3. Loch
Install the body clip in the 3rd hole
31
32
Tüte E
Bag E
.........4
Befestigen Sie den Karosseriesplint im 15. Loch
Install the body clip in the 15th hole
LRP_S18-TC_Anleitung_071206_fv.indd 12LRP_S18-TC_Anleitung_071206_fv.indd 12 08.01.2008 10:42:2608.01.2008 10:42:26

13
13
WWW.LRP.CC
WWW.LRP.CC
33 34
35 36
Rechts
Right
..........1
3x8mm Madenschraube
3x8mm Set screw
Tüte E
Bag E
Links
Left
..........1
3x8mm Madenschraube
3x8mm Set screw
Tüte E
Bag E
Links
Left
..........1
2.6x15mm Madenschraube
2.6x15mm Set screw
Tüte E
Bag E
Rechts
Right
..........1
2.6x15mm Madenschraube
2.6x15mm Set screw
10mm 10mm
Tüte E
Bag E
Madenschraube anziehen bis sie plan zur Oberfläche ist.
Tighten the set screw until you get a plane surface area. Madenschraube anziehen bis sie plan zur Oberfläche ist.
Tighten the set screw until you get a plane surface area.
LRP_S18-TC_Anleitung_071206_fv.indd 13LRP_S18-TC_Anleitung_071206_fv.indd 13 08.01.2008 10:42:3408.01.2008 10:42:34

14
14
37
39
38
Rechts
Right Links
Left
5~5.5mm
1.3mm
1.3mm
5~5.5mm
Vertiefung auf der Oberseite
Recess upwards
Tüte E
Bag E
..........1
..........2
Achsstift
Hinge pin
..........2
5x8x2.5mm Kugellager
5x8x2.5mm Ball bearing
Einstell-Clip
Adjust spacer
LRP_S18-TC_Anleitung_071206_fv.indd 14LRP_S18-TC_Anleitung_071206_fv.indd 14 08.01.2008 10:42:4208.01.2008 10:42:42

15
15
WWW.LRP.CC
WWW.LRP.CC
40
41
1.3mm 1.3mm
Tüte E
Bag E
..........1
..........2
Achsstift
Hinge pin
..........2
5x8x2.5mm Kugellager
5x8x2.5mm Ball bearing
Einstell-Clip
Adjust spacer
Tüte E
Bag E
2x37.5mm Achsstift
2x37.5mm Hinge pin
Rechts
Right
Rechts
Right
Links
Left
Vertiefung auf der Oberseite
Recess upwards
LRP_S18-TC_Anleitung_071206_fv.indd 15LRP_S18-TC_Anleitung_071206_fv.indd 15 08.01.2008 10:42:5008.01.2008 10:42:50

16
16
42
43
2x6mm
Tüte E
Bag E
2.6x10mm
..........3
..........4
2.6x10mm Senkkopf-
schneidschraube
2.6x10mm Countersunk
TP screw
2x6mm Schneidschraube
2x6mm TP screw
x4
Vordere und Hintere Dämpfer
Front and Rear Shocks
......8
......8
Tüte F
Bag F
1.5mm E-Clip
O-Ring
O-ring
Öl
Oil
LRP_S18-TC_Anleitung_071206_fv.indd 16LRP_S18-TC_Anleitung_071206_fv.indd 16 08.01.2008 10:42:5808.01.2008 10:42:58

17
17
WWW.LRP.CC
WWW.LRP.CC
......4
......4
x4
Dämpfer
Shocks
Vordere Dämpfer
Front Shocks
Bewegen Sie den
Kolben langsam nach
oben und unten, damit
die Luftblasen
entweichen können.
Move the shaft up and
down slowly to remove
the air bubbles.
44
46
Öl
Oil
Dämpfer
Shocks
45
2x14mm Schraube
2x14mm Screw
2x14mm Schraube
2x14mm Screw
2x5mm Unterlegscheibe
2mm Stoppmutter
2mm Lock nut
2x12mm Schraube
2x12mm Screw
2x12mm Schraube
2x12mm Screw
Tüte F
Bag F
........2
........2
........2
........2
........2
........2
LRP_S18-TC_Anleitung_071206_fv.indd 17LRP_S18-TC_Anleitung_071206_fv.indd 17 08.01.2008 10:43:0608.01.2008 10:43:06

18
18
47
48
2x14mm Schraube
2x14mm Screw
2x5mm Unterlegscheibe
2mm Stoppmutter
2mm Lock nut
2x12mm Schraube
2x12mm Screw
2x12mm Schraube
2x12mm Screw
Tüte F
Bag F
........2
........2
........2
2x14mm Schraube
2x14mm Screw
........2
........2
........2
Befestigen Sie den Karosseriesplint im 3. Loch
Install the body clip in the 3rdhole
Höhe der Karosseriehalter für verschiedene
Karosserien einstellbar
Adjustable height of the body posts
to fit different body shells
Befestigen Sie den Karosseriesplint im dritten
Loch von unten
Install the body clip in the third of the last hole
........4
Tüte G
Bag G
LRP_S18-TC_Anleitung_071206_fv.indd 18LRP_S18-TC_Anleitung_071206_fv.indd 18 08.01.2008 10:43:1508.01.2008 10:43:15

19
19
WWW.LRP.CC
WWW.LRP.CC
AN
ON
7.2V Akku
7.2V Battery
Empfänger
Receiver
90°
50
49
2.6x8mm
LRP_S18-TC_Anleitung_071206_fv.indd 19LRP_S18-TC_Anleitung_071206_fv.indd 19 08.01.2008 10:43:2308.01.2008 10:43:23
Table of contents
Other LRP Motorized Toy Car manuals

LRP
LRP S18.MT User manual

LRP
LRP S10 TWISTER 2 EXTREME 100 BRUSHLESS TRUGGY User manual

LRP
LRP ANTIX MT-1 User manual

LRP
LRP S10 Twister 2 BL User manual

LRP
LRP S8 BX2 User manual

LRP
LRP shark 18 ATV User manual

LRP
LRP Shark 18 Monster User manual

LRP
LRP S8 Rebel BXe User manual

LRP
LRP Shark 18 Monster User manual

LRP
LRP S8 BX User manual

LRP
LRP Z.28R Spec.3 Truggy User manual

LRP
LRP Quantum Sport User manual

LRP
LRP 32120 User manual

LRP
LRP S10 Twister User manual

LRP
LRP S10 TVISTER buggy User manual

LRP
LRP S10 BLAST BX User manual

LRP
LRP QUANTUM SPORT 2 Series User manual

LRP
LRP S8 NXR User manual

LRP
LRP S8 REBEL TX User manual

LRP
LRP Deep Blue 450 User manual