LRS T9100 User manual

Installation, Warranty and Service Information
Long Range Systems, In .
4550 Excel Parkway, Suite 200
Addison, TX 75001
800.437.499 •www.pager.net
T9100 &
Cancel Panel
Paging System Transmitter
USER MANUAL

Table Of Contents
The T9100 . . . . . . . . . . . . . . . . . . . . . . . . . . . . . . . . . . . . . . . . . . . . . . . . . . . . . . . . . . . . . . . . . . . . 3
Installation . . . . . . . . . . . . . . . . . . . . . . . . . . . . . . . . . . . . . . . . . . . . . . . . . . . . . . . . . . . . . . . . . . . 3
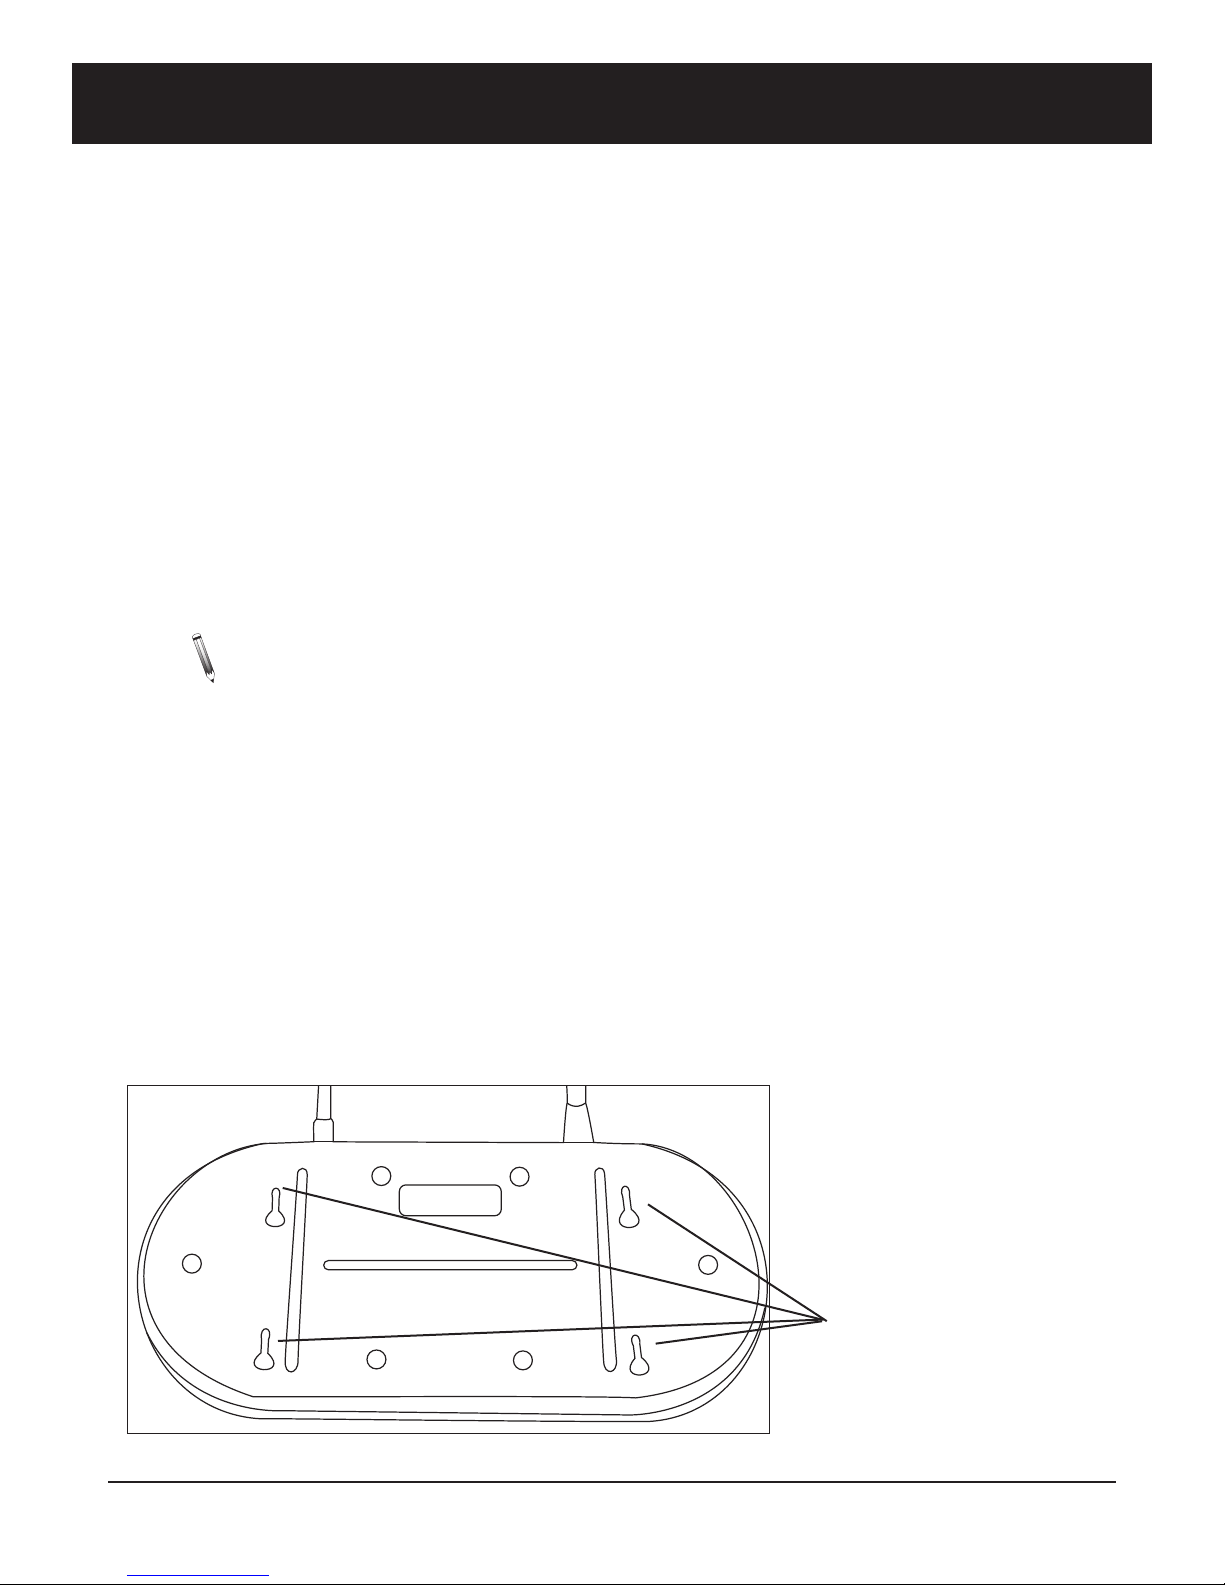
Hardware Provided . . . . . . . . . . . . . . . . . . . . . . . . . . . . . . . . . . . . . . . . . . . . . . . . . . . 3
Optional Hardware . . . . . . . . . . . . . . . . . . . . . . . . . . . . . . . . . . . . . . . . . . . . . . . . . . . . 3
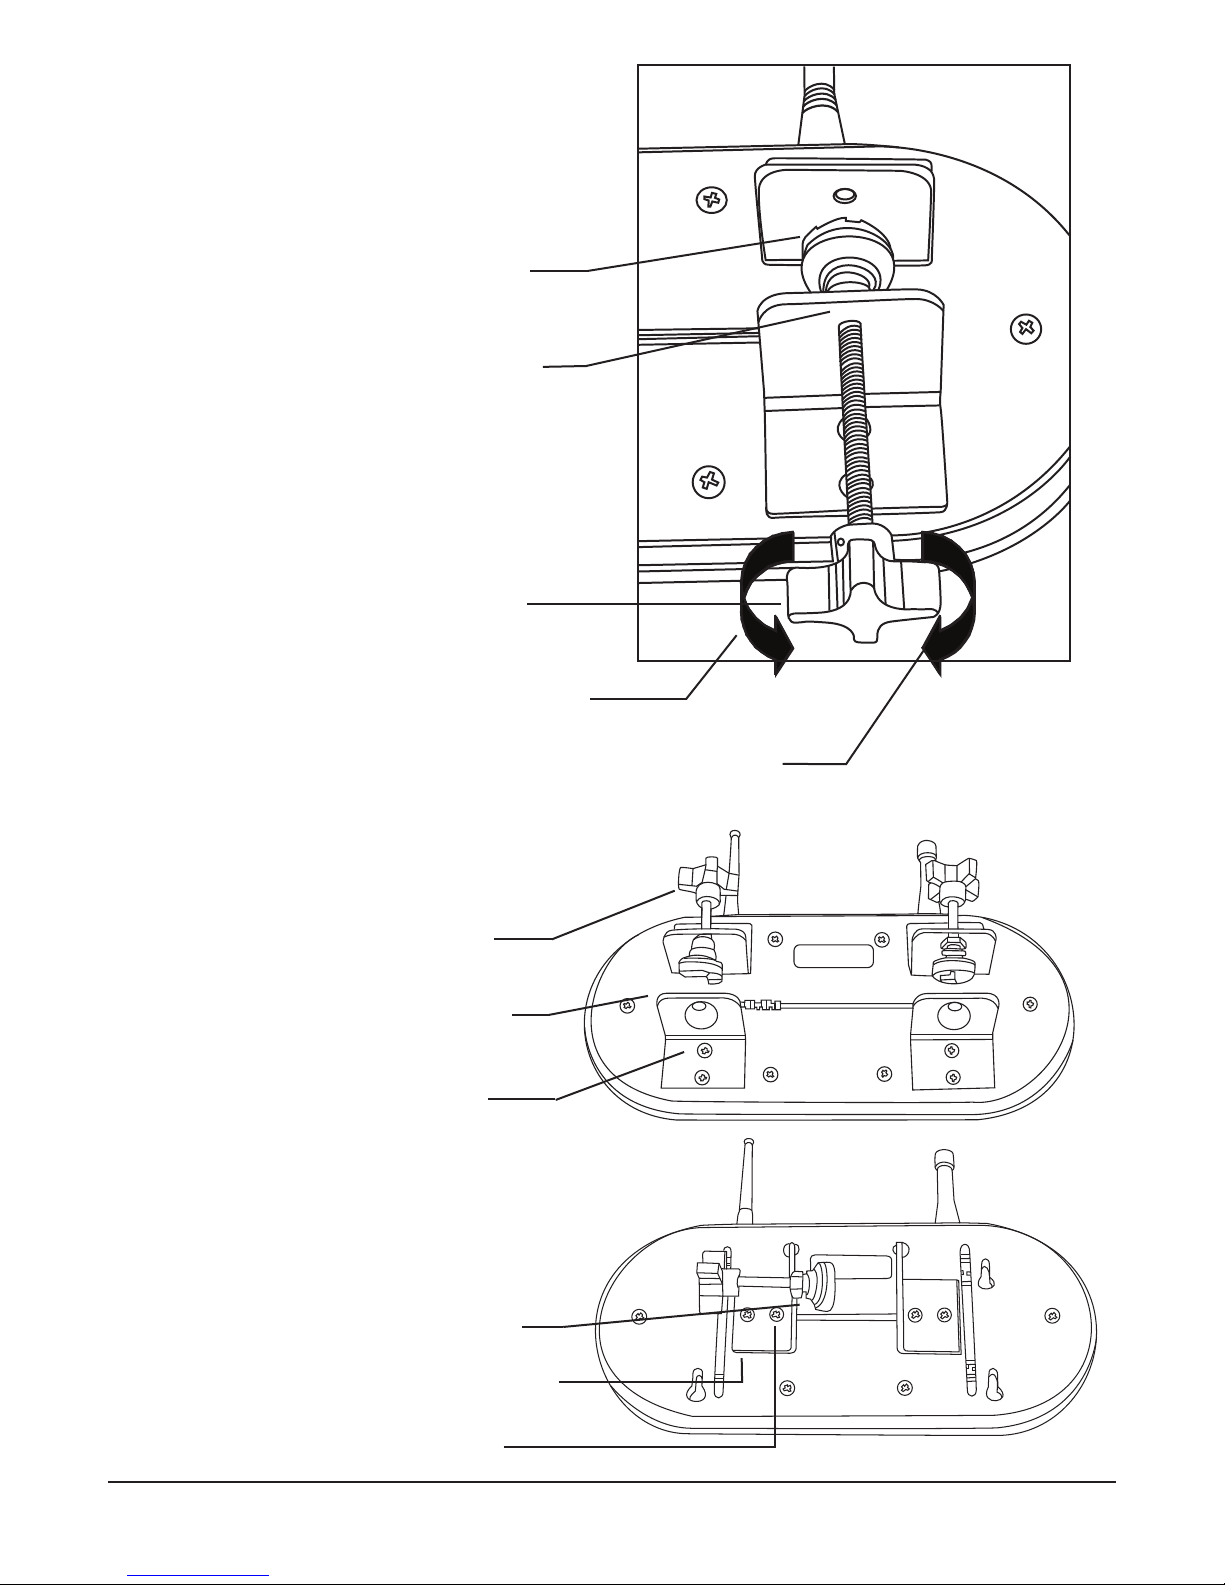
Hardware Setup Pro edure . . . . . . . . . . . . . . . . . . . . . . . . . . . . . . . . . . . . . . . . . . . . . 3
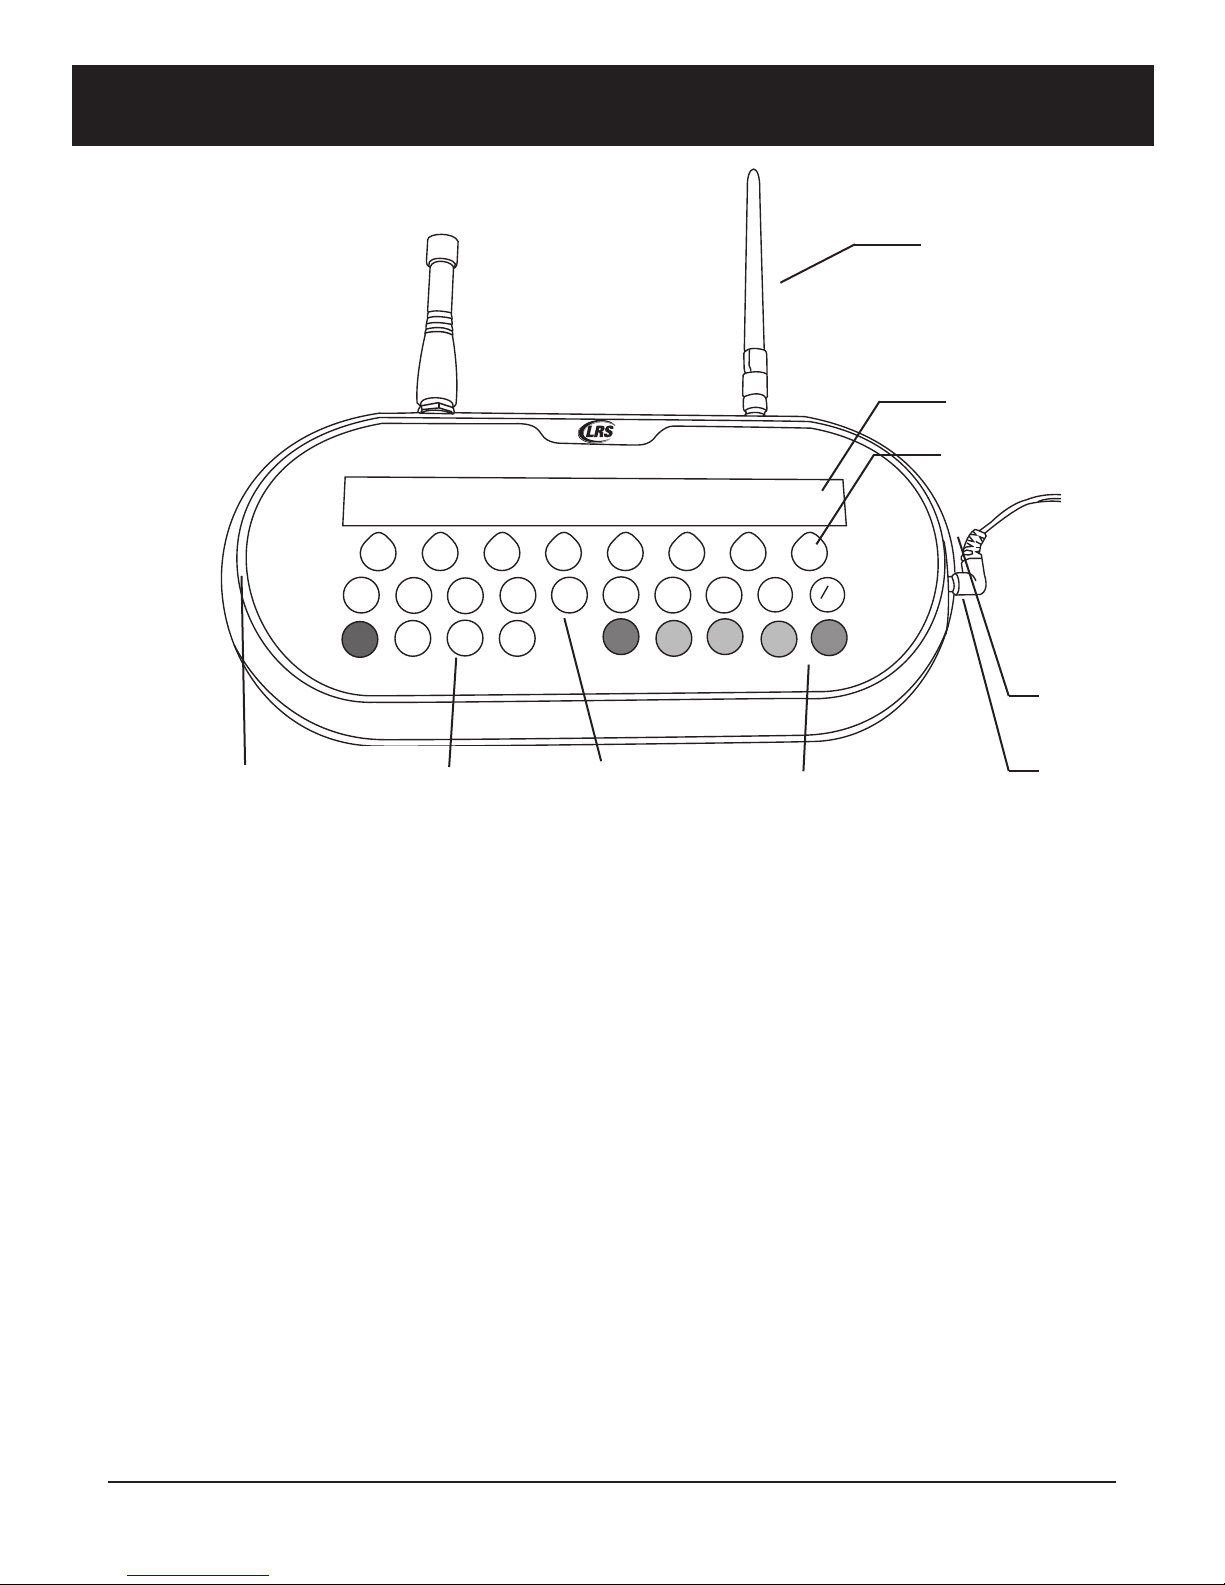
Overview of T9100 . . . . . . . . . . . . . . . . . . . . . . . . . . . . . . . . . . . . . . . . . . . . . . . . . . . . . . . . . . . . . 7
Keypad . . . . . . . . . . . . . . . . . . . . . . . . . . . . . . . . . . . . . . . . . . . . . . . . . . . . . . . . . . . . . 7
Antenna . . . . . . . . . . . . . . . . . . . . . . . . . . . . . . . . . . . . . . . . . . . . . . . . . . . . . . . . . . . . 8
Rest Terminals . . . . . . . . . . . . . . . . . . . . . . . . . . . . . . . . . . . . . . . . . . . . . . . . . . . . . . . 8
Status LED . . . . . . . . . . . . . . . . . . . . . . . . . . . . . . . . . . . . . . . . . . . . . . . . . . . . . . . . . . 8
System Spe ifi ations . . . . . . . . . . . . . . . . . . . . . . . . . . . . . . . . . . . . . . . . . . . . . . . . . 8
Using the T9100 . . . . . . . . . . . . . . . . . . . . . . . . . . . . . . . . . . . . . . . . . . . . . . . . . . . . . . . . . . . . . . . 9
Time and Date . . . . . . . . . . . . . . . . . . . . . . . . . . . . . . . . . . . . . . . . . . . . . . . . . . . . . . . 9
Paging . . . . . . . . . . . . . . . . . . . . . . . . . . . . . . . . . . . . . . . . . . . . . . . . . . . . . . . . . . . . . . 9
Can el Page . . . . . . . . . . . . . . . . . . . . . . . . . . . . . . . . . . . . . . . . . . . . . . . . . . . . . . . . . 9
User Preferences . . . . . . . . . . . . . . . . . . . . . . . . . . . . . . . . . . . . . . . . . . . . . . . . . . . . . . . . . . . . . 10
Display Current Settings . . . . . . . . . . . . . . . . . . . . . . . . . . . . . . . . . . . . . . . . . . . . . . . 10
Antitheft . . . . . . . . . . . . . . . . . . . . . . . . . . . . . . . . . . . . . . . . . . . . . . . . . . . . . . . . . . . . 10
Display Clo k . . . . . . . . . . . . . . . . . . . . . . . . . . . . . . . . . . . . . . . . . . . . . . . . . . . . . . . . 11
Vibe Level . . . . . . . . . . . . . . . . . . . . . . . . . . . . . . . . . . . . . . . . . . . . . . . . . . . . . . . . . . . 11
Keytone . . . . . . . . . . . . . . . . . . . . . . . . . . . . . . . . . . . . . . . . . . . . . . . . . . . . . . . . . . . . . 11
Preset Message . . . . . . . . . . . . . . . . . . . . . . . . . . . . . . . . . . . . . . . . . . . . . . . . . . . . . . 12
Repaging . . . . . . . . . . . . . . . . . . . . . . . . . . . . . . . . . . . . . . . . . . . . . . . . . . . . . . . . . . . . 13
Repeater Delay . . . . . . . . . . . . . . . . . . . . . . . . . . . . . . . . . . . . . . . . . . . . . . . . . . . . . . . 13
Duty Pager . . . . . . . . . . . . . . . . . . . . . . . . . . . . . . . . . . . . . . . . . . . . . . . . . . . . . . . . . . 13
Restaurant ID . . . . . . . . . . . . . . . . . . . . . . . . . . . . . . . . . . . . . . . . . . . . . . . . . . . . . . . . 13
Station ID . . . . . . . . . . . . . . . . . . . . . . . . . . . . . . . . . . . . . . . . . . . . . . . . . . . . . . . . . . . 14
POCSAG (FM) Start . . . . . . . . . . . . . . . . . . . . . . . . . . . . . . . . . . . . . . . . . . . . . . . . . . . 14
Edit Manager Pager Number . . . . . . . . . . . . . . . . . . . . . . . . . . . . . . . . . . . . . . . . . . . 14
Reset to Fa tory Default . . . . . . . . . . . . . . . . . . . . . . . . . . . . . . . . . . . . . . . . . . . . . . . 14
Server Statisti s . . . . . . . . . . . . . . . . . . . . . . . . . . . . . . . . . . . . . . . . . . . . . . . . . . . . . . 14
Range Test . . . . . . . . . . . . . . . . . . . . . . . . . . . . . . . . . . . . . . . . . . . . . . . . . . . . . . . . . . 16
Find ID . . . . . . . . . . . . . . . . . . . . . . . . . . . . . . . . . . . . . . . . . . . . . . . . . . . . . . . . . . . . . . 16
Three Digit POCSAG Paging . . . . . . . . . . . . . . . . . . . . . . . . . . . . . . . . . . . . . . . . . . . . 16
Pager Programming . . . . . . . . . . . . . . . . . . . . . . . . . . . . . . . . . . . . . . . . . . . . . . . . . . . . . . . . . . . 17
Long Range Systems 1T9100 User Manual

Long Range Systems 2T9100 User Manual
T9100 Cancel Panel . . . . . . . . . . . . . . . . . . . . . . . . . . . . . . . . . . . . . . . . . . . . . . . . . . . . . . . . . . . 18
Overview of T9100 Can el Panel . . . . . . . . . . . . . . . . . . . . . . . . . . . . . . . . . . . . . . . . 18
Keypad . . . . . . . . . . . . . . . . . . . . . . . . . . . . . . . . . . . . . . . . . . . . . . . . . . . . . . . . . . . . . 18
Using the T9100 Cancel Panel . . . . . . . . . . . . . . . . . . . . . . . . . . . . . . . . . . . . . . . . . . . . . . . . . . 19
Paging . . . . . . . . . . . . . . . . . . . . . . . . . . . . . . . . . . . . . . . . . . . . . . . . . . . . . . . . . . . . . . 19
Can el Page . . . . . . . . . . . . . . . . . . . . . . . . . . . . . . . . . . . . . . . . . . . . . . . . . . . . . . . . . 19
User Preferences . . . . . . . . . . . . . . . . . . . . . . . . . . . . . . . . . . . . . . . . . . . . . . . . . . . . . . . . . . . . . 20
Paging from Can el Panel . . . . . . . . . . . . . . . . . . . . . . . . . . . . . . . . . . . . . . . . . . . . . . 20
Associating the T9100 Cancel Panel to T9100 . . . . . . . . . . . . . . . . . . . . . . . . . . . . . . . . . . . . . 21
Changing Transmitters as 2.4 GHz Master . . . . . . . . . . . . . . . . . . . . . . . . . . . . . . . . . . . . . . . . 21
Service Questions and Answers . . . . . . . . . . . . . . . . . . . . . . . . . . . . . . . . . . . . . . . . . . . . . . . . 22
LRS PAGERS AVAILABLE FOR THE T9100 . . . . . . . . . . . . . . . . . . . . . . . . . . . . . . . . . . . . . . . . . 23
USING THE SP . . . . . . . . . . . . . . . . . . . . . . . . . . . . . . . . . . . . . . . . . . . . . . . . . . . . . . . . . . . . . . . 23
Charging . . . . . . . . . . . . . . . . . . . . . . . . . . . . . . . . . . . . . . . . . . . . . . . . . . . . . . . . . . . . 23
Menus . . . . . . . . . . . . . . . . . . . . . . . . . . . . . . . . . . . . . . . . . . . . . . . . . . . . . . . . . . . . . . 23
Settings . . . . . . . . . . . . . . . . . . . . . . . . . . . . . . . . . . . . . . . . . . . . . . . . . . . . . . . . . . . . . 25
Messages . . . . . . . . . . . . . . . . . . . . . . . . . . . . . . . . . . . . . . . . . . . . . . . . . . . . . . . . . . . 25
Time . . . . . . . . . . . . . . . . . . . . . . . . . . . . . . . . . . . . . . . . . . . . . . . . . . . . . . . . . . . . . . . . 25
Reprogramming and Reset . . . . . . . . . . . . . . . . . . . . . . . . . . . . . . . . . . . . . . . . . . . . . 25
USING THE LRS ALPHA E467 . . . . . . . . . . . . . . . . . . . . . . . . . . . . . . . . . . . . . . . . . . . . . . . . . . . 26
Menus . . . . . . . . . . . . . . . . . . . . . . . . . . . . . . . . . . . . . . . . . . . . . . . . . . . . . . . . . . . . . . 26
Power On/Off . . . . . . . . . . . . . . . . . . . . . . . . . . . . . . . . . . . . . . . . . . . . . . . . . . . . . . . . 26
Read Message . . . . . . . . . . . . . . . . . . . . . . . . . . . . . . . . . . . . . . . . . . . . . . . . . . . . . . . 27
Delete Messages . . . . . . . . . . . . . . . . . . . . . . . . . . . . . . . . . . . . . . . . . . . . . . . . . . . . . 27
Time/Date Set . . . . . . . . . . . . . . . . . . . . . . . . . . . . . . . . . . . . . . . . . . . . . . . . . . . . . . . . 27
Set Contrast . . . . . . . . . . . . . . . . . . . . . . . . . . . . . . . . . . . . . . . . . . . . . . . . . . . . . . . . . 27
Auto ON/OFF . . . . . . . . . . . . . . . . . . . . . . . . . . . . . . . . . . . . . . . . . . . . . . . . . . . . . . . . 27
Set Keytone On/Off . . . . . . . . . . . . . . . . . . . . . . . . . . . . . . . . . . . . . . . . . . . . . . . . . . . 27
Sele t Alert . . . . . . . . . . . . . . . . . . . . . . . . . . . . . . . . . . . . . . . . . . . . . . . . . . . . . . . . . . 28
USING THE STAR PAGER . . . . . . . . . . . . . . . . . . . . . . . . . . . . . . . . . . . . . . . . . . . . . . . . . . . . . . . 29
Charging . . . . . . . . . . . . . . . . . . . . . . . . . . . . . . . . . . . . . . . . . . . . . . . . . . . . . . . . . . . . 29
Messaging . . . . . . . . . . . . . . . . . . . . . . . . . . . . . . . . . . . . . . . . . . . . . . . . . . . . . . . . . . 29
Cleaning & Charging Instructions for LRS Paging Equipment . . . . . . . . . . . . . . . . . . . . . . 30
Warranty . . . . . . . . . . . . . . . . . . . . . . . . . . . . . . . . . . . . . . . . . . . . . . . . . . . . . . . . . . . . . . . . . . . . 31

THE T9100 Installation:
Hardware Provided
Ea h transmitter kit ontains the transmitter, Instru tion Booklet, two antenna, one 9VAC 1.5A power adap-
tor, one Staff Name board, and four mounting bra ket kits.
Optional Hardware
The T9100 and T9100 Can el Panel have the ability to print a server report to a POS Printer. Conta t LRS if
you wish to pur hase a printer.
Hardware Setup Procedure
1. Remove all items from their pa kaging.
2. Lo ate the silver onne tor on the top of the transmitter. Twist the antenna (about 3” long, BNC,
silver bottom) onto the onne tor.
3. Lo ate the gold onne tor on the top of the transmitter. Twist the antenna (about 4” long, SMA,
bends at right angle) onto the gold onne tor.
Note: Both antennas must be atta hed before turning on transmitter. Do not remove either an-
tenna at any time due to risk of damage.
4. Mount the power supply in onvenient lo ation with a ess to 110V power.
Mounting the Transmitter
The T9100 is designed to be mounted in various ways to a ommodate the kit hen environment: to a hori-
zontal surfa e (i.e. table, ounter, shelf), to a verti al surfa e, or hanging to a wall or stand.
Caution: Mounting with the antenna near any large metal objects will degrade the operating range.
To pla e on a wall or stand, lo ate the four slots on the mounting plate. Then align four wall an hors (5mm
diameter) into the wall to the mounting plate.
Long Range Systems 3T9100 User Manual
Panel and Wall Mount
Mounting Holes

For mounting to surfa es, pla e the mounting
bra kets into the aptive nuts for either horizontal
or verti al mounting. There are two sets of 4 ap-
tive nuts for mounting to horizontal surfa es, and
one set of aptive nuts for mounting to verti al
surfa es.
To attach the clamps:
1. Align the mounting nuts to the lamps.
2. Use the #10-32 x 3/8” s rews to hold
the lamps. Do not fully tighten
s rews.
3. Adjust the distan e between lamps
until fits to the mounting surfa e.
4. Tighten s rews.
Long Range Systems 4T9100 User Manual
Captive Nuts
Clamp
Captive Nuts
Screws

5. Pla e the thumbs rew into the lamp op-
posite the one with the foam pad.
6. Atta h the foot of the thumbs rew.
7. Adjust position of thumbs rew and tighten
to hold the transmitter in pla e.
Be ause the thumbs rews and bra kets an be
mounted in many ways, they an be adapted to
most lo ations is possible.
Horizontal Mount
Vertical Mount
Long Range Systems T9100 User Manual
Clamp with
Foam Pad
Thumbscrew
Foot
Thumbscrew
Turn clockwise
to tighten
Turn counter-
clockwise to
loosen
Thumbscrew
Mounting
Bracket
Mounting
Screws
Thumbscrew
Mounting
Bracket
Mounting
Screws

Long Range Systems 6T9100 User Manual
Power Connection
1. Plug the power supply into a standard 110V outlet and the barrel onne tor end into the ja k on
the side of the transmitter.
2. Upon ompletion of the setup, make sure pagers are fully harged.

Overview of T9100
Keypad
Function Keys
The fun tion keys are lo ated along the bottom row of the T9100.
- M1 & M2 used to page and program Manager Pagers.
- 86 “All Call” button used to page all pagers.
- CLR used to lear an entry or to ba k up one menu level.
- PROG press on e to program pagers, press a se ond time to a ess the menu fun tions.
- ENT used to enter fun tions.
Vibration Keys
V1, V2 and V3 sele t the number of vibrations a pager will respond with. This button is pressed before pag-
ing a pager. Sends message 1, 2 or 3 to Alpha pagers.
Number Keys
Number keys 1 through 10 lo ated along the enter row. Number 10 is also 0 when Programming, using the
Menus, or paging pagers greater than 10.
1
234
5
67
89
10
M1
M2
86
CLR
PROG
ENT
V1V2
V3
www.pager.net
0
CANCEL PANEL
Long Range Systems 7T9100 User Manual
Antenna
Number Keys
Status LED
Power
Supply
Function Keys Vibration Keys
Reset Terminals
Cancel Keys
Printer
Port

Long Range Systems 8T9100 User Manual
Cancel Keys
The row of keys lo ated below the display. These keys will an el a all to the pager number shown on the
display immediately above the respe tive key. The Can el Keys also are used during menu sele tion.
Antenna
The T9100 utilizes 2 antennas when transmitting.
A UHF antenna, lo ated to the user’s left, is used to ommuni ate with the LRS pagers.
A 2.4 GHz antenna, lo ated to the user’s right, ommuni ates with the T9100 Can el Panel.
Reset Terminals
The Reset Terminals are lo ated to the user’s left side on the transmitter. These are used to reset a pager for
programming.
Status LED
This LED will light green to indi ate that the T9100 is sending information to the pagers or T9100 Can el
Panel.
System Specifications
Notice: Operation is subje t to the following:
• This devi e may not ause interferen e
• This devi e will a ept any interferen e in luding interferen e that may ause undesired oper-
ation of the unit.
Required Voltage: One 110/220V outlet for the T9100 transmitter
Operating Frequen y: 420-470 MHz
Radiated Power: < 4900 mi ro-volts/meter
Operating Range: Dependent upon pagers used

Using the T9100
Time and Date
Initial Power Up
During power up, to enter the time and date:
• At [enter time], enter the hh mm (hour, minute) using the number keys, and then press ENT.
• Press 2 for AM or 10 for PM.
• At [date], enter the mm dd yy (month, day, year) using the number keys, and then press ENT.
Clock Menu
The time and date an also be set from the Clo k menu by:
• Press PROG – PROG – 1 – ENT.
• Press the button under set.
• At [enter time], enter the hh mm (hour, minute) using the number keys, and then press ENT.
• Press the button under AM or PM.
• At [date], enter the mm dd yy (month, day, year) using the number keys, and then press ENT.
• If done, press Yes (button under Yes), if not, press No (button under No.)
Note: The transmitter will use a default sele tion of “Yes” after 30 se onds of ina tivity.)
Send Time
This feature will automati ally send the urrent time and date to the pagers every 15 minutes. The default
setting is OFF.
To enable:
• Press PROG – PROG – 1 – ENT.
• Press button under Send.
• At [Auto] sele t button under ON.
• If done, sele t Yes (button under Yes), if not, sele t No (button under No.)
To disable:
• Press PROG – PROG – 1 – ENT.
• Press button under Send.
• At [Auto] Press sele t button under OFF.
• If done, sele t Yes (button under Yes), if not, sele t No (button under No.)
Paging
To page pagers 1 through 99, enter the 2 digit pager number using the number keys. The 10 key also is used
as the 0 key.
All Call
If all staff pagers need to be alled at on e, press the 86 key.
Manager Pagers
To page the managers, press the M1 for the #1 manager pager or M2 for the #2 manager pager.
Cancel Page
To lear/ an el a pager to the server, press the Can el Key under the pager number.
Long Range Systems 9T9100 User Manual

User Preferences
The T9100 will ome with fa tory settings for normal operating use. Some features an hange per the user’s
ustom needs.
Display Current Settings
To view the urrent settings for the transmitter:
• Press PROG – PROG – 1 – 6 – ENT.
• Press ENT to s roll through ea h item:
• Date
• Restaurant ID Number
• Station ID Number
• FM Start point
• Pre- anned Message
• Repage interval
• M1 (Manager 1) information
• M2 (Manager 2) information
• Duty Pager information
• Router Set
• Can el Panel set to page (yes or no) (Note: Only seen on Can el Panel)
• UHF Master
• T9100 is set to Master (yes or no)
• Node ID
• Pan and Channel ID
• Channel S an is on or off
• Syn hed on or off
• Beeper (keytone) is on or off
• Code Version
• Error Count
• If done, press 6 for Yes, if not, press 10 for No.
Antitheft
Note: This feature is ONLY for text pagers.
This feature will make a pager beep and/or vibrate ontinuously if goes beyond the range of the transmitter.
To enable:
• Press PROG – PROG – 4 – ENT.
• At [theft] press button under ON.
• If done, sele t Yes (button under Yes), if not, sele t No (button under No.).
To disable:
• Press PROG – PROG – 4 – ENT.
• At [theft] press button under OFF.
• If done, sele t Yes (button under Yes), if not, sele t No (button under No.)
Long Range Systems 10 T9100 User Manual

Long Range Systems 11 T9100 User Manual
Display Clock
The default setting for the lo k is ON during normal operation.
To disable:
• Press PROG – PROG – 1 – 0 – ENT.
• Press button under Clo k for the Clo k sub-menu.
• At [ lo k] Press button under OFF.
• If done, sele t Yes (button under Yes), if not, sele t No (button under No.)
To enable:
• Press PROG – PROG – 1 – 0 – ENT.
• Press button under Clo k for the Clo k sub-menu.
• At [ lo k] Press button under ON.
• If done, sele t Yes (button under Yes), if not, sele t No (button under No.)
Vibe Level
The default Vibration Level for pagers an be set via:
1. Pressing the V1, V2, or V3 buttons for levels 1, 2, and 3 respe tively.
2. From the menus:
• Press PROG – PROG – 1 – 2 – ENT.
• Enter a value of 1, 2, or 3 from the keypad
• If done, sele t Yes (button under Yes), if not, sele t No (button under No.)
Keytone
The transmitter default is for tones to sound with ea h key press.
To disable:
• Press PROG – PROG – 2 – 2 – ENT.
• At [beeper] press button under OFF.
• If done, sele t Yes (button under Yes), if not, sele t No (button under No.)
To enable:
• Press PROG – PROG – 2 – 2 – ENT.
• At [beeper] press button under ON.
• If done, sele t Yes (button under Yes), if not, sele t No (button under No.)

Long Range Systems 12 T9100 User Manual
Preset Message
The LRS transmitters ome with a list of preset messages that an be sent to Alpha Pagers. To edit whi h
message is sent:
• Press PROG – PROG – 1 – 3 – ENT.
• Enter the preferred message from the table, then press ENT.
• If done, sele t Yes (button under Yes), if not, sele t No (button under No.)
Pre Loaded Messages
Repaging
Repaging sends repeated messages to the pagers.
Note: This feature requires use of an asso iated Can el Panel to work.
Server
To set the re-page time for Server pagers:
• Press PROG – PROG – 6 – ENT.
• Press button under Repage.
• At [time] use the number keys to enter as mm ss (minute, se onds), then press ENT. The s reen
will briefly show the updated re-page time.
000 Phone Call
001 Sales Call
002 Manager
003 Customer
004 Room
005 Visitor
006 all Ext
007 MTG Room
008 Lane
009 Aisle
010 Void
011 Stamps
012 Change
013 Station
014 Ma hine
015 Operator
016 Emergen y
017 XX Minutes
018 Tee
019 Pro Shop
020 Starter
021 Servi e drive
022 Showroom
023 Parked Call
024 Voi e Mail
025 Dressing room
026 Pri e he k
027 Department
028 Cashier
029 Offi e
030 Table
031 Winner
032 Pi kup
033 Do k
034 You have mail
035 Table ready
036 No spe ial
037 Hole
038 Kit hen
039 Bar
040 Door
041 Survey
042 T-nnn Q-mm
043 Break
044 Fire
045 Unit
046 Window
047 Nurse
048 Register
049 Owner
050 Che k
051 Drink
052 Food
053 Servi e
054 Seat
055 Booth
056 Lobby
057 Help
058 Restroom
059 Valet
060 Car
061 Bus
062 Bay
063 Low battery
064 Error
065 Exit
066 Fax
067 host
068 Spa e
069 Lo ation
070 Nursery
071 Teller
072 Offi er
073 Buffet
074 Diaper hange
075 Child rying
076 To nursery

Long Range Systems 13 T9100 User Manual
• If done, sele t Yes (button under Yes), if not, sele t No (button under No.)
Manager
To set the Manager to be paged on e after the third re-page:
• Press PROG – PROG – 6 – ENT.
• Press button under More.
• At [mgr] press button under Mgr.
• Press button On.
• If done, sele t Yes (button under Yes), if not, sele t No (button under No.)
To turn Off the Manager to be paged:
• Press PROG – PROG – 6 – ENT.
• Press button under More.
• At [mgr] press button under Mgr.
• Press button under Off.
• If done, sele t Yes (button under Yes), if not, sele t No (button under No.)
Repeater Delay
When using a repeater it may be ne essary to add a delay between pages when paging multiple pagers to
allow the repeater time to repeat the signal and dete t the next one. Default setting is OFF.
To add repeat Delay:
• Press PROG – PROG – 6 – ENT.
• Press button under More.
• Press button under repeater.
• At [rPt], press button under ON to enable the Repeat Delay. Press button under OFF to disable
Repeat Delay.
• If done, sele t Yes (button under Yes), if not, sele t No (button under No.)
Duty Pager
The duty pager is used to remind someone of a periodi repetitive task. To setup:
• Press PROG – PROG – 7 – ENT.
• At [duty] press button under On. (After 10 se onds, the s reen will default to Off.)
• Enter the Duty Pager number with the keypad, then press ENT.
• Enter Vibe Level (value of 1, 2, or 3), then press ENT.
• Enter the repage time as mm ss (minutes, se onds), then press ENT.
• S reen will briefly display the new settings.
• If done, sele t Yes (button under Yes), if not, sele t No (button under No.)
To disable the Duty Pager:
• Press PROG – PROG – 7 – ENT.
• At [duty] press button under Off.
• If done, sele t Yes (button under Yes), if not, sele t No (button under No.)
Restaurant ID
The ID of the Restaurant system. Set if more than one LRS system is in an area to prevent interferen e. To set:
• Press PROG – PROG – 1 – 4 – ENT.

Long Range Systems 14 T9100 User Manual
• At [rest ID], enter a value from 0 to 9, and then press ENT.
• If done, sele t Yes (button under Yes), if not, sele t No (button under No.)
Station ID
The station that will be displayed on a pager if more than 1 station is in use. To set:
• Press PROG – PROG – 1 – 1 – ENT.
• At [stn ID], enter a value from 0 to 9, and then press ENT.
• If done, sele t Yes (button under Yes), if not, sele t No (button under No.)
POCSAG (FM) Start
• Press PROG – PROG – 8 – ENT.
• Press button under FM Start (Note: A 10 se ond delay will default to FM Start).
• Set the start point at value from 00 to 99, and then press ENT.
• If done, sele t Yes (button under Yes), if not, sele t No (button under No.)
Edit Manager Pager Number
In the event the Manger’s pager numbers are hanged, to hange the T9100:
• Press PROG – PROG – M1. (or M2)
• At [MGR1 num], enter the new manger number from the keypad (value from 0 to 99), then press ENT.
• Enter the Vibration Level (Value of 1, 2, or 3), then press ENT.
• If done, sele t Yes (button under Yes), if not, sele t No (button under No.)
Reset to Factory Default
Note/Caution: If you reset the T9100 to fa tory defaults the system ID, vibration mode, and sta-
tion ID ould be reset and you may have to re-set these to work with your exist-
ing pagers. If you still want to pro eed with this fun tion, do the following:
• Press PROG – PROG – 2 – 1 – ENT.
• At [reset] press button under Yes. (Sele t No to keep urrent settings.)
• If done, sele t Yes (button under Yes), if not, sele t No (button under No.)
Server Statistics
The T9100 an tra k the daily statisti s of the number of times a server was paged, the server’s average re-
sponse time, and the number of times a manager is paged.
To enable Server Statisti s:
• Press PROG – PROG – 2 – 3.
• Press ENT.
• At [Stats], press button under ON.
• Enter the start time (example 3 for 3 AM or 3 PM) and then press ENT.
• Press button under AM or PM.
• The transmitter’s memory will lear.
• If done, sele t Yes (button under Yes), if not, sele t No (button under No.)
Note:
• At the set time, the daily report will print to the POS Printer.
• At the set time, the memory will also lear to begin a new set of daily statisti s.
To disable the Server Statisti s:
• Press PROG – PROG – 2 – 3.

Long Range Systems 1 T9100 User Manual
• Press ENT.
• At [Stats], press button under OFF.
• If done, sele t Yes (button under Yes), if not, sele t No (button under No.)
Printing Statistics
Note: Server Stats needs to be turned ON before stats an be viewed or printed. The transmit-
ter must be set as UHF Master.
The urrent POS Printer supported for the T9100 is the Star TSP650.
The onne tion between the transmitter and printer is a “straight-through”. This is a hieved with a standard
DB9 to DB25 adapter onne ted to the ba k of the printer, and a LRS provided serial able to onne t the
printer to the transmitter.
If the user attempts to use a “null able” between the printer and the transmitter, a “null modem” will need
to be added in-line to orre t the onne tion.
To print a urrent view of the Server Statisti s:
• Press PROG – PROG – 2 – 4 – ENT.
• Enter a server number and press ENT.
• Press button under PRINT.
• The statisti s will now print.
• If done, sele t Yes (button under Yes), if not, sele t No (button under No.)
Note: The Statisti s will also print at the time set in the Stats menu.
Example Print
Viewing Statistics
To View the urrent Server Statisti s:
• Press PROG – PROG – 2 – 4.
• Enter a server number and press ENT.
• Press button under VIEW.
• Press ENT to s roll through the list of servers. (The list will start at the number entered and will
ontinue to the end of the list or until CLR is pressed.)
• If done, sele t Yes (button under Yes), if not, sele t No (button under No.)
Date:
Time:
Server Response Report
Svr Pages A.R.T. Mgr
1500:44 02
5400:29 01
12 3 00:15 --
17 4 00:25 01
--------------------------------------------------------------
Svr = Server
Pager = # of pages in last 24 hours
A.R.T. = Average Response Time
Mgr = # of times manager was paged

Long Range Systems 16 T9100 User Manual
Example Statistics View:
Range Test
This an be used to determine the effe tive range of the T9100 in your environment. To start the range test:
• Press PROG – PROG – 8 – ENT.
• Press button under Range. The Range Test will begin automati ally.
• Stop the Range Test by pressing any button.
• If done, sele t Yes (button under Yes), if not, sele t No (button under No.)
Find ID
• Press PROG – PROG – 1 – 0 – ENT.
• Press button under ID. (Note: A 10 se ond delay will default to ID.)
• To start lo ating the ID, sele t Yes. (To not lo ate the ID, sele t No.)
• The transmitter will begin by transmitting on ID 0 (zero). If the pager re eived the page, at the
prompt [re eive] sele t Yes. If not, sele t No. The transmitter will automati ally in rement to
the next ID and page. Repeat this step until the pager re eives the page.
• If done, sele t Yes (button under Yes), if not, sele t No (button under No.)
Three Digit POCSAG Paging
If using the T9100 in an LRS system with Group Programmed POCSAG Pagers, the Group Paging mode
will allow the T9100 to page the three digit individual pager number of the POCSAG Pager.
When this mode is turned on, numbers on the keypad and display are treated as +100. (ex: Pressing 22, the
LED Display will show 22, pager #122 will be paged.)
Note: Turning on this mode will not enable support to page Group Numbers 1-99. The trans-
mitter will only page individual numbers 100-199.
To turn on Group Paging Support:
- Press PROG – PROG – 2 – 0 – ENT
- Press the button under Yes
- If done, sele t Yes (Button under Yes), if not sele t No (Button under No)
Server#
1
# of Pages in
24 hr Period
05
Average
Response time
(mm:ss)
00:44
# of Times
Manager Paged
02

Pager Programming
Star and Alpha Pagers an be reprogrammed from the T9100 transmitter. If the pagers need to have their
identifi ation ode reprogrammed, onta t LRS before pro eeding. The following is the basi pro edure to
use:
For Server Pagers:
1. Be sure to set the T9100 for the System ID in use.
2. Be sure the POCSAG (FM) start is orre t for the pagers in use.
3. Reset the pager:
• Re hargeable pagers are removed from the harger (or tou hed to the reset terminals. They
stop vibrating when reset is omplete.)
• Battery powered pagers reset when turned off and then ba k on (or remove and repla e battery).
4. Press PROG- # - ENT (# is the pager number 1 through 99).
5. After the pager responds, page it to ensure it programmed okay.
• Star pagers will do one glow mode y le.
• Alpha pagers will beep 4 times.
For Manager Pagers:
1. Be sure to set the T9100 for the System ID in use.
2. Be sure the POCSAG (FM) start is orre t for the pagers in use.
Long Range Systems 17 T9100 User Manual

T9100 CANCEL PANEL
Overview of T9100 Cancel Panel
Keypad
Function Keys
The fun tion keys are lo ated along the bottom row of the Can el Panel.
- M1 & M2 used to page and program Manager Pagers.
- 86 “All Call” button used to page all pagers.
-CLR used to lear an entry or to ba k up one menu level.
- PROG press on e to program pagers, press a se ond time to a ess the menu fun tions.
-ENT used to enter fun tions.
Vibration Keys
V1, V2 and V3 sele t the number of vibrations a pager will respond with. This button is pressed before pag-
ing a pager. Sends message 1, 2 or 3 to Alpha pagers.
Cancel Keys
The row of keys lo ated below the display. These keys will an el a all to the pager number shown on the
display immediately above the respe tive key. The Can el Keys also are used during menu sele tion.
1
234
5
67
89
10
M1
M2
86
CLR
PROG
ENT
V1V2
V3
www.pager.net
0
CANCEL PANEL
Long Range Systems 18 T9100 User Manual
Antenna
Number Keys
Cancel Keys
Power
Supply
Function Keys Vibration Keys
Reset Terminals

Using the T9100 Cancel Panel
Paging
To page pagers 1 though 99 enter the 2 digit number of the pager.
The transmitter an page up to 16 pagers at one time without using the 86 “all all” button.
When paged, the pager number will show on Can el Panel display. If not an eled, the pager number will
begin to flash after the first re-page time expires. The pager number will flash faster after the se ond re-page
time expires.
Cancel Page
To Can el a page, press the Can el Key immediately under the number of the pager.
If using a Can el Panel with T9100, the pager number may be an eled from the Can el Panel or by press-
ing CLR then the pager number on the T9100.
Long Range Systems 19 T9100 User Manual
This manual suits for next models
1
Table of contents
Other LRS Transmitter manuals

LRS
LRS TX-7471-C232 User manual

LRS
LRS TX-9560MT Manual

LRS
LRS T9550 LCK User manual

LRS
LRS TX-9561EZ User manual

LRS
LRS Table Genie Specification sheet

LRS
LRS TX-7470-C232 User manual

LRS
LRS Butler II Instruction Manual

LRS
LRS Butler XP Operating instructions

LRS
LRS T9550 LCK User manual

LRS
LRS Freedom TX-7470 User manual