MecPower Tecway Crazy Crab User manual

Crazy Crab Operation Manual

1
CONTENT
一、 GAME INTRODUCTION........................................................... 3
二、 GAME INSTRUCTION.............................................................. 4
三、 TECHNICAL PARAMETER....................................................... 5
五、 INSTALLATION....................................................................... 6
5.2 FIXING MACHINE ........................................................................................... 7
5.3 INSTALL STEP ................................................................................................ 8
八、 GAME TEST............................................................................ 9
8.1 GAME TEST & SETTING .................................................................................10
8.2 SETTING & TEST MODE ................................................................................13
8.3 SETTING & TEST INSTRUCTION .....................................................................13
九、 ADJUSTMENT....................................................................... 15
9.1 COIN ACCEPTOR ...........................................................................................16
9.2 VOLUME ADJUSTMENT..................................................................................17
十一、 TROUBLE SHOOTING ........................................................... 18
十二、 PART LIST DRAWING ............................................................ 19
12.1 LIGHT BOX DRAWING & PART LIST.................................................................20
12.2 LIGHT BOX FRAME(2 SETS)DRAWING & PART LIST .....................................20
12.3 FRONT REPAIRING DOOR ASSY. & PART LIST ...................................................21
12.4 CABINET ASSY. & PART LIST .........................................................................22
12.5 CONTROL CABINET DRAWING ASSY. & PART LIST...........................................23
12.6 MAIN BOARD DRAWING ASSY. & PART LIST ...................................................23

2
12.7 POWER SUPPLY DRAWING ASSY. & PART LIST.................................................24
12.8 PRIZE MOUTH ASSY.(4 SETS)& PART LIST .................................................24
12.9 COIN DOOR ASSY.(4 SETS)& PART LIST.....................................................25
12.10 CABINET ASSY.(4 SETS)& PART LIST ........................................................25
12.11 PLATE ASSY.(2 SETS)& PART LIST ............................................................26
12.12 FRUIT PLATE(4 SETS)& PART LIST ...........................................................26
12.13 SLIDE RAIL ASSY.(4 SETS)& PART LIST.....................................................27
12.14 CRAB ASSY.(4 SETS)& PART LIST.............................................................28
12.15 SIDE BOARD ASSY.(2 SETS)& PART LIST...................................................29
十三、 SCHEMATIC DRAWING ......................................................... 30
3
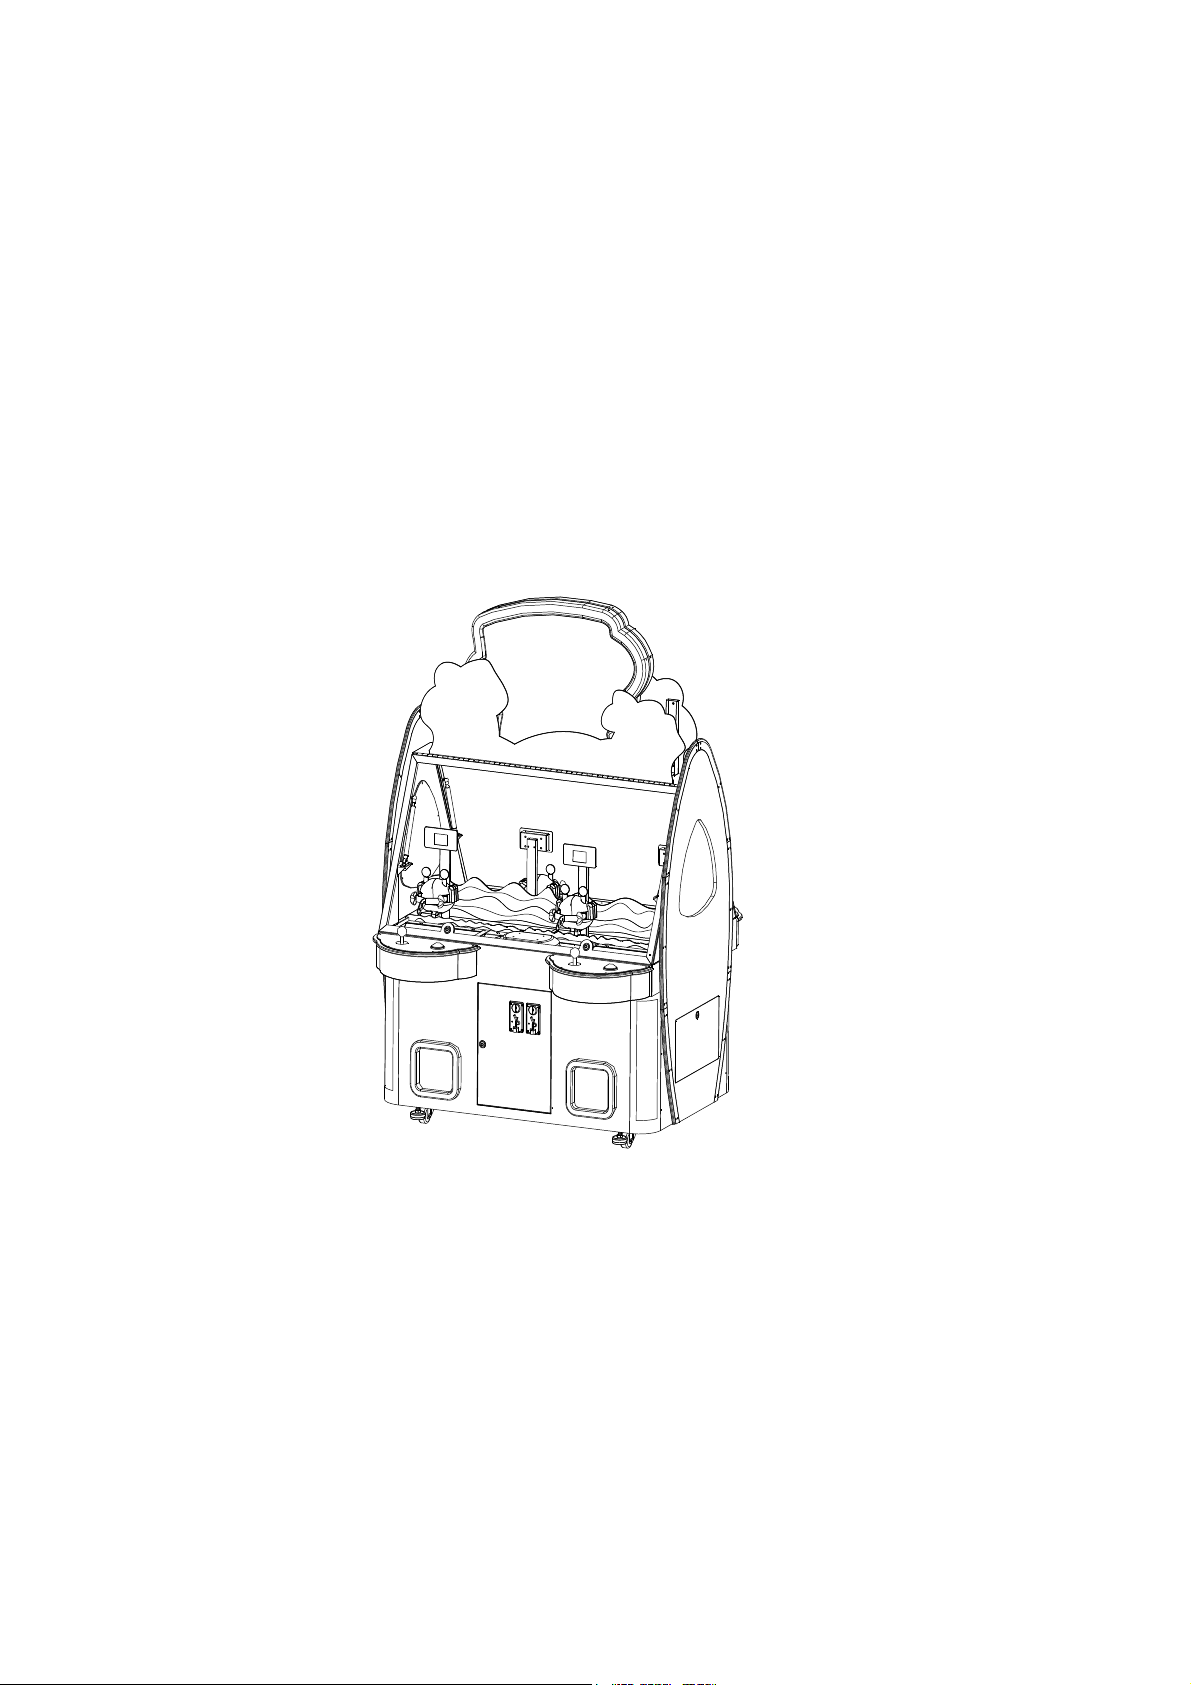
一、 Game Instruction
Crazy Crab the unique, beautiful and streamlined appearance of crab clip music and
interesting and exciting game content make it very popular with young players in the
playground。
Crazy Crab is another masterpiece developed by our company based on the research of
the game content loved by children, combined with the new popular elements of the game. It
is an essential model in the entertainment place。
Characteristic:
The appearance design has the characteristics of layering, bright color and beautiful
appearance;
Adopt integrated main board, fast processing CPU, stable and reliable performance;
High definition and high-quality LCD is adopted to ensure clear display quality;
Stable and reliable rotating components;

4
Game playing method, stimulation, strong sense of operability, very entertaining;
The operating income ratio can be adjusted according to the actual situation。
二、 Game Instruction
This machine can be used for 4 people to play at the same time, and each game bit can be coin operated
separately. Play method can be set to automatic mode or non automatic mode.
A、Automatic Mode:
1) After the coin is put in, operate the left and right directions of the rocker to make the crabs move left and right
within the specified time.
2) When the crab moves to the desired gift position; press the OK button, the crab will open his hands and lean
down to grab the gift you want.
3) When the crab grabs the gift, it will automatically get up and go to the podium to put down the gift.
4) The platform push mechanism will send gifts to the gift mouth.
B、Non Automatic Mode:
1) After the coin is put in, operate the left and right directions of the rocker to make the crabs move left and right
within the specified time.
2) When the crab moves to the desired gift position; press the start button, the crab will open his hands and lean
down to grab the gift you want.
3) Crabs will get up immediately after grabbing the gift; operate the left and right direction of the rocker, go to the
prize platform, and press the OK button to put down the gift.
4) The platform push mechanism will send gifts to the gift mouth.

5
三、 Technical Parameter
Voltage:AC220V(50/60HZ)
Maximum/Minimum Current:2.1A/2.3A
(Note: please refer to the mark on the nameplate of the machine for the actual
voltage and current)
Maximum Power:300W
Standby Power:270W
Coin box capacity:φ25mm*1.5mm coin about 5250 pieces.
Operating environment: room temperature is - 5 ~ 40 ° C, environmental
humidity is more than 90%, no corrosive liquid direct contact, no
excessive oil mist and dust
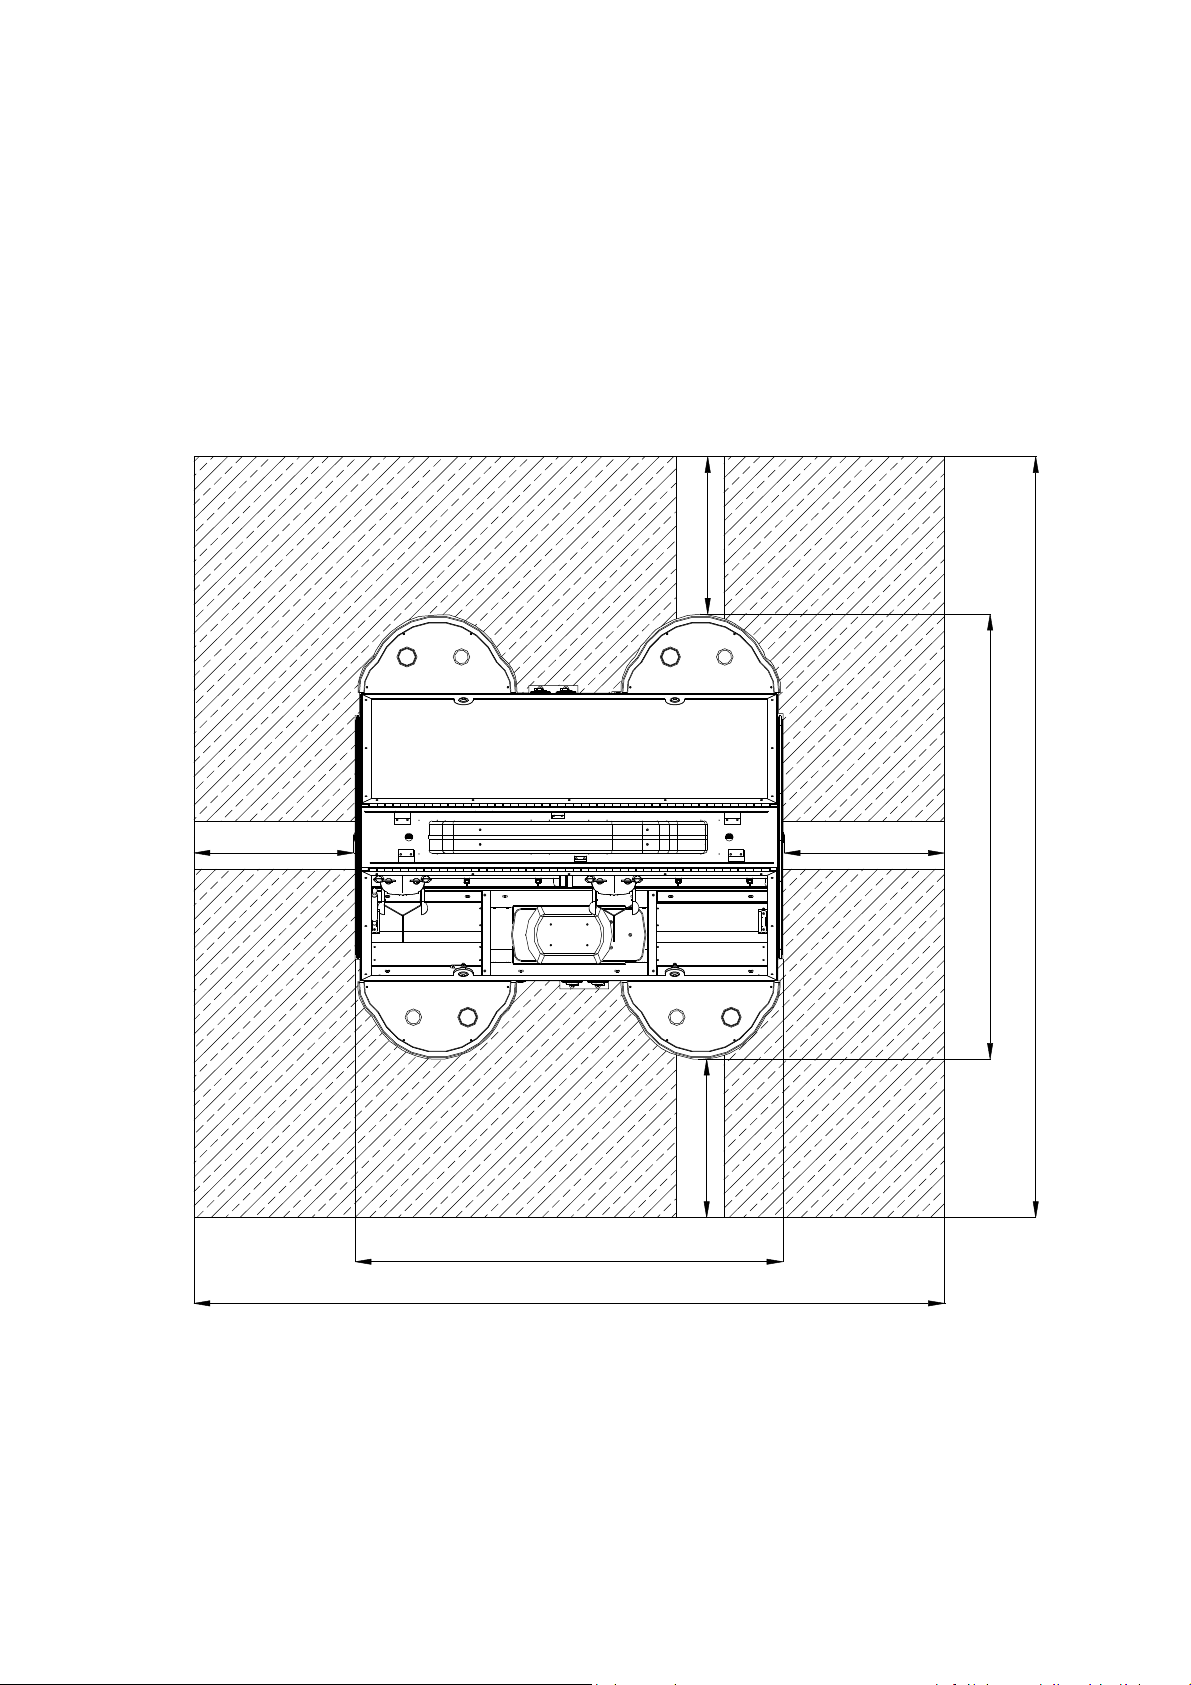
Dimension:L1333mm*W1387mm*H2129mm
2129
1621
950
1387
1333
6
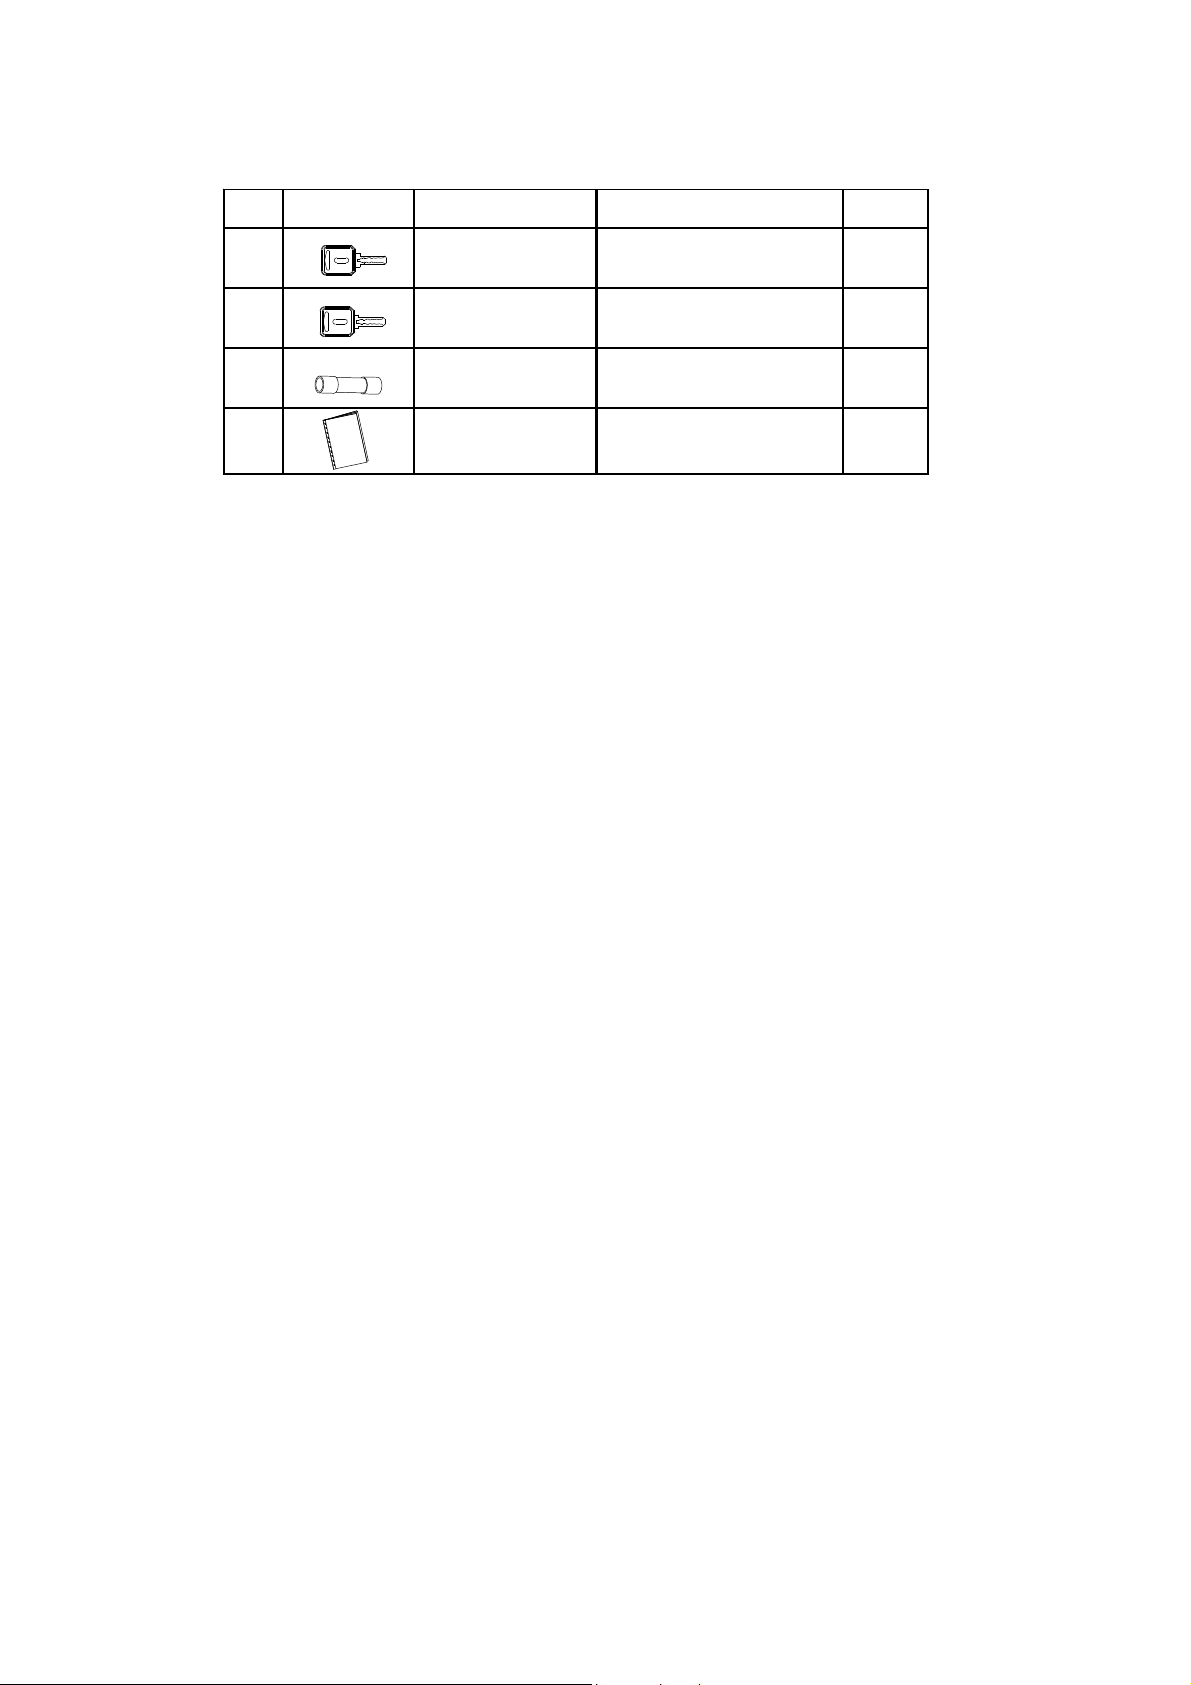
Spare Part List:
No. Drawing Item Spec./Model Qty
1 Key 1285# 2pcs
2 Key 1396# 2pcs
3 Fuse 5A Small 2pcs
4 Manual 1pc
OPERATION MANUAL

7
四、 Installation
Packing List
No. Drawing/Item Qty No. Drawing/Item Qty
1 1set 3 2sets
2 1set
Body
Light box
Light box frame cover assy.
8
When installing the machine for the first time, please do the following
5.1 Select the installation place
1) According to the play method of the machine, place the machine in the same type, and then
select the specific place of the machine according to the appearance of the machine
2) The size and position of the site as shown in the figure below shall be reserved to place the
machine, so that the machine can have enough space for normal operation in daily use, and
ensure that the customers can have comfortable play。
Note: the machine must be placed on a flat ground, so that the machine can be
placed on the ground smoothly.
0.5m
0.5m 0.5m
0.5m
2.39m
1.33m
2.33m
1.39m

9
5.2 Fixing machine
5.3 Installation Step
1) As shown in the figure below, fix the light box assembly on the top hardware
of the face cover with 6 M4 method cover nuts.
5mm
Fixed foot
Movable castors
Light Box
Main Cabinet
Installation Sketch

10
2) As shown in the figure below, fix the acrylic component of the outer frame
of the light box on the top hardware of the cover with 6 M4 method cover nuts.
Acrylic component of outer frame of light box
Main Cabinet
Installation Sketch

11
3) As shown in the figure below, fix the acrylic component of the outer frame
of another light box on the top hardware of the cover with 6 M4 method cover
nuts.
Acrylic component of outer frame of light box
Main Cabinet
Installation Sketch
12
五、 Test & Setting
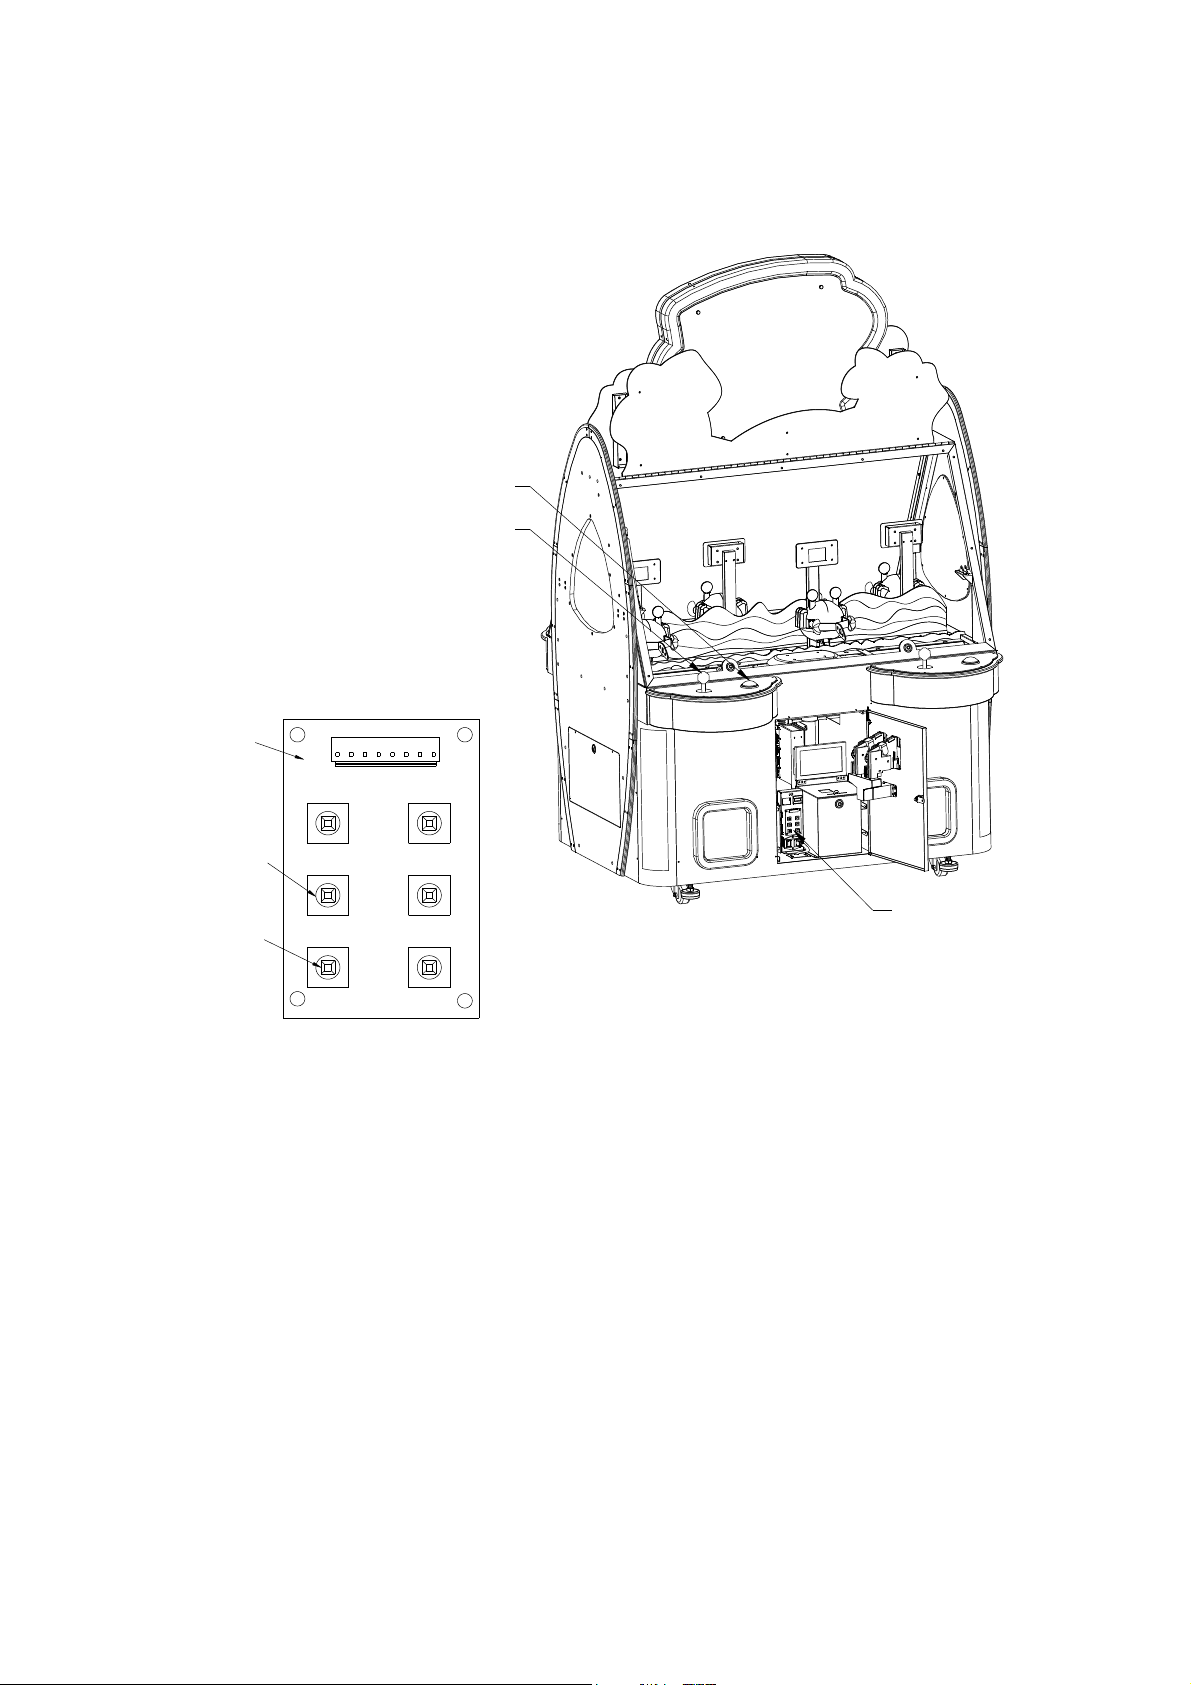
8.1 Test & setting instruction
Open the coin door and find the setting board
TEST/setting button:Enter setup and test menu
SERVE/Free play button:Free play mode
Rocker:Item select
Confirm button:Change item content
1P
1
P
SW1
TEST
SERVE
SELECT
ENTER
ERASE
confirm button
rod
setting board
setting board
setting button
free play

13
8.2 Test & Setting mode
Press the "test" key on the setting panel to enter / exit the game content
setting / testing interface; control the left and right directions of the rocker (the
left side is "previous item" and the right side is "next item"), select the item to
be changed; press the OK key to change the item content.
8.3 Test & Setting Instruction
Press the "test" key on the setting panel to enter / exit the game content setting / testing interface,
as shown below
1) Setting:Select this item to enter the setting interface (refer to "P18 setting
interface description" for details)
2) I/O TEST:Select this item to enter the test interface (refer to "P19 test
interface description" for details)
3) exit:Select to exit the setup / test interface。
Setting
I/O TEST
exit

14
Setting menu instruction:
Showed as atached:
1) 18 game times: this setting determines the game time of the machine. If it is set to "18", the game
time of each game is "18" seconds. (the factory setting of automatic mode is "18", the adjustable
range is 18-300, and the step size is 2; the factory setting of non automatic mode is "30", the
adjustable range is 30-300, and the step size is 5.)
2) 1 coin: this setting is to decide how many coins the machine will throw to play the game once. If
it is set to "1", you can play the game once by casting 1 coin. (factory set to "1", adjustable range
1-10, step size 1.)
3) 10 volume: select to determine the volume of the machine. If "25" is set, the machine is at the
maximum volume. (factory set to "10", adjustable range 1-25, step size 1.)
4) On auto mode: select to determine whether the game is in auto mode or not. If the "on" game is
set to automatic mode; if the "off" game is set to non automatic mode.
Note: automatic mode on means that one coin can only be played once; if it is off, it means
that the time ends, and one coin can be played many times within the specified time.
5) Yes reset: all parameters are reset to factory settings; at the same time, the current player's number
of coins and the total number of coins recorded in the business are cleared.
6) Yes exit: exit the setting interface.
Setting
1币数
on自动模式
yes复位
yes退出
10音量
参数调整
18游戏时间

15
Setting menu instruction:
Setting menu as below
1)ALL INPUT :For the test of electric eye and switch, when there is an
induction, the corresponding word turns red, but not yellow.
2)ALL OUTPUT :For the test of motor and lamp, press the Enter key to
power on its status, and the corresponding word turns red, and it turns
yellow if it is not powered on; when testing the nixie tube, the number from
0 to 9 will be displayed automatically, if not, it means there is a problem.
I/O TEST
ALL INPUT(Sensor)
ALL OUTPUT(Motor)
左移动电眼一
俯身电眼上一
夹礼物电眼打开一
左右中间电眼一
摇杆左一
摇杆右一
左右移动电机off off off off
按键灯一
右移动电眼一
俯身电眼下一
夹礼物电眼闭合一 夹礼物电眼闭合二
俯身电眼下二
右移动电二
摇杆右二
摇杆左二
左右中间电眼二
夹礼物电眼打开二
俯身电眼上二
左移动电眼二
夹礼物电眼闭合三
俯身电眼下三
右移动电眼三
摇杆右三
摇杆左三
左右中间电眼三
夹礼物电眼打开三
俯身电眼上三
左移动电眼三
夹礼物电眼闭合四
俯身电眼下四
右移动电眼四
摇杆右四
摇杆左四
左右中间电眼四
夹礼物电眼打开四
俯身电眼上四
左移动电眼四
上下俯身电机off off off off
推盘电机二 off
夹礼物电机 off off off off
推盘电机一 off
数码管 0
按键灯二 按键灯三 按键灯四 退出

16
六、 Adjustment
9.1 Coin Acceptor Adjustment
Coin acceptor adjustment mode:
1) Please remove the plastic coin in the sample slot and replace it with the token to be used as the
sample currency.
2) Loosen the screw on the back of the coin slot, and adjust the fixed piece on the back of the coin
slot according to the diameter of the token used, so as to prevent the coin with too large diameter
from being stuck in the coin slot by mistake.
3) Turn the coin normal switch to the no position. Note: the switch can be used as a coin switch
when it is turned on.
4) Adjust the coin signal wavelength adjustment switch to 50ms.
5) Adjust the tolerance of token and fine adjust the resistance according to the figure. If the
sensitivity of adjusting the tolerance of token in clockwise direction is increased, the range of
accepting the tolerance of token will be larger; if the sensitivity of adjusting the tolerance of token
in counterclockwise direction is reduced, the range of accepting the tolerance of coin will be
smaller, that is to say, the selection will be stricter.

17
9.2 Adjust the volume
Adjust volume:1):Open the coin gate, find the volume potentiometer on the
power amplifier board, and turn the volume potentiometer to
adjust the volume of the machine. Turn the potentiometer
clockwise to increase the output volume of the machine, and turn
the potentiometer anticlockwise to decrease the output volume of
the machine.
2)Open the coin gate, enter the background setting to adjust the
volume according to the method in 8.2 and 8.3, enter the volume
setting interface, adjust the volume "value" to change the volume,
the higher the value, the higher the volume, and vice versa
The main method of volume adjustment of this machine is the second method
of volume adjustment.
!
amplifier board volume potentiometer
amplifier board

18
七、 Trouble Shooting
Trouble Shooting:
Failure Fault Trouble Shooting
No sample coin Put the sample coin
Coin pass through
Sensitive too high Adjust the coin acceptor sensitive
Coin acceptor damage Replace the coin acceptor
Coin wire block Connect coin acceptor wire
Coin acceptor damage Replace the coin acceptor
Main board damage Repaire or replace the main board
Light wire block Connect the light wire
Light damage Replace the light
Button light wire block Connect the button light wire
Button light damage Replace the button light
Main board damage Repaire or replace the main board
Switch wire block Connect the switch wire
Switch damage Replace the switch
Main board damage Repaire or replace the main board
Do not connect the display wire Connect the display wire
Monitor damage Replace the monitor
Main board damage Replace the main board
Speaker wire loosen Connect the speaker wire
Volume too low Adjust the volume potiometer
Speaker damage Replace the speaker
Motor wire block Connect the wire of motor
Motor drive board damage Set or repair the motor drive board
Main board damage Repaire or replace the main board
Motor damage Replace the motor
No input voltage AC110V/220V Check the power
Fuse burned Replace the fuse
Filter switch turn off Check and turn on the switch
No out put voltage of power supply Repair or replace the power supply
Main board do not operate Replace the main board
Motor do not
work
Machine no
function
Do not insert
coin
No Sound
Button invavid
Common light do
not light up
Coin Invavid
Display board
can not display
Button light do
not light up

19
Error Code Trouble Shooting
Failure Fault Trouble Shooting
Sensor wire block Connect the sensor wire
Sensor damage Replace the sensor
mechanism not in place and cannot be sensed Check the mechanism loosen or not
Motor wire block Connect the motor wire
motor drive board damage Set or repair drive board
Motor damage Replace the motor
Main board damage Replace the main board
Sensor wire block Connect the sensor wire
Sensor damage Replace the sensor
mechanism not in place and cannot be sensed Check the mechanism loosen or not
and small motor can work or not
Main board damage Replace the main board
Sensor wire block Connect the sensor wire
Sensor damage Replace the sensor
mechanism not in place and cannot be sensed Check the mechanism loosen or not
Motor wire block Connect the motor wire
motor drive board damage Set or repair drive board
Motor damage Replace the motor
Main board damage Replace the main board
Sensor wire block Connect the sensor wire
Sensor damage Replace the sensor
mechanism not in place and cannot be sensed Check the mechanism loosen or not
Motor wire block Connect the motor wire
motor drive board damage Set or repair drive board
Motor damage Replace the motor
Main board damage Replace the main board
E5(Error in
opening or
closing electric
eye or clamping
motor)
E1(left moving
limit senor or
motor error)
E2(right moving
limit sensor or
motor error)
E3(Middle
sesor error)
E4(Bent up and
down eyes or
bent down
motor error)
Table of contents
Other MecPower Tecway Arcade Game Machine manuals

MecPower Tecway
MecPower Tecway Kiddie Pirate User manual

MecPower Tecway
MecPower Tecway POLICE MOTO User manual

MecPower Tecway
MecPower Tecway Kid Carrier User manual

MecPower Tecway
MecPower Tecway Dining Car User manual

MecPower Tecway
MecPower Tecway Alien Fireman User manual

MecPower Tecway
MecPower Tecway Toddler Police User manual

MecPower Tecway
MecPower Tecway Kiddie Firemen User manual

MecPower Tecway
MecPower Tecway Cyclontron User manual

MecPower Tecway
MecPower Tecway Big Teeth Battle User manual

MecPower Tecway
MecPower Tecway GALAX TRAVEL User manual


