Medel Check User manual

MANUALE D’USO - INSTRUCTION MANUAL
100042_MEDEL CHECK USER MANUAL_ ALL LANGUAGES.indd 1 28/06/2017 10:30:58

MEM
1
2
3
4
5
6
7
89
100042_MEDEL CHECK USER MANUAL_ ALL LANGUAGES.indd 2-3 28/06/2017 10:30:59

Cu
100042_MEDEL CHECK USER MANUAL_ ALL LANGUAGES.indd 4-5 28/06/2017 10:31:02

Cu Cu
SÍMBOLOS SIMBOLURI
SYMBOLE ΣΥΜΒΟΛΑ
Dados anteriormente medidos na memória. Date măsurători anterioare, memorate.
Media ultimelor 3 măsurători.
Tensiune arterială sistolică în mm Hg.
Tensiune arterială diastolică în mm Hg.
Număr bătăi pe minut.
Baterie descărcată.
Măsurătoare în curs.
Indicator de aritmie cardiacă (I.H.B.)
Eroare în timpul măsurătorii.
Priză tub manşetă
Umare
Dezumare
Dane wcześniejszych pomiarów zapisane w pamięci. Δεδομένα προηγούμενων μετρήσεων στη μνήμη.
Średnia wartość z 3 ostatnich pomiarów. Μέσος όρος 3 τελευταίων μετρήσεων.
Ciśnienie krwi skurczowe w mmHg. Συστολική πίεση του αίματος σε mm Hg.
Ciśnienie krwi rozkurczowe w mmHg. Διαστολική πίεση του αίματος σε mm Hg.
Uderzenia na minutę. Παλμοί το λεπτό.
Wyczerpane baterie. Μπαταρία αποφορτισμένη.
Pomiar w toku. Μέτρηση σε εξέλιξη.
Wskaźnik nieregularnego tętna (I.H.B.). Δείκτης ακανόνιστων καρδιακών παλμών (I.H.B.)
Błąd w trakcie pomiaru. Σφάλμα κατά τη διάρκεια της μέτρησης.
Wtyczka powietrza mankietu. Υποδοχή σωλήνα περιβραχιόνιου
Nadmuchiwanie powietrza Φούσκωμα
Spuszczanie powietrza Ξεφούσκωμα
Média das últimas 3medições.
Pressão sanguínea sistólica em mm Hg.
Pressão sanguínea diastólica em mm Hg.
Batimentos por minutos.
Bateria descarregada.
Medições em curso.
Indicador de batimento cardíaco irregular (I.H.B.)
Erro durante a medição.
Tomada tubo da braçadeira
Inar
Desinar PT RO
PL EL
100042_MEDEL CHECK USER MANUAL_ ALL LANGUAGES.indd 6-7 28/06/2017 10:31:08

Cu Cu
SZIMBÓLUMOK 기호
СИМВОЛЫ SÍMBOLOS
Korábban mért, memorizált adatok. 저장된 사전 측정 데이터
Данные предыдущих измерений хранятся в памяти. Datos anteriormente medidos en memoria.
Среднее арифметическое 3-х последних измерений. Media de las 3 últimas mediciones.
Артериальное систолическое давление в мм. рт.ст. Presión sanguínea sistólica en mm Hg.
Артериальное диастолическое давление в мм. рт.ст. Presión sanguínea diastólica en mm Hg.
Ударов в минуту. Latidos por minuto.
Батарея разряжена. Pila descargada.
Выполняется измерение. Medición en curso.
Индикатор нерегулярного ритма (I.H.B.). Indicador de frecuencia cardíaca irregular (I.H.B.)
Ошибка во время измерения. Error durante la medición.
Разъем трубки манжеты. Toma tubo brazalete.
Накачка Hinchado
Сдутие Deshinchado
Utolsó 3 mérés átlaga. 최근 3 번의 측정의 평균값
Szisztolás vérnyomás Hgmm-ben. 수축기혈압 mm Hg. 수치
Diasztolés vérnyomás Hgmm-ben. 이완기혈압 mm Hg. 수치
Pulzus percenként. 1분당 박동수
Lemerült elem. 배터리 없음
Mérés folyamatban. 측정 중
Szabálytalan szívverés mutató (I.H.B.) 변칙적 심장박동 측정기 (I.H.B.)
Hiba mérés közben. 측정 중 오류 발생
Mandzsetta cső dugalj 완장 튜브 통로
Felfújás 팽창
Leeresztés 수축
HU KO
RU ES
100042_MEDEL CHECK USER MANUAL_ ALL LANGUAGES.indd 8-9 28/06/2017 10:31:17

Cu
3
).I.H.B(
AR
Cu
Données précédemment mesurées mémorisées.
Moyenne des 3 dernières mesures.
Tension artérielle systolique mm Hg.
Tension artérielle diastolique mm Hg.
Battements par minute.
Batterie déchargée.
Mesure en cours.
Indicateur de battement cardiaque irrégulier (I.H.B.)
Erreur pendant la mesure.
Prise tuyau brassard
Gonage
Dégonage
SYMBOLES
FR
Bereits gemessene Daten im Speicher.
之前存储的测量数据
Durchschnitt der letzten 3 Messungen.
最近3次测量的均值
Systolischer Blutdruck in mm Hg.
mm Hg表示的收缩压
Diastolischer Blutdruck in mm Hg.
mm Hg表示的舒张压
Herzschläge pro Minute
每分钟心跳数
Symbol schwache Batterie
放电电池
Laufende Messung.
正在进行的测量
Indikator für unregelmäßigen Herzschlag (I.H.B.)
不规律心跳显示器(I.H.B)
Fehler während der Messung.
测量期间的错误
Stecker Manschettenschlauch.
臂环管插口
Aufpumpen
充气
Druck ablassen
放气
SYMBOLE
标志
DE
ZH
CN
100042_MEDEL CHECK USER MANUAL_ ALL LANGUAGES.indd 10-11 28/06/2017 10:31:25

FA
.
.
).
儲存的先前測量資料。
最近 3 次測量結果平均值。
收縮壓(單位:mm Hg)。
舒張壓(單位:mm Hg)。
每分鐘心跳次數。
電池電量不足。
正在執行測量。
心律不齐指示器(I.H.B.)
测量过程中发生的错误。
袖带软管接头
充气
放气
標記
ZH
TW
100042_MEDEL CHECK USER MANUAL_ ALL LANGUAGES.indd 12-13 28/06/2017 10:31:28

TI
15
IT
14
1. INTRODUZIONE
Il misuratore di pressione MEDEL CHECK è un dispositivo digitale completamen-
te automatizzato per adulti che, mediante metodo di misurazione oscillometrico,
permette una misurazione rapida ed affidabile. L’apparecchio offre una preci-
sione di misurazione molto elevata, ed è stato progettato per essere di semplice
utilizzo. E’un dispositivo destinato all’ utilizzo domiciliare.
ATTENZIONE!
Prima dell’utilizzo si prega di leggere attentamente e per intero questo libretto
di istruzioni. Per ulteriori informazioni in merito alla pressione sanguigna e alla
sua misurazione, si prega di contattare il proprio medico. Tenere MEDEL CHECK
fuori dalla portata dei bambini. Non usare MEDEL CHECK in vicinanza di miscele
anestetiche, infiammabili o contenenti ossigeno o con ossido nitroso.
ATTENZIONE!
1.1 Informazioni importanti sull’auto-misurazione
• Non dimenticare: auto-misurazione significa controllo, non diagnosi o tratta-
mento. I valori insoliti devono essere sempre discussi con il proprio medico.
In nessuna circostanza si devono modificare i dosaggi di qualsiasi farmaco
prescritto dal proprio medico.
• Il display del battito non è adatto per controllare la frequenza dei pacemaker
cardiaci!
• Nei casi di irregolarità cardiaca (I.H.B.), le misurazioni effettuate con questo
strumento devono essere valutate solo dopo aver consultato il medico.
• Non sono ammesse modifiche al dispositivo da parte dell’utente.
• Non utilizzare il misuratore di pressione su neonati e pazienti con preeclam-
psia. Prima di utilizzare il misuratore in gravidanza si consiglia di consultare
il medico.
• L’ apparecchio non necessita di calibrazione.
• Non immergere il dispositivo in acqua.
• Lo schiacciamento, piegamento, compressione del tubo può causare una pres-
sione costante del bracciale con riduzione del flusso di sangue e conseguente
danno al paziente
• Misurazioni troppo frequenti potrebbero causare un danno al paziente dovuto
alla temporanea interferenza del flusso sanguigno.
• Non applicare il bracciale sopra una ferita: ciò potrebbe causare un danno
ulteriore.
• Non applicare il bracciale su un arto dove un accesso intravascolare, una te-
rapia o uno shunt arterovenoso è presente poichè la temporanea interferenza
con il flusso sanguigno potrebbe causare un danno al paziente.
• Non applicare il bracciale a persone che hanno subito una mastectomia.
• Durante il gonfiaggio è possibile che le funzioni dell’ arto siano momentane-
amente compromesse.
• Durante la misurazione della pressione arteriosa la circolazione sanguigna
non deve essere inutilmente interrotta per lungo tempo.
• Se il dispositivo non funziona correttamente rimuovere il bracciale dal braccio.
• Prima dell’ uso l’ utilizzatore deve controllare che il dispositivo funzioni in
modo sicuro e che tutte le sue parti siano in buono stato.
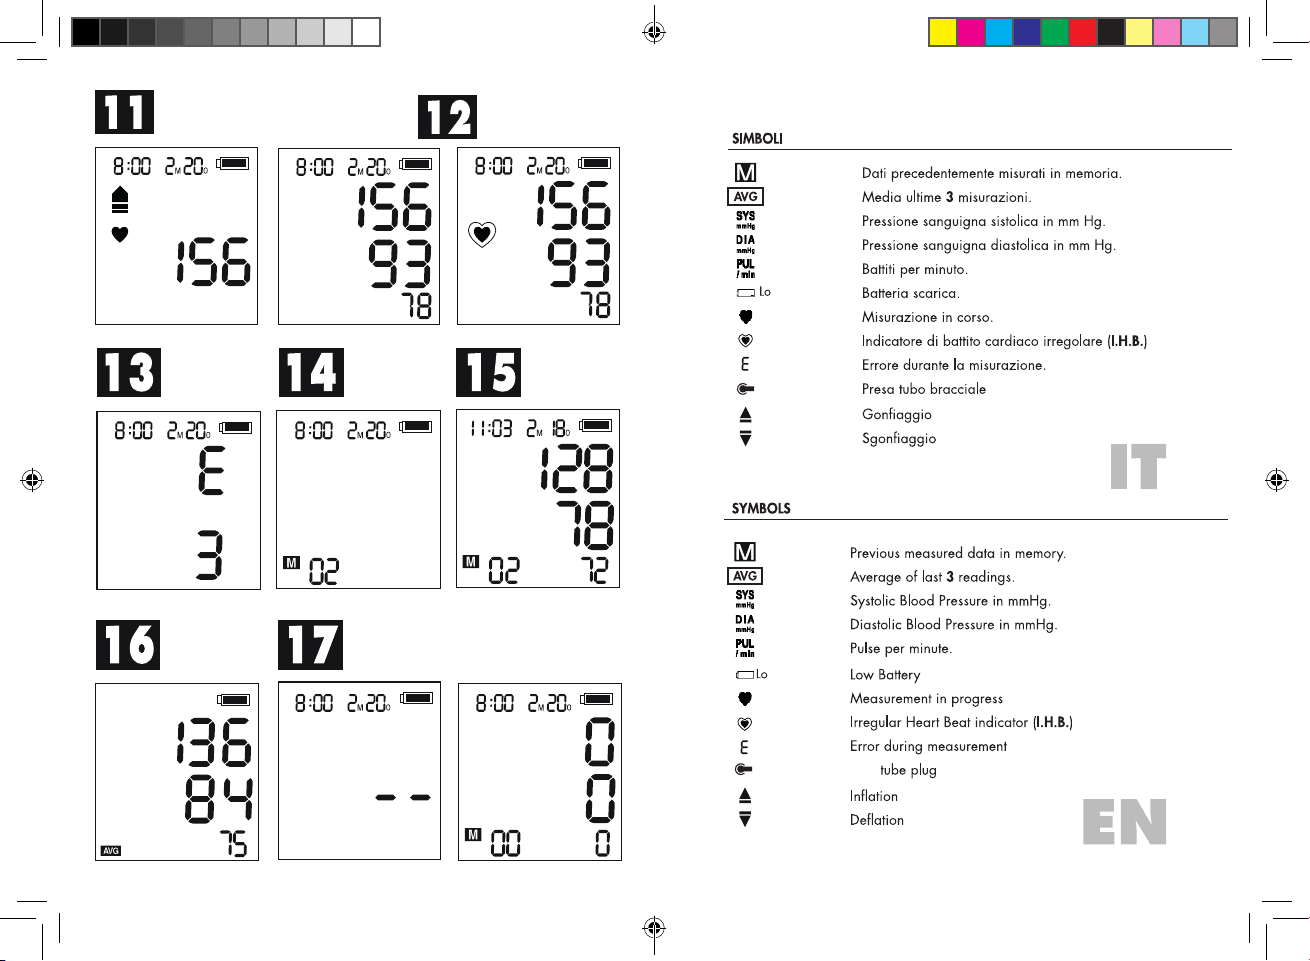
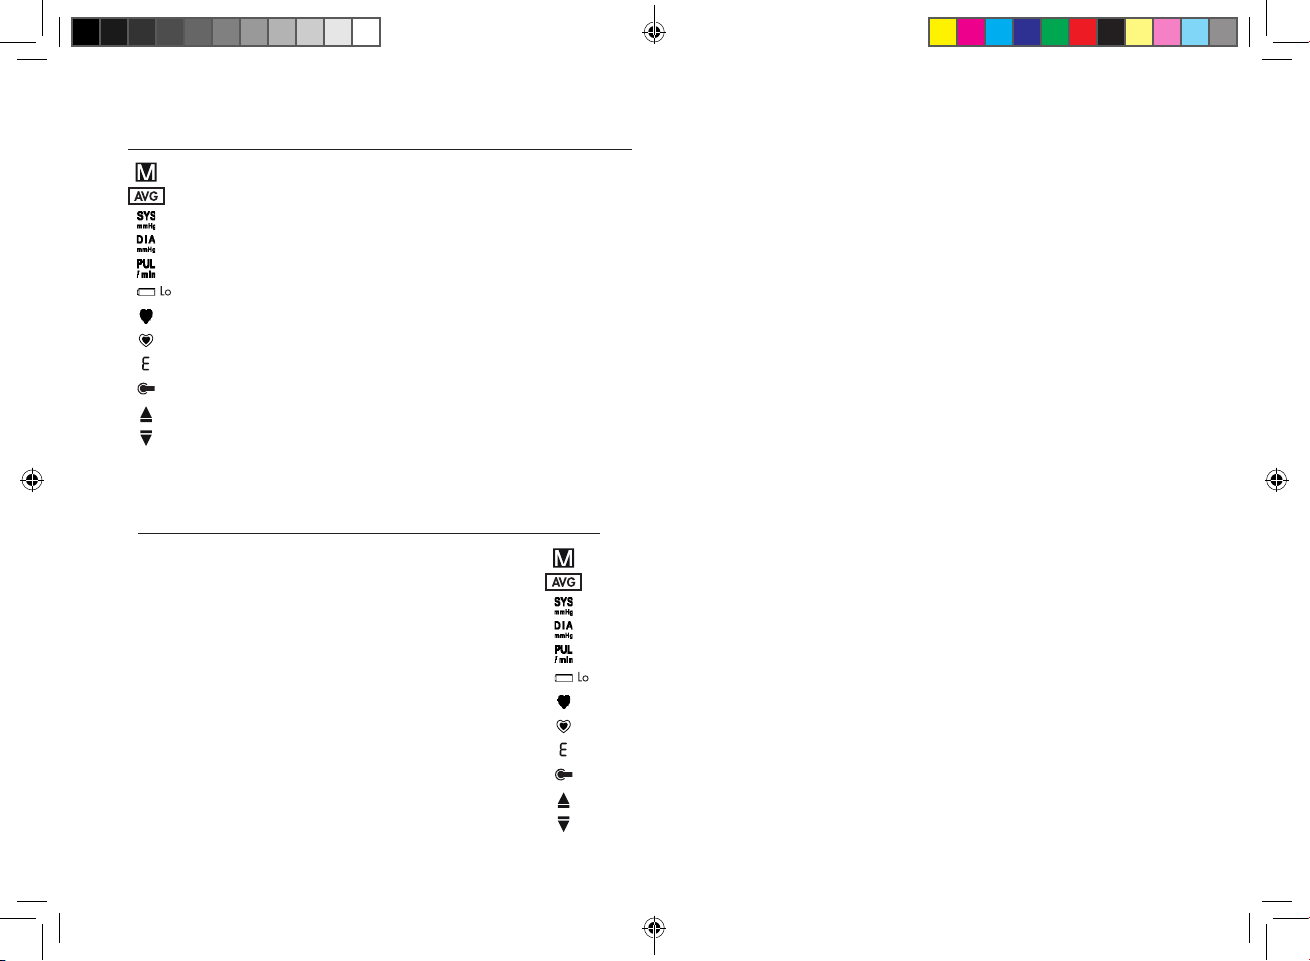
!
1. Display LCD
2. Pulsante O/I (Start / Stop)
3. Pulsante memoria (MEM)
4. Pulsante media (T3)
5. Presa per il bracciale
6. USB per alimentazione
7. Vano batterie
8. Bracciale adulti Universale per
braccio con circ. cm 22~42
9. Indicatore memoria
10. Indicatore valore medio
11. Indicatore battito cardiaco
irregolare
12. Indicatore batterie
13. Pressione sistolica
14. Pressione diastolica
15. Pulsazioni
16. Simbolo gonfiaggio/sgonfiaggio
17. Data/orologio
18. Valori memorizzati
19. Utente ( )
1.2 Interferenza elettromagnetica
Il dispositivo contiene componenti elettronici sensibili. Evitare perciò forti
campi elettrici o elettromagnetici nelle immediate vicinanze del dispositivo (ad
es. telefoni cellulari, forni a microonde). Questi possono causare una tempo-
ranea mancanza di precisione nella misurazione della pressione sanguigna
diastolica.
2. COMPONENTI DEL MISURATORE DI PRESSIONE (fig.1)
Alimentazione:
4 Batterie alcaline tipo AA. Le batterie ricaricabili non sono adatte per questo
apparecchio. Alimentatore (non incluso). Si consiglia l’ utilizzo con un alimen-
tatore 5V DC min 1 A conforme alla normativa EN60601.1 con connessione
micro usb*.
* Non è una porta USB per lo scarico dati.
3. MESSA IN FUNZIONE DEL MISURATORE DI PRESSIONE
3.1 Inserimento delle batterie
Inserire le batterie.(fig.2)
1. Sollevare il coperchio del vano batteria
2. Inserire 4batterie AA accertandosi che la polarità sia corretta
3. Riposizionare il coperchio del vano batterie.
ATTENZIONE!
• Una volta che è apparso il simbolo “ Lo“ batterie scariche, l’apparecchio
è bloccato fino a che le batterie non verranno sostituite.
• Si prega di utilizzare batterie AA - 1,5V.
• Rimuovere sempre le batterie se l’apparecchio non è utilizzato per un mese
o più.
• Non lasciare mai nel vano batterie, delle batterie esauste, poichè eventuali
perdite potrebbero danneggiare l’unità.
3.2 Impostazione utente, data e orologio
1. Inserite le batterie e acceso l’ apparecchio, verranno visualizzate sul di-
splay data e ora (modalità Orologio)
2. In modalità Orologio, premere il tasto O/I e MEM contemporaneamente
!
!
100042_MEDEL CHECK USER MANUAL_ ALL LANGUAGES.indd 14-15 28/06/2017 10:31:28

TI
17
IT
16
per 2secondi, per prima cosa lampeggerà il simbolo utente; premere il
tasto MEM per selezionare l’ utente desiderato ( ).
3. Premere O/I per passare alla regolazione dell’anno e premere il tasto
MEM per impostarlo (fig.3)
4. Premere il pulsante O/I per confermare e passare alla regolazione del
mese (impostare con tasto MEM)
5. Ripetere la procedura sopra descritta per regolare il giorno, l’ ora e i
minuti.
6. L’ apparecchio si spegnerà automaticamente dopo circa 1 minuto se la-
sciato inattivo, in questo caso data e ora rimarranno invariate.
7. Ogni volta che si sostituiscono le batterie si dovrà impostare nuovamente
data, ora e utente come descritto sopra.
3.3 Connessione del bracciale
Inserire il connettore del bracciale nella presa per il bracciale sul lato sinistro
del misuratore (fig.1)
NOTA:
Se il bracciale è rotto o non funzionante, utilizzarne uno nuovo; se questo non include
il connettore, utilizzare quello del vecchio bracciale.
4. COME EFFETTUARE UNA MISURAZIONE
4.1. Prima della misurazione
• Rilassarsi per circa 10 min. evitando di mangiare, fumare e fare esercizio
fisico. Tutti questi fattori influenzano il risultato della misurazione.
• Se si indossano indumenti molto aderenti al braccio, toglierli.
• Sedersi in posizione comoda per la misurazione della pressione. Appoggiare
la schiena e le braccia. Non incrociare le gambe. Appoggiare la pianta dei
piedi al pavimento.
• Per non falsare l’esito, è importante restare tranquilli e non parlare e muoversi
durante la misurazione
• Misurare sempre sullo stesso braccio (normalmente il sinistro)
• Cercare di effettuare le misurazioni regolarmente alla stessa ora del giorno,
perchè la pressione sanguigna cambia durante il corso della giornata.
NOTA:
Le dimensioni del bracciale dovranno essere adeguate alla circonferenza del
braccio. Sul bracciale sono riportate le misure limite della circonferenza del
braccio entro le quali esso può essere impiegato, misurata con i muscoli rilas-
sati; qualora la circonferenza del braccio del paziente non rientrasse in tali
misure, rivolgersi ai rivenditori specializzati.
ATTENZIONE:
• Usare solamente bracciali originali MEDEL
• Un bracciale non ben serrato o una camera d’aria sporgente lateralmente
sono causa di misurazioni falsa
• In caso di ripetute misurazioni, il sangue non scorre fisiologicamente nel brac-
cio e questo può provocare risultati non attendibili.
• Misurazioni della pressione sanguigna eseguite correttamente dovrebbero
!
perciò essere ripetute dopo una pausa di 5 minuti o dopo che il braccio è
stato tenuto sollevato, in modo da permettere al sangue accumulato di scor-
rere normalmente.
4.2. Applicazione del bracciale
1. Passare l’estremità del bracciale (con fermo di gomma integrato) attraver-
so l’archetto metallico, formando un laccio. La chiusura a strappo si dovrà
trovare all’esterno. (Se il bracciale è già preparato come descritto, saltare
questo passaggio.)(fig.4)
2. Infilare il bracciale sul braccio sinistro in modo tale che il tubo sia rivolto
verso l’avambraccio. (fig.5)
3. Applicare il bracciale al braccio come illustrato in figura (fig.6) , avendo
cura che il bordo inferiore si trovi 2-3 cm al di sopra dell’incavo del gomito
e che l’uscita del tubo in gomma dal bracciale sia situata sul lato interno del
braccio.
4. Tendere l’estremità libera del bracciale e chiuderlo con la chiusura a strappo.
(fig.7)
ATTENZIONE!
Posizionare il bracciale in modo tale che il bordo inferiore si trovi a 2-3 cm al di
sopra del gomito e della arteria brachiale. Il tubo deve essere orientato verso il
centro del palmo della mano.
5. Tra il braccio ed il bracciale non dovranno rimanere spazi liberi, che con-
dizionerebbero il risultato della misurazione. Inoltre, il braccio non dovrà
essere compresso da maniche rimboccate: in caso contrario, l’indumento
andrà tolto.
6. Assicurare il bracciale con la chiusura a strappo in modo da farlo aderire
comodamente al braccio senza essere troppo stretto.Distendere il braccio
sul tavolo (il palmo della mano dovrà essere rivolto verso l’alto) in modo
tale che il bracciale si venga a trovare all’altezza del cuore. Aver cura di
non piegare il tubo. (fig.8-9)
7. Rimanere tranquillamente seduti per due minuti prima di iniziare la misu-
razione.
NOTA:
Qualora non fosse possibile applicare il bracciale al braccio sinistro, esso potrà
essere applicato anche al braccio destro. L’importante è che le misurazioni
vengano effettuate sempre sullo stesso braccio.
4.3 Procedura di misurazione
Dopo che il bracciale è stato adeguatamente posizionato, la misurazione può
iniziare.
1. Premere il pulsante O/I. Tutti i simboli del display vengono visualizzati per
!
100042_MEDEL CHECK USER MANUAL_ ALL LANGUAGES.indd 16-17 28/06/2017 10:31:28

TI
19
IT
18
1secondo Se l’ apparecchio ha memorizzato delle misurazioni, il display
visualizzerà per prima la più recente. Se non vi sono dati in memoria, il di-
splay visualizzerà 0 in ogni campo. Dopo nella colonna diastolica apparirà
0(fig.10). L’apparecchio ora è pronto per la misurazione.
2. Il bracciale inizia a gonfiarsi automaticamente.Viene visualizzato il simbolo
“ ” (fig.10)
3. Non appena viene rilevato un battito, il simbolo “ ” inizia a lampeggiare
(fig.11)
4. Una volta raggiunta la corretta pressione, il gonfiaggio si arresta e il braccia-
le inizia a sgonfiarsi.
5. Quando la misurazione risulta completata, la pressione sistolica/diastolica e
il battito vengono visualizzati contemporaneamente nel display.
6. Nel caso in cui la misurazione mostri un battito del cuore irregolare (I.H.B.),
viene visualizzato il simbolo“ ”.In questo caso i risultati della misurazione
possono deviare rispetto ad una situazione normale. Occorre quindi ripetere
la misurazione. In molti casi, questo non è motivo di preoccupazione. Se il
simbolo “ “ appare con regolarità (per esempio molte volte alla settimana
durante le diverse misurazioni giornaliere) si consiglia di parlarne con il pro-
prio medico curante. (fig.12)
4.4 Come utilizzare la funzione di memoria
• In modalità Orologio (OFF) premere il pulsante MEM; viene visualizzato il nu-
mero di misurazioni memorizzate (fig.14), successivamente viene visualizzato
l’ ultimo valore memorizzato con data e ora. (fig.15)
• Per visualizzare i valori successivi premere nuovamente il pulsante MEM.
4.5 Funzione T3. (Media calcolata su 3 misurazioni rilevate in 15 minuti).
1. Premere il tasto O/I ed effettuare la prima misurazione.
2. Alla fine della prima misurazione attendere almeno 5 minuti in posizione
rilassata. Poi ripetere la misurazione seguendo nuovamente il passo 1.
3. All fine della seconda misurazione, attendere almeno altri 5 minuti in posi-
zione rilassata per poi ripetere nuovamente la misurazione seguendo nuova-
mente il passo 1.
4. Alla fine della terza misurazione, in modalitàspento, premere il tasto T3 per
avere la media delle ultime 3 misurazioni effettuate (il simbolo AVG lampeg-
gerà sul display) (fig.16).
NOTA:
La visualizzazione tramite pulsante T3 si ha solo se si effettuano le misurazioni
nell’arco di 15 minuti, altrimenti il valore visualizzato sarà 0.
4.6 Per cancellare tutti i valori memorizzati
In modalità Orologio (OFF), premere il pulsante MEM, una volta che i valori me-
Codice
di
errore
Causa/e possibile/i Azione consigliata
E1 Sgonfiaggio troppo veloce o
non gonfia Riallacciare il bracciale e riprovare
E2 Sgonfiaggio troppo lento
morizzati sono visualizzati, premere e tenere premuto per 3 secondi il pulsante
MEM tutti i risultati saranno cancellati. (fig. 17). Premere il tasto MEM o il tasto
O/I per spegnere il display.
5. MESSAGGI DI ERRORE/MALFUNZIONAMENTO
Seguire le azioni consigliate nelle seguenti tabelle e premere di nuovo il pulsante
O/I per iniziare un’altra misurazione.
E3 La pressione del bracciale è
eccessiva Rilassarsi per un momento e riprovare
E20 Il processo di misurazione
non riesce a rilevare il bat-
tito
Il movimento può compromettere la misu-
razione.
Rilassarsi per un momento e riprovare.
Allentare i vestiti al braccio e riprovare.
E21 Lettura inaccurata Rilassarsi per un momento e riprovare.
E Exx Si è verificato un problema
di
calibrazione
Ripetere la misurazione. Se il problema per-
siste contattare il Centro Assistenza. Con-
sultare la garanzia per le informazioni di
contatto e le istruzioni di restituzione.
5.1 Altre possibili disfunzioni
Problema Causa/e possibile/i Azione consigliata
Nel display LCD
compare il simbolo
“ “ Le batterie sono scariche.Sostituire tutte le batterie con
batterie nuove.
I valori di pressione san-
guigna visualizzati sono
estremamente alti o bassi.
Il bracciale non è stato avvolto
correttamente intorno al
braccio.
Avvolgere correttamente il mani-
cotto e posizionarlo alla stessa
altezza del cuore.
La spalla o il braccio sono sotto
tensione eccessiva.
Rilassarsi e ripetere la misurazione.
Il braccio o i muscoli del
braccio vengono mossi durante
la misurazione.
Rimanere immobili e non spostar-
si/contrarre i muscoli durante la
misurazione.
100042_MEDEL CHECK USER MANUAL_ ALL LANGUAGES.indd 18-19 28/06/2017 10:31:29

TI
21
IT
20
Viene visualizzato
il simbolo ” “
(I.H.B.), ma la fre-
quenza del battito
cardiaco è normale.
Il braccio o i muscoli del
braccio vengono mossi du-
rante la misurazione.
Rimanere immobili e non spo-
starsi/contrarre i muscoli du-
rante la misurazione.
La luce nel display è
tenue o non è accesa Le batterie sono scariche o
inserite in modo scorretto.
Sostituire le batterie con batte-
rie nuove. Inserire le batterie in
modo corretto.
6. MANUTENZIONE E RIPARAZIONE
Se l’azione sopra descritta non risolve il problema, rivolgersi a personale quali-
ficato autorizzato da Medel International Srl Non aprire in alcun caso l’apparec-
chio. L’apparecchio non ha alcuna parte al suo interno che possa essere riparata
da personale non qualificato e non necessita di manutenzione interna e/o di
lubrificazione. Nel caso in cui l’apparecchio non funzioni in modo corretto,
rivolgersi al CUSTOMER SERVICE MEDEL.
7. CURA, MANUTENZIONE E CONSERVAZIONE
1. Per la pulizia, usare solo un tessuto morbido e leggermente inumidito.
2. Non usare alcoli a base di petrolio, diluenti o solventi simili.
3. Non lavare il bracciale. Le macchie sul bracciale possono essere tolte con
cautela con un panno umido.
4. Prestare la massima attenzione al fine di evitare che il bracciale venga
danneggiato da estremità taglienti o da oggetti appuntiti come forbici,
coltelli ecc…
5. Estrarre le batterie se si prevede di non utilizzare il dispositivo per un periodo
di tempo prolungato.
6. Nel caso in cui il dispositivo non funzioni correttamente a causa dell’influen-
za di forti campi elettromagnetici presenti nelle vicinanze, spegnere il dispo-
sitivo e ripetere nuovamente la procedura di misurazione.
7. Lo smaltimento del dispositivo (e delle batterie esauste) deve essere realizza-
to conformemente alle regolamentazioni nazionali in materia di smaltimento
di prodotti elettronici.
8. NORMATIVE DI RIFERIMENTO
L’apparecchio soddisfa i requisiti degli standard europei per il controllo non
invasivo della pressione sanguigna.
• EN1060 -3 Sfigmomanometri non invasivi - Requisiti supplementari per siste-
mi elettromeccanici di misurazione della pressione sanguigna.
• EN 60601-1Requisiti di sicurezza
• EN 60601-1-2 Compatibilità elettromagnetica
• IEC 80601- 2- 30 Requisiti particolari per la sicurezza e le prestazioni essen-
ziali di sfigmomanometri automatici non invasivi.
9. SIMBOLI
Corretto smaltimento del prodotto (rifiuti elettrici ed elettronici) (Applicabile
nei paesi dell’Unione Europea e nei paesi con sistemi di raccolta differen-
ziata).Il simbolo riportato sul prodotto o sulla sua documentazione indica
che il prodotto è conforme alla normativa sulle apparecchiature elettriche ed
elettroniche e non deve essere smaltito tra i rifiuti domestici. L’utente è respon-
sabile del conferimento dell’apparecchio a fine vita alle appropriate strutture
di raccolta, pena le sanzioni previste dalla vigente legislazione sui rifiuti. Per
informazioni più dettagliate inerenti ai sistemi di raccolta disponibili rivolgersi al
locale servizio di smaltimento rifiuti.
!
ATTENZIONE!
CONSULTARE LE ISTRUZIONI PER L’ USO
PARTE APPLICATA TIPO BF
CORRENTE CONTINUA
FABBRICANTE
LIMITI DI TEMPERATURA PER TRASPORTO E STOCCAGGIO
PROTEGGERE DALL’ UMIDITA’
Conforme alla direttiva 93/42/CEE sui Dispositivi Medici
CODICE PRODOTTO
SERIAL NUMBER
100042_MEDEL CHECK USER MANUAL_ ALL LANGUAGES.indd 20-21 28/06/2017 10:31:30

TI
23
IT
22
10. SPECIFICHE TECNICHE
Display: Display digitale a cristalli liquidi
Tecnologia: Metodo oscillometrico
Classificazione: Apparecchio ad alimentazione interna,
con parte applicata tipo BF
Intervallo di misura: Pressione da 30 a 280 mmHg
Battito cardiaco: da 40 a 199 battiti/min.
Accuratezza: Pressione sanguigna: +/- 3 mmHg
Battito cardiaco: +/- 5%
Memoria max: 60 set di dati (pressione sist.; diast.; e battito cardiaco)
per ciascun utente (2)
Alimentazione: 4 batterie AA da 1,5 V
Vita delle batterie: circa 300 misurazioni (dipende dal livello pressorio e
dalla pressione della pompa)
Accessori: Bracciale universale circonferenza 22 - 42 cm
Pressione del bracciale: da 0 a 300 mmHg
Condizioni operative:
Temperatura: da +10°C a +40°C
Umidità relativa:10 - 85%
Pressione 80 ~ 105 kPa
Condizioni di trasporto/conservazione:
Temperatura: da -20°C a +60°C
Umidità relativa: da 10 a 95%
Pressione: da 80 a 105 kPa
Peso dell’unità principale: 320 g (senza batterie)
Dimensioni esterne(mm): 185 x 100 x 55 mm
NOTA:
Le specifiche sono soggette a modifica senza preavviso.
11. CONDIZIONI DI GARANZIA
• L’apparecchio è garantito 5 anni dalla data di acquisto contro qualsiasi
difetto originario di materiali o di costruzione.
• La garanzia consiste nella sostituzione e/o riparazione gratuita dei compo-
nenti difettosi all’origine.
• La garanzia non copre gli accessori forniti a corredo e le parti soggette a
normale usura.
• L’apparecchio deve essere riparato solo da centri di assistenza tecnica au-
torizzati.
• L’apparecchio deve essere inviato al CUSTOMER SERVICE MEDELper la ri-
parazione.
• Le spese di spedizione dell’apparecchio sono a carico dell’utente.
• Le riparazioni al di fuori delle condizioni di garanzia sono addebitate all’u-
tente.
• La garanzia decade se l’apparecchio è stato manomesso, se il difetto deriva
da uso improprio o se il danneggiamento non è imputabile al produttore
(caduta accidentale, trasporto non accurato, ecc.).
• La garanzia non comporta alcun risarcimento di danni, diretti o indiretti, di
qualsiasi natura verso persone o cose durante il periodo di inefficienza del
prodotto.
• La garanzia è valida dalla data d’acquisto del prodotto certificata dallo
scontrino fiscale o dalla fattura d’acquisto da allegare tassativamente al ta-
gliando di garanzia.
• La mancanza del tagliando appositamente compilato e convalidato dal certi-
ficato d’acquisto non dà diritto ad alcuna assistenza in garanzia.
TAGLIANDO DA RESTITUIRE IN CASO DI RIPARAZIONE
LA GARANZIA E’ VALIDA SOLO ALLEGANDO LO SCONTRINO FISCALE
Apparecchio tipo:
Modello:
Numero serie:
Data d’acquisto:
DATI DELL’ ACQUIRENTE
Nome:
Indirizzo:
Telefono:
Descrizione difetto:
Firma per accettazione delle condizioni di garanzia
Autorizzo l’uso delle informazioni sopra riportate ai sensi della legge 675/96 sulla Privacy.
100042_MEDEL CHECK USER MANUAL_ ALL LANGUAGES.indd 22-23 28/06/2017 10:31:30

EN
25
EN
24
1. INTRODUCTION
MEDEL CHECK blood-pressure monitor is a automatic, digital blood pressure
measuring device for adult using oscillometric method.It offers a very high meas-
urement accuracy and has been designed to provide the maximum user-friend-
liness. Medel CHECK is a device suitable for home healthcare environment.
ATTENTION!
Before using, please read through this instruction manual carefully. For further
questions on the subject of blood-pressure and its measurement, please contact
your doctor. Keep MEDEL CHECK out of the reach of children. Do not use MEDEL
CHECK near anaesthetic, flammable or oxygen mixture, or with nitrous oxide.
ATTENTION!
1.1 Important information about self-measurement
Do not forget: self-measurement means control, not diagnosis or treatment. Unu-
sual values must always be discussed with your doctor. Under no circumstances
should you alter the dosages of any drugs prescribed by your doctor.
• The pulse display is not suitable for checking the frequency of heart pace-
makers!
• In cases of cardiac irregularity (I.H.B.), measurements made with this instru-
ment should only be evaluated after consultation with the doctor.
• Changes to the unit by the user are not admitted
• Do not use the blood pressure monitor on newborns or patients with preec-
lampsia. We recommend consulting a doctor before using the blood pressure
monitor during pregnancy.
• The device does not require any calibration
• Do not dip the device in water
• Tubing kinking can cause continuous cuff pressure and may result in blood
flow interference and patient injury.
• Too frequent measurements can cause injury to the patient due to blood
flow interference;
• Do not apply the CUFF over a wound: this can cause further injury;
• Do not apply the CUFF on any limb where intravascular access or
therapy, or an arterio-venous (A-V) shunt, is present because of tem-
porary interference to blood flow and could result in injury to the PATIENT;
• Do not apply the CUFF on the arm on the side of a mastectomy;
• Please note that , when infalting, the functions of the limb in question may
be impaired;
• During the blood pressure measurement, the blood cisrculation must not be
stopped for an unnecessarily long time.
• If the device malfunctions remove the cuff from the arm.
!
1. LCD
2. O/I (Start / Stop)
3. Memory button(MEM)
4. Average button (T3)
5. Air socket
6. USB port for power supply
7. Battery compartement
8. Universal adult Cuff
for 22~42 cm arm
9. Memory symbol
10. Average value symbol
11. Heartbeat symbol
12. Battery symbol
13. Systolic blood pressure
14. Diastolic blood pressure
15. Pulse display
16. Inflation/Deflation symbol
17. Date/Time display
18. Stored data
19. User ( )
• The user must check that the equipment functions safely and see that all its
parts are in proper conditions before use.
1.2 Electromagnetic interference
The device contains sensitive electronic components. Therefore, avoid strong
electrical or electromagnetic fields close to the device (e.g. mobile telephones,
microwave ovens).These can lead to temporary impairment of the accuracy.
2. COMPONENTS OF THE BLOOD-PRESSURE MONITOR( fig.1)
NOTE:
If your arm Cuff is broken or not functional, please use a new Cuff. If the new
arm Cuff does not include an air plug, please continue to use the old air plug.
Power:
4 AA Alkaline Batteries(Rechargeable batteries are not suitable for this monitor)
Adapter (not included). Adapter 5V DC min 1A must comply with EN 60601.1
Micro USB port for power supply*
*ATTENTION ! THE USB PORT CAN’T BE USED FOR DATA DOWNLOADING.
3 PUTTING THE BLOOD-PRESSURE MONITOR INTO OPERATION
3.1 Inserting the batteries
Insert the batteries. (pic.2)
1. Remove the battery cover from the battery compartment.
2. Insert four AA powerful batteries into the compartment and ensure each bat-
tery is in the proper direction.
3. Replace the battery cover.
ATTENTION !
• After the battery warning symbol” ” appears, the device is blocked until
the batteries have been replaced.
• Please use “AA”Long-Life 1.5 V batteries.
• Recharcable batteries are not suitable for this monitor.
• Never leave any low battery in the battery compartment since they may leak
and cause damage to the unit.
!
!
100042_MEDEL CHECK USER MANUAL_ ALL LANGUAGES.indd 24-25 28/06/2017 10:31:30

EN
27
EN
26
• If the blood-pressure monitor is left unused for long periods, please remove the
batteries from the device.
3.2 User, Clock and date adjustement
1. Once you install the battery or turn off the monitor, it will enter Clock mode,
and LCD will display date and time.
2. In Clock Mode, press the O/I and MEM buttons simoultaneously for 2 sec-
onds and the User value will blink first, press MEM button to to select the
user ( )
3. Press O/I button to confirm and switch to the year value (press MEM button
to set up the year)
4. Press O/I button to confirm and switch to the month value (press MEM button
to set up the month)
5. Repeat the procedure described above to set the day, hour and minutes.
6. After nearly one minute of inactivity the device will automatically switch-off
with date and time of last measuerement.
7. Once you change the batteries, you should readjust the time and date.
3.3 Connecting the cuff
Insert the cuff connector into the socket on the left side of the meter (Pic.1)
4. HOW TO TAKE PROPER MEASUREMENTS
4.1. Before the measurement:
• Relax and avoid eating, smoking as well as all forms of exertion directly
before the measurement. All these factors influence the measurement result.
• Remove any garment that fits closely to your upper arm.
• To take your blood pressure, make sure you are sitting comfortably with your
arms and back leaning on something. Do not cross your legs. Place your feet
flat on the ground.
• To avoid falsifying the measurement, it is important to remain still during the
measurement and not to speak.
• Measure always on the same arm (normally left)
• Make sure to measure the blood pressure always at the same time during
the day.
NOTE: The cuff size depends on the circumference of the arm. The allowed
range is printed on the cuff. If this is not suitable for your use, please contact
your dealer.
ATTENTION!
• Only use MEDEL original cuffs!
• A loose cuff or a sideways protruding air-pocket causes false measurement
values.With repeated measurements, blood accumulates in the respective
arm, which can lead to false results.
!
!
• Correctly executed blood-pressure measurements should therefore first be
repeated after 5minutes pause or after the arm has been held up in order to
allow the accumulated blood to flow away.
4.2. Fitting the cuff
1. Pass the end of the cuff (with sewn-in rubber stopper) through the metal
stirrup so that a loop is formed. The Velcro closer must be facing outwards.
(Ignore this step if the cuff has already been prepared.) (Pic 4)
2. Push the cuff over the left upper arm so that the tube points in the direction
of the lower arm. (Pic 5)
3. Position the cuff on the arm as illustrated in the picture (Pic. 6). Make certain
that the lower edge of the cuff lies approximately 2 to 3 cm above the elbow
and that the rubber tube leaves the cuff on the inner side of the arm )
4. Tighten the free end of the cuff and close the cuff with the closer. (Pic 7)
ATTENTION!
Place the cuff in order to have its edge 2-3 cm above the elbow and the brachial
artery. The tube must be positioned towards the palm center.
5. There must be no free space between the arm and the cuff as this would
influence the result. Clothing must not restrict the arm. Any piece of clothing
which does (e.g. a pullover) must be taken off.
6. Secure the cuff with the Velcro closer in such a way that it lies comfortably
and is not too tight. Lay the arm on the table (palm upwards) so that the cuff
is at the same height as the heart. Make sure that the tube is not kinked.
(Pic 8-9).
7. Remain seated quietly for two minutes before you begin the measurement.
NOTE:If it is not possible to fit the cuff to the left arm, it can also be placed on
the right one. However all measurements should be made using the same arm.
4.3. Measuring procedure
After the cuff has been appropriately positioned, the measurement can begin
1. Press O/I button. All display symbols appear for 1second. Then 0 will ap-
pear on LCD on the DIA column. (pic. 10). The monitor is ready for the
measurement.
2. Then the cuff inflates automatically. The symbol “ “ will appear. (pic. 10)
3. Once a pulse is detected, the “ “symbol blinks. (pic. 11)
4. When appropriate pressure is reached, inflation stops and the cuff starts to
deflate.
5. When the measurement is completed, the systolic / diastolic pressure and
pulse are shown simultaneously .
6. In case the measurement shows irregular heartbeat (I.H.B.), the ” ”symbol
100042_MEDEL CHECK USER MANUAL_ ALL LANGUAGES.indd 26-27 28/06/2017 10:31:30

EN
29
EN
28
is displayed. In this case the results of the measurement have deviated from a
normal situation. Then the measurement needs to be repeated. In the majority
of cases, this is not cause for concern. If the symbol ” ” appears regularly
(for example several times a week during different daily measurements) it is
advisable to discuss it with your medical advisor (pic. 12).
4.4 How to use the memory function
•
•
4.5 T3 Function. (The average is calculated upon last 3 readings measured within
15 minutes).
1. Press O/I button and take the first measurement.
2. At the end of the first measurement wait at least 5 minutes in a relaxed posi-
tion. Then repeat the measurement following step 1 again.
3. At the end of the second measurement wait at least 5 minutes in a relaxed
position. Then repeat the measurement following step 1 again.
4. At the end of the third measurement press T3 button to perform the average
of the last three measurements taken (the AVG symbol will appear) (pic. 16).
NOTE:
The average data using T3 button is shown only if the last 3 measurements have
been done within 15 minutes. Otherwise, the data will be shown as 0.
4.6 To delete all values stored in the memory
In Clock mode (Off mode)press MEM button, after the latest data stored will be
displayed press again and hold the MEM button for 3 sec. All results will be
deleted. Press the MEM or O/I button to turn off the display (pic. 17).
5. ERROR MESSAGE/MALFUNCTION
Follow the below recommended actions and press O/I button again to initiate
another measurement.
Error code Possible cause(s) Recommended Action
E 1 Deflation is too fast or the cuff
doesn’t inflate Re-apply the cuff and try again
E 2 Deflation is too slow
E 3 The cuff pressure is excessive Relax for a moment and try again
E 20 The reading process cannot
detect the heart beat Movement can compromise the
measurement.
Relax for a moment and try
again .
Loosen the clothes on the arm and
try again
E 21 Inaccurate reading Relax for a moment and try again
E Exx There is a calibration problem Repeat the reading. If the problem
persists, contact the Service
Centre. Refer to the warranty for
the contact information and the
instructions concerning returns.
Problem Possible cause(s) Recommended Action
The display shows the
symbol Batteries are drained. Replace all batteries
with new ones.
The blood pressure
values displayed are
abnormally high or
low.
The cuff is not wrapped
correctly or not at the
level of the heart.
Wrap the cuff correctly
and rise your hand so
that the cuff is at the
same level of your heart.
Too much stress is ap-
plied on your shoulder
or arm.
Relax yourself and make
measurement.
You move your arm
or arm muscles during
measurement.
Remain still and do
not move /contract the
muscles during measure-
ment.
5.1 Other possible malfunctions:
100042_MEDEL CHECK USER MANUAL_ ALL LANGUAGES.indd 28-29 28/06/2017 10:31:31

EN
31
EN
30
The (I.H.B.)symbol
” “ is displayed,
but my heart beat rate
should be normal.
You move your arm
or arm muscles during
measurement.
Remain still and do
not move /contract the
muscles during measure-
ment.
The light on the display
is dim or not lit The batteries are flat or
inserted incorrectly Replace the flat batteries
with new ones. Insert the
batteries correctly.
6. MAINTENANCE AND REPAIRS
For any repair operations, only refer to a technical assistance centre authorized
by the Medel International Srl and request original spare parts. Never open
the device. There are no user-serviceable parts within. The device requires no
lubrication or maintenance. Failure to comply with what expressed above may
compromise the safety of MEDEL CHECK.
7. CARE, MAINTENANCE AND STORAGE
1. For cleaning only use a soft, lightly moistened cloth.
2. Do not use petroleum spirits, thinners or similar solvents.
3. Do not wash the cuff.
4. Take care to ensure the cuff is not damaged by sharp or pointed objects such
as scissors, knives, etc.
5. Take the batteries out if the device is not used for a long period.
6. In case the device becomes malfunction due to the influence of strong electro-
magnetic fields, power off the device and repeat the procedure again.
7. Disposal of the device (and used batteries) should be carried out according to
the national regulations for the disposal of electronic products.
8. REFERENCE TO STANDARDS
Device standard: Device corresponds to the requirements of the European stand-
ard for non-invasive blood-pressure monitor.
• EN1060-3 Non-invasive sphygmomanometers - Supplementary
requirements for electro-mechanical blood pressure measuring
systems.
• EN 60601-1Safety requirements
• EN 60601-1-2 Electromagnetical compatibility
• IEC 80601- 2- 30 Particular requirements for the basic safety and essential
performance of automated non-invasive sphygmomanometers.
Separate collection for waste electrical and electronic equipment.
Applicable to European Union countries and countries with separate col-
lection systems) This symbol on the product or its literature indicates that
the product complies with the Electrical and electronic equipment and should not
be disposed of as household waste. The user is responsible for the transfer of
the equipment at end of life with the appropriate collection facilities, subject to
the penalties provided for by current legislation on waste. For more detailed in-
formation collection systems available contact your local waste disposal service.
Comply with the Medical Device Directive 93/42/EEC
!
WARNING!
REFER TO THE INSTRUCTIONS
TYPE BF APPLIED PART
DIRECT CURRENT
MANUFACTURER
TEMPERATURE LIMITATION FOR TRANSPORT AND STORAGE
KEEP DRY
MANUFACTURER’S CATALOGUE DEVICE NUMBER
SERIAL NUMBER
9. SYMBOLS
100042_MEDEL CHECK USER MANUAL_ ALL LANGUAGES.indd 30-31 28/06/2017 10:31:31

EN
33
EN
32
10. PRODUCT SPECIFICATION
Display : LCD digital display
Technology: Oscillometric method
Classification : Internally powered equipment, with type
BF applied part
Measurement range: Pressure : 30 to 280 mmHg
Heart rate : 40 to 199 times/minute
Accuracy : Pressure : +/- 3 mmHg
Heart rate : +/- 5%
Memory : Storing 60 memories (Systolic / Diastolic
pressure, Heart beat) for each user (2)
Power supply: 4 AA 1.5V (batteries)
Battery life: For approx. 300 measurements, depending on
levels of blood pressure and pump pressure
Accessories: Universal cuff circum. 22 - 42cm
Cuff pressure: 0 to 300 mmHg
Operation conditions: Temperature : +10°C to +40° C;
Relative Humidity: 10 - 85%
pressure: 80 to 105 kPa
Transport/Storage conditions: Temperature : -20°C to +60°C ;
Relative Humidity : 10 - 95%
pressure: 80 to 105 kPa
Weight of main unit : 320 g (without batteries)
External dimensions: 185 X 100 X 55 mm
NOTE:
Specifications are subject to change without prior notice.
10. WARRANTY CONDITIONS
• The device is covered by a 5-year warranty from date of purchase for any
defects in the design or in the material used.
• The warranty consists in the replacement and/or repair free of charge of
originally detective components.
• The warranty does not cover the accessories supplied with the equipment
and those parts subject to normal wear and tear.
• The equipment must be repaired by authorized technical service centres
only.
• The equipment must be sent to the authorized technical service centre for
repair within 8 days after the defect is noticed.
• The transport costs for the equipment are at user’s charge. Any repair out
of the warranty conditions are at user’s charge.
• The warranty does not cover failures resulting from misuse, abuse of the
product or in case the damage is not due to manufacturer’s liability (acci-
dental fall, rough transportation, etc…)
• The warranty does not involve any compensation for any kind of damages
to persons or things, either direct or indirect, occurred when the equipment
is not operating.
• The warranty is valid from the date of purchase certified by the ticket or the
invoice which have to be peremptorily attached to the warranty coupon.
• The lack of warranty coupon properly filled in and validated by a certifica-
tion of purchase voids the warranty.
COUPON TO BE RETURNED IN CASE OF REPAIRS
THE WARRANTY IS VALID ONLY IF ACCOMPANIED BY THE TICKET/INVOICE
Product type:
Model:
Serial No.:
Date of purchase:
BUYER’S DATA
Name:
Address:
Telephone:
Defect description:
Signature for acceptance of the above mentioned warranty conditions
100042_MEDEL CHECK USER MANUAL_ ALL LANGUAGES.indd 32-33 28/06/2017 10:31:31

EN
35
EN
34
Guidance and manufacturer’s declaration – electromagnetic emissions
The model Medel Check is intended for use in the electromagnetic environment
specied below. The customer or the user of the model Medel Check should
ensure that it is used in such an environment.
Emission test
RF emissions
CISPR 11
Compliance
Group 1
Electromagnetic environment –
guidance
The model Medel Check uses RF
energy only for its internal fun-
ction. Therefore, its RF emissions
are very low and are not likely to
cause any interference in nearby
electronic equipment.
RF emissions
CISPR 11
Class B
The model Medel Check is suitable
for use in all establishments,
including domestic establishments
and those directly connected to
the public low-voltage power
supply network that supplies buil-
dings used for domestic purposes.
Harmonic emissions
IEC 61000-3-2
Not applicable
Voltage uctuations/
icker emissions
IEC 61000-3-3
Not applicable
Guidance and manufacturer’s declaration – electromagnetic immunity
The model Medel Check is intended for use in the electromagnetic environment
specied below. The customer or the user of the model Medel Check should
ensure that it is used in such an environment.
Immunity
test
Electrostatic
discharges
(ESD)
IEC 61000-4-2
IEC 60601 test level
± 6kV contact
± 8kV air
Compliance level
± 6kV contact
± 8kV air
Electromagnetic
environment - guidance
Floors should be wood, con-
crete or ceramic tile. If oors
are covered with synthetic
material, the relative humidi-
ty should be at least 30 %.
Electrical fast
transient/
burst
IEC 61000-4-4
±2 kV for power
supply lines
…….
Not Applicable Mains power quality should
be that of a typical commer-
cial or hospital environment.
Surge
IEC 61000-4-5
± 1kV in differential
mode
Not Applicable Mains power quality should
be that of a typical commer-
cial or hospital environment.
Voltage dips,
short
interruptions
and
voltage
variations
on power
supply
input lines
IEC 61000-
4-11
<5 % UT
(>95 % dip in UT)
for 0,5 cycle
40 % UT
(60 % dip in UT)
for 5 cycles
70 % UT
(30 % dip in UT)
for 25 cycles
<5 % UT
(>95 % dip in UT) for
5 sec.
Not Applicable Mains power quality should
be that of a typical commer-
cial or hospital environment.
If the user of the model
Medel Check requires conti-
nued operation during power
mains interruptions, it is
recommended that the model
Medel Check be powered
from an uninterruptible
power supply or a battery.
Power
frequency
(50/60 Hz)
magnetic eld
IEC 61000-4-8
3 A/m 3 A/m Power frequency magnetic
elds should be at levels cha-
racteristic of a typical location
in a typical commercial or
hospital environment.
NOTE: UT is the a.c. mains voltage before the application of the test level
100042_MEDEL CHECK USER MANUAL_ ALL LANGUAGES.indd 34-35 28/06/2017 10:31:31

EN
37
EN
36
Guidelines and declaration of the manufacturer – electromagnetic immunity
The model Medel Check is intended for use in the electromagnetic environment
specied below. The customer or the user of the model Medel Check should
ensure that it is used in such an environment.
Immunity
test
Conducted RF
IEC 61000-4-6
Radiated RF
IEC 61000-4-3
IEC 60601
Test level
3Vrms
150kHz to
80MHz
3V/m
80MHz to
2,5GHz
Compliance
level
Not applicable
3V/m
Electromagnetic environment
- guidance
Portable and mobile RF
communications equipment
should be used no closer to
any part of the model Medel
Check, including cables, than
the recommended separation
distance calculated from the
equation applicable to the
frequency of the transmitter.
Recommended separation
distances
d=1.2√P
d=1.2√P 80MHz to 800MHz
d=2.3 √P 800MHz to 2.5 GHz
Where P is the maximum
output power rating of the
transmitter in watts (W)
according to the transmitter
manufacturer and d is the
recommended separation
distance in metres (m).
Field strengths from xed RF
transmitters, as determined
by an electromagnetic site
survey,a should be less than
the compliance level in each
frequency range.b Interference
may occur in the vicinity of
equipment marked with the
following symbol:
NOTE 1 At 80 MHz and 800 MHz, the higher frequency range applies.
NOTE 2 These guidelines may not apply in all situations. Electromagnetic
propagation is affected by absorption and reection from structures, objects and
people.
Recommended separation distances between portable and mobile RF
communications equipment and the 24W Compact Daylight
The model Medel Check is intended for use in an electromagnetic environment in which
radiated RF disturbances are controlled. The customer or the user of the model Medel
Check can help prevent electromagnetic interference by maintaining a minimum distan-
ce between portable and mobile RF communications equipment (transmitters) and the
model Medel Check as recommended below, according to the maximum output power
of the communications equipment.
Rated maximum
output power of
transmitter
W
Separation distance according to frequency of transmitter (m)
150kHz to 80MHz 80MHz to 800MHz 800MHz to 2,5 GHz
d= [ ] √P
3,5
V1
0,01 0,12 0.12 0,23
0,1 0,38 0,38 0,73
1 1,2 1,2 2,3
10 3,8 3,8 7,3
100 12 12 23
For transmitters rated at a maximum output power not listed above, the recommended separation
distance d in meters (m) can be estimated using the equation applicable to the frequency of the
transmitter, where P is the maximum output power rating of the transmitter in watts (W) according to
the transmitter manufacturer.
NOTE 1: At 80 MHz and 800 MHz, the separation distance for the higher frequency range applies.
NOTE 2: These guidelines may not apply in all situations. Electromagnetic propagation is affected by
absorption and reection from structures, objects and people.
a. Field strengths from xed transmitters, such as base stations for radio (cellular/
cordless) telephones and land mobile radios, amateur radio, AM and FM radio bro-
adcast and TV broadcast cannot be predicted theoretically with accuracy. To assess
the electromagnetic environment due to xed RF transmitters, an electromagnetic site
survey should be considered. If the measured eld strength in the location in which
the model Medel Check is used exceeds the applicable RF compliance level above,
the model Medel Check should be observed to verify normal operation. If abnormal
performance is observed, additional measures may be necessary, such as reorienting
or relocating the model Medel Check.
b. Over the frequency range 150 kHz to 80 MHz, eld strengths should be less than
[V1] V/m
d= [ ] √P
3,5
E1
d= [ ] √P
7
E1
100042_MEDEL CHECK USER MANUAL_ ALL LANGUAGES.indd 36-37 28/06/2017 10:31:32

PT
39
PT
38
1. INTRODUÇÃO
O medidor de pressão MEDEL CHECK é um dispositivo digital completamente
automatizado para adultos que, mediante método de medição oscilométrico,
permite uma medição rápida e confiável. O aparelho oferece uma precisão de
medição muito elevada e foi concebido para ser de simples utilização. É um
dispositivo destinado ao uso domiciliar.
ATENÇÃO!
Antes do uso, é importante ler atentamente todo o livrete de instruções. Para
ulteriores informações relativas à pressão sanguínea e à sua medição, contactar
o próprio médico. Manter MEDEL CHECK fora do alcança das crianças. Não
usar MEDEL CHECK próximo a misturas anestésicas, inflamáveis ou contentores
de oxigénio ou com óxido nitroso.
ATENÇÃO!
1.1 Informações importantes sobre a auto-medição
• Não esquecer: auto-medição significa controlo, não diagnóstico ou tratamen-
to. Os valores insólitos devem ser sempre discutidos com o seu médico. Em
nenhuma circunstância deve-se modificar as dosagens de qualquer medica-
mento prescrito pelo seu médico.
• O ecrã do batimento não é adequado para controlar a frequência de marca
passos cardíacos!
• Em caso de irregularidade cardíaca (I.H.B.), as medições efetuadas com esse
instrumento devem ser avaliadas apenas após consultar o médico.
• Não são admitidas modificações ao dispositivo por parte do usuário.
• Não utilizar o medidor de pressão em recém-nascidos e pacientes com pré-
-eclampsia. Antes de utilizar o medidor na gravidez, aconselha-se consultar
o médico.
• O dispositivo não necessita de calibração.
• Não mergulhe o aparelho na água.
• Esmagar, dobrar e comprimir o tubo pode causar uma pressão constante da
braçadeira com redução do fluxo de sangue e consequente dano ao paciente.
• Medições muito frequentes podem causar um dano ao paciente devido à
temporária interferência do fluxo sanguíneo
• Não aplicar a braçadeira sobre uma ferida, isso pode causar um dano ul-
terior.
• Não aplicar a braçadeira em um membro onde esteja presente um aces-
so intravascular, tratamento ou um shunt arteriovenoso, pois a interferência
temporária com o fluxo de sangue pode resultar em danos para o paciente.
• Não aplicar a braçadeira em pessoas que tenham passado por mastectomia.
• Ao inflar, é possível que as funções do membro fiquem momentaneamente
comprometidas.
• Durante a medição da pressão arterial, a circulação sanguínea não deve ser
inutilmente interrompida por longo tempo.
• Se o dispositivo não funcionar corretamente, remover a braçadeira do braço.
• Antes do uso, o utilizador deve verificar se o dispositivo está a funcionar de
modo seguro e que todas as suas partes estejam em bom estado.
!
1. Ecrã LCD
2. Botão O/I (Start / Stop)
3. Botão de memória (MEM)
4. Botão de média (T3)
5. Tomada para a braçadeira
6. USB para alimentação
7. Vão das baterias
8. Braçadeira adulto Universal
para braço com circ. 22~42 cm.
9. Indicador de memória
10. Indicador de valor médio
11. Indicador de batimento cardíaco
irregular
12. Indicador de baterias
13. Pressão sistólica
14. Pressão diastólica
15. Pulsações
16. Símbolo de inflar/desinflar
17. Data/relógio
18. Valores memorizados
19. Utilizador ( )
1.2 Interferência eletromagnética
O dispositivo contém componentes eletrónicos sensíveis. Por isso, evitar for-
tes campos elétricos ou eletromagnéticos nas proximidades imediatas do
dispositivo (por ex. telemóveis, fornos de micro-ondas). Esses podem causar
uma temporária falta de pressão na medição da pressão sanguínea diastólica.
2. COMPONENTES DO MEDIDOR DE PRESSÃO (fig.1)
Alimentação:
4 Baterias alcalinas tipo AA. As baterias recarregáveis não são adequadas a
esse aparelho. Alimentador (não incluído). Aconselha-se o uso com um alimen-
tador 5V DC min 1 A conforme a normativa EN60601.1 com conexão micro
usb*.
* Não é uma porta USB para descarregar dados.
3. COLOCAR O MEDIDOR DE PRESSÃO A FUNCIONAR
3.1 Inserção das baterias
Inserir as baterias.(fig.2)
1. Levantar a tampa do vão de baterias
2. Inserir 4baterias AA assegurando-se de que a polaridade esteja correta
3. Recolocar a tampa do vão de baterias.
ATENÇÃO!
• Ao aparecer o símbolo “ Lo” baterias descarregadas, o aparelho blo-
queia-se até que as baterias sejam substituídas.
• Utilizar baterias AA - 1,5V.
• Remover sempre as baterias se o aparelho não for utilizado por um mês ou
mais.
• Nunca deixar as baterias descarregadas no vão, pois eventuais vazamentos
podem danificar a unidade.
3.2 Definição do usuário, data e relógio
1. Inserir as baterias e ligar o aparelho, no ecrã são mostradas data e hora
(modalidade Relógio)
!
!
100042_MEDEL CHECK USER MANUAL_ ALL LANGUAGES.indd 38-39 28/06/2017 10:31:32
Other manuals for Check
3
Table of contents
Languages:
Other Medel Blood Pressure Monitor manuals

Medel
Medel CLIP & GO User manual

Medel
Medel Elite User manual

Medel
Medel Elite User manual

Medel
Medel GCE602 User manual

Medel
Medel CONTROL User manual

Medel
Medel Check User manual

Medel
Medel Check User manual

Medel
Medel Connect Cardio MB10 User manual

Medel
Medel Elite User manual

Medel
Medel GCE602 User manual