medi Collamed OA User manual
medi GmbH & Co. KG
Medicusstraße 1
D-95448 Bayreuth
Germany
T +49 921 912-0
F +49 921 912-780
www.medi.de
medi Austria GmbH
Adamgasse 16/7
6020 Innsbruck
Austria
T +43 512 57 95 15
F +43 512 57 95 15 45
vertrieb@medi-austria.at
www.medi-austria.at
medi Belgium bvba
Posthoornstraat 13/1
3582 Koersel
Belgium
T +32 011 24 25 60
F +32 011 24 25 64
info@medibelgium.be
www.medibelgium.be
medi Brasil
Rua Neusa 216
Diadema-Sao Paulo
Cep 09941-640
Brazil
T +55 11 3201 1188
F +55 11 3201 1185
sac@medibrasil.com
www.medibrasil.com
medi Danmark ApS
Vejlegardsvej 59
2665 Vallensbæk Strand
Denmark
T +45 46 55 75 69
F +45 70 25 56 20
kundeservice@sw.dk
www.medidanmark.dk
medi Bayreuth España SL
C/Canigó 2 – 6 bajos
Hospitalet de Llobregat
08901 Barcelona
Spain
T +34 93 260 04 00
F +34 93 260 23 14
medi@mediespana.com
www.mediespana.com
medi France
Z.I. Charles de Gaulle
25, rue Henri Farman
93297 Tremblay en France Cedex
France
T +33 1 48 61 76 10
F +33 1 49 63 33 05
infos@medi-france.com
www.medi-france.com
medi Hungary Kft.
Bokor u. 21.
1037 Budapest
Hungary
T +36 1371 0090
F +36 1371 0091
info@medi-hungary.hu
www.medi-hungary.hu
medi Medical Support Sdn Bhd
medi representative office Asia
Unit No. B-2-19, Block B, No.2,
Jalan PJU 1A/7A
Oasis Ara Damansara, PJU 1A,
47301 PETALING JAYA
Selangor Darul Ehsan
Malaysia
T: +6 03 7832 3591
F: +6 03 78323921
info@medi-asia.com
www.medi-asia.com
medi Middle East
P. O. Box: 109307
Abu Dhabi
United Arab Emirates
T +971 2 6429201
F +971 2 6429070
info@mediuae.ae
www.mediuae.ae
medi Nederland BV
Heusing 5
4817 ZB Breda
The Netherlands
T +31 76 57 22 555
F +31 76 57 22 565
www.medi.nl
medi Polska Sp. z. o. o.
Zygmunta Starego 26
44-100 Gliwice
Poland
T+48 32 230 60 21
F+48 32 202 87 56
www.medi-polska.pl
medi Bayreuth Unipessoal, Lda
Rua Eugénio de Castro Rodrigues, n°2
1700-184 Lisboa
Portugal
T +351 21 843 71 60
F +351 21 847 08 33
medi.portugal@medibayreuth.pt
www.medi.pt
medi RUS LRC
Business Park “Rumyantsevo”
Rumyantsevo, Build. 1
Leninsky Township
142784 Moscow Region
Russia
T +7 495 229 04 58
F +7 495 229 04 58
info@medirus.ru
www.medirus.ru
medi UK Ltd.
Plough Lane
Hereford HR4 OEL
United Kingdom
T +44 1432 37 35 00
F +44 1432 37 35 10
enquiries@mediuk.co.uk
www.mediuk.co.uk
medi Ukraine LLC
Tankova Str. 8, office 35
Business-center “Flora Park”
Kiev 04112
Ukraine
T +380 44 591 1163
F +380 44 455 6181
office@medi.ua
www.medi.ua
medi USA L.P.
6481 Franz Warner Parkway
Whitsett, N.C. 27377-3000
USA
T +1 336 4 49 44 40
F +1 888 5 70 45 54
order[email protected]
www.mediusa.com
Wichtige Hinweise
Die Orthese wird nur zum Gebrauch an einem Patienten empfohlen. Wird sie für die Behandlung von mehr als einem Patienten verwendet,
erlischt die Produkthaftung des Herstellers im Sinne des Medizinproduktegesetzes. Sollten übermäßige Schmerzen oder ein unangenehmes
Gefühl während des Tragens auftreten, kontaktieren Sie bitte umgehend Ihren Arzt oder Orthopädietechniker. Tragen Sie die Orthese nicht auf
offenen Wunden und nur unter vorheriger medizinischer Anleitung.
Important notes
This brace is recommended for single patient use only. If it is used for treating more than one patient, the manufacturer’s product liability according to
the Medical Devices Act will become invalid. If undue pain or an unpleasant sensation develops while you are wearing the support, please consult your
doctor or orthotist immediately. Do not wear the brace over open wounds, and use it only as instructed by your doctor or orthotist.
Remarques importantes
L’orthèse n’est recommandée que pour l’utilisation d’un seul patient. Si elle est utilisée pour le traitement de plusieurs patients, le fabricant décline
toute responsabilité dans le sens de la loi sur les produits médicaux. Si des douleurs extrêmes ou une sensation de gêne devaient se manifester durant
l’utilisation, veuillez consulter immédiatement votre médecin ou votre technicien-orthopédiste. Ne portez pas l’orthèse sur des plaies ouvertes. Ne
portez l’orthèse qu’uniquement après avoir reçu les instructions du médecin.
Advertencia importante
El dispositivo ortopédico está recomendado para ser utilizado por un solo paciente. En el caso de que se utilice para el tratamiento de más de un
paciente, desaparece la responsabilidad del fabricante sobre el producto, según la ley del medicamento. De producirse dolores excesivos o una
sensación de incomodidad durante el uso del dispotivo, sírvase solicite ayuda de su médico o técnico ortopédico inmediato. No utilice el dispositivo
sobre heridas abiertas. Úselo sólo por prescripción médica.
Indicações importantes
A ortótese deve ser usada apenas por um doente. Se for utilizada para o tratamento de mais de um doente, prescreve a responsabilidade do
fabricante do produto, nos termos da Legislação sobre Produtos Médicos. Se surgirem dores excessivas ou uma sensação desagradável durante a
utilização, por favor consulte imediatamente o seu médico ou técnico ortopédico. Não use a ortótese sobre feridas abertas e utilize-a apenas sob
instruções do médico.
Avvertenze importanti
Si consiglia di utilizzare l‘ortesi per un solo paziente. Qualora essa fosse venga usata per il trattamento di più di un paziente, decade automaticamente
la responsabilità del produttore, secondo quanto prescritto dalle vigenti leggi sui prodotti medicali. Nel caso in cui, durante l‘uso, sopravvengano
dolori intensi o sensazione di disagio, consultare immediatamente il medico specialista o il tecnico ortopedico. Non applicare l‘ortesi su ferite aperte
e seguire sempre le istruzioni del medico.
Belangrijke aanwijzingen
De orthese is slechts voor één patiënt bedoeld. Indien ze voor de behandeling van meer dan één patiënt wordt gebruikt, aanvaardt de producent geen
aansprakelijkheid in de zin van de wet op medische producten. Mocht u tijdens het dragen veel pijn of een onaangenaam gevoel hebben, vraag
onmiddellijk uw arts of ortopedisch instrumentenmaker om raad. Draag de orthese niet op open wonden en slechts na medische instructie vooraf.
Vigtige oplysninger
Ortosen anbefales kun til brug på én patient. Bruges den i behandlingen af mere end en patient, bortfalder producentens produktansvar i h.t.
lægemiddellovgivningen. Skulle der opstå store smerter eller en følelse af ubehag, mens De har ortosen på, skal De straks tage ortosen af og
konsultere Deres læge eller bandagist. Anbring ikke ortosen oven på åbne sår og brug kun ortosen efter forudgående lægelig vejledning.
Viktiga råd
Ortosen rekommenderas enbart för användning på en och samma patient. Om den används av flera patienter, gäller inte tillverkarens garanti enligt
lagen om medicintekniska produkter. Om starka smärtor eller obehagskänslor uppträder vid bärande av ortosen, skall detta genast
avtagas. Tag sedan kontakt med din läkare eller ortopedtekniker. Bär inte ortosen på öppna sår och bara på läkares ordination.
Důležité informace
Doporučujeme, aby ortézu používal jen jeden pacient. Budete-li ji používat při léčbě více než jednoho pacienta, zaniká záruka za produkt
poskytovaná výrobcem ve smyslu zákona o lékařských produktech. Pokud by se během nošení vyskytly nepřiměřené bolesti nebo nepříjemný
pocit, sejměte, prosím okamžitě bandáž a vyhledejte svého lékaře nebo ortopéda. Ortézu nenoste na otevřených ranách a používejte ji jen podle
předchozího lékařského návodu.
Važna upozorenja
Ortoza se preporučuje za uporabu samo na jednom pacijentu. Ako se ista koristi za liječenje više od jeden pacient prestaje jamstvo za proizvod
proizvoača u smislu Zakona o medicinskim proizvodima. Ako se bol i osjećaj nelagode pojave ili pojačaju za vrijeme nošenja bandaže odmah je skinite
i kontaktirajte vašeg liječnika. Nemojte nositi ortozu na otvorenim ranama i samo uz prethodnu medicinsku uputnicu.
Bажные замечания
Данное изделие рекомендуется только для индивидуального применения. В случае использования изделия более чем одним пациентом
гарантии производителя утрачивают силу. Если при пользовании изделием у Вас возникли боль или неприятные ощущения, пожалуйста,
немедленно снимите его и проконсультируйтесь у Вашего врача. Не носите изделие при наличии открытых ран. Применяйте изделие только
согласно рекомендации Вашего врача.
Önemli uyarı
Ortezin sadece bir tek hastada kullanılması tavsiye edilir. Ortezin birden fazla hastada kullanılması halinde, üretici firmanın sorumluluğu tıbbi
ürünler kanununa istinaden sona erer. Kullanım esnasında aşırı ağrı ya da rahatsız edici bir his ortaya çıkarsa lütfen ortezi derhal çıkartınız ve
hekiminize ya da ortopedi teknikerinize başvurunuz. Ortezi açık yaralar üzerinde taşımayınız ve sadece önceden yapılan tıbbi açıklamalardan sonra
kullanınız.
Ważne wskazówki
Zaleca się stosowanie ortezy tylko przez jednego pacjenta. W przypadku stosowania ortezy do leczenia więcej niż jednego pacjenta
wygasa odpowiedzialność producenta za produkt w rozumieniu ustawy o produktach medycznych. W razie wystąpienia nadmiernego bólu
lub nieprzyjemnego uczucia w trakcie noszenia bandaża bandaż należy natychmiast zdjąć i skonsultować się z lekarzem lub technikiem
ortopedycznym. Nie nosić ortezy na otwartych ranach i zakładać go tylko po uprzednim uzyskaniu instrukcji medycznej.
Σηµαντικές υποδείξεις
Ο νάρθηκας συνιστάται για χρήση σε έναν μόνο ασθενή. Αν χρησιμοποιείται για περισσότερους του ενός ασθενούς, η ευθύνη του παραγωγού για το προϊόν,
σύμφωνα με τον περί ιατροτεχνολογικών προϊόντων νόμο (Medical Devices Act) ακυρώνεται. Εάν παρουσιασθούν υπερβολικοί πόνοι ή ενοχλήσεις κατά τη
διάρκεια της χρήσης, διακόψτε αμέσως τη χρήση του νάρθηκα και συμβουλευθείτε το γιατρό σας ή τον ορθοπεδικό τεχνικό σας. Μην φοράτε τον νάρθηκα
πάνω από ανοιχτές πληγές, και χρησιμοποιείτε το μόνο σύμφωνα με τις οδηγίες του γιατρού σας.
Важливі вказівки
Ортез рекомендується використовувати лише одному пацієнту. У разі використання виробу більше ніж для одного пацієнта виробник
відмовляється від відповідальності, закріпленої за ним згідно з Законом про товари медичного призначення. Якщо під час носіння бандажа
виникають надмірні болі або неприємні відчуття, негайно зверніться до свого лікаря або техніка-ортопеда. Не носіть ортез на відкритих ранах та
використовуйте його лише згідно з попередніми медичними рекомендаціями.
41597/06.2013
Collamed® OA
Knieorthese
Knee Brace
Orthèse d’abduction pour le genou
Ortesis funcional de rodilla
Gebrauchsanweisung. Instructions for use. Mode d’emploi. Instrucciones de uso.
Instruções para aplicação. Istruzioni per l’uso. Gebruiksaanwijzing. Brugsvejledning.
Bruksanvisning. Návod k použití. Uputa za uporabu. Инструкция по использованию.
Kullanma kılavuzu. Instrukcja zakładania. Οδηγία εφαρµογής. Інструкція з
використання
medi. I feel better.
41597_AAL_Collamed_OA.indd 42,2 19.06.13 11:28

Deutsch
nächsten drei bis vier Wochen eintritt.
Beachten Sie, dass die Erwartungen
des Patienten realistisch bleiben
sollen.
2. Überprüfen und bestätigen Sie die
Verordnung (mediales oder laterales
Kompartiment betroffen).
3. Fragen Sie den Patienten nach akuten
Symptomen und lassen Sie ihn ein
paar Schritte laufen. Achten Sie dabei
auf seinen Gang. Sind Instabilitäten im
Gelenk oder Varus- bzw. Valgus-Ver-
formungen zu beobachten?
4. Legen Sie die Orthese an, um dem
Patienten die Unterschiede zwischen
dem Laufen mit und ohne Orthese zu
verdeutlichen.
5. Wenn möglich, verabreden Sie mit
dem Patienten einen weiteren Termin
nach etwa zwei Wochen. Nutzen Sie
diese Möglichkeit, um den Patienten
seine Fortschritte zu zeigen und
überprüfen Sie Sitz und Passform der
Orthese.
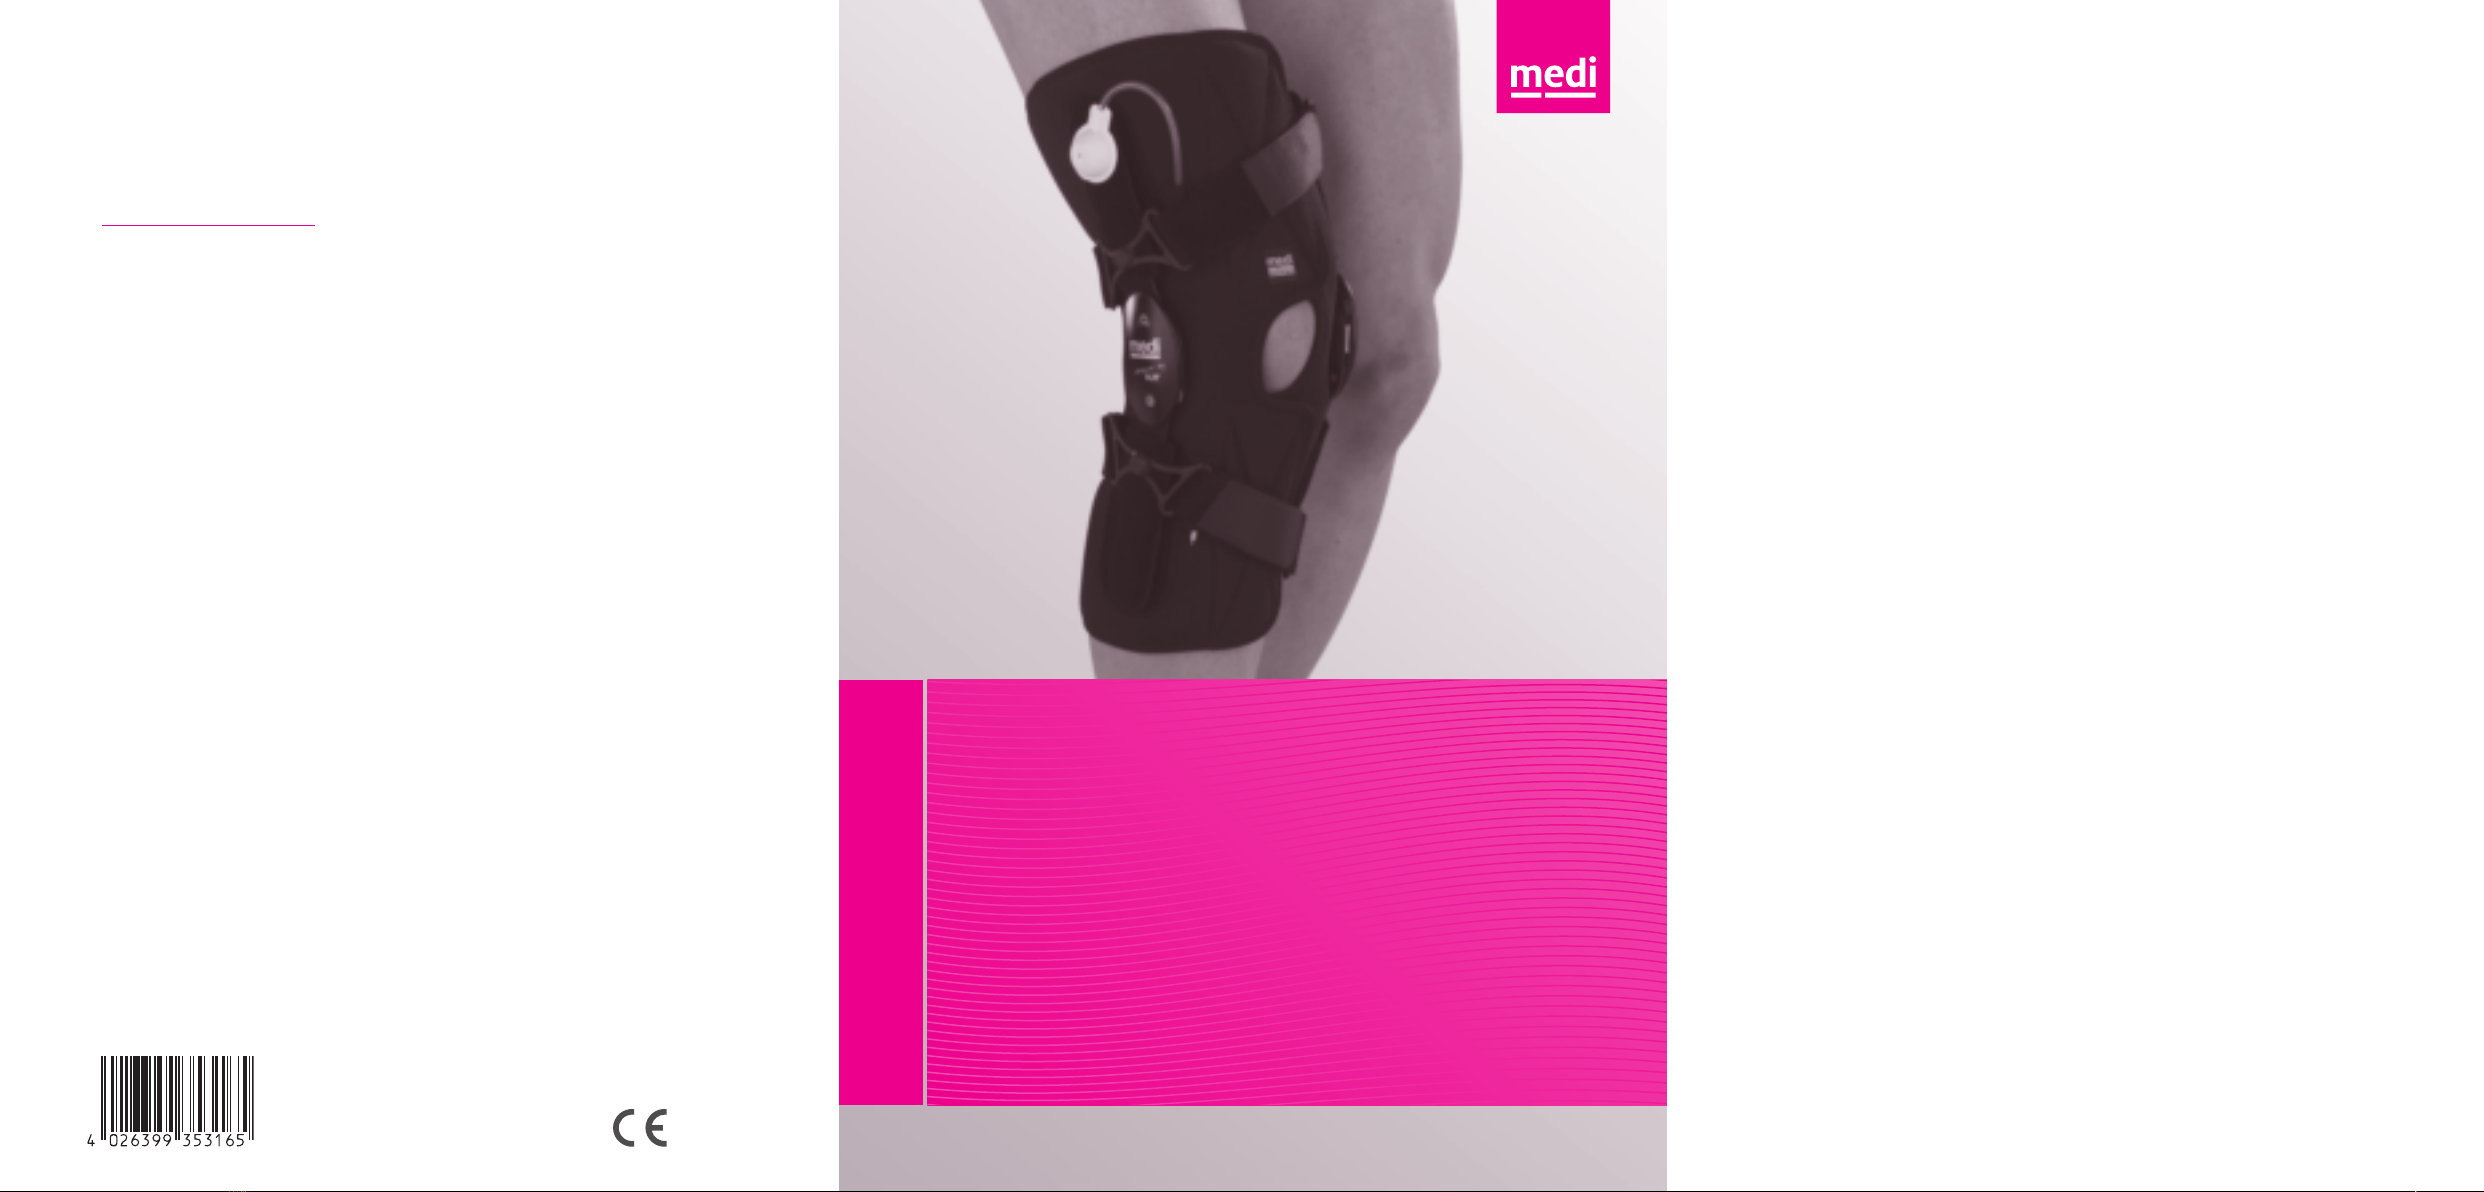
Anziehanleitung
A Öffnen Sie die vier Gurte vollständig
und lösen Sie den oberen und unteren
Klettverschluss. Vergewissern Sie sich,
dass das aufblasbare Kondylenpolster
richtig platziert auf der Innenseite der
Orthese sitzt und auf der gegenüber-
liegenden Seite der betroffenen
Kniegelenkseite angebracht ist.
Collamed®OA
Lieber Patient, Lieber Techniker,
der Arzt hat die funktionelle Knie-
orthese Collamed OA verschrieben. Um
Ihnen das Anlegen zu erleichtern, lesen
Sie bitte diese Anleitung sorgfältig
durch.
Indikationen
• Leichte bis mittlere, mediale wie
laterale Gonarthrose
Kontraindikationen
• Gleichzeitige mediale und laterale
Gonarthrose
Hinweise für den Techniker
Anpassen der Orthese
1. Begutachten Sie die Form des zu
versorgenden Beines und nutzen Sie
die Möglichkeit, dem Patienten die
Funktionsweise der Collamed OA zu
erklären.Schildern Sie dem Patienten
die Wirkungsweise der Orthese mit
ihrer valgisierenden bzw. varisie-
renden Kraft, wodurch das betroffene
Kompartiment entlastet wird. Der
Patient kann eine Schmerzlinderung
zwischen 65 % und 95 % dank der
Orthese erwarten. Machen Sie jedoch
deutlich, dass dieser Effekt nicht
sofort, sondern innerhalb der
A
+
B
A
+
B
D
C1
C1
E2
C2
C2
F
Diagnose und Auswahl der Orthese
Beinstellung Varus-Stellung Valgus-Stellung
Betroffene Seite medial lateral
Therapie mediale Entlastung laterale Entlastung
Position d. aufblasbaren Kondylen-
polsters
lateral medial
Krafteinwirkungsrichtung valgisierend varisierend
Orthese Collamed OA varus Collamed OA valgus
41597_AAL_Collamed_OA.indd 3-41 19.06.13 11:28

Deutsch
B Setzen Sie sich auf die Kante eines
Stuhls und winkeln Sie das Bein um 45°
ab. Legen Sie die Orthese von hinten
an das Bein und verschließen Sie fest
die beiden Klettverschlüsse. Die
Kniescheibe liegt mittig in der dafür
vorgesehenen Aussparung der
Orthese.
C Positionieren Sie die Gelenke so, dass
sich die Scharniermitten (Extensions-
keile) auf Höhe der Oberkante der
Kniescheibe befinden. Achten Sie
drauf, dass die Orthese dabei nicht
verdreht am Bein sitzt.
D Schließen Sie zunächst das untere
Gurtpaar, beginnend mit dem hinteren
Gurt. Dann die beiden oberen Gurte,
auch hier erst den hinteren, dann den
vordern Gurt. Behalten Sie das Knie in
Beugestellung und achten Sie darauf,
dass die Gelenke noch in der richtigen
Position sitzen.
E Stehen Sie nun auf und machen Sie
einige leichte Kniebewegungen. Ziehen
Sie dann die Gurte in der gleichen
Reihenfolge nochmals fest, um ein
Rutschen der Orthese zu vermeiden.
F Durch das aufblasbare Kondylenpol-
ster können Sie größeren Druck
ausüben und damit eine zusätzliche
Entlastung der betroffenen Kniege-
lenkseite erreichen. Drücken Sie dazu
die weiße Pumpe auf der Außenseite
der Orthese. Zum Ablassen von Luft
drücken Sie das Ventil unterhalb des
Gelenkes. Die Pumpe ist mit einem
Steckventil mit dem Luftpolster
verbunden und kann bei Bedarf
abgenommen werden.
Einstellen von Flexions- und
Extensionsbegrenzungen (nur vom
Orthopädietechniker durchzuführen)
Extensionsbegrenzungskeile
(Streckbegrenzung):
0°, 10°, 20°, 30°, 45°
Flexionsbegrenzungskeile
(Beugebegrenzung):
0°, 10°, 20°, 30°, 45°,60°, 75°, 90°, 120°
Ruhigstellungsmöglichkeit bei:
0°, 10°, 20°, 30°, 45°
Die mediale (Innenseite) und die laterale
(Außenseite) Gradeinstellung muss
immer gleich sein.
1. In Ihrer Knieorthese sind 10°
Extensionskeile vorinstalliert.
2. Um die Keile auszuwechseln, öffnen
Sie zunächst die Schrauben der
Gelenkabdeckung und nehmen Sie
den Deckel ab.
3. Um den silbernen Extensionskeil zu
wechseln, öffnen Sie die Schraube und
ziehen Sie den Keil nach vorne heraus.
Die Austauschkeile finden Sie im
Keileset mit dem Aufdruck der
entsprechenden Gradeinstellung.
Schieben Sie den neuen Extensionskeil
von vorne ins Gelenk. Legen Sie nun
die Schraube in die Gewinde-Öffnung
und ziehen Sie sie fest.
4. Die Flexionskeile werden von hinten
installiert. Wählen Sie aus dem
Keileset den passenden Flexionskeil
aus, der mit der entsprechenden
Gradzahl beschriftet ist. Legen Sie den
Keil und ziehen Sie die Schraube fest.
5. Bewegen Sie die Orthesengelenke und
überprüfen Sie die Position der Keile.
Befestigen Sie anschließend die
Gelenkabdeckung.
41597_AAL_Collamed_OA.indd 1 19.06.13 11:27

Deutsch
Wichtiger Hinweis
Ändern Sie die Extensions- und
Flexionsbegrenzungen nur auf Vorgabe
Ihres behandelnden Arztes.
Um eine Hyperextension zu vermeiden,
müssen immer Extensionskeile oder
aber 0°-Keile eingesetzt sein.
Die Mitte der Gelenke sollte auf Höhe
der Kniescheibenoberkante liegen.
Das Gelenk muss hinter der seitlichen
Mittellinie des Beins positioniert sein.
Pflegehinweise
• Die textilen Bestandteile der Orthese
können in Handwäsche bei 30°
gereinigt werden. Spülen Sie sie danach
mit klarem Wasser. Lufttrocknen
lassen.
• Bei normalem Gebrauch ist der
Gelenkmechanismus wartungsfrei.
Er kann aber, nach Gebrauch der
Orthese im Wasser, mit Teflon™ Spray
geschmiert werden.
• Die Gelenkschrauben regelmäßig auf
festen Sitz prüfen und eventuell
nachziehen.
Lagerungshinweis
Bitte die Orthese trocken lagern und vor
direkter Sonneneinstrahlung schützen.
Garantie / Gewährleistung
liegen im Rahmen der gesetzlichen
Bestimmungen.
Ihr medi Team
wünscht Ihnen schnelle Genesung.
41597_AAL_Collamed_OA.indd 2 19.06.13 11:27

English
2. Check and verify the prescription
(medial or lateral compartment).
3. Ask the patient about any acute
symptoms and ask him/her to take a
few steps. Observe his/her gait
carefully. Can you identify any
instability of the joint or any varus/
valgus deformity?
4. Fit the brace to make clear to the
patient the difference between
walking with and without it.
5. If possible make a second
appointment with the patient after
about two weeks. Take this
opportunity to show the patient how
much progress he/she has made and
check that the brace fits properly.
Fitting instructions
A Open the four straps completely and
undo the upper and lower Velcro
fasteners. Make sure that the
inflatable condyle cushion is correctly
positioned on the inside of the brace
and is fitted to the side opposite to the
affected side of the knee joint.
B Sit on the edge of a chair and bend
your leg to 45°. Put the brace on your
leg from the back and close the two
Velcro fasteners tightly. The kneecap
should be positioned in the centre of
the moulded recess in the brace.
C Position the brace joints so that the
centres of the hinges (extension
wedges) are level with the upper
border of the kneecap. Make sure that
the brace is not twisted on your leg.
Collamed®OA
Dear Patient, Dear Technician,
the doctor has prescribed the
functional knee brace Collamed OA.
Please read these instructions carefully
to help you put the brace on.
Indications
• Mild to moderate, medial and lateral
osteoarthritis of the knee
Kontraindikationen
• Simultaneous medial and lateral
osteoarthritis of the knee
Notes for the technician
Fitting the brace
1. Inspect the shape of the affected leg
and take the opportunity to explain to
the patient how the Collamed OA
works.
Describe to the patient how the brace
works by exerting a force to push the
knee into a varus or valgus position to
relieve the pressure on the affected
compartment. Thanks to the brace the
patient can expect pain relief of
between 65 % and 95 %. However,
make it clear that this effect will not
occur immediately, but will onset
gradually within the next three to four
weeks. Remember that the patient’s
expectations should remain realistic.
Diagnosis and choice of brace
Leg alignment Varus position Valgus position
Affected compartment medial lateral
Treatment mediale pressure relief laterale pressure relief
Position of the inflatable
condyle cushion
lateral medial
Force direction Into valgus Into varus
Brace Collamed OA varus Collamed OA valgus
41597_AAL_Collamed_OA.indd 3 19.06.13 11:27

English
D Now fasten the lower two straps,
starting with the strap at the back.
Then fasten the upper two straps, first
the back one and then the front. Keep
your knee bent and make sure that the
hinges are still in the right position.
E Now stand up and move your knee
gently a few times. Then tighten the
straps in the order given above to stop
the brace from slipping.
F The inflatable condyle cushion enables
you to exert more pressure and thus
relieve more pressure on the affected
side of the knee. To inflate the cushion
press on the white pump on the
outside of the brace. To deflate the
cushion press in the valve below the
joint. The pump is connected to the air
cushion with a plug-in valve and can
be removed if wished.
Adjusting the flexion and extension
limits (may only be done by the
orthopaedic technician)
Extension limitation wedges
(extension limit):
0°, 10°, 20°, 30°, 45°
Flexion limitation wedges (flexion limit):
0°, 10°, 20°, 30°, 45°, 60°, 75°, 90°, 120°
Can be locked at:
0°, 10°, 20°, 30°, 45°,
The medial (inside) and lateral (outside)
settings - in degrees - must always be
the same.
1. Your knee brace comes with 10°
extension wedges fitted.
2. To change the wedges first loosen the
screws in the joint cover and take the
cover off.
3. To change the silver extension wedges
first loosen the screw and then pull
the wedge out from the front of the
brace. You will find the replacement
wedges in the wedge set, marked with
the corresponding setting in degrees.
Slide the new extension wedge into
the front of the joint. Now replace the
screw in the threaded hole and screw
it tight.
4. The flexion wedges are installed from
the back. Select the suitable wedge
from the wedge set – it is marked with
the corresponding setting in degrees.
Insert the wedge and tighten the
screw.
5. Move the brace’s joints and check the
positions of the wedges. Finally secure
the joint cover.
Important information
Only change the flexion and extension
limits when your attending doctor tells
you to.
In order to prevent hyperextension
always insert either extension wedges or
the 0° wedge. The centres of the hinges
must be level with the upper border of
your kneecap. The joint must be
positioned behind the midline of the leg
on each side.
Care instructions
• The fabric parts of the brace can be
washed by hand at 30°C. Rinse it in
clean water afterwards.
Leave out to dry.
• Under normal use the brace is
maintenance-free. However, after
using the brace in water the hinges
may be lubricated with Teflon™ spray.
• Check regularly that the joint screws
are secure, tighten them if necessary.
Storage instructions
Please keep the brace in a cool, dry place
and protect from direct sunlight.
Your medi Team
hopes you will get well soon.
41597_AAL_Collamed_OA.indd 4 19.06.13 11:27

Français
Collamed®OA
Cher patient, cher technicien,
le médecin a prescrit le port de
l’orthèse de genou fonctionnelle
Collamed OA. Pour vous faciliter
sa mise en place, veuillez lire
attentivement les instructions ci-
dessous..
Indications
• Gonarthrose légère à modérée, soit
interne, soit externe
Contraindications
• Gonarthrose à la fois interne et
externe
Instructions destinées au technicien
Ajustage de l’orthèse
1. Examinez la forme de la jambe à
traiter et profitez de cette occasion
pour expliquer au patient le mode de
fonctionnement de l’orthèse
Collamed OA.
Décrivez au patient la façon dont
l’orthèse, avec sa force valgisante ou
varisante, permet de décharger le
compartiment touché. Le patient peut
escompter un soulagement de la
douleur de l’ordre de 65 à 95% grâce à
l’orthèse. Toutefois, précisez bien que
cet effet ne se fera pas sentir dans
l’immédiat mais dans les trois à quatre
prochaines semaines. Veillez à ce que
les attentes du patient restent
réalistes.
2. Vérifiez et confirmez la prescription
(compartiment interne ou externe
touché).
3. Interrogez le patient sur d’éventuels
symptômes aigus et faites lui faire
quelques pas. Observez alors sa
démarche. Pouvez-vous relever une
instabilité de l’articulation ou des
déformations en varus ou en valgus?
4. Mettez l’orthèse en place pour
expliquer au patient la différence
entre la marche avec et sans orthèse.
5. Si possible, convenez avec le patient
d’un nouveau rendez-vous environ
deux semaines plus tard. Profitez de
cette occasion pour montrer au
patient les progrès accomplis et
vérifiez l’ajustement et la mise en
place de l’orthèse.
Mise en place
A Ouvrez complètement les quatre
sangles et détachez la fermeture
Velcro inférieure et supérieure.
Assurez-vous que le coussinet
condylien gonflable est bien
positionné sur la face interne de
l’orthèse et vient se placer contre la
face opposée du côté de l’articulation
du genou touché.
Diagnostic et choix de l’orthèse
Position de la jambe Genu varum Genu valgum
Côté touché interne externe
Traitement décharge interne décharge externe
Position du coussinet
condylien gonflable
externe interne
Sens de l’action de la force valgisant varisant
Orthèse Collamed OA varus Collamed OA valgus
41597_AAL_Collamed_OA.indd 5 19.06.13 11:27

Français
B Asseyez-vous sur le bord d’une chaise
et fléchissez la jambe à 45°. Posez
l’orthèse contre la jambe par l’arrière
et fermez bien les deux bandes Velcro.
La rotule apparaît au centre de
l’ouverture de l’orthèse prévue à cet
effet.
C Positionnez les charnières de sorte que
leur centre (cales d’extension) se
trouve à hauteur du bord supérieur de
la rotule. Veillez à ce que l’orthèse soit
parfaitement dans l’axe de la jambe.
D Fermez ensuite la paire de sangles
inférieures en commençant par la
sangle arrière. Passez aux deux
sangles supérieures, en fermant de
nouveau la sangle arrière d’abord, puis
la sangle avant. Gardez le genou fléchi
et vérifiez que les charnières sont
toujours dans la bonne position.
E Maintenant levez-vous et faites
quelques légers mouvements de
genou. Serrez enfin de nouveau les
sangles dans le même ordre que
précédemment afin d’éviter tout
glissement de l’orthèse.
F Le coussinet condylien gonflable
permet d’exercer une plus forte
pression et d’obtenir une décharge plus
importante du côté de l’articulation du
genou touché. Pour gonfler le
coussinet, pressez la pompe blanche
placée sur la face externe de l’orthèse.
Pour dégonfler le coussinet, actionnez
la valve placée sous la charnière. La
pompe est reliée au coussinet
gonflable par une valve enfichable et
peut, au besoin, être retirée.
Réglage des limitations de flexion et
d’extension (uniquement réalisé par
le technicien orthopédique)
Cale de limitation de l’extension (limite
d’extension):
0°, 10°, 20°, 30°, 45°
Cale de limitation de flexion (limite de la
flexion):
0°, 10°, 20°, 30°, 45°, 60°, 75°, 90°, 120°
Possibilité d’immobilisation du genou à:
0°, 10°, 20°, 30°, 45°
Les réglages médiaux (face interne) et
latéraux (face externe) – en degrés -
doivent toujours être identiques.
1. L’orthèse de genou est pré-équipée de
cales d’extension à 10°.
2. Pour changer les cales, dévissez tout
d’abord les vis du cache-charnière et
retirez le cache.
3. Pour remplacer la cale d’extension
argentée, desserrez la vis et sortez la
cale vers l’avant. Vous trouverez les
cales de rechange dans le jeu de cales
avec l’angle correspondant imprimé
dessus. Poussez la nouvelle cale
d’extension par l’avant dans la
charnière. Replacez la vis dans l’orifice
fileté et resserrez-la bien.
4. Les cales de flexion s’installent par
l’arrière. Choisissez la cale de flexion
adéquate portant le degré
correspondant dans le jeu de cales.
Mettez la cale en place et serrez bien
la vis.
5. Faites jouer les charnières de l’orthèse
et vérifiez la position des cales. Fixez
ensuite le cache-charnière.
41597_AAL_Collamed_OA.indd 6 19.06.13 11:27

Français
Attention
Ne modifiez les limitations d’extension
et de flexion que sur prescription du
médecin traitant.
Pour éviter une hyperextension, des
cales d’extension ou des cales à 0°
doivent toujours être en place.
Le milieu de la charnière doit se trouver
à la hauteur du bord supérieur de la
rotule. La charnière doit être positionnée
derrière la ligne médiane latérale de la
jambe.
Conseils d’entretien
• Les éléments textiles de l’orthèse
peuvent être lavés à la main à 30°.
Rincez-les ensuite à l’eau claire et
laissez-les sécher à l’air libre.
• Dans des conditions d’utilisation
normales, le système de charnières ne
nécessite pas d’entretien. Il peut
toutefois être lubrifié à l’aide de spray
Teflon™ après l’utilisation de l’orthèse
dans l’eau.
• Vériez régulièrement le serrage des
vis des charnières et resserrez-les si
nécessaire.
Conditions de stockage
Conservez l’orthèse dans un endroit sec
et à l’abri du rayonnement direct du
soleil.
Votre équipe medi
vous souhaite un prompt rétablissement
41597_AAL_Collamed_OA.indd 7 19.06.13 11:27

Español
Collamed®OA
Estimado paciente, estimado técnico:
Su médico ha prescrito la ortesis de
rodilla Collamed OA. Para facilitarle a
Vd. la colocación, por favor lea estas
instrucciones detenidamente.
Indicaciones
• Gonartrosis leve hasta mediana, tanto
medial como lateral.
Contraindicaciones
• Gonartrosis simultánea medial y
lateral
Advertencias para el técnico
Ajuste de la ortesis
1.Examine Vd. la forma de la pierna en
cuestión y aproveche la oportunidad
para explicarle al paciente el
funcionamiento de Collamed OA.
Explíquele al paciente el
funcionamiento de la ortesis con su
fuerza valguizante o varizante, por la
cual es descargado el compartimento
afectado. El paciente puede contar con
la mitigación del dolor entre el 65 % y
el 95 % gracias a la ortesis. Sin
embargo, explíquele claramente que
este efecto no aparecerá
inmediatamente sino más bien dentro
de las próximas tres a cuatro semanas.
Por favor, tenga en cuenta que las
expectativas del paciente deben de ser
realistas.
2.Compruebe y confirme la prescripción
(compartimento medial o lateral
afectado).
3. Pregunte al paciente si tiene síntomas
agudos y hágalo andar unos pasos
observando su modo de andar.
¿Pueden observarse inestabilidades
en la articulación o deformaciones
varus o valgus?
4. Póngale al paciente la ortesis para
mostrarle la diferencia entre el andar
con y sin ortesis.
5. Si es posible, convenga con su paciente
otra cita después de
aproximadamente dos semanas.
Aproveche esa posibilidad para
mostrarle al paciente sus progresos y
controle la posición y el ajuste de la
ortesis.
Instrucciones para la colocación
A Abra las cuatro correas por completo y
afloje el cierre de velcro superior e
inferior. Asegúrese de que la
almohadilla hinchable para los
cóndilos esté debidamente
posicionada en el lado interior de la
ortesis y esté colocada en el lado
opuesto al lado afectado de la rodilla.
B Siéntese al borde de una silla y doble la
pierna en un ángulo de 45°. Coloque la
ortesis a la pierna desde atrás, y cierre
bien los dos cierres de velcro. La rótula
se encuentra en el centro de la
ventana de la ortesis prevista para
ello.
Diagnosis y selección de la ortesis
Posición de la pierna Genu varum Genu valgum
Lado afectado Medial Lateral
Terapia Descarga medial Descarga lateral
Posición de la almohadilla
hinchable para los cóndilos
Lateral Medial
Dirección de actuación de fuerza Valguizante Varizante
Ortesis Collamed OA varus Collamed OA valgus
41597_AAL_Collamed_OA.indd 8 19.06.13 11:27

Español
C Posicione las articulaciones de tal
manera que los centros de las
charnelas (cuñas de extensión) se
encuentren a la altura del canto
superior de la rótula. Cuide de que la
ortesis no esté colocada en la pierna
de manera torcida.
D Cierre primero el par de correas
inferior, empezando con la correa
trasera. Después, cierre las dos correas
superiores, aquí también empezando
con la correa trasera y cerrando
después la delantera. Mantenga la
rodilla en posición flexionada y cuide
de que las articulaciones sigan
estando en la posición correcta.
E Levántese ahora y haga unos ligeros
movimientos de flexión de la rodilla.
Reajuste las correas en el mismo orden
para evitar que se resbale la ortesis.
F Gracias a las almohadillas hinchables
para los cóndilos, puede Vd. ejercer una
mayor fuerza y con ello alcanzar una
descarga añadida del lado afectado de
la rodilla. Para ello, presione el bombín
blanco del lado exterior de la ortesis.
Para dejar salir el aire, presione la
válvula por debajo de la articulación.
El bombín está unido con la
almohadilla de aire por una válvula
insertable y puede ser retirado en caso
de necesidad.
Ajuste de las limitaciones de flexión y
extensión (Éste debe ser realizado
únicamente por un técnico de
ortopedia)
Cuñas de limitación de extensión
(limitación de trayecto):
0°, 10°, 20°, 30°, 45°
Cuñas de limitación de flexión
(limitación de flexión):
0°, 10°, 20°, 30°, 45°, 60°, 75°, 90°, 120°
Posibilidad de inmobilización en un
ángulo de :
0°, 10°, 20°, 30°, 45°
El ajuste de grados en el lado interior
(medial) y en el lado exterior (lateral)
siempre debe ser igual.
1. En su ortesis de rodilla están
preinstaladas cuñas de extensión de
10°.
2. Para cambiar la cuña, abra primero los
tornillos de la cubierta de articulación
y quite la tapa.
3. Para cambiar la cuña plateada de
extensión, abra el tornillo y extraiga la
cuña tirando de ella hacia adelante.
Las cuñas de recambio se encuentran
en el juego de cuñas con la impresión
de graduación correspondiente.
Empuje la nueva cuña de extensión
introduciéndola por delante en la
articulación. Coloque entonces el
tornillo en el orificio de rosca y
apriételo.
4. Las cuñas de flexión se instalan desde
atrás. Elija del juego de cuñas, la cuña
de flexión adecuada que tenga inscrito
el número de grado correspondiente.
Coloque la cuña y apriete el tornillo.
5. Mueva las articulaciones de ortesis y
compruebe la posición de las cuñas.
Sujete a continuación la cubierta de
articulación.
41597_AAL_Collamed_OA.indd 9 19.06.13 11:27

Español
Nota importante
Modifique las limitaciones de extensión
y flexión sólo conforme a la
especificación del médico que asista al
paciente. Para evitar una
hiperextensión, siempre deben ser
empleadas cuñas de extensión o cuñas
de 0°.
El centro de las articulaciones debe
encontrarse a la altura del canto
superior de la rótula. La articulación
debe estar posicionada detrás de la línea
central lateral de la pierna.
Notas para el cuidado
• Las partes textiles de la ortesis pueden
ser lavadas a mano a 30°. Enjuáguelas
después utilizando agua clara. Dejar
que ésta se seque al aire.
• En el caso de un uso normal, el
mecanismo de articulación no
requerirá ningún mantenimiento.
Sin embargo, el mismo puede ser
lubricado con un aerosol de Teflon™
después de haber sido utilizada la
ortesis en el agua.
• Comprobar regularmente la posición
fija de los tornillos de articulación y
apretarlos en caso de necesidad.
Notas para el almacenamiento
Por favor guardar la ortesis en un lugar
seco y protegerla de la irradiación solar
directa.
Su equipo medi
le desea una rápida recuperación
41597_AAL_Collamed_OA.indd 10 19.06.13 11:27

Português
Collamed®OA
Caro paciente!
O seu médico prescreveu-lhe a ortótese
funcional para o joelho Collamed OA.
Para lhe facilitar a colocação, por favor
leia estas instruções cuidadosamente.
Indicações
• Osteoartrose ligeira a moderada dos
joelhos na região medial e lateral
Contra-indicações
• Osteoartrose dos joelhos simultânea
na região medial e lateral
Indicações para o técnico
Adaptar a ortótese
1. Examine a forma da perna a ser
tratada e aproveite a oportunidade
para explicar o modo de
funcionamento da Collamed OA.
Explique ao paciente o modo de acção
da ortótese com a sua força no sentido
valgus ou varus, em que o respectivo
compartimento é aliviado. Graças à
aplicação da ortótese, o paciente pode
esperar uma redução das dores entre
65 % e 95 %. No entanto, é necessário
informar o paciente de que o efeito
não é imediato, pois a sua acção só
deve começar a fazer efeito dentro das
próximas três a quatro semanas.
Certifique-se de que as expectativas
do paciente permanecem realistas.
2. Verifique e confirme a prescrição
(compartimento medial ou lateral a ser
tratado).
3. Questione o paciente sobre os
sintomas actuais e deixe-o dar alguns
passos. Observe o modo como o
paciente caminha. Consegue
constatar instabilidades na
articulação ou deformações no varus
ou valgus?
4. Coloque a ortótese para demonstrar
ao paciente as diferenças entre o
caminhar com e sem a ortótese.
5. Se possível, marque uma próxima
consulta com o paciente após aprox.
duas semanas. Utilize esta
oportunidade para demonstrar os
progressos ao paciente e para verificar
o ajuste e a forma da ortótese.
Instruções de aplicação
• Abra totalmente as quatro correias e
solte o fecho de velcro superior e
inferior. Certifique-se de que o
amortecimento insuflável do côndilo
está posicionado correctamente no
lado interior da ortótese e fixado no
lado oposto da articulação do joelho a
ser tratada.
• Sente-se na extremidade de uma
cadeira e dobre a perna num ângulo de
45°. Coloque a ortótese no lado
traseiro da perna e aperte os dois
fechos de velcro. A rótula do joelho
está posicionada no centro da
abertura da ortótese.
Diagnóstico e selecção da ortótese
Posição da perna Posição varus Posição valgus
Lado afectado Medial Lateral
Terapia Alívio medial Alívio lateral
Posição dos amortecimentos
insufláveis dos côndilos
Lateral Medial
Sentido da força valgus varus
Ortótese Collamed OA varus Collamed OA valgus
41597_AAL_Collamed_OA.indd 11 19.06.13 11:27

Português
• Posicione as articulações de modo a
que o centro das dobradiças (cunhas de
extensão) esteja à altura da margem
superior da rótula do joelho. Tenha
atenção para que a ortótese não esteja
torcida na perna.
• Em primeiro lugar, feche os pares de
correia inferiores começando com a
correia traseira. Depois, as duas
correias superiores. Aqui também se
deve começar com a correia traseira e,
depois, a correia da frente. Mantenha o
joelho dobrado e certifique-se de que
as articulações ainda estão na posição
correcta.
• Agora, levante-se e realize alguns
movimentos ligeiros com o joelho.
Depois, volte a apertar as correias na
mesma sequência para evitar que a
ortótese escorregue.
• Através do amortecimento insuável
do côndilo, existe a possibilidade de
exercer mais pressão e, deste modo,
obter um alívio adicional do respectivo
lado da articulação do joelho. Para isso,
pressione a bomba branca na parte
exterior da ortótese. Para evacuar o ar,
pressione a válvula localizada por baixo
da articulação. A bomba está unida à
almofada de ar através de uma válvula
de encaixe e, em caso de necessidade,
pode ser removida.
Ajustar os limites de flexão e extensão
(a ser realizado apenas por
ortopedistas)
Cunhas de limitação da extensão
(limitação do alongamento):
0°, 10°, 20°, 30°, 45°
Cunhas de limitação da flexão
(limitação da curvatura):
0°, 10°, 20°, 30°, 45°,60°, 75°, 90°, 120°
Possibilidade de retensão a:
0°, 10°, 20°, 30°, 45°
O ajuste gradual medial (lado interior) e
lateral (lado exterior) tem de ser sempre
igual.
1. A sua ortótese para o joelho possui
cunhas de extensão de 10° pré-
instaladas.
2. Para substituir as cunhas, remova, em
primeiro lugar, os parafusos da
cobertura da articulação e retire a
tampa.
3. Para substituir a cunha de extensão
prateada, solte o parafuso e remova a
cunha puxando para a frente. As
cunhas de substituição são fornecidas
no conjunto de cunhas com a
impressão do respectivo ajuste
gradual. Insira a cunha de extensão
nova na parte da frente da articulação.
Enrosque o parafuso na abertura da
rosca e aperte com força.
4. As cunhas de flexão são instaladas
pelo lado de trás. No conjunto de
cunhas, seleccione a cunha de flexão
correcta com o respectivo número dos
graus. Coloque a cunha e aperte o
parafuso.
5. Movimente as articulações da
ortótese e verifique a posição das
cunhas. Em seguida, fixe a cobertura
da articulação.
41597_AAL_Collamed_OA.indd 12 19.06.13 11:27

Português
Indicação importante
Altere os limites de extensão e de flexão
apenas segundo indicação do seu
médico assistente.
Para evitar uma hiperextensão, têm
sempre de ser empregues cunhas de
extensão ou então cunhas de 0°. O
centro das articulações deve situar-se à
altura da margem superior da rótula do
joelho. A articulação deve estar situada
atrás da linha média lateral da perna.
Instruções de limpeza
• Os componentes têxteis da ortótese
podem ser lavados à mão a 30°. Depois,
enxagúe com água limpa. Deixe secar
ao ar.
• Em caso de utilização normal, o
mecanismo da articulação não
necessita de manutenção. No entanto,
após a utilização da ortótese, ele pode
ser lubrificado com um spray de
Teflon™.
• Verique regularmente os parafusos da
articulação em relação ao aperto e,
eventualmente, reaperte os mesmos.
Conservação
Conserve a ortótese em lugar seco e não
a exponha directamente à luz directa do
sol.
A sua equipa medi
deseja-lhe um bom restabelecimento!
41597_AAL_Collamed_OA.indd 13 19.06.13 11:27

Italiano
Collamed®OA
Gentile Paziente,
Il Suo medico Le ha prescritto la
ginocchiera funzionale Collamed OA.
Per facilitarne l’applicazione, legga
attentamente queste istruzioni.
Indicazioni
• Gonartrosi mediale e laterale, da lieve
a media
Controindicazioni
• Gonartrosi mediale e laterale
contemporanea
Indicazioni per il tecnico
Applicazione dell’ortesi
1. Valutare la forma della gamba da
trattare e cogliere l’occasione per
spiegare al paziente il funzionamento
di Collamed OA
Descrivere al paziente l’azione
terapeutica dell’ortesi con la sua forza
valgizzante o varizzante, grazie a cui il
compartimento interessato viene
alleggerito. Con l’ortesi, il paziente
può aspettarsi un alleviamento del
dolore fra il 65 e il 95%. Chiarire,
tuttavia, che questo effetto non si
avverte subito ma nel corso delle
tre-quattro settimane successive
all’applicazione dell’ortesi. Assicurarsi
che le aspettative del paziente siano
realistiche.
2. Controllare e confermare la
prescrizione (compartimento mediale
o laterale interessato).
3. Domandare al paziente se accusa
sintomi acuti e fargli fare un paio di
passi, prestando attenzione alla sua
andatura. Si osservano instabilità
dell’articolazione o varismo/valgismo?
4. Applicare l’ortesi per illustrare al
paziente la differenza fra l’andatura
con e senza ortesi.
5. Se possibile, fissare un nuovo
appuntamento con il paziente dopo
circa due settimane. Cogliere questa
occasione per mostrare al paziente i
progressi fatti e per verificare la
tenuta e l’adattamento dell’ortesi.
Istruzioni per l’applicazione
• Aprire completamente le quattro
cinghie e allentare la chiusura a velcro
superiore e inferiore. Accertarsi che
l'imbottitura gonfiabile dei condili sia
correttamente posizionata sulla parte
interna dell’ortesi e che sia applicata
sul lato opposto dell’articolazione di
ginocchio interessata.
• Sedersi sul bordo di una sedia e piegare
la gamba di 45°. Applicare l’ortesi alla
gamba da dietro e chiudere saldamente
entrambe le chiusure a velcro. La rotula
si trova al centro dell’apposita apertura
dell’ortesi.
Diagnosi e scelta dell'ortesi
Posizione dell'arto Posizione vara Posizione valga
Parte interessata Mediale Laterale
Terapia Descarga medial Descarga lateral
Posizione dell’imbottitura
gonfiabile dei condili
Laterale Mediale
Direzione della forza applicata Valgizzante Varizzante
Ortesi Collamed OA varus Collamed OA valgus
41597_AAL_Collamed_OA.indd 14 19.06.13 11:27

Italiano
• Posizionare l'articolazione in modo che
i centri delle cerniere (spessori di
estensione) si trovino all'altezza del
bordo superiore della rotula. Prestare
attenzione a che l’ortesi non sia
applicata storta sulla gamba.
• Chiudere prima le due cinghie inferiori,
partendo da quella situata più in basso.
Quindi chiudere le due cinghie
superiori, anche in questo caso
iniziando da quella situata più in basso.
Infine, chiudere la cinghia anteriore.
Mantenere il ginocchio in posizione
piegata e accertarsi che le articolazioni
si trovino ancora nella posizione
corretta.
• Alzarsi e fare alcuni lievi movimenti
con il ginocchio. Chiudere quindi
nuovamente le cinghie nella stessa
sequenza per evitare uno scivolamento
dell’ortesi.
• Grazie all’imbottitura gonabile dei
condili è possibile esercitare una
pressione più forte e ottenere, così, un
ulteriore alleggerimento
dell’articolazione di ginocchio
interessata. A tal fine, premere la
pompa bianca sul lato esterno
dell’ortesi. Per scaricare aria, premere
la valvola situata sotto l’articolazione.
La pompa è collegata all’imbottitura ad
aria mediante una valvola a innesto e,
all’occorrenza, può essere rimossa.
Regolazione delle limitazioni di
flesso-estensione (eseguibile
solamente dall’ortopedico)
Spessori di limitazione dell'estensione
(limitazione della corsa):
0°, 10°, 20°, 30°, 45°
Spessori di limitazione della flessione
(limitazione del piegamento):
0°, 10°, 20°, 30°, 45°,60°, 75°, 90°, 120°
Possibilità di immobilizzazione a:
0°, 10°, 20°, 30°, 45°
L'impostazione mediale (lato interno)
dei gradi deve sempre corrispondere a
quella laterale (lato esterno).
1. Nella Sua ortesi di ginocchio sono
incorporati spessori di estensione a
10°.
2. Per sostituire gli spessori, svitare le
viti della copertura e rimuoverla.
3. Per sostituire lo spessore di estensione
argentato, svitare la vite ed estrarre lo
spessore dal davanti. Gli spessori di
ricambio si trovano nel set di spessori e
recano la stampa della corrispondente
impostazione dei gradi. Inserire
nell'articolazione il nuovo spessore di
estensione dal davanti. Inserire ora la
vite nel foro filettato e serrarla.
4. Gli spessori di flessione vengono
montati da dietro. Tra gli spessori
disponibili nel set, scegliere lo
spessore di flessione adatto marcato
con il grado desiderato. Inserire lo
spessore e serrare la vite.
5. Muovere l'articolazione ortesica e
controllare la corretta posizione degli
spessori. Infine, fissare la copertura.
41597_AAL_Collamed_OA.indd 15 19.06.13 11:27

Italiano
Avvertenza importante
Modificare le limitazioni della flesso-
estensione solo su indicazione del
medico curante.
Per evitare l’iperestensione, vanno
inseriti sempre gli spessori per
l’estensione oppure quelli di 0° gradi. Il
centro dell’articolazione dovrebbe
trovarsi all’altezza del bordo superiore
della rotula. L’articolazione deve essere
posizionata dietro la linea mediana
laterale della gamba.
Indicazioni per la manutenzione
• Le parti in tessuto dell’ortesi possono
essere lavata a mano a 30°. Sciacquare
con acqua pulita. Fare asciugare
all'aria.
• Se utilizzato normalmente, il
meccanismo dell'articolazione non
richiede manutenzione. Se, tuttavia,
l'ortesi è stata utilizzata in acqua, può
essere lubrificata con spray Teflon™.
• Vericare regolarmente che le viti
dell’articolazione siano ben serrate ed
eventualmente stringerle.
Avvertenze per la conservazione
Conservare l’ortesi in luogo asciutto e al
riparo dalla luce solare diretta.
Il team medi
Le augura una pronta guarigione.
41597_AAL_Collamed_OA.indd 16 19.06.13 11:27

EnglishNederlands
Collamed®OA
Beste patiënt, beste technicus,
de arts heeft de functionele
knie-orthese Collamed OA.
voorgeschreven. Om het aantrekken
te vergemakkelijken verdient het
aanbeveling deze gebruiksaanwijzing
zorgvuldig door te lezen.
Indicaties
• Lichte tot middelmatige mediale en
laterale gonartrose
Contra-indicaties
• Gelijktijdige mediale en laterale
gonartrose
Aanwijzingen voor de technicus
Aanpassen van de orthese
1. Bekijk de vorm van het te verzorgen
been en maak gebruik van de
mogelijkheid om aan uw patiënt de
werkwijze van de Collamed OA uit te
leggen.
Beschrijf aan de patiënt de werkwijze
van de orthese met de valgiserende
c.q. variserende kracht ervan,
waardoor het betreffende
compartiment wordt ontlast. De
patiënt kan verwachten dat hij door
het gebruik van de orthese 65% tot
95% minder pijn heeft.
Maak hem echter duidelijk dat dit
effect niet onmiddellijk wordt bereikt
maar pas na een week of drie, vier. Let
erop dat de verwachtingen van de
patiënt realistisch moeten blijven.
2. Controleer de gegevens op het recept
(gaat het om het mediale of laterale
compartiment).
3. Vraag de patiënt naar acute
symptomen en laat hem een paar
stappen doen. Let daarbij op zijn
manier van lopen. Ziet u een
instabiliteit in het gewricht of
vervormingen van varus of valgus?
4. Leg de orthese aan om de patiënt het
verschil duidelijk te maken tussen
lopen met en zonder orthese.
5. Maak zo mogelijk een afspraak met de
patiënt voor over twee weken. Maak
daarbij dan gebruik van de
mogelijkheid om de patiënt zijn
vorderingen te laten zien en
controleer zitting en pasvorm van de
orthese.
Diagnose en keuze van de orthese
Beenstand varusstand valgusstand
Betreffende zijde mediaal lateraal
Therapie mediale ontlasting laterale ontlasting
Positie van de opblaasbare
condylusbekleding
lateraal mediaal
Richting waarin de kracht werkt valgiserend variserend
Orthese Collamed OA varus Collamed OA valgus
41597_AAL_Collamed_OA.indd 17 19.06.13 11:27

Nederlands
Gebruiksaanwijzing
A Open de vier gordels helemaal en maak
de bovenste en onderste
klittenbandsluiting los. Vergewis u
ervan dat de opblaasbare
condylusbekleding op de juiste plaats
tegen de binnenkant van de orthese zit
en aan de andere kant tegenover die
van het betreffende kniegewricht
aangebracht is.
B Ga op de rand van een stoel zitten en
buig het been 45°. Leg de orthese van
achteren tegen het been en sluit de
beide klittenbandsluitingen stevig. De
knieschijf ligt in het midden van de
daarvoor bedoelde opening van de
orthese.
C Plaats de scharnieren nu zo dat het
midden van de scharnieren
(extensiewiggen) zich ter hoogte van
de bovenkant van de knieschijf
bevindt. Let erop dat de orthese
daarbij niet verdraaid tegen het been
zit.
D Sluit eerst het onderste paar gordels
waarbij u bij de achterste gordel
begint. Dan de beide bovenste gordels,
ook hier eerst de achterste en dan de
voorste gordel. Laat de knie gebogen
en let erop dat de scharnieren nog in
de juiste positie zitten.
E Sta nu op en beweeg de knieën een
beetje. Trek vervolgens de gordels in
dezelfde volgorde nog eens vast om te
voorkomen dat de orthese gaat glijden.
F Door de opblaasbare
condylusbekleding kunt u een grotere
druk uitoefenen en zo de getroffen
kant van het kniegewricht wat meer
ontlasten. Druk daartoe de witte pomp
op de buitekant van de orthese. Om
lucht af te laten drukt u op het ventiel
onder het gewricht. De pomp is via een
insteekventiel verbonden met het
luchtkussen en kan zo nodig
verwijderd worden.
Instellen van flexie- en extensiebe-
perkingen (alleen uit te voeren door
de technicus/orthopedist)
Extensiebeperkingswiggen
(strekbeperking):
0°, 10°, 20°, 30°, 45°
Flexiebeperkingswiggen
(buigbeperking): 0°, 10°, 20°, 30°,
45°,60°, 75°, 90°, 120°
Immobilisatiemogelijkheid bij:
0°, 10°, 20°, 30°, 45°
De mediale (binnenzijde) en de laterale
(buitenzijde) gradeninstelling moeten
altijd gelijk zijn.
1. In uw knie-orthese zijn
extensiewiggen van 10° geïnstalleerd.
2. Om de wiggen te vervangen opent u
eerst de schroeven van de
scharnierafdekking en verwijdert u
het deksel.
3. Om de zilveren extensiewig te
vervangen opent u de schroef en trekt
u de wig er naar voren uit. De
reservewiggen vindt u in de wiggenset
met de opdruk van de bijpassende
gradeninstelling.
Schuif de nieuwe extensiewig van
voren in het scharnier. Leg nu de
schroef in de schroefdraadopening en
draai deze stevig vast.
4. De flexiewiggen worden van achteren
geïnstalleerd. Kies uit de wiggenset de
passende flexiewig waar de
gradeninstelling op staat die u nodig
heeft. Leg de wig aan en draai de
schroef stevig vast.
5. Beweeg de orthesescharnieren en
controleer de stand van de wiggen.
Bevestig vervolgens de
scharnierafdekking.
41597_AAL_Collamed_OA.indd 18 19.06.13 11:27
Table of contents
Languages:
Other medi Personal Care Product manuals

medi
medi Rhizomed soft User manual

medi
medi Lumbamed sacro User manual

medi
medi CIRCAID READY-FIT User manual

medi
medi protect.Knee immobilizer User manual

medi
medi mediven 550 Arm User manual

medi
medi lipomed User manual

medi
medi Collamed User manual

medi
medi Levamed User manual

medi
medi 4C flex User manual

medi
medi Mediven User manual

medi
medi Circaid Juxtacures User manual

medi
medi 4C flex User manual

medi
medi protect.Lumbostyle User manual

medi
medi protect.CSB User manual

medi
medi Lumbamed sacro User manual

medi
medi Achimed User manual

medi
medi Lumbamed plus User manual

medi
medi CIRCAID MEASURE-UP User manual

medi
medi Rehab one User manual

medi
medi Manumed User manual


