Metrica 60719 User manual

Ref. 60719

2
BRAVO LASER ROTATIVO H
1. FUNZIONI
L’apparecchio è equipaggiato con un diodo semiconduttore con
lunghezza d’onda di 635nm, così da garantire al raggio laser la
massima visibilità. Il modulo laser dell’apparecchio ruota otte-
nendo, così, una superficie di scansione come di seguito rap-
presentata:
2. INTRODUZIONE
2.1 Corpo principale
Manico
Modulo Laser Finestra Laser
Pannello di
Controllo
2.2 Pannello

3
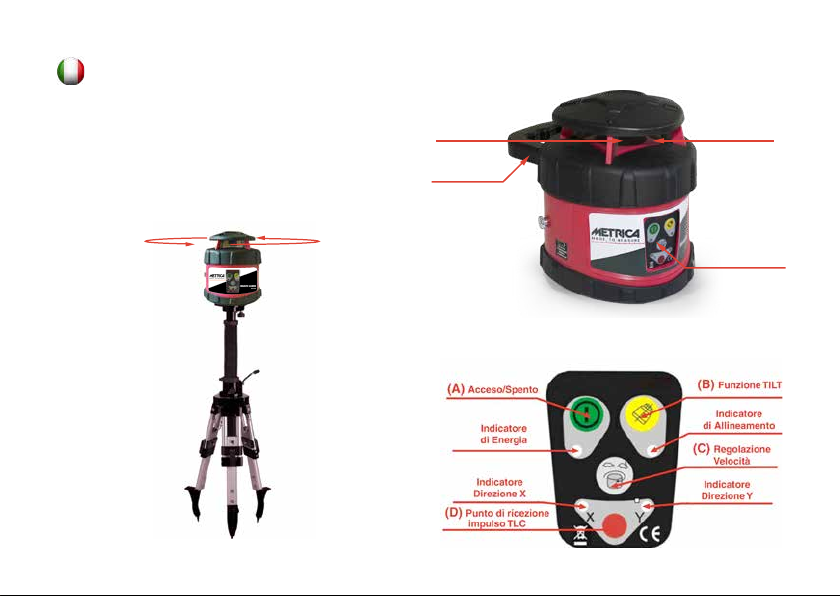
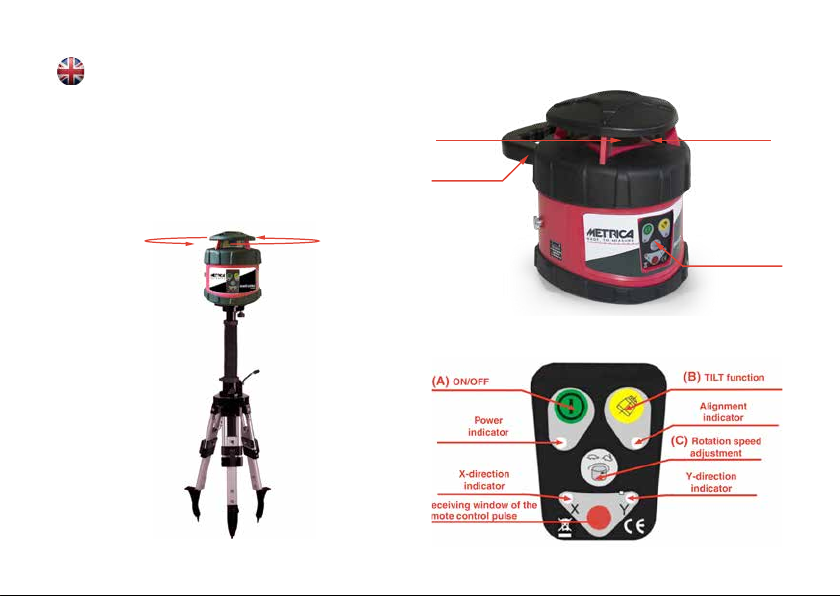
2.3 Funzioni sul Pannello
– (A) ON OFF - Acceso/Spento: questo tasto controlla lo stato
dell’alimentazione.
– (B) Funzione TILT. Dopo l’autolivellamento del laser premere
questo pulsante:.
- Il led rosso lampeggia.
- Dopo 20 secondi il led rosso rimane acceso e la funzione
TILT si attiva. In questa modalità, in caso di spostamento dello
strumento, il raggio lampeggia e smette di ruotare: significa
che lo strumento è disallineato rispetto alla posizione originale.
– (C) Regolazione della velocità di rotazione. La velocità di
scansione prevede 5 modalità: 0 – 60 - 120 – 300 – 600
r.p.m.. Se si preme questo pulsante ripetutamente, la velocità
di rotazione del modulo laser cambia successivamente.
– (D) Punto di ricezione dell’impulso dal telecomando. Dopo
che il raggio laser ha iniziato a ruotare, è possibile attivare le
funzioni direttamente dal telecomando, ad esempio l’imposta-
zione della pendenza, l’avvio dell’allineamento automatico.
– Indicatore Direzione X. Quando quest’indicatore è acceso, il
piano generato dal raggio laser rotante può essere inclinato
lungo la direzione X.
– Indicatore Direzione Y. Quando quest’indicatore è acceso, il
piano generato dal raggio laser rotante può essere inclinato
lungo la direzione Y.
3. ISTRUZIONI
3.1 Batterie
Questo apparecchio può funzionare sia con 4 batterie ricaricabili
che con 4 batterie a secco (AA).
ATTENZIONE:
– I DUE TIPI DI BATTERIE NON POSSONO ESSERE UTILIZZATI
INSIEME
– NON INSERIRE IL CAVO DI RICARICA E NON METTERE SOT-
TO CARICA QUANDO ALL’INTERNO SONO STATE POSIZIO-
NATE BATTERIE A SECCO.
L’APPARECCHIO ESPLODEREBBE.
– ESCLUSIVAMENTE QUANDO SI USANO BATTERIE RICARI-
BILI si può inserire il cavo di ricarica nell’apposito foro
sul lato dello strumento coperto dal tappo in gomma.
3.1.1 Installazione delle batterie
1. Dopo aver svitato la vite, togliere il coperchio del vano batterie
posto sul fianco dello strumento
2. Inserire le batterie nel vano seguendo il + ed il –
3. Richiudere il vano con il coperchio e avvitare la vite
3.2 Collocazione dello strumento
Collocare lo strumento o sul treppiede (con filetto 5/8”) o su una
superficie piana o appenderlo alla parete. Posizionare lo stru-
mento in piano entro i -5° e +5°.

4
3.3 Funzionamento
3.3.1 Pulsante (A) ON/OFF
Premere il pulsante (A) ON/OFF: L’indicatore di energia si accen-
de ed inizia l’auto-livellamento.
Se l’indicatore di energia lampeggia, significa che il livello delle
batterie è insufficiente. Quindi ricaricare le batterie ricaricabili o
sostituire le 4 batterie a secco.
Premere di nuovo il pulsante ON/OFF per spegnere l’apparec-
chio: l’indicatore di energia si spegne.
3.3.2 Auto-livellamento
Premere il pulsante (A) ON/OFF per attivare la funzione di auto-
livellamento: il raggio laser inizia a lampeggiare lentamente. Al
termine dell’auto-livellamento il modulo laser girerà alla velocità
di 600 r.p.m.
Se l’apparecchio è mal posizionato o lo strumento ha una pen-
denza non compresa tra i -5° e +5°, il raggio laser lampeggia
lentamente. In questo caso deve essere corretta la posizione
dell’apparecchio.
NOTA: L’apparecchio si spegne automaticamente dopo cin-
que minuti che è in allarme.
3.3.3 Rotazione
Premere il pulsante (C) Regolazione della velocità di rotazione
e impostare la velocità di rotazione desiderata (vedere tasto C
funzioni del pannello al punto 2.3)
4. ENERGIA
Alloggiamento
batterie
Caricabatteria
(solo per batterie ricaricabili)
Quando l’indicatore di energia lampeggia, significa che le batte-
rie, se ricaricabili, devono essere subito ricaricate o sostituite se
si usano batterie non ricaribili.
ATTENZIONE:
NON INSERIRE LA RICARICA QUANDO SI UTILIZZANO BATTE-
RIE A SECCO (NON RICARICABILI). L’APPARECCHIO ESPLO-
DEREBBE!
Collegare il caricabatterie alla rete di corrente alternata, inserire
lo spinotto nell’apposito foro protetto da un tappo in gomma po-
sto sul fianco dello strumento.
Quando l’indicatore di carica sul caricabatterie è rosso significa

5
che le batterie si stanno caricando, quando diventa verde signifi-
ca che ha terminato la fase di ricarica.
NOTE:
– Utilizzandolebatteriericaricabilistandarddell’apparecchio,
sono necessarie 5 ore per il completamento della ricarica
– Energia richiesta per il caricabatteria:
– Frequenza: 50 – 60 Hz
– Voltaggio: 85 - 265 V
– Se si tiene l’apparecchio in deposito (o inutilizzato per
lungo tempo) è necessario togliere dall’apparecchio le
batterie, siano esse a secco o ricaricabili.
– Batterie ricaricabili nuove o inutilizzate per lungo tempo
devono essere ricaricate e scaricate 3 volte per raggiun-
gere il corretto livello di funzionamento.
5. TELECOMANDO
Il telecomando funziona ad infrarossi.
Il pannello del telecomando include 6 pulsanti.
Dopo aver acceso lo strumento, puntare il telecomando verso il
punto (D) dell’apparecchio per attivare la funzione di controllo a
distanza, entro 20 m circa.
Premendo un qualsiasi pulsante, l’indicatore sul dispositivo lam-
peggia per indicare che è stato inviato un segnale di operatività.
4
5
21
3
6
Le funzioni attivabili dal telecomando sono
1. Rotazione: premendo il tasto 1 successivamente, impostare la
rotazione desiderata.
2. Regolazione manuale della pendenza non autolivellata:
Il piano laser può essere inclinato nelle direzioni X e Y, indicate
dalle frecce presenti sulla parte superiore dell’apparecchio.
Per eseguire questa operazione:
Una volta acceso lo strumento, a raggio rotante:
Per predisporre l’inclinazione in direzione X:
- Premere il pulsante (2) sul telecomando (che esclude l’au-
tolivellamento)
- Si accende il led verde in corrispondenza di (D) a sinistra
- Per alzare/abbassare il piano laser premere i pulsanti
“+”(4) o “-“ (5)

6
- Per tornare all’autolivellamento premere nuovamente il pul-
sante (2)
Per inclinare il piano in direzione Y:
- premere il pulsante (2) sul telecomando,
- Si accende il led verde in corrispondenza di (D) a destra
- Per alzare/abbassare il piano laser premere i pulsanti
“+”(4) o “-“ (5)
- Per tornare all’autolivellamento premere nuovamente il pul-
sante (2)
E’ possibile variare la modalità di rotazione del laser:
– Per passare dal raggio rotante al punto premere il tasto (1) sul
telecomando o (C) sull’apparecchio
– Per fermare il punto premere il tasto (1) sul telecomando
– Per far ruotare il punto passo passo premere in modo discon-
tinuo il tasto (4) o (5) a seconda della direzione di rotazione
desiderata.
– Per far ruotare il punto in modo continuo tenere premuto il
tasto (4)
– Per tornare alla modalità raggio rotante premere il tasto (1)
sul telecomando o (C) sull’apparecchio sino a raggiungere la
modalità desiderata.
– Per regolare la velocità di rotazione del punto premere suc-
cessivamente il tasto (1) sul telecomando
6. RICEVITORE
Ricevitore acustico e visibile su ambo i lati:
- Premere il pulsante per accendere e spegnere
- Premere il tasto per inserire/disattivare il sonoro
- Premere il tasto per aumentare/diminuire la sensibilità di
lettura del ricevitore

7
SPECIFICHE TECNICHE
Precisione di livellamento Orizzontale +/- 20”
Range di livellamento +/- 5°
Range di misurazione Diametro: 500m (con il laser detector)
Velocità di rotazione 0 – 60 – 120 – 300 – 600 r.p.m.
Range di regolazione della pendenza +/-5° (Direzione X e Y)
Lunghezza d’onda 635nm
Laser Standard Classe II
Portata del telecomando Circa 20m
Alimentazione Elettrica DC 4.8-6 V (4 batterie a secco o ricaricabili AA)
Resistenza all’acqua IP 64
Dimensioni 190 (Lung) x 145 (Larg) x 166 (H) mm
Peso 1,2 Kg

8
BRAVO LASER ROTATIVO H
1. FUNCTIONS
This instrument is equipped with a semiconductor diode with a
wavelength of 635nm, to ensure maximum visibility to the laser
beam. The laser module rotates forming a laser-scanning sur-
face as shown below:
2. INTRODUCTION
2.1 Main body
Handle
Laser Modul Laser Window
Control
Panel
2.2 Panel

9
2.3 Functions on the Control Panel
–(A) ON OFF - This button controls the power state
–(B) TILT function. After the laser level has started with the
self-levelling, press this button (hold it):
- The red LED flashes
- After 20 seconds the red LED stays on and the TILT function
is enabled. Now, when the laser level is moved, the laser beam
will start to flash and the rotation will stops this means that the
laser is misaligned in relation to the starting position.
– (C) Rotational speed adjustment. The scan speed has 5 mo-
des: 0 – 60 - 120 – 300 – 600 r.p.m.. If this button is pressed
repeatedly, the speed of rotation of the laser module consecu-
tively changes.
– (D) Receiving window of the remote control pulse. After the
laser beam began to rotate some functions can be activated
via remote control, e.g. setting of the slope, the start of the
automatic alignment
–X-direction indicator. When this indicator is turned on, the
plan generated by the rotating laser can be tilted along the
direction X
– Y-direction indicator. When this indicator is turned on, the
plan generated by the rotating laser can be tilted along the
direction Y.
3. GUIDELINES
3.1 Batteries
4 rechargeable batteries OR 4 dry batteries (AA) can be used for
this instrument.
WARNING
– THE TWO TYPES OF BATTERIES CANNOT BE MIXED
– DO NOT CONNECT THE CABLE RECHARGE AND DO NOT PUT
THE INSTRUMENT IN CHARGE WHEN DRY BATTERIES ARE
PLACED INSIDE.
THE INSTRUMENT WOULD BLAST
– ONLY WHEN USING rechargeable batteries the charging
cable can be inserted into the hole on the side of the in-
strument covered by a rubber stopper.
3.1.1 Batteries installment
1. After loosening the screw remove the cover of the batteries
socket on the side of the instrument
2. Insert the batteries according to + and - symbols
3. Replace the cover on the socket and tighten the screw
3.2 Instrument allocation
Place the instrument on the tripod (with a 5/8” thread) or on a
flat surface or hang it on the wall. Place the tool upright and flat
within a range from -5 ° to +5 °

10
3.3 Operations
3.3.1 (A) button ON/OFF
Press the (A) button ON/OFF: the power indicator lights up and
the automatic self-levelling starts up.
If the power indicator is blinking the batteries level is insufficient.
Then, recharge the 4 rechargeable batteries or replace the 4 dry
batteries
Press the (A) button ON/OFF again to switch off the instrument:
the power indicator turns off
3.3.2 Self-levelling
Press the (A) button ON/OFF to activate the self-levelling fun-
ction: the laser beam starts blinking slowly. At the end of the
self-levelling the laser module will run at a speed of 600 r.p.m..
If the instrument is positioned improperly or the slope exceeds
the range from -5 ° to + 5 ° the laser beam starts blinking slowly.
In this case the position of the unit must be corrected.
NOTICE: instrument will automatically turn off after five mi-
nutes of alarm
3.3.3 Rotating
Press the (C) button Rotational Speed adjustment and set the
desired rotational speed (see paragraph 2.3 – Functions on the
control panel - C button)
4. POWER
Battery housing Battery Charger
(only for rechargeable batteries)
Whenthepowerindicator is blinking,the batteries,ifrechargeable,
mustberechargedimmediatelyorreplacedifdrybatteriesareused.
WARNING: DO NOT CONNECT THE CABLE RECHARGE WHEN
DRY BATTERIE AREPLACED INSIDE (NON RECHARGEABLE
BATTERIES).THE INSTRUMENT WOULD BLAST!!
Connect the battery charger to the AC, insert the pin into the
hole protected by a rubber stopper on the side of the instrument.
When the charging indicator on the charger is red means that the
batteries are charging. When it becomes green the recharging
has been concluded.

11
NOTES:
– 5 hours are required to fully recharge the standard re-
chargeable batteries supplied with the instrument
– Power required for the charger:
- Frequency: 50 – 60 Hz
- Voltage: 85 - 265 V
– When the instrument is stored (or unused for a long time)
take out the batteries from the instrument whether dry or
rechargeable batteries
– New or long-time unused rechargeable batteries needs to
be recharged and discharged 3 times to achieve the best
performance.
5. REMOTE CONTROL
The remote control adopts the infrared technique.
The remote control panel includes 6 buttons.
After turning on the instrument point the remote control at the
point (D) of the unit to activate the remote control function within
about 20 m.
Pressing any key the indicator on the device blinks to show the
operating signal has been sent out.
4
5
21
3
6
Functions fulfilled by the remote control are as follows:
1. Rotating: press the button (1) repeatedly to set the desired
speed of rotation
2. Slope adjustment.
The plan generated by the rotating laser can be tilted along
the directions X and Y, indicated by arrows on the top of the
instrument.
To perform this operation: Once switched on the instrument,
and while the laser ray is rotating:
To prepare the inclination in X-direction
- Press button (2) of the remote control,
- the green led on the left of (D) lights up
- to move the laser plan up and down press the buttons “+”
(4) o “-“ (5)

12
- press again button (2) to come back to self levelling function
To prepare the inclination in Y-direction
- Press button (2) of the remote control,
- the green led on the right of (D) lights up
- to move the laser plan up and down press the buttons “+”
(4) o “-“ (5)
- press again button (2) to come back to self levelling fun-
ction.
The laser scan mode can be changed
– To switch from rotating beam to laser point press button (1)
on the remote control or (C) button on the instrument
– To stop the laser point press button (1) on the remote control
– Press button (4) discontinuously to make the point rotating
step by step
– Keep pressed button (4) to make the point rotating in a conti-
nuous manner
– To return to rotating beam mode press button (1) on the remo-
te control or (C) button on the instrument until you reach the
desired mode.
– To adjust the laser point rotational speed press button (1) on
the remote control repeatedly
6. RECEVER
Receiver visible on both sides and acoustic
Press to switch it on/off
Press button to activate/disactivate the sound
Press button to increase or decrease the reading capability
of the receiver

13
TECHNICAL SPECIFICATIONS
Levelling accuracy Horizontal +/- 20”
Levelling Range +/- 5°
Range of measurement Diameter: 500m (with laser detector)
Rotational speed 0 – 60 – 120 – 300 – 600 r.p.m.
Range of the slope adjustment +/-5° (X and Y directions)
Wavelength 635nm
Laser Standard Class II
Range of remote control Approximately 20m
Power supply DC 4.8-6 V (nr.4 per AA rechargeable or dry batteries)
Water proof IP 64
Dimensions 190 (L) x 145 (W) x 166 (H) mm
Weight 1,2 Kg

14
BRAVO LASER ROTATIVO H
1. FONCTIONS
Le dispositif est équipé d’une diode à semi-conducteur avec
une longueur d’onde de 635nm, afin de garantir au rayon laser
une visibilité maximale. En tournant le module laser de l’appareil
obtient une surface de balayage tel que représenté ci-dessous:
2. INTRODUCTION
2.1 Corps principal
Manche
Module Laser Fenêtre Laser
Panneau de
Contrôle
2.2 Panneau
(D) Point de réception
de l’impulsion de TLC
Indicateur
de direction X
(B) Système
automatique
d’alignement
Indicateur
d’alignement
(C) Réglage de
la vitesse de rotation
Indicateur
de direction Y
(A) bouton ON/OFF
Indicateur
d’energie

15
2.3 Fonctions sur le panneau
– (A) ON OFF - On / Off: Ce bouton contrôle l’état d’alimentation
–(B) Fonction TILT. Après l’auto-nivellement du niveau laser,
appuyez sur cette touche:
- le LED rouge s’allume.
- après 20 s le LED rouge reste allumé et la function TILT est
ainsi active. Dans ce mode, si l’appareil est déplacé, le rayon
laser alignate et ne tourne plus: cela signific que le niveau
n’est plus alligné par rapport à sa position initiale
– (C) Réglage de la vitesse de rotation. Il y a 5 modalités de
vitesse de balayage: 0 - 60 - 120 - 300 - 600 rpm. Pour chan-
ger la vitesse de rotation du laser il faut appuyer à plusieurs
reprises sur cette touche
– (D) Point de réception de l’impulsion de la télécommande.
Après que le rayon laser a commencé à tourner, il est possi-
ble d’activer certaines fonctions en utilisant la télécommande.
Exemple : fixer la pente, ou l’alignement automatique.
– Indicateur de direction X. Lorsque cet indicateur est allumé,
le plan généré par le laser rotatif peut être incliné le long de la
direction X.
– Indicateur de direction Y. Lorsque cet indicateur est allumé,
le plan généré par le laser rotatif peut être incliné le long de la
direction Y.
3. INSTRUCTIONS
3.1 Batteries
Cet appareil peut fonctionner soit avec 4 piles rechargeables
qu’avec 4 piles sèches (AA)
ATTENTION:
– LES DEUX TYPES DE BATTERIE NE PEUVENT PAS ÊTRE UTI-
LISÉS ENSEMBLE
– EN CAS D’UTILISATION DE PILES SECHEA IL NE FAUT AB-
SOLUMENT PAS INSERERER LE CABLE POUR LA CHARGE ET
NE PAS METTRE EN CHARGE L’APPAREIL.
L ‘APPAREIL POURRAIT EXPLOSER
– VOUS POUVEZ INSÉRER LE CÂBLE DE CHARGE DANS LE
TROU SUR LE CÔTÉ DE L’INSTRUMENT COUVERT PAR UN
BOUCHON EN CAOUTCHOUC UNIQUEMENT LORSQUE VOUS
UTILISEZ DES PILES RECHARGEABLES.
3.1.1 Installation des batteries
1. Après avoir desserré la vis, enlever le couvercle de la batterie
sur le côté de l’instrument
2. Insérez les piles dans le compartiment en respectant les po-
larités + et –
3. Fermer le compartiment avec le couvercle et serrer la vis.
3.2 Placement de l’instrument
Placez l’instrument sur un trépied (avec filetage 5/8 “) ou sur

16
une surface plane ou accroché au mur. Placez l’outil à plat dans
les -5 ° et +5 °.
3.3 Fonctionnement
3.3.1 Bouton (A) ON / OFF
Appuyez sur le bouton (A) ON / OFF: L’indicateur d’énergie s’al-
lume pour commencer l’auto-nivellement.
Si l’indicateur d’énergie clignote, signifie que le niveau des bat-
teries est faible.
Il faut donc recharger les batteries rechargeables ou remplacer
les 4 piles sèches.
Appuyez encore sur le bouton ON / OFF pour éteindre l’appareil :
l’indicateur d’énergie s’éteint.
3.3.2 Auto-nivellement
Appuyer sur le bouton (A) bouton ON / OFF pour activer la fon-
ction de auto-nivellement: le rayon laser commence à clignoter
lentement. À la fin de l’auto-nivellement le module laser tournera
à une vitesse de 600 tours par minute
Si l’appareil est mal placé ou l’instrument a une pente qui n’est
pas comprise entre -5 ° et +5 °, le rayon laser clignote lente-
ment. Dans ce cas, il placer l’appareil correctement.
REMARQUE: L’appareil s’éteint automatiquement après cinq
minutes qu’il est en état d’alarme.
3.3.3 Rotation
Appuyez sur le bouton (C) afin de régler la vitesse de rotation
et de fixer la vitesse désirée (voir touche C – fonctions panneau
point 2.3).
4. ENERGIE
Placement
Batteries
Chargeur de batterie
(uniquement pour batteries rechargeables)
Lorsque l’indicateur d’énergie clignote, les piles, si rechargea-
bles doivent rechargées ou remplacées immédiatement si vous
utilisez des piles non rechargeables.
ATTENTION: NE PAS METTRE L’APPAREIL EN CHARGE EN CAS
D’UTILISATION DE BATTERIES SECHES (NON RECHARGEA-
BLES). L ‘APPAREIL EXPLOSERA!
Brancher le chargeur sur le réseau AC, insérer la cheville dans
le trou protégé par un bouchon en caoutchouc sur le côté de
l’instrument.

17
Lorsque l’indicateur de charge sur le chargeur est rouge signifie
que les batteries sont en charge, vert veut dire l’appareil a ter-
miné l’opération de charge.
NOTES:
– En utilisant les batteries standard rechargeables de l’ap-
pareil, sont nécessaires 5 heures pour l’achèvement de la
charge
– L’énergie nécessaire pour le chargeur:
- Fréquence: 50 à 60 Hz
- Tension: 85 à 265 V
– Si l’appareil est tenu en stock (ou n’est pas utilisé pendant
une longue période) il faut enlever les piles de l’appareil
– Les batteries rechargeables nouvelles ou inutilisées
pendant une longue période doivent être chargées et
déchargées 3 fois pour atteindre le niveau approprié de
fonctionnement.
5. TÉLÉCOMMANDE
La télécommande fonctionne à rayons infrarouges et il a 6 tou-
ches.
Après avoir allumé l’appareil, pointez la télécommande vers le
point (D) de l’appareil pour activer le contrôle à distance dans
une distance d’environ 20 mètres.
En appuyant sur n’importe quelle touche, l’indicateur sur l’ap-
pareil clignote pour indiquer que vous avez envoyé un signal
d’opération.
4
5
21
3
6
Les fonctions qu’on peut activer grâce à la télécommande
sont les suivantes:
1. Rotation: Appuyer sur le bouton (1) et définir après la rotation
souhaitée
2. Réglage manuel de la pente non auto-nivelée.
Le plan laser peut être incliné dans les directions X et Y, indi-
quées par les flèches sur la partie supérieure de l’unité.
Pour activer cette opération: Allumer l’appareil à rayon
tournant.
Pour préparer l’inclinaison dans la direction X
- Appuyez sur le bouton (2) de la télécommande (exclut
l’auto-nivellement)
- LED s’allume de couleur vert en correspondance au point
(D) à gauche

18
- Pour monter ou descendre le plan laser appuyer sur les tou-
ches “+” (4) ou “-” (5)
- Pour revenir à la fonction d’auto-nivellement appuyer sur le
bouton (2)
Pour incliner le plan dans la direction Y
- Appuyez sur le bouton (2) de la télécommande
- LED s’allume en vert s’allume de couleur vert en correspon-
dance au point (D) à droite
- Pour monter / descendre le plan laser appuyer sur les tou-
ches “+” (4) ou “-” (5)
- Pour revenir à la fonction d’auto-nivellement appuyer sur le
bouton (2)
Il y a la possibilité de changer le mode de rotation du laser
– Pour passer du rayon laser tournant au point appuyer sur la
touche (1) de la télécommande ou (C) de l’appareil
– Pour arrêter le point appuyer sur la touche (1) de la télécom-
mande
– Pour faire pivoter le point pas à pas appuyer sur le bouton de
façon intermittente (4) ou (5) en fonction de la direction de
rotation désidée.
– Pour faire pivoter le point en continu appuyer sur la touche (4)
– Pour revenir à la modalité rayon laser tournant, appuyer sur la
touche(1) sur la télécommande ou (C) sur l’appareil jusqu’à
ce que vous atteigniez la modalité désirée.
– Pour régler la vitesse de rotation du point, appuyer sur le bou-
ton (1) de la télécommande.
6. RÉCEPTEUR
Récepteur acoustique visible sur les 2 cotés
Appuyer sur la touche pour allument et éteindre le récep-
teur
Appuyer sur la touche pour insérer ou désactiver le son
Appuyer sur la touche per augmenter ou diminuer la sen-
sibilité de lecture du récepteur

19
TECHNICAL SPECIFICATIONS
Précision de nivellement Horizontal +/- 20”
Plage d’auto-nivellement +/- 5°
Portée Diamètre: 500m (avec détecteur laser)
Vitesse de rotation 0 – 60 – 120 – 300 – 600 r.p.m.
Plage de réglage de la pente +/-5° (Direction X et Y)
Type de laser 635nm
Puissance du laser Classe II
Portée de la télécommande Environ 20m
Alimentation Électrique DC 4.8-6 V (4 batteries à sec ou rechargeables AA)
étaneheïté IP 64
Dimensions 190 (Longueur) x 145 (Largeur) x 166 (H) mm
Poids 1,2 Kg

20
BRAVO LASER ROTATIVO H
1. FONCTIONS
Das Gerät ist mit einer Halbleiterdiode mit einer Wellenlänge von
635 nm ausgestattet, um den Laserstrahl maximale Sichtbarkeit
zu gewährleisten. Durch Drehen des Lasermoduls erhält man
eine Abtastfläche wie unten dargestellt:
2. EINFÜHRUNG
2.1 Laser-Gerät
Griff
Laser Modul Laser-Fenster
Bedienungstastatur
2.2 Bedienungs-Tastatur
Table of contents
Languages:
Other Metrica Laser Level manuals

Metrica
Metrica 60800 User manual

Metrica
Metrica BRAVO LASER BOX User manual

Metrica
Metrica BRAVO LASER XL 2.0 User manual

Metrica
Metrica BRAVO 61355 User manual

Metrica
Metrica 60821 User manual

Metrica
Metrica BRAVO LASER SQ 2.0 User manual

Metrica
Metrica 33806 User manual

Metrica
Metrica BRAVO LASER BOX3 User manual

Metrica
Metrica 60806 User manual

Metrica
Metrica 60804 User manual
Popular Laser Level manuals by other brands

Leica Geosystems
Leica Geosystems LINO L6G manual

Kingfisher
Kingfisher 5059340457970 manual

Spectra Precision
Spectra Precision LL100N Handy Tips & Advice

Kapro
Kapro Prolaser Multi Beam GREEN Orbital laser user manual

AccuLine
AccuLine 40-6535 instruction manual

Black & Decker
Black & Decker BDL205S instruction manual