Metrica BRAVO 61355 User manual

Ref. 61355
LASER
AUTOLIVELLANTE
ROTANTE
SELF-LEVELING ROTATING LASER
LASER ROTATIF AUTO-NIVELANT
SELBSTNIVELLIERENDER

TASTIERA COMANDI
CLAVIER DE COMMANDES
KEYBOARD
TASTATURBEFEHLE
FINESTRA DEL LASER
FENÊTRES DE LASER
LASER WINDOW
LASERFENSTER
IMPUGNATURA
POIGNÉE
HANDLE
GRIFF
MODULO LASER
MODULE LASER
LASER MODULE
LASERMODUL

B
C
D
E E
G
M
bm
a
H
F
A
TASTIERA COMANDI
A Interruttore ON / OFF
B Funzione TILT
C Scanner
D Regolazione velocità di rotazione
E Asse X
F Asse Y
G Regolazione rotazione
in senso orario
H Regolazione rotazione
in senso antiorario
M Manuale / Automatico
TASTATURBEFEHLE
A ON / OFF
B TILT-Funktion
C Scanner
D Geschwindigkeitseinstellung
E X-Achse
F Y-Achse
G Einstellung der
Rechtsdrehung
im Uhrzeigersinn
H Einstellung der Linksdrehung
gegen den Uhrzeigersinn
M Manuell / Automatik
CLAVIER DE COMMANDES
A Interrupteur ON/OFF
B Fonction TILT
C Scanner
D Réglage vitesse de rotation
E Axe X
F Axe Y
G Réglage rotation droite
horaire
H Réglage rotation
gauche antihoraire
M Manuel/Automatique
KEYBOARD
A ON / OFF
B TILT function
C Scanner
D Speed setting
E X-axis
F Y-axis
G Setting the rotation
to the right/clockwise
H Setting the rotation to the
left turn/counterclockwise
rotation
M Manual / Automatic

ALIMENTAZIONE
Il dispositivo funziona con:
• Kit 4 batterie ricaricabili NiMH C-tipo che si trova sul fondo
all’interno dell’unità.
Viene fornito con il caricatore.
FUNZIONI
Piano orizzontale:collocare il apparecchio su un piano, un cavalet-
to o una staffa a parete. La gamma di auto-livellamento è (± 5 °).
Piano verticale: collocare l’apparecchio sul laterale piatto, la
gamma di auto-livellamento (± 5 °).
• Premere il pulsante (A) per accendere l’unità.
Se il LED (A) lampeggia, il livello della batteria non è suffi-
ciente. Ricaricare o sostituire le batterie.
• All’accensione l’unità è configurata in modalità automatica.
Il laser lampeggierà fino ad autolivellamento avvenuto. Suc-
cessivamente il laser ruoterà a 600 giri / minuto.
Se l’apparecchio non rientra nell’intervallo di autolivellamento
(± 5 °), il raggio laser e il LED lampeggeranno. Posizionare
quindi, l’apparecchio su un piano per permettere l’autolivella-
mento (± 5 °).
REGOLAZIONE VELOCITÀ
• Per modificare la velocità, premere il tasto (D)
• Una volta: il raggio è fisso a 0 giri / min
• Due volte: il raggio ruota a 60 giri / min
• Tre volte: il raggio ruota a 120 giri / min
• Quattro volte: il raggio ruota a 300 giri / min
• Cinque volte: il raggio ruota a 600 giri / min
• Per ruotare il punto, a laser fermo, premere i pulsanti (H o G)
progressivamente.
FUNZIONE SCANNER
Per accedere alla funzione scanner, premere il tasto (C).
Premendolo in successione, il raggio viene proiettato con una
larghezza di 10 °, 45 °, 90 ° e 180 °.
Per ruotare gradualmente il raggio laser, premere i tasti (H o G).
FUNZIONE TILT PER SEGNALARE MOVIMENTI ACCIDENTALI
DEL DISPOSITIVO
Per attivare la funzione TILT l’apparecchio deve essere in funzio-
ne di autolivellamento. Premere il tasto (B), Il LED (b) lampeg-
gierà lentamente durante la fase di settaggio. Dopo 30 secondi
lampeggerà in modo rapido, segnalando l’attivazione definitiva
della funzione TILT.
• Se l’unità si sposta accidentalmente, il raggio laser smette di
lampeggiare.
• Spegnere l’unità e riavviare premendo il tasto (A). La funzione
TILT verrà disabilitata.
FUNZIONE PENDENZA (PER REGOLARE LE INCLINAZIONI)
Posizionare l’unità su un piano orizzontale.

• Premere il tasto (M). Il LED (m) si accende. L’unità è in fun-
zione manuale.
Regolazione inclinazione dell’asse X: puntare l’asse X1 in di-
rezione della inclinazione desiderata.
Premere i pulsanti Eo per regolare l’angolo
nell’asse X.
Regolazione inclinazione dell’asse Y: puntare l’asse Y1 in di-
rezione della inclinazione desiderata.
Premere i pulsanti Fo per regolare l’angolo nell’asse Y.
• Per tornare all’auto-livellamento, premere il tasto (M). Il LED
(m) si spegne.
TELECOMANDO
Puntare il telecomando perpendicolare a qualsiasi lato dell’ap-
parecchio.
Funzioni utilizzabili:
1. Rotazione
2. Scanner
3. Slope (inclinazioni)
RICEVITORE
3 tasti:
1. ON / OFF
2. Per attivare o escludere il segnale acustico.
3. Per selezionare la sensibilità della misura (fine o media)
CONTROLLO CALIBRAZIONE
DISTANZA 30 METRI
PIANO ORIZZONTALE
X1
ASSE X1 h1
ASSE X2 h2
Posizionare apparecchio a circa 30 m da un muro come nel di-
segno sopra. Posizionare l’unità con l’asse X1 diretto verso la
parete.
Accendere il dispositivo e intercettare il raggio orizzontale (h1).
Ruotare il dispositivo di 180 °, accendere e intercettare il raggio
orizzontale (h2).
La distanza verticale tra 2 punti (h1 e h2) dovrebbe essere in-
feriore a 3 mm.
Ripetere la stessa procedura per l’asse Y.

CARATTERISTICHE TECNICHE
Precisione di livellamento ± 3 mm / 30 m
Campo di autolivellamento ± 5 °
Autonomia ~ 20 ore
Portata ~ Ø 400 m (con ricevitore) a seconda delle condizioni atmosferiche
Velocità di rotazione 60-120 - 300-600 t / min
Funzione Scanner 0 ° - 10 ° - 45 ° - 90 ° - 180 °
Funzione Tilt sì
Tipo di laser 635 nm, 1mW
Potenza laser Classe 2
Batterie 4 x NiMH C4000mAh 1,2 V ricaricabili
Dimensioni 160 x 200 x 200 millimetri
Temperatura di esercizio -10 ° C / +50 ° C
Peso (senza batterie) 3 kg
Grado di protezione IP 65
Attacco treppiede 5/8“
Portata del telecomando ~ 30 / 10 m (in/out)
Angolo del telecomando 0 ° - 90 ° - 180 ° - 270 ° (4 ricevitori sul dispositivo)
Batterie per telecomando 2 da 1.5 V
Batterie per il ricevitore 1 DC 9 V
Accessori Telecomando - Ricevitore - Caricabatterie - Occhiali - Custodia

ALIMENTATION
L’appareil fonctionne avec :
• Kit 4 piles rechargeables type C NiMH qui se trouve sur le
fond à l’intérieur de l’appareil.
Fourni avec chargeur.
FONCTIONS
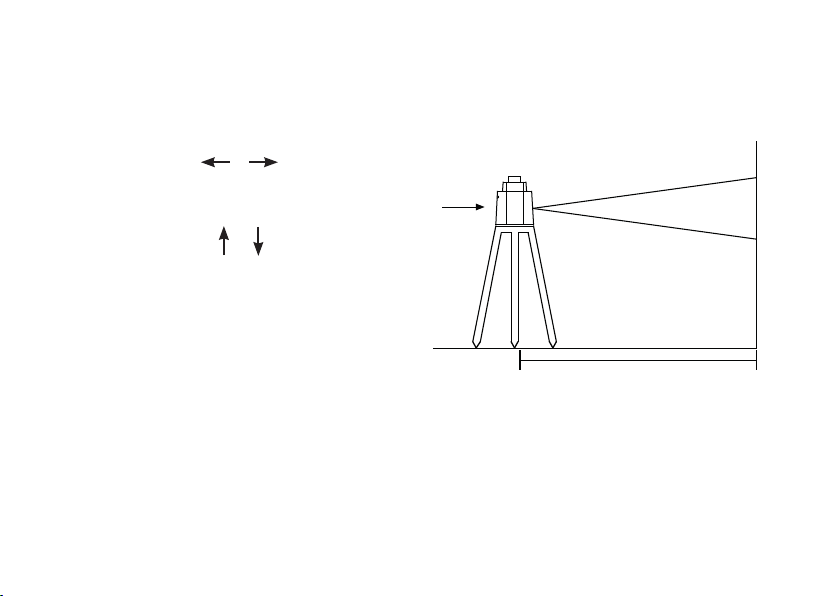
Plans horizontaux : mettre l’appareil dans la plage d’auto-nivel-
lement (± 5°), sur un plan ou sur un trépied ou sur un support
mural.
Plans verticaux : posez l’appareil sur sa face plate, dans la plage
d’auto-nivellement (± 5°).
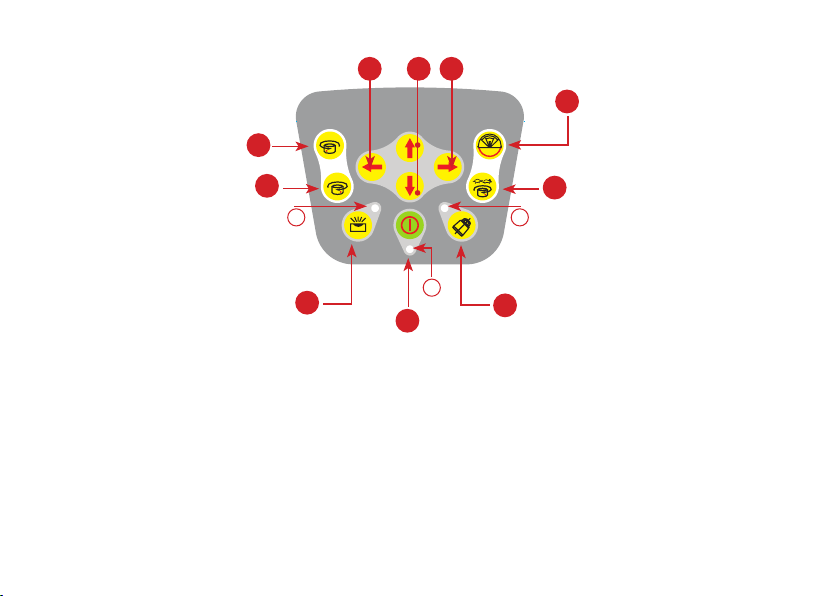
• Appuyez brièvement sur la touche (A) pour allumer l’appareil
Si la LED (a) clignote, le niveau des batteries n’est pas
suffisant. Elles doivent être rechargées ou changées.
• L’unité est configurée en mode automatique
Le rayon clignote jusqu’à ce que l’appareil s’auto-nivelle.
Ensuite le faisceau tourne à 600 tours/minute. Si l’appareil
est mis hors de la plage d’auto-nivellement (± 5°), le rayon
laser ainsi que la LED clignotent. Remettre l’appareil dans la
plage d’auto-nivellement (± 5°).
FONCTION VITESSES
• Pour changer la vitesse, appuyez sur le bouton (D)
• 1 fois : le faisceau est fixe à 0 tr/min
• 2 fois : le faisceau tourne à 60 tr/min
• 3 fois : le faisceau tourne à 120 tr/min
• 4 fois : le faisceau tourne à 300 tr/min
• 5 fois : le faisceau tourne à 600 tr/min
• Pour déplacer progressivement le point laser à la vitesse 0 tr
/ min, appuyez sur les touches Hou G.
FONCTION SCANNER
Pour accéder à la fonction scanner, appuyez sur le bouton (C).
Si on appuie une fois de plus, le faisceau est projeté avec une
largeur de 10 °, 45 °, 90 ° et 180 ° successivement.
Pour déplacer progressivement le faisceau laser, appuyez sur les
touches Hou G.
FONCTION TILT POUR SIGNALER LES MOUVEMENTS
ACCIDENTELS NON PRÉVUS DE L’APPAREIL
Si l’appareil est en auto-nivellement, appuyez sur la touche (B)
pour activer la fonction TILT. La LED (B) clignote lentement,
après 30 secondes rapidement, et ensuite elle reste allumée.
• Si l’appareil est accidentellement déplacé, le faisceau laser
s’arrête et clignote.
• Eteignez complètement l’appareil et ré-allumez en appuyant
sur la touche (A). La fonction TILT est désactivée.
FONCTION SLOPE (POUR RÉGLER LES PENTES)
Positionnez l’appareil en horizontal pour la projection d’un plan
horizontal.

• Appuyez sur la touche (M)
• La LED (m) s’allume. L’appareil est maintenant en fonction
manuelle.
Inclinaison selon l’axe X: pointez l’axe X1 dans la direction
d’inclinaison désirée.
Appuyez sur les touches Eou pour régler l’inclinaison
dans l’axe X.
Inclinaison selon l’axe Y: pointez l’axe Y1 dans la direction
d’inclinaison désirée.
Appuyez sur les touches Fou ppour régler l’inclinaison
dans l’axe Y.
• Pour revenir à l’auto-nivellement, appuyez sur la touche (M).
La LED (m) s’éteint.
TÉLÉCOMMANDE À RAYON INFRAROUGE
Pointez la télécommande perpendiculaire vers n’importe quelle
face de l’appareil.
Fonctions utilisables :
1.Rotation
2.Scanner
3.Slope (inclinaisons)
RÉCEPTEUR
3 touches :
1.ON/OFF
2.Pour activer ou exclure le beep.
3.Pour sélectionner la sensibilité de la mesure (fine ou moyenne).
CONTRÔLE DU CALIBRAGE
Placer l’appareil à environ 30 m d’un mur comme sur le dessin
ci-dessus. Placer l’appareil avec l’axe X1 dirigé vers le mur.
Allumer l’appareil et intercepter le rayon horizontal (point h1).
Tourner l’appareil à 180° et intercepter le rayon horizontal
(point h2).
La distance verticale entre les 2 points (h1 et h2) doivent être
moins de 3 mm.
Répétez la même procédure pour l’axe Y.
ENVIRON 30 METRES
PLAN HORIZONTAL
X1
X1 POINT LASER h1
X2 POINT LASER h2

CARACTÉRISTIQUES TECHNIQUES
Précision de nivellement ± 3 mm / 30 m
Plage d’auto-nivellement ± 5 °
Autonomie ~ 20 heures
Portée ~ Ø 400 m (avec récepteur) selon les conditions climatiques
Vitesses de rotation 60 - 120 - 300 - 600 t/min
Fonction Scanner 0 ° - 10 ° - 45 ° - 90 ° - 180 °
Fonction Tilt oui
Type de laser 635 nm, 1mW
Puissance du laser Classe 2
Piles 4 x NiMH C4000mAh 1,2 V rechargeables
Dimensions 160 x 200 x 200 millimetr
Température d’exercice -10 ° C / +50 ° C
Poids (sans les piles) 3 kg
Etanchéité IP 65
Filetage pour trépied 5/8“
Portée de la télécommande ~ 30 / 10 m (in/out)
Angle de la télécommande 0 °- 90 °- 180°- 270 ° (4 récepteurs sur l’appareil)
Piles pour télécommande 2 type 1,5 V
Batteries pour le récepteur 1 DC 9 V
Accessoires Télécommande - Récepteur - Chargeur - Boite

POWER SUPPLY
The device works with:
• Set of 4 rechargeable NiMH C-type batteries, which is attached
to the underside of the unit.
Charger included.
FUNCTIONS
Horizontal planes: Place the device in the self-leveling range (± 5
°), on a plane or on a tripod or a wall mount.
Vertical planes: Place the device on the flat side, inside the self-
leveling range (± 5 °).
• Press the button (A) briefly to switch the device on
If the LED (a) blinks, the remaining battery capacity is
insufficient. They have to be recharged or replaced.
• The device is set in automatic mode
The beam will blink until the unit is in the self-leveling range.
Then, the beam rotates at 600 revolutions / minute. If the unit
is outside of the self-leveling range (± 5 °), the laser beam
and the LED are flashing. Put the device back into the self-
leveling range (± 5 °).
SPEED FUNCTION
To change the speed, press the button (D):
• 1 time: the beam is fixed at 0 r / min
• 2 times: the beam rotates at 60 rev / min
• 3 times: the beam rotates at 120 rev / min
• 4 times: the beam rotates at 300 rev / min
• 5 times: the beam rotates at 600 rev / min
• for progressive moves of the laser point at 0 rpm, press the
buttons Hor G.
SCANNER FUNCTIONS
To access the scanner function press the button (C).
If pressed one more time, the projected beam will have a width
of 10 °, 45 °, 90 ° and 180 °.
To move the laser beam progressively, press the buttons Hor G.
TILT-FUNCTION TO SIGNAL UNFORESEEN ACCIDENTAL
MOVEMENT OF THE UNIT
If the unit in the self-leveling mode, press the button (B) to
activate the TILT function. The LED (b) blinks slowly, after 30
seconds fast, and then stays on.
• If the unit is accidentally moved, the laser beam stops and
flashes.
• Switch the instrument completely off and on again by pushing
the button (A). The TILT function is disabled.
SLOPE FUNCTION (INCLINATION)
Put the device in a horizontal position to project a horizontal plane.
• Press the button (M)

• The LED (m) lights. The device is now in the manual mode.
Inclinations along the X-axis: Align the X1 axis in the desired
direction of inclination.
Press the Eor buttons to adjust the slope in the
X-axis.
Inclinations along the Y-axis: Align the Y1 axis in the desired
direction of inclination.
Press the For Tbuttons to adjust the slope in the Y-axis
• To return the self-leveling mode; press the button (M). The
LED (m) turns off.
INFRARED REMOTE CONTROL
Point the remote perpendicular to any side of the unit.
Usable functions:
1. Rotation
2. Scanner
3. Slope
RECEIVER
3 buttons:
1. ON / OFF
2. Enable or disable the beep
3. Sensitivity of measurement (fine or gross)
CALIBRATION CONTROL
ENVIRON 30 METRES
PLAN HORIZONTAL
X1
X1 POINT LASER h1
X2 POINT LASER h2
Place the unit about 30 meters from a wall, such as in the a.m.
drawing. Place the device with the axis X1 to the wall.
Turn on the device and mark the horizontal beam (point h1).
Turn the device through 180 ° and mark the horizontal beam
(point h2).
The vertical distance between two points (h1 and h2) should be
less than 3 mm.
Repeat the process for the Y-axis.

TECHNICAL CHARACTERISTICS
Leveling accuracy ± 3 mm / 30 m
Self-leveling range ± 5 °
Autonomy ~ 20 hours
Working range ~ Ø 400 m (with receiver), depending on weather conditions
Rotational speeds 60-120 - 300-600 rpm
Scanner function 0 ° - 10 ° - 45 ° - 90 ° - 180 °
Tilt function yes
Laser type 635 nm, 1 mW
Laser output Class 2
Power supply 4 x NiMH C4000mAh 1,2 V rechargeables
Dimensions 160 x 200 x 200 mm
Operating temperature -10 ° C / + 50 ° C
Weight (without batteries) 3 kg
Impermeability IP 65
Tripod thread 5/8 “
Remote control distance ~ 30 / 10 m (in/out)
Angle on the remote 0 ° - 90 ° - 180 ° - 270 ° (4 receptors on the device)
Batteries for remote control two 1.5V-type
Batteries for the receiver one 9 V DC
Accessories remote control - receiver - charger - case

SPEISUNG
Das Gerät arbeitet mit:
• Satz aus 4 wiederaufladbaren NiMH-C-Typ Batterien, welcher
an der Unterseite des Gerätes angebracht ist.
Ladegerät im Lieferumfang.
FUNKTIONEN
Horizontale Ebenen: Stellen Sie das Gerät in der Nivellierbe-
reich (± 5°), auf eine Ebene oder auf ein Stativ oder an einer
Wandhalterung.
Vertikale Ebenen: Stellen Sie das Gerät auf die flache Seite, im
Nivellierbereich (± 5 °).
• Drücken Sie die Taste (A) kurz, um das Gerät einzuschalten
Wenn die LED (a) blinkt, ist der Ladezustand der Batterien
nicht ausreichend. Sie müssen wieder aufgeladen oder
ausgetauscht werden.
• Das Gerät ist im automatischen Modus eingestellt
Der Balken blinkt, bis das Gerät im Selbstnivellierbereich ist.
Dann dreht sich der Strahl bei 600 Umdrehungen / Minute.
Wenn das Gerät außerhalb des Nivellierbereichs (± 5 °) ist,
blinken der Laserstrahl und die LED. Setzen Sie das Gerät in
den Nivellierbereich (± 5 °) zurück.
GESCHWINDIGKEITSFUNKTION (SPEED)
Um die Geschwindigkeit zu ändern, drücken Sie die Taste (D):
• 1-mal: der Strahl ist fixiert ( 0 U / min)
• 2-mal: der Strahl rotiert mit 60 U / min
• 3-mal: der Strahl rotiert mit 120 U / min
• 4-mal: der Strahl rotiert mit 300 U / min
• 5-mal: der Strahl rotiert mit 600 U / min
• um den Laserpunkt progressiv bei 0 U / min zu bewegen,
drücken Sie die Tasten Hoder G.
SCANNER-FUNKTION
Um in die Scannerfunktion zu gelangen, drücken Sie die Taste (C).
Wenn einmal mehr gedrückt wird, wird der Strahl mit einer Breite
von 10 °, 45 °, 90 ° und 180 ° projiziert.
Um den Laserstrahl progressiv zu bewegen, drücken Sie die
Tasten Hoder G.
TILT-FUNKTION UM UNVORHERGESEHENE
VERSEHENTLICHE BEWEGUNGEN DES GERÄTES ZU
SIGNALISIEREN
Wenn das Gerät in der Selbstnivellierung ist,drücken Sie die Taste
(B), um die TILT-FUNKTION zu aktivieren. Die LED (B) blinkt
langsam, nach 30 Sekunden schnell, und dann bleibt sie an.
• Wenn das Gerät versehentlich bewegt wird, stoppt und blinkt
der Laserstrahl.
• Schalten Sie das Gerät komplett aus und wieder ein indem
Sie die Taste (A) drücken. Die TILT-Funktion ist deaktiviert.
SLOPE-FUNKTION (NEIGUNGEN)
Stellen Sie das Gerät horizontal um eine horizontale Ebene zu
projizieren.

• Drücken Sie die Taste (M)
• Die LED (m) leuchtet. Das Gerät ist nun in der manuellen
Funktion.
Neigungen entlang der X-Achse: Richten Sie die X1-Achse in die
gewünschte Neigungsrichtung.
Drücken Sie die Eoder Tasten, um die Neigung in der
X-Achse zu justieren.
Neigungen entlang der Y-Achse: Richten Sie die Y1-Achse in die
gewünschte Neigungsrichtung.
Drücken Sie die Foder Tasten, um die Neigung in der
Y-Achse zu justieren
• Zur Rückkehr der Selbstnivellierung, drücken Sie die Taste
(M). Die LED (m) erlischt.
INFRAROT-FERNBEDIENUNG
Richten Sie die Fernbedienung senkrecht zu jeder beliebigen
Seite des Geräts.
Nutzbare Funktionen:
1. Rotation
2. Scanner
3. Slope (Neigung)
EMPFÄNGER
3 Tasten:
1. EIN / AUS
2. Aktivieren oder Ausschalten des Signaltons
3. Empfindlichkeitseinstellung der Messung (fein oder grob)
KALIBRIERSTEUERUNG
ENVIRON 30 METRES
PLAN HORIZONTAL
X1
X1 POINT LASER h1
X2 POINT LASER h2
Stellen Sie das Gerät etwa 30 Meter von einer Wand wie in der
o.a. Zeichnung. Stellen Sie das Gerät mit der Achse X1 zur Wand.
Schalten Sie das Gerät ein und markieren Sie den horizontalen
Strahl (Punkt h1).
Drehen Sie das Gerät um 180 ° und markieren Sie den
horizontalen Strahl (Punkt h2).
Der vertikale Abstand zwischen zwei Punkten (h1 und h2) sollte
weniger als 3 mm betragen.
Wiederholen Sie den Vorgang für die Y-Achse.

TECHNISCHE EIGENSCHAFTEN
Nivelliergenauigkeit ± 3 mm / 30 m
Nivellierbereich ± 5 °
Autonomie ~ 20 Stunden
Reichweite ~ Ø 400 m (mit Empfänger), je nach Wetterbedingungen
Rotationsgeschwindigkeiten 60 - 120 – 300 - 600 U / min
Scanner-Funktion 0 ° - 10 ° - 45 ° - 90 ° - 180 °
Tilt-Funktion ja
Lasertyp 635 nm, 1 mW
Laserstärke Klasse 2
Speisung 4 x NiMH C4000mAh 1,2 V wiederaufladbar
Abmessungen 160 x 200 x 200 mm
Betriebstemperatur -10 ° C / + 50 ° C
Gewicht (ohne Batterien) 3 kg
Schutzart IP 65
Stativgewinde 5/8 “
Reichweite der Fernbedienung ~ 30 / 10 m (in/out)
Winkel auf der Fernbedienung 0 ° - 90 ° - 180 ° - 270 ° (4-Rezeptoren auf dem Gerät)
Batterien für Fernbedienung Typ-2-1.5V
Batterien für den Empfänger Typ-1-9 V DC
Zubehör Fernbedienung – Empfänger - Ladegerät - Koffer

IP 65
NON FISSARE IL RAGGIO - APPARECCHIO LASER CLASSE II
POTENZA MASSIMA DI USCITA:
RADIAZIONE LASER
635nm
NE PAS REGARDER LE FAISCEAU - PRODUIT LASER CLASSE II
PUISSANCE MAXIMALE SORTIE:
RADIATION LASER
635nm
NICHT IN DEN STRAHL BLICKEN - KLASSE II LASER-PRODUKT
MAXIMALE AUSGANGSLEISTUNG:
LASER-STRAHLUNG
635nm
RADIACIÓN LÁSER
NO MIRE AL RAYO - LÁSER CLASE II
POTENCIA MÁXIMA DE SALIDA:
635nm
DO NOT STARE INTO BEAM - CLASS II LASER PRODUCT
MAXIMUM OUTPUT POWER:
LASER RADIATION
635nm
CAUTION
Table of contents
Languages:
Other Metrica Laser Level manuals

Metrica
Metrica 60703 User manual

Metrica
Metrica BRAVO LASER XL 2.0 User manual

Metrica
Metrica BRAVO LASER BOX3 User manual

Metrica
Metrica BRAVO LASER 360 + 2V User manual

Metrica
Metrica 61400M User manual

Metrica
Metrica 60800 User manual

Metrica
Metrica 60804 User manual

Metrica
Metrica 60821 User manual

Metrica
Metrica 60719 User manual

Metrica
Metrica BRAVO LASER BOX User manual