MIR MIROxi User manual

MIROxi User Manual cod. 980265 Rev 1.6 Page 1 of 32
MIROxi
User Manual
User Manual Rev. 1.6
Issued on: 06/10/2008
Approved on: 06/10/2008

MIROxi User Manual cod. 980265 Rev 1.6 Page 2 of 32
Thank you for choosing a product from MIR
MEDICAL INTERNATIONAL RESEARCH
The original packaging contains the device plus its standard accessories:
Accessories supplied with MIROxi CODE
MIROxi carrying case 672690
MIROxi device 910570
1 Oximeter sensor 919010
MIROxi User Manual 980205
USB connection cable 532365
4 x 1.5V AAA batteries 970080
CD winspiroPRO 920100
Belt and holder 919089
OPTIONS CODE
RS232 connection cable 532367
“Wrap” finger sensor for long term oximetry*919001
* accessories for single use only; all other accessories are reusable
Before using your MIROxi …
•Read this Manual carefully, plus all labels and any other product information supplied.
•If not fitted, install the operating batteries taking care to connect the “+” and “-” battery poles correctly, as shown within
the battery compartment.
•Set the device configuration as required (date, time, predicted values, device language etc.) as described in Paragraph
2.4.
WARNING
The winspiroPRO PC software supplied with the device MUST be correctly installed on the PC before
connecting MIROxi to the PC. At the end of the installation, connect the device to the PC and the hardware
will be "recognised" by the PC. The device can then be used with the winspiroPRO software.
Keep the original packaging!
In the event that your device requires service then always use the original packaging to return it to the distributor or
manufacturer.
In this case, please follow these guidelines:
•Return the complete device with accessories in the original packaging, and
•The transport (plus any customs or taxes) costs must be prepaid.
Manufacturer’s address:
MIR SRL
VIA DEL MAGGIOLINO, 125
00155 ROMA (ITALY)
Tel ++ 39 0622754777
Fax ++ 39 0622754785
Web site: www.spirometry.com
MIR has a policy of continuous product development and improvement, and the manufacturer therefore
reserves the right to modify and to update the information contained in this Manual as required. Any
suggestions and or comments regarding this product should be sent via email to: mi[email protected].
Thank you.
MIR accepts no responsibility for any loss or damage caused by the User of the device due to instructions
contained in this Manual and/or due to an incorrect use of the product.
Note that due to printing limitations the screenshots shown in this manual may differ from the display of the
machine and/or from the keyboard icons.
Copying this manual in whole or in part is strictly forbidden.
FEDERAL LAW RESTRICTS THIS DEVICE TO SALE TO OR ON THE ORDER OF A PHYSICIAN

MIROxi User Manual cod. 980265 Rev 1.6 Page 3 of 32
INDEX
1. INTRODUCTION...................................................................................................................................................... 4
1.1 Intended Use.................................................................................................................................................... 4
1.1.1 User Category ............................................................................................................................................. 4
1.1.2 Ability and experience required ................................................................................................................... 4
1.1.3 Operating environment................................................................................................................................ 4
1.1.4 Who can or must make the installation........................................................................................................ 4
1.1.5 Subject effect on the use of the device........................................................................................................ 4
1.1.6 Limitations of use - Contraindications.......................................................................................................... 4
1.2 Important safety warnings ................................................................................................................................ 5
1.2.1 Danger of cross-contamination.................................................................................................................... 5
1.2.2 Oximetry sensor .......................................................................................................................................... 5
1.2.3 Device ......................................................................................................................................................... 6
1.3 Unforeseen errors ............................................................................................................................................ 6
1.4 Labels and symbols ......................................................................................................................................... 7
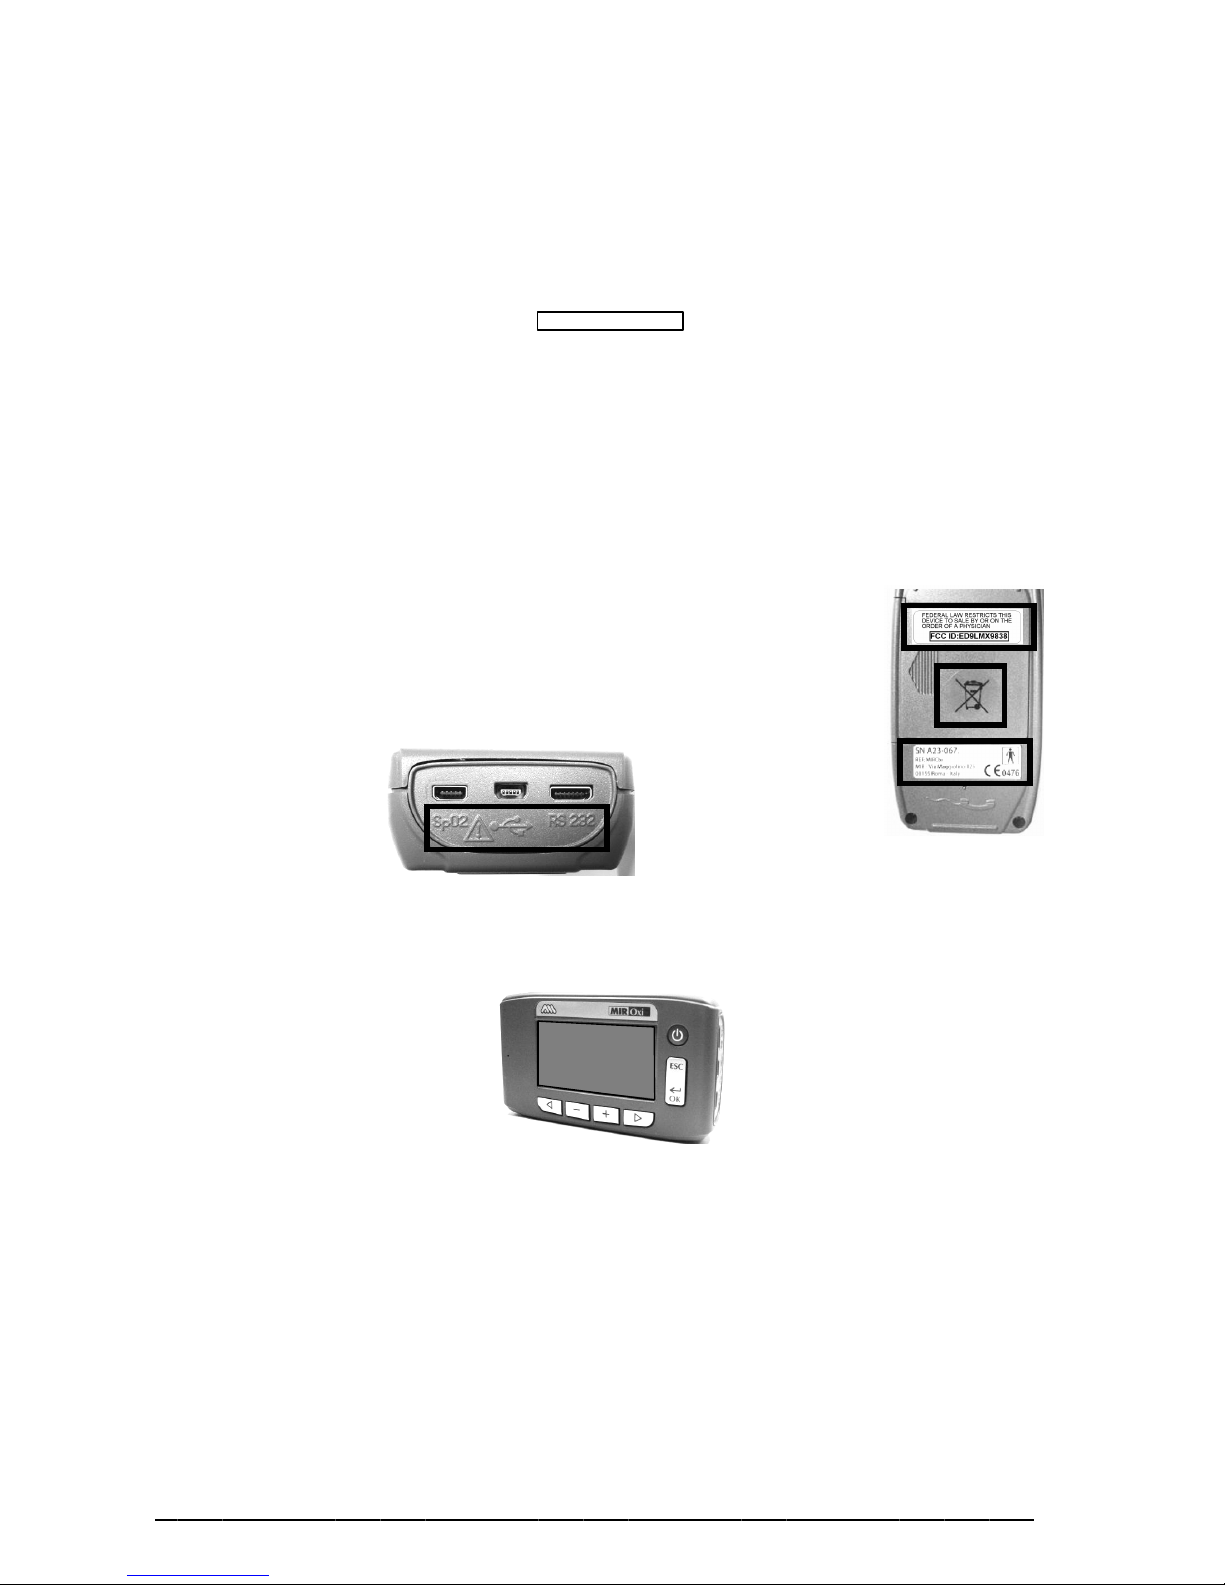
1.4.1 Identification label........................................................................................................................................ 7
1.4.2 CE mark for medical devices....................................................................................................................... 7
1.4.3 Electrical safety symbol............................................................................................................................... 7
1.4.4 Warning symbol for the RS232 serial port...................................................................................................7
1.4.5 Warning symbol for the USB serial port ...................................................................................................... 7
1.4.6 Warning symbol for the SpO2 port for oximetry........................................................................................... 7
1.4.7 Warning symbol for the WEEE.................................................................................................................... 7
1.4.8 FCC Warnings............................................................................................................................................. 8
1.5 Product description .......................................................................................................................................... 8
1.6 Technical specifications ................................................................................................................................... 9
1.6.1 Other features ........................................................................................................................................... 11
2. FUNCTIONING OF THE MIROxi............................................................................................................................ 11
2.1 Keyboard........................................................................................................................................................ 11
2.2 Battery Level .................................................................................................................................................. 13
2.3 Information ..................................................................................................................................................... 13
2.4 Initial Set-up ................................................................................................................................................... 13
2.5 Patient Data ................................................................................................................................................... 15
2.6 Displaying data in memory............................................................................................................................. 16
2.7 Online operating mode (connected to a PC) .................................................................................................. 16
2.8 Oximetry testing ............................................................................................................................................. 16
2.8.1 Walk Test (6MWT) .................................................................................................................................... 18
2.8.2 Sleep Oximetry.......................................................................................................................................... 19
2.8.3 SPO2 BPM Oximetry Test......................................................................................................................... 19
2.8.4 SPO2 BPM Test........................................................................................................................................ 20
2.8.5 Adult Single Patient Sensor – Instructions for Use.................................................................................... 20
2.8.6 Instruction for the belt and holder.............................................................................................................. 21
3DATA TRANSMISSION ............................................................................................................................................. 21
3.1 Wireless Data Transmission via Phone Line (optional function)..................................................................... 21
3.2 Data Transmission via Bluetooth to a cell phone ........................................................................................... 22
3.2.1 Preliminary Operations.............................................................................................................................. 22
3.2.2 Setting the Phone Number ........................................................................................................................22
3.2.3 Bluetooth Data Transmission .................................................................................................................... 22
3.3 Data Transmission via Bluetooth for printing..................................................................................................22
3.4 Connection to a PC through USB port ........................................................................................................... 23
3.5 Connection to a PC through the RS232......................................................................................................... 23
3.6 Upgrade Internal software.............................................................................................................................. 23
4MAINTENANCE......................................................................................................................................................... 23
4.1 Cleaning the oximetry sensor......................................................................................................................... 24
4.2 Changing the adhesive tape of the wrap sensor ............................................................................................ 24
4.3 Changing the Batteries................................................................................................................................... 24
5PROBLEM SOLVING................................................................................................................................................. 24
5.1 Causes and Solutions .................................................................................................................................... 25
LIMITED WARRANTY CONDITIONS ............................................................................................................................... 27
ANNEX 1 OXYMETRY TEST REPORT EXAMPLES................................................................................................ 28
ANNEX 2 INFORMATION FOR CORRECT USE IN AN ELECTROMAGNETIC ENVIRONMENT........................... 31

MIROxi User Manual cod. 980265 Rev 1.6 Page 4 of 32
1. INTRODUCTION
1.1 Intended Use
The MIROxi pulse oximeter is intended to be used by a physician or by a patient under the instruction of a physician or
paramedic.
The device is intended to test lung function and can make oximetry testing in people of all ages.
It can be used in any setting.
1.1.1 User Category
The MIROxi oximeter calculates a series of parameters relating to human respiratory function.
Typically the doctor “prescribes” the use of the device and is responsible for analysing and controlling the results
obtained.
1.1.2 Ability and experience required
The correct use of the device, the interpretation of the results and the maintenance of the device all require qualified
personnel. In the event that the device is operated by the patient, then sufficient training must first be given to the patient
by the doctor or by the trained paramedic under the supervision of the doctor.
WARNING
The manufacturer cannot be held responsible for any damage caused by the user of the device failing to
follow the instructions and warnings contained in this manual.
MIROxi is intended for spot-checking, overnight sleep screening and/or continuous monitoring when
attended by a trained healthcare professional.
1.1.3 Operating environment
MIROxi has been designed for use in a doctor’s office, in a hospital or directly by the patient during day-to-day activities
for the monitoring of physical conditions. All information necessary for the proper use of the device in electromagnetic
environments (as required by the EN 60601-1-2 Standard) is available from the manufacturer.
Used at home, at work, at school or during sports, day by day the device records data and functional respiratory
parameters for a period of weeks or months, assisting the patient in making a better assessment of hisor her own health.
The procedures for using the device at home are described according to the type of test to be made; the display will
show all instructions (messages, suggestions etc.) step-by-step, which allows the subject to correctly perform tests and
obtain correct results, to be analysed by the doctor.
The instrument is not intended for use in an operating theatre nor in the presence of inflammable liquids or detergents,
nor in the presence of inflammable anaesthetic gases (oxygen or nitrogen).
The instrument is not designed to be used in direct sources of heat or cold, direct sun rays or other sources of light or
energy, dust, sand or any other chemical substances.
The user and/or the doctor are responsible for ensuring that the device is stored and used in appropriate environmental
conditions; in this regard reference is made to the specifics described in paragraph 1.6.1 below.
WARNING
If the device is exposed to unsuitable environmental conditions, this could cause the device to malfunction
and to give incorrect results.
1.1.4 Who can or must make the installation
The device requires installation by qualified personnel. Normally the doctor configures the instrument before giving it to
the patient for use at home.
1.1.5 Subject effect on the use of the device
Patient collaboration is not required to make oximetry testing.
1.1.6 Limitations of use - Contraindications
An analysis of the results of oximetry testing is not by itself sufficient to make a correct diagnosis of the subject’s clinical
condition. A detailed clinical history of the subject is required together with the results of any other test(s) suggested by a
doctor.
Test comments, a test interpretation and suggested courses of treatment must be given by a doctor.
Any symptoms that the subject has at the time of the test must be carefully considered before a oximetry test is made.
The user is responsible to assess both the mental and the physical capacity of the subject in order to make a correct test.
The acceptability of a test is the responsibility of the user.

MIROxi User Manual cod. 980265 Rev 1.6 Page 5 of 32
The device must never be used when it is possible or probable that the validity of the results may be compromised due to
any such external factors.
ATTENTION
MIROxi has limited alarms, therefore the device requires frequent observation of SpO2 and pulse rate results
displayed.
1.2 Important safety warnings
MIROxi has been examined by an independent laboratory which has certified the conformity of the device to the
European Safety Standards EN 601-1 and guarantees the EMC Requirements within the limits laid down in the European
Standard EN 60601-1-2.
MIROxi is continually controlled during its production and therefore the product conforms to the established security
levels and quality standards laid down by the Council Directive 93/42/EEC for MEDICAL DEVICES.
After removing the device from its packaging, check that there is no visible damage. In case of damage do not use the
device, return it to the manufacturer for repair.
WARNING
The safety and the correct performance of the device can only be assured if the user of the device respects
all of the relevant safety rules and regulations.
The manufacturer cannot be held responsible for damage caused by the failure of the user correctly to follow
these instructions.
The device must be used only and exclusively as an oximeter following the indications given by the
manufacturer with particular attention to the paragraph on intended use (see paragraph 1.1), and utilizing
only original spare parts and accessories. The use of non-original parts such as the oximetry sensor or other
accessories may cause errors in measurement and/or compromise the correct functioning of the device, and
is therefore not permitted.
Do not use the device beyond the declared life span. The life span is strictly related to the life of the internal
lithium backup battery (CR2032) and in normal conditions this should be around 10 years. The device
constantly monitors the state of charge of this battery and a message informs the user when the battery is
discharged. Contact Technical Service to have this battery changed.
In the event of any incident or accident of any kind resulting from the use of the device, the user is required
to inform the manufacturer without delay, this procedure is laid down in Article.9 of the European
Regulations No. 46/1997, which implemented the EC Directive No. 93/42.
1.2.1 Danger of cross-contamination
In order to avoid exposing the subject to the critical danger of cross-contamination, the oximetry sensor must always be
cleaned before each oximetry test. If a single-patient sensor is used, then a new one must be used for each patient.
1.2.2 Oximetry sensor
The oximetry sensor has two light emitting diodes (LEDs), one emits in the visible spectre and one infrared. Both lights
pass through the finger and are “read” by the receiver. As these lights pass through the finger, a proportion of the light is
absorbed by the blood and by the soft tissue, in function of the concentration of heamoglobin. The quantity of light
absorbed, at each frequency, depends on the degree of oxygenation of the haemoglobin inside the soft tissue.
The oximetry sensor can be disinfected with isopropilic alcohol.
The oximetry sensors which can be used with MIROxi are the following:
MANUFACTURER MANUFACTURER CODE DESCRIPTION
BCI 1300 adult sensor (disposable)
BCI 3026 wrap-around sensor for infants
BCI 3043 universal Y sensor
BCI 3078 ear sensor
BCI 3178 pediatric finger sensor, reusable
BCI 3444 adult sensor reusable (Comfort Clip)
BCI 3044 adult sensor, reusable, for finger
These sensors require the use of an extension cable cod. 919100 to connect to the device.
These sensors are also available with a microconnector for direct connection.
Prolonged use and/or the patient’s condition may require changing the sensor site periodically. Change sensor site and
check skin integrity, circulatory status, and correct alignment at least every 4 hours.
WARNING
Incorrectly applied sensors or damaged cables may cause inaccurate readings. Using a damaged sensor
may cause inaccurate readings, possibly resulting in patient injury or death. Inspect each sensor before use.
If a sensor appears damaged do not use it. Use another sensor or contact your authorized repair centre for
assistance.

MIROxi User Manual cod. 980265 Rev 1.6 Page 6 of 32
Use only MIR sensors supplied with or specifically intended for use with the MIROxi. The use of sensors not
intended for use with the MIROxi may cause inaccurate readings.
Oximetry measurements may be inaccurate in the presence of high ambiental light. Shield the sensor area
(with a surgical towel, for example) if necessary.
WARNING
Dyes introduced into the bloodstream, such as methylene blue, indocyanine green, indigo carmine, patent
blue V (PBV), and fluorescein may adversely affect the accuracy of the oximetry reading.
Any condition that restricts blood flow, such as the use of a blood pressure cuff or a device for systemic
vascular resistance, may cause an inability to determine accurate pulse rate and SpO2 readings.
Remove fingernail polish and/or false fingernails before applying SpO2 sensors. Both may cause inaccurate
oximetry measurement.
Significant levels of dysfunctional hemoglobins, such as carboxyhemoglobin or methemoglobin, may
adversely affect the accuracy of the oximetry measurement.
Optical cross-talk can occur when two or more sensors are placed in close proximity. Optical cross-talk may
adversely affect the accuracy of the oximetry readings. The danger can be eliminated by covering each site
with opaque material.
Obstructions or dirt on the sensor’s emitter and/or detector may cause a sensor failure or inaccurate
readings. Make sure there are no obstructions and the sensor is clean.
Autoclaving, ethylene oxide sterilizing, may cause sensor damage. Do not attempt to sterilize the sensor.
Unplug the sensor from the MIROxi before cleaning or disinfecting to prevent damaging sensor or device,
and to prevent safety hazards for the user.
1.2.3 Device
WARNING
The maintenance operations detailed in this Manual must be fully and accurately carried out. If these
instructions are not followed this can cause measurement errors and/or an incorrect test interpretation.
Any modifications, adjustments, repairs or reconfiguration must be made by the manufacturer or by
personnel authorised by the manufacturer. Never attempt to make a repair oneself. The set-up of
configurable parameters should only be made by qualified personnel. However, an incorrect set-up of the
parameters does not put the patient at risk.
High-frequency emissions from other electronic devices may interfere with the correct operation of the
instrument. For this reason, certain minimum clearances (a few metres) should be observed when high-
frequency appliances such as a TV, radio, portable phone, etc. and other electronic units are operated at the
same time in the same room.
The instrument may give inaccurate readings if operated in the presence of strong electromagnetic sources,
such as electrosurgical equipment, or in the presence of computed tomography (CT) equipment.
Do not use the instrument in the presence of magnetic resonance imaging (MRI) equipment. MRI equipment
may cause an induced current to the oximetry sensor, resulting in patient injury.
If the PC and/or the printer connected to MIROxi come into contact with an area containing patient data, ref.
directive EN 60601-1-1, it is necessary that they conform to the directive EN 60601-1.
For the recycling of the MIROxi, the accessories, any plastic consumable materials as well as the battery,
use only the appropriate containers or return all such parts to the dealer or to a recycling centre. All
applicable local regulations must be followed.
If any of these rules are not followed then MIR will decline all responsibility for any direct or indirect
damages, however caused.
Use only the battery type indicated in the § Technical specifications.
Remove the battery from the device if the machine is not used for a long period (several months).
The instrument may be powered through a PC by a USB cable. By this means, the device works both on line
with the PC, or individually powered by the PC.
Keep the device out of reach of children and of any person with mental handicap.
1.3 Unforeseen errors
In case the device internal memory data are damaged, when the device is switched on, the following message appears:
Error on RAM memory
Recovery data
Please wait
If data are successfully recovered then the device completes the standard switch on process, otherwise please contact
an authorised technical assistance point or the manufacturer.

MIROxi User Manual cod. 980265 Rev 1.6 Page 7 of 32
In the case of a problem with the device, a message indicating the nature of the problem will appear on the screen,
together with a warning “beep”.
Operation of the device beyond its declared life (see 1.6 Technical Specifications) could provoke a loss of data in the
memory of the device (SRAM memory).
Errors in measurement or in interpretation can also be caused by:
•use by non-qualified or non-trained personnel, lacking ability or experience
•user error
•use of the instrument outside the guidelines described in this Manual
•use of the instrument even when some operational anomalies are encountered
•non-authorised servicing of the instrument.
1.4 Labels and symbols
1.4.1 Identification label
The label shows:
•Serial number of the device
•Product name
•Name and address of the manufacturer
•Electrical safety symbol
•CE mark in compliance with the Directive 93/42 EEC.
1.4.2 CE mark for medical devices
0476
This product is certified to conform to the Class II requirements of the 93/42/EEC medical device directive.
1.4.3 Electrical safety symbol
In accordance with the IEC 60601-1 Standard, this product and its component parts are of type BF and therefore
protected against the dangers of direct and indirect contact with electricity.
1.4.4 Warning symbol for the RS232 serial port
RS232
For connection to other devices such as PC or printer.
Use only the serial cable supplied by the manufacturer and observe the safety regulations of IEC 60601-1-1.
1.4.5 Warning symbol for the USB serial port
For connection to other devices such as PC or printer.
Use only the serial cable supplied by the manufacturer and observe the safety regulations of IEC 60601-1-1.
1.4.6 Warning symbol for the SpO2 port for oximetry
SpO2
1.4.7 Warning symbol for the WEEE
As laid down in the European Directive 2002/96/EEC requirements regarding the disposal of electrical and electronic
devices (WEEE), at the end of its useful life this device must not be thrown away with normal domestic waste as it

MIROxi User Manual cod. 980265 Rev 1.6 Page 8 of 32
contains materials which would cause damage to the environment and/or represent a health risk. Instead it must be
delivered to a WEEE authorised collection centre, where the device will be disposed of correctly.
An alternative is to return the device without charge to the dealer or distributor when a new equivalent device is
purchased.
Due to the materials used in the manufacturing of the device, disposing it as a normal waste product could cause harm to
the environment and/or to health.
Failure to observe these regulations can lead to prosecution.
1.4.8 FCC Warnings
FCC ID:TUK-MIR023
MIROxicomplies with Part 15 of the FCC Rules. The correct operation is subject to the following conditions:
(1) this device must not cause harmful interference
(2) this device must accept any interference received, including interference that may cause undesired operation.
Any modifications not expressly approved by the manufacturer could void the user's authority to operate the equipment.
NOTE: This device has been tested and found to comply with the limits for a Class B digital device, pursuant to Part 15
of the FCC Rules. These limits are designed to provide reasonable protection against harmful interference in a
residential installation. This equipment generates, uses and can radiate radio frequency energy and, if not installed and
used in accordance with the instructions, may cause harmful interference to radio communications.
However, there is no guarantee that interference will not occur in a particular installation. If this equipment does cause
harmful interference to radio or television reception, which can be determined by turning the equipment off and on, the
user is encouraged to try to correct the interference by one or more of the following measures:
•Reorient or relocate the receiving antenna.
•Increase the separation between the equipment and receiver.
•Connect the equipment into an outlet on a circuit different from that to which the receiver
is connected.
•Consult the dealer or an experienced radio/TV technician for assistance.
Labels and symbols are displayed on the device like shown in the following images:
1.5 Product description
MIROxi is a pocket oximeter. It can operate in stand alone mode and it can be connected to a PC or to a printer using
any one of several available connection methods: RS232, USB, Bluetooth.
MIROxi is specifically designed to measure and to monitor the saturation of oxygen in the blood and the heart beat. The
device has an internal memory sufficient for over 1000 hours (or 40 days) of oximetry monitoring.
MIROxi is a powerful and compact measurement device, intended for use by a respiratory specialist or by a suitably
trained generalist.
MIROxi is able to transfer the stored test data through an (optional) simple acoustic coupling to a PC, so the patient can
send test data by phone to the doctor. In this way the doctor can check the patient’s condition remotely.
MIROxi can also be connected to a PC (or to another computerised system) to configure the system. All oximetry test
results plus the related subject details stored inside the device can be transferred from the device to the PC and then
viewed on the PC.
The connection to the PC can be made in the following ways:
•through the RS232 port
•through the USB port
The device has two batteries:

MIROxi User Manual cod. 980265 Rev 1.6 Page 9 of 32
•Main power: AAA 1.5V battery (4 batteries are required)
•Memory back up: lithium battery type CR2032 of 3V. The battery life is about 10 years, depending on the use of the
device
1.6 Technical specifications
A comprehensive description of the main features of the device and of the oximetry sensor follows.
Definitions:
Desaturation Event Desaturation events SpO2 fall ≥4% in a limited period of 8-40 sec and successive rise ≥2% within a
total period of 150 sec.
Total Pulse rate
Variation Pulse rate rise ≥10 BPM in limited period of 8-40 sec and successive fall ≥8 BPM during a total
period of 150 sec.
Parameters measured during sleep oximetry:
SYMBOL DESCRIPTION Units
SpO2 Baseline SpO2 Average in first three minutes %
SpO2 Min SpO2 Minimum during period of analysis %
SpO2 Max SpO2 Maximum during period of analysis %
SpO2 Mean SpO2 Average during period of analysis %
BPM Baseline Average pulse frequency in the first 3 minutes BPM
BPM Min Minimum pulse frequency during the analysis period BPM
BPM Max Maximum pulse frequency during the analysis period BPM
BPM Mean Average pulse frequency during the analysis period BPM
Recording time Total time of SpO2 measurement hh:mm:ss
T < 90% Time passed with SpO2 < 90 % % hh:mm:ss
T < 89% Time passed with SpO2 < 89 % % hh:mm:ss
T < 88% Time passed with SpO2 < 88 % % hh:mm:ss
T < 87% Time passed with SpO2 < 87 % % hh:mm:ss
N° Events SpO2
<89% Fall of SpO2 below 89% for at least 20 seconds \
∆Index [12s] Index of SpO2 fluctuation calculated in intervals of 12 seconds \
T< 40 BPM Time passed with pulse frequency < 40 BPM % hh:mm:ss
T> 120 BPM Time passed with pulse frequency > 120 BPM % hh:mm:ss
N°Events < 40 BPM Bradycardia events during the entire period of analysis \
N°Events > 120 BPM Tachycardia events during the entire analysis period \
Tot. Desat. Events Desaturation events during the entire analysis period \
ODI Desaturation events per hour of analysis 1/h
Mean Duration Average duration of desaturation events s
Longest Duration Longest duration of desaturation events s
Desaturation Peak Minimum Sp02 during desaturation events %
Mean Desaturation Average duration of desaturation events %
Mean Drop SpO2 Average SpO2 fall (with respect to baseline) during the desaturation events %
Max Drop SpO2 Maximum fall of SpO2 (with respect to baseline ) during the desaturation
events %
N°Pulse Variations Variation of pulse frequency events during the entire analysis period \
Pulse Index Variation of pulse frequency per hour of analysis 1/h
NOD 4% Time passed with SpO2 < 4 % with respect to SpO2 base for continual periods
above 5 minutes \ hh:mm:ss
NOD 89% Time passed with SpO2 < 89 % for continued periods above 5 minutes \ hh:mm:ss
NOD 90% Time passed with SpO2 < 90 % for continued periods above 5 minutes with
minimum value < 86 % (Nadir) \ hh:mm:ss
∆=DELTA
Parameters measured for six minute walk test analysis:
SYMBOL DESCRIPTION Units
SpO2 Baseline SpO2 average before walking %
SpO2 End SpO2 after walking %
SpO2 Min SpO2 minimum during walking %
SpO2 Max SpO2 maximum during walking %
SpO2 Mean SpO2 average during walking %
BPM Baseline Average pulse frequency before walking BPM
BPM End Pulse frequency after walking BPM
BPM Min Pulse frequency minimum during walking BPM
BPM Max Pulse frequency maximum during walking BPM
BPM Mean Pulse frequency average during walking BPM
T < 90% Time passed with SpO2 < 90 % % hh:mm:ss

MIROxi User Manual cod. 980265 Rev 1.6 Page 10 of 32
T < 89% Time passed with SpO2 < 89 % % hh:mm:ss
T < 88% Time passed with SpO2 < 88 % % hh:mm:ss
T < 87% Time passed with SpO2 < 87 % % hh:mm:ss
T∆2 [∆SpO22%] Time passed during walking test with SpO2 < 2 % with respect to SpO2 base hh:mm:ss
T∆4 [∆SpO2 4%] Time passed during SpO2 walking test < 4 % with respect to SpO2 base hh:mm:ss
T< 40 BPM Time passed with pulse frequency < 40 BPM hh:mm:ss
T> 120 BPM Time passed with pulse frequency > 120 BPM hh:mm:ss
N°Events < 40 BPM Bradycardia events during the entire period of analysis \
N°Events > 120 BPM Tachycardia events during the entire analysis period \
Recording time Total time measure of SpO2 hh:mm:ss
Baseline Time Duration of baseline phase hh:mm:ss
Walking Time Duration of walking phase hh:mm:ss
Recovery Time Duration of recovery phase hh:mm:ss
Predicted Predicted standard distance m
Pred. Min Predicted minimum distance m
% Predicted Standard % in variations of the distance covered with respect to the predicted standard
distance %
% Pred. Min % of variations of distance covered with respect to the predicted minimum
distance %
AUC/Distance Area under SpO2 curve base relative to the distance covered \
Dyspnea Borg CHG Variation in grade of dyspnea during walking \
Fatigue Borg CHG Variations in level of fatigue during walking \
∆=DELTA
*Here follows a description of the method for calculating the area below the SpO2 baseline curve:
Parameters requested for six minute walk test analysis
SYMBOL DESCRIPTION Units
Dyspnea Borg Baseline Grade of dyspnea before walking \
Dyspnea Borg End Grade of dyspnea after walking \
Fatigue Borg Baseline Level of fatigue before walking \
Fatigue Borg End Level of fatigue after walking \
Walked Distance covered during walking m
Parameters measured with SpO2 Analysis:
SYMBOL DESCRIPTION Units
SpO2 Baseline SpO2 Average during first three minutes %
SpO2 Min SpO2 Minimum during analysis period %
SpO2 Max SpO2 Maximum during analysis period %
SpO2 Mean SpO2 Average during analysis period %
BPM Baseline Average pulse frequency in the first 3 minutes BPM
BPM Min Minimum pulse frequency during the analysis period BPM
BPM Max Maximum pulse frequency during the analysis period BPM
BPM Mean Average pulse frequency during the analysis period BPM
Recording time Total SpO2 measurement time hh:mm:ss
T < 90% Time passed with SpO2 < 90 % % hh:mm:ss
T < 89% Time passed with SpO2 < 89 % % hh:mm:ss
T < 88% Time passed with SpO2 < 88 % % hh:mm:ss
T < 87% Time passed with SpO2 < 87 % % hh:mm:ss
N°Events SpO2 < 89% Fall of SpO2 below 89 % for at least 20 seconds \
∆Index [12s] Index of SpO2 fluctuation calculated in intervals of 12 seconds \
T< 40 BPM Time passed with pulse frequency < 40 BPM % hh:mm:ss
T> 120 BPM Time passed with pulse frequency > 120 BPM % hh:mm:ss
N°Events < 40 BPM Bradycardia events during the entire analysis period \
N°Events > 120 BPM Tachycardia events during the entire analysis period \
∆=DELTA

MIROxi User Manual cod. 980265 Rev 1.6 Page 11 of 32
Measurement method: Red and infrared absorption
Range of measurement %SpO2: 0 – 99% (with 1% increments)
%SpO2accuracy: ±2% between 70-99% SpO2
Average number of heart beats for the %SpO2calculation: 8 beats
Range of measurement of cardiac pulse: 30 – 254 BPM (with 1 BPM increments)
Accuracy of cardiac pulse: ±2 BPM or 2%
Average interval for the calculation of cardiac pulse: 8 seconds
Signal quality indication: 0 - 8 segments on display
Acoustic signals:
•Beep with frequency of the cardiac pulse
•Continuous beep in the case of either %SpO2or cardiac pulse going outside of the programmed alarm levels
•Continuous beep during oximetry measurement in the case of a low battery level.
The specifications for both the oximetry and for the cardiac pulse are the same regardless of which of the above
mentioned oximetry sensors is used.
1.6.1 Other features
Memory Memory capacity over 1000 hours (or 40 days)
Display STN graphic LCD,128x64 Pixel
Keyboard Membrane keyboard with 6 keys
Interface RS232, USB, Bluetooth
Duration of the CR2032 3V lithium battery (memory backup) Circa 10 years, under normal conditions of use
and storage
Power supply 4 x AAA batteries 1.5V DC (type AAA), or
through USB connection
Dimensions 60x105x25 mm
Weight 150 grams (including batteries)
Type of electrical protection Class II device
Type of electrical protection BF
Grade of protection against water ingress IPX1 device, protected against water drops
Safety level in the presence of inflammable anaesthetic gas,
oxygen or nitrogen Device not suitable
Conditions of use Device for continuous use
Storage conditions Temperature: MIN -20 °C, MAX + 60 °C
Humidity :MIN 10% RH; MAX 95%RH
Operating conditions Temperature: MIN + 10 °C, MAX + 40 °C;
Humidity: MIN 10% RH; MAX 95%RH
Applied norms Electrical Safety Standard IEC 60601-1
Electro Magnetic Compatibility IEC 60601-1-2
2. FUNCTIONING OF THE MIROXI
2.1 Keyboard
The MIROxi keyboard is composed of 7 keys:
Key functions are as followed:
1 On/Off
2
3 ESC
OK
esc/ok previous page
OK/confirm (with corresponding icon on display)
4
Scroll left
(with corresponding icon on display)
5
Scroll down
(with corresponding icon on display)
6
Scroll up

MIROxi User Manual cod. 980265 Rev 1.6 Page 12 of 32
(with corresponding icon on display)
7
Scroll right
(with corresponding icon on display)
WARNING
The ESC/OK is a rocker-type key, i.e. it has two functions in one; press the bottom to use the enter function
(OK); press the top to use ESC.
Switching on MIROxi
To switch on MIROxi press and then release.
Switching off MIROxi
To switch off MIROxi press and hold for at least two seconds.
CONFIRM: to confirm and pass to the next phase, use
or OK
Symbols and Icons
The icons used in the various function screens and their meanings are shown in the following table:
ICON DESCRIPTION
To access the MIROxi set up (Service Menu)
To manage or enter new patient data from the main screen
To enter new patient data
To modify patient data
To carry out an oximetry test
To access previous tests
To access transmission data area
To search for tests made
To display oximetry test results of selected subject
To search test by subject ID code
To search tests made after a certain date (partial memory)
To scroll through files in memory
To search patient by subject surname
To select male patient
To select female patient
To carry out a sleep oximetry test
To carry out an oximetry test while walking/Go to walking phase during test
To pass to the recovery phase during a walking test
To access oximetry tests/To carry out an SpO2/BPM
To display previous test(s) in memory
To display next test in memory
To print data from memory (through Bluetooth connection)

MIROxi User Manual cod. 980265 Rev 1.6 Page 13 of 32
To transfer data through a Bluetooth connection
To transfer data through acoustic coupling
WARNING
IF no key is pressed for 1 minute the instrument will ‘beep’, and if no key is pressed for a further 10 seconds
the device will automatically switch off. If MIROxi is powered by a USB connection to a PC, this auto power-
off function is disabled and the device is switched off using .
The instrument can be switched off at any time by pressing and holding the key for two seconds.
2.2 Battery Level
The symbol
shown in the second screen when the unit is turned on indicates that the battery is charged. The following symbol
indicates Low Battery:
If the battery is discharged the following message appears:
BATTERY DISCHARGED
2.3 Information
Switch on MIROxi by pressing . The display will show:
•MIROxi – x.y (device name and software revision number)
•Power means (USB or battery symbol)
•Current date and time
•icon (Access to the Service Menu)
•SpO2/BPM icon
Press OK to go to the second display. Press ESC to go directly to the main screen.
The second display will show:
•Subjects in memory (no. of patients)
•SpO2 (no. of oximetry tests made)
•Available memory (% value).
If there is no information or test data in memory, i.e. the memory is empty, then all data is shown with 0 (null).
2.4 Initial Set-up
Switch on MIROxi by pressing and holding and wait for the second screen. Press
to access the service menu.
The following screen “Service Menu” contains the following menu:
•Select Language (English is the default)
•Delete MEMORY
•Change Date/Time
•Date Format
•Units Format
•Phone Setup
•Bluetooth Setup
•Firmware Info
•Oximetry alarms
•SpO2 sampling time
•Energy saving
Select the option required using
or
and the symbol on the left of the screen; press OK to access options; select
the required setup using the
or
arrow, then press OK to return to the Service Menu.
Select Language

MIROxi User Manual cod. 980265 Rev 1.6 Page 14 of 32
Press OK to access the Menu, use
or
to select the required language and then press OK to register the change and
to return to the Service Menu.
Delete Memory
Enter Menu with OK, then enter the password:
if the password is inserted correctly then the following message appears:
Test data has been cancelled
Change Date/Time
In date and time setting, the
arrow shown to the right of the field indicates
the field to modify. Use
or
to modify the selected option; use
for the
following option. Lastly, press OK to return to the Service Menu.
To return to the Service Menu display without entering any changes press ESC.
Date Format
Use
or
to select the required format and press OK to confirm and to return to the Service Menu.
Units Format
Access with OK and select imperial or metric as required. Press OK again to return to the Service Menu.
Phone Setup
Access with OK and then use the horizontal scroll arrow to select phone number (click on number to insert in connect list).
Having set the option, press OK to confirm and to return to the Service Menu.
Bluetooth Setup
Access with OK to search for available devices, select “Search Device” and then press OK; MIROxi will start to search for
Bluetooth devices in the area; once one or more devices are found the screen will display profiles, press OK to set the
device as printer or phone, select one of the two options and then press OK. On the “Bluetooth Setup” screen all devices
entered on the “printer list” and on the “phone list” can be checked. A device can be set as default by accessing the lists
with OK and then selecting the device, (to which MIROxi will automatically connect) or deleted from the list (in this case
press OK on the bottom to confirm the deletion, or press ESC to go back and to not delete the device).
Firmware Info
Click OK to view information on the revision of the following components, where available, of MIROxi:
•MIROxi
•Bluetooth
•Display
•Oximeter
After approximately 10 seconds MIROxi automatically displays the Service Menu, otherwise press ESC.
Oximetry Alarms
This function permits the setting up of reference values for Sp02 and for BPM;
if during a test these values go below the minimum or above the maximum
values selectedthen an acoustic alarm sounds to alert the user.
The cursor will rest on the minimum Sp02 value, use the
or
keys to select the desired value, then pass to the next
value by pressing OK. Once the four values have been set up you can then activate or disactivate the acoustic alarm by
pressing
or
. To confirm the selection press OK, the service menu will then be displayed.

MIROxi User Manual cod. 980265 Rev 1.6 Page 15 of 32
SpO2 sampling time
Through this function it is possible to define the time interval between the values memorised between one oximetry
parameter and the next one; use
or
to select the desired value (
for 2 seconds,
for 4 seconds), press OK to set
the value selected and to pass to the service menu.
Energy saving
This function enables the display to be set “always on”, or to switch off automatically. This function is valid for the sleep
oximetry test. The option “Display -OFF” will switch off the display after 5 minutes which therefore extends the battery life.
At any time during the test the display can be switched back on by pressing . Then select the required option as
previously described with
or
and then OK.
Having set the parameters (from the Service Menu) press ESC to access the second screen, and then the main screen,
as follows:
Indicates:
•Patient name (A.Martin)
•Date of birth (dd mm yy)
•Height (cm)
•Weight (kg)
•Sex (S)
•Patient ID code
•Function icons
2.5 Patient Data
Switch on MIROxi by pressing , or if already switched on, press
( icon); to access the “PATIENT DATA
MANAGEMENT” screen The following table describes the functions and displayed icons:
Icon Key Description
To enter new patient data
To modify existing patient data
To access memory
To enter new patient data
From the “Patient Data Management” menu press
to access the data input screen.
First screen (name and surname)
Use
and
to select required letters; confirm or delete using
or
. To input surname press OK. The letters can
also be selected automatically after a few seconds using the cursor.
Press OK to go to the next screen.
Second screen (date of birth, weight, height, sex)
Use
or
to select date of birth, use
to set month, repeat to set year; continue setting data by entering patient
height, weight and sex using the same
key. The arrow shown to the right of the field indicates the numerical value
that is being modified. Then use OK to go to the following screen; to return to the previous screen press
, or press ESC
to exit set-up mode and go to the main screen.
Third screen (ethnic group)
Setting the correction factor: this value allows test data to be adapted according to the patient ethnic group (the “no
correction” option can also be set); press OK to complete the setting of parameters, the main screen then appears. In the
event of an error during the setting of patient data press
to go back to the previous screen.
To interrupt data input press ESC, which then returns to the main screen.
Modifying patient data
In the “Patient Data Management” menu press
(corresponds to the icon). Modify data in the following screens
by using the keys as already described for entering new patient data.
To return to the main screen without changing any data press ESC.
To access memory

MIROxi User Manual cod. 980265 Rev 1.6 Page 16 of 32
From the “Patient Data Management” screen use
directly to access the screen with the four memory search methods
(§ 2.6).
2.6 Displaying data in memory
From the main screen press
( icon), to check patient data or to search for another patient’s data; the following
options are available:
KEY ICON FUNCTION
Display oximetry tests of the selected patient
Access data in memory
Press ESC to return to the main screen.
Access the search menu to display data, using one of four different methods:
KEY ICON FUNCTION
Search by ID Code
Display files from a certain date onwards (partial memory)
Display files from beginning to end (full memory)
Search by initial letter of surname
Search by ID Code: enter the ID Code of the patient to be searched for; then press OK to access the data.
Partial Memory: enter test date of required file; enter the date and press OK to access data. Test data will be shown
starting from the date entered up to the most recent file in memory.
Full Memory: to show data in alphabetical order.
Most recent data are marked by a double beep, then the data shown begins from the first one in memory.
Search by Surname: enter patient surname, or first initial; then press OK to access the data.
Use
and
to display relevant patient test data.
Press ESC to return to the main screen without searching.
Use
from the data screen ( icon) to print out data through a Bluetooth connection (automatic); use
to display
all test data of relevant file on memory, use
and
to scroll through data; press OK to go back to the memory screen.
From this screen press OK to make a new test on the selected subject (press OK again), press ESC to return to the data
stored.
2.7 Online operating mode (connected to a PC)
This operating mode is comparable to a laboratory oximeter, connected to a PC the device operates in real time.
Connect the unit to a PC using either the USB cable or the RS 232 serial cable.
MIROxi thus acts as an intelligent sensor for measurements while the PC controls functions, including the switching on
and off of the unit.
Connected to a portable PC, MIROxi can be used to carry out epidemiologic studies in work environments, school
settings etc.
2.8 Oximetry testing
MIROxi can carry out 4 different types of oximetry tests, which are described in the following paragraphs.
WARNING
If during the oximetry testing the SpO2 blood pulse rate goes below the lower threshold or over the upper
threshold, MIROxi will ‘beep’ while the situation persists. This option can be disenabled during sleep tests.
The values shown are the MIROxi default settings.
WARNING
The sensor described below is for illustration purposes only. MIROxi is enabled for the use of any of the
sensors described in the previous Paragraph 1.2.2. MIR does not recommend the use of a specific type of
senor; any decision in regard is made by the individual doctor.

MIROxi User Manual cod. 980265 Rev 1.6 Page 17 of 32
During the oximetry test MIROxi cannot be switched off, to switch off the device it is necessary to interrupt
the test in progress, this avoids unwanted interruptions which could compromise the accuracy of the data
obtained.
For the non-invasive measurement of the SpO2oxygen saturation and the blood pulse rate, utilize the re-usable finger
sensor. This sensor is recommended for patients weighing >20 Kg with limited activity.
Carry out an oximetry test as follows:
•Connect the sensor to the instrument: insert the connector with the arrow
(printed on the connector) face-up:
•Choose a high perfusion site, easily adaptable to the sensor.
•Insert a finger into the sensor until the finger touches the end of the
probe.
Ensure that the bottom part of the finger completely covers the detector. If
the finger cannot be correctly positioned, use another finger.
•Position the sensor so that the cable is underneath the palm of the hand.
This enables the light source to remain on the fingernail and the detector
on the bottom part of the finger.
•From the main screen press
to access the test menu.
The display will show the screen with the oximetry tests that can be performed, specifically:
ICON KEY DESCRIPTION
Walk test - 6MWT
Sleep oximetry
Oximetry (SpO2/BPM)
WARNING
In order not to compromise the reproducibility of the measurements and the integrity of the sensor, avoid
twisting the sensor cable and handle with due care when using, connecting, disconnecting and when placing
the finger into it.
During the first few seconds of the test the device searches for the best signal, after which the timer re-sets to zero and
MIROxi starts to memorise the data.
If the sensor has not been correctly inserted, the following message will appear:
WARNING
Sensor unplugged
If the sensor has been inserted but the finger is not inserted correctly, the following message will appear:
WARNING
FINGER not inserted
If the sensor correctly receives the signal, after a few seconds the device starts to ‘beep’ and the values will be displayed
on the screen.
For all oximtery tests, alarms can be set up to sound in the case that the critical values are exceeded as described in
paragraph 2.4.
If an alarm is activated then the symbol is shown on the display
during that test. Alarms can be activated or disactivated during a test
by pressing
; this brings up a menu showing the preset alarm
thresholds. Press OK to confirm the disactivate or to activate the alarm
function. If OK is NOT pressed then the device continues the test
without changing the alarm settings.
For further information on the correct set up for this function please refer to paragraph 2.4.

MIROxi User Manual cod. 980265 Rev 1.6 Page 18 of 32
WARNING
A test is saved using the name of the last patient visualised. If this refers to a patient whose data has already
been inserted in the device, call up a previous test carried out on the patient in question and proceed as
described in the final part of paragraph 2.6.
WARNING
During all "stand alone" oximetry testing, the remaining battery life is always shown: the battery symbol is
shown on the lower left side of the display, together with the value of the battery life in hours and minutes.
This information is shown as follows:
2.8.1 Walk Test (6MWT)
To make a walk test press
.
This test is made up of 3 phases:
•Initial rest
•Walking
•Recovery
Initial Rest
In this phase the display will show the following data:
The duration of the test is minimum 2 minutes, then the screen shows corresponding to the
key; press this key to
pass to the following phase. If the phase lasts for more than 6 minutes then MIROxi will emit a ‘beep’ as a reminder to
pass to the following walking phase.
The number of bars (“I” symbol), on the right upper of the screen is proportional to the quality of the oximetry signal: the
higher the quality of the signal the more bars will be shown (maximum 7). Place finger into the sensor in order to obtain
the highest quality of the signal.
Walk Phase
At the beginning of the phase the timer is reset to zero to give an accurate control of the duration of each phase. The
data on the display is the same as previously shown.
The duration of this phase is minimum 2 minutes, then the icon appears corresponding to
. Press this key for a
few seconds to pass to the initial rest phase. If this phase lasts for more than 6 minutes then MIROxi will emit a ‘beep’
after which the device passes to the initial phase and the timer is re-set to zero.
Recovery Phase
The user can decide freely on the duration of this phase, the duration is not suggested (at the beginning of the phase the
time is re-set to zero).
To end the test press ESC and then
. This must be done each time the current test is interrupted.
At the end of the test the data required for the calculation of the parameters must be inserted; more specifically:
•Baseline DYSPNEA

MIROxi User Manual cod. 980265 Rev 1.6 Page 19 of 32
•Final DYSPNEA
•Baseline FATIGUE
•Final FATIGUE
•Distance (m)
These follow the Borg scale and can have the following values: 0, 0.5, 1, 2, 3, 4, 5, 6, 7, 8, 9, 10, the distance covered is
indicated in m.
The Borg scale coefficients represent the following severity values:
SCALE SEVERITY
0 None
0.5 Very Very Slight (Just Noticeable)
1 Very Slight
2 Slight
3 Moderate
4 Somewhat Severe
5 Severe
6 “
7 Very Severe
8 “
9 Very Very Severe (Almost Maximum)
10 Maximum
Use
and
to enter data; use OK to pass to next data.
Walk test data results are shown in the following 6 screens.
To print data see Paragraph 3.3. The printout version of the test will only show the walk test results; an example of a test
printout report is attached.
Press ESC and then
to end the test at any moment.
WARNING
One of the parameters calculated by the MIROxi during an oximetry test is the so-called “Recovery Time”.
The Recovery Time is defined as the time taken for the SpO2 value to return to at least 99% of the average
base value calculated during the initial phase of the test.
2.8.2 Sleep Oximetry
To activate this test press
( ). This test records the variations of the patient’s parameters overnight.
Providing the Energy saving option is abilitated in the initial set up (see paragraph 2.4), after approximately 5 minutes,
MIROxi will go on standby i.e., it stops beeping and the display turns off. The led signal remains on. To control the
correct functioning while on standby, press , then after 1 minute MIROxi will return to standby.
If no signal is received while on standby then the device will automatically exit this phase and a warning message will
appear (sensor unplugged or finger not detected correctly).
The data shown are the same as described in the preceding test, except for information on this present phase, which has
not been envisaged for this test.
After the required time the test can be interrupted as previously described.
To print data see Paragraph 3.3.; an example of a test printout report is attached.
2.8.3 SPO2 BPM Oximetry Test
To start the test, press
from the oximetry test menu screen.
The display will show “oximeter (SpO2/BPM)”. The test duration is unlimited and the aim is to record variations of the
oximetry values during the period required by the doctor.
During the test the display will show the information shown here. The icons
BEEP and ALARM enable the user to modify the set up:
•BEEP, use
to activate/disactivate the acoustic heart rate signal
•ALARM, use
to activate/disactivate the various alarms, as described in
paragraph 2.8
The display does not have the standby function, it always shows test data.
To end test press ESC and then
.
To print data see Paragraph 3.3.; an example of a test printout report is shown.
If the finger is removed from the sensor during the test, the following message is shown (even if on standby):
WARNING

MIROxi User Manual cod. 980265 Rev 1.6 Page 20 of 32
Searching for signal, finger not inserted correctly
2.8.4 SPO2 BPM Test
This test allows the control of the oxymetric data plus the cardiac pulse of a patient in real time. The test can only be
accessed when the device is switched on by pressing
corresponding to on the first screen. To confirm press
OK.
During the test use
to activate/disactivate the acoustic beep.
Relative data is memorised according to instructions shown on the screen prior to making the test (ID#: “1234” and
SURNAME: “OXYTEST”). This data is required when searching the memory for the relevant test data.
Test duration, SpO2 value and heart beat data are shown.
To end test see instructions contained in the previous paragraph.
2.8.5 Adult Single Patient Sensor – Instructions for Use
WARNING
The sensor described below is for illustration purposes only MIROxi is enabled for the use of any of the
sensors described in the previous Paragraph 1.2.2. MIR does not recommend the use of a specific type of
sensor; any decision is made by each individual doctor.
To perform a non-invasive monitoring of arterial oxygen saturation it is recommended to use the reusable "wrap" sensor.
The use of this sensor is indicated for patients weighing more than 30 Kg and contraindicated for patients with allergy to
adhesive tape.
WARNING
The materials used for manufacturing the sensor are NATURAL LATEX PROTIEN free. The materials used for
the sensor are subject to biocompatibility tests.
WARNING
This sensor is contraindicated for use on patients who exhibit allergic reactions to the adhesive tape. Do not
reuse. One use on one patient.
•Choose an application site on the patient’s finger or toe where the light source
will be directly over and in-line with the detector. The preferred sites are the
forefinger or smaller thumb.
•Remove any nail polish or artificial fingernails
•Place the patient’s finger into the sensor nail-side up, lining up the digit’s pad
over the detector. The sensor’s positioning line runs across the mid axis of the
fingertip
•Wrap the bottom adhesive around the digit, being careful not to cover the nail.
•Fold the top of the sensor over the digit, making sure that the light source is
directly over and in-line with the detector. Wrap the adhesive around the finger
or toe to secure the sensor. Route the cable along the palm or the bottom of the
foot, and secure with adhesive tape if necessary.
Connect the sensor to the instrument: insert the connector with the arrow on the connector face-up and control the
correct functioning following the previous instructions.
Table of contents
Other MIR Medical Equipment manuals

MIR
MIR SPIROBANK Oxi User manual

MIR
MIR MiniSpir Light User manual

MIR
MIR Smart One Oxi User manual

MIR
MIR Spirolab User manual

MIR
MIR MiniSpir Light User manual

MIR
MIR Spirobank Smart User manual

MIR
MIR Spirobank Smart User manual

MIR
MIR Spirodoc User manual

MIR
MIR Minispir New User manual

MIR
MIR Spirobank II User manual