MIR Spirolab User manual

spirolab
UK Version | User Manual

Spirolab main unit Power supply
Re-usable turbine
(Optional)
Standard mouthpiece
Single use nose clip
MiniFlowmeter
Complete with:
• Spirolab main unit
• MiniFlowmeter sensor
• Re-usable turbine or
disposable turbines
• Power supply unit
• Mouthpiece
• Single use nose clip
• Durable carrying case
Durable carrying case
spirolab standard package
Available with disposable turbines or re-usable turbine

05 Product Description
07 Overview
08 Getting Started
09 Calibration Check
11 Customise
13 View Results
14 Patients
15 Perform Test
21 Maintenance
24 Technical Specication
32 Troubleshooting
34 Appendix: Information about the correct use of device in an electromagnetic environment
Power supply
Re-usable turbine
(Optional)
Standard mouthpiece
Contents

MIR Spirolab (UK version) | User Manual
WARNING: READ BEFORE USE
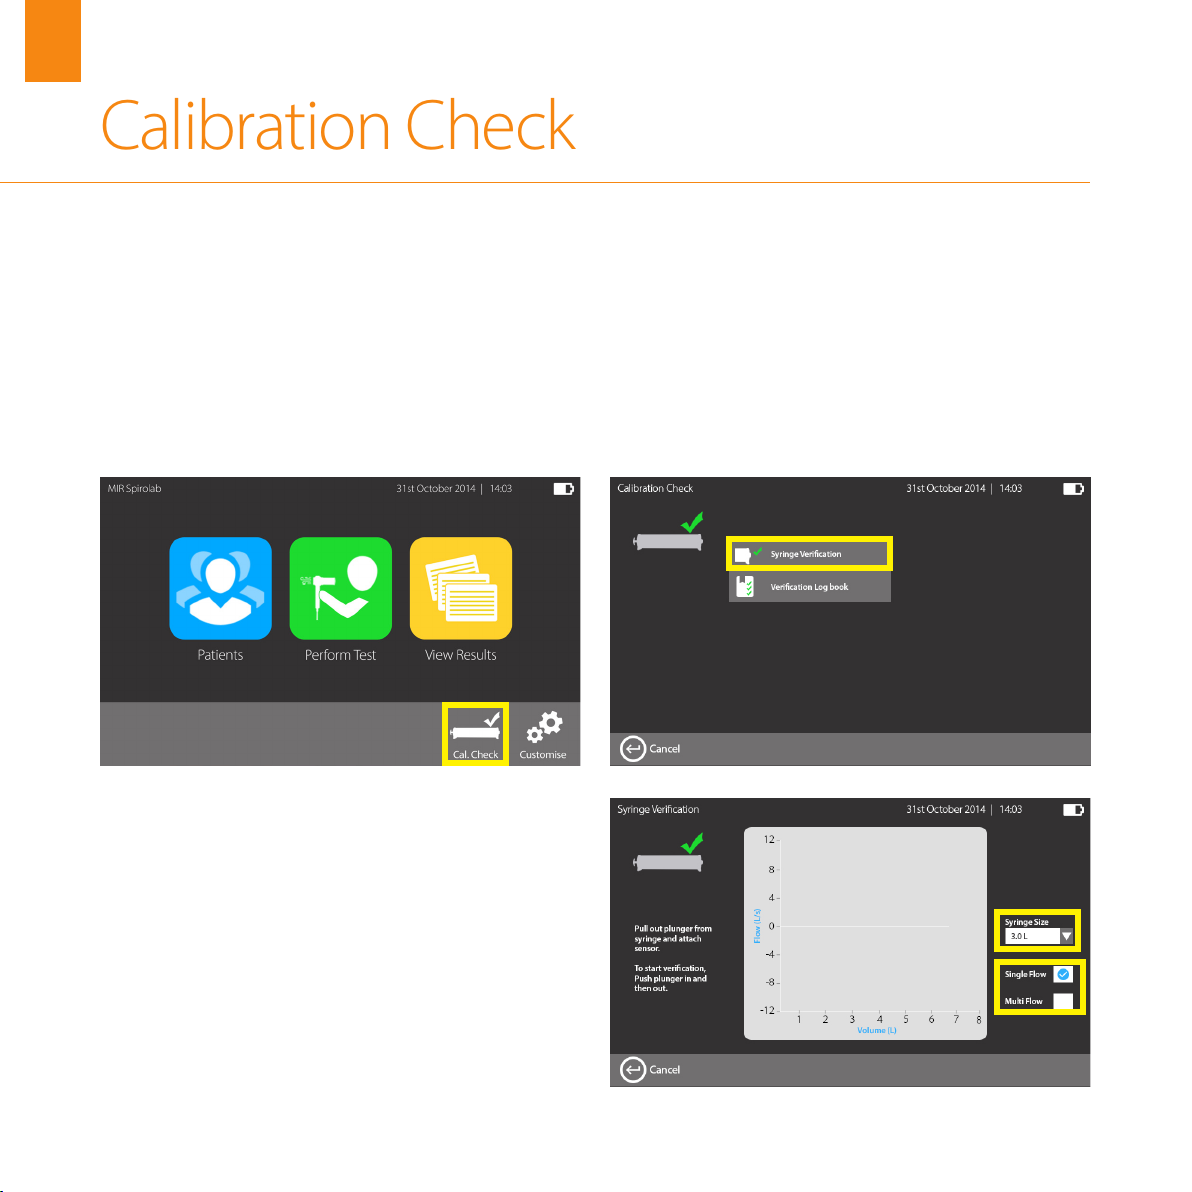
All the maintenance operations described in the user manual must be carried out with great care. Failure to follow these
instructions may lead to incorrect readings or the incorrect interpretation of readings that have been taken.
Do not modify the device without authorisation from the manufacturer.
All modications, adjustments, repairs and recongurations must be performed by the manufacturer or by personnel
authorised by the manufacturer. In the event of problems, do not attempt to make repairs.The setting of congurable
parameters must be performed by qualied sta. The incorrect setting of parameters, however, will not compromise a
patient’s state of health. On request, the manufacturer can provide electrical diagrams, parts lists, descriptions and calibration
instructions to assist the technicians with repairs.
The high frequencies emitted by an“electronic”device can interfere with the functioning of the device. For this reason, a
minimum distance (of several metres), must be observed if there are other devices in operation in the same area. Examples
of such devices include TVs, radios, domestic appliances, mobile phones, cordless phones etc. The device may provide
inaccurate readings in the presence of strong electromagnetic sources such as electrosurgical scalpels or medical devices
such as CT equipment. Do not use the device in the presence of MRI equipment that can generate an induced current in the
oximetry sensor and harm the patient.
The use of accessories and cables other than those specied by the manufacturer may result in increased emissions or
decreased device immunity.
The Spirolab device should not be used close to or stacked with other equipment; if it must be used close to or stacked with
other equipment, Spirolab should be observed to verify normal operation in the conguration in which it will be used.
If the device is used in conjunction with other items of equipment, only equipment that complies with current safety
regulations can be used so as meet the safety standards laid down by IEC EN 6060160601-1; consequently, the PC or printer
to which Spirolab is connected should comply with IEC EN 60601-1.
As regards the disposal of Spirolab devices, accessories, plastic consumables (mouthpieces), removable components and
items that are subject to ageing (e.g. the battery pack), only use suitable containers or, better, send the materials to the
device retailer or an approved disposal centre. Local legal requirements in force must be complied with in all cases.
Failure to comply with the above mentioned regulations will relieve MIR of all responsibility from any direct or indirect
claim for damages.
Use only the battery pack specied in § Technical Specications.
The device can also be powered using a USB cable connected to a computer, thus also allowing online operation.
Keep the device out of the reach of children and dierently-able persons.


Product Description
Spirolab is a portable spirometer that can also feature a pulse oximeter feature (optional).
The device can operate completely autonomously or can be connected to a personal
computer or printer by means of USB or Bluetooth connections.
The device is intended for measuring respiratory parameters and monitoring oxygen
saturation and pulse rate.
The device carries out a control test on the quality of the readings taken and can save the
results of approximately 2,000 spirometric tests or a maximum of 900 hours of oximetry
data.
Spirolab is intended for use by medical specialists and it provides them with a powerful
but compact tool that can process approximately 30 functional parameters.The device
also provides a pharmacodynamic response, i.e. the % comparison of spirometric data
measured before and after (PRE/POST) administration of a drug for bronchial provocation
or bronchodilation.The POST data measured after administering the drug is compared
with the PRE data obtained before administration.
A turbine inside the device that uses the interruption of infra-red light as its operating
principle, measures volume and ow rate of expired air directly at B.T.P.S. (Body
Temperature and Pressure with Saturated water vapour).
5
MIR Spirolab (UK version) | User Manual

This operating principle ensures accurate, reproducible results without needing periodic
recalibration although, routine verication as per local guidelines is recommended.
The key features of this type of sensor are as follows:
• Accurate readings even with low air ow rates (end of exhalation)
• Not aected by humidity and gas density
• Inexpensive to replace
The turbine volume and ow sensor is available in disposable and reusable versions.
6
Product Description
MIR Spirolab (UK version) | User Manual

The Spirolab uses a high resolution touch screen with individual icons to
represent each function available.
Power supply port at rear
of device
Power charge status light on main
interface
Charging the Spirolab
The Spirolab is shipped with the battery
fully discharged. Prior to rst use, it is highly
recommended that the Spirolab is fully charged to
obtain optimum battery performance. Charging the
battery takes approximately 4 hours.
Connect the Spirolab to the mains power supply with
the AC adaptor provided.
When the Spirolab device is
turned on, the battery icon
located in the top right-hand
corner of the screen shows the
charge remaining.
The maximum charge level
is reached when the battery
symbol is completely white.
7
Overview
MIR Spirolab (UK version) | User Manual

Connecting the sensor
To correctly perform a spirometry test, observe the following instructions.
Once connected, a blue LED will illuminate in the lower right hand corner to indicate the
Spirolab is charging.The LED indicator will illuminate green once charging is complete.
The Spirolab can be used on mains power supply whilst the battery is being charged
providing that the battery has sucient charge for it to operate. The battery will continue
to charge even when in use.
Insert a cardboard
mouthpiece or bacterial
lter.
Connect the
MiniFlowmeter to
Spirolab as shown in the
image.
Slide the turbine fully
into position in the
MiniFlowmeter then turn
it clockwise until it clicks
into place.
Getting Started
8
MIR Spirolab (UK version) | User Manual

The Spirolab can be veried as per local guidelines using a single ow or calibrated using a
multi ow.
Tap the“Cal. Check”icon from the home screen.
Tap the“Syringe Verication”icon to enter the verication screen.
You have the option to perform a single
ow or multi ow verication by tapping
on the desired icon. You can also choose
the syringe size by tapping on the drop
down arrow.
Calibration Check
9
MIR Spirolab (UK version) | User Manual

Verifying using single ow
For single ow verication push in and then pull out the syringe at a steady ow rate.
The results are then displayed on screen and a pass or fail is indicated. You have the
option to repeat the verication, save or print. The single ow verication is based on
the memorised multiow calibration data. All verication data can be viewed in the
verication log book.
Calibrating using multi ow
For multi ow‘calibration’push in and pull out the syringe at the dierent ow rates as
indicated by the lines and red dots. When the correct ow and volume has been achieved
then the red dot will turn green. Each ow and volume has to be achieved 3 times. The
average results are then displayed on screen and a pass or fail is indicated. If the volume is
within 3.5% of the syringe volume then the calibration is unchanged. If the volume is over
3.5% of the syringe volume then the Spirolab is recalibrated to these new values.
Connect the calibration
syringe with the plunger
fully out.
To start the verication,
push in then pull out the
syringe.
10
Calibration Check
MIR Spirolab (UK version) | User Manual

MIR Spirolab (UK version) | User Manual
The Spirolab can be fully congured to the users own specication.
Tap the“Customise”icon from the home screen. Enter the password (1223) to access the
settings menu which is divided into the following sections. Each section has sub-sections
which allow the user to navigate easily through the options.
The options available are:
Device Language, turbine used, auto power o, Bluetooth o, height/weight,
format, touch beep, brightness, date and time, device information,
printer header and factory reset
Customise
11

MIR Spirolab (UK version) | User Manual
Spirometry Parameter selection, test type, test beep, print curves,
interpretation, units of measurement, incentive
Oximetry Min/Max SpO2, Min/Max BPM
Reference Predicted value selection
Database Management Memory used, format database
12
INFORMATION
The default password is 1223
Customise

From the home screen you have the option to view the results from previous tests.
Tap on“View results”. You can congure the search criteria by tapping on the drop down
menu and choosing to search by patient ID, surname, date of birth, test date or view all
patients.
You can also choose to view FVC, VC, POST or Oximetry tests. Type in the desired patient
details and tap the“Search”or“OK”button. You will see all of the patients with that ID,
surname etc.
Tap on the desired patient and tap“Select”and you will see all of the patient details as
well as their previous results. By highlighting the desired result the option to view results,
perform a test or perform a POST test becomes available.
View Results
13
MIR Spirolab (UK version) | User Manual

From the home screen you have the option to search for patient details or adding new
patient details.
Tap on the“Patient”icon. Search for an existing patient by either patient ID or surname.
View the patient entered today by tapping on the“View patients entered today”icon.
Add a new patient by tapping“Add a new patient”icon. You will be prompted to enter a
unique ID number, rst name, surname, DOB, height, weight, sex and ethnic group.
Any elds which have an asterisk next to them are required elds so they have to be lled
in to obtain predicted values for the patient.
When the patient details are complete you have the option to either save them for use at a
later date/time or tap“Perform test”to continue to the test screen.
14
Patients
MIR Spirolab (UK version) | User Manual

From the home screen (or after entering patient details) you can perform a test. If no
patient details have been entered or selected then you will be asked to enter the details or
search for a patient as above. You will then have the options displayed below:
Note: Oximetry is available as an optional add-on. Button will display if installed.
Perform Test
15
MIR Spirolab (UK version) | User Manual

Relaxed VC
To perform a relaxed VC test tap on the“Relaxed VC”icon. You can then
perform the relaxed test as required. When the trial is complete all of the
active indices are shown with the graphical interpretation.
Tap on“Add Trial”to perform another trial,“Reject Trial”if the trial isn’t
acceptable, or“Finish Test”to end the test. With each subsequent trial
performed the previous best trial and the current trial will be shown for
comparison and repeatability.
At the end of the test the results screen will be shown. The best result will
be shown with % predicted as well as the graph. Options to add notes,
print results, nish test or perform a forced VC test will be available.
16
Perform Test
MIR Spirolab (UK version) | User Manual

Forced VC
To perform a Forced VC test tap on the“Forced VC”icon. You can then perform a Forced
test as required. During the test you can see both the Flow Volume and Volume Time
graphs. You have the option to choose the incentive if desired.
When the trial is complete the four main parameters of FEV1, FVC, PEF and FEV/FVC are
shown along with the graphical interpretation. With each subsequent trial performed the
previous best trial and the current trial will be shown for comparison and repeatability.
A quality message for the individual trial will also be shown i.e. Good blow, Abrupt end etc.
Variance for both FEV1 and FVC will be shown in litres and %. At the end of the test the
results screen will be shown. The best results of the active indices will be shown with %
predicted. Interpretation is shown and is based on the ATS/ERS guidelines.
Options to add notes, print results, nish test or perform a post test will be available.
17
Perform Test
MIR Spirolab (UK version) | User Manual

POST
To perform a POST test tap on the POST icon. A base test can be selected from the list
as required. The test can be performed in the usual way but you will be able to see the
baseline graph for comparison.
At the end of the test the results screen will be shown displaying the PRE and POST best
indices for comparison.
Options to add notes, print results, nish test or perform an additional POST test will be
available.
Oximetry
The Spirolab allows the user to perform oximetry (optional extra).
18
Perform Test
MIR Spirolab (UK version) | User Manual

Preparation for oximetry
Choose a site with a good blood ow that is suitable for the sensor. Insert the nger all
the way into the sensor. Make sure that the under part of the nger completely covers
the detector. If you cannot position the nger properly use a dierent nger. Position the
sensor so that the cable runs over the back of the hand. This ensures that the light source
stays on the same side as the nails while the detector remains under the nger.
Performing an oximeter test
Select a patient and from the perform test screen tap the“Oximetry”icon in the bottom
right hand corner. The oximetry test screen will appear.
19
Perform Test
MIR Spirolab (UK version) | User Manual
Other manuals for Spirolab
2
Table of contents
Other MIR Medical Equipment manuals

MIR
MIR Spirodoc User manual

MIR
MIR Spirobank Smart User manual

MIR
MIR Smart One User manual

MIR
MIR MiniSpir Light User manual

MIR
MIR Spirolab User manual

MIR
MIR Spirobank II User manual

MIR
MIR SMARTONE User manual

MIR
MIR Spirolab III User manual

MIR
MIR SPIROBANK Oxi User manual

MIR
MIR Spirobank II User manual