Mitutoyo Corporation 20-1, Sakado 1-Chome, Takatsu-ku, Kawasaki-shi, Kanagawa 213-8533, Japan Date of publication: September 1, 2022
Printed in Japan
2
3. Precautions for Use
■Precautions for High-Accuracy Measurements
Exercise caution for the following points when performing high-accuracy measurements at 0.1 μm resolution with this
product.
●Temperature
• If the product is used while being held in your hands, it will lengthen by about 0.5 μm after 10 minutes (see
"13. Measurement Error Due to Temperature Fluctuations"), so install the micrometer stand and then measure.
Alternatively, measure while using the heat-resistant cover.
• Accuracy is assured at an ambient temperature of 20 °C. When performing high-accuracy measurements at
other ambient temperatures, performing comparative measurements with a gauge block or master workpiece is
recommended.
• Before using the product, allow it to acclimate to room temperature.
●Cleaning the measurement surface
• Accurate measurements cannot be made if dirt is afxed to the measurement surface. The measurement results
will also be affected if there is an oil lm. For that reason, the measurement surface and measurement parts of the
workpiece must be cleaned prior to measuring.
• For details about cleaning the measurement surface, see "3. Precautions for Use ■Cleaning the Measurement
Surface".
●Measuring force
• If the constant-pressure mechanism that is mounted on this product is used, the measuring force will be about 8 N.
However, if excessive force is applied to the spindle when the constant-pressure mechanism is used, the measuring
force will vary greatly, causing an error.
Exercise caution so excessive force is not applied to the spindle when the constant-pressure mechanism is used.
Tips
The error for a 1 N change in measuring force is about 0.1 μm.
●Measuring orientation
• Use the same orientation and conditions when measuring and setting the reference point.
• Installing the micrometer on the micrometer stand horizontally is recommended.
●Approach speed toward the workpiece
• If you apply too much force when bringing the measurement surface of the spindle into contact with the workpiece,
the workpiece may be deformed, and the measurement result may be affected. When measuring, bring the mea-
surement surface of the spindle slowly into contact with the workpiece.
●Dust
• Measure in an area with minimal dust.
●Reference point setting
• Be sure to perform reference point setting before measurement. Frequently checking the reference point is
recommended.
■Cleaning the Measurement Surface
Dirt, an oil lm, etc., on the measurement surface can be a source of error. Clean the measurement surface before and
after measuring.
1Insert the supplied wiping sheet between the measurement surface of the anvil and the measurement surface of
the spindle.
2Apply force to the measurement surfaces (see "3. Precautions for Use ■Measuring Force").
3Maintain this state and slowly pull the wiping sheet.
4After it has been pulled, retract the spindle.
Tips
If pulled to the end, bers of the wiping sheet, etc., may remain.
5Remove the wiping sheet.
Repeat steps above two or three times.
■Measuring Force
• Use the ratchet thimble to ensure a consistent measuring force.
• The appropriate measuring force is achieved with the following procedure:
bring the measurement surfaces into light contact with the workpiece,
stop momentarily, and then manually turn the ratchet thimble about three
to ve times.
■Precautions for Measurement
• Use caution when measuring magnetized workpieces.
If the product becomes magnetized, measurement results may be affected.
• When the workpiece is pinched against the measurement surfaces during
a measurement, parts in contact may deform slightly. This deformation will
vary according to the size and shape of the workpiece and the magnitude
of the measuring force.
to ve times.
■Precautions after Use
• After use, clean the entire product and check that none of the parts are damaged.
• Do not store the product in a place with high humidity or a lot of dust.
• For storage, leave a gap of 0.2 to 2 mm open for the measurement surfaces.
• If the product will not be used for three months or longer, apply micrometer oil (Part No. 207000) to the spindle to
prevent rust, and store it with its battery removed.
• If Micrometer Oil is not available and you must use a commercially available product, we recommend using an anti-rust
agent with low viscosity almost equivalent to ISO VG10.
4. Turning the Power On or Off
■Turning On the Power
1 Briey press the [ON/OFF] key.
》The power will turn on.
■ Turning O the Power
1Press and hold the [ON/OFF] key.
》The power will turn off.
Tips
• The product will be in measurement mode when the power is turned on.
• The measurement system (ABS/INC) used when the power is turned on will be the measurement system when the
power is turned off. (For details about the measurement system (ABS/INC), see "7. Key Functions ■Switching the
Measurement Mode: [SET] Key".)
• If the power does not turn on even when the [ON/OFF] key is pressed, the battery has been consumed. Replace
the battery.
• If the power is turned off during setup, setup will be canceled and the settings will return to their previous values.
• The display of this product automatically turns off if this product is not used for 20 minutes or more. Briey press the
[ON/OFF] key to turn the display on again.
5. PRESET Value (Reference Point) Setting
• Always check and set the reference point before measuring with the following procedure.
• Reference point setting and measurement should be made in the same orientation and conditions with
the procedure as below.
■When the Battery is Installed
1Clean both the anvil and spindle measurement surfaces to
remove all debris or dust.
2Install the battery (see "2. Installing the Battery").
》[- - - - - - -] will blink on the display unit.
3Bring the measurement surfaces into light contact with each
other, stop momentarily, and then apply the appropriate
measuring force (see "3. Precautions for Use ■Measuring
Force").
4 Briey press the [SET] key.
》[- - - - - - -] will be cleared from the display unit and the
value for PRESET (reference point) will be set.
■Registering the Value for PRESET
When the measurement mode is the ABS measurement system (see "7. Key Functions ■Switching the Measurement
Mode: [SET] Key"), perform the following operation.
1 Briey press the [SET] key.
》The previously registered number is displayed and [P] blinks.
When not changing the displayed value, proceed to step 8to
nish setting the reference point. When changing the displayed
value, use the following procedure to change the preset value.
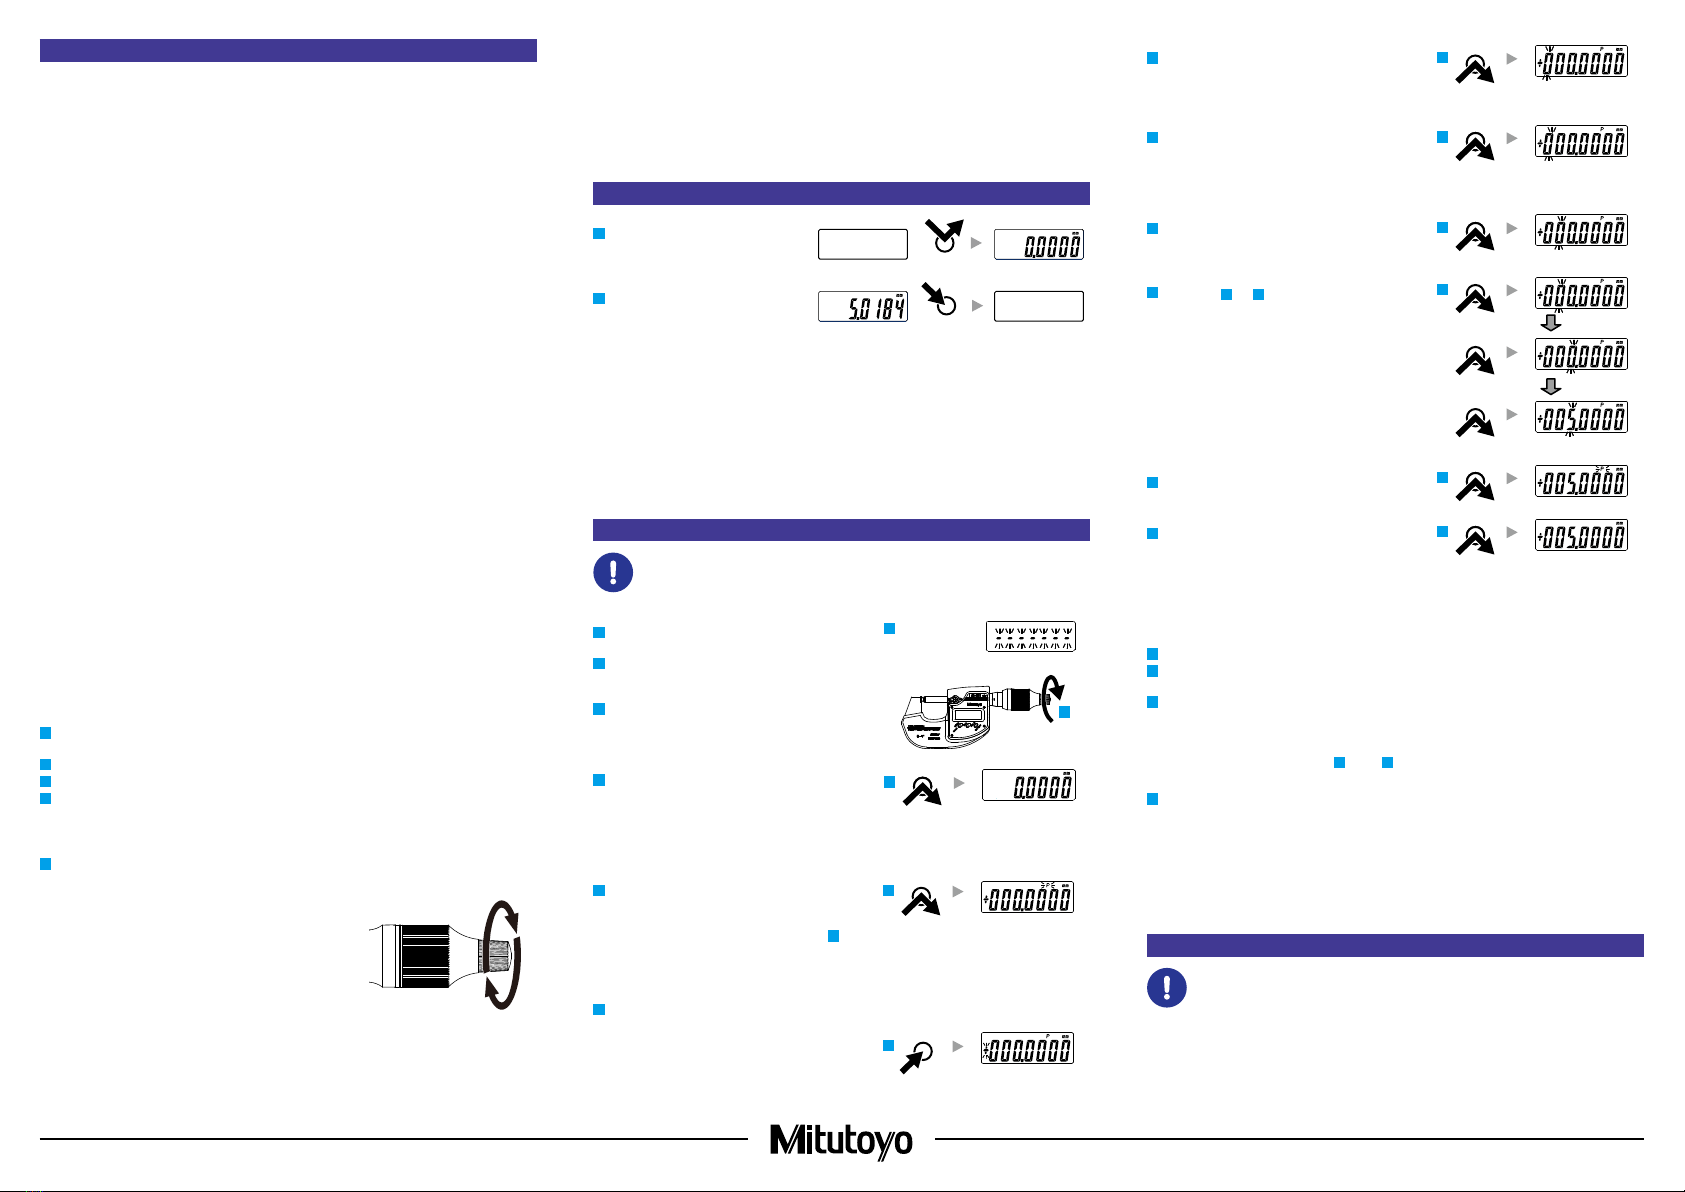
<Example> Registering 5.0000 mm for P (preset value)
2Press and hold the [SET] key.
》The sign blinks.
Tips
Briey press the [MODE] key to switch between [+] and [-].
ON/OFF
ON/OFF
2
1
SET
3 Briey press the [SET] key.
》 The sign will be conrmed, and the leftmost number will blink.
4 Briey press the [MODE] key until [0] is displayed.
Tips
The numbers will switch in order from [0] to [1] to [2] up to [9]
and then [0] each time the [MODE] key is briey pressed.
5 Briey press the [SET] key.
》The number in the next digit blinks.
6Repeat steps 4and 5so that [0], [0], [5], [0], [0], [0], and
[0] are displayed for the digits.
7 Briey press the [SET] key until [P] blinks.
8 Briey press the [SET] key.
》[P] is cleared, the reference point setting is complete,
and the product returns to the ABS measurement system
mode.
■Reference Point Setting
When the measurement mode is the ABS measurement system (see "7. Key Functions ■Switching the Measurement
Mode: [SET] Key"), perform the following operation.
1Remove any dirt or dust from both the anvil and spindle measurement surfaces and the gage.
2Bring the measurement surfaces into light contact with each other, stop momentarily, and then apply the appropriate
measuring force (see "3. Precautions for Use ■Measuring Force").
3 Briey press the [SET] key.
》The registered preset value is displayed and [P] blinks.
Tips
When changing the preset value, see steps 2through 7in "5. PRESET Value (Reference Point) Setting ■Regis-
tering the Value for PRESET".
4 Briey press the [SET] key.
》[P] is cleared.
Tips
• If the [SET] key is accidentally pressed during measurement, press and hold the [MODE] key to return to the former
state.
• Do not handle gages (gauge blocks, etc.) with your bare hands. Use precision work gloves such as cotton gloves.
6. Measurement Method
• Be sure to perform reference point setting before measurement.
• Bring the measurement surface of the spindle slowly into contact with the workpiece. Moving too quickly
could deform the workpiece and affect measurement results.
Gradually and lightly bring the measurement surfaces into contact with the workpiece in the same orientation and
conditions as for reference point setting, apply the appropriate measuring force, and then read the display value (see
"3. Precautions for Use ■Measuring Force").
5
4
6
MODE
SET
SET
MODE
MODE
7
SET
8
SET
2
3
4
SET
3
SET


