manuals.online logo
Brands
  1. Home
  2. •
  3. Brands
  4. •
  5. Mocka
  6. •
  7. Indoor Furnishing
  8. •
  9. Mocka Aspen User manual

Mocka Aspen User manual

mocka.co.nz I mocka.com.au I PO BOX 18, Pinkenba QLD 4008
ASSEMBLY I N S TRUCTION S
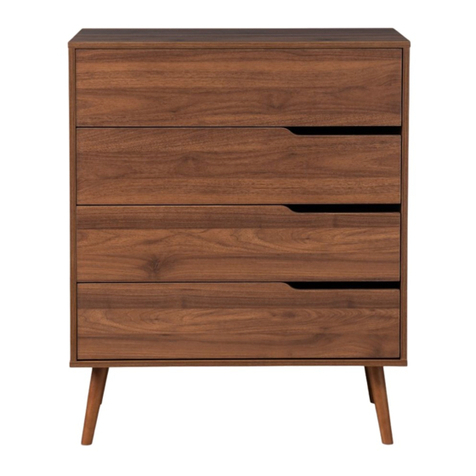
Aspen
Four Drawer
Thank you for your purchase.
Please follow the instructions below for correct assembly
WARNING: Any furniture that is not anchored to a wall has
the potential to tip over in certain circumstances, i.e. if a
child attempts to climb up on the furniture or in the event
of an earthquake. Accordingly, we recommend that all
furniture is anchored to a wall. We supply a free safety
wall anchor with all furniture sold and we recommend
these are used to prevent your product tipping. The fixing
device provided should fit most wall types, but please
note that dierent wall materials may require dierent
fixing devices from those supplied.
Phillips & Flathead screwdrivers required.
For quicker assembly, we recommend the
use of a power drill on a low-speed setting.
X
Z
Y
W
safety
x1
strap
x1
screw
long
x1
screw
wall
x1
anchor
x1
washer
B
ACDEF
GH
12 mm
Hardware Supplied
bolt
x32
locking
nut x 32 x12
dowelsmall
I
screw x32
L + R
x8
slide rail
L + R
x8
slide rail
screw x 20
40 mm
long
handle
x 4
screw x 10
30 mm
medium
JKL
x4
nu
tlong
screw x4
cover
x 16
M
wedge
x8
Aspen
mocka.co.nz I mocka.com.au I PO BOX 18, Pinkenba QLD 4008
ASSEMBLY I N S TRUCTION S
21
Four Drawer
2
Insert 4 x nuts (K) into panels [10]. Attach panels [9] to panels [10] and secure
with 4 x screws (L). Attach 1 x wall strap (W) to panel [1] using 1x screw (Y).
Insert 4 x bolts (A) into panel [1]. Tighten with a screwdriver.
Attach 4 x left slide rails (G) to panel [3] and secure with 8 x small screws (E).
Attach 4 x right slide rails (G) to panel [4] and secure with 8 x small screws (E).
Insert 8 x bolts (A) into panels [3] and [4]. Tighten with a screwdriver.
A
1
G
E
4
10
9
10
9L
L
K
KK
K
L
L
K
YW
A
A
A
A
E
EE
EE
EE
A
A
GGGG
EE
3AA
EE
EE
EE
A
A
A
A
GG
G
G
Aspen
Four Drawer
mocka.co.nz I mocka.com.au I PO BOX 18, Pinkenba QLD 4008
ASSEMBLY I N S TRUCTION S
Insert 2 x dowel s (C) into panels [6]. Attach panels [4] to panels [5]
and [6] and secure with 4 x locking nuts (B). Tighten with a screwdriver.
3 4
5
4
6
B
6
B
BB
B
C
B
C
6
6
5
BB
BC
B
C3
Insert 2 x dowel s (C) into panels [6]. Attach panels [3] to panels [5] and [6]
and secure with 4 x locking nuts (B). Tighten with a screwdriver.
mocka.co.nz I mocka.com.au I PO BOX 18, Pinkenba QLD 4008
ASSEMBLY I N S TRUCTION S
Aspen
Four Drawer
5
6
Slide panels [7] and [8] between the grooves on panels [3] and [4]
to form theback of the unit as shown.
Insert 4 x dowels (C) into panels [3] and [4]. Attach panel [2]
to panels [3] and [4] and secure with 4 x long screws (D).
7
8
3
4
2
D
D
D
D
C
C
C
3
4
Aspen
Four Drawer
mocka.co.nz I mocka.com.au I PO BOX 18, Pinkenba QLD 4008
ASSEMBLY I N S TRUCTION S
Attach panels [9] and [10] to panel [2] and secure with 6 x long screws (D).
Tighten with a screwdriver.
Insert 4 x dowels (C) into panels [3] and [4]. Attach panel [1] to panels [3]
and [4] and secure with 4 x locing nuts (B). Tighten with a screwdriver.
7 8
3
4
1
C
3
DD
D
D
D
D
2
7
C
B
B
B
B
CC
9
10
Aspen
Four Drawer
mocka.co.nz I mocka.com.au I PO BOX 18, Pinkenba QLD 4008
ASSEMBLY I N S TRUCTION S
Insert 16 x bolts (A) into panel [11] .Attach panels [12] and [13] to panel
[11] secure with 16 x locking nuts (B). Cover locking nuts (B) with 16 x covers (M).
Tighten with a screwdriver.
Insert 4 x bolts (A) into panels [11]. Slide panels [15] between the grooves on
panels [12] and [13] to form the base of the drawer as shown. Attach panels [14]
to panels [11] and secure with 4 x locking nuts (B).
109 Drawers (x4)
B
BB
B
A
AA
A
11
12
13
B
A12
13
14
15
11
I
II
M
Drawers (x4)
11
Aspen
Four Drawer
mocka.co.nz I mocka.com.au I PO BOX 18, Pinkenba QLD 4008
ASSEMBLY I N S TRUCTION S
Attach panels [16] to panels [12], [13] and [14] secure with 20 x medium
screws (F).Tighten with a screwdriver.
Attach 8 x slide rails (H) to panels [12] and [13] and secure
with 16 x small screws (E). Insert 4 x handles (I) into panels [11] .
12
Drawers (x6) Drawers (x6)
I
E
I
13
E
H
H
E
F
F
F
F
F
12
15 14
16
13
11
12
13
Aspen
Four Drawer
mocka.co.nz I mocka.com.au I PO BOX 18, Pinkenba QLD 4008
ASSEMBLY I N S TRUCTION S
Attach 8 x wedges (J) to panels [7] and [8].
Tighten with a screwdriver.
Once assembled lift furniture into place, do not drag. Use a drill to create
a small hole lining up with the top of the safety strap (W). Fasten to wall
using wall anchor (X), washer (Z) and screw. Ensure the unit is balaced
and steady before use. You’re done, enjoy!
14
X
Z
x1
wall
screw
anchor
wall
wall
screw
Washer
Strap
J
J
J
8
J
J
J
J
7
J
J

Other manuals for Aspen

10

Other Mocka Indoor Furnishing manuals

Mocka Hudson Kids Stools User manual

Mocka

Mocka Hudson Kids Stools User manual

Mocka Mod Headboard User manual

Mocka

Mocka Mod Headboard User manual

Mocka Zara User manual

Mocka

Mocka Zara User manual

Mocka Vigo Shelf - Slim User manual

Mocka

Mocka Vigo Shelf - Slim User manual

Mocka Maya Corner Shelf User manual

Mocka

Mocka Maya Corner Shelf User manual

Mocka Zara User manual

Mocka

Mocka Zara User manual

Mocka Nava User manual

Mocka

Mocka Nava User manual

Mocka Brooklyn Midi Drawers User manual

Mocka

Mocka Brooklyn Midi Drawers User manual

Mocka Vigo Entertainment Unit User manual

Mocka

Mocka Vigo Entertainment Unit User manual

Mocka Kids Armchair User manual

Mocka

Mocka Kids Armchair User manual

Mocka Elias Cot User manual

Mocka

Mocka Elias Cot User manual

Mocka Harlin Kids Bedside Table User manual

Mocka

Mocka Harlin Kids Bedside Table User manual

Mocka Bentley Tall Shelf User manual

Mocka

Mocka Bentley Tall Shelf User manual

Mocka Chelsea Four Drawer User manual

Mocka

Mocka Chelsea Four Drawer User manual

Mocka Vibe Puzzle Drawers User manual

Mocka

Mocka Vibe Puzzle Drawers User manual

Mocka Parker Console User manual

Mocka

Mocka Parker Console User manual

Mocka Jack Four User manual

Mocka

Mocka Jack Four User manual

Mocka Asha Entertainment Unit User manual

Mocka

Mocka Asha Entertainment Unit User manual

Mocka Eclipse Change Table User manual

Mocka

Mocka Eclipse Change Table User manual

Mocka Alps User manual

Mocka

Mocka Alps User manual

Mocka Jesse Changing Tray User manual

Mocka

Mocka Jesse Changing Tray User manual

Mocka Scarborough Six Drawer User manual

Mocka

Mocka Scarborough Six Drawer User manual

Mocka Jolt Bedside User manual

Mocka

Mocka Jolt Bedside User manual

Mocka Zara User manual

Mocka

Mocka Zara User manual

Popular Indoor Furnishing manuals by other brands

Ordex Z29776 Assembly and Safety Advice

Ordex

Ordex Z29776 Assembly and Safety Advice

meubar STONE V1 Assembly instruction

meubar

meubar STONE V1 Assembly instruction

Whalen WSLW30IFV Quikstart guide

Whalen

Whalen WSLW30IFV Quikstart guide

Dolle NELE quick start guide

Dolle

Dolle NELE quick start guide

Next AMELIA 129380 Assembly instructions

Next

Next AMELIA 129380 Assembly instructions

Emmezeta SHETLAND SHED61 Assembling instructions

Emmezeta

Emmezeta SHETLAND SHED61 Assembling instructions

BGS technic 4101 instruction manual

BGS technic

BGS technic 4101 instruction manual

RoomTec Murphy Bed Accessories Installation instructions manual

RoomTec

RoomTec Murphy Bed Accessories Installation instructions manual

VINNOVA 701660M manual

VINNOVA

VINNOVA 701660M manual

Camaflexi Armario Assembly instructions

Camaflexi

Camaflexi Armario Assembly instructions

MATTRESS FIRM 600 user manual

MATTRESS FIRM

MATTRESS FIRM 600 user manual

Next PIPER M64213 Assembly instructions

Next

Next PIPER M64213 Assembly instructions

GFW PANAMA OTTOMAN STORAGE Assembly instructions

GFW

GFW PANAMA OTTOMAN STORAGE Assembly instructions

Beeper HL101 Installation & use manual

Beeper

Beeper HL101 Installation & use manual

BEST EXPERIENCE Springs Window Fashions  Cordless Pull Shade How to install

BEST EXPERIENCE

BEST EXPERIENCE Springs Window Fashions Cordless Pull Shade How to install

Tutti Bambini 211707/BEARS Assembly instruction

Tutti Bambini

Tutti Bambini 211707/BEARS Assembly instruction

Rauch M1742 Assembly instructions

Rauch

Rauch M1742 Assembly instructions

antoniolupi ICE Assembly instructions

antoniolupi

antoniolupi ICE Assembly instructions

manuals.online logo
manuals.online logoBrands
  • About & Mission
  • Contact us
  • Privacy Policy
  • Terms and Conditions

Copyright 2025 Manuals.Online. All Rights Reserved.