manuals.online logo
Brands
  1. Home
  2. •
  3. Brands
  4. •
  5. Monacor
  6. •
  7. Microphone
  8. •
  9. Monacor img Stage Line ECM-180 User manual

Monacor img Stage Line ECM-180 User manual

Großmembran-
Kondensatormikrofon
Bitte lesen Sie diese Bedienungsanleitung vor dem
Betrieb gründlich durch und heben Sie sie für ein
späteres achlesen auf.
1 Einsatzmö lichkeiten
Dieses Kondensatormikrofon mit extrem dünner,
goldbeschichteter 25,4-mm-Membran (1") ist für
professionelle Studio- und Live-Einsätze konzipiert
und eignet sich sowohl für die Schallabnahme von
Instrumenten als auch für Gesangs- und Sprachan-
wendungen. Zum Betrieb benötigt das Mikrofon eine
Phantomspeisung von 48 V.
Zum Lieferumfang gehören ein Koffer und ein vi-
brationsdämpfender Halter (Spinne).
2 Wichti e Hinweise für den Gebrauch
Das Mikrofon entspricht allen erforderlichen Richtli-
nien der EU und ist deshalb mit gekennzeichnet.
GSetzen Sie das Mikrofon nur im Innenbereich ein.
Schützen Sie es vor Feuchtigkeit und Hitze (zu-
lässiger Einsatztemperaturbereich 0 – 40 °C).
GVerwenden Sie für die Reinigung nur ein trocke-
nes, weiches Tuch, niemals Chemikalien oder
Wasser.
GWird das Mikrofon zweckentfremdet, falsch ange-
schlossen oder nicht fachgerecht repariert, kann
keine Haftung für daraus resultierende Sach- oder
Copyright©by MONACOR NTERNAT ONAL GmbH & Co. KG, Bremen, Germany. All rights reserved. A-0876.99.01.07.2008
®
ECM-180
Best.-Nr. 23.5630
wwwwww..iimmggssttaaggeelliinnee..ccoomm
Personenschäden und keine Garantie für das Mi-
kro fon übernommen werden.
3 Inbetriebnahme
1) Die Mikrofonhalterung auf ein Stativ mit 15,9-
mm-Ge winde (5⁄8") schrauben. Die beiden Draht-
bügel an der Halterung zusammendrücken und
das Mi kro fon einsetzen.
2) Zum Ausrichten des Mikrofons die Feststell -
schrau be an der Halterung lösen. Das Mikrofon
so positionieren, dass die Seite mit dem Symbol
in Richtung der Schallquelle zeigt. Anschlie-
ßend die Schrau be wieder festdrehen.
3) Das Mikrofon über ein Kabel mit XLR- Ste cker
(z. B. ein Kabel der MEC-Serie von „img Stage
Line“) an einen Mi krofon eingang des verwende-
ten Audiogeräts (z. B. Mischpult) an schließen.
Der Mikrofon eingang muss eine 48-V-Phantom -
speisung aufweisen. Stellt das Audiogerät kei ne
Phantom spei sung bereit, das Mikrofon über ein
Phantomspeisungsgerät (z. B. EMA-3 von „img
Stage Line“) an das Audiogerät an schließen.
4) Ein als Zubehör erhältlicher Poppschutz (z. B.
WS-100 von „img Stage Line“) verhindert bei
Sprach- oder Gesangsanwendungen nicht nur
die Überbetonung von Explosivlauten sondern
Soll das Mikrofon endgültig aus dem
Betrieb genommen werden, übergeben
Sie es zur umweltgerechten Entsorgung
einem örtlichen Recyclingbetrieb.
schützt das Mikrofon auch vor der Feuchtigkeit
des Atems.
4 Technische Daten
System: . . . . . . . . . . . . . . . . Druckgradientenempfänger,
Nierencharakteristik
Empfindlichkeit: . . . . . . . . . . 13 mV/Pa bei 1 kHz
mpedanz: . . . . . . . . . . . . . . 200
Ω
Max. Schalldruck: . . . . . . . . 130 dB bei 0,5 % Klirrfaktor
Signal-Rausch-Abstand: . . . 79 dB (A-Filter)
Stromversorgung: . . . . . . . . Phantomspeisung 48 V ±4 V
Anschluss: . . . . . . . . . . . . . XLR, symmetrisch
Kontaktbelegung: . . . . . 1 = Schirm/Phantomspeisung
-
2 = Signal+/Phantomspeisung+
3 = Signal
-
/Phantomspeisung+
Abmessungen: . . . . . . . . . . ∅60 mm ×150 mm
Gewicht: . . . . . . . . . . . . . . . 470 g
Änderungen vorbehalten.
Lar e Diaphra m Condenser
Microphone
Please read these operating instructions carefully
prior to operating the unit and keep them for later
reference.
1 Applications
This condenser microphone with extra thin, gold-
coated 25.4 mm (1") diaphragm is designed for pro-
fessional studio and live applications and is both
suitable for the sound pick-up of musical instru-
ments and for vocal sound and speech applications.
For the operation the microphone requires a phan-
tom power of 48 V.
The microphone is supplied with a case and a vi-
bration-dampening support (spider).
2 Important Notes
The microphone corresponds to all required direc -
tives of the EU and is therefore marked with .
GThe microphone is only suitable for indoor use.
Protect it against humidity and heat (admissible
ambient temperature range 0 – 40 °C).
GFor cleaning only use a dry, soft cloth, never use
chemicals or water.
Go guarantee claims for the microphone and no
liability for any resulting personal damage or ma-
terial damage will be accepted if the microphone
is used for other purposes than originally intend -
ed, if it is not correctly connected, or not repaired
in an expert way.
3 Settin into Operation
1) Screw the microphone support onto a stand with
15.9 mm (5⁄8") thread. Press the two wire brackets
at the support together and insert the micro-
phone.
2) To align the microphone, release the setscrew at
the support. Position the microphone so that the
side with the symbol is directed towards the
sound source. Then retighten the screw.
3) Connect the microphone via a cable with XLR
plug (e. g. a cable of the MEC series from “img
Stage Line”) to a microphone input of the audio
unit used (e. g. mixer). The microphone input
must have a 48 V phantom power supply. If the
audio unit does not provide any phantom power,
connect the microphone via a phantom power
supply unit (e. g. EMA-3 from “img Stage Line”)
to the audio unit.
4) A pop protection available as an accessory (e. g.
WS-100 from “img Stage Line”) does not only
prevent the overemphasis of pop noise in case of
vocal sound or speech applications but also pro-
If the microphone is to be put out of oper-
ation definitively, take it to a local recycling
plant for a disposal which is not harmful
for the environment.
tects the microphone against the humidity of the
userʼs breath.
4 Specifications
System: . . . . . . . . . . . . . . . . pressure gradient microphone,
cardioid
Sensitivity: . . . . . . . . . . . . . . 13 mV/Pa at 1 kHz
mpedance: . . . . . . . . . . . . . 200
Ω
Max. sound pressure: . . . . . 130 dB at 0.5 % THD
S/N ratio: . . . . . . . . . . . . . . . 79 dB (A filter)
Power supply: . . . . . . . . . . . phantom power 48 V ±4 V
Connection: . . . . . . . . . . . . . XLR, balanced
contact configuration: . . 1 = screen/phantom power
-
2 = signal+/phantom power+
3 = signal
-
/phantom power+
Dimensions: . . . . . . . . . . . . ∅60 mm ×150 mm
Weight: . . . . . . . . . . . . . . . . 470 g
Subject to technical modification.
D A CH
GB
 
Frequenzgang
Frequency response
Polardiagramm (bei 1 kHz)
Polar pattern (at 1 kHz)
Microphone à condensateur
avec rande membrane
Veuillez lire la présente notice avec attention avant
le fonctionnement et conservez-la pour pouvoir vous
y reporter ultérieurement.
1 Possibilités dʼutilisation
Ce microphone à condensateur avec une mem-
brane 25,4 mm (1") extrêmement fine et à revête-
ment or, est conçu pour des utilisations profession-
nelles en studio et en direct. Il est tout aussi bien
adapté pour des prises de son dʼinstruments que
pour des applications de chant et discours. Pour le
fonctionnement, le microphone requiert une alimen-
tation fantôme de 48 V.
Sont livrés un coffret et un support atténuateur de
vibrations (araignée).
2 Conseils dʼutilisation importants
Le microphone répond à toutes les directives né-
cessaires de lʼUnion européenne et port donc le
symbole .
GLe microphone nʼest conçu que pour une utilisa-
tion en intérieur. Protégez-le de lʼhumidité et de la
chaleur (plage de température de fonctionnement
autorisée : 0 – 40 °C).
GPour le nettoyer, utilisez un chiffon sec et doux,
en aucun cas de produits chimiques ou dʼeau.
Gous déclinons toute responsabilité en cas de
dommage matériels ou corporels résultants si le
Copyright©by MONACOR NTERNAT ONAL GmbH & Co. KG, Bremen, Germany. All rights reserved. A-0876.99.01.07.2008
®
ECM-180
Best.-Nr. 23.5630
wwwwww..iimmggssttaaggeelliinnee..ccoomm
microphone est utilisé dans un but autre que celui
pour lequel il a été conçu, sʼil nʼest pas correcte-
ment branché ou sʼil nʼest pas réparé par une per-
sonne habilitée ; en outre, la garantie deviendrait
caduque.
3 Fonctionnement
1) Vissez le support du microphone sur un pied doté
dʼun filetage 15,9 mm (5⁄8"). Pressez les deux
étriers à fil sur le support et insérez le micro-
phone.
2) Pour orienter le microphone, desserrez la vis de
réglage sur le support. Positionnez le micro-
phone de telle sorte que le côté avec le symbole
soit en direction de la source sonore. Puis re-
vissez la vis.
3) Reliez le microphone via un cordon avec fiche
XLR mâle (par exemple un cordon de la série
MEC de “img Stage Line”) à une entrée micro de
lʼappareil audio utilisé (par exemple table de mixa-
ge). Lʼentrée micro doit avoir une alimentation
fantôme 48 V. Si lʼappareil audio ne délivre pas
dʼalimentation fantôme, reliez le microphone via
un appareil à alimentation fantôme (par exemple
EMA-3 de “img Stage Line”) à lʼappareil audio.
Lorsque le microphone est définitivement
retiré du service, vous devez le déposer
dans une usine de recyclage adaptée pour
contribuer à son élimination non polluante.
4) Une protection anti-pop disponible en option (par
exemple WS-100 de “img Stage Line”) empêche
lors dʼapplications de chant ou de discours, non
seulement une accentuation excessive de sons
explosifs mais protège aussi le microphone de
lʼhumidité de la respiration.
4 Caractéristiques techniques
Système : . . . . . . . . . . . . . . récepteur à gradient de pres-
sion/cardioïde
Sensibilité : . . . . . . . . . . . . . 13 mV/Pa à 1 kHz
mpédance : . . . . . . . . . . . . 200
Ω
Pression sonore max. : . . . . 130 dB pour taux de distorsion
0,5 %
Rapport signal/bruit : . . . . . 79 dB (filtre A)
Alimentation : . . . . . . . . . . . alimentation fantôme 48 V ±4 V
Branchement : . . . . . . . . . . XLR, symétrique
Configuration contacts :
1= blindage/alimentation fantôme
-
2= signal+/alimentation fantôme +
3=signal
-
/alimentation fantôme +
Dimensions : . . . . . . . . . . . . ∅60 mm ×150 mm
Poids : . . . . . . . . . . . . . . . . . 470 g
Tout droit de modification réservé.
Microfono a condensatore
a rande membrana
Vi preghiamo di leggere attentamente le presenti
istruzioni prima della messa in funzione e di con-
servarle per un uso futuro.
1 Possibilità dʼimpie o
Questo microfono a condensatore con la sua mem-
brana di 25,4 mm (1"), estremamente sottile, placata
dʼoro, è stato realizzato per impieghi professionali
negli studi di registrazione e dal vivo; è adatto sia
per prelevare il suono da strumenti musicali che per
applicazioni di canto e di lingua parlata. Per il fun-
zionamento, il microfono richiede unʼalimentazione
phantom di 48 V.
Il kit comprende una valigetta e un supporto del
microfono che riduce le vibrazioni (spider).
2 Avvertenze importanti
Il microfono è conforme a tutte le direttive richieste
dellʼUE e pertanto porta la sigla .
GUsare il microfono solo allʼinterno di locali. Pro-
teggerlo dallʼ umidità e dal calore (temperatura
dʼimpiego ammessa fra 0 e 40 °C).
GPer la pulizia usare solo un panno morbido,
asciut to; non impiegare in nessun caso prodotti
chimici o acqua.
Gel caso dʼuso improprio, di collegamenti sbagliati
o di riparazione scorretta del microfono, non si as-
sume nessuna responsabilità per eventuali danni
consequenziali a persone o a cose e non si as-
sume nessuna garanzia per il microfono.
3 Messa in funzione
1) Avvitare il supporto microfono su uno stativo con
filettatura di 15,9 mm (5⁄8"). Esercitare una pres-
sione sulle due staffe di filo di ferro dello spider ed
inserire il microfono.
2) Per orientare il microfono, allentare la vite di bloc-
caggio del supporto, posizionare il microfono in
modo che il lato con il simbolo sia indirizzato
verso la sorgente sonora e stringere di nuovo la
vite.
3) Collegare il microfono con un ingresso microfono
dellʼapparecchio audio utilizzato (p. es. di un
mixer), servendosi di un cavo con connettori XLR
(p. es. un cavo della serie MEC di “img Stage
Line”). Lʼingresso deve essere equipaggiato con
un alimentazione phantom di 48 V. Se lʼappa-
recchio audio non dispone di alimentazione
phantom, occorre collegare il microfono con lʼap-
parecchio audio per mezzo di un alimentatore
phantom esterno (p. es. EMA-3 di “img Stage
Line”).
4) Un dispositivo antivento (p. es. WS-100 di “img
Stage Line”) disponibile come accessorio, es-
Se si desidera eliminare il microfono defi-
nitivamente, consegnarlo per lo smalti-
mento ad unʼistituzione locale per il rici-
claggio.
clude nella lingua parlata e nel canto non solo la
riproduzione esagerata delle consonanti occlu-
sive, ma protegge il microfono anche dallʼumidità
del respiro.
4 Dati tecnici
Sistema: . . . . . . . . . . . . . . . microfono a gradiente di pres-
sione, a cardioide
Sensibilità: . . . . . . . . . . . . . 13 mV/Pa con 1 kHz
mpedenza: . . . . . . . . . . . . . 200
Ω
Max. pressione sonora: . . . 130 dB con fattore di distorsione
0,5 %
Rapporto S/R: . . . . . . . . . . . 79 dB (filtro A)
Alimentazione: . . . . . . . . . . phantom 48 V ±4 V
Connessione: . . . . . . . . . . . XLR, simmetrica
Contatti:
1 = schermatura/alimentazione phantom
-
2 = segnale +/ alimentazione phantom +
3 = segnale
-
/ alimentazione phantom +
Dimensioni: . . . . . . . . . . . . . ∅60 mm × 150 mm
Peso: . . . . . . . . . . . . . . . . . . 470 g
Con riserva di modifiche tecniche.
F
I
 
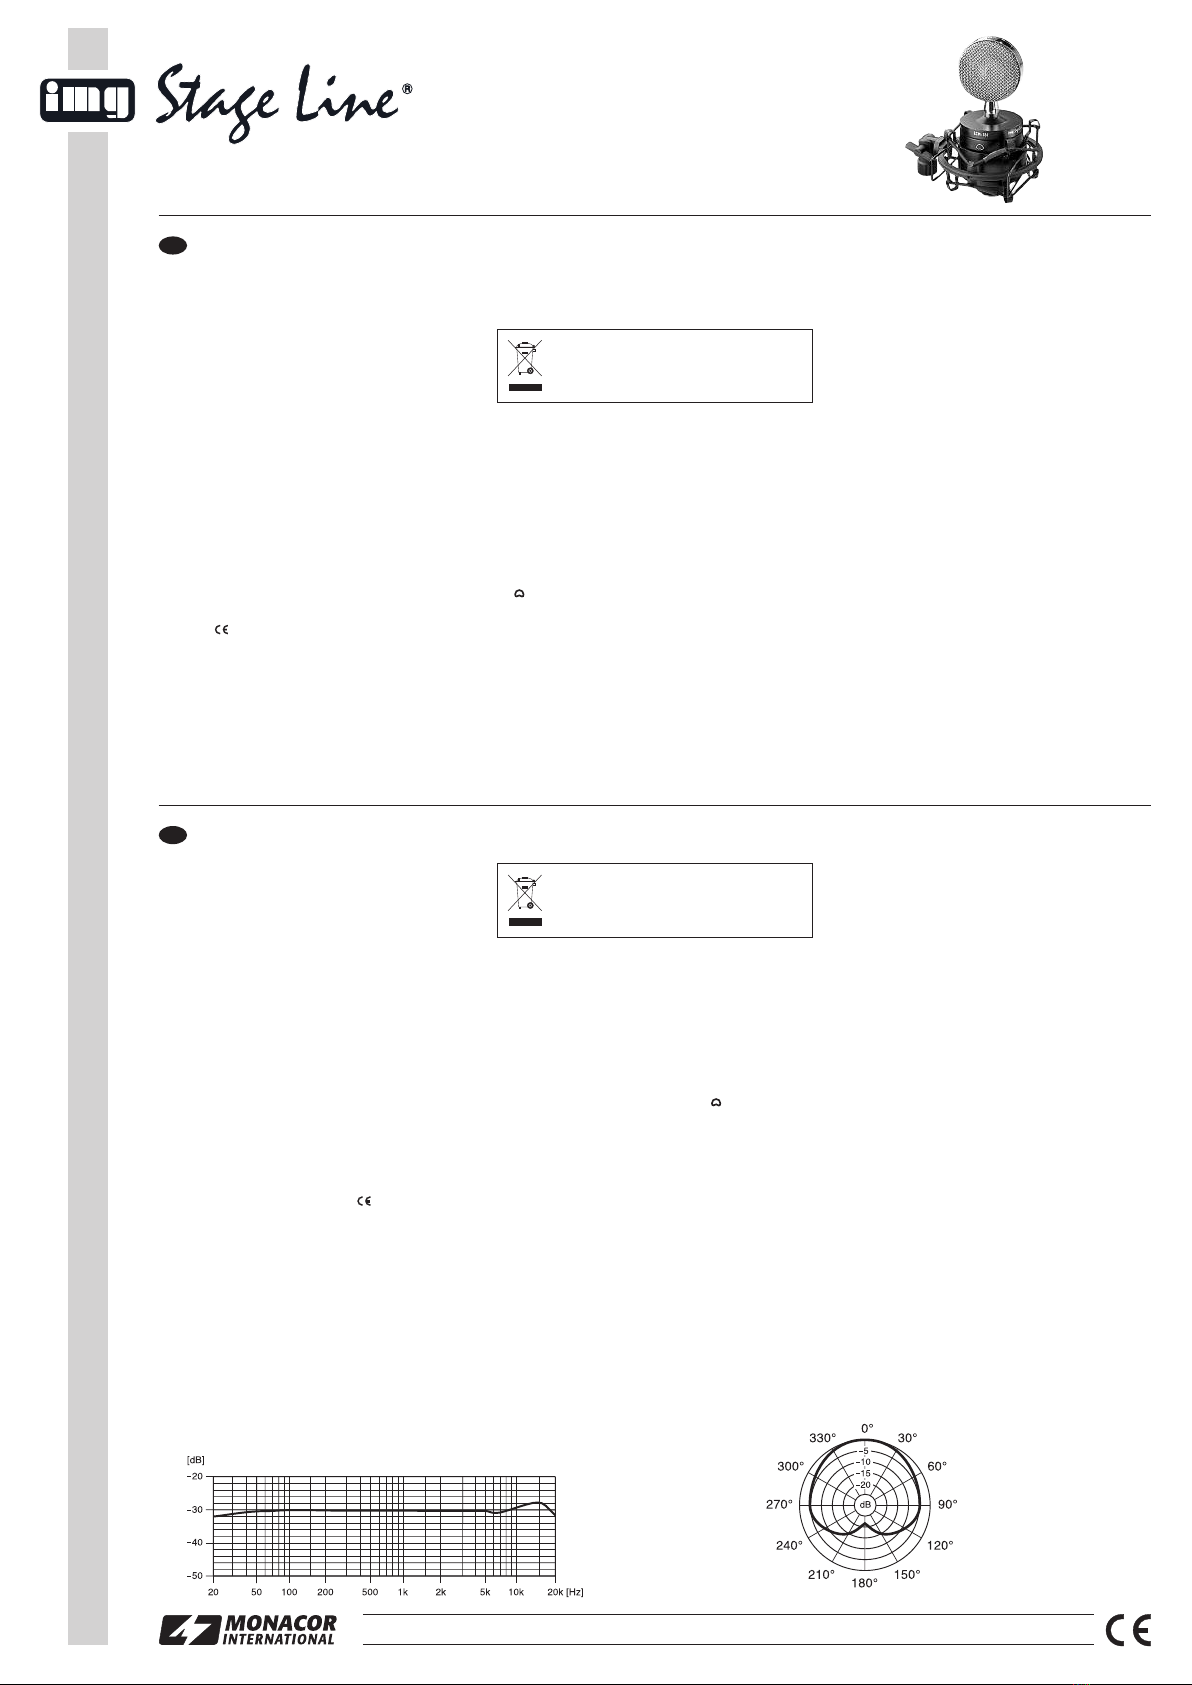
Réponse en fréquence
Risposta in frequenza
Diagramme polaire (à 1 kHz)
Diagramma direttivo (con 1 kHz)
Micrófono Condensador de
Gran Membrana
Lea atentamente estas instrucciones de funciona-
miento antes de utilizar el aparato y guárdelas para
usos posteriores.
1 Aplicaciones
Este micrófono condensador con un membrana ex-
traplana, bañada en oro de 25,4 mm (1") está di -
señado para aplicaciones profesionales en estudio
y en directo, además está adecuado para captar el
sonido de instrumentos o de la voz. Para utilizar el
micrófono se necesita una alimentación phantom de
48 V.
El micrófono se entrega en una caja con un so-
porte antigolpes y antivibraciones (spider).
2 Notas Importantes
El micrófono cumple con todas las directivas re-
queridas por la UE y por lo tanto está marcado con
el símbolo .
GEl micrófono está adecuado para su utilización
sólo en interiores. Protéjalo de la humedad y del
calor (temperatura ambiente admisible: 0 – 40 ºC).
GUtilice sólo un paño suave y seco para la lim-
pieza, no utilice nunca ni productos químicos ni
agua.
Go podrá reclamarse garantía o responsabilidad
alguna por cualquier daño personal o material re-
sultante si se utiliza el micrófono para otros fines
Copyright©by MONACOR NTERNAT ONAL GmbH & Co. KG, Bremen, Germany. All rights reserved. A-0876.99.01.07.2008
®
ECM-180
Best.-Nr. 23.5630
wwwwww..iimmggssttaaggeelliinnee..ccoomm
diferentes a los originalmente concebidos, si no
se conecta adecuadamente o no se repara por
expertos.
3 Puesta en Marcha
1) Enrosque el soporte del micrófono en un pie con
rosca de 15,9 mm (5⁄8"). Pulse los dos seguros de
alambre del soporte al mismo tiempo y luego in-
serte el micrófono.
2) Para alinear el micrófono, afloje el tornillo de pre-
sión del soporte. Coloque el micrófono de modo
que la cara con el símbolo esté dirigida hacia
la fuente de sonido. A continuación apriete el tor-
nillo de nuevo.
3) Conecte el micrófono mediante un cable con
toma XLR (p. ej. un cable de los modelos MEC
de “img Stage Line”) a una entrada de micrófono
del aparato de audio que utilice (p. ej. mezcla-
dor). La entrada de micrófono ha de tener una
alimentación phantom de 48 V. Si el aparato de
audio no tiene alimentación phantom, conecte el
micrófono mediante un alimentador phantom
(p. ej. EMA-3 de “img Stage Line”) al aparato de
audio.
4) Una espuma antiviento disponible como acceso-
rio (p. ej. WS-100 de “img Stage Line”) no solo
Si va a poner el micrófono fuera de servicio
definitivamente, llévelo a la planta de reci-
claje más cercana para que su eliminación
no sea perjudicial para el medioambiente.
previene el énfasis excesivo en caso de sonidos
vocales o charlas sino que también protege el mi-
crófono de la humedad de la respiración del
usuario.
4 Especificaciones
Sistema: . . . . . . . . . . . . . . . Micrófono de presión pendiente,
cardioide
Sensibilidad: . . . . . . . . . . . . 13 mV/Pa a 1 kHz
mpedancia: . . . . . . . . . . . . 200
Ω
Presión sonora máxima: . . . 130 dB a 0,5 % THD
Relación sonido/ruido: . . . . 79 dB (filtro A)
Alimentación: . . . . . . . . . . . Alimentación phantom 48 V ±4 V
Conexión: . . . . . . . . . . . . . . XLR, simétrica
Configuración de contacto:
1 = pantalla/alimentación phantom
-
2 = señal+/alimentación phantom +
3 = señal
-
/alimentación phantom +
Dimensiones: . . . . . . . . . . . ∅60 mm ×150 mm
Peso: . . . . . . . . . . . . . . . . . . 470 g
Sujeto a modificaciones técnicas.
Wielkomembranowy mikrofon
pojemnościowy
Przed rozpoczęciem użytkowania proszę zapoznać
się z instrukcją obsługi i zachować ją do wglądu.
1 Zastosowanie
Mikrofon pojemnościowy wyposażony jest w ultra
cienką, pozłacaną membranę 25,4 mm (1") zapro-
jektowaną do profesjonalnych zastosowań studyj-
nych oraz nagrań na żywo, idealną do zbierania
dźwięków zarówno instrumentów muzycznych, jak i
wokalu. Mikrofon wymaga do pracy zasilania phan-
tom 48 V.
W komplecie z mikrofonem znajduje się walizka
transportowa oraz uchwyt antywibracyjny (pająk).
2 Środki bezpieczeństwa
Mikrofon spełnia wszystkie wymagania norm UE,
dlatego został oznaczony symbolem .
GMikrofon przeznaczony jest wyłącznie do zasto-
sowań wewnątrz pomieszczeń. ależy chronić go
przed dużą wilgotnością oraz wysoką tempera-
turą (dopuszczalny zakres 0 – 40 °C).
GDo czyszczenia używać suchej, miękkiej ście-
reczki; nie używać wody i środków chemicznych.
GProducent ani dostawca nie ponoszą odpowie-
dzialności za wynikłe szkody lub utratę zdrowia
użytkownika, jeśli urządzenie było używane nie-
zgodnie z przeznaczeniem, zostało podłączone
niewłaściwie lub poddane nieautoryzowanej na-
prawie.
3 Przy otowanie do pracy
1) Przykręcić dołączony uchwyt mikrofonowy
(pająk) do statywu z gwintem 15,9 mm (5⁄8").
Wcisnąć dwa zaczepy na uchwycie i włożyć mi-
krofon do uchwytu.
2) Aby zmienić ustawienie mikrofonu, ponownie
wcisnąć oba zaczepy. Mikrofon ustawić w taki
sposób, aby symbol znajdował się na wprost
ust mówcy.
3) Podłączyć kabel ze złączami XLR (np. serii
MEC-... marki “img Stage Line”) do gniazda na
mikrofonie, a następnie do wejścia mikrofono-
wego na urządzeniu audio (np. mikserze). Mikro-
fon musi być zasilany napięciem phantom 48 V.
Jeżeli urządzenie audio nie zapewnia zasilania
phantom, należy podłączyć mikrofon do urzą-
dzenia audio poprzez zasilacz phantomowy (np.
EMA-3 marki “img Stage Line”).
4) Jako wyposażenie dodatkowe, dostępny jest
wiatrochron (np. WS-100 marki “img Stage
Line”), zapobiegający powstawaniu nieprzyjem-
nego efektu pop, typowego dla głosek wybucho-
wych, a także chroniący mikrofon przed wilgocią.
Po całkowitym zakończeniu eksploatacji,
należy oddać urządzenie do punktu
recyklingu, aby nie zaśmiecać środo-
wiska.
4 Specyfikacja
ystem: . . . . . . . . . . . . . . mikrofon ciśnieniowo gradien-
towy, kardioida
Czułość: . . . . . . . . . . . . . 13 mV/ Pa przy 1 kHz
Impedancja: . . . . . . . . . . . 200
Ω
Max. PL: . . . . . . . . . . . . 130 dB przy 0,5 % THD
tosunek /N: . . . . . . . . . 79 dB (ważony A)
Zasilanie: . . . . . . . . . . . . . phantom 48 V ±4 V
Złącza: . . . . . . . . . . . . . . XLR, sym.
konfiguracja pinów: . . . 1 = ekran/zasilanie phantom
-
2 = sygnał+/zasilanie phantom+
3 = sygnał
-
/zasilanie phantom+
Wymiary: . . . . . . . . . . . . . ∅60 mm ×150 mm
Waga: . . . . . . . . . . . . . . . 470 g
Z zastrzeżeniem możliwości zmian.
E
PL
 
Frecuencia de respuesta
Ch-ka częstotliwościowa
Diagrama de polos (a 1 kHz)
Ch-ka kierunkowości (at 1 kHz)

This manual suits for next models

1

Other Monacor Microphone manuals

Monacor HSE-140/SK User manual

Monacor

Monacor HSE-140/SK User manual

Monacor img Stage Line ECM-16N User manual

Monacor

Monacor img Stage Line ECM-16N User manual

Monacor PA ECM-450 User manual

Monacor

Monacor PA ECM-450 User manual

Monacor EMG-600P User manual

Monacor

Monacor EMG-600P User manual

Monacor JTS 25.5450 User manual

Monacor

Monacor JTS 25.5450 User manual

Monacor IMG Stageline DM-1800 User manual

Monacor

Monacor IMG Stageline DM-1800 User manual

Monacor PDM-300 User manual

Monacor

Monacor PDM-300 User manual

Monacor Stage Line TXS-820SX User manual

Monacor

Monacor Stage Line TXS-820SX User manual

Monacor VM-1 User manual

Monacor

Monacor VM-1 User manual

Monacor img Stage Line TXS-820HT User manual

Monacor

Monacor img Stage Line TXS-820HT User manual

Monacor img Stage Line HM-30 User manual

Monacor

Monacor img Stage Line HM-30 User manual

Monacor DMG-400 User manual

Monacor

Monacor DMG-400 User manual

Monacor img Stage Line ECM-80 User manual

Monacor

Monacor img Stage Line ECM-80 User manual

Monacor IMG Stageline HSE-200/SK User manual

Monacor

Monacor IMG Stageline HSE-200/SK User manual

Monacor IMG Stageline ECM-110 User manual

Monacor

Monacor IMG Stageline ECM-110 User manual

Monacor img Stage Line DM-101 User manual

Monacor

Monacor img Stage Line DM-101 User manual

Monacor ECM-450 User manual

Monacor

Monacor ECM-450 User manual

Monacor EMG-250P User manual

Monacor

Monacor EMG-250P User manual

Monacor IMG STAGELINE ECM-280 User manual

Monacor

Monacor IMG STAGELINE ECM-280 User manual

Monacor IMG STAGELINE HSE-90 User manual

Monacor

Monacor IMG STAGELINE HSE-90 User manual

Monacor img Stage Line ECM-270 User manual

Monacor

Monacor img Stage Line ECM-270 User manual

Monacor IMG STAGELINE HOMEX-1 User manual

Monacor

Monacor IMG STAGELINE HOMEX-1 User manual

Monacor DMG-600 User manual

Monacor

Monacor DMG-600 User manual

Monacor IMG STAGELINE HM-30 User manual

Monacor

Monacor IMG STAGELINE HM-30 User manual

Popular Microphone manuals by other brands

Sennheiser ME 62 Instructions for use

Sennheiser

Sennheiser ME 62 Instructions for use

LEXIBOOK MIC100 instruction manual

LEXIBOOK

LEXIBOOK MIC100 instruction manual

Motorola PMMN4140 RM760 IMPRES user guide

Motorola

Motorola PMMN4140 RM760 IMPRES user guide

MIC&MOD U47 Build guide

MIC&MOD

MIC&MOD U47 Build guide

RODE Microphones Classic II Instruction guide

RODE Microphones

RODE Microphones Classic II Instruction guide

Sennheiser E 965 Specification sheet

Sennheiser

Sennheiser E 965 Specification sheet

CA CVL-1084 owner's guide

CA

CA CVL-1084 owner's guide

PEAS TS-200 user manual

PEAS

PEAS TS-200 user manual

3M QUESTemp 32 quick start guide

3M

3M QUESTemp 32 quick start guide

RODE Microphones NT-USB instruction manual

RODE Microphones

RODE Microphones NT-USB instruction manual

Sennheiser MZF 8000 Product sheet

Sennheiser

Sennheiser MZF 8000 Product sheet

auna BTF11 manual

auna

auna BTF11 manual

JVC CU-V10U instructions

JVC

JVC CU-V10U instructions

Sennheiser EVOLUTION E908 instruction manual

Sennheiser

Sennheiser EVOLUTION E908 instruction manual

Nacon STREAMING MICROPHONE manual

Nacon

Nacon STREAMING MICROPHONE manual

Albrecht SM 500 User information

Albrecht

Albrecht SM 500 User information

Krüger & Matz KM0765 owner's manual

Krüger & Matz

Krüger & Matz KM0765 owner's manual

SAL MVN 300 instruction manual

SAL

SAL MVN 300 instruction manual

manuals.online logo
manuals.online logoBrands
  • About & Mission
  • Contact us
  • Privacy Policy
  • Terms and Conditions

Copyright 2025 Manuals.Online. All Rights Reserved.