manuals.online logo
Brands
  1. Home
  2. •
  3. Brands
  4. •
  5. Monacor
  6. •
  7. Microphone
  8. •
  9. Monacor img Stage Line ECM-285 User manual

Monacor img Stage Line ECM-285 User manual

ELECTRONICS FOR SPECIALISTS ELECTRONICS FOR SPECIALISTS ELECTRONICS FOR SPECIALISTS ELECTRONICS FOR SPECIALISTS ELECTRONICS FOR SPECIALISTS ELECTRONICS
ECM-285
Bestell-Nr. •Order No. 23.2760
MONACOR INTERNATIONAL GmbH & Co. KG • Zum Falsch 36 • 28307 Bremen • Germany
Copyright©by MONACOR INTERNATIONAL. All rights reserved. A-0976.99.03.09.2018
0°
30°
60°
90°
120°
150°
180°
210°
240°
270°
300°
330°
[dB]
-
100
20 50 100 200 500 1k 2k 5k 10k 20k [Hz]
-
50
-
60
-
70
-
80
-
90
Electret Overhead Microphone
These operating instructions are intended for
users with basic knowledge in audio technol-
ogy. Please read the instructions carefully prior
to operation and keep them for later reference.
1 Applications
The electret microphone ECM-285 is designed for
applications on stage and in the studio and is ide-
ally suited for the sound pick-up of instruments (e.g.
as overhead microphone for cymbals or hi-hat) and
for vocal sound and speech applications. The micro-
phone can alternatively be supplied via a 1.5 V bat-
tery or externally via the connected audio unit (phan-
tom power 9–48V).
A support with 16mm (5⁄8”) thread including
adapter screw with 9mm (3⁄8”) thread as well as a
6m connection cable are included.
2 Important Notes
The microphone corresponds to all relevant directives
of the EU and is therefore marked with .
•
The microphone is suitable for indoor use only.
Protect it against dripping water and splash water,
high air humidity and heat (admissible ambient
temperature range 0–40°C).
•
For cleaning only use a dry, soft cloth; never use
chemicals or water.
•
No guarantee claims for the microphone and no
liability for any resulting personal damage or ma-
terial damage will be accepted if it is used for other
purposes than originally intended, if it is not cor-
rectly connected or not repaired in an expert way.
If the microphone is to be put out of oper-
ation definitively, take it to a local recycling
plant for a disposal which is not harmful to
the environment.
Never put discharged batteries in the household
waste. To protect the environment, always take
them to a special waste disposal, e.g. collection
container at your retailer.
3 Setting into Operation
1) If the microphone input to which the microphone
is to be connected is not provided with a phantom
power of 9–48V(⎓), insert a 1.5V battery of size
AA: screw off the screw cover (lower housing part)
by turning it counterclockwise, and put the battery
into the battery compartment. Observe the correct
polarity (see imprint in the battery compartment).
Screw on the screw cover of the housing again.
If the microphone is not used for a longer
period of time, remove the battery as a precaution
so that the microphone will not be damaged in
case the battery should leak.
2) Screw the supplied microphone support on a
microphone stand: if the stand is equipped with
a 16mm (5⁄8”) thread, remove the adapter screw
of the support and screw on the support directly.
In case of a 9mm (3⁄8”) thread, fix the support via
the adapter screw. Slide the microphone into the
support.
3) Connect the microphone to an XLR microphone
input of the audio unit (e.g. mixer, amplifier).
4) To switch on the microphone, set the sliding switch
from “OFF” (microphone switched off) to “ON”.
4 Specifications
Type:� � � � � � � � � � � � � � electret microphone
Pick-up pattern:� � � � � � cardioid
Frequency range:� � � � � 80–15 000 Hz
Sensitivity:� � � � � � � � � � 5 mV/Pa at 1kHz
Impedance: � � � � � � � � � 400Ω
Max� SPL: � � � � � � � � � � 115dB
Power supply: � � � � � � � 1�5 V battery of size AA or phan-
tom power 9– 48V (⎓)
Ambient temperature: � 0–40°C
Dimensions: � � � � � � � � ⌀26/24mm × 195mm
Weight�� � � � � � � � � � � � 110g
Connection:� � � � � � � � � XLR, balanced
Subject to technical modification.
Elektret-Overhead-Mikrofon
Diese Anleitung richtet sich an Benutzer mit
Grundkenntnissen in der Audiotechnik. Bitte
lesen Sie die Anleitung vor dem Betrieb gründ-
lich durch und heben Sie sie für ein späteres
Nachlesen auf.
1 Einsatzmöglichkeiten
Das Elektret-Mikrofon ECM-285 ist für den Einsatz
auf der Bühne und im Studio konzipiert und eignet
sich optimal für die Schallabnahme von Instrumenten
(z.B. als Overhead-Mikrofon für Becken oder Hi-Hat)
und für Gesangs- und Sprachanwendungen. Das
Mikrofon kann wahlweise über eine 1,5-V-Batterie
gespeist werden oder extern über das angeschlos-
sene Audiogerät (Phantomspeisung 9–48V).
Zum Lieferumfang gehören ein Halter mit 16-mm-
Gewinde (5⁄8”) inkl. Adapterschraube mit 9-mm-Ge-
winde (3⁄8”) sowie ein 6m langes Anschlusskabel.
2 Wichtige Hinweise
Das Mikrofon entspricht allen relevanten Richtlinien
der EU und trägt deshalb das -Zeichen.
•
Setzen Sie das Mikrofon nur im Innenbereich ein
und schützen Sie es vor Tropf- und Spritzwasser,
hoher Luftfeuchtigkeit und Hitze (zulässiger Ein-
satztemperaturbereich 0–40°C).
•
Verwenden Sie für die Reinigung nur ein trocke-
nes, weiches Tuch, auf keinen Fall Chemikalien
oder Wasser.
•
Wird das Mikrofon zweckentfremdet, falsch ange-
schlossen oder nicht fachgerecht repariert, kann
keine Haftung für daraus resultierende Sach- oder
Personenschäden und keine Garantie für das Mik-
rofon übernommen werden.
Soll das Mikrofon endgültig aus dem
Betrieb genommen werden, übergeben
Sie es zur umweltgerechten Entsorgung
einem örtlichen Recyclingbetrieb.
Verbrauchte Batterien dürfen nicht in den Haus-
müll geworfen werden. Geben Sie sie zur umwelt-
gerechten Entsorgung nur in den Sondermüll (z.B.
Sammelbehälter im Einzelhandel).
3 Inbetriebnahme
1) Ist der Mikrofoneingang, an dem das Mikrofon
angeschlossen werden soll, nicht mit einer Phan-
tomspeisung von 9–48V(⎓) ausgestattet, eine
1,5-V-Batterie vom Typ Mignon (AA) einsetzen:
Die Schraubkappe (unterer Gehäuseteil) durch
Drehen gegen den Uhrzeigersinn abschrauben
und die Batterie in das Batteriefach legen. Dabei
auf die richtige Polarität achten (siehe Aufdruck
im Batteriefach). Die Schraubkappe des Gehäuses
wieder aufschrauben.
Wird das Mikrofon längere Zeit nicht benutzt,
sollte die Batterie herausgenommen werden, um
Schäden durch ein eventuelles Auslaufen der Bat-
terie zu vermeiden.
2) Den beiliegenden Mikrofonhalter auf ein Mikro-
fonstativ schrauben: Besitzt das Stativ ein 16-mm-
Gewinde (5⁄8”), die Adapterschraube des Halters
entfernen und den Halter direkt aufschrauben. Bei
einem 9-mm-Gewinde (3⁄8”) am Stativ den Halter
über die Adapterschraube befestigen. Das Mikro-
fon in den Halter schieben.
3) Das Mikrofon an einen XLR-Mikrofoneingang
des Audiogerätes (z.B. Mischpult, Verstärker) an-
schließen.
4) Zum Einschalten des Mikrofons den Schiebeschal-
ter von „OFF“ (Mikrofon abgeschaltet) auf „ON“
stellen.
4 Technische Daten
Typ:� � � � � � � � � � � � � � � Elektret-Mikrofon
Richtcharakteristik: � � � Niere
Frequenzbereich: � � � � � 80– 15 000Hz
Empfindlichkeit:� � � � � � 5mV/Pa bei 1 kHz
Impedanz:� � � � � � � � � � 400Ω
Max� Schalldruck: � � � � 115 dB
Stromversorgung: � � � � 1,5-V-Mignon-Batterie (AA) oder
Phantomspeisung 9– 48V (⎓)
Einsatztemperatur:� � � � 0– 40 °C
Abmessungen:� � � � � � � ⌀26/24mm × 195 mm
Gewicht: � � � � � � � � � � � 110g
Anschluss:� � � � � � � � � � XLR, symmetrisch
Änderungen vorbehalten.
DeutschEnglish
Frequenzgang • Frequency responsePolardiagramm • Polar pattern
ELECTRONICS FOR SPECIALISTS ELECTRONICS FOR SPECIALISTS ELECTRONICS FOR SPECIALISTS ELECTRONICS FOR SPECIALISTS ELECTRONICS FOR SPECIALISTS ELECTRONICS
MONACOR INTERNATIONAL GmbH & Co. KG • Zum Falsch 36 • 28307 Bremen • Germany
Copyright©by MONACOR INTERNATIONAL. All rights reserved. A-0976.99.03.09.2018
0°
30°
60°
90°
120°
150°
180°
210°
240°
270°
300°
330°
[dB]
-
100
20 50 100 200 500 1k 2k 5k 10k 20k [Hz]
-
50
-
60
-
70
-
80
-
90
Microfono overhead
all’elettrete
Queste istruzioni sono rivolte a utenti con cono-
scenze base nella tecnica audio. Vi preghiamo di
leggerle attentamente prima dell’installazione e
di conservarle per un uso futuro.
1 Possibilità d’impiego
Il microfono all’elettrete è previsto per l’impiego
professionale sul palcoscenico e nello studio di regi-
strazione ed è indicato in modo ottimale per la ripro-
duzione di strumenti musicali (p.es. come microfono
overhead per piatti, hi-hat) nonché per il canto e la lin-
gua parlata. A scelta, il microfono può essere alimen-
tato da una batteria 1,5V oppure dall’apparecchio
audio collegato (alimentazione phantom 9–48V).
Ha in dotazione un supporto con filettatura
16mm (5⁄8”) equipaggiato con un adattatore con
filettatura 9mm (3⁄8”) nonché. In dotazione c’è anche
un cavo di collegamento di 6m.
2 Avvertenze di sicurezza
Il microfono è conforme a tutte le direttive rilevanti
dell’UE e pertanto porta la sigla .
•
Usare il microfono solo all’interno di locali e pro-
teggerlo dall’acqua gocciolante e dagli spruzzi
d’acqua, da alta umidità dell’aria e dal calore (tem-
peratura d’impiego ammessa fra 0 e 40°C).
•
Per la pulizia usare solo un panno morbido,
asciutto; non impiegare in nessun caso prodotti
chimici o acqua.
•
Nel caso d’uso improprio, di collegamenti sbagliati,
o di riparazione non a regola d’arte del microfono,
non si assume nessuna responsabilità per eventuali
danni consequenziali a persone o a cose e non si
assume nessuna garanzia per il microfono.
Se si desidera eliminare il microfono defini-
tivamente, consegnarlo per lo smaltimento
ad un’istituzione locale per il riciclaggio.
Non gettare le batterie scariche nei rifiuti di casa
bensì negli appositi raccoglitori.
3 Messa in funzione
1) Se l’ingresso microfono dell’apparecchio audio
non è equipaggiato con un’alimentazione phan-
tom 9–48V(⎓), montare una batteria 1,5V del
tipo mignon (AA): svitare la parte bassa del mi-
crofono in senso antiorario ed inserire la batteria,
rispettando la corretta polarità (vedi sovrastampa
nel vano batteria). Riavvitare la parte svitata.
Se il microfono non viene utilizzato per un
tempo prolungato conviene togliere la batteria
per evitare danni se la batteria perde.
2) Avvitare il supporto del microfono sul treppiede.
Se il treppiede è con filettatura 16mm (5⁄8”), svitare
l’adattatore dal supporto ed avvitare il supporto
direttamente sul treppiede. Se il treppiede è con
filettatura 9mm (3⁄8”) usare l’adattatore per il fis-
saggio. Inserire il microfono nel supporto.
3) Collegare il microfono con un ingresso microfono
XLR dell’apparecchio audio (p.es. mixer, amplifi-
catore).
4) Per accendere il microfono spostare l’interruttore
da “OFF” (spento) su “ON”.
4 Dati tecnici
Tipo: � � � � � � � � � � � � � � microfono all’elettrete
Caratteristica: � � � � � � � a cardioide
Banda passante: � � � � � 80 – 15 000Hz
Sensibilità:� � � � � � � � � � 5mV/Pa a 1kHz
Impedenza: � � � � � � � � � 400Ω
Pressione sonora max�: 115dB
Alimentazione: � � � � � � batteria 1,5V mignon (AA)
oppure alimentazione phantom
9– 48V (⎓)
Temperatura d’impiego:
0 –40 °C
Dimensioni:� � � � � � � � � ⌀26/24mm × 195mm
Peso:� � � � � � � � � � � � � � 110 g
Collegamento:� � � � � � � XLR, simmetrico
Con riserva di modifiche tecniche.
ECM-285
Référence num. • Codice 23.2760
Microphone électret overhead
Cette notice s’adresse aux utilisateurs avec des
connaissances techniques de base en audio.
Veuillez lire la présente notice avec attention
avant le fonctionnement et conservez-la pour
pouvoir vous y reporter ultérieurement.
1 Possibilités d’utilisation
Le micro électret ECM-285 est conçu pour une utili-
sation sur scène et en studio et est idéal pour la prise
de son d’instruments (p. ex. comme micro overhead
pour cymbale ou hi-hat) et pour les applications de
discours et chant. Il peut, au choix, être alimenté par
une batterie 1,5V ou de manière externe via l’appa-
reil audio relié (alimentation fantôme 9–48V).
Le micro est livré avec un support avec filetage
16mm (5⁄8”), y compris une vis d’adaptation avec file-
tage 9mm (3⁄8”), et un câble de branchement de 6m.
2 Conseils importants
Le microphone répond à toutes les directives néces-
saires de l’Union Européenne et porte donc le sym-
bole .
•
Le microphone n’est conçu que pour une utilisation
en intérieur. Protégez-le de tout type de projections
d’eau, des éclaboussures, d’une humidité élevée et
de la chaleur (plage de température de fonctionne-
ment autorisée : 0–40°C).
•
Pour le nettoyer, utilisez un chiffon sec et doux, en
aucun cas de produits chimiques ou d’eau.
•
Nous déclinons toute responsabilité en cas de
dommages matériels ou corporels résultants si le
microphone est utilisé dans un but autre que celui
pour lequel il a été conçu, s’il n’est pas correcte-
ment branché ou s’il n’est pas réparé par une per-
sonne habilitée ; en outre, la garantie deviendrait
caduque.
Lorsque le microphone est définitivement
retiré du service, vous devez le déposer
dans une usine de recyclage adaptée pour
contribuer à son élimination non polluante.
Ne jetez pas directement les batteries usagées dans
la poubelle domestique, ramenez-les à un contai-
ner spécifique (p.ex. un collecteur chez votre re-
vendeur).
3 Fonctionnement
1) Si l’entrée micro à laquelle le micro doit être relié
n’est pas équipée d’une alimentation fantôme
9–48V(⎓), insérez une batterie 1,5V de type
R6 : dévissez le couvercle (partie inférieure) en le
tournant dans le sens inverse des aiguilles d’une
montre et insérez la batterie dans le compartiment
en respectant la polarité (notée dans le comparti-
ment). Revissez le couvercle du boîtier.
En cas de non utilisation prolongée, veillez à
retirer la batterie : si elle viendrait à couler, elle
peut endommager le micro.
2) Vissez le support micro livré sur un pied pour
micro: si le pied dispose d’un filetage 16 mm (5⁄8”),
retirez la vis d’adaptation du support et vissez di-
rectement le support. Si le pied a un filetage 9mm
(3⁄8”), fixez le support via la vis d’adaptation. Placez
le micro dans le support.
3) Branchez le micro à une entrée micro XLR de l’ap-
pareil audio (p.ex. table de mixage, amplificateur).
4) Pour allumer le micro, mettez l’interrupteur sur
«ON»; en position «OFF», le micro est déconnecté.
4 Caractéristiques techniques
Type : � � � � � � � � � � � � � microphone électret
Directivité : � � � � � � � � � cardioÏde
Bande passante :� � � � � 80– 15 000 Hz
Sensibilité : � � � � � � � � � 5mV/Pa à 1kHz
Impédance : � � � � � � � � 400 Ω
Pression sonore max� : � 115dB
Alimentation : � � � � � � � batterie 1,5V (type R6) ou ali-
mentation fantôme 9– 48V (⎓)
Temp� d’utilisation : � � � 0 – 40°C
Dimensions : � � � � � � � � ⌀26/24mm × 195mm
Poids :� � � � � � � � � � � � � 110 g
Branchement :� � � � � � � XLR symétrique
Tout droit de modification réservé.
Italiano
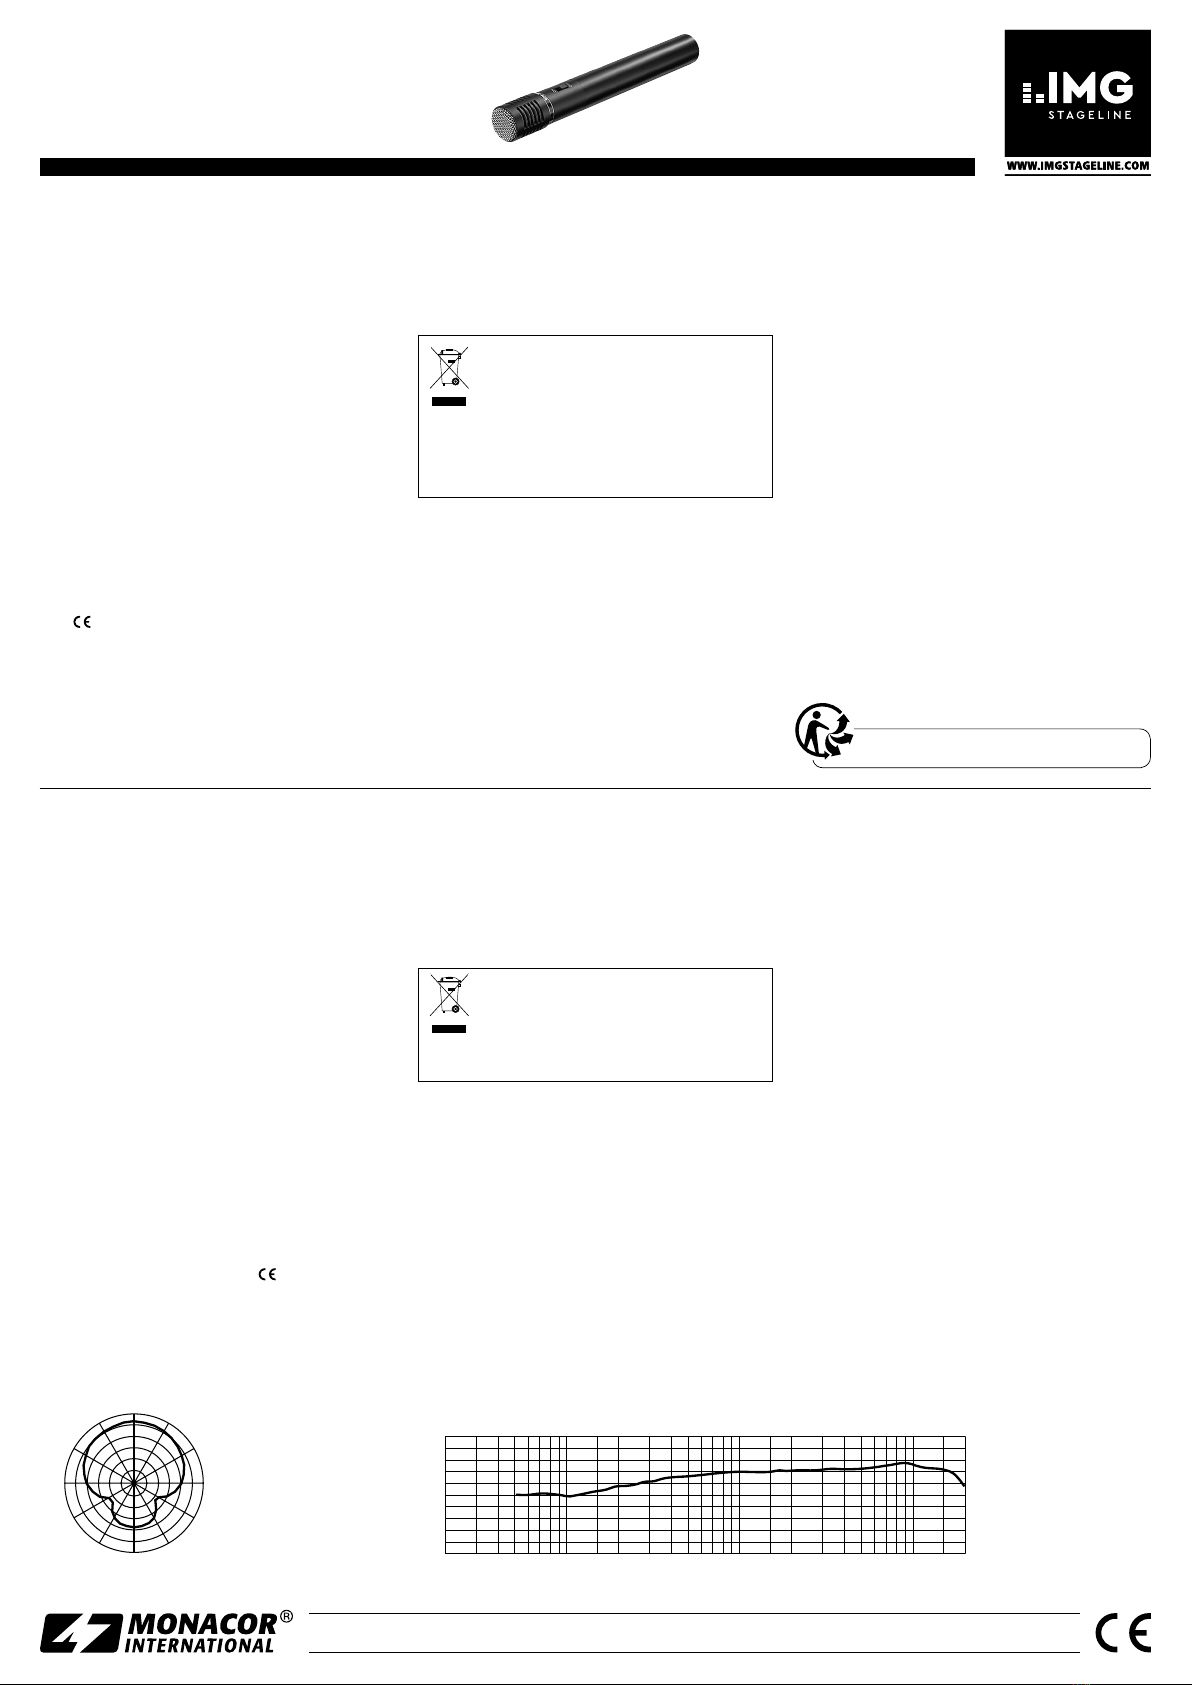
Réponse en fréquence • Risposta in frequenza Diagramme polaire • Diagramma direttivo
Français
CARTONS ET EMBALLAGE
PAPIER À TRIER

This manual suits for next models

1

Other Monacor Microphone manuals

Monacor img Stage Line EMG-450 User manual

Monacor

Monacor img Stage Line EMG-450 User manual

Monacor IMG Stageline HSE-100 User manual

Monacor

Monacor IMG Stageline HSE-100 User manual

Monacor IMG STAGELINE HSE-150/SK User manual

Monacor

Monacor IMG STAGELINE HSE-150/SK User manual

Monacor IMG STAGELINE DM-730 User manual

Monacor

Monacor IMG STAGELINE DM-730 User manual

Monacor IMG Stageline ECM-500L/SK User manual

Monacor

Monacor IMG Stageline ECM-500L/SK User manual

Monacor ECM-300L User manual

Monacor

Monacor ECM-300L User manual

Monacor img Stage Line ECM-180 User manual

Monacor

Monacor img Stage Line ECM-180 User manual

Monacor img Stage Line ECM-16N User manual

Monacor

Monacor img Stage Line ECM-16N User manual

Monacor JTS UT-16HW/1 User manual

Monacor

Monacor JTS UT-16HW/1 User manual

Monacor IMG STAGELINE DM-3400 User manual

Monacor

Monacor IMG STAGELINE DM-3400 User manual

Monacor HSE-72 User manual

Monacor

Monacor HSE-72 User manual

Monacor MEVAC-1FH User manual

Monacor

Monacor MEVAC-1FH User manual

Monacor IMG STAGELINE DMG-450 User manual

Monacor

Monacor IMG STAGELINE DMG-450 User manual

Monacor IMG Stage Line ECM-302B User manual

Monacor

Monacor IMG Stage Line ECM-302B User manual

Monacor PA-4000FMP User manual

Monacor

Monacor PA-4000FMP User manual

Monacor img Stage Line DM-1000 User manual

Monacor

Monacor img Stage Line DM-1000 User manual

Monacor IMG STAGELINE DM-710 User manual

Monacor

Monacor IMG STAGELINE DM-710 User manual

Monacor img Stage Line ECM-285 User manual

Monacor

Monacor img Stage Line ECM-285 User manual

Monacor IMG STAGELINE ECM-2500 User manual

Monacor

Monacor IMG STAGELINE ECM-2500 User manual

Monacor IMG Stageline ECM-310W User manual

Monacor

Monacor IMG Stageline ECM-310W User manual

Monacor IMG Stageline DM-720 User manual

Monacor

Monacor IMG Stageline DM-720 User manual

Monacor JTS UT-16HW/5 User manual

Monacor

Monacor JTS UT-16HW/5 User manual

Monacor HSE-300/SK User manual

Monacor

Monacor HSE-300/SK User manual

Monacor ECM-300DT User manual

Monacor

Monacor ECM-300DT User manual

Popular Microphone manuals by other brands

AKG C 214 Service manual

AKG

AKG C 214 Service manual

Comica CVM-VS07 user manual

Comica

Comica CVM-VS07 user manual

Audio Technica ATR1100x quick start guide

Audio Technica

Audio Technica ATR1100x quick start guide

Sennheiser MK 4 instruction manual

Sennheiser

Sennheiser MK 4 instruction manual

Audibax Missouri 2000 user manual

Audibax

Audibax Missouri 2000 user manual

Audio Technica ES964 user manual

Audio Technica

Audio Technica ES964 user manual

auna PRO Mic 600 manual

auna PRO

auna PRO Mic 600 manual

Nady Systems Center Stage Dynamic Microphone manual 

Nady Systems

Nady Systems Center Stage Dynamic Microphone manual 

Superlux E205UMKII manual

Superlux

Superlux E205UMKII manual

PRYME PRYMEBLU WTX-PTT1500D user guide

PRYME

PRYME PRYMEBLU WTX-PTT1500D user guide

Astatic WM-625 Specifications

Astatic

Astatic WM-625 Specifications

Shure 556s datasheet

Shure

Shure 556s datasheet

Senal CXGN Series user guide

Senal

Senal CXGN Series user guide

Philips SpeechMike Premium Touch SMP3700 manual

Philips

Philips SpeechMike Premium Touch SMP3700 manual

Steren WR-810 instruction manual

Steren

Steren WR-810 instruction manual

Shure LEGENDARY PERFORMANCE MV88 user guide

Shure

Shure LEGENDARY PERFORMANCE MV88 user guide

Shure 545SD user guide

Shure

Shure 545SD user guide

Homily MIC-K17 quick guide

Homily

Homily MIC-K17 quick guide

manuals.online logo
manuals.online logoBrands
  • About & Mission
  • Contact us
  • Privacy Policy
  • Terms and Conditions

Copyright 2025 Manuals.Online. All Rights Reserved.