manuals.online logo
Brands
  1. Home
  2. •
  3. Brands
  4. •
  5. Monacor
  6. •
  7. Microphone
  8. •
  9. Monacor ECM-925P User manual

Monacor ECM-925P User manual

ELECTRONICS FOR SPECIALISTS ELECTRONICS FOR SPECIALISTS ELECTRONICS FOR SPECIALISTS ELECTRONICS FOR SPECIALISTS ELECTRONICS FOR SPECIALISTS ELECTRONICS
ECM-925P
Bestell-Nr. •Order No. 23.1990
MONACOR INTERNATIONAL GmbH & Co. KG • Zum Falsch 36 • 28307 Bremen • Germany
Copyright©by MONACOR INTERNATIONAL. All rights reserved. A-0102.99.04.08.2016
12
3
20 Hz 50 100 200 500 1kHz 2 5 10 20 kHz
Front
Back
Tele Normal
-
90 dB
-
80 dB
-
70 dB
-
60 dB
-
50 dB
-
80 dB
-
90 dB
-
80 dB
-
70 dB
-
60 dB
-
50 dB
-
80 dB
Electret Directional Microphone
These instructions are intended for users with-
out any specific technical knowledge. Please
read the instructions carefully prior to operation
and keep them for later reference.
1 Applications
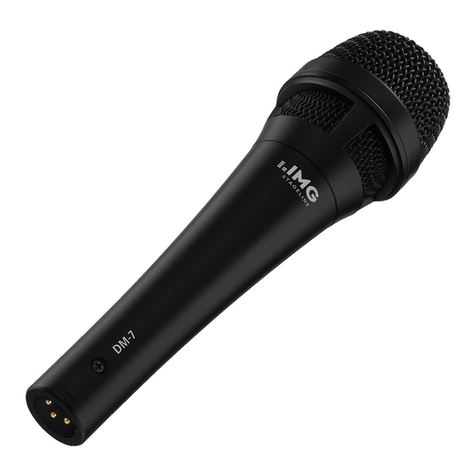
The microphone ECM-925P with switchable pick-up
pattern (cardioid/supercardioid) is ideally suited for
recordings which require a strong directivity due
to interfering ambient noise. It is supplied with a
microphone support, a windshield and a 5m low
noise cable. The power supply can be made alter-
natively via a phantom power of 9– 48V (⎓)or via
a 1.5Vbattery.
2 Important Notes
The microphone corresponds to all relevant directives
of the EU and is therefore marked with .
•
Protect the microphone against humidity and heat
(admissible ambient temperature range 0–40 °C).
The microphone is not weatherproof. Therefore,
in case of outdoor recordings, make sure that it
is protected against rain and other precipitation.
•
For cleaning only use a dry, soft cloth; never use
chemicals or water.
•
No guarantee claims for the microphone and
no liability for any resulting personal damage or
material damage will be accepted if the micro-
phone is used for other purposes than originally
intended, if it is not correctly connected or not
repaired in an expert way.
If the microphone is to be put out of oper-
ation definitively, take it to a local recycling
plant for a disposal which is not harmful to
the environment.
Never put discharged batteries into the household
rubbish; always take them to the special waste
disposal (e.g. collective container at your electrical
supply shop).
3 Setting into Operation
1) If the microphone input, to which the microphone
is to be connected, is not provided with a phan-
tom power of 9– 48V (⎓), insert a 1.5V battery of
size AA. For this purpose unscrew the screw sleeve
at the lower end of the microphone. Insert the
battery as indicated in the battery compartment.
If the microphone is not used for a longer time,
the battery should be taken out. Thus, the micro-
phone will not be damaged in case the battery
should leak.
2) Screw the supplied support onto a stand with
16mm thread (5⁄8”), and put the microphone onto
it. If required, place the supplied windshield.
3) Connect the microphone via the supplied cable to
the microphone input of an audio unit (e.g. mixer,
recorder, amplifier).
4) Select the directivity with the sliding switch:
NORMAL = cardioid, TELE = supercardioid
Thus, the microphone is switched on.
5) If the microphone is not used, set the sliding
switch to the lower position. Thus, the micro-
phone is switched off.
4 Specifications
Frequency range:� � � � � � � � � 80 – 12 000 Hz
Sensitivity, impedance
normal (cardioid): � � � � � � 3 mV/Pa at 1kHz, 1�0kΩ
tele (supercardioid):� � � � � 15 mV/ Pa at 1 kHz, 2�3 kΩ
Max� SPL: � � � � � � � � � � � � � � 120 dB
S/N ratio: � � � � � � � � � � � � � � > 40 dB
Power supply: � � � � � � � � � � � phantom power 9 – 48 V(⎓)
or 1�5 V battery, size AA
Ambient temperature: � � � � � 0 – 40 °C
Housing: � � � � � � � � � � � � � � � metal
Dimensions: � � � � � � � � � � � � ⌀25 mm × 285 mm
Weight w/o battery:� � � � � � � 460 g
Connection: � � � � � � � � � � � � XLR, bal�
Subject to technical modification.
Elektret-Richtmikrofon
Diese Anleitung richtet sich an Benutzer ohne
besondere Fachkenntnisse. Bitte lesen Sie die
Anleitung vor dem Betrieb gründlich durch und
heben Sie sie für ein späteres Nachlesen auf.
1 Einsatzmöglichkeiten
Das Mikrofon ECM-925P mit umschaltbarer Richt-
charakteristik (Niere/Superniere) ist besonders für
Aufnahmen geeignet, bei denen wegen störender
Nebengeräusche eine starke Richtwirkung erfor-
derlich ist. Es wird mit einem Mikrofonhalter, einem
Windschutz und einem 5 m langen Low-Noise-Kabel
geliefert. Die Stromversorgung kann wahlweise über
eine Phantomspeisung von 9– 48V (⎓) erfolgen oder
über eine 1,5-V-Batterie.
2 Wichtige Hinweise für den Gebrauch
Das Mikrofon entspricht allen relevanten Richtlinien
der EU und trägt deshalb das -Zeichen.
•
Schützen Sie das Mikrofon vor Feuchtigkeit und
Hitze (zulässiger Einsatztemperaturbereich 0°C bis
40°C). Das Mikrofon ist nicht wetterfest. Achten
Sie deshalb bei Außenaufnahmen auf Schutz vor
Regen und sonstigem Niederschlag.
•
Verwenden Sie für die Reinigung nur ein trocke-
nes, weiches Tuch, auf keinen Fall Chemikalien
oder Wasser.
•
Wird das Mikrofon zweckentfremdet, falsch ange-
schlossen oder nicht fachgerecht repariert, kann
keine Haftung für daraus resultierende Sach- oder
Personenschäden und keine Garantie für das Mik-
rofon übernommen werden.
Soll das Mikrofon endgültig aus dem Be-
trieb genommen werden, übergeben Sie
es zur umweltgerechten Entsorgung einem
örtlichen Recyclingbetrieb.
Werfen Sie verbrauchte Batterien nicht in den
Hausmüll, sondern geben Sie sie nur in den Son-
dermüll (z.B. Sammelbehälter bei Ihrem Elektro-
fachhändler).
3 Inbetriebnahme
1) Ist der Mikrofoneingang, an dem das Mikrofon
angeschlossen werden soll, nicht mit einer Phan-
tomspeisung von 9– 48V (⎓) ausgestattet, eine
1,5-V-Batterie vom Typ Mignon (AA) einsetzen.
Dazu am unteren Ende des Mikrofons die Schraub-
hülse abschrauben. Die Batterie so herum, wie im
Batteriefach aufgedruckt, einsetzen.
Bei längerem Nichtgebrauch sollte die Batterie
herausgenommen werden. So bleibt das Mikrofon
bei einem eventuellen Auslaufen der Batterie un-
beschädigt.
2) Die beiliegende Halterung auf ein Stativ mit
16-mm-Gewinde (5⁄8”) schrauben und das Mikro-
fon darauf stecken. Bei Bedarf den beiliegenden
Windschutz aufstecken.
3) Das Mikrofon über das beiliegende Anschlusskabel
an den Mikrofoneingang eines Audiogerätes (z.B.
Mischpult, Aufnahmegerät, Verstärker) anschließen.
4) Mit dem Schiebeschalter die Richtcharakteristik
auswählen:
NORMAL = Niere, TELE = Superniere
Das Mikrofon ist damit eingeschaltet.
5) Wird das Mikrofon nicht benötigt, den Schiebe-
schalter in die untere Position stellen. Das Mikro-
fon ist damit abgeschaltet.
4 Technische Daten
Frequenzbereich:� � � � � � � � � 80 – 12 000 Hz
Empfindlichkeit, Impedanz
Normal (Niere): � � � � � � � � 3 mV/Pa bei 1kHz, 1,0 kΩ
Tele (Superniere):� � � � � � � 15 mV/ Pa bei 1 kHz, 2,3 kΩ
maximaler Schalldruck: � � � � 120 dB
Signal/Rauschabstand: � � � � > 40 dB
Stromversorgung: � � � � � � � � Phantomspeisung 9 – 48V(⎓)
oder 1,5-V-Batterie, Größe
Mignon (AA)
Einsatztemperatur: � � � � � � � 0 – 40 °C
Gehäuse:� � � � � � � � � � � � � � � Metall
Abmessungen, Gewicht: � � � ⌀25 mm × 285 mm
Gewicht ohne Batterie: � � � � 460 g
Anschluss:� � � � � � � � � � � � � � XLR, sym�
Änderungen vorbehalten.
DeutschEnglish
Beschaltung • Circuit diagram Frequenzgang • Frequency response Polardiagramm • Polar pattern
ELECTRONICS FOR SPECIALISTS ELECTRONICS FOR SPECIALISTS ELECTRONICS FOR SPECIALISTS ELECTRONICS FOR SPECIALISTS ELECTRONICS FOR SPECIALISTS ELECTRONICS
MONACOR INTERNATIONAL GmbH & Co. KG • Zum Falsch 36 • 28307 Bremen • Germany
Copyright©by MONACOR INTERNATIONAL. All rights reserved. A-0102.99.04.08.2016
12
3
20 Hz 50 100 200 500 1kHz 2 5 10 20 kHz
Front
Back
Tele Normal
-
90 dB
-
80 dB
-
70 dB
-
60 dB
-
50 dB
-
80 dB
-
90 dB
-
80 dB
-
70 dB
-
60 dB
-
50 dB
-
80 dB
Microfono direttivo all’elettrete
Queste istruzioni sono rivolte all’utente senza
conoscenze tecniche specifiche. Vi preghiamo
di leggerle attentamente prima della messa in
funzione e di conservarle per un uso futuro.
1 Possibilità d’impiego
Il microfono ECM-925P con caratteristica direttiva
commutabile (a cardioide/a super cardioide) è parti-
colarmente indicato per registrazioni che richiedono
un forte effetto direzionale a causa dei rumori di
sottofondo. In dotazione sono un supporto per il
microfono, una cuffia antivento e un cavo low-noise
di 5metri. L’alimentazione è possibile, a scelta, attra-
verso un’alimentazione phantom 9– 48V (⎓) oppure
attraverso una batteria di 1,5V.
2 Avvertenze importanti per l’uso
Il microfono è conforme a tutte le direttive rilevanti
dell’UE e pertanto porta la sigla .
•
Proteggere il microfono dall’umidità e dal calore
(temperatura d’impiego ammessa fra 0°C e 40 °C).
Il microfono non è resistente alle intemperie. Nel
caso di riprese all’esterno proteggerlo dalla pioggia
e da altre precipitazioni.
•
Per la pulizia usare solo un panno morbido,
asciutto; non impiegare in nessun caso prodotti
chimici o acqua.
•
Nel caso d’uso improprio, di collegamenti sbagliati
o di riparazione non a regola d’arte del microfono,
non si assume nessuna responsabilità per eventuali
danni consequenziali a persone o a cose e non si
assume nessuna garanzia per il microfono.
Se si desidera eliminare il microfono defini-
tivamente, consegnarlo per lo smaltimento
ad un’istituzione locale per il riciclaggio.
Non gettare le batterie scariche nei rifiuti di casa
bensì negli appositi raccoglitori.
3 Messa in funzione
1) Se l’ingresso microfono previsto non è equipag-
giato con un’alimentazione phantom 9– 48V (⎓),
inserire una batteria del tipo mignon (AA), 1,5V.
Per fare ciò svitare la boccola alla parte inferiore
del microfono. Inserire la batteria come segnato
sul vano batteria.
Nel caso di non utilizzo prolungato, conviene
togliere la batteria per evitare che perda danneg-
giando il microfono.
2) Avvitare il supporto in dotazione su un treppiede
con filettatura di 16mm (5⁄8”) e posizionare il
microfono sul supporto. Se necessario applicare la
cuffia antivento.
3) Collegare il microfono con l’ingresso microfono
di un apparecchio audio (p.es. mixer, registratore,
amplificatore) servendosi del cavo in dotazione.
4) Selezionare la caratteristica direzionale con l’appo-
sito commutatore:
NORMAL = a cardioide, TELE = a super cardioide.
Il microfono è così acceso.
5) Se il microfono non serve più, spostare il commu-
tatore nella posizione inferiore. Il microfono così
è spento.
4 Dati tecnici
Banda passante: � � � � � � � � � 80 – 12 000 Hz
Sensibilità, impedenza
Normal (a cardioide):� � � � 3 mV/Pa a 1 kHz, 1,0kΩ
Tele (a super cardioide):� � 15 mV/ Pa a 1 kHz, 2,3 kΩ
Pressione sonora max�: � � � � 120 dB
Rapporto S/R: � � � � � � � � � � � > 40 dB
Alimentazione: � � � � � � � � � � alimentazione phantom
9 – 48V(⎓) oppure
batteria 1,5 V, mignon (AA)
Temperatura d’impiego:� � � � 0 – 40 °C
Corpo:� � � � � � � � � � � � � � � � � metallo
Dimensioni:� � � � � � � � � � � � � ⌀25 mm × 285mm
Peso senza batteria: � � � � � � 460 g
Collegamento:� � � � � � � � � � � XLR, sym�
Con riserva di modifiche tecniche.
ECM-925P
Référence num. •Codice. 23.1990
Microphone directionnel électret
Cette notice s’adresse aux utilisateurs sans
connaissances techniques particulières. Veuillez
lire la présente notice avec attention avant le
fonctionnement et conservez-la pour pouvoir
vous y reporter ultérieurement.
1 Possibilités d’utilisation
Le microphone ECM-925P commutable (cardioïde/
super cardioïde) est particulièrement bien adapté
pour les enregistrements, où une directivité impor-
tante est requise à cause de bruits parasites. Il est livré
avec un support micro, une bonnette anti-vent et un
cordon Low Noise de 5m de long. L’alimentation
peut être effectuée, au choix, via une batterie 1,5V
ou une alimentation fantôme 9– 48V (⎓).
2 Conseils importants d’utilisation
Le microphone répond à toutes les directives néces-
saires de l’Union européenne et porte donc le sym-
bole .
•
Protégez le microphone de l’humidité et de la chaleur
(température d’utilisation admissible 0–40°C). Le
microphone n’est pas résistant aux intempéries. Pour
cette raison, en cas des enregistrement extérieurs,
protégez-le de la pluie et d’autres précipitations.
•
Pour le nettoyer, utilisez un chiffon sec et doux, en
aucun cas de produits chimiques ou d’eau.
•
Nous déclinons toute responsabilité en cas de dom-
mages matériels ou corporels résultants si le micro-
phone est utilisé dans un but autre que celui pour
lequel il a été conçu, s’il n’est pas correctement
branché ou s’il n’est pas réparé par une personne
habilitée ; en outre, la garantie deviendrait caduque.
Lorsque le microphone est définitivement
retiré du service, vous devez le déposer
dans une usine de recyclage adaptée pour
contribuer à son élimination non polluante.
Ne jetez pas les batteries usagées dans la poubelle
domestique, ramenez-les à un container spécifique
(p.ex. un collecteur chez votre revendeur).
CARTONS ET EMBALLAGE
PAPIER À TRIER
3 Fonctionnement
1) Si l’entrée micro à laquelle le micro doit être relié
n’est pas dotée d’une alimentation fantôme
9– 48V (⎓), vous devez utiliser une batterie 1,5 V
de type AA (R6). Pour l’insérer, dévissez le cache
situé dans la partie inférieure du micro, placez la
batterie comme indiqué dans le compartiment.
En cas de non utilisation prolongée, veillez à
retirer la batterie du micro, elle pourrait couler et
l’endommager.
2) Vissez le support livré sur un pied avec un filetage
16mm (5⁄8”), et placez le micro dessus. Si besoin,
utilisez la bonnette livrée.
3) Reliez le micro via le cordon de branchement livré
à l’entrée micro d’un appareil audio (p.ex. table de
mixage, amplificateur, enregistreur).
4) Sélectionnez le type de fonctionnement avec le
potentiomètre à glissière :
NORMAL = cardioïde, TELE = super cardioïde
Le micro est alors allumé.
5) Pour l’éteindre en fin d’utilisation, poussez l’inter-
rupteur vers le bas.
4 Caractéristiques techniques
Bande passante :� � � � � � � � � 80 – 12 000 Hz
Sensibilité, impédance
normal (cardioïde) : � � � � � 3 mV/Pa à 1kHz, 1,0 kΩ
tele (super cardioïde) : � � � 15 mV/ Pa à 1 kHz, 2,3 kΩ
Pression sonore maximale : � 120 dB
Rapport signal/bruit : � � � � � > 40 dB
Alimentation : � � � � � � � � � � � alimentation fantôme
9 – 48V (⎓) ou
1 batterie 1,5V de type R6
Température d’utilisation :� � 0 – 40 °C
Corps : � � � � � � � � � � � � � � � � métallique
Dimensions : � � � � � � � � � � � � ⌀25 mm × 285 mm
Poids sans batterie : � � � � � � 460 g
Branchement :� � � � � � � � � � � XLR symétrique
Tout droit de modification réservé.
Italiano
Schéma électrique • Schema elettrico Réponse en fréquence • Risposta in frequenza Diagramme polaire • Diagramma direttivo
Français
This manual suits for next models

2

Other Monacor Microphone manuals

Monacor img Stage Line DM-800USB User manual

Monacor

Monacor img Stage Line DM-800USB User manual

Monacor JTS 25.5450 User manual

Monacor

Monacor JTS 25.5450 User manual

Monacor ECM-30A User manual

Monacor

Monacor ECM-30A User manual

Monacor ECM-500 User manual

Monacor

Monacor ECM-500 User manual

Monacor PDM-300 User manual

Monacor

Monacor PDM-300 User manual

Monacor img Stage Line ECM-310W User manual

Monacor

Monacor img Stage Line ECM-310W User manual

Monacor 23.1560 User manual

Monacor

Monacor 23.1560 User manual

Monacor img Stage Line ECM-40 User manual

Monacor

Monacor img Stage Line ECM-40 User manual

Monacor JTS User manual

Monacor

Monacor JTS User manual

Monacor HSE-70WP User manual

Monacor

Monacor HSE-70WP User manual

Monacor ECM-450 User manual

Monacor

Monacor ECM-450 User manual

Monacor IMG Stageline TXS-420SX User manual

Monacor

Monacor IMG Stageline TXS-420SX User manual

Monacor img Stage Line HSE-72 User manual

Monacor

Monacor img Stage Line HSE-72 User manual

Monacor IMG STAGELINE EMG-650P User manual

Monacor

Monacor IMG STAGELINE EMG-650P User manual

Monacor img Stage Line DM-2400 User manual

Monacor

Monacor img Stage Line DM-2400 User manual

Monacor HSE-90 User manual

Monacor

Monacor HSE-90 User manual

Monacor IMG STAGELINE DM-710 User manual

Monacor

Monacor IMG STAGELINE DM-710 User manual

Monacor Stage Line ECM-140 User manual

Monacor

Monacor Stage Line ECM-140 User manual

Monacor UT 16HW/1 User manual

Monacor

Monacor UT 16HW/1 User manual

Monacor DM-3 User manual

Monacor

Monacor DM-3 User manual

Monacor JTS KA-8TH/1 User manual

Monacor

Monacor JTS KA-8TH/1 User manual

Monacor HM-30 User manual

Monacor

Monacor HM-30 User manual

Monacor HSE-40/SK User manual

Monacor

Monacor HSE-40/SK User manual

Monacor IMG Stageline ECM-50 User manual

Monacor

Monacor IMG Stageline ECM-50 User manual

Popular Microphone manuals by other brands

Audio Technica ATR1300 instruction manual

Audio Technica

Audio Technica ATR1300 instruction manual

Toa DM-1300US instruction manual

Toa

Toa DM-1300US instruction manual

Sennheiser MKH 106 P 48 manual

Sennheiser

Sennheiser MKH 106 P 48 manual

Kenwood KMC-21 - Speaker Microphone parts list

Kenwood

Kenwood KMC-21 - Speaker Microphone parts list

Sony ECMMS907 - Stereo Type Mic operating instructions

Sony

Sony ECMMS907 - Stereo Type Mic operating instructions

DPA Hydrophone 8011 user manual

DPA

DPA Hydrophone 8011 user manual

Clear One Beamforming Microphone Array 2 quick start guide

Clear One

Clear One Beamforming Microphone Array 2 quick start guide

AKG C314 User instructions

AKG

AKG C314 User instructions

Bosch PLE‑1CS Specfications

Bosch

Bosch PLE‑1CS Specfications

RODE Microphones HS2 quick start guide

RODE Microphones

RODE Microphones HS2 quick start guide

Philips SpeechMike LFH3220 user manual

Philips

Philips SpeechMike LFH3220 user manual

Toa EM-700 operating instructions

Toa

Toa EM-700 operating instructions

Blue Baby Bottle manual

Blue

Blue Baby Bottle manual

Shure SM10A user guide

Shure

Shure SM10A user guide

AKG D 112 User instructions

AKG

AKG D 112 User instructions

GLEMM SET 7620 instruction manual

GLEMM

GLEMM SET 7620 instruction manual

Takstar E-340 quick start guide

Takstar

Takstar E-340 quick start guide

Audio Technica PRO 8HEx Specifications

Audio Technica

Audio Technica PRO 8HEx Specifications

manuals.online logo
manuals.online logoBrands
  • About & Mission
  • Contact us
  • Privacy Policy
  • Terms and Conditions

Copyright 2025 Manuals.Online. All Rights Reserved.