manuals.online logo
Brands
  1. Home
  2. •
  3. Brands
  4. •
  5. Monacor
  6. •
  7. Power Supply
  8. •
  9. Monacor IMG STAGELINE EMA-3 User manual

Monacor IMG STAGELINE EMA-3 User manual

ELECTRONICS FOR SPECIALISTS ELECTRONICS FOR SPECIALISTS ELECTRONICS FOR SPECIALISTS ELECTRONICS FOR SPECIALISTS ELECTRONICS FOR SPECIALISTS ELECTRONICS
EMA-3
Bestell-Nr. • Order No. 23.3820
MONACOR INTERNATIONAL GmbH & Co. KG • Zum Falsch 36 • 28307 Bremen • Germany
Copyright©by MONACOR INTERNATIONAL. All rights reserved. A-0286.99.05.08.2020
2
1
3
3
2
1
1
2
3
4
POWER ON24 VINPUT
BAL.
OUTPUT
BAL.
3 Fonctionnement
1) Reliez un microphone à alimentation fantôme à la prise
INPUT (3).
2) Reliez la prise OUTPUT (4) à l’entrée micro de l’appareil
audio suivant (p.ex. table de mixage, amplificateur).
3) Mettez la fiche basse tension du bloc secteur dans la
prise «24V⎓» (1) et reliez le bloc secteur à une prise
secteur 230V/50Hz. L’appareil est en fonction, la LED
POWER ON (2), témoin de fonctionnement, brille.
4) Après le fonctionnement, débranchez le bloc secteur de
la prise secteur pour éviter toute consommation inutile
de courant.
4 Caractéristiques techniques
Bande passante :. . . . . . . 20 – 20 000 Hz
Alimentation fantôme :. . +48 V
Alimentation :. . . . . . . . . par bloc secteur livré relié à
230V/50Hz
Température fonction. :. . 0–40°C
Dimensions, poids :. . . . . 126 × 75 × 45mm, 535g
Entrée et sortie : . . . . . . . XLR, sym.
Tout droit de modification réservé.
Alimentation fantôme 48V
Cette notice s‘adresse aux utilisateurs sans connais-
sances techniques particulières. Veuillez lire la pré-
sente notice avant le fonctionnement et conservez-la
pour pouvoir vous y reporter ultérieurement.
1 Possibilités d’utilisation
L’alimentation fantôme EMA-3 délivre la tension d’alimen-
tation nécessaire à un microphone électret ou à conden-
sateur, configuré pour une alimentation fantôme de 48 V.
Ainsi le branchement d’un microphone à alimentation
fantôme à des tables de mixage ou amplificateurs, ne pro-
posant pas d’alimentation fantôme, est possible.
2 Conseils de sécurité
Les appareils (l’alimentation fantôme et bloc secteur) ré-
pondent à toutes les directives nécessaires de l’Union eu-
ropéenne et portent donc le symbole .
AVERTISSEMENT ! Le bloc secteur est alimenté par une
tension dangereuse. Ne touchez jamais l’intérieur de
l’appareil, vous pourriez subir une décharge électrique.
•
Les appareils ne sont conçus que pour une utilisation
en intérieur. Protégez-les des projections d’eau et écla-
boussures, d’une humidité d’air élevée et de la chaleur
(plage de température de fonctionnement autorisée
0–40°C).
•
Ne faites pas fonctionner l’alimentation fantôme ou dé-
branchez le bloc secteur immédiatement dans les cas
suivants :
1. l’alimentation fantôme ou le bloc secteur présentent
des dommages visibles.
2. après une chute ou accident similaire, vous avez un
doute sur l’état de l’appareil.
3. des dysfonctionnements apparaissent.
Dans tous les cas, les dommages doivent être réparés par
un technicien spécialisé.
•
Pour les nettoyer, utilisez uniquement un chiffon sec et
doux, en aucun cas de produits chimiques ou d’eau.
•
Nous déclinons toute responsabilité en cas de dom-
mages matériels ou corporels résultants si les appareils
sont utilisés dans un but autre que celui pour lequel ils
ont été conçus, s’ils ne sont pas correctement branchés
ou s’ils ne sont pas réparés par une personne habilitée ;
en outre, la garantie deviendrait caduque.
Lorsque les appareils sont définitivement retirés
du service, éliminez-les conformément aux di-
rectives locales.
CARTONS ET EMBALLAGE
PAPIER À TRIER
48V Phantom Power Supply Unit
These instructions are intended for users without any
specific technical knowledge. Please read these in-
structions carefully prior to operation and keep them
for later reference.
1 Applications
The phantom power supply unit EMA-3 supplies the
required supply voltage for a condenser or electret mi-
crophone designed for a phantom power supply of
48V. Thus, it is possible to connect a phantom-powered
microphone to mixers or amplifiers which do not provide
phantom power.
2 Safety Notes
The units (phantom power supply unit and power supply
unit) correspond to all relevant directives of the EU and are
therefore marked with .
WARNING! The power supply unit uses dangerous
mains voltage. Leave servicing to skilled personnel only.
Inexpert handling may result in electric shock.
•
The units are suitable for indoor use only. Protect
them against dripping water and splash water, high air
humidity and heat (admissible ambient temperature
range 0–40°C).
•
Do not operate the phantom power supply unit or imme-
diately disconnect the power supply unit from the socket
1. if the phantom power supply unit or the power sup-
ply unit is visibly damaged,
2. if a defect might have occurred after a unit was
dropped or suffered a similar accident,
3. if malfunctions occur.
In any case, the units must be repaired by skilled per-
sonnel.
•
For cleaning only use a dry, soft cloth, never use chem-
icals or water.
•
No guarantee claims for the units and no liability for any
resulting personal damage or material damage will be
accepted if the units are used for other purposes than
originally intended, if they are not correctly connected,
or if they are not repaired in an expert way.
If the units are to be put out of operation defi-
nitely, dispose of the units in accordance with
local regulations.
3 Setting into Operation
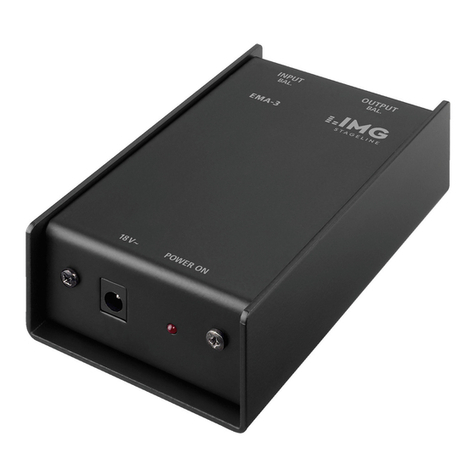
1) Connect a phantom-powered microphone to the jack
INPUT (3).
2) Connect the jack OUTPUT (4) to the microphone input
of the following audio unit (e.g. mixer, amplifier).
3) Connect the low-voltage plug of the power supply unit
to the jack “24V⎓” (1) and the power supply unit to a
mains socket (230V/50Hz). The unit is in operation and
the power LED POWER ON (2) lights up.
4) After operation, disconnect the power supply unit from
the mains socket to save power.
4 Specifications
Frequency range: . . . . . . 20 – 20 000 Hz
Phantom power:. . . . . . . +48 V
Power supply: . . . . . . . . . via supplied power supply unit
connected to 230V/50Hz
Ambient temperature: . . 0 – 40 °C
Dimensions, weight: . . . . 126 × 75 × 45 mm, 535 g
Input and output: . . . . . . XLR, bal.
Subject to technical modification.
48-V-Phantomspeisegerät
Diese Anleitung richtet sich an Benutzer ohne beson-
dere Fachkenntnisse. Bitte lesen Sie die Anleitung vor
dem Betrieb gründlich durch und heben Sie sie für
ein späteres Nachlesen auf.
1 Einsatzmöglichkeiten
Das Phantomspeisegerät EMA-3 liefert einem Kondensa-
tor- oder Elektretmikrofon, das für eine Phantomspeisung
von 48V ausgelegt ist, die erforderliche Speisespannung.
Damit ist der Anschluss eines phantomgespeisten Mikro-
fons an Mischpulte oder Verstärker möglich, die keine
Phantomspeisung bereitstellen.
2 Sicherheitshinweise
Die Geräte (Phantomspeisegerät und Netzgerät) entspre-
chen allen relevanten Richtlinien der EU und tragen des-
halb das -Zeichen.
WARNUNG! Das Netzgerät wird mit lebensgefährlicher
Netzspannung versorgt. Nehmen Sie deshalb niemals
selbst Eingriffe am Netzgerät vor! Es besteht die Gefahr
eines elektrischen Schlages.
•
Verwenden Sie die Geräte nur im Innenbereich. Schüt-
zen Sie sie vor Tropf- und Spritzwasser, hoher Luftfeuch-
tigkeit und Hitze (zulässiger Einsatztemperaturbereich
0–40°C).
•
Nehmen Sie das Phantomspeisegerät nicht in Betrieb bzw.
ziehen Sie sofort das Netzgerät aus der Steckdose, wenn:
1. sichtbare Schäden am Phantomspeisegerät oder am
Netzgerät vorhanden sind,
2. nach einem Sturz oder Ähnlichem der Verdacht auf
einen Defekt besteht,
3. Funktionsstörungen auftreten.
Lassen Sie die Geräte in jedem Fall in einer Fachwerkstatt
reparieren.
•
Verwenden Sie für die Reinigung nur ein trockenes, wei-
ches Tuch, niemals Chemikalien oder Wasser.
•
Werden die Geräte zweckentfremdet, falsch angeschlos-
sen oder nicht fachgerecht repariert, kann keine Haftung
für daraus resultierende Sach- oder Personenschäden
und keine Garantie für die Geräte übernommen werden.
Sollen die Geräte endgültig aus dem Betrieb ge-
nommen werden, entsorgen Sie sie gemäß den
örtlichen Vorschriften.
3 Inbetriebnahme
1) Ein phantomgespeistes Mikrofon an die Buchse INPUT
(3) anschließen.
2) Die Buchse OUTPUT (4) an den Mikrofoneingang des
nachfolgenden Audiogerätes (z.B. Mischpult, Verstär-
ker) anschließen.
3) Den Kleinspannungsstecker des Netzgerätes in die
Buchse „24V⎓“ (1) stecken und das Netzgerät in eine
Steckdose (230V/50Hz). Das Gerät ist in Betrieb und
die Betriebsanzeige POWER ON (2) leuchtet.
4) Nach dem Betrieb das Netzgerät aus der Steckdose
ziehen, damit kein Strom unnötig verbraucht wird.
4 Technische Daten
Frequenzbereich: . . . . . . 20–20000Hz
Phantomspeisung: . . . . . +48 V
Stromversorgung: . . . . . . über beiliegendes Netzgerät an
230V/50Hz
Einsatztemperatur: . . . . . 0 – 40 °C
Abmessungen, Gewicht:. 126 × 75 × 45 mm, 535 g
Ein- und Ausgang: . . . . . XLR, sym.
Änderungen vorbehalten.
DeutschEnglishFrançais

ELECTRONICS FOR SPECIALISTS ELECTRONICS FOR SPECIALISTS ELECTRONICS FOR SPECIALISTS ELECTRONICS FOR SPECIALISTS ELECTRONICS FOR SPECIALISTS ELECTRONICS
EMA-3
Bestell-Nr. • Order No. 23.3820
MONACOR INTERNATIONAL GmbH & Co. KG • Zum Falsch 36 • 28307 Bremen • Germany
Copyright©by MONACOR INTERNATIONAL. All rights reserved. A-0286.99.05.08.2020
2
1
3
3
2
1
1
2
3
4
POWER ON24 VINPUT
BAL.
OUTPUT
BAL.
3 Przygotowanie do pracy
1) Podłączyć mikrofon wymagający zasilania phantomo-
wego do wejścia INPUT (3).
2) Podłączyć wyjście OUTPUT (4) z wejściem kolejnego w
torze urządzenia audio (np. mikser, wzmacniacz).
3) Podłączyć wtyk zasilacza do gniazda wzmacniacza
“24V⎓” (1), a następnie zasilacz do sieci (230V/50Hz).
Zapali się zielony wskaźnik POWER ON (2), urządzenie
jest gotowe do pracy.
4) Po zakończeniu pracy, odłączyć zasilacz z sieci.
4 Dane techniczne
Pasmo przenoszenia:. . . . 20 – 20 000 Hz
Zasilanie phantomowe:. . +48 V
Zasilanie:. . . . . . . . . . . . . z dołączonego zasilacza
230V/50Hz
Temperatura pracy: . . . . . 0–40°C
Wymiary, waga: . . . . . . . 126 × 75 × 45 mm, 535 g
Wejście i wyjście: . . . . . . XLR, zbalansowane
Z zastrzeżeniem do możliwych zmian.
Zasilacz phantomowy 48V
Niniejsza instrukcja przeznaczona jest dla użytkow-
ników, którzy nie posiadają wiedzy i doświadczenia
technicznego. Przed rozpoczęciem użytkowania pro-
szę zapoznać się z instrukcją, a następnie zachować
ją do wglądu.
1 Zastosowanie
EMA-3 służy do zasilania napięciem 48V mikrofonów
pojemnościowych lub elektretowych (wymaganego do
ich pracy). W ten sposób wykorzystując EMA-3 można
podłączać wyżej wymienione typy mikrofonów do urzą-
dzeń (wzmacniaczy, mikserów) nie wyposażonych w takie
zasilanie.
2 Środki ostrożności
Urządzenia (zasilacz phantomowy oraz zasilacz) spełniają
wszystkie wymogi norm UE i dlatego posiadają oznaczenie
certyfikatem .
UWAGA! Zasilacz pracuje na niebezpiecznym napięciu.
Wszelkie naprawy serwisowe należy zlecić specjaliście.
Nieodpowiednia obsługa może spowodować porażenie
prądem elektrycznym.
•
Urządzenia są przeznaczone tylko do użytku wewnątrz
pomieszczeń. Chroń przed wodą, wysoką wilgotnością i
wysoką temperaturą (dopuszczalny zakres temperatury
to 0–40°C).
•
Nie wolno używać oraz należy natychmiast odłączyć
urządzenie od zasilania:
1. Jeżeli widoczne są jakiekolwiek uszkodzenia urzą-
dzenia,
2. Jeżeli urządzenie upadło lub uległo podobnemu wy-
padkowi, który mógł spowodować jego uszkodzenie,
3. Jeśli urządzenie działa nieprawidłowo.
W każdym z powyższych przypadków urządzenie musi
zostać poddane naprawie przez odpowiednio wyszko-
lony personel.
•
Do czyszczenia należy używać tylko suchej, miękkiej ście-
reczki. Nie wolno używać wody ani żadnych środków
chemicznych.
•
Nie ponosi się odpowiedzialności za wynikłe uszkodzenia
sprzętu lub obrażenia użytkownika w przypadku, gdy
urządzenia są wykorzystywane w innych celach niż to się
przewiduje lub, jeśli są nieodpowiednio zainstalowane,
użytkowane lub naprawiane.
Jeśli urządzenia nie będą już nigdy więcej uży-
wane, wskazane jest pzekazanie ich do miejsca
utylizacji odpadów, aby zostały utylizowane bez
szkody dla środowiska.
Alimentador phantom 48V
Estas instrucciones van dirigidas a usuarios sin nin-
gún conocimiento técnico específico. Lea atenta-
mente estas instrucciones antes de funcionamiento
y guárdelas para usos posteriores.
1 Aplicaciones
El alimentador phantom EMA-3 proporciona el voltaje ne-
cesario para un micrófono de condensador o micrófono
electret diseñado para una alimentación phantom de 48V.
Así, es posible conectar un micrófono con alimentación
phantom a mezcladores o amplificadores que no tienen
potencia phantom.
2 Notas de seguridad
Los aparatos (alimentador phantom y alimentador de red)
cumplen con todas las directivas relevantes de la UE y por
lo tanto están marcados con el símbolo .
¡ADVERTENCIA! El alimentador de red utiliza un voltaje
peligroso. Deje el mantenimiento en manos del personal
cualificado. El manejo inexperto puede provocar una
descarga.
•
Los aparatos están adecuados para utilizarse en interiores.
Protéjalos de goteos y salpicaduras, elevada humedad del
aire y calor (temperatura ambiente admisible: 0–40 °C).
•
No utilice el alimentador phantom o desconecte inmedia-
tamente el alimentador de red del enchufe si:
1. El alimentador phantom o el alimentador de red están
visiblemente dañados.
2. Los aparatos han sufrido daños después de una caída
o accidente similar.
3. No funcionan correctamente.
Sólo el personal técnico puede reparar los aparatos bajo
cualquier circunstancia.
•
Para limpiar los aparatos, utilice un trapo seco y suave,
no utilice nunca productos químicos or agua.
•
No podrá reclamarse garantía o responsabilidad alguna
por cualquier daño personal o material resultante si los
aparatos se conectan para otros fines diferentes a los ori-
ginalmente concebidos, si no se utilizan adecuadamente
o si no se reparan por expertos.
Si los aparatos se van a dejar fuera de servicio
definitivamente, deshágase de los aparatos
según las normativas locales.
3 Funcionamiento
1) Conecte un micrófono con alimentación phantom a la
toma INPUT (3).
2) Conecte la toma OUTPUT (4) a la entrada del micró-
fono del siguiente aparato de audio (p.ej. mezclador,
amplificador).
3) Conecte el conector de bajo voltaje del alimentador de
red a la toma “24V⎓” (1) y el alimentador de red a
un enchufe (230V/50Hz). El aparato está en funciona-
miento y el LED POWER ON (2) se ilumina.
4) Después del funcionamiento, desconecte el alimenta-
dor de red del enchufe de manera que no se consuma
innecesariamente.
4 Especificaciones
Rango de frecuencias:. . . 20 – 20 000 Hz
Potencia phantom: . . . . . +48 V
Alimentación: . . . . . . . . . vía alimentador de red entre-
gado, conectado a 230V/50Hz
Temperatura ambiente:. . 0 – 40 °C
Dimensiones, peso:. . . . . 126 × 75 × 45 mm, 535 g
Entrada y salida: . . . . . . . XLR, sim.
Sujeto a modificaciones técnicas.
Alimentatore phantom 48V
Queste istruzioni sono rivolte all‘utente senza cono-
scenze tecniche specifiche. Vi preghiamo di leggerle
attentamente prima della messa in funzione e di con-
servarle per un uso futuro.
1 Possibilità d’impiego
L’alimentatore phantom EMA-3 fornisce la tensione neces-
saria a un microfono a condensatore o a elettrete, previ-
sto per alimentazione phantom 48V. Pertanto è possibile
collegare un microfono con alimentazione phantom con
un mixer o amplificatore che non forniscono detta alimen-
tazione.
2 Avvertenze di sicurezza
Gli apparecchi (alimentatore phantom e alimentatore rete)
sono conformi a tutte le direttive rilevanti dell’UE e per-
tanto portano la sigla .
AVVERTIMENTO! L’alimentatore rete funziona con ten-
sione di rete. Non intervenire mai al suo interno; la manipo-
lazione scorretta può provocare delle scariche pericolose.
•
Far funzionare gli apparecchi solo all’interno di locali.
Proteggerli dall’acqua gocciolante e dagli spruzzi d’ac-
qua, da alta umidità dell’aria e dal calore (temperatura
d’impiego ammessa fra 0 e 40°C).
•
Non mettere in funzione l’alimentatore phantom o stac-
care subito l’alimentatore rete dalla presa di rete se:
1. l’alimentatore phantom o l’alimentatore rete presen-
tano dei danni visibili;
2. dopo una caduta o dopo eventi simili sussiste il so-
spetto di un difetto;
3. gli apparecchi non funzionano correttamente.
Per la riparazione rivolgersi sempre ad un’officina com-
petente.
•
Per la pulizia usare solo un panno morbido, asciutto; non
impiegare in nessun caso prodotti chimici o acqua.
•
Nel caso d’uso improprio, di collegamenti sbagliati o di
riparazione non a regola d’arte degli apparecchi, non si
assume nessuna responsabilità per eventuali danni con-
sequenziali a persone o a cose e non si assume nessuna
garanzia per gli apparecchi.
Se si desidera eliminare gli apparecchi defini-
tivamente, consegnarli per lo smaltimento ad
unistituzione locale per il riciclaggio.
3 Messa in funzione
1) Collegare un microfono con alimentazione phantom
con la presa INPUT (3).
2) Collegare la presa OUTPUT (4) con l’ingresso microfono
dell’apparecchio audio a valle (p.es. mixer, amplificatore).
3) Collegare lo spinotto dell’alimentatore rete con la presa
“
24V⎓
” (1) e inserire l’alimentatore rete in una presa di
rete (230V/50Hz). L’apparecchio è in funzione e la spia di
funzionamento POWER ON (2) rimane accesa.
4) Dopo il funzionamento staccare l’alimentatore rete dalla
presa di rete per non consumare inutilmente della cor-
rente.
4 Dati tecnici
Gamma di frequenze: . . . 20 – 20 000 Hz
Alimentazione phantom:. +48V
Alimentazione corrente: . tramite alimentatore in dota-
zione con
230V/50Hz
Temperatura d’esercizio: . 0–40°C
Dimensioni, peso: . . . . . . 126 × 75 × 45 mm, 535 g
Ingresso e uscita: . . . . . . XLR, simm.
Con riserva di modifiche tecniche.
ItalianoEspañolPolski

This manual suits for next models

1

Other Monacor Power Supply manuals

Monacor PSS-1000USB User manual

Monacor

Monacor PSS-1000USB User manual

Monacor PS-362 ST User manual

Monacor

Monacor PS-362 ST User manual

Monacor PSS-800 User manual

Monacor

Monacor PSS-800 User manual

Monacor PS-120WP User manual

Monacor

Monacor PS-120WP User manual

Monacor NB-1000 User manual

Monacor

Monacor NB-1000 User manual

Monacor PS-120WP User manual

Monacor

Monacor PS-120WP User manual

Monacor PSS-600E User manual

Monacor

Monacor PSS-600E User manual

Monacor PSS-1005USB User manual

Monacor

Monacor PSS-1005USB User manual

Monacor PS-500ST User manual

Monacor

Monacor PS-500ST User manual

Monacor PSS-510DC User manual

Monacor

Monacor PSS-510DC User manual

Monacor PS-168 User manual

Monacor

Monacor PS-168 User manual

Monacor PS-128A User manual

Monacor

Monacor PS-128A User manual

Monacor PSS-1005USB User manual

Monacor

Monacor PSS-1005USB User manual

Monacor PS-970AC User manual

Monacor

Monacor PS-970AC User manual

Monacor IMG STAGELINE EMA-3 User manual

Monacor

Monacor IMG STAGELINE EMA-3 User manual

Monacor PS-1540AC User manual

Monacor

Monacor PS-1540AC User manual

Monacor PSS-1260DC User manual

Monacor

Monacor PSS-1260DC User manual

Monacor PSS-3000SV User manual

Monacor

Monacor PSS-3000SV User manual

Monacor PSS-1206 User manual

Monacor

Monacor PSS-1206 User manual

Monacor PSS-5000 User manual

Monacor

Monacor PSS-5000 User manual

Monacor PSS-2500SV User manual

Monacor

Monacor PSS-2500SV User manual

Monacor PSS-600E User manual

Monacor

Monacor PSS-600E User manual

Monacor PS-214 User manual

Monacor

Monacor PS-214 User manual

Monacor PSS-1500SV User manual

Monacor

Monacor PSS-1500SV User manual

Popular Power Supply manuals by other brands

Puls PIANO PIM60.241 manual

Puls

Puls PIANO PIM60.241 manual

SEW-Eurodrive MOVITRANS THM20C operating instructions

SEW-Eurodrive

SEW-Eurodrive MOVITRANS THM20C operating instructions

EnerSys Alpha XRT-TPPL quick start guide

EnerSys

EnerSys Alpha XRT-TPPL quick start guide

Osram OPTOTRONIC OT Wi 15/220-240/1A0 NFC CA LP manual

Osram

Osram OPTOTRONIC OT Wi 15/220-240/1A0 NFC CA LP manual

Elsner KNX PS640-IP 2U installation instructions

Elsner

Elsner KNX PS640-IP 2U installation instructions

Redarc DPS1225 manual

Redarc

Redarc DPS1225 manual

NZXT HALE82 V2S user manual

NZXT

NZXT HALE82 V2S user manual

MobilePower POWER 400 instruction manual

MobilePower

MobilePower POWER 400 instruction manual

Keithley 242 instruction manual

Keithley

Keithley 242 instruction manual

Goobay 54793 user manual

Goobay

Goobay 54793 user manual

ASL INTERCOM BS 181 quick guide

ASL INTERCOM

ASL INTERCOM BS 181 quick guide

Ultra ULT33184 user manual

Ultra

Ultra ULT33184 user manual

SSD NEB/3U product manual

SSD

SSD NEB/3U product manual

Wheelock RPS-2406-I installation instructions

Wheelock

Wheelock RPS-2406-I installation instructions

Horizont farmer N100 instruction manual

Horizont

Horizont farmer N100 instruction manual

Allen-Bradley Bulletin 1606 Reference manual

Allen-Bradley

Allen-Bradley Bulletin 1606 Reference manual

WFCO WF-8900-AD-MBA Series Operator's manual

WFCO

WFCO WF-8900-AD-MBA Series Operator's manual

BEICH CH9720 Series Operation manual

BEICH

BEICH CH9720 Series Operation manual

manuals.online logo
manuals.online logoBrands
  • About & Mission
  • Contact us
  • Privacy Policy
  • Terms and Conditions

Copyright 2025 Manuals.Online. All Rights Reserved.