MSA Altair QuickCheck Station User manual

Altair®QuickCheckTM Station
Instruction Manual
Estación Altair®QuickCheckTM
Manual de Instrucciones
Poste Altair®QuickCheckTM
Mode d’emploi
In the U.S., to contact your nearest stocking location, dial toll-free 1-
800-MSA-2222
To contact MSA International, dial 1-412-967-3354 or 1-800-MSA-7777
© MINE SAFETY APPLIANCES COMPANY 2006 - All Rights Reserved
This manual is available on the internet at www.msanet.com
Para comunicarse con el lugar de abastecimiento más cercano en
los EE.UU., llame gratis al 1-800-MSA-2222.
Para comunicarse con MSA International, llame al 1-412-967-3354 ó
1-800-MSA-7777.
© MINE SAFETY APPLIANCES COMPANY 2006. Se reservan todos
los derechos.
Este manual puede obtenerse en la Internet, en el sitio:
www.msanet.com.
En Amérique du Nord, pour contacter notre dépôt le plus proche,
composez le numéro gratuit 1-800-MSA-2222.
Pour contacter MSA International, composez le 1-412-967-3354 ou
1-800-MSA-7777
© MINE SAFETY APPLIANCES COMPANY 2006 - Tous droits
réservés.
Ce manuel est disponible sur Internet à www.msanet.com.
Manufactured by/Fabricado por/Fabriqué par
MSA NORTH AMERICA
P.O. Box 427, Pittsburgh, Pennsylvania 15230
(L) Rev 0 10077260

Altair®QuickCheckTM Station
Instruction Manual
In the U.S., to contact your nearest stocking location, dial toll-free 1-800-MSA-2222
To contact MSA International, dial 1-412-967-3354 or 1-800-MSA-7777
© MINE SAFETY APPLIANCES COMPANY 2006 - All Rights Reserved
This manual is available on the internet at www.msanet.com
Manufactured by
MSA NORTH AMERICA
P.O. Box 427, Pittsburgh, Pennsylvania 15230
(L) Rev 0 10077260

i
THIS MANUAL MUST BE CAREFULLY READ BY ALL INDIVIDUALS WHO HAVE OR WILL
HAVE THE RESPONSIBILITY FOR USING OR SERVICING THE PRODUCT. Like any piece of
complex equipment, this instrument will perform as designed only if it is used and serviced
in accordance with the manufacturer’s instructions. OTHERWISE, IT COULD FAIL TO PER-
FORM AS DESIGNED AND PERSONS WHO RELY ON THIS PRODUCT FOR THEIR SAFETY
COULD SUSTAIN SEVERE PERSONAL INJURY OR DEATH.
The warranties made by Mine Safety Appliances Company with respect to the product are
voided if the product is not used and serviced in accordance with the instructions in this
manual. Please protect yourself and others by following them. We encourage our customers
to write or call regarding this equipment prior to use or for any additional information relative
to use or service.
1. Read instruction manual completely before use.
2. Do not test other gases with the Cl/ClO2, NH3or HCN units. All Altair QuickCheck Station
units are only to be used with the specific gas for which they are labeled.
3. Use the QuickCheck Station only in non-hazardous environments.
4. Repair or alteration of the Altair QuickCheck Station, beyond the procedures described in
this manual or by anyone other than a person authorized by MSA, could cause the
instrument to fail to perform properly.
5. Use only genuine MSA replacement parts when performing any maintenance procedures
described in this manual. Substitution of components can seriously impair instrument
performance, alter intrinsic safety characteristics or void agency approvals.
FAILURE TO FOLLOW THESE WARNINGS CAN RESULT IN SERIOUS PERSONAL INJURY
OR DEATH.
""WARNING
""WARNING

ii
Table of Contents
Chapter 1, General Description . . . . . . . . . . . . . . . . . . . . . . . . . . . . . .1-1
Figure 1-1. Altair QuickCheck Station Components . . . . . . . . . . . . . . . . . . . . . . .1-1
Table 1-1. Altair QuickCheck Versions Available . . . . . . . . . . . . . . . . . . . . . . . . .1-2
Test Station Set-up . . . . . . . . . . . . . . . . . . . . . . . . . . . . . . . . . . . . . . . . . . . . . . . . . . . .1-3
Table 1-2. Necessary Gas Cylinder Concentrations . . . . . . . . . . . . . . . . . . . . . .1-3
Chapter 2, Operation . . . . . . . . . . . . . . . . . . . . . . . . . . . . . . . . . . . . . .2-1
Automatic Version . . . . . . . . . . . . . . . . . . . . . . . . . . . . . . . . . . . . . . . . . . . . . . . . . . . .2-1
Test Sequence . . . . . . . . . . . . . . . . . . . . . . . . . . . . . . . . . . . . . . . . . . . . . . . . . .2-1
Alarm Test: . . . . . . . . . . . . . . . . . . . . . . . . . . . . . . . . . . . . . . . . . . . . . . . . . . . . .2-1
Gas Test: . . . . . . . . . . . . . . . . . . . . . . . . . . . . . . . . . . . . . . . . . . . . . . . . . . . . . .2-1
Overall Pass/Fail Test: . . . . . . . . . . . . . . . . . . . . . . . . . . . . . . . . . . . . . . . . . . . .2-1
Manual Version . . . . . . . . . . . . . . . . . . . . . . . . . . . . . . . . . . . . . . . . . . . . . . . . . . . . . .2-1
Test Sequence . . . . . . . . . . . . . . . . . . . . . . . . . . . . . . . . . . . . . . . . . . . . . . . . . .2-1
Alarm Test: . . . . . . . . . . . . . . . . . . . . . . . . . . . . . . . . . . . . . . . . . . . . . . . . . . . . .2-1
Gas Test: . . . . . . . . . . . . . . . . . . . . . . . . . . . . . . . . . . . . . . . . . . . . . . . . . . . . . .2-1
Overall Pass/Fail Test: . . . . . . . . . . . . . . . . . . . . . . . . . . . . . . . . . . . . . . . . . . . .2-1
"CAUTION . . . . . . . . . . . . . . . . . . . . . . . . . . . . . . . . . . . . . . . . . . . . . . . . . . . . .2-1
Test Failure . . . . . . . . . . . . . . . . . . . . . . . . . . . . . . . . . . . . . . . . . . . . . . . . . . . . . . . . . .2-2
Important Operation Notes . . . . . . . . . . . . . . . . . . . . . . . . . . . . . . . . . . . . . . . . . . . . . .2-2
Chapter 3, Warranty, Maintenance and Troubleshooting . . . . . . . . .3-1
MSA Portable Instrument Warranty . . . . . . . . . . . . . . . . . . . . . . . . . . . . . . . . . . . . .3-1
Troubleshooting . . . . . . . . . . . . . . . . . . . . . . . . . . . . . . . . . . . . . . . . . . . . . . . . . . . . . .3-2
Table 3-1. Replacement and Accessory Parts . . . . . . . . . . . . . . . . . . . . . . . . . . .3-2
" WARNING . . . . . . . . . . . . . . . . . . . . . . . . . . . . . . . . . . . . . . . . . . . . . . . . . . . .3-2
Table 3-2.Troubleshooting Guidelines . . . . . . . . . . . . . . . . . . . . . . . . . . . . . . . . .3-3
Chapter 4, Specifications . . . . . . . . . . . . . . . . . . . . . . . . . . . . . . . . . . .4-1
Table 4-1. Specifications . . . . . . . . . . . . . . . . . . . . . . . . . . . . . . . . . . . . . . . . . . .4-1

Chapter 1,
General Description
• The Altair QuickCheck Station is designed to
test the Altair and Altair Pro Single Gas
Detectors, verifying:
• instrument response to gas (bump check)
• alarm functionality.
• The Test Station:
• uses a microphone
to detect the audible alarm
• electronically checks the instrument’s
visual LED alarm and
standard vibrating alarm
• tests the instrument’s response to a
known concentration of gas
• is compatible with:
• all three Altair Detector versions:
•CO,H
2S and O2
• Altair Pro Detector versions:
•O
2, CO, CO Steel, CO Fire,
H2S, HCN, Cl2,
ClO2, SO2, NO2and NH3
• has three LED indicators:
• Alarm Test LED
• Gas Test LED
• Pass/Fail and Confidence Pulse LED
(indicates unit is receiving power).
NOTE: The Altair and Altair Pro instruments
record the date, time, and result of a bump
test internally in their event recorder:
• 25 events are stored in the
Altair Detector
• 50 events are stored in the
Altair Pro Detector.
ITEM
NUMBER DESCRIPTION
1 REGULATOR (sold separately - manual version)
2 GAS CYLINDER (sold separately)
3 ALTAIR INSTRUMENT (sold separately)
4 TEST STATION HOUSING
5 ALARM TEST LED
6 GAS TEST LED
7 PASS/FAIL LED
Figure 1-1. Altair QuickCheck Station
Components
1
2
3
4
5
6
7
1-1

• TABLE 1-1 is a complete list of available
versions of the Altair Quickcheck station.
1-2
Table 1-1. Altair QuickCheck Versions Available
REGULATOR
GAS TYPE REGULATOR POWER SUPPLY PART NO. INCLUDED
O2 / CO / H2S /SO2 /NO2MANUAL NORTH AMERICAN POWER SUPPLY 10076692 NO
O2 / CO / H2S / SO2 / NO3AUTOMATIC NORTH AMERICAN POWER SUPPLY 10076704 YES
Cl2 / ClO2MANUAL NORTH AMERICAN POWER SUPPLY 10076701 NO
Cl2 / ClO2AUTOMATIC NORTH AMERICAN POWER SUPPLY 10076713 YES
NH3MANUAL NORTH AMERICAN POWER SUPPLY 10076695 NO
NH3AUTOMATIC NORTH AMERICAN POWER SUPPLY 10076707 YES
HCN MANUAL NORTH AMERICAN POWER SUPPLY 10076698 NO
HCN AUTOMATIC NORTH AMERICAN POWER SUPPLY 10076710 YES
O2 / CO / H2S / SO2 / NO2MANUAL GLOBAL POWER SUPPLY 10076693 NO
O2 / CO / H2S / SO2 / NO3AUTOMATIC GLOBAL POWER SUPPLY 10076705 YES
Cl2 / ClO2MANUAL GLOBAL POWER SUPPLY 10076702 NO
Cl2 / ClO2AUTOMATIC GLOBAL POWER SUPPLY 10076714 YES
NH3MANUAL GLOBAL POWER SUPPLY 10076696 NO
NH3AUTOMATIC GLOBAL POWER SUPPLY 10076708 YES
HCN MANUAL GLOBAL POWER SUPPLY 10076699 NO
HCN AUTOMATIC GLOBAL POWER SUPPLY 10076711 YES
O2 / CO / H2S / SO2 / NO2MANUAL AUSTRALIAN POWER SUPPLY 10076694 NO
O2 / CO / H2S / SO2 / NO3AUTOMATIC AUSTRALIAN POWER SUPPLY 10076706 YES
Cl2 / ClO2MANUAL AUSTRALIAN POWER SUPPLY 10076703 NO
Cl2 / ClO2AUTOMATIC AUSTRALIAN POWER SUPPLY 10076715 YES
NH3MANUAL AUSTRALIAN POWER SUPPLY 10076697 NO
NH3AUTOMATIC AUSTRALIAN POWER SUPPLY 10076709 YES
HCN MANUAL AUSTRALIAN POWER SUPPLY 10076700 NO
HCN AUTOMATIC AUSTRALIAN POWER SUPPLY 10076712 YES
NOTE:
For manual versions of the Altair QuickCheck Station, a manual regulator (P/N 467895) and
regulator tubing (P/N 10077384) must be purchased separately.

Test Station Set-up
1. Place the unit:
• on a level surface
• in an atmosphere with an ambient noise
level of 100 dB or less.
2. Test station power requirements are:
• 115-230 VAC 50-60 Hz input
(MSA power supply)
• 6 V output to the test station.
3. Connect power cord into the receptor
at the rear of the unit.
4. To connect tubing, attach:
• one end of tubing
to the regulator barb fitting
• other end of tubing
to the test station barb fitting.
5. Connect regulator to the necessary
gas cylinder.
• See TABLE 1-2 for necessary gas
cylinder concentrations.
• Only the specified gas concentrations
may be used with the Altair QuickCheck
Station.
1-3
Table 1-2.
Necessary Gas Cylinder Concentrations
GAS
ALTAIR / CONCENTRATION
ALTAIR PRO USED FOR CYLINDER PART
SENSORS QUICKCHECK TYPE NO.
H2S 40 ppm Econo-Cal 711062
40 ppm RP 467897
CO 60 ppm 100 LTRS Steel RP 710882
O25% 100 LTRS Steel RP 493580
NO210 ppm Econo-Cal 711068
10 ppm RP 808977
SO210 ppm Econo-Cal 711070
10 ppm RP 808978
NH325 ppm Econo-Cal 711078
25 ppm RP 814866
CL210 ppm Econo-Cal 711066
10 ppm RP 806740
CLO22 ppm Cl2Econo-Cal 711082
2 ppm Cl2RP 10028080
HCN 10 ppm Econo-Cal 711072
10 ppm RP 809351
• All Cylinders are: RP - 58 LTRS, 500 PSI
EC - 34 LTRS, 500 PSI
NOTE: Required gas concentrations
are also listed on the bottom of the test station.

Chapter 2,
Operation
Automatic Version
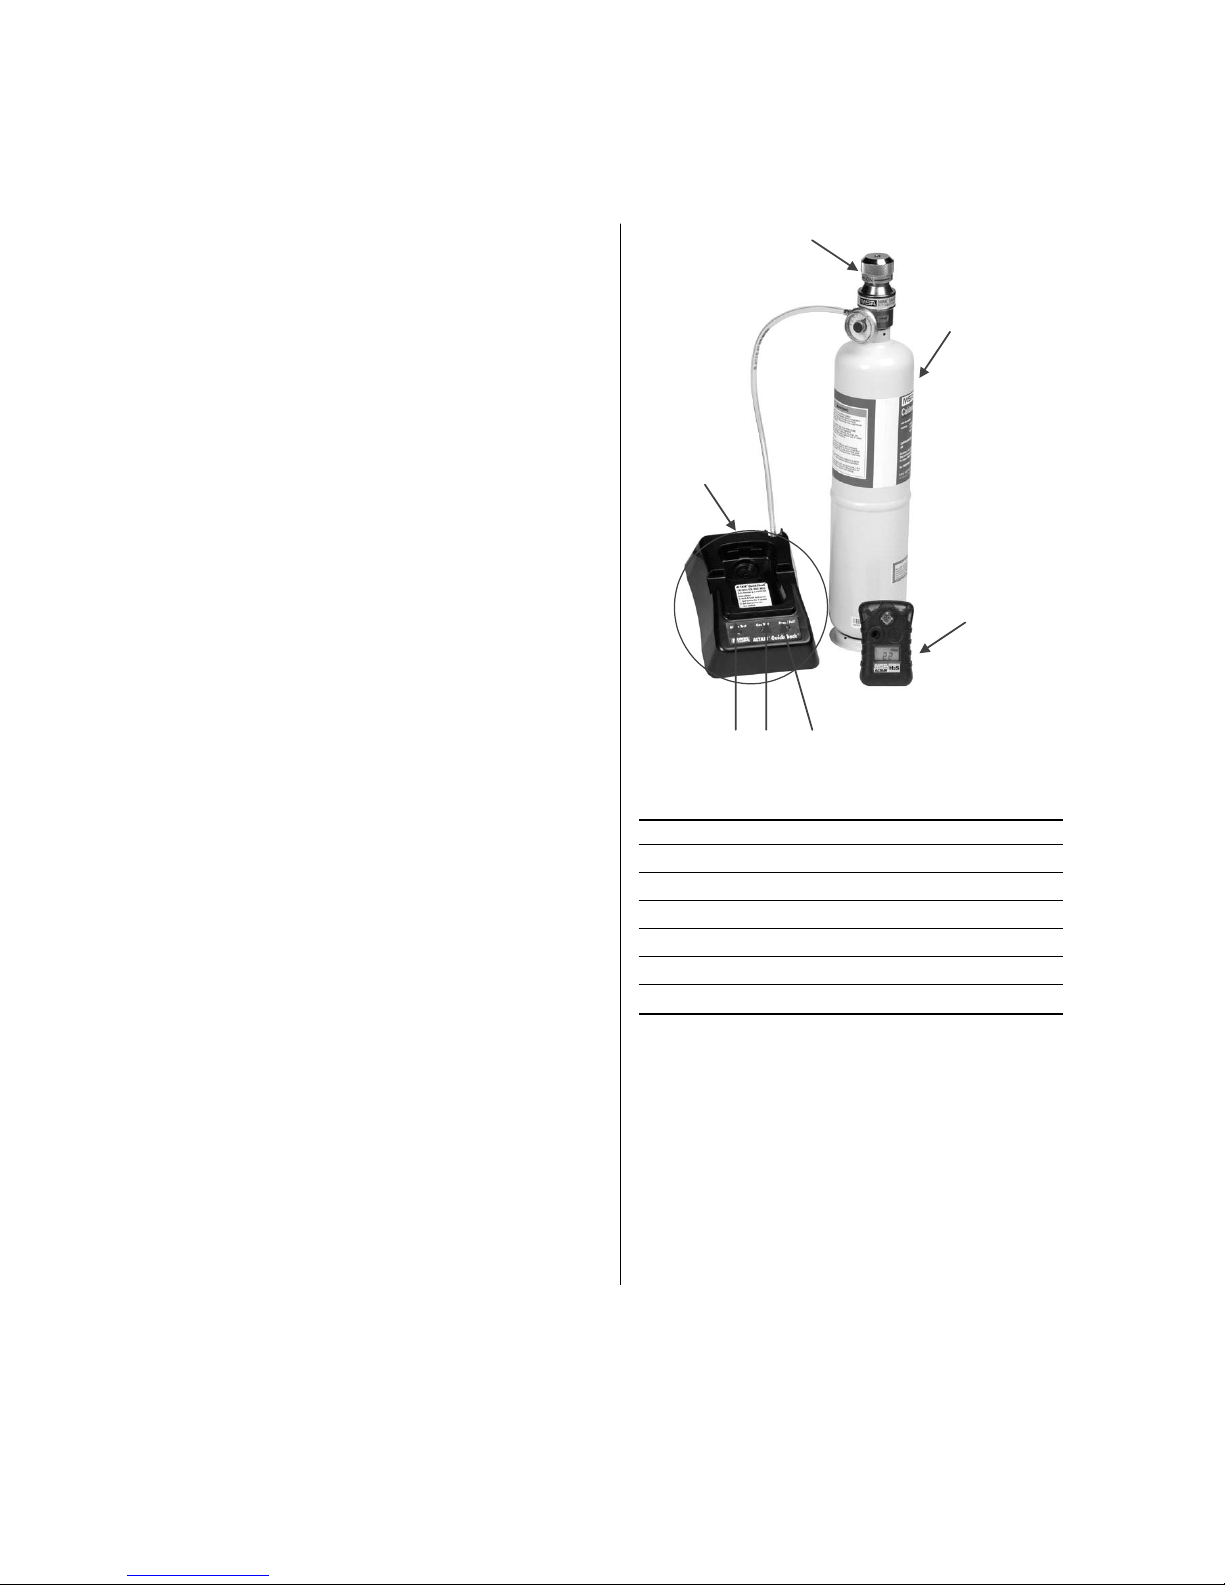
1. Verify that tubing is connected and
power is supplied.
• The Pass/Fail LED flashes green in 30-
second intervals, serving as a confidence
pulse to indicate that unit is powered.
2. Verify that automatic regulator is ON.
3. Hold down Altair or Altair Pro TEST button
for one second.
4. Insert instrument into the test station.
• The following test sequence occurs:
Test Sequence
Alarm Test
• checks for functionality of the three
alarms (audible, visual and vibrating)
• corresponds with "Alarm Test" LED
• LED flashes amber during test
• green LED indicates passing
• red LED indicates failure.
Gas Test
• verifies that sensor responds to gas
• corresponds with "Gas Test" LED
• LED flashes amber during test
• green LED indicates passing
• red LED indicates failure.
Overall Pass/Fail Test
• corresponds with "Pass/Fail" LED
• green LED indicates passing
• red LED indicates failure
• checkmark symbol appears on
instrument display when it is
successfully bump checked
• Failure of either of the two previous
tests results in an overall failure.
5. After a Pass/Fail indication is given, remove
instrument from the test station.
Manual Version
1. Verify tubing is connected and
power is supplied.
• The Pass/Fail LED flashes green in 30-
second intervals, serving as a confidence
pulse to indicate that unit is powered.
2. Hold down the instrument TEST button for
one second.
3. Insert the instrument into the test station.
4. Turn ON regulator.
• The following test sequence occurs:
Test Sequence
Alarm Test
• checks for functionality of the three
alarms (audible, visual and vibrating)
• corresponds with "Alarm Test" LED
• LED flashes amber during test
• green LED indicates passing
• red LED indicates failure.
Gas Test
• verifies that sensor responds to gas
• corresponds with "Gas Test" LED
• LED flashes amber during test
• green LED indicates passing
• red LED indicates failure.
Overall Pass/Fail Test
• corresponds with "Pass/Fail" LED
• green LED indicates passing
• red LED indicates failure
• checkmark symbol appears on
instrument display when it is
successfully bump checked
• Failure of either of the two previous
tests results in an overall failure.
5. After a Pass/Fail indication is given, remove
instrument from the test station.
6. Turn OFF the regulator.
Failure to turn OFF the regulator will
drain the gas cylinder.
""CAUTION
2-1

Test Failure
• If the detector fails the gas test, recalibrate
instrument and perform another bump test.
• See Chapter 3, TABLE 3-2,
"Troubleshooting Guidelines" if:
• the detector fails the Alarm Test or
• the detector continues to fail the
bump test.
Important Operation Notes
1. The audible alarm is not checked on ALTAIR
units with Software Version 1.0.
2. If an instrument is removed from the test
station before test completion, the:
• instrument is not properly bump tested
• test fails
• checkmark symbol does not appear
on instrument display.
3. The LEDs automatically turn OFF if the
instrument is left in the cradle for more than
30 seconds after a passed test.
4. Alarms disabled with FiveStar®Link Software
will not be tested by the QuickCheck Station;
the test station will view these as passing.
5. A failed or aborted test removes the
checkmark symbol from the
instrument display.
6. A checkmark on the instrument display
indicates a passed test.
7. If instrument is not seated completely in the
cradle, the test cannot start.
8. If the gas cylinder is depleted, the test fails.
9. Testing time may vary based on:
• instrument software version
• sensor condition.
2-2

Chapter 3,
Warranty, Maintenance
and Troubleshooting
3-1
MSA Portable Instrument Warranty
1. Warranty - MSA warrants that this product will be free from mechanical defects and faulty
workmanship for a period of two (2) years from date of manufacture, provided it is
maintained and used in accordance with MSA's instructions and/or recommendations. MSA
shall be released from all obligations under this warranty in the event repairs or
modifications are made by persons other than its own or authorized service personnel or if
the warranty claim results from physical abuse or misuse of the product. No agent,
employee or representative of MSA has any authority to bind MSA to any affirmation,
representation or warranty concerning the goods sold under this contract. THIS
WARRANTY IS IN LIEU OF ALL OTHER WARRANTIES, EXPRESSED, IMPLIED OR
STATUTORY, AND IS STRICTLY LIMITED TO THE TERMS HEREOF. SELLER SPECIFICALLY
DISCLAIMS ANY WARRANTY OF MERCHANTABILITY OR OF FITNESS FOR A PARTICULAR
PURPOSE.
2. Exclusive Remedy - It is expressly agreed that Purchaser's sole and exclusive remedy for
breach of the above warranty, for any tortious conduct of MSA, or for any other cause of
action, shall be the repair and/or replacement at MSA's option, of any equipment or parts
thereof, which after examination by MSA is proven to be defective. Replacement equipment
and/or parts will be provided at no cost to Purchaser, F.O.B. MSA's Plant. Failure of MSA to
successfully repair any nonconforming product shall not cause the remedy established
hereby to fail of its essential purpose.
3. Exclusion of Consequential Damage - Purchaser specifically understands and agrees that
under no circumstances will MSA be liable to Purchaser for economic, special, incidental or
consequential damages or losses of any kind whatsoever, including but not limited to, loss
of anticipated profits and any other loss caused by reason of non-operation of the goods.
This exclusion is applicable to claims for breach of warranty, tortious conduct or any other
cause of action against MSA.

Maintenance
Clean with a damp rag only when
unit is unplugged. Allow to dry before
providing power to the unit.
Troubleshooting
• The Altair QuickCheck Station operates
reliably when handled properly.
• If the unit becomes inoperative, refer to the
TABLE 3-2 Troubleshooting Guidelines,
which indicate the most likely causes of
a problem.
• Inoperative units that are under warranty may
be returned to:
•MSA Instrument Division
Repair and Service Department
1000 Cranberry Woods Drive
Cranberry Township, PA 16066-5207
1-800-MSA-INST
• To contact MSA International, call:
•1-412-967-3000 or
• 1-800-MSA-7777.
Repair or alteration of the Altair
QuickCheck Station, beyond the pro-
cedures described in this manual or
by anyone other than a person
authorized by MSA, could cause the
unit to fail to perform properly. Use
only genuine MSA replacement parts
when performing any maintenance
procedures described in this manual.
Substitution of components can seri-
ously impair performance of the unit,
alter intrinsic safety characteristics or
void agency approvals.
FAILURE TO FOLLOW THIS WARN-
ING CAN RESULT IN SERIOUS PER-
SONAL INJURY OR DEATH.
Table 3-1. Replacement and Accessory Parts
PART PART NO.
North American Power Supply 10047342
European Power Supply 10047343
International Power Supply 10058037
Vehicle Power Supply 10049410
Regulator Tubing 10077384
Front Housing Assembly 10077385
Automatic-Gas Regulator 10075893
Manual Regulator 467895
""WARNING
""WARNING
3-2

3-3
Table 3-2. Troubleshooting Guidelines
PROBLEM POSSIBLE CAUSE SOLUTION
Alarm Test Failure QuickCheck Station alarm chamber Check for contamination in alarm chamber on Quick-
plugged with dirt or debris Check Station and in Altair Detector; clean as needed
Alarm nonfunctional Press instrument TEST button; if no sound occurs
during alarm check, contact MSA for replacement
Instrument LEDs LEDs nonfunctional Press instrument TEST button; if LEDs are
activated, but nonfunctional, contact MSA for replacement
LEDs do not light
during Alarm Test
Vibrating alarm Vibrator Alarm non-functional Press instrument TEST button; if vibrator alarm is
is activated on nonfunctional, contact MSA for replacement
instrument, but it
does not vibrate
during Alarm test
Gas Test Failure No gas in calibration cylinder Check pressure gage on calibration cylinder
Instrument requires calibration Calibrate instrument per MSA recommendations
Calibration cylinder tubing improperly installed Verify tubing is fully connected to QuickCheck
Station fitting
QuickCheck station gas delivery outlet Clean gas delivery outlet
plugged with dirt
Altair Instrument inlet is blocked Check for blockage and remove if necessary
Wrong calibration cylinder Verify that calibration cylinder is the same gas type as
the Altair instrument
Wrong calibration gas concentration Check manual and calibration cylinder for
proper concentration
Regulator closed Ensure regulator is opened or turned ON before
placing the instrument into the QuickCheck Station
Expired Cylinder Check expiration date of calibration cylinder;
replace if necessary
Incorrect regulator Verify that QuickCheck Station is used with
the recommended regulator
QuickCheck not QuickCheck Station not powered Check power connections to QuickCheck Station
responding to
Altair instrument
Altair instrument button pressed for less than Remove instrument; press and hold TEST button for
one second prior to instrument placement in one full second before placing instrument into
QuickCheck Station QuickCheck Station
Instrument not fully seated Fully seat instrument in QuickCheck Station
No checkmark Instrument removed prior to test completion Re-test instrument
appears on Altair
instrument after
a bump test

Chapter 4,
Specifications
4-1
Table 4-1. Specifications
FOR USE WITH ALTAIR
SINGLE-GAS DETECTOR All versions
ALTAIR PRO
SINGLE-GAS DETECTOR O2, H2S, CO, CO Fire, CO Steel, SO2, NO2, CL2, CLO2, NH3, and HCN
TESTS PERFORMED Visual alarm activation
Vibrating alarm activation
Audible alarm activation and verification
Sensor response to gas
General pass fail indication
VISUAL INDICATORS LED INDICATORS FOR ALARM TEST, GAS TEST, AND GENERAL PASS/FAIL
FLASHING AMBER Test in in progress
SOLID RED Failed Test
SOLID GREEN Passed Test
CHECKMARK Displays on ALTAIR instrument for 24-hours following a passed test
VERSIONS
AVAILABLE MANUAL Features a .25 lpm manual regulator that user turns ON during testing
AUTOMATIC Features a .25 lpm automatic regulator that pulls gas as it is needed
TESTING TIME AVERAGE Less than 30 seconds
DIMENSIONS 2" h x 4-¾ " w x 6-½ " l (5.1 cm x 12.1 cm x 16.5 cm)
WEIGHT 8.6 oz. (245 g)
POWER SUPPLY
REQUIREMENTS 115/230 VAC, 50/60 Hz.
OPERATING
TEMPERATURE 32º F to +104ºF (0ºC to +40ºC)

Estación Altair®QuickCheckTM
Manual de Instrucciones
Para comunicarse con el lugar de abastecimiento más cercano en los EE.UU., llame gratis al 1-800-MSA-2222.
Para comunicarse con MSA International, llame al 1-412-967-3354 ó 1-800-MSA-7777.
© MINE SAFETY APPLIANCES COMPANY 2006. Se reservan todos los derechos.
Este manual puede obtenerse en la Internet, en el sitio: www.msanet.com.
Fabricado por:
MSA NORTH AMERICA
P.O. Box 427, Pittsburgh, Pennsylvania 15230
(L) Rev. 0 10077260

i
ESTE MANUAL DEBE LEERSE DETENIDAMENTE POR TODOS AQUELLOS INDIVIDUOS QUE
TENGAN O QUE VAYAN A TENER LA RESPONSABILIDAD DE USAR EL PRODUCTO O
PRESTARLE SERVICIO. Como con cualquier equipo complejo, este instrumento sólo
funcionará según su diseño si se instala, utiliza y da servicio de acuerdo a las instrucciones
del fabricante. DE LO CONTRARIO, EL EQUIPO PUEDE DEJAR DE FUNCIONAR CONFORME
A SU DISEÑO Y LAS PERSONAS CUYA SEGURIDAD DEPENDE DE ESTE PRODUCTO
PUEDEN SUFRIR LESIONES PERSONALES GRAVES O LA MUERTE.
Las garantías que Mine Safety Appliances Company da a este producto quedarán invalidadas
si el mismo no se utiliza ni se le da mantenimiento de acuerdo con las instrucciones que
aparecen en este manual. Protéjase personalmente y proteja a los además siguiendo dichas
instrucciones. Exhortamos a nuestros clientes a que nos escriban o llamen si tienen dudas
sobre el equipo antes de usarlo o para obtener cualquier información adicional relacionada
con el uso o el servicio del mismo.
1. Lea el Manual de Instrucciones completamente antes de usar la unidad.
2. Con las unidades de Cl/ClO2, NH3o HCN no pruebe otros gases. Todas las unidades de
Estación Altair QuickCheck deben usarse solamente con el gas específico indicado en sus
etiquetas.
3. Use la Estación QuickCheck solamente en medios que no sean peligrosos.
4. La reparación o alteración de la Estación Altair QuickCheck más allá de los procedimientos
descritos en este manual o por cualquier persona no autorizada por MSA, podría causar que
el instrumento no funcione adecuadamente.
5. Cuando realice cualquier procedimiento de mantenimiento descrito en este manual, use
únicamente piezas de repuesto originales de MSA. La substitución de componentes puede
dañar seriamente el funcionamiento del instrumento, puede alterar las características de
seguridad intrínsecas o puede violar las aprobaciones de las agencias.
EL INCUMPLIMIENTO CON ESTAS ADVERTENCIAS PUEDE RESULTAR EN UNA LESIÓN
PERSONAL GRAVE O LA MUERTE.
ADVERTENCIA
ADVERTENCIA

ii
Índice
Capítulo 1: Descripción general . . . . . . . . . . . . . . . . . . . . . . . . . . . . .1-1
Figura 1-1: Componentes de la Estación Altair QuickCheck . . . . . . . . . . . . . . . . . . .1-1
Tabla 1-1: Versiones disponibles del Altair QuickCheck . . . . . . . . . . . . . . . . . . . . . .1-2
Configuración de la estación de prueba . . . . . . . . . . . . . . . . . . . . . . . . . . . . . . . . . . . . . . .1-3
Tabla 1-2: Concentraciones del cilindro de gas necesario . . . . . . . . . . . . . . . . . . . . .1-3
Capítulo 2: Operación . . . . . . . . . . . . . . . . . . . . . . . . . . . . . . . . . . . . .2-1
Versión automática . . . . . . . . . . . . . . . . . . . . . . . . . . . . . . . . . . . . . . . . . . . . . . . . . . . . . . .2-1
Secuencia de prueba . . . . . . . . . . . . . . . . . . . . . . . . . . . . . . . . . . . . . . . . . . . . . . . . .2-1
Prueba de alarmas . . . . . . . . . . . . . . . . . . . . . . . . . . . . . . . . . . . . . . . . . . . . . . . . . . .2-1
Prueba de gas . . . . . . . . . . . . . . . . . . . . . . . . . . . . . . . . . . . . . . . . . . . . . . . . . . . . . .2-1
Prueba general pasar/no pasar . . . . . . . . . . . . . . . . . . . . . . . . . . . . . . . . . . . . . . . .2-1
Versión manual . . . . . . . . . . . . . . . . . . . . . . . . . . . . . . . . . . . . . . . . . . . . . . . . . . . . . . . . . .2-1
Secuencia de prueba . . . . . . . . . . . . . . . . . . . . . . . . . . . . . . . . . . . . . . . . . . . . . . . . .2-1
Prueba de alarmas . . . . . . . . . . . . . . . . . . . . . . . . . . . . . . . . . . . . . . . . . . . . . . . . . . .2-1
Prueba de gas . . . . . . . . . . . . . . . . . . . . . . . . . . . . . . . . . . . . . . . . . . . . . . . . . . . . . .2-1
Prueba general pasar/no pasar . . . . . . . . . . . . . . . . . . . . . . . . . . . . . . . . . . . . . . . .2-1
CUIDADO . . . . . . . . . . . . . . . . . . . . . . . . . . . . . . . . . . . . . . . . . . . . . . . . . . . . . . . .2-1
Falla de prueba . . . . . . . . . . . . . . . . . . . . . . . . . . . . . . . . . . . . . . . . . . . . . . . . . . . . . . . . . .2-2
Notas importantes sobre el funcionamiento . . . . . . . . . . . . . . . . . . . . . . . . . . . . . . . . . . . .2-2
Capítulo 3: Garantía, mantenimiento y detección
y reparación de averías . . . . . . . . . . . . . . . . . . . . . . . . . . . . . . . . . . . .3-1
Garantía de instrumentos portátiles de MSA . . . . . . . . . . . . . . . . . . . . . . . . . . . . . . . . . . .3-1
Detección y reparación de averías . . . . . . . . . . . . . . . . . . . . . . . . . . . . . . . . . . . . . . . . . . .3-2
Tabla 3-1: Piezas de repuesto y accesorios . . . . . . . . . . . . . . . . . . . . . . . . . . . . . . . .3-2
ADVERTENCIA . . . . . . . . . . . . . . . . . . . . . . . . . . . . . . . . . . . . . . . . . . . . . . . . . . .3-2
Tabla 3-2: Pautas para la detección y reparación de averías . . . . . . . . . . . . . . . . . .3-3
Capítulo 4: Especificaciones . . . . . . . . . . . . . . . . . . . . . . . . . . . . . . . .4-1
Tabla 4-1: Especificaciones . . . . . . . . . . . . . . . . . . . . . . . . . . . . . . . . . . . . . . . . . . . .4-1

Capítulo 1:
Descripción general
• La Estación de Comprobación Rápida “Altair
QuickCheck” está diseñada para probar en
los detectores de un gas Altair y Altair Pro lo
siguiente:
• La respuesta del instrumento al gas
(revisión del funcionamiento)
• El funcionamiento de las alarmas.
• La estación de prueba:
• Usa un micrófono para detectar la alarma
audible
• Revisa electrónicamente la alarma LED
visual y la alarma de vibración estándar
del instrumento
• Comprueba la respuesta del instrumento
a una concentración de gas ya conocida.
• Es compatible con:
• Todas las tres versiones del Detector
Altair.
• CO, H2S y O2
• Las versiones del Detector Altair Pro:
•O
2, CO, CO en acero, CO en
incendios, H2S, HCN, Cl2,
ClO2, SO2, NO2y NH3
• dispone de tres indicadores LED:
• Un LED de prueba de alarmas
• Un LED de prueba del gas
• Un LED de pasar/no pasar prueba y
pulso de confianza (que indica si la
unidad está recibiendo potencia).
NOTA: Los instrumentos Altair y Altair Pro graban
internamente la fecha, la hora y los resul-
tados de una prueba de funcionamiento en
sus grabadoras de sucesos:
• En el Detector Altair se almacenan
25 sucesos.
• En el Detector Altair Pro se almacenan
50 sucesos.
1-1
1
2
3
4
5
6
7
ÍTEM
NÚMERO DESCRIPCIÓN
1 REGULADOR (vendido por separado -
versión manual)
2 CILINDRO DE GAS (vendido por separado)
3 INSTRUMENTO ALTAIR (vendido por separado)
4 CAJA DE PROTECCIÓN DE LA ESTACIÓN DE
PRUEBA
5 LED DE PRUEBA DE ALARMAS
6 LED DE PRUEBA DEL GAS
7 LED DE PASAR/NO PASAR
Figura 1-1: Componentes de la Estación
Altair QuickCheck

•La TABLA 1-1 contiene una lista completa de
las versiones disponibles de la estación Altair
Quickcheck.
1-2
Tabla 1-1: Versiones disponibles del Altair QuickCheck
NO. DE REGULADOR
TIPO DE GAS REGULADOR FUENTE DE ALIMENTACIÓN PIEZA INCLUIDO
O2/ CO / H2S /SO2/NO2MANUAL FUENTE DE ALIMENTACIÓN 10076692 NO
PARA AMÉRICA DEL NORTE
O2/ CO / H2S / SO2/ NO3AUTOMÁTICA FUENTE DE ALIMENTACIÓN 10076704 SÍ
PARA AMÉRICA DEL NORTE
Cl2/ ClO2MANUAL FUENTE DE ALIMENTACIÓN 10076701 NO
PARA AMÉRICA DEL NORTE
Cl2/ ClO2AUTOMÁTICA FUENTE DE ALIMENTACIÓN 10076713 SÍ
PARA AMÉRICA DEL NORTE
NH3MANUAL FUENTE DE ALIMENTACIÓN 10076695 NO
PARA AMÉRICA DEL NORTE
NH3AUTOMÁTICA FUENTE DE ALIMENTACIÓN 10076707 SÍ
PARA AMÉRICA DEL NORTE
HCN MANUAL FUENTE DE ALIMENTACIÓN 10076698 NO
PARA AMÉRICA DEL NORTE
HCN AUTOMÁTICA FUENTE DE ALIMENTACIÓN 10076710 SÍ
PARA AMÉRICA DEL NORTE
O2/ CO / H2S / SO2/ NO2MANUAL FUENTE DE ALIMENTACIÓN MUNDIAL 10076693 NO
O2/ CO / H2S / SO2/ NO3AUTOMÁTICA FUENTE DE ALIMENTACIÓN MUNDIAL 10076705 SÍ
Cl2/ ClO2MANUAL FUENTE DE ALIMENTACIÓN MUNDIAL 10076702 NO
Cl2/ ClO2AUTOMÁTICA FUENTE DE ALIMENTACIÓN MUNDIAL 10076714 SÍ
NH3MANUAL FUENTE DE ALIMENTACIÓN MUNDIAL 10076696 NO
NH3AUTOMÁTICA FUENTE DE ALIMENTACIÓN MUNDIAL 10076708 SÍ
HCN MANUAL FUENTE DE ALIMENTACIÓN MUNDIAL 10076699 NO
HCN AUTOMÁTICA FUENTE DE ALIMENTACIÓN MUNDIAL 10076711 SÍ
O2/ CO / H2S / SO2/ NO2MANUAL FUENTE DE ALIMENTACIÓN AUSTRALIANA 10076694 NO
O2/ CO / H2S / SO2/ NO3AUTOMÁTICA FUENTE DE ALIMENTACIÓN AUSTRALIANA 10076706 SÍ
Cl2/ ClO2MANUAL FUENTE DE ALIMENTACIÓN AUSTRALIANA 10076703 NO
Cl2/ ClO2AUTOMÁTICA FUENTE DE ALIMENTACIÓN AUSTRALIANA 10076715 SÍ
NH3MANUAL FUENTE DE ALIMENTACIÓN AUSTRALIANA 10076697 NO
NH3AUTOMÁTICA FUENTE DE ALIMENTACIÓN AUSTRALIANA 10076709 SÍ
HCN MANUAL FUENTE DE ALIMENTACIÓN AUSTRALIANA 10076700 NO
HCN AUTOMÁTICA FUENTE DE ALIMENTACIÓN AUSTRALIANA 10076712 SÍ
NOTA:
Para las versiones manuales de la Estación Altair QuickCheck, se debe comprar por
separado un regulador manual (N/P 467895) y un tubo de regulador (N/P 10077384).

Configuración de la estación
de prueba
1. Coloque la unidad:
• sobre una superficie nivelada
• en una atmósfera con un nivel de ruido
ambiental de 100 dB o menos.
2. Los requisitos de potencia para la estación de
prueba son:
• Alimentación de 115-230 VCA 50-60 Hz
(fuente de alimentación de MSA)
• Salida de 6 V hacia la estación de prueba.
3. Conecte el cordón eléctrico al receptor que
está en la parte posterior de la unidad.
4. Para conectar el tubo:
• Conecte un extremo del tubo al accesorio
dentado del regulador.
• Y el otro extremo del tubo al accesorio
dentado de la estación de prueba.
5. Conecte el regulador al cilindro de
gas necesario.
• Consulte la TABLA 1-2 para las
concentraciones del cilindro de gas
necesario.
• Con la Estación Altair QuickCheck se puede
usar solamente las concentraciones de gas
especificadas.
1-3
Tabla 1-2:
Concentraciones del cilindro de gas necesario
CONCENTRACIÓN
SENSORES DE GAS
ALTAIR/ USADA PARA TIPO DE NO. DE
ALTAIR PRO QUICKCHECK CILINDRO PIEZA
H2S 40 ppm Econo-Cal 711062
40 ppm RP 467897
CO 60 ppm 100 LITROS RP Acero 710882
O25% 100 LITROS RP Acero 493580
NO210 ppm Econo-Cal 711068
10 ppm RP 808977
SO210 ppm Econo-Cal 711070
10 ppm RP 808978
NH325 ppm Econo-Cal 711078
25 ppm RP 814866
CL210 ppm Econo-Cal 711066
10 ppm RP 806740
CLO22 ppm Cl2Econo-Cal 711082
2 ppm Cl2RP 028080
HCN 10 ppm Econo-Cal 711072
10 ppm RP 809351
• Todos los cilindros son: RP - 58 LITROS, 500 PSI
EC - 34 LITROS, 500 PSI
NOTA: Las concentraciones de gas requeridas también se
encuentran listadas en la parte de abajo de la estación
de prueba.

Capítulo 2:
Operación
Versión automática
1. Verifique que el tubo esté conectado y que haya
suministro de electricidad.
• El LED “PASS/FAIL” de pasar/no pasar la
prueba destella en verde en intervalos de
30 segundos, lo que sirve como un pulso
de confianza que indica que la unidad está
encendida.
2. Verifique que el regulador automático esté
ENCENDIDO.
3. Mantenga presionado el botón de PRUEBA del
Altair o Altair Pro por un segundo.
4. Inserte el instrumento en la estación de prueba.
• Se producirá la siguiente secuencia de
prueba:
Secuencia de prueba
Prueba de alarmas
• Revisa el funcionamiento de las tres
alarmas (audible, visual y vibratoria)
• Corresponde al LED de “prueba de
alarmas”.
• El LED destella en color ámbar durante la
prueba
• Un LED verde indica que ha pasado la
prueba
• Un LED rojo indica que no ha pasado la
prueba.
Prueba de gas
• Verifica que el sensor responde ante el gas
• Corresponde al LED de “prueba de gas”.
• El LED destella en color ámbar durante la
prueba
• Un LED verde indica que ha pasado la
prueba
• Un LED rojo indica que no ha pasado la
prueba.
Prueba general de pasar/no pasar:
• Corresponde al LED PASS/FAIL (pasar/no
pasar) la prueba
• Un LED verde indica que ha pasado la
prueba
• Un LED rojo indica que no ha pasado la
prueba.
• En la pantalla del instrumento aparece
un símbolo de palomita cuando se ha
realizado exitosamente una prueba de
funcionamiento.
• La falla de cualquiera de las dos
pruebas previas resultará en una falla
general.
5. Después que se da una indicación de Pasar/
No pasar, quite el instrumento de la estación
de prueba.
Versión manual
1. Verifique que el tubo esté conectado y que
haya suministro de electricidad.
• El LED “PASS/FAIL” de pasar/no pasar la
prueba destella en verde en intervalos de
30 segundos, lo que sirve como un pulso
de confianza que indica que la unidad está
encendida.
2. Mantenga presionado el botón PRUEBA del
instrumento por un segundo.
3. Inserte el instrumento en la estación de prueba.
4. ENCIENDA el regulador.
• Se producirá la siguiente secuencia de
prueba:
Secuencia de prueba
Prueba de alarmas
• Revisa el funcionamiento de las tres
alarmas (audible, visual y vibratoria)
• Corresponde al LED de “prueba de
alarmas”.
2-1
Other manuals for Altair QuickCheck Station
1
Table of contents
Languages:
Other MSA Test Equipment manuals

MSA
MSA Multitest plus Console User manual

MSA
MSA SafEye Xenon 800 Series User manual

MSA
MSA galaxy GX2 User manual

MSA
MSA General Monitors TL105 User manual

MSA
MSA FlameGard 5 Test Lamp User manual

MSA
MSA Altair QuickCheck Station User manual

MSA
MSA galaxy GX2 User manual

MSA
MSA General Monitors SB100 User manual

MSA
MSA Airetool GT Series Instruction and safety manual

MSA
MSA ALTAIR Pump Probe User manual