Nav TV MOST-HUR MB User manual

MOST-HUR MB (OPTI-1)
Mercedes Head Unit Replacement Interface
NTV-KIT421
DS, BM
04/15/14
NTV-DOC141
rB6
3950 NW 120th Ave, Coral Springs, FL 33065 TEL 561-955-9770 FAX 561-955-9760

DS, BM
4/15/14
NTV-DOC141
rB6
Agreement: End user agrees to use this product in compliance with all State and Federal laws. NAV-TV Corp. would not be held liable for
misuse of its product. If you do not agree, please discontinue use immediately and return product to place of purchase. This product is
intended for off-road use and passenger entertainment only.
2 | P a g e
Overview
NAV-TV’s OPTI-1 is a radio replacement interface for compatible Mercedes Benz vehicles
equipped with an external M.O.S.T. fiber optic amplifier. The module allows the factory
amplifier, speakers and sound quality to be retained when adding a modern aftermarket radio.
Other components in the factory system, such as a CD changer, satellite radio, telephone
module, DVD player, or any other factory component in the M.O.S.T loop, will not function after
the installation.
Kit Contents
Vehicles with M.O.S.T. amplifier:
2005-2008 CLS/SL/SLK, 2003-2008 E, 2004-2006 S, CL
To confirm compatibility, remove the radio. With a CD playing in the radio, NOT in an external
changer, remove the M.O.S.T fiber optic cable from the radio harness (see pictures below). If all
sound goes away completely and the model and year is listed above, the vehicle is compatible
with the OPTI-1. It is important to properly validate the vehicle prior to installation, especially in
SLK vehicles.
OPTI-1 Interface pin outs
Vehicle Compatibility
Pin #
Description
Color
1
12v (+) Constant IN
Red
2
12v Remote (+) IN
Blue
3
[Common] Audio Shield
Gray
7
Ground IN (-)
Black
8
Right Audio IN (+)
--
9
Left Audio IN (+)
--
Wire Side
Power/Signal Harness
NTV-HAR012
MOST Fiber Optic Coupler
NTV-CON002
OPTI-1 Interface
NTV-ASY149

DS, BM
4/15/14
NTV-DOC141
rB6
Agreement: End user agrees to use this product in compliance with all State and Federal laws. NAV-TV Corp. would not be held liable for
misuse of its product. If you do not agree, please discontinue use immediately and return product to place of purchase. This product is
intended for off-road use and passenger entertainment only.
3 | P a g e
OPTI-1 Installation
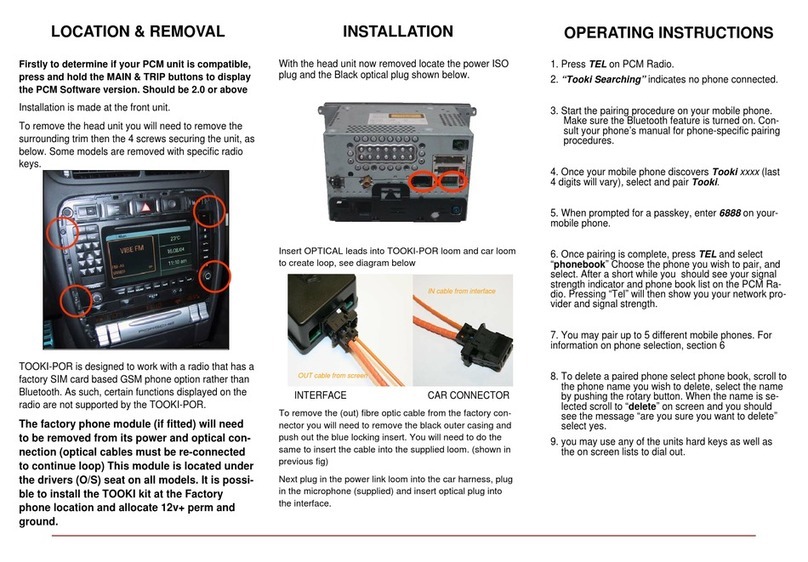
1. S CLASS, CL, SL Vehicles: You must decode the voice recognition from the car via a local
dealer before removing the COMMAND radio.
2. ALL VEHICLES: Base-line the factory COMMAND radio:
a. Adjust the volume to a comfortable listening level
b. Tune the radio to an AM station (otherwise you may lose AM tuning ability)
c. Be certain the MUTE function is not enabled
d. Center the balance and fade, center the bass and treble
e. Be certain there are no other problems with the factory MOST system before
installing this unit.
3. Remove the COMMAND radio.
4. Disconnect the power harness from the back of the COMAND and remove the optic
cable inner plug by gently prying the retaining clip back with a pick tool (see FIG 1 & 2
below)
5. Insert the optic cable inner plug into the provided M.O.S.T. outer coupler (see FIG 3 & 4
below) and plug the completed new assembly into the fiber optic input of the OPTI-1.
FIG 1: CLS, E, SLK Factory MOST Plug
FIG 2: CL, S, SL Factory MOST Plug
FIG 3: Fiber cable removed from factory plug
FIG 4: Optics installed in the provided coupler

DS, BM
4/15/14
NTV-DOC141
rB6
Agreement: End user agrees to use this product in compliance with all State and Federal laws. NAV-TV Corp. would not be held liable for
misuse of its product. If you do not agree, please discontinue use immediately and return product to place of purchase. This product is
intended for off-road use and passenger entertainment only.
4 | P a g e
6. Connect the following wires from the provided Power/Signal Harness:
Pin #, Color
Description
Connect to:
7
Black
Ground (-)
Ground (-) @ Radio Harness
1
Red
Constant 12v (+)
12v (+) Constant Power
2
Blue
Remote in 12v (+)
Remote OUT from radio (blue/white)
7. Connect a full range RCA output from the aftermarket radio and connect it to the RCA
inputs of the OPTI-1. Note: A short RCA cable is sometimes needed in order to position
the OPTI-1 in a location that does not hinder the depth of the radio opening.
8. Plug the OPTI-1 power harness in the unit and proceed to the next section ‘Radio &
antenna connections’
Radio & Antenna connections
1. Refer to the installation guide from the aftermarket head unit for wiring information.
2. The constant power from the aftermarket head unit (Usually yellow) must be connected
to a circuit that can supply the radio with sufficient current (check the specifications in
the radio installation manual. Usually the demand does not exceed 10 to 15 AMPS.)
Suggested connection points are the driver’s side dash fuse box on E, CLS and SLK
vehicles, the front or rear fuse box on S and CL vehicles and from the rear fuse and
distribution block on the SL (There are two clips on the false door cover that will allow
access to the fuse and distribution block on the SL). MAKE SURE THAT YOU FUSE THE
CONSTANT POWER CONNECTION PROPERLY!
3. Connect the accessory wire from the aftermarket deck (usually red) to the front
cigarette lighter accessory power (black or red with a stripe). Use a multi meter to verify
accessory at this location prior to making a connection.
4. Connect the ground (usually black) from the aftermarket radio harness to the ground
(brown) wire at the front cigarette lighter.
5. Connect the illumination or dimmer wire from the aftermarket power harness (usually
orange or orange/white) to the illumination wire at the front cigarette lighter (grey with
a blue stripe). Use a multi meter to verify the wire is illumination prior to making a
connection.

DS, BM
4/15/14
NTV-DOC141
rB6
Agreement: End user agrees to use this product in compliance with all State and Federal laws. NAV-TV Corp. would not be held liable for
misuse of its product. If you do not agree, please discontinue use immediately and return product to place of purchase. This product is
intended for off-road use and passenger entertainment only.
5 | P a g e
6. The AM/FM antenna is located at the audio gateway (AGW). To interface with the
factory AM/FM antenna you must use an antenna adapter (Metra 40-EU10, not
provided) as well as an antenna extension harness (not provided) which must be run
from the AGW to the front of the vehicle and into the antenna input of the aftermarket
radio. The location of the AGW varies in each vehicle. The AGW in the SL is located
behind the driver’s seat in the side panel. On the E & CLS class it is in the driver’s side of
the trunk behind the carpet and sandwiched between the outer skin and trunk support.
On the S & CL class the AGW is located in the driver’s side trunk behind the carpet and
on the door. The AGW in the SLK is located in the front of the vehicle below the
passenger foot well.
Dash Kits, radio mounting and not included accessories
NAV-TV recommends professional installation of this product using MECP accepted
practices. Dash kits, either pre-made or custom fabricated, as well as the required and optional
non included accessories, are available through specialty aftermarket professionals world-wide.
For a recommended dealer in your area please call our sales and support team at 1-866-477-
3336 (toll free USA and Canada) or 1-561-955-9770 (international and locally). NAV-TV does not
cover technical support for dash kits and or custom mounting options, please consult with your
local recommended specialist.
FAQs
Q1: The OPTI-1 works fine on AM/FM but as soon as I put a CD or DVD in the unit all sound
goes away.
A1: Some aftermarket head units have an amplifier turn on wire as well as a power antenna
wire. Normally, an amplifier turn on wire is blue/white and a power antenna remote wire is
blue. The power antenna remote wire only outputs voltage when on Am or FM modes. The
solution is to connect the blue wire from the OPTI-1 to a wire that outputs 12 volts + in every
mode from the aftermarket head unit (blue/white)
Q2: I installed the unit and I have lost all bass response in the vehicle. All the speakers are
playing but I have no low end.
A2: Some aftermarket head units have cross-overs built into them that limit either low
frequency or high frequency response. Refer to the owners’ guide of the aftermarket head unit
and turn on any high or low pass electronic crossover in the head unit to ensure a full range
output.
Q3: I installed the unit and all I hear is bass but not high frequencies.
A3: Refer to answer 2. Also, make sure that you did not attach the RCA inputs of the OPTI-1 to
the subwoofer output from the aftermarket deck.
Q4: The OPTI-1 works and sounds great but I can only get balance left and right to function
and not front to back fade.
A4: The OPTI-1 does not support front to back fade due to the lack of any available aftermarket
head unit with a communication network. Balance will function but fade will not.
DS, BM
4/15/14
NTV-DOC141
rB6
Agreement: End user agrees to use this product in compliance with all State and Federal laws. NAV-TV Corp. would not be held liable for
misuse of its product. If you do not agree, please discontinue use immediately and return product to place of purchase. This product is
intended for off-road use and passenger entertainment only.
6 | P a g e
Q5: Will the OPTI-1 work with any aftermarket head unit?
A5: Yes, as long as the unit is capable of a full range RCA pre-amplified audio output and a
remote amplifier turn on.
Q6: I purchased an aftermarket steering wheel control interface and cannot get it to work.
A6: Steering wheel controls in every compatible vehicle are on the CAN network. CAN High is
brown/red and CAN low is brown in a twisted pair at the audio gateway. Please contact the
manufacturer of the device for support.
Q7: Will the OPTI-1 work with any vehicle that is not listed as being compatible?
A7: No, the OPTI-1 is only compatible with the listed model and year vehicles.
Q8: After reading the installation manual owner and over I am still having problems. What
should I do?
A8: Our highly trained technical support staff can be reached Monday through Friday, 9 A.M. to
6 P.M. EST, at 1-866-477-3336 x 2 (Toll free USA and Canada) or 1-561-955-9770 x 2 (local and
international).
This manual suits for next models
1
Table of contents
Other Nav TV Automobile Electronic manuals

Nav TV
Nav TV NTV-KIT701 User manual

Nav TV
Nav TV SRX VIM User manual

Nav TV
Nav TV OPI-A User manual

Nav TV
Nav TV Sonata-CAM User manual

Nav TV
Nav TV REC-AV XG User manual

Nav TV
Nav TV UCT-13 User manual

Nav TV
Nav TV AUDI DYNAMIC-INT User manual

Nav TV
Nav TV OPV-2LR User manual

Nav TV
Nav TV UCT-13 User manual

Nav TV
Nav TV ProMASTER-CAM User manual
Popular Automobile Electronic manuals by other brands

banks
banks iQ owner's manual

NavInc
NavInc RT3 VAN manual

Waeco
Waeco MagicWatch MWE650 Installation and operating manual

Pyle
Pyle PLCM7700 user manual

Dometic
Dometic MagicWatch MWE 6004 Installation and operating manual

Audiovox
Audiovox SBAR - SBAR Bar-Type Chrome Back-up Sensor Installation & user manual